battery MAZDA MODEL MX-5 MIATA RF 2020 Owner's Manual
[x] Cancel search | Manufacturer: MAZDA, Model Year: 2020, Model line: MODEL MX-5 MIATA RF, Model: MAZDA MODEL MX-5 MIATA RF 2020Pages: 566, PDF Size: 62.47 MB
Page 137 of 566

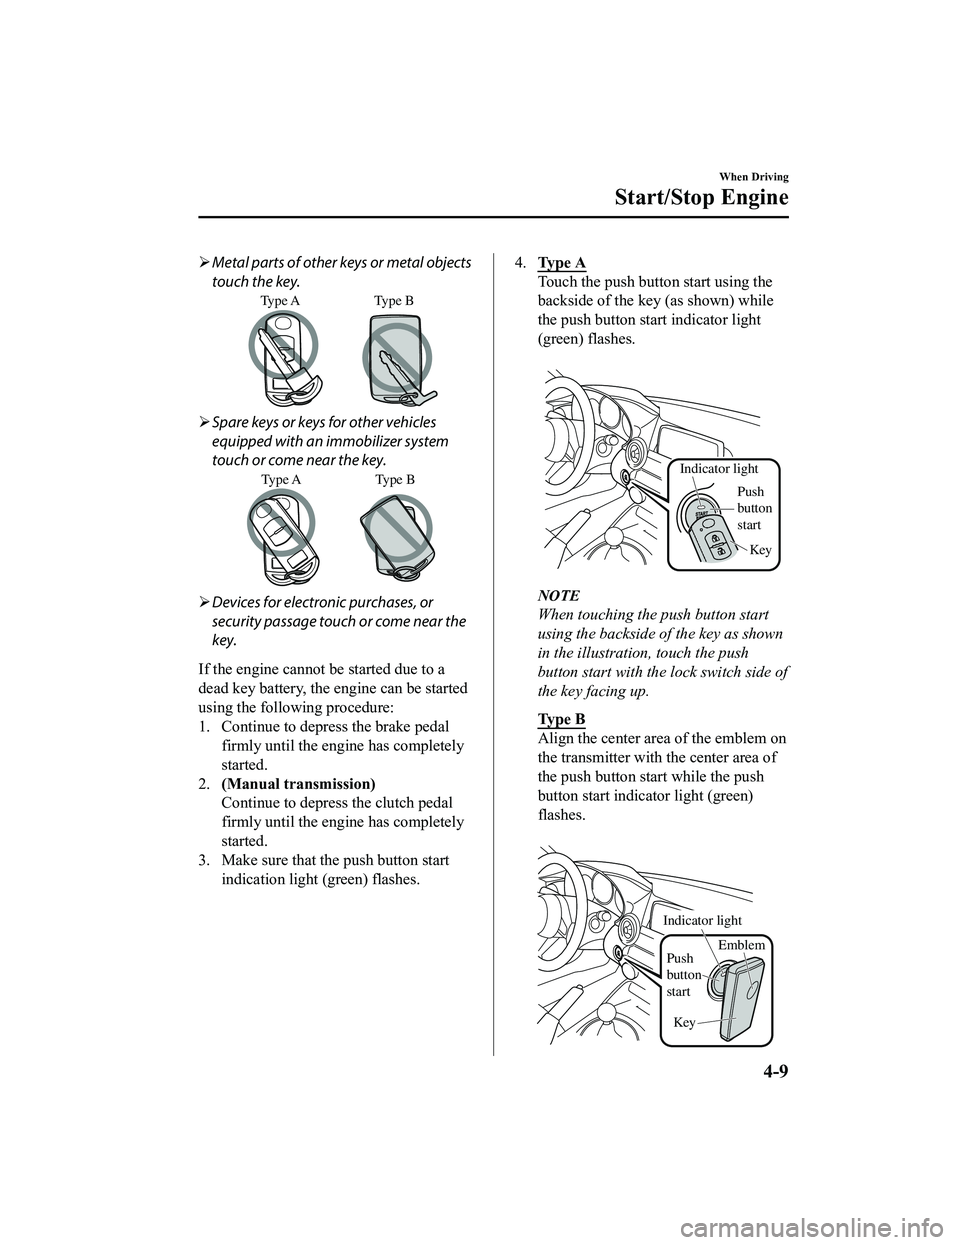
Metal parts of other keys or metal objects
touch the key.
Type A Type B
Spare keys or keys for other vehicles
equipped with an immobilizer system
touch or come near the key.
Type A Type B
Devices for electronic purchases, or
security passage touch or come near the
key.
If the engine cannot be started due to a
dead key battery, the engine can be started
using the following procedure:
1. Continue to depress the brake pedal firmly until the engine has completely
started.
2. (Manual transmission)
Continue to depress the clutch pedal
firmly until the engine has completely
started.
3. Make sure that the push button start indication light (green) flashes.
4.Ty p e A
Touch the push button start using the
backside of the ke y (as shown) while
the push button start indicator light
(green) flashes.
Push
b utton
start
Indicator light
Key
NOTE
When touching the push button start
using the backside of the key as shown
in the illustration, touch the push
button start with the lock switch side of
the key facing up.
Ty p e B
Align the center area of the emblem on
the transmitter with the center area of
the push button start while the push
button start indicator light (green)
flashes.
Push
b
utton
start
Indicator light
Key Emblem
When Driving
Start/Stop Engine
4-9
MX-5_8JA4-EA-19K_Edition1_old
2019-8-29 16:18:06
Page 139 of 566

Turning the Engine Off
WA R N I N G
Do not stop the engine while the vehicle is
moving:
Stopping the engine while the vehicle is
moving for any reason other than in an
emergency is dangerous. Stopping the
engine while the vehicle is moving will
result in reduced braking ability due to the
loss of power braking, which could cause
an accident and serious injury.
1. Stop the vehicle completely.
2.(Manual transmission)
Shift into neutral and set the parking
brake.
(Automatic transmission)
Shift the selector lever to the P
position and set the parking brake.
3. Press the push button start to turn off
the engine. The ignition position is off.
CAUTION
When leaving the vehicle, make sure the
push button start is off.
NOTE
The cooling fan in the engine
compartment could turn on for a few
minutes after the ignition is switched
from ON to OFF, whether or not the A/C
is on or off, to cool the engine
compartment quickly.
If the system detects that the remaining
battery power of the key is low when the
ignition is switched from ON to ACC or
OFF, the following is indicated.
Replace with a new battery before the
key becomes unusable.
Refer to Key Battery Replacement on
page 6-34.
(Vehicle equipped with Type A
instrument cluster)
A message is indicated in the display of
the instrument cluster.
(Vehicle equipped with Type B
instrument cluster)
The KEY indicator li ght (green) flashes
for approximately 30 seconds.
Refer to Warning/Indicator Lights on
page 4-27.
(Automatic transmission)
If the engine is turned off while the
selector lever is in a position other than
P, the ignition switches to ACC.
▼Emergency Engine Stop
Continuously pressing the push button
start or quickly pressing it any number of
times while the engi
ne is running or the
vehicle is being driven will turn the engine
off immediately. The ignition switches to
ACC.
When Driving
Start/Stop Engine
4-11
MX-5_8JA4-EA-19K_Edition1_old 2019-8-29 16:18:06
Page 142 of 566

The trip meter records the total distance
the vehicle is driven until the meter is
again reset. Return it to “0.0” by
depressing and holding the selector for one
second or more. Use this meter to measure
trip distances and to compute fuel
consumption.
NOTE
If TRIP A is reset using the trip meter
when the function which synchronizes
(resets) the fuel economy monitor and
the trip meter (TRIP A) is on, the fuel
economy data resets in conjunction with
TRIP A.
Refer to Fuel Economy Monitor on page
4-69.
Only the trip meters record tenths of
kilometers (miles).
The trip record will be erased when:
The power supply is interrupted
(blown fuse or the battery is
disconnected).
The vehicle is driven over 9999.9 km
(mile).
▼ Tachometer
The tachometer shows engine speed in
thousands of revoluti
ons per minute (rpm).
CAUTION
Do not run the engine with the tachometer
needle in the RED ZONE.
This may cause severe engine damage.
Striped zone
Red zone
NOTE
When the tachometer needle enters the
STRIPED ZONE, this indicates to the
driver that the gears should be shifted
before entering the RED ZONE.
When Driving
Instrument Cluster and Display
4-14
MX-5_8JA4-EA-19K_Edition1_old 2019-8-29 16:18:06
Page 146 of 566

NOTE
Even though the distance-to-empty
display may indicate a sufficient amount
of remaining driving distance before
refueling is required, refuel as soon as
possible if the fuel level is very low or
the low fuel warning light illuminates.
The display may not change unless you
add more than approximately 9 L (2.3
US gal, 1.9 Imp gal) of fuel.
The distance-to-empty is the
approximate remaining distance the
vehicle can be driven until all the
graduation marks in the fuel gauge
(indicating the remaining fuel supply)
disappear.
If there is no past fuel economy
information such as after first
purchasing your vehicle or the
information is deleted when the battery
cables are disconnected, the actual
distance-to empty/range may differ from
the amount indicated.
Average fuel economy mode
This mode displays the average fuel
economy by calculating the total traveled
distance and the total fuel consumption
since the vehicle was purchased or the past
data was reset. The average fuel economy
is calculated and displayed every minute.
To reset the displayed past data, press the
INFO switch for 1.5 seconds or longer.
After resetting the data, - - - L/100 km
(- - - mpg) is displayed for one minute
before the fuel economy is recalculated
and displayed.
NOTE
If TRIP A is reset using the trip meter
when the function which synchronizes
(resets) the fuel economy monitor and the
trip meter (TRIP A) is on, the displayed
past data is reset.
Current fuel economy mode
This mode displays the current fuel
economy by calculating the amount of fuel
consumption and the distance traveled.
Current fuel economy will be calculated
and displayed every 2 seconds.
When you've slowed to about 5 km/h (3
mph), - - - L/100 km (- - - mpg) will be
displayed.
Average vehicle speed mode
This mode displays the average vehicle
speed by calculating the distance and the
time traveled since connecting the battery
or resetting the data.
Average vehicle speed will be calculated
and displayed every 10 seconds.
To clear the data being displayed, press the
INFO switch for more than 1.5 seconds.
After pressing the INF O switch, - - - km/h
(- - - mph) will be displayed for about 1
minute before the vehicle speed is
recalculated and displayed.
When Driving
Instrument Cluster and Display
4-18
MX-5_8JA4-EA-19K_Edition1_old 2019-8-29 16:18:06
Page 149 of 566

▼Odometer, Trip Meter and Trip
Meter Selector
The odometer is constantly displayed on
the screen when the ignition is switched
ON, and the TRIP A or TRIP B screen can
be displayed by operating the INFO
switch.
Press the INFO switch INFO switch
Trip meter A,
Odometer
Trip meter B,
Odometer
Odometer
The odometer records
the total distance
the vehicle has been driven.
Trip meter
The driving distance for a specified
interval is indicated. Two types (TRIP A,
TRIP B) of interval distance and the
average fuel economy for each can be
measured.
For instance, trip me ter A can record the
distance from the point of origin, and trip
meter B can record the distance from
where the fuel tank is filled.
When trip meter A is selected, TRIP A
will be displayed. When trip meter B is
selected, TRIP B will be displayed.
The trip meter and average fuel economy
can be reset by pressing the INFO switch
for 1.5 seconds or more while in each
mode.
NOTE
Only the trip meters record tenths of
kilometers (miles).
The trip record will be erased when:
The power supply is interrupted
(blown fuse or the battery is
disconnected).
The vehicle is driven over 9999.9 km
(mile).
When Driving
Instrument Cluster and Display
4-21
MX-5_8JA4-EA-19K_Edition1_old 2019-8-29 16:18:06
Page 152 of 566

The distance-to-empty is the
approximate remaining distance the
vehicle can be driven until all the
graduation marks in the fuel gauge
indicating the remaining fuel supply
disappear.
If there is no past fuel economy
information such as after first
purchasing your vehicle or the
information is deleted when the battery
cables are disconnected, the actual
distance-to empty/range may differ from
the amount indicated.
▼Average Fuel Economy
The average fuel economy is calculated
every minute from the total traveled
distance on the trip met
er and the total fuel
consumption, and the average fuel
economy for either TRIP A or TRIP B is
displayed.
The average fuel economy and trip meters
can be reset by pressing the INFO switch
for 1.5 seconds or more while in each
mode. After the data is cleared, the fuel
consumption is recalculated and the - - -
L/100 km (- - - mpg) for the 1 minute prior
to it being displa yed is indicated.
▼Current Fuel Economy
This displays the current fuel economy by
calculating the amount of fuel
consumption and the distance traveled.
Current fuel economy will be calculated
and displayed every two seconds.
When you've slowed to about 5 km/h (3
mph), - - - L/100 km (- - - mpg) will be
displayed.
▼Maintenance Monitor
The following maintenance period
notifications can be
displayed by turning
the Maintenance Monitor on.
Scheduled Maintenance
Tire Rotation
Oil Change
For the setting method and indications for
the maintenance monitor, refer to the
Maintenance Monitor.
Refer to Maintenance Monitor on page
6-15.
The maintenance mo nitor displays the
information when the i gnition is switched
ON.
NOTE
This function is inoperable while the
vehicle is being driven.
When Driving
Instrument Cluster and Display
4-24
MX-5_8JA4-EA-19K_Edition1_old 2019-8-29 16:18:06
Page 173 of 566

Lighting Control
▼Headlights
Turn the headlight switch to turn
the headlights and other exterior lights on or off.
When the lights are turned on, the lights-on indicator light in the instrument cluster turns on.
NOTE
If the light switch is left on, the lights will automatically switch off approximately 30
seconds after switching the ignition off.
The time setting can be changed.
Refer to Personalization Features on page 9-9.
To prevent discharging the battery, do not leave the lights on while the engine is off unless
safety requires them.
Without auto-light control
Switch Position OFF
Ignition PositionONACC or
OFF ONACC or
OFF ONACC or
OFF
Headlights Off Off Off Off On
On
*2
Daytime running lightsOn*1OffOn*1Off Off Off
Taillights
Parking lights
License plate lights
Side-marker lights Off Off On
On
*2OnOn*2
*1 The lights are turned on wh ile the vehicle is driven.*2 The lights are turned on for the specified period by the auto headlight off function.
When Driving
Switches and Controls
4-45
MX-5_8JA4-EA-19K_Edition1_old 2019-8-29 16:18:06
Page 186 of 566

Using these garage door openers can
increase the risk of serious injury or death.
For further information, contact HomeLink
at 1-800-355-3515 or www.homelink.com
or an Authorized Mazda Dealer.
Always check the areas surrounding
garage doors and gates for people or
obstructions before programming or
during operation of the HomeLink system:
Programming or operating the HomeLink
system without verifying the safety of areas
surrounding garage doors and gates is
dangerous and could result in an
unexpected accident and serious injury if
someone were to be hit.
NOTE
The programming will not be erased even
if the battery is disconnected.
▼Pre-programming the HomeLink
System
NOTE
It is recommended that a new battery be
placed in the hand-held transmitter of the
device being programmed to HomeLink
for quicker training and accurate
transmission of the radio-frequency signal.
Verify that there is a remote control
transmitter available for the device you
would like to program.
Disconnect the power to the device.
▼ Programming the HomeLink
System
CAUTION
When programming a garage door opener
or a gate, disconnect the power to these
devices before performing programming.
Continuous operation of the devices could
damage the motor.
The HomeLink system provides 3 buttons
which can be individually selected and
programmed using the transmitters for
current, on-market devices as follows:
1. Disconnect the power to the garage
door opener or gate programmed to the
hand-held transmitter.
2. Position the end of your hand-held transmitter 2.5―7.5 cm (1―3 inches)
away from the HomeLink button you
wish to program while keeping the
indicator light in view.
3. Simultaneously press and hold both the chosen HomeLink and hand-held
transmitter buttons. Do not release the
buttons until step 3 has been
completed.
NOTE
Some gate operators and garage door
openers may require you to replace
this Programming Step 2 with
procedures noted in the “Gate
Operator/Canadian Programming”
section.
4. After the HomeLi nk indicator light
changes from a slow to a rapidly
blinking light, release both the
HomeLink and hand-held transmitter
buttons.
When Driving
Switches and Controls
4-58
MX-5_8JA4-EA-19K_Edition1_old 2019-8-29 16:18:06
Page 216 of 566

NOTE
The BSM will operate when all of the following conditions are met:
The ignition is switched ON.
The BSM switch is pressed and the BSM OFF indicator light in the instrument cluster is
turned off.
The vehicle speed is about 10 km/h (6.3 mph) or faster.
The BSM will not operate under the following circumstances.
The vehicle speed falls below about 10 km/h (6.3 mph) even though the BSM OFF
indicator light is turned off.
The shift lever (manual transmission)/selector lever (automatic transmission) is shifted
to reverse (R) and the vehicle is reversing.
In the following cases, the BSM OFF indicator light turns on and operation of the system
is stopped. If the BSM OFF indicator light re mains illuminated, have the vehicle inspected
at an Authorized Mazda Dealer as soon as possible.
Some problem with the system including the BSM warning lights is detected.
A large deviation in the installation position of a radar sensor (rear) on the vehicle has
occurred.
There is a large accumulation of snow or ice on the rear bumper near a radar sensor
(rear). Remove any snow, ice or mud on the rear bumper.
Driving on snow-covered roads for long periods.
The temperature near the radar sensors (rear) becomes extremely hot due to driving for
long periods on slopes during the summer.
The battery voltage has decreased.
Under the following conditions, the radar sensors (rear) cannot detect target objects or it
may be difficult to detect them.
A vehicle is in the detection area at the rear in an adjacent driving lane but it does not
approach. The BSM determines the condition based on radar detection data.
A vehicle is traveling alongside your vehicle at nearly the same speed for an extended
period of time.
Vehicles approaching in the opposite direction.
A vehicle in an adjacent driving lane is attempting to pass your vehicle.
A vehicle is in an adjacent lane on a road with extremely wide driving lanes. The
detection area of the radar sensors (rear) is set at the road width of expressways.
In the following cases, the activation of the BSM warning lights and the warning beep
may not occur or they may be delayed.
A vehicle makes a lane change from a driving lane two lanes over to an adjacent lane.
Driving on steep slopes.
Crossing the summit of a hill or mountain pass.
The turning radius is small (making a sharp turn, turning at intersections).
When Driving
i-ACTIVSENSE
4-88
MX-5_8JA4-EA-19K_Edition1_old 2019-8-29 16:18:06
Page 228 of 566

The battery voltage has decreased.
Under the following conditions, the radar sensors (rear) cannot detect target objects or it
may be difficult to detect them.
The vehicle speed when reversing is about 10 km/h (6.3 mph) or faster.
The radar sensor (rear) detection area is obstructed by a nearby wall or parked vehicle.
(Reverse the vehicle to a position where the radar sensor detection area is no longer
obstructed.)
Your vehicle
A vehicle is approaching directly from the rear of your vehicle.
Your vehicle
The vehicle is parked at an angle.
Your vehicle
Directly after the Blind Spot Monitoring (BSM) system becomes operable using the
personalization feature.
Radio wave interference from a radar sensor equipped on a nearby parked vehicle.
In the following cases, it may be difficult to view the illumination/flashing of the Blind
Spot Monitoring (BSM) warning indicator lights equipped on the door mirrors.
Snow or ice adheres to the door mirrors.
The door glass is fogged or covered in snow, frost or dirt.
Turn off the RCTA system while pulling a trailer or while an accessory such as a bicycle
carrier is installed to the rear of the vehicl e. Otherwise, the radio waves emitted by the
radar will be blocked causing the system to not operate normally.
When Driving
i-ACTIVSENSE
4-100
MX-5_8JA4-EA-19K_Edition1_old 2019-8-29 16:18:06