light MAZDA MODEL MX-5 MIATA RF 2022 Owners Manual
[x] Cancel search | Manufacturer: MAZDA, Model Year: 2022, Model line: MODEL MX-5 MIATA RF, Model: MAZDA MODEL MX-5 MIATA RF 2022Pages: 503, PDF Size: 42.06 MB
Page 309 of 503
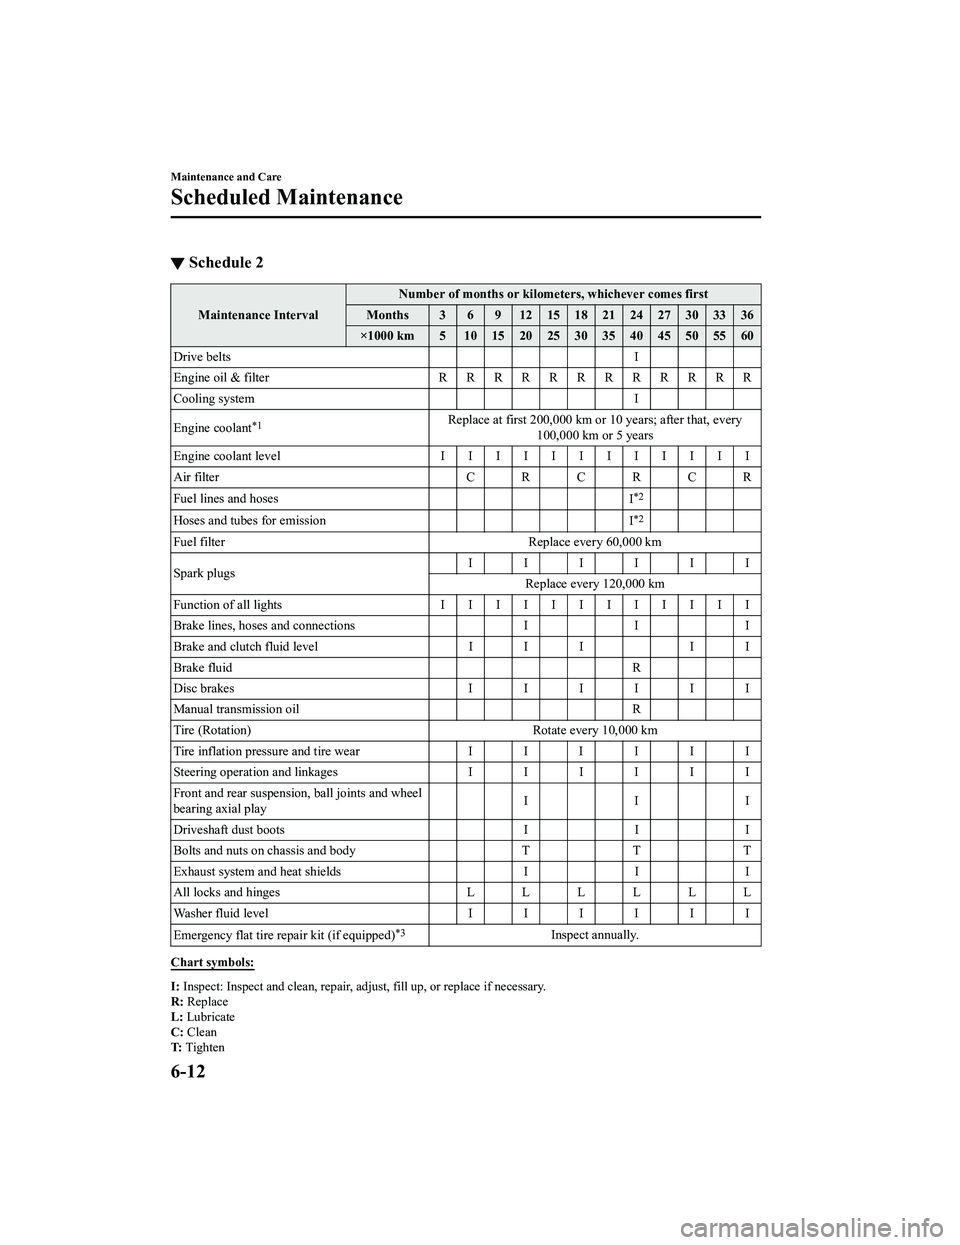
â–¼Schedule 2
Maintenance Interval Number of months or kilometers, whichever comes first
Months 3 6 9 121518212427303336
×1000 km 5 1015202530354045505560
Drive belts I
Engine oil & filter RRRRRRRRRRRR
Cooling system I
Engine coolant
*1Replace at first 200,000 km or 10 years; after that, every 100,000 km or 5 years
Engine coolant level IIIIIIIIIIII
Air filter CRCRCR
Fuel lines and hoses I
*2
Hoses and tubes for emissionI*2
Fuel filterReplace every 60,000 km
Spark plugs IIIIII
Replace every 120,000 km
Function of all lights IIIIIIIIIIII
Brake lines, hoses and connections II I
Brake and clutch fluid level I I II I
Brake fluid R
Disc brakes IIIIII
Manual transmission oil R
Tire (Rotation) Rotate every 10,000 km
Tire inflation pressure and tire wear IIIIII
Steering operation and linkages IIIIII
Front and rear suspension, ball joints and wheel
bearing axial play III
Driveshaft dust boots II I
Bolts and nuts on chassis and body TTT
Exhaust system and heat shields II I
All locks and hinges LLLLLL
Washer fluid level IIIIII
Emergency flat tire repair kit (if equipped)
*3Inspect annually.
Chart symbols:
I: Inspect: Inspect and clean, repair, ad just, fill up, or replace if necessary.
R: Replace
L: Lubricate
C: Clean
T: Tighten
Maintenance and Care
Scheduled Maintenance
6-12
MX-5_8KH8-EA-21K_Edition3_old 2021-11-10 13:10:56
Page 310 of 503
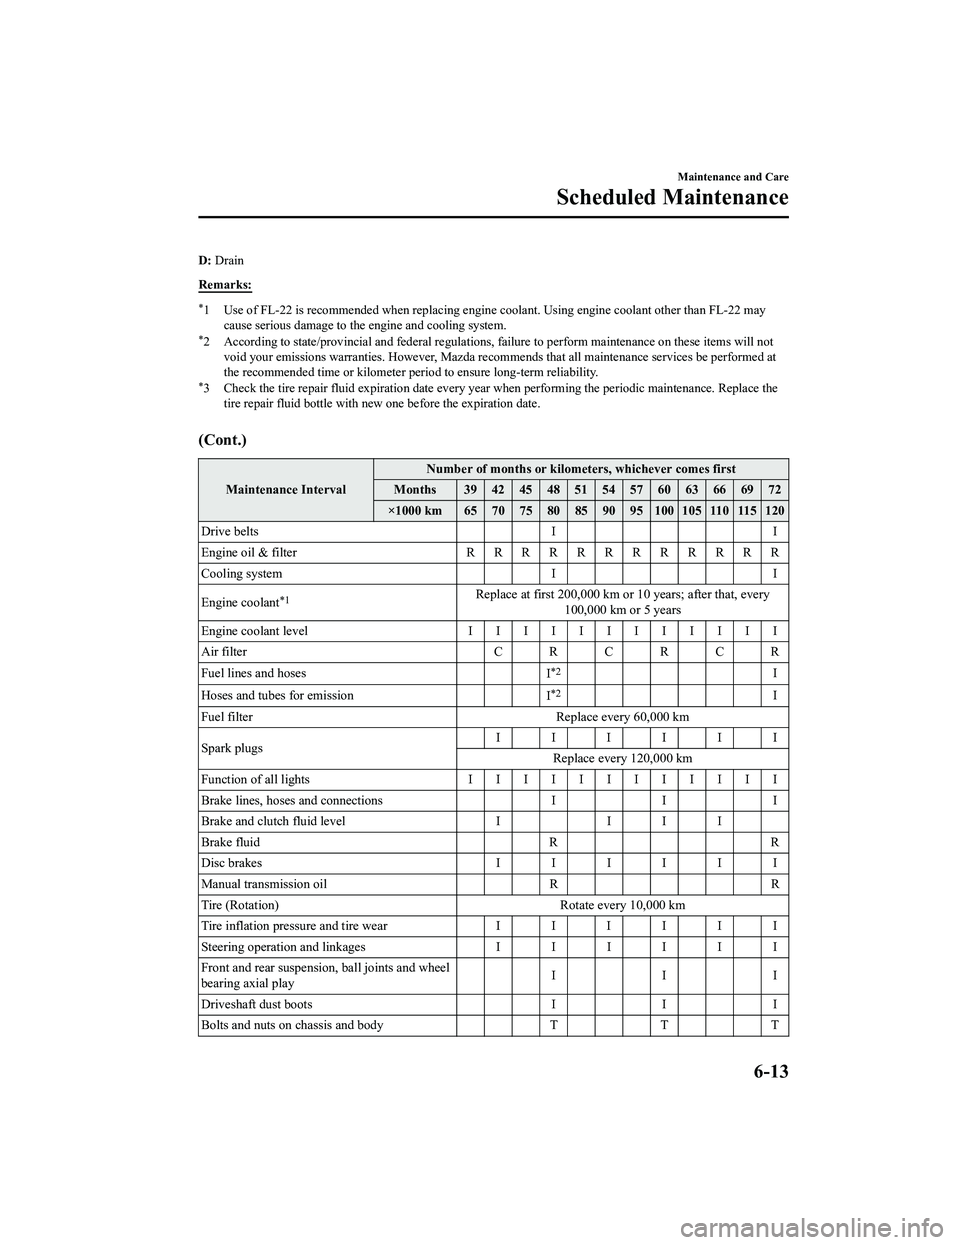
D: Drain
Remarks:
*1 Use of FL-22 is recommended when replacing engine coolant. Using engine coolant other than FL-22 may cause serious damage to the engine and cooling system.
*2 According to state/provincial and federal regulations , failure to perform maintenance on these items will not
void your emissions warranties. However, Mazda recomme nds that all maintenance services be performed at
the recommended time or kilometer period to ensure long-term reliability.
*3 Check the tire repair fluid expiration date every year when performing the periodic maintenance. Replace the tire repair fluid bottle with new one before the expiration date.
(Cont.)
Maintenance Interval Number of months or kilometers, whichever comes first
Months 39 42 45 48 51 54 57 60 63 66 69 72
×1000 km 65 70 75 80 85 90 95 100 105 110 115 120
Drive belts II
Engine oil & filter R R R R R R R R R R R R
Cooling system II
Engine coolant
*1Replace at first 200,000 km or 10 years; after that, every 100,000 km or 5 years
Engine coolant level IIIIIIIIIIII
Air filter CRCRCR
Fuel lines and hoses I
*2I
Hoses and tubes for emission I
*2I
Fuel filter Replace every 60,000 km
Spark plugs IIIIII
Replace every 120,000 km
Function of all lights I I I I I I I I I I I I
Brake lines, hoses and connections III
Brake and clutch fluid level II I I
Brake fluid RR
Disc brakes IIIIII
Manual transmission oil RR
Tire (Rotation) Rotate every 10,000 km
Tire inflation pressure and tire wear IIIIII
Steering operation and linkages IIIIII
Front and rear suspensi on, ball joints and wheel
bearing axial play III
Driveshaft dust boots III
Bolts and nuts on chassis and body TT T
Maintenance and Care
Scheduled Maintenance
6-13
MX-5_8KH8-EA-21K_Edition3_old 2021-11-10 13:10:56
Page 321 of 503
Washer Fluid
â–¼Inspecting Washer Fluid Level
WA R N I N G
Use only windshield washer fluid or plain
water in the reservoir:
Using radiator antifreeze as washer
fluid is
dangerous. If sprayed on the windshield, it
will dirty the windshield, affect your
visibility, and could result in an accident.
Using Washer Fluid Without Anti-freeze
Protection in Cold Weather:
Operating your vehicle in temperatures
below 4 °C (40 °F) using washer fluid
without anti-freeze protection is dangerous
as it could cause impaired windshield
vision and result in an accident. In cold
weather, always use washer fluid with
anti-freeze protection.
NOTE
State or local regulations may restrict the
use of volatile organic compounds
(VOCs), which are commonly used as
anti-freeze agents in washer fluid. A
washer fluid with limited VOC content
should be used only if it provides adequate
freeze resistance for all regions and
climates in which the vehicle will be
operated.
Add washer fluid under any of the
following conditions.
ï‚·The top of the fluid level is low.
ï‚·The Low Washer Fluid Level Warning
Indication/Warning Light (if equipped)
turns on.
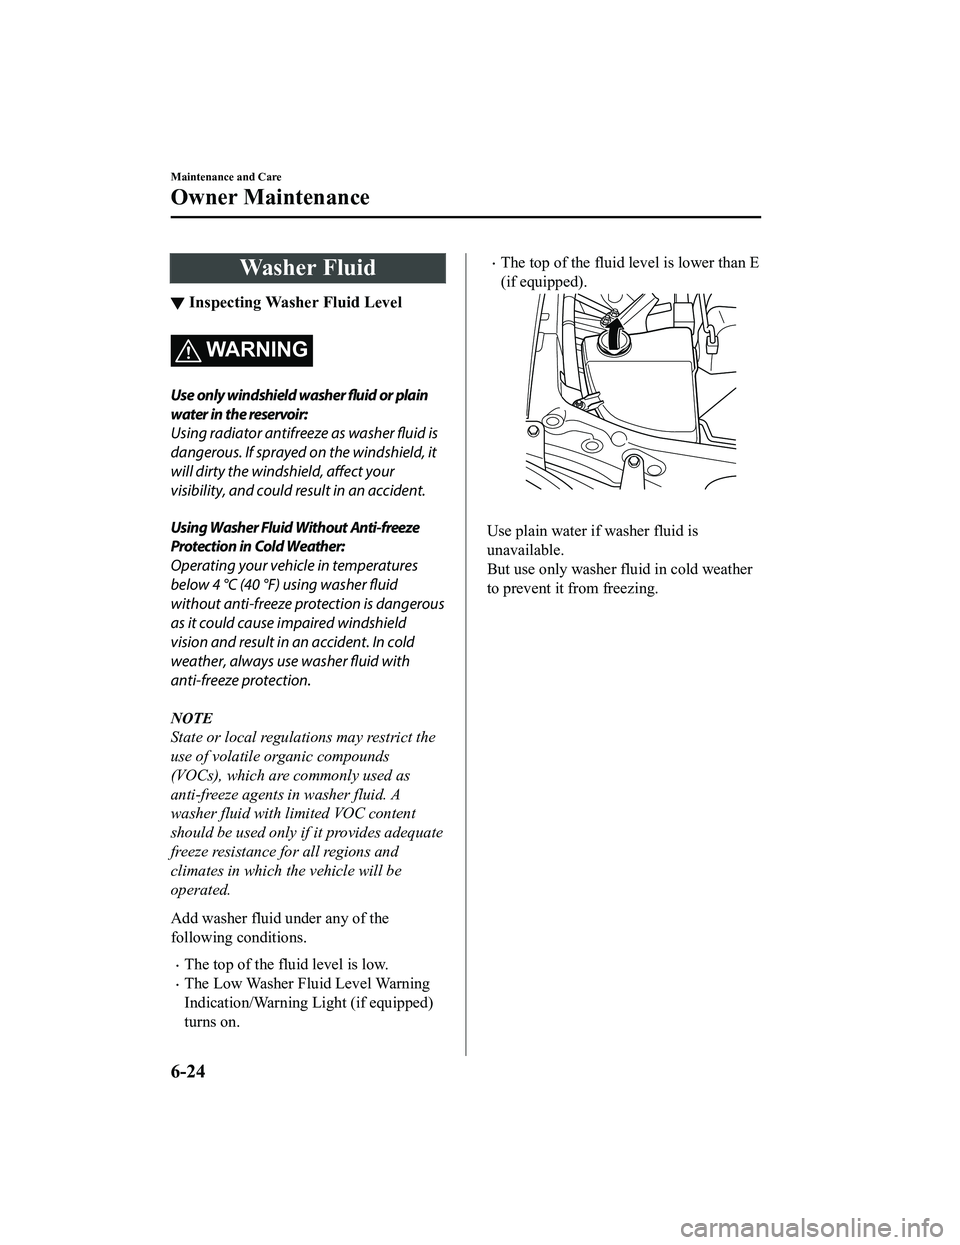
ï‚·The top of the fluid level is lower than E
(if equipped).
Use plain water if washer fluid is
unavailable.
But use only washer flu id in cold weather
to prevent it from freezing.
Maintenance and Care
Owner Maintenance
6-24
MX-5_8KH8-EA-21K_Edition3_old 2021-11-10 13:10:56
Page 328 of 503
â–¼Battery Maintenance
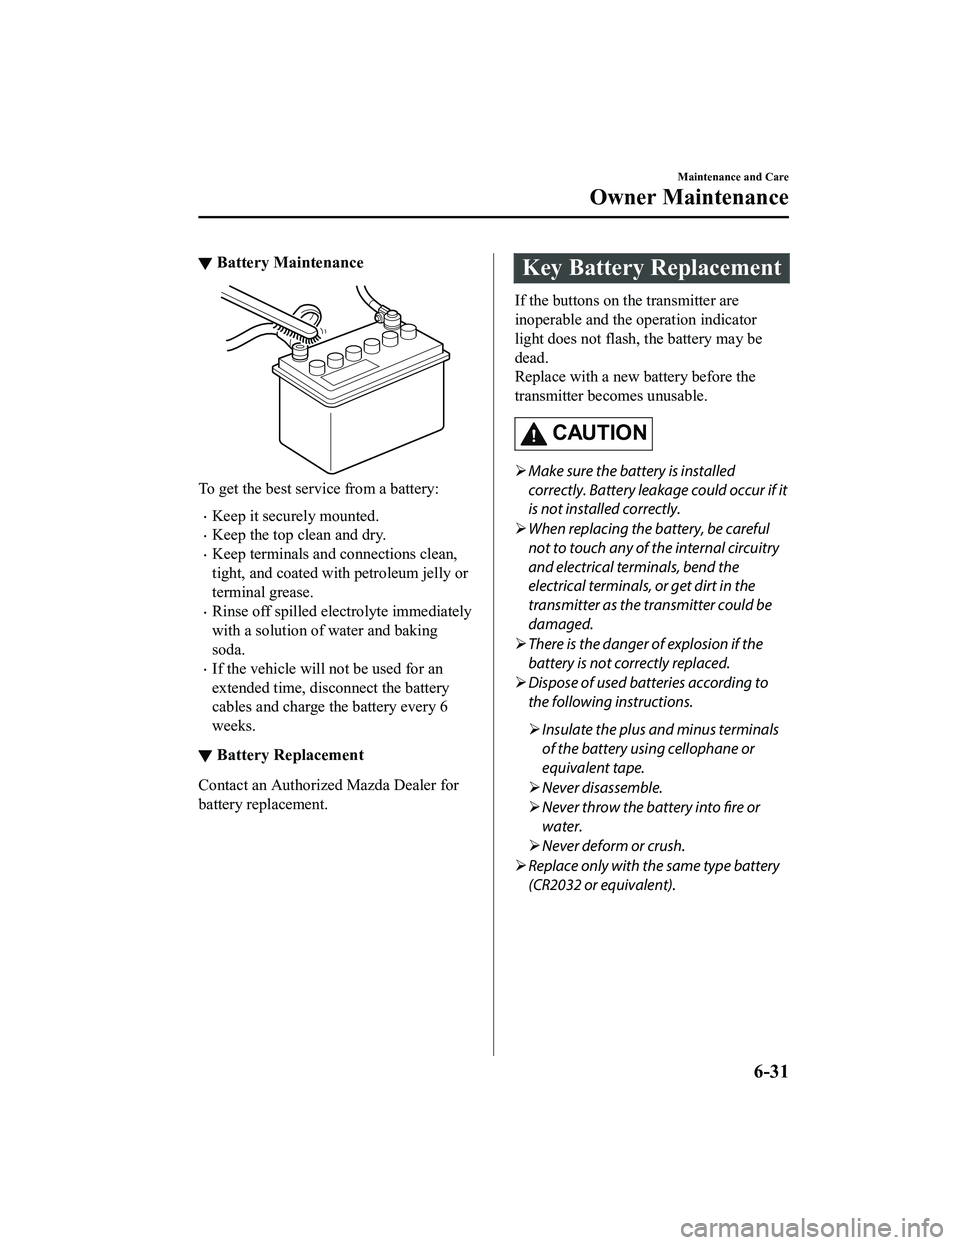
To get the best service from a battery:
ï‚·Keep it securely mounted.
ï‚·Keep the top clean and dry.
ï‚·Keep terminals and connections clean,
tight, and coated with petroleum jelly or
terminal grease.
ï‚·Rinse off spilled electrolyte immediately
with a solution of water and baking
soda.
ï‚·If the vehicle will not be used for an
extended time, disconnect the battery
cables and charge the battery every 6
weeks.
â–¼Battery Replacement
Contact an Authorized Mazda Dealer for
battery replacement.
Key Battery Replacement
If the buttons on the transmitter are
inoperable and the operation indicator
light does not flash, the battery may be
dead.
Replace with a new battery before the
transmitter becomes unusable.
CAUTION

Make sure the battery is installed
correctly. Battery leakage could occur if it
is not installed correctly.
 When replacing the battery, be careful
not to touch any of the internal circuitry
and electrical terminals, bend the
electrical terminals, or get dirt in the
transmitter as the transmitter could be
damaged.
 There is the danger of explosion if the
battery is not correctly replaced.
 Dispose of used batteries according to
the following instructions.
 Insulate the plus and minus terminals
of the battery using cellophane or
equivalent tape.
 Never disassemble.
 Never throw the battery into
fire or
water.
 Never deform or crush.
 Replace only with the same type battery
(CR2032 or equivalent).
Maintenance and Care
Owner Maintenance
6-31
MX-5_8KH8-EA-21K_Edition3_old 2021-11-10 13:10:56
Page 329 of 503
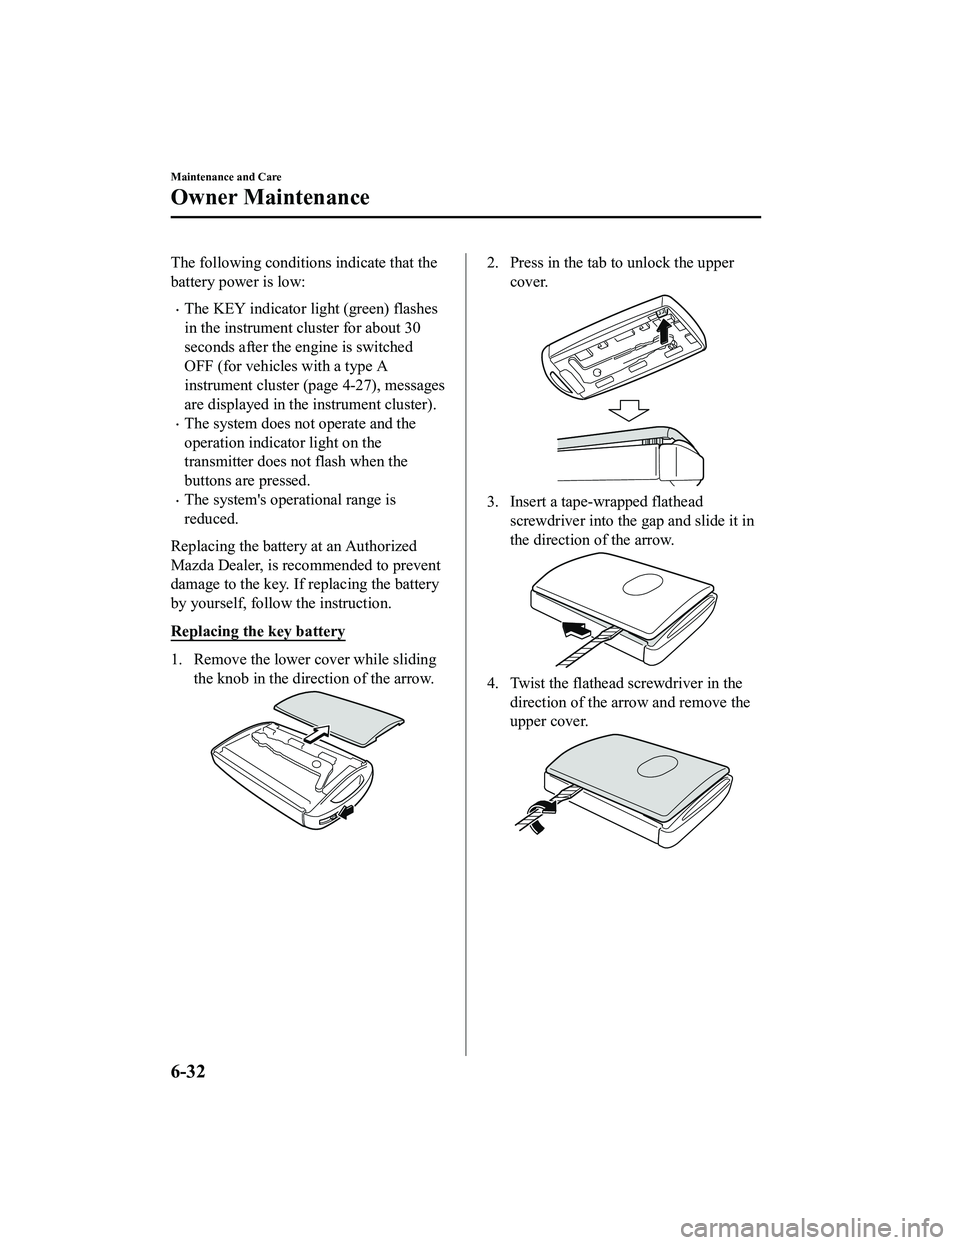
The following conditions indicate that the
battery power is low:
ï‚·The KEY indicator light (green) flashes
in the instrument cluster for about 30
seconds after the engine is switched
OFF (for vehicles with a type A
instrument cluster (page 4-27), messages
are displayed in the instrument cluster).
ï‚·The system does not operate and the
operation indicator light on the
transmitter does not flash when the
buttons are pressed.
ï‚·The system's operational range is
reduced.
Replacing the battery at an Authorized
Mazda Dealer, is recommended to prevent
damage to the key. If replacing the battery
by yourself, follow the instruction.
Replacing the key battery
1. Remove the lower cover while sliding the knob in the direction of the arrow.
2. Press in the tab to unlock the upper
cover.
3. Insert a tape-wrapped flatheadscrewdriver into the gap and slide it in
the direction of the arrow.
4. Twist the flathead screwdriver in the
direction of the arrow and remove the
upper cover.
Maintenance and Care
Owner Maintenance
6-32
MX-5_8KH8-EA-21K_Edition3_old 2021-11-10 13:10:56
Page 333 of 503
â–¼Replacing a Tire
WA R N I N G
Always use tires that are in good condition:
Driving with worn tires is dangerous.
Reduced braking, steering, and traction
could result in an accident.
Replace all four tires at the same time:
Replacing just one ti
re is dangerous. It
could cause poor handling and poor
braking resulting in loss of vehicle control.
Mazda strongly recommends that you
replace all four tires at the same time.
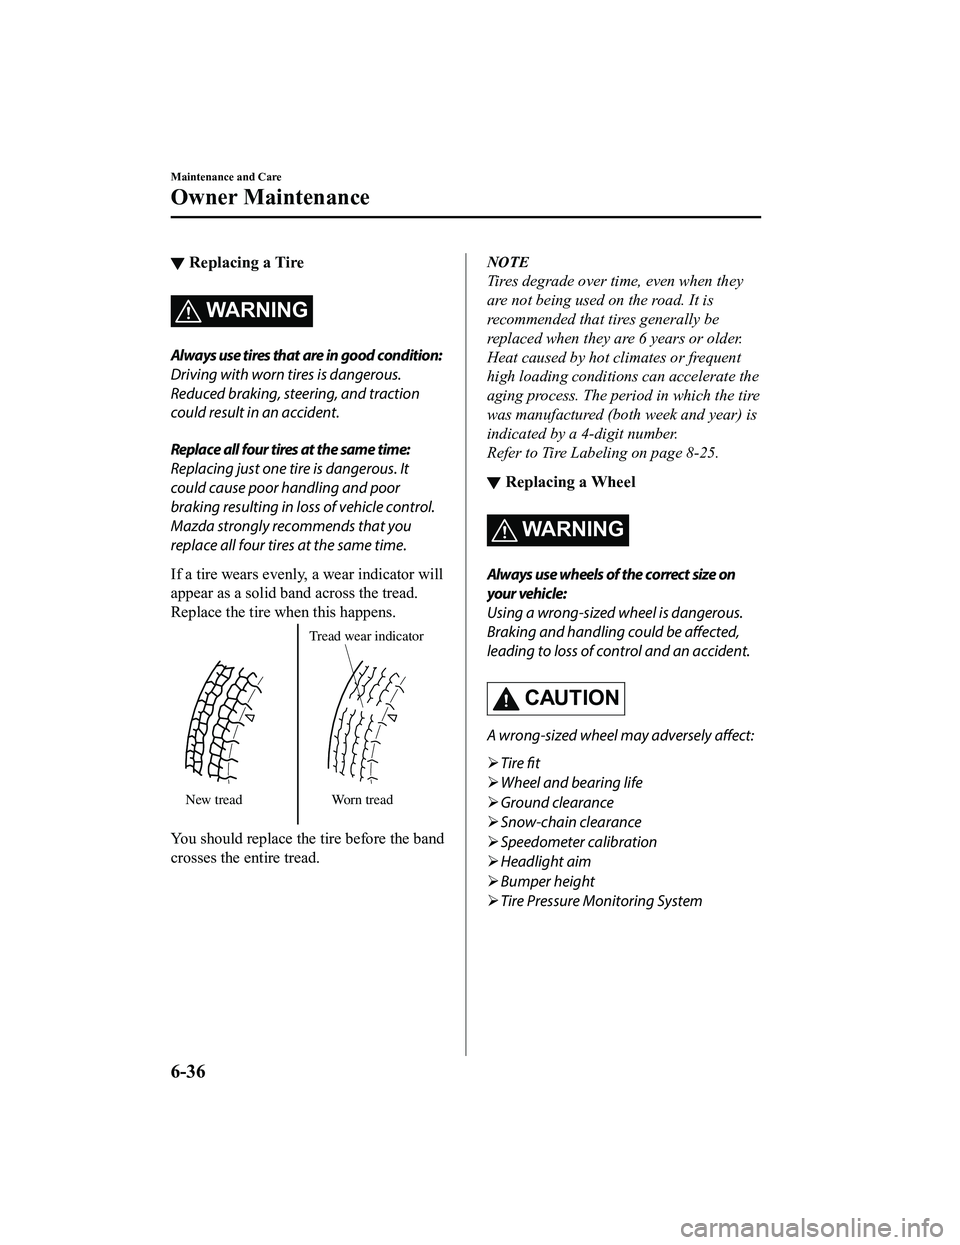
If a tire wears evenly, a wear indicator will
appear as a solid band across the tread.
Replace the tire when this happens.
New tread Tread wear indicator
Worn tread
You should replace the tire before the band
crosses the entire tread.
NOTE
Tires degrade over time, even when they
are not being used on the road. It is
recommended that tires generally be
replaced when they are 6 years or older.
Heat caused by hot climates or frequent
high loading conditions can accelerate the
aging process. The period in which the tire
was manufactured (both week and year) is
indicated by a 4-digit number.
Refer to Tire Labeling on page 8-25.
â–¼Replacing a Wheel
WA R N I N G
Always use wheels of the correct size on
your vehicle:
Using a wrong-sized wheel is dangerous.
Braking and handling could be
affected,
leading to loss of control and an accident.
CAUTION
A wrong-sized wheel may adversely affect:
 Tire fit
 Wheel and bearing life
 Ground clearance
 Snow-chain clearance
 Speedometer calibration
 Headlight aim
 Bumper height
 Tire Pressure Monitoring System
Maintenance and Care
Owner Maintenance
6-36
MX-5_8KH8-EA-21K_Edition3_old 2021-11-10 13:10:56
Page 335 of 503

Light Bulbs
Overhead lightSide turn signal lights
High-mount brake light
Trunk light
Front side-marker lights
Front turn signal lights
Headlights (Low/High beam)
Parking lights
Daytime running lights
License plate lights
Brake lights
Taillights
Rear side-marker lights
Reverse lights
Rear turn signal lights
Maintenance and Care
Owner Maintenance
6-38
MX-5_8KH8-EA-21K_Edition3_old
2021-11-10 13:10:56
Page 336 of 503

CAUTION
When removing the lens or lamp unit using a flathead screwdriver, make sure that the
flathead screwdriver does not contact the int erior terminal. If the flathead screwdriver
contacts the terminal, a short circuit may occur.
NOTE
ï‚·To replace the bulb, contact an Authorized Mazda Dealer.
ï‚·Use the protective cover and carton for the re placement bulb to dispose of the old bulb
promptly and out of the reach of children.
â–¼ Replacing Exterior Light Bulbs
Headlights, Daytime running lights
(LED type), Parkin
g lights, High-mount
brake light, Brake lights, Taillights
The LED bulb cannot be replaced as a
single unit because it is an integrated unit.
The LED bulb has to be replaced with the
unit. We recommend an Authorized
Mazda Dealer when the replacement is
necessary.
Daytime running lights (Bulb type)
1. Make sure the ignition is switched off,
and the headlight switch is off.
2. Pull the center of each plastic retainer
and remove the retainers.
Removal
Installation
3. Turn the screw counterclockwise andremove it, and then partially peel back
the mudguard.
4. Turn the socket and bulb assemblycounterclockwise and remove it.
5. Disconnect the bulb from the socket.
6. Install the new bulb in the reverseorder of the removal procedure.
Maintenance and Care
Owner Maintenance
6-39
MX-5_8KH8-EA-21K_Edition3_old 2021-11-10 13:10:56
Page 337 of 503

Front side-marker lights
1. Make sure the ignition is switched off,and the headlight switch is off.
2. If you are changing the right bulb, start the engine, turn the steering wheel all
the way to the right, and turn off
engine. If you are changing the left
bulb, turn the steering wheel to the left.
3. Pull the center of each plastic retainer and remove the retainers, and then
partially peel back the mudguard.
Removal
Installation
4. Turn the socket and bulb assemblycounterclockwise and remove it.
5. Disconnect the bulb from the socket.
6. Install the new bulb in the reverseorder of the removal procedure.
Front turn signal lights
1. Make sure the igniti on is switched off,
and the headlight switch is off.
2. If you are changing the right bulb, start the engine, turn the steering wheel all
the way to the right, and turn off
engine. If you are changing the left
bulb, turn the steering wheel to the left.
3. Pull the center of each plastic retainer and remove the retainers, and then
partially peel back the mudguard.
Removal
Installation
4. Disconnect the connector from the unitby pressing the tab on the connector
with your finger and pulling the
connector rearward.
Maintenance and Care
Owner Maintenance
6-40
MX-5_8KH8-EA-21K_Edition3_old 2021-11-10 13:10:56
Page 338 of 503

5. Turn the socket and bulb assemblycounterclockwise and remove it.
6. Disconnect the bulb from the socket.
7. Install the new bulb in the reverseorder of the removal procedure.
Side turn signal lights
1. Make sure the ignition is switched off, and the headlight switch is off.
2. If you are changing the right bulb, start the engine, turn the steering wheel all
the way to the right, and turn off
engine. If you are changing the left
bulb, turn the steering wheel to the left.
3. Pull the center of each plastic retainer
and remove the retainers, and then
partially peel back the mudguard.
Removal
Installation
4. Remove the unit by pressing the tab onthe unit with your finger and pulling
the unit forward.
5. Detach the electrical connector from
the unit by pulling it to the rear.
Maintenance and Care
Owner Maintenance
6-41
MX-5_8KH8-EA-21K_Edition3_old 2021-11-10 13:10:56