trunk MAZDA MODEL MX-5 MIATA RF 2022 Owner's Manual
[x] Cancel search | Manufacturer: MAZDA, Model Year: 2022, Model line: MODEL MX-5 MIATA RF, Model: MAZDA MODEL MX-5 MIATA RF 2022Pages: 503, PDF Size: 42.06 MB
Page 96 of 503
Fuel-Filler Lid and Cap
WARNING
When removing the fuel-filler cap, loosen
the cap slightly and wait for any hissing to
stop, then remove it:
Fuel spray is dangerous. Fuel can burn skin
and eyes and cause illness if ingested. Fuel
spray is released when there is pressure in
the fuel tank and the fuel-filler cap is
removed too quickly.
Before refueling, stop the engine, and
always keep sparks and flames away from
the filler neck:
Fuel vapor is dangerous. It could be ignited
by sparks or flames causing serious burns
and injuries.
Additionally, use of the incorrect fuel-filler
cap or not using a fuel-filler cap may result
in a fuel leak, which could result in serious
burns or death in an accident.
Do not continue refueling after the fuel
pump nozzle shuts off automatically:
Continuing to add fuel after the fuel pump
nozzle has shut off automatically is
dangerous because overfilling the fuel tank
may cause fuel overflow or leakage. Fuel
overflow and leakage could damage the
vehicle and if the fuel ignites it could cause
a fire and explosion resulting in serious
injury or death.
CAUTION
Always use only a genuine Mazda fuel-filler
cap or an approved equivalent, available
at an Authorized Mazda Dealer. The wrong
cap can result in a serious malfunction of
the fuel and emission control systems.
(U.S.A. and Canada)
It may also cause the check engine light in
the instrument cluster to illuminate.
▼ Refueling
Before refueling, close both the doors,
windows, and the trunk lid, and switch the
ignition OFF.
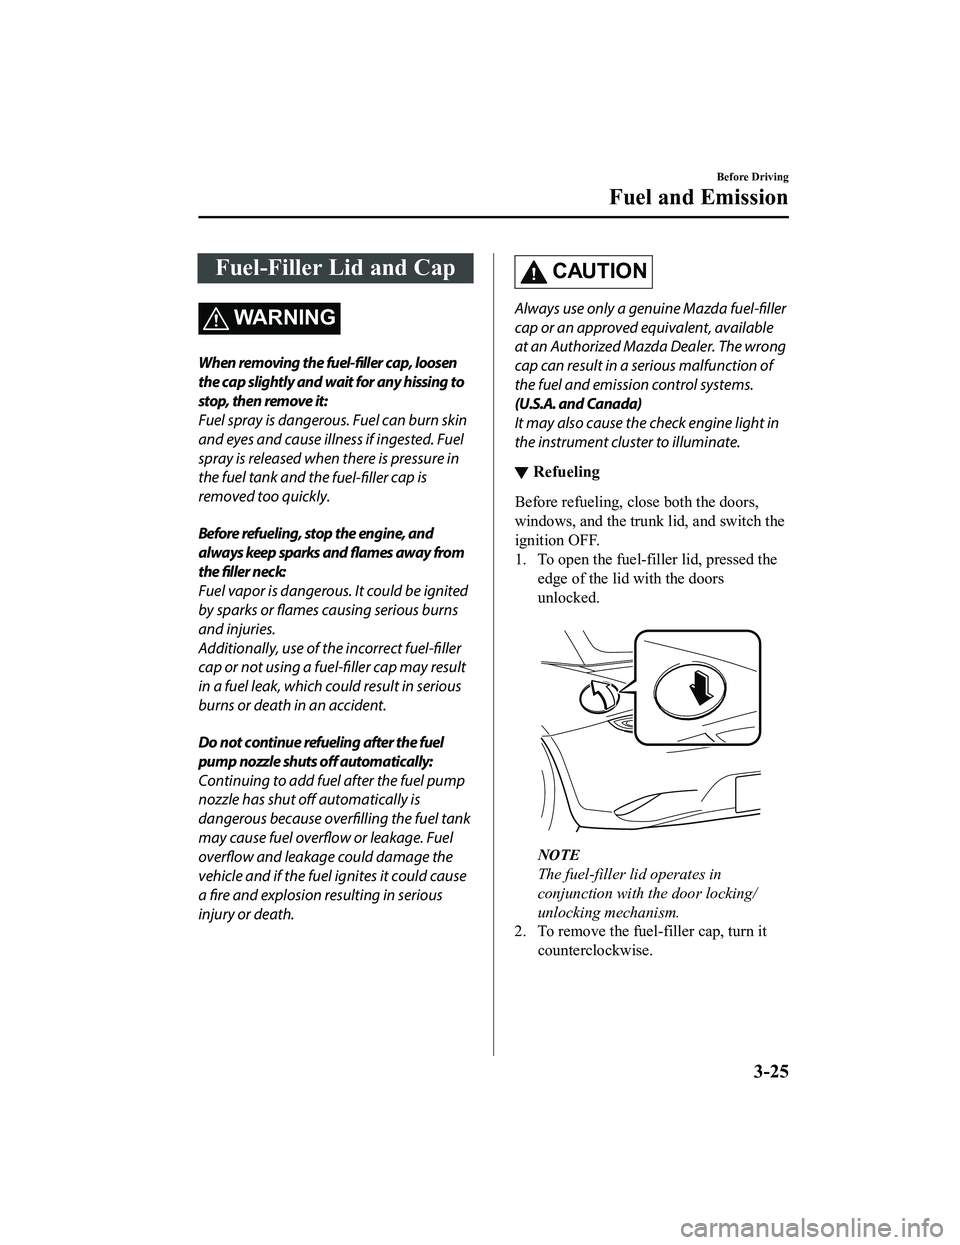
1. To open the fuel-filler lid, pressed the
edge of the lid with the doors
unlocked.
NOTE
The fuel-filler lid operates in
conjunction with the door locking/
unlocking mechanism.
2. To remove the fuel-filler cap, turn it
counterclockwise.
Before Driving
Fuel and Emission
3-25
MX-5_8KH8-EA-21K_Edition3_old 2021-11-10 13:10:56
Page 112 of 503
▼Opening the Roof
When opening the roof, make sure objects
inside the vehicle are not blown away by
the wind. Secure all loose objects inside
before driving with the roof down.
1. Park the vehicle on level ground in a
safe place where the vehicle does not
obstruct traffic.
Shift the shift lever to neutral on a
manual transmission vehicle.
Shift the selector lever to P on an
automatic transmission vehicle.
Apply the parking brake.
2. Make sure that the trunk is closed.
3. Start the engine to prevent the battery
from going dead.
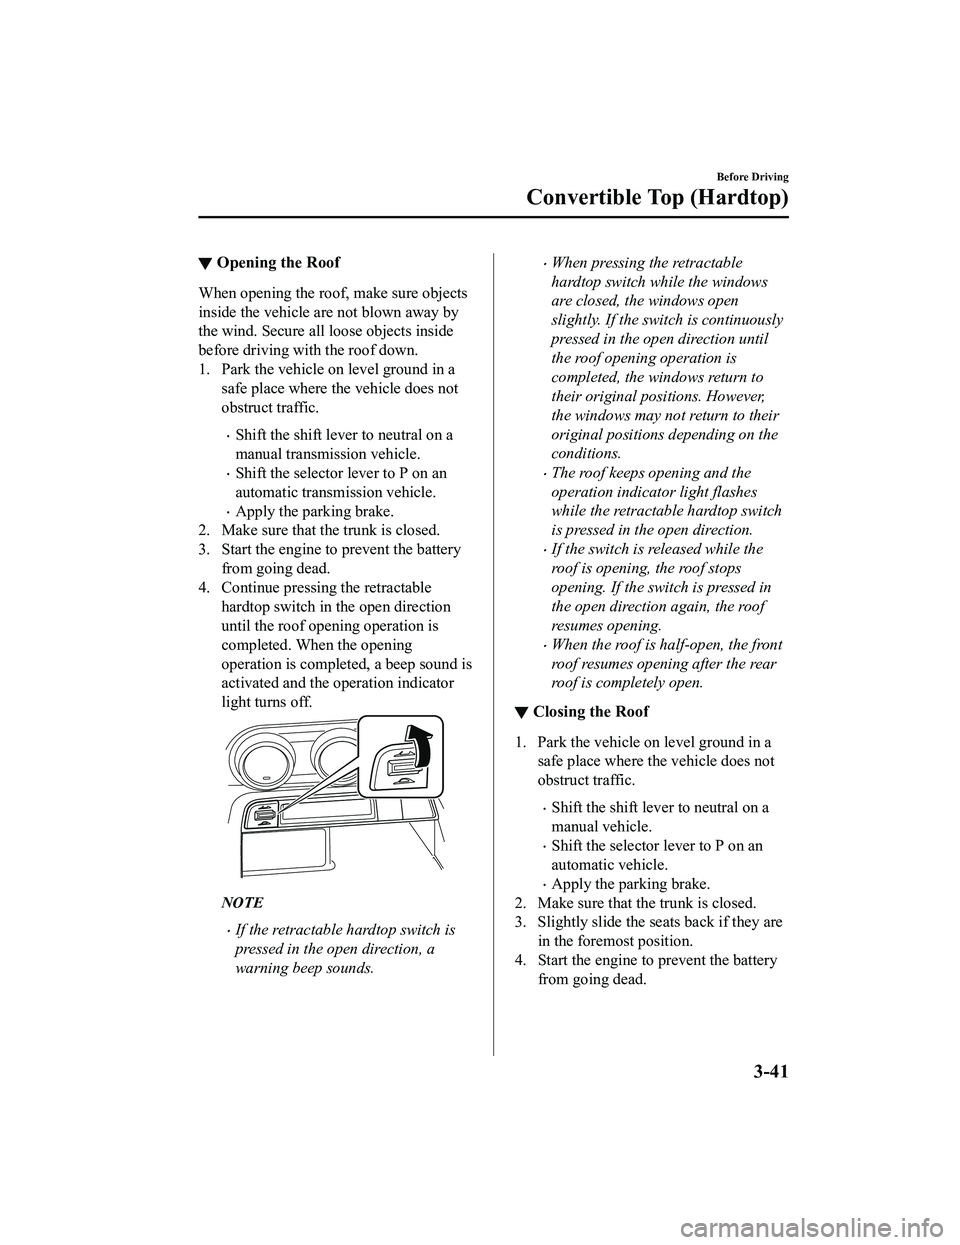
4. Continue pressing the retractable
hardtop switch in the open direction
until the roof opening operation is
completed. When the opening
operation is completed, a beep sound is
activated and the operation indicator
light turns off.
NOTE
If the retractable hardtop switch is
pressed in the open direction, a
warning beep sounds.
When pressing the retractable
hardtop switch while the windows
are closed, the windows open
slightly. If the switch is continuously
pressed in the open direction until
the roof opening operation is
completed, the windows return to
their original positions. However,
the windows may not return to their
original positions depending on the
conditions.
The roof keeps opening and the
operation indicator light flashes
while the retractable hardtop switch
is pressed in the open direction.
If the switch is released while the
roof is opening, the roof stops
opening. If the switch is pressed in
the open direction again, the roof
resumes opening.
When the roof is half-open, the front
roof resumes opening after the rear
roof is completely open.
▼Closing the Roof
1. Park the vehicle on level ground in a
safe place where the vehicle does not
obstruct traffic.
Shift the shift lever to neutral on a
manual vehicle.
Shift the selector lever to P on an
automatic vehicle.
Apply the parking brake.
2. Make sure that the trunk is closed.
3. Slightly slide the seats back if they are in the foremost position.
4. Start the engine to prevent the battery from going dead.
Before Driving
Convertible Top (Hardtop)
3-41
MX-5_8KH8-EA-21K_Edition3_old 2021-11-10 13:10:56
Page 113 of 503

5. Continue pressing the retractablehardtop switch in the close direction
until the roof closing operation is
completed. When the closing operation
is completed, a beep sound is activated
and the operation indicator light turns
off.
6. Close the windows using the powerwindow switch.
NOTE
If the retractable hardtop switch is
pressed in the close direction, a warning
beep sounds.
When pressing the retractable hardtop
switch while the windows are closed, the
windows open slightly. The windows do
not return to their original positions
even after the roof closing operation is
completed.
The roof keeps closing and the operation
indicator light flashes while the
retractable hardtop switch is pressed in
the close direction.
If the switch is released while the roof is
closing, the roof stops closing. If the
switch is pressed in the close direction
again, the roof resumes closing.
▼Operation Conditions
If the following conditions have been
satisfied, the roof can be opened/closed.
The ignition is switched ON.
Shift/selector lever is in a position other
than R (reverse).
Vehicle speed is 10 km/h (6.2 mph) or
less.
The trunk lid is closed.
The vehicle is tilted at an angle of 15
degrees or less.
CAUTION
If the vehicle speed exceeds 10 km/h (6.2
mph) during the opening/closing
operation, the opening/closing operation
of the roof stops midstream. If the roof
stops midstream, visibility at the rear may
be impaired or damage to the roof may
occur which could lead to an accident.
Operate the switch again with the vehicle
stopped, depending on the road and traffic
conditions, to complete opening/closing
operation of the roof.
NOTE
For the purposes of safety when
opening/closing the roof, follow the
instructions for Opening the Roof and
Closing the Roof.
If the roof cannot be closed even after
the operation conditions are all met,
have it checked at an Authorized Mazda
Dealer.
The roof can be closed manually as an
emergency measure.
Refer to When the Roof Cannot be
Closed on page 7-57.
Before Driving
Convertible Top (Hardtop)
3-42
MX-5_8KH8-EA-21K_Edition3_old
2021-11-10 13:10:56
Page 117 of 503
Theft-Deterrent System*
If the theft-deterrent system detects an
inappropriate entry into the vehicle, which
could result in the vehicle or its contents
being stolen, the alarm alerts the
surrounding area of an abnormality by
sounding the horn and flashing the hazard
warning lights.
The system will not function unless it's
properly armed. So when you leave the
vehicle, follow the arming procedure
correctly.
▼ Operation
System triggering conditions
The horn sounds intermittently and the
hazard warning lights flash for about 30
seconds when the system is triggered by
any one of the following:
Unlocking a door with
the auxiliary key,
door lock switch, or an inside door-lock
knob.
Forcing open a door, the hood or the
trunk lid.
Opening the hood by operating the hood
release handle.
Switching the ignition ON without using
the push button start.
If the system is triggered again, the lights
and horn will activate until the driver's
door is unlocked with the transmitter.
(With the advanced keyless function)
The lights and horn can also be
deactivated by pressing the request switch
on a door.
NOTE
The trunk lid does not open while the
theft-deterrent system is operating.
If the battery goes dead while the
theft-deterrent system is armed, the horn
will activate and the hazard warning
lights will flash wh en the battery is
charged or replaced.
▼ How to Arm the System
1. Close the windows and the convertible
top securely.
2. Switch the ignition OFF.
3. Make sure the hood, the doors, and the
trunk lid are closed.
4. Press the lock button on the transmitter
or lock the driver's door from the
outside with the auxiliary key.
The hazard warning lights will flash
once.
The following method will also arm
the theft-deterrent system:
Press the door-lock switch “
” while
any door is open and then close both of
the doors.
(With the advanced keyless function)
Press a request switch.
The security indicator light in the
instrument cluster flashes twice per
second for 20 seconds.
5. After 20 seconds, the system is fully armed.
Before Driving
Security System
3-46*Some models.
MX-5_8KH8-EA-21K_Edition3_old 2021-11-10 13:10:56
Page 118 of 503
NOTE
The theft-deterrent system can also be
armed by activating the auto relock
function with both the doors, the trunk
lid and the hood closed.
Refer to Transmitter on page 3-5.
The system will disarm if one of the
following operations takes place within
20 seconds after pressing the lock
button:
Unlocking any door.
Opening any door.
Opening the hood.
Switching the ignition ON.
To rearm the system, do the arming
procedure again.
When the doors are locked by pressing
the lock button on the transmitter or
using the auxiliary key while the
theft-deterrent system is armed, the
hazard warning lights will flash once to
indicate that the system is armed.
▼ To Tu r n O f f a n A r m e d S y s t e m
An armed system can be turned off using
any one of the following methods:
Pressing the unlock button on the
transmitter.
Starting the engine with the push button
start.
(With the advanced keyless function)
Pressing a request switch on the
doors.
The hazard warning lights will flash twice.
NOTE
When the doors are unlocked by pressing
the unlock button on the transmitter while
the theft-deterrent system is turned off, the
hazard warning lights will flash twice to
indicate that the system is turned off.
▼ To S t o p t h e A l a r m
A triggered alarm can be turned off using
any one of the following methods:
Pressing the unlock button or the trunk
button on the transmitter.
Starting the engine with the push button
start.
(With the advanced keyless function)
Pressing a request switch on the
doors.
The hazard warning lights will flash twice.
Before Driving
Security System
3-47
MX-5_8KH8-EA-21K_Edition3_old 2021-11-10 13:10:56
Page 156 of 503
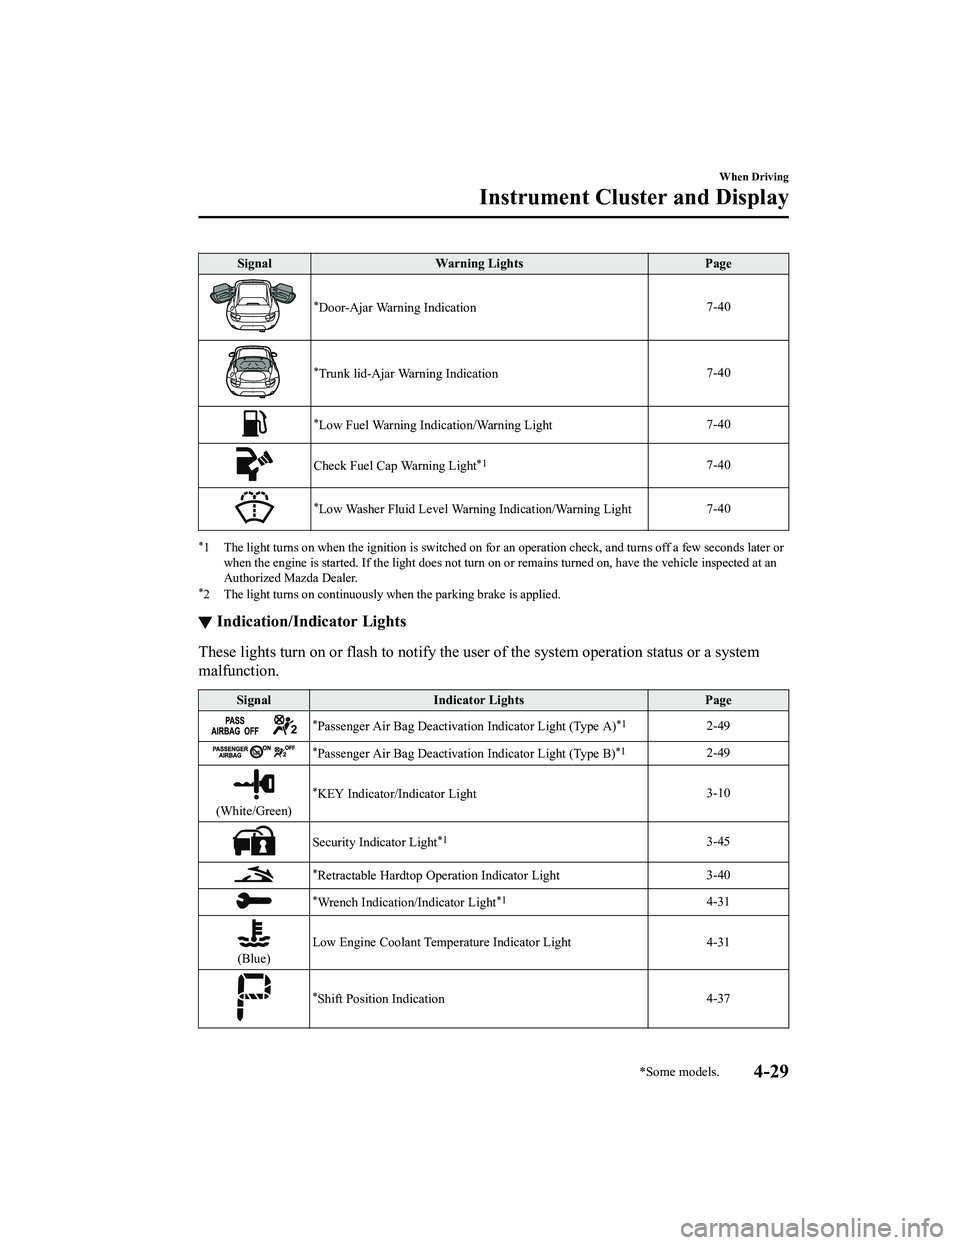
SignalWarning Lights Page
*Door-Ajar Warning Indication 7-40
*Trunk lid-Ajar Warning Indication7-40
*Low Fuel Warning Indication/Warning Light
7-40
Check Fuel Cap Warning Light*17-40
*Low Washer Fluid Level Warning Indication/Warning Light7-40
*1 The light turns on when the ignition is switched on for an operation check, and turns off a few seconds later or
when the engine is started. If the light does not turn on or remains turned on, have the vehicle inspected at an
Authorized Mazda Dealer.
*2 The light turns on continuously when the parking brake is applied.
▼ Indication/Indicator Lights
These lights turn on or flash to notify the us
er of the system operation status or a system
malfunction.
Signal Indicator Lights Page
*Passenger Air Bag Deactivation Indicator Light (Type A)*12-49
*Passenger Air Bag Deactivation Indicator Light (Type B)*12-49
(White/Green)
*KEY Indicator/Indicator Light 3-10
Security Indicator Light*13-45
*Retractable Hardtop Operation Indicator Light
3-40
*Wrench Indication/Indicator Light*14-31
(Blue)Low Engine Coolant Temperature Indicator Light 4-31
*Shift Position Indication
4-37
When Driving
Instrument Cluster and Display
*Some models.4-29
MX-5_8KH8-EA-21K_Edition3_old
2021-11-10 13:10:56
Page 288 of 503

Sunvisors
When you need a sunvisor, lower it for use
in front.
▼Va n i t y M i r r o r s
To use the vanity
mirror, lower the
sunvisor.
Interior Lights
NOTE
Do not leave the lights on for long periods
while the engine is turned off. Otherwise
the battery power could be depleted.
Overhead Light
Switch Posi‐
tion Overhead Light
Light off
Light is on when any door is openLight is on or off when the illumi
‐
nated entry system is on
Light on
Trunk Light
The trunk light is on when the lid is open
and off when it's closed.
Interior Features
Interior Equipment
5-35
MX-5_8KH8-EA-21K_Edition3_old 2021-11-10 13:10:56
Page 289 of 503

NOTE
To prevent the battery from being
discharged, do not leave the trunk open
for a long period when the engine is not
running.
▼Illuminated Entry System
The overhead lights turn on when any of
the following operations is done with the
overhead light sw
itch in the DOOR
position.
The driver's door is unlocked with the
ignition is switched OFF.
The ignition is swit ched OFF with all
doors closed.
NOTE
The illumination time differs depending
on the operation.
Battery saver
If an interior light is left on with the
ignition switched OFF, the light is
turned off automatically after about 30
minutes to prevent battery depletion.
The operation of the illuminated entry
system can be changed.
Refer to the Settings section in the
Mazda Connect Owner's Manual.
Accessory Socket
The accessory socket is located deep in the
back of the footwell on the passenger side.
Only use genuine Mazda accessories or
the equivalent requiring no greater than
120 W (DC 12 V, 10 A).
The ignition must be switched to ACC or
ON.
CAUTION
To prevent accessory socket damage or
electrical failure, pay attention to the
following:
Do not use accessories that require
more than 120 W (DC 12 V, 10 A).
Do not use accessories that are not
genuine Mazda accessories or the
equivalent.
Close the cover when the accessory
socket is not in use to prevent foreign
objects and liquids from getting into
the accessory socket.
Correctly insert the plug into the
accessory socket.
Do not insert the cigarette lighter into
the accessory socket.
Interior Features
Interior Equipment
5-36
MX-5_8KH8-EA-21K_Edition3_old 2021-11-10 13:10:56
Page 335 of 503

Light Bulbs
Overhead lightSide turn signal lights
High-mount brake light
Trunk light
Front side-marker lights
Front turn signal lights
Headlights (Low/High beam)
Parking lights
Daytime running lights
License plate lights
Brake lights
Taillights
Rear side-marker lights
Reverse lights
Rear turn signal lights
Maintenance and Care
Owner Maintenance
6-38
MX-5_8KH8-EA-21K_Edition3_old
2021-11-10 13:10:56
Page 339 of 503

6. Install the new side turn signal unit inthe reverse order of the removal
procedure.
Rear turn signal lights
1. Make sure the ignition is switched off, and the headlight switch is off.
2. Pull the center of each plastic retainer
and remove the retainers and the trunk
end trim.
Removal
Installation
3. Disconnect the connector from the unitby pressing the tab on the connector
with your finger and pulling the
connector downward.
4. Pull the center of each plastic retainerand remove the retainers, and then
partially peel back the trunk side trim.
Removal
Installation
Maintenance and Care
Owner Maintenance
6-42
MX-5_8KH8-EA-21K_Edition3_old 2021-11-10 13:10:56