clock MAZDA MODEL PROTÉGÉ 2001 Owners Manual (in English)
[x] Cancel search | Manufacturer: MAZDA, Model Year: 2001, Model line: MODEL PROTÉGÉ, Model: MAZDA MODEL PROTÉGÉ 2001Pages: 290, PDF Size: 5.53 MB
Page 39 of 290
![MAZDA MODEL PROTÉGÉ 2001 Owners Manual (in English) Eslential Safe!] Equipment
3. To gel the reEaclor into dle automaticlocking mode, pull dre sboulder tEltponion of the seat belt unhl fte entirelength of lbe belt is out of ine retactorPush ille child MAZDA MODEL PROTÉGÉ 2001 Owners Manual (in English) Eslential Safe!] Equipment
3. To gel the reEaclor into dle automaticlocking mode, pull dre sboulder tEltponion of the seat belt unhl fte entirelength of lbe belt is out of ine retactorPush ille child](/img/28/15604/w960_15604-38.png)
Eslential Safe!] Equipment
3. To gel the reEaclor into dle automaticlocking mode, pull dre sboulder tEltponion of the seat belt unhl fte entirelength of lbe belt is out of ine retactorPush ille child resfaint system finirlyinto he vehicle seat Be sure the belrrctracts as snugly 3s possible. Clickingfrom dre reu?clor will be heard duringrchction if lhe syslem js in aubmaticlocking rnode. If dre belt does not l(rkdle seat down righ! reFat rhis srep.
4. hspec! ihis lincrion before each use ofdre child restrain! sysrem. You should norbe able to prtl the shoulder b€lt out oflhe reu€clcr while fie system is in iheauircmatic lffking mode. When you
rcmove the ciild restsaint system, besure tlle belt fully rctracrs io letum thesystem trc emelgency locking modebefore ecuparts use the seat belts.
LATCH Child-Restraint
Systems*
Your Mazda is equipped wilh LATCH
lower anchors for attachment ofspecially
designed LATCH clrild restraint systems
in the outboard rear seats. Attachment ofLAICH child-restraint slstems should all
fit the outboard positions. Achild
reslraint system with LAICH
altachments cannot be installed in the
rear cenler position unless the seat behs
Both anchors must be used, otherwise rhe
seatwillbounce around and pur the child
in danger. Some LATCH child,restraint
systems must also be used in conjuncrion
wirh a tether to be effecrive. If they have
a tether you must use it to better assureyour child's safety.
V Front pass€ng€r's seat
child-restraint system installation(Laplshoulder belt)
l. Slide $e seatas far back as possible.
2. Secure the child reshaint system wih the
lap poiion of lhe lapshoulder beli. Seethe insmctions on the chlld restrainr
system for bell routing instructions.NOTE
Follow the child resmint sysemmanulacnnef s instuctions carefu lly.Depending on lhe type of child-restraintsystem. 11 may not employ seat belrswhich arc in automatic lftking mode.
son. n.oer . 2-27
Page 72 of 290
Knowine Your Mazdt
Tfunk Lid
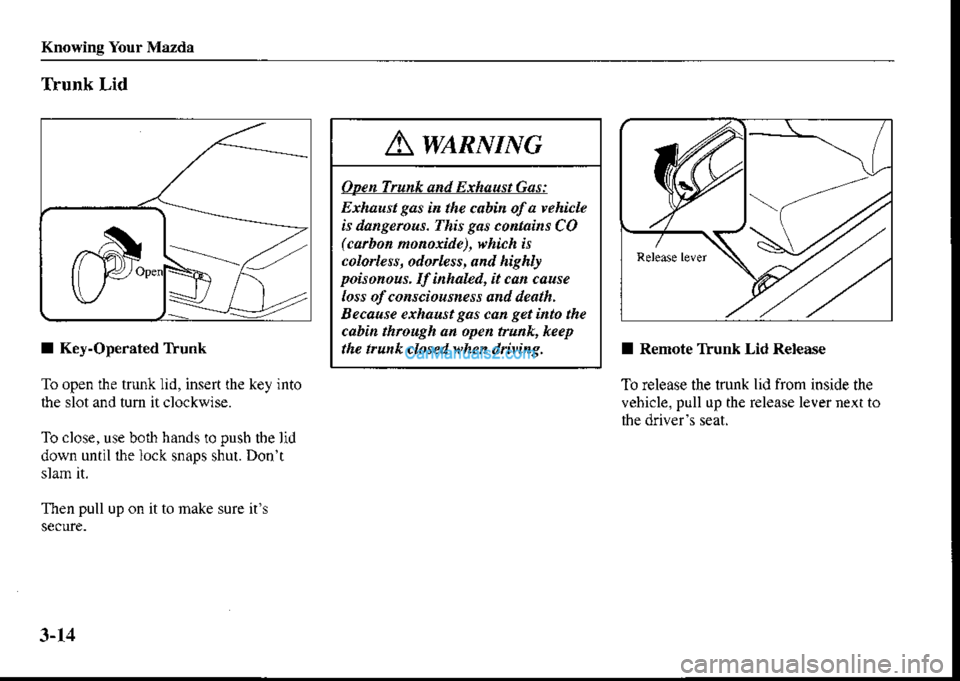
I Key-Opemted T|unk
To open the trunk lid, ins€rt the key into
the slot and tum itclockwise.
To close, use both hands to pusb tbe lid
down until lhe lock snaps shul. Don't
slam it.
Then pull up on it to make sure it\
I Remote Ttunk Lid Release
To release the trunk lid from inside the
vehicle. pull up the release levernext to
Awtnumc
opcaAryafuBdE Laast@
Ethaust gas in the cabin of a 'ehicleis dangerous. This g.s co tains CO(..tfion nonoide), $'hich is
colorletr, odo ess, and highlf
poisonous. If inhaled, it ca cause
loss of consciousness and death.
Because erhaustgas can geti to the
cabin through an ope trunk, keep
the trunk ctosed when diving.
3-14
Page 73 of 290
![MAZDA MODEL PROTÉGÉ 2001 Owners Manual (in English) Knowing Your Mazda
I lhunk S€curit]
In some situalions you may want toprevenl the trunk from being opened with
the remote trunk release lever,
Give your key only to someone you rrusr.
To secure ihe MAZDA MODEL PROTÉGÉ 2001 Owners Manual (in English) Knowing Your Mazda
I lhunk S€curit]
In some situalions you may want toprevenl the trunk from being opened with
the remote trunk release lever,
Give your key only to someone you rrusr.
To secure ihe](/img/28/15604/w960_15604-72.png)
Knowing Your Mazda
I lhunk S€curit]
In some situalions you may want toprevenl the trunk from being opened with
the remote trunk release lever,
Give your key only to someone you rrusr.
To secure ihe trunk iid,lock the rear
seaibacks (page 2-8). push ihe trunk lock
lever up, and close the trunk.
To cancel the secuity feaiure, insen the
key inio the lock, lum the key clockwise.
and push the trunk lock lever down.
ffi._r
3-15
Page 77 of 290
Knowing Your Mazda
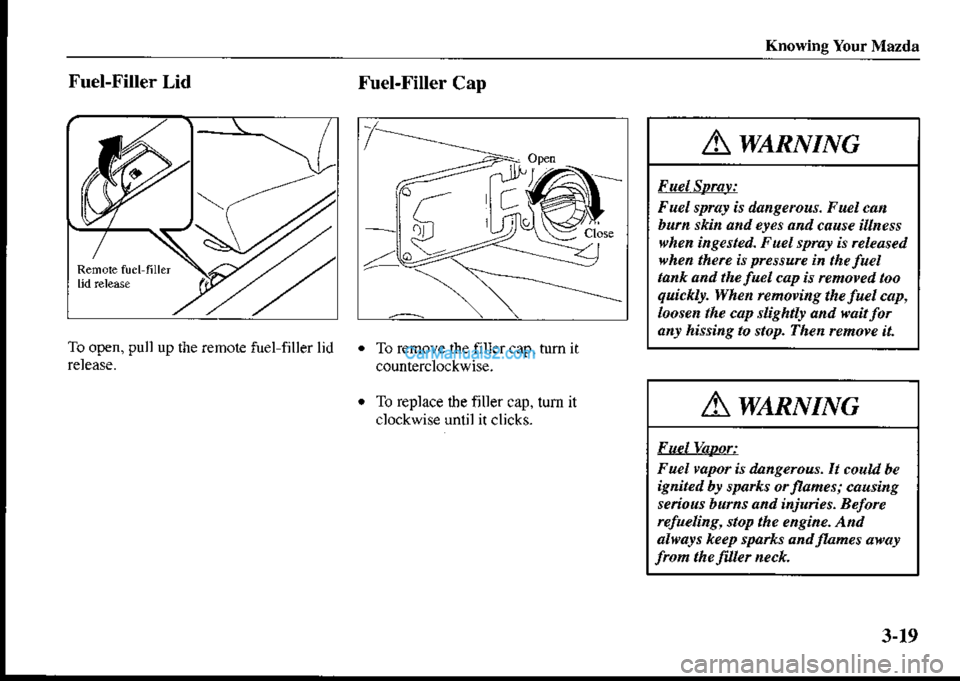
Fuel-Filler Lid
To open. pull up the remote tuel filler lid
Fuel-Filler Cap
To remove the filler cap, tum it
To replace lhe filler cap. tum it
clockwise until it clicks-
Awanume
F uel SpBy
F uel sprar is dangercus. Fuel catt
bu ski and eres andcause i ness
vhen inqested. F uel sprar h rclcased
N'hen therc is pressurc in the fueltank and the fuel cap is nnoved too
qui.kry. Whe renot'i g the fuel cap,
loosen the cap slightlr and wait fo.ary hissing to stop. Then remove it.
Awanr,tmc
FuelUapor
Fuel yapor X dangerous.It coud be
ignit.d br spa*s orflames; causilg
senous bftns and injunes. Betorc
nfuelins, stop the ensine. A d
alvars keep sparks and funes awar
frcm the friler neck.
3-19
Page 139 of 290
Driving Your Mazda
A wamrnrc
Open Storaee Box:
Diving with a storage box open is
dangerous. To rcduce the possibiury
of injury in an accident or a sudden
stop, keep the storagc boxes closed
AclurroN
In hot weather, don't leave
combustible ma|erials or objects
which witl deforn in exlreme heat
such as lighters and glasses in the
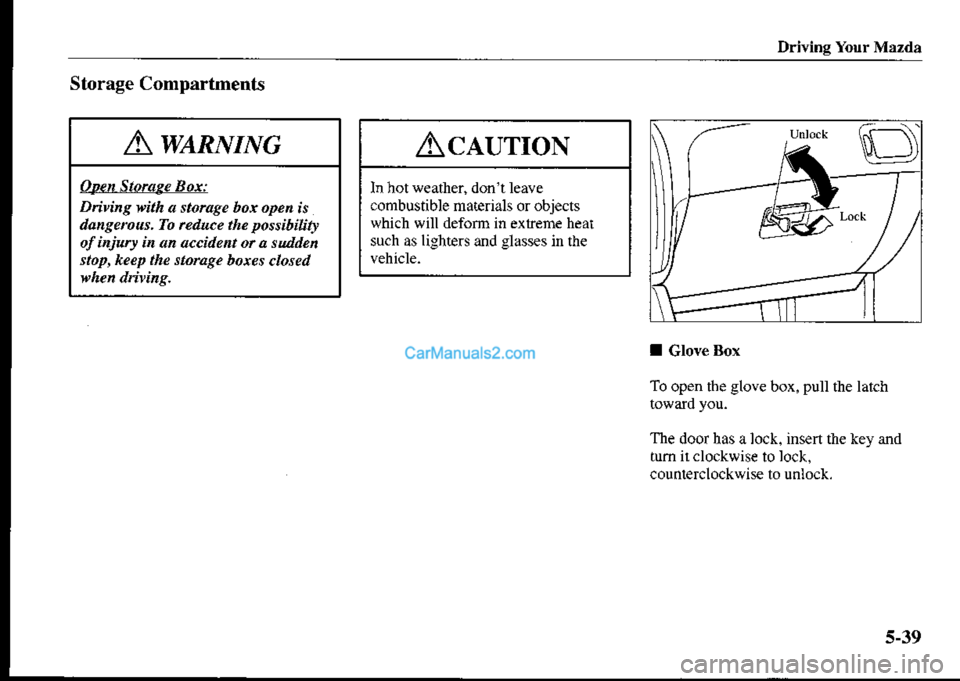
Storage Compartments
I Glove Box
To open the glove box. pull the latch
The door has a lock. insert the key and
tum ir clockwise to lock.
counterclockwise to unlock,
5-39
Page 146 of 290
Driving Your Mazda
/6f
cord r7i Hd
v___/
O€,,z.GO
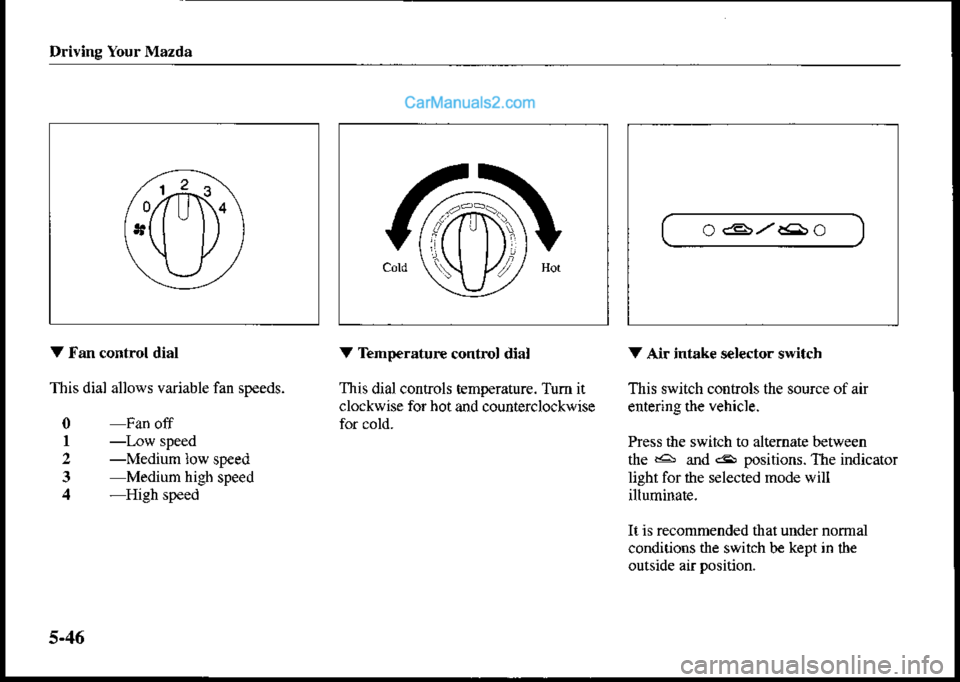
V tran control dial
This dial allows variable fan speeds.
0 Fan off
I -Low speed
2 -Medium low speed
3 Mediurn high speed,l -High speed
V Tempe.aturc control dial
This dial controls temperature. Tum it
clockwise for hot and counterclockwise
V Air intake sel€cto. switch
This switch controls the source of air
ente ngthe vehicle.
Press the switch to alternate between
fte ra and 6 positions. The indicator
light for the selected mode will
illuminate.
It is recommended that under normal
conditions the switch b€ kept in lhe
5-46
Page 160 of 290
Ddving Your Mazda
Tr€ble conlrol
To adjust the treble. select TREB by
pressing the audio controi knob. "TREB '
will be displayed.
Tum the audio contol knob io ihe right
to increase rreble, to the left lo decrease
it. The level will be displayed.
Release the audio control knob when the
desired level has been reached.
Fader control
To adjust the sound distribution between
fiont and rear speakers. select FADE by
pressing ihe audio control knob. "FADE'
will be dispiayed.
Turn the audio control knob to the right
to shift the sound to the rear, to the left ro
shift $e sound to the front. The level will
be displayed.
Rel€ase the audio control knob when lhe
desired level has been reached.
Balance control
To adjusr the sound dislribuiion belween
left and right speakers, select BALby
pressing the audio control knob. 'BAL"
will be displayed.
Turn tbe audio conrol knob to the rigbt
to shift the sound to the righl, to the left
to shift the sound !o lhe left. The level
will be displayed.
Release the audio control knob when lhe
desired level has been reached-I Clock
V Setting the time
The clock cln be set at any time when lhe
ignition switch is in lhe ACC or ON
I . To adjusr the lime, press the clock
butlon for about 2 seconds until abeep
2. Tbe clock s cunenitime will flash
unlil the time is set.
5-60
tc."*-l
-+-
Page 161 of 290
![MAZDA MODEL PROTÉGÉ 2001 Owners Manual (in English) Driving Your Mazda
f---]-
/" ** l
i t-
/*orto."frl
3. To advance the hours, press ihe hour
sel button ( H ) to advance the
mjnules, press the minute setbutton( M ) while the time is flashing.
4. Press MAZDA MODEL PROTÉGÉ 2001 Owners Manual (in English) Driving Your Mazda
f---]-
/" ** l
i t-
/*orto."frl
3. To advance the hours, press ihe hour
sel button ( H ) to advance the
mjnules, press the minute setbutton( M ) while the time is flashing.
4. Press](/img/28/15604/w960_15604-160.png)
Driving Your Mazda
f---]-
/" ** l
i t-
/*orto."frl
3. To advance the hours, press ihe hour
sel button ( H ) to advance the
mjnules, press the minute setbutton( M ) while the time is flashing.
4. Press the clock button again to start
NOTE
lf the power supply to the unit is
intrerrupred (if the fuse blows or fte
vehicle's battery is disconn€cted), the
clock will need 1() be reset.
l_--'---------a-::---| '{.J H I I '{H(a I
lnItl
\,, \,2
f-J.-=frn- T---.El!-frI
NOTE
If the time is not adjusted while the
clock's current time is flashing (if
neilber the H nor M is pressed). and
th€ clockbutton ispressed a second
time, the minut€s will be set to 00. If
fte clock s current time selting is
within the lauer pan of dle hour (from
30 to 59 min). tbe hour se$ing will
automatically advance one hour.
V Changing the display mode
The disptay on the unit can be changed
by pressing the clock bution. This
altemates the dhplay between tirne and
audio. When the clock mode has been
s€lechd, the time will be displayed.
fc.o"*-i
-+-
NOTE
Ifaudio operarion is selected while
tle time mode is on, the selected
audio mode will be displayed for ten
seconds, then the display will revert
5-61
Page 201 of 290
In Cas€ ofan Emerg€ncy
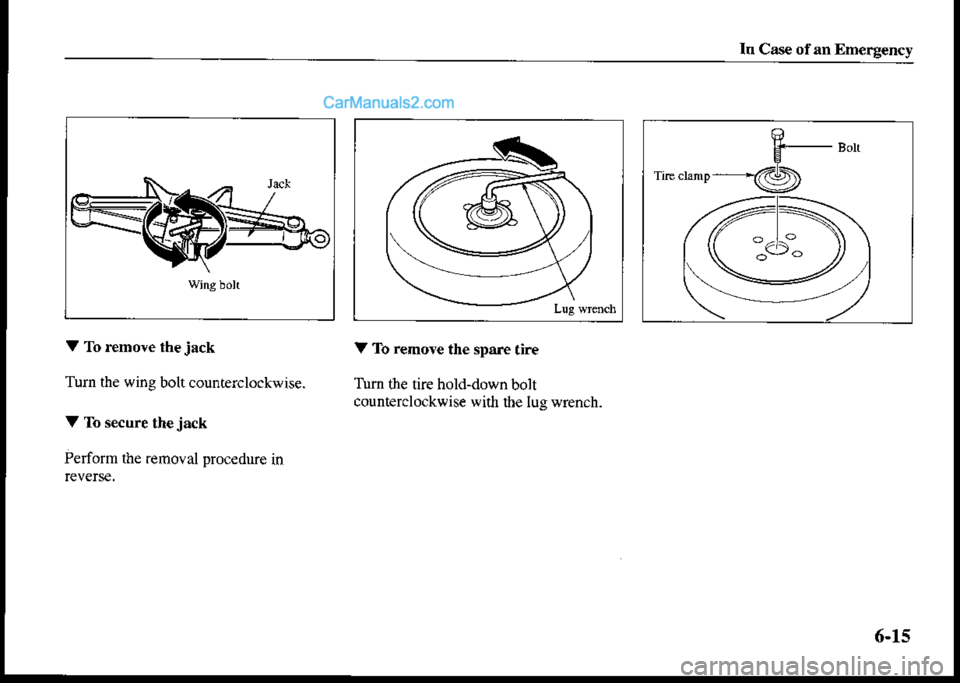
V To rcmove thejack
Turn the wing bolt counterclockwise.
V To secure the jack
Perform the remoyal proc€dure in
V To remove the spare tire
Tum the tire hold-down bolt
counterclockwise wift dre lug wrench.
6-15
Page 204 of 290
In Case of aD Emergency
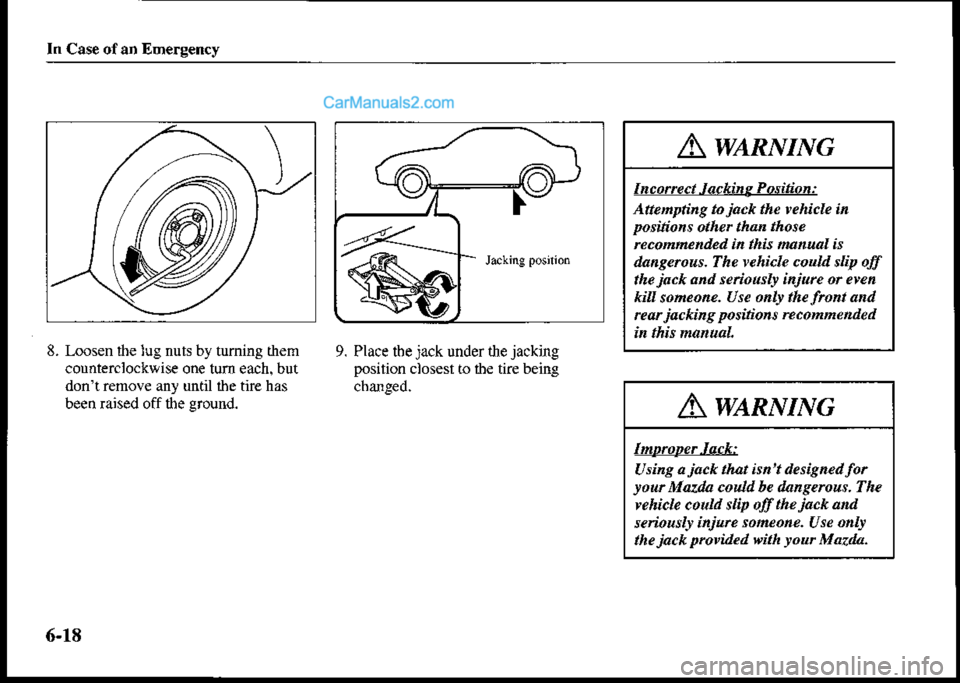
8. Loosen $e lug nuts by turning them
counterclockwise one tum each. but
don't remove any until ihe tire has
been raised off the groud.
9. Place tbe jack under the jacking
position closest io tbe tire being
cbanged.
Awtnvme
I nc orrc ct.l ackin g P osition :
Attenptilg tojack the rehicle in
positions other than those
nconne ded inthk Iu ual is
dansenus. The rehicle couu slip off
thejack and senoustr injure or even
kill someone. Use onlr the front and
rcarjacking positioN recomme ded
A waRlrnsc
Inuapcr,latk
Using a jack that isn't desiened foryo r Mazda codd be dengercus. The
rehick coua snp olf the jack a d
seiouslr inj rc someone. Use o lt
thejack ptovided dth rou Mozda.
6-18