lock MAZDA MODEL RX 8 2005 (in English) User Guide
[x] Cancel search | Manufacturer: MAZDA, Model Year: 2005, Model line: MODEL RX 8, Model: MAZDA MODEL RX 8 2005Pages: 364
Page 36 of 364
Black plate (36,1)
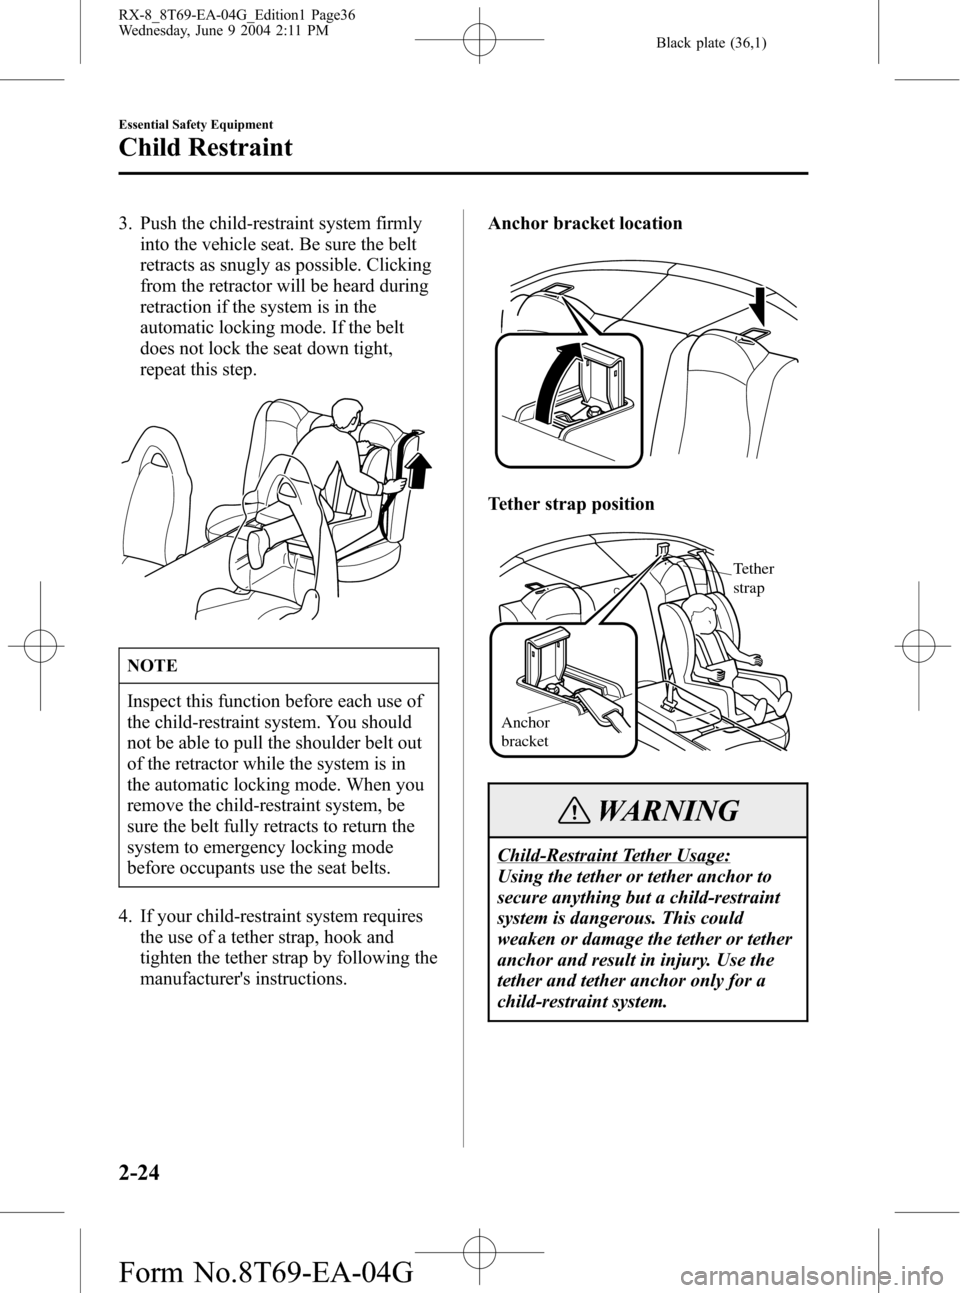
3. Push the child-restraint system firmly
into the vehicle seat. Be sure the belt
retracts as snugly as possible. Clicking
from the retractor will be heard during
retraction if the system is in the
automatic locking mode. If the belt
does not lock the seat down tight,
repeat this step.
NOTE
Inspect this function before each use of
the child-restraint system. You should
not be able to pull the shoulder belt out
of the retractor while the system is in
the automatic locking mode. When you
remove the child-restraint system, be
sure the belt fully retracts to return the
system to emergency locking mode
before occupants use the seat belts.
4. If your child-restraint system requires
the use of a tether strap, hook and
tighten the tether strap by following the
manufacturer's instructions.Anchor bracket location
Tether strap position
Anchor
bracketTether
strap
WARNING
Child-Restraint Tether Usage:
Using the tether or tether anchor to
secure anything but a child-restraint
system is dangerous. This could
weaken or damage the tether or tether
anchor and result in injury. Use the
tether and tether anchor only for a
child-restraint system.
2-24
Essential Safety Equipment
Child Restraint
RX-8_8T69-EA-04G_Edition1 Page36
Wednesday, June 9 2004 2:11 PM
Form No.8T69-EA-04G
Page 38 of 364
Black plate (38,1)
WARNING
Children and Seating Position with
Side and Curtain Air Bags:
Allowing anyone to lean over or
against the front door, the area of
front seat, front and rear window
pillars and the roof edge along both
sides which the side and curtain air
bags deploy even though using a
child-restraint system is dangerous. If
the vehicle is equipped with side and
curtain air bags, the impact of
inflation could cause serious injury or
death to the child. Furthermore,
leaning over or against the front door
could block the side and curtain air
bags and eliminate the advantages of
supplemental protection. With the
front air bag and the additional side
air bag that comes out of the front
seat, the rear seat is always a better
location for children. Do not allow a
child to lean over or against the doors,
even if the child is seated in a child-
restraint system.
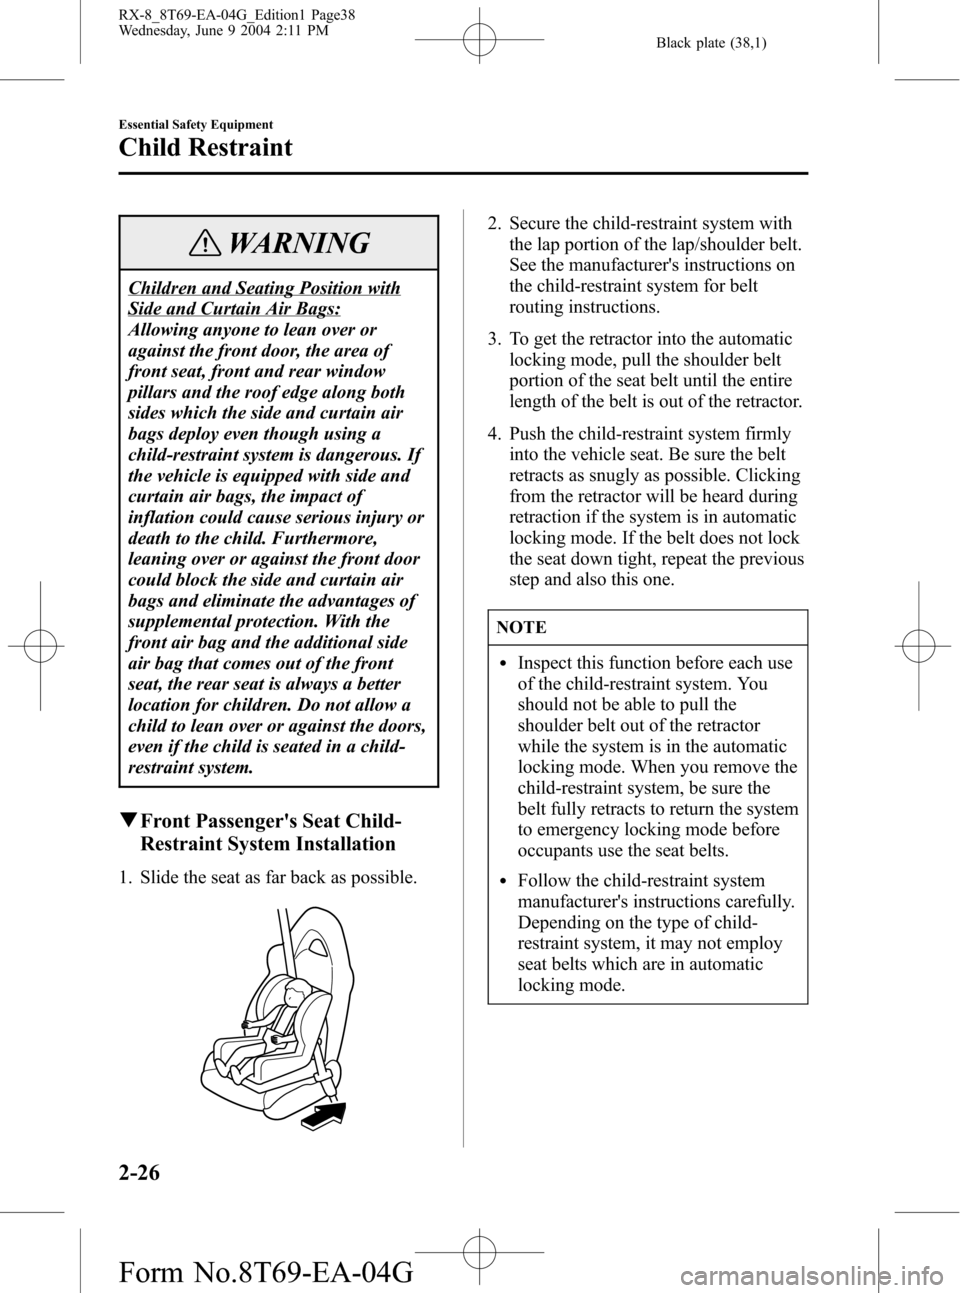
qFront Passenger's Seat Child-
Restraint System Installation
1. Slide the seat as far back as possible.
2. Secure the child-restraint system with
the lap portion of the lap/shoulder belt.
See the manufacturer's instructions on
the child-restraint system for belt
routing instructions.
3. To get the retractor into the automatic
locking mode, pull the shoulder belt
portion of the seat belt until the entire
length of the belt is out of the retractor.
4. Push the child-restraint system firmly
into the vehicle seat. Be sure the belt
retracts as snugly as possible. Clicking
from the retractor will be heard during
retraction if the system is in automatic
locking mode. If the belt does not lock
the seat down tight, repeat the previous
step and also this one.
NOTE
lInspect this function before each use
of the child-restraint system. You
should not be able to pull the
shoulder belt out of the retractor
while the system is in the automatic
locking mode. When you remove the
child-restraint system, be sure the
belt fully retracts to return the system
to emergency locking mode before
occupants use the seat belts.
lFollow the child-restraint system
manufacturer's instructions carefully.
Depending on the type of child-
restraint system, it may not employ
seat belts which are in automatic
locking mode.
2-26
Essential Safety Equipment
Child Restraint
RX-8_8T69-EA-04G_Edition1 Page38
Wednesday, June 9 2004 2:11 PM
Form No.8T69-EA-04G
Page 43 of 364
Black plate (43,1)
WARNING
Seating Position with Side and Curtain Air Bags:
Sitting too close to the side air bag modules or placing hands on them is extremely
dangerous. The side air bags inflate with great force and speed directly out of the
outboard side of the front seat and expand along the front door on the side the car is
hit. Serious injury could occur if someone is sitting too close to the door or leaning
against a window, or if rear seat occupants grab the sides of the front seatbacks.
Furthermore, sleeping up against the door or hanging out the windows in the vehicle
could block the side and curtain air bags and eliminate the advantages of
supplemental protection. Give the side and curtain air bags room to work by sitting in
the center of the seat while the vehicle is moving with seat belts worn properly.
Front Air Bag Modules:
Attaching an object to the front air bag modules or placing something in front of them
is dangerous. In an accident, the object could interfere with front air bag inflation and
injure the occupants.
Always keep the front air bag modules free of objects.
Side Air Bag Modules:
Attaching things to the front seat in such a way as to cover the outboard side of the
seat in any way is dangerous. In an accident the object could interfere with the side air
bag, which inflates from the outboard side of the front seats, impeding the added
protection of the side air bag system or redirecting the air bag in a way that is
dangerous. Furthermore, the bag could be cut open spewing exhaust.
Do not hang net bags, map pouches or backpacks with side straps on the front seats.
Never use seat covers on the front seats. Always keep the side air bag modules in your
front seats free to deploy in the event of a side collision.
Curtain Air Bag Modules:
Attaching objects to the areas where the curtain air bag activates such as on the
windshield glass, side door glass, front and rear window pillars and along the roof
edge and assist grips is dangerous. In an accident the object could interfere with the
curtain air bag, which inflates from the front and rear window pillars and along the
roof edge, impeding the added protection of the curtain air bag system or redirecting
the air bag in a way that is dangerous. Furthermore, the bag could be cut open
spewing exhaust.
Do not place hangers or any other objects on the assist grips. When hanging clothes,
hang them on the coat hook directly. Always keep the curtain air bag modules free to
deploy in the event of a side collision.
Essential Safety Equipment
SRS Air Bags
2-31
RX-8_8T69-EA-04G_Edition1 Page43
Wednesday, June 9 2004 2:11 PM
Form No.8T69-EA-04G
Page 53 of 364
Black plate (53,1)
3Knowing Your Mazda
Explanation of basic operations and controls; opening/closing and adjustment
of various parts.
Doors and Locks ........................................................................... 3-2
Keys .......................................................................................... 3-2
Keyless Entry System ............................................................... 3-3
Door Locks ............................................................................... 3-8
Trunk Lid ................................................................................ 3-12
Inside Trunk Release Slide Lever ............................................ 3-15
Power Windows ...................................................................... 3-16
Rear Quarter Windows ............................................................ 3-18
Fuel-Filler Lid and Cap ........................................................... 3-19
Hood ....................................................................................... 3-21
Moonroof
í............................................................................. 3-22
Security System ........................................................................... 3-24
Immobilizer System ................................................................ 3-24
Theft-Deterrent System
í........................................................ 3-27
Steering Wheel and Mirrors ...................................................... 3-29
Steering Wheel ........................................................................ 3-29
Mirrors .................................................................................... 3-29
3-1íSome models.
RX-8_8T69-EA-04G_Edition1 Page53
Wednesday, June 9 2004 2:11 PM
Form No.8T69-EA-04G
Page 54 of 364
Black plate (54,1)
Keys
WARNING
Keys and Children:
Leaving children in a vehicle with the
key is dangerous. This could result in
someone being badly injured or even
killed. They could play with power
windows or other controls, or even
make the vehicle move. Don't leave the
keys in your vehicle with children and
keep them in a place where your
children will not find or play with
them.
NOTE
Refer to Immobilizer System (page
3-24) for information regarding keys
and engine starting on vehicles
equipped with the immobilizer system.
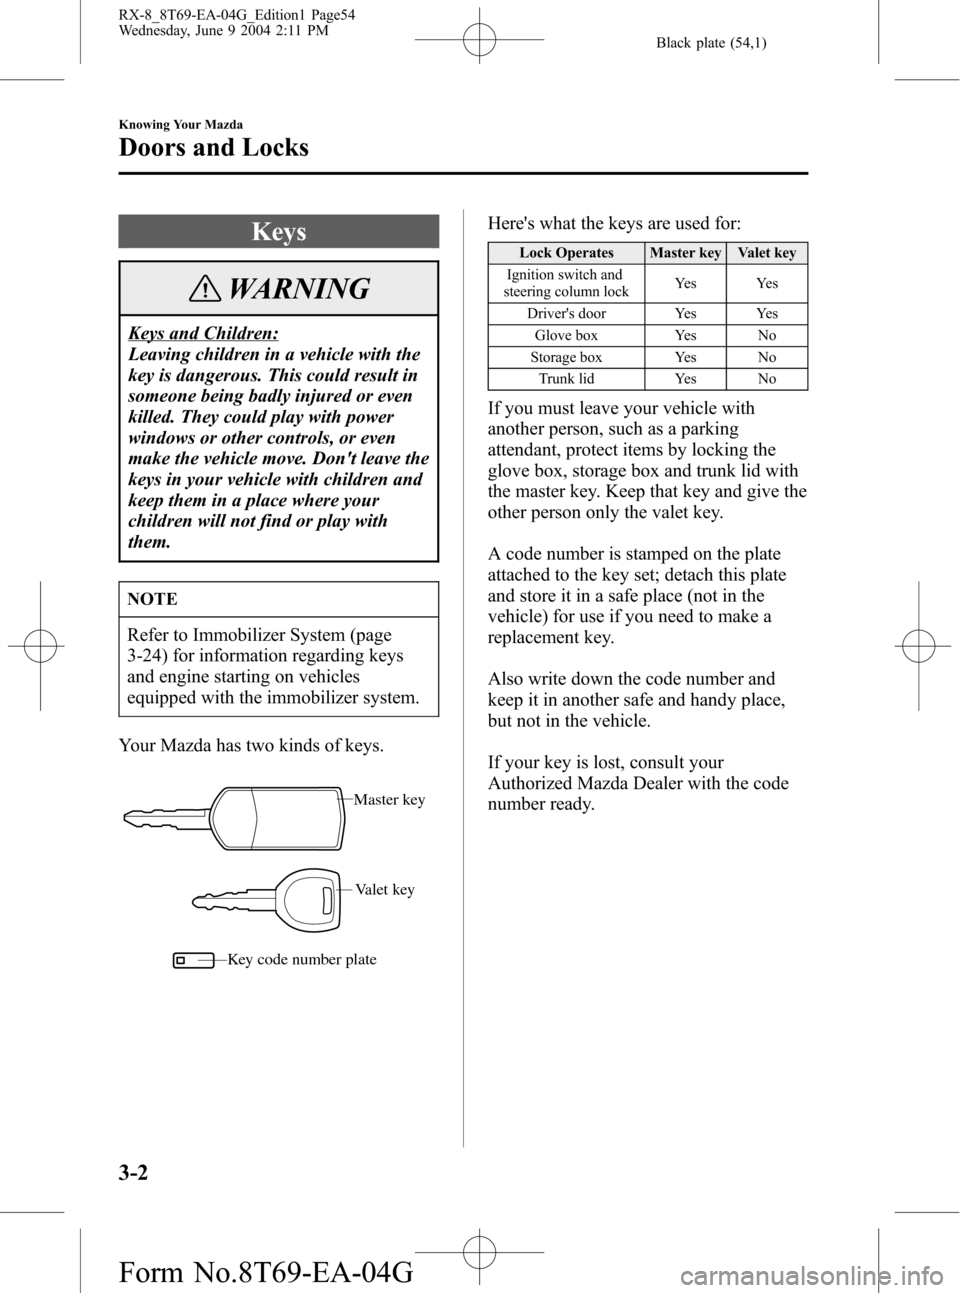
Your Mazda has two kinds of keys.
Valet key Master key
Key code number plate
Here's what the keys are used for:
Lock Operates Master key Valet key
Ignition switch and
steering column lockYe s Ye s
Driver's door Yes Yes
Glove box Yes No
Storage box Yes No
Trunk lid Yes No
If you must leave your vehicle with
another person, such as a parking
attendant, protect items by locking the
glove box, storage box and trunk lid with
the master key. Keep that key and give the
other person only the valet key.
A code number is stamped on the plate
attached to the key set; detach this plate
and store it in a safe place (not in the
vehicle) for use if you need to make a
replacement key.
Also write down the code number and
keep it in another safe and handy place,
but not in the vehicle.
If your key is lost, consult your
Authorized Mazda Dealer with the code
number ready.
3-2
Knowing Your Mazda
Doors and Locks
RX-8_8T69-EA-04G_Edition1 Page54
Wednesday, June 9 2004 2:11 PM
Form No.8T69-EA-04G
Page 55 of 364

Black plate (55,1)
Key unfold/fold method (Retractable
key type)
To unfold the key, press the release
button.
To fold the key, press the release button
and rotate the key into the holder.Keyless Entry System
This system locks and unlocks the doors
and opens the trunk.
It can also help you signal for attention in
an emergency.
Press the button slowly and accurately.
CAUTION
To avoid damage to the transmitter, do
not:
lDrop it.
lGet it wet.
lDisassemble it.
lExpose it to heat or sunlight.
Knowing Your Mazda
Doors and Locks
3-3
RX-8_8T69-EA-04G_Edition1 Page55
Wednesday, June 9 2004 2:11 PM
Form No.8T69-EA-04G
Page 56 of 364

Black plate (56,1)
NOTE
lThe keyless entry system is designed
to operate up to about 2.5 m (8 ft)
from the center of the vehicle, but
this may vary because of local
conditions.
lThe system doesn't operate when the
key is in the ignition switch.
lDoors cannot be locked by pressing
the LOCK button while any other
door is open. The hazard warning
lights will also not flash.
lIf the transmitter does not operate
when pressing a button or the
operation range becomes too small,
the battery may be dead. To install a
new battery, refer to Maintenance
(page 3-6).
lAdditional transmitters can be
obtained at an Authorized Mazda
Dealer. Up to 3 transmitters can be
used with the keyless entry system
per vehicle. Bring all transmitters to
an Authorized Mazda Dealer when
the electronic codes need to be reset.
qTransmitter
Lock button
Unlock button
Trunk buttonPanic button
NOTE
l(U.S.A.)
This device complies with part 15 of
the FCC Rules. Operation is subject
to the following two conditions: (1)
This device may not cause harmful
interference, and (2) this device must
accept any interference received,
including interference that may cause
undesired operation.
l(CANADA)
This device complies with RSS-210
of Industry CANADA. Operation is
subject to the following two
conditions: (1) this device may not
cause interference, and (2) this
device must accept any interference,
including interference that may cause
undesired operation of the device.
NOTE
If the lock and unlock buttons are
pressed sequentially, the hazard
warning lights may not flash correctly.
3-4
Knowing Your Mazda
Doors and Locks
RX-8_8T69-EA-04G_Edition1 Page56
Wednesday, June 9 2004 2:11 PM
Form No.8T69-EA-04G
Page 57 of 364

Black plate (57,1)
Lock button
To lock the doors, press the lock button
and the hazard warning lights will flash
once.
To confirm that all the doors have been
locked, press the lock button again within
5 seconds. If they are closed and locked,
the horn will sound and the hazard
warning lights will flash once.
NOTE
lAll doors cannot be locked when any
door is open and the key is in the
ignition switch.
lConfirm that all the doors are locked
visually or audibly by use of the
double click.
Unlock button
To unlock the driver's door, press the
unlock button and the hazard warning
lights will flash twice.
To unlock all the doors, press the unlock
button again within 5 seconds and the
hazard warning lights will flash twice.
NOTE
After unlocking with the transmitter, all
doors will automatically lock if one of
the doors is not opened within about 30
seconds.
Trunk button
To open the trunk, press the trunk button.
NOTE
The trunk button is disabled when the
glove box-mounted trunk lid release
lock-out button is in the OFF position.
Refer to Remote Trunk Lid Release
Lock-Out on page 3-14.
Panic button
You can use the panic button to turn on
the alarm, which allows you to signal for
attention in an emergency.
NOTE
The alarm will work whether any door
is open or closed.
Turning on the alarm
Pressing the panic button for about a
second will trigger the alarm for about 2
minutes and 30 seconds, and do the
following:
lThe horn sounds intermittently.
lThe hazard warning lights flash.
Turning off the alarm
Press any button on the transmitter or
insert the key into the ignition switch.
Knowing Your Mazda
Doors and Locks
3-5
RX-8_8T69-EA-04G_Edition1 Page57
Wednesday, June 9 2004 2:11 PM
Form No.8T69-EA-04G
Page 58 of 364

Black plate (58,1)
qTransmitter Maintenance
CAUTION
lMake sure the battery is installed
with the correct pole facing upward.
Battery leakage could occur if it is
not installed correctly.
lWhen replacing the battery, be
careful not to bend the electrical
terminals or get oil on them. Also be
careful not to get dirt in the
transmitter as it could damage it.
lDanger of battery explosion if it is
incorrectly replaced.
lReplace only with the same type
battery (CR1620 or equivalent).
lDispose of used batteries according
to the following instructions.
lInsulate the plus and minus
terminals of the battery using
cellophane or equivalent tape.
lNever disassemble.lNever throw the battery into fire
and/or water.
lNever deform or crush.
Replacing the transmitter battery
1. Insert a small screwdriver into the slot
and push the tab to remove the key
from the transmitter.
Ta b
2. Insert a small screwdriver into the slot
and gently pry open the transmitter.
3-6
Knowing Your Mazda
Doors and Locks
RX-8_8T69-EA-04G_Edition1 Page58
Wednesday, June 9 2004 2:11 PM
Form No.8T69-EA-04G
Page 59 of 364

Black plate (59,1)
3. Press the portion of the battery
indicated by A and remove the battery.
A
4. Put in the new battery (CR1620 or
equivalent) with the positive pole (
)
facing down.
5. Align the front and back covers and
snap the transmitter shut.
6. Install the key to the transmitter.
qService
If you have a problem with the keyless
entry system, consult an Authorized
Mazda Dealer.
If your transmitter is lost or stolen, bring
all remaining transmitters to an
Authorized Mazda Dealer as soon as
possible for a replacement and to make
the lost or stolen transmitter inoperative.
CAUTION
Changes or modifications not expressly
approved by the party responsible for
compliance could void the user's
authority to operate the equipment.
Knowing Your Mazda
Doors and Locks
3-7
RX-8_8T69-EA-04G_Edition1 Page59
Wednesday, June 9 2004 2:11 PM
Form No.8T69-EA-04G