lights MAZDA MODEL RX 8 2009 (in English) Service Manual
[x] Cancel search | Manufacturer: MAZDA, Model Year: 2009, Model line: MODEL RX 8, Model: MAZDA MODEL RX 8 2009Pages: 430, PDF Size: 4.9 MB
Page 285 of 430

Black plate (285,1)
Sunvisors
When you need a sunvisor, lower it for
use in front or swing it to the side.
Sunvisor
qVanity Mirrors
To use the vanity mirror, lower the
sunvisor.
The vanity mirror light will illuminate
when you open the cover.
Interior Lights
qIlluminated Entry System
When the illuminated entry system
operates, the overhead light (switch is in
the DOOR position) and the courtesy
lights turn on for:
lAbout 30 seconds after the driver's
door is unlocked and the ignition
switch is in the LOCK position (with
the ignition key removed).
lAbout 15 seconds after all doors are
closed (If your vehicle is equipped with
the advanced key, the overhead light
turns on for about 5 seconds when the
advanced key is outside of the vehicle).
lAbout 15 seconds after the ignition
switch is in the LOCK position (with
the ignition key removed) with all
doors closed.
The light also turns off when:
lThe ignition switch is turned to the ON
position and all doors are closed.
lThe driver's door is locked.
NOTE
Battery saver
If any door is left opened, the light goes out
after about 30 minutes to save the battery.
The light turns on again when the ignition
switch is turned to the ON position, or when
any door is opened after all doors have been
closed.
Interior Comfort
Interior Equipment
6-77
RX-8_8Z09-EA-08C_Edition3 Page285
Thursday, July 3 2008 2:24 PM
Form No.8Z09-EA-08C
Page 286 of 430

Black plate (286,1)
qOverhead Lights
Front
Switch Position Front Overhead Lights
Light off
lLight is on when any door is
open
lLight is on or off when the
illuminated entry system is
on
Rear
Switch
Position Rear Overhead Lights
Light off
Light is on when any door is open
Light is on or off when the
illuminated entry system is on
Light on
q
Map Lights
The map lights are switched on or off by
pressing the switches.
qCourtesy Lights
Turns on when any door is open or the
illuminated entry system is on.
Courtesy Light
6-78
Interior Comfort
Interior Equipment
RX-8_8Z09-EA-08C_Edition3 Page286
Thursday, July 3 2008 2:24 PM
Form No.8Z09-EA-08C
Page 298 of 430

Black plate (298,1)
Parking in an Emergency
The hazard warning lights should always
be used when you stop on or near a
roadway in an emergency.
The hazard warning lights warn other
drivers that your vehicle is a traffic hazard
and that they must take extreme caution
when near it.
Depress the hazard warning flasher and all
the turn signals will flash.
NOTE
lThe turn signals do not work when the
hazard warning lights are on.
lCheck local regulations about the use of
hazard warning lights while the vehicle is
being towed to verify that it is not in
violation of the law.
7-2
In Case of an Emergency
Parking in an Emergency
RX-8_8Z09-EA-08C_Edition3 Page298
Thursday, July 3 2008 2:24 PM
Form No.8Z09-EA-08C
Page 328 of 430

Black plate (328,1)
qSchedule 2
Maintenance Interval Number of months or kilometers (miles), whichever comes first
Months 4 8 12 16 20 24 28 32 36 40 44 48
×1000 km 8 16 24 32 40 48 56 64 72 80 88 96
×1000 miles 5 10 15 20 25 30 35 40 45 50 55 60
ENGINE
Engine oil Puerto Rico Replace every 5,000 km (3,000 miles) or 3 months
Others
RRRRRRRRRRRR
Engine oil filter RRRRRRRRRRRR
Drive belts II
COOLING SYSTEM
Engine coolant FL22 type
*1Replace at first 192,000 km (120,000 miles) or 10 years; after
that, every 96,000 km (60,000 miles) or 5 years
Others Replace at first 96,000 km (60,000 miles) or 4 years; after that,
every 2 years
Engine coolant level IIIIIIIIIIII
FUEL SYSTEM
Air filter R
Fuel lines and hoses
*2II
Hoses and tubes for emission*2I
IGNITION SYSTEM
Spark plugs R
ELECTRICAL SYSTEM
Function of all lights IIIIIIIIIIII
8-6
Maintenance and Care
Scheduled Maintenance
RX-8_8Z09-EA-08C_Edition3 Page328
Thursday, July 3 2008 2:24 PM
Form No.8Z09-EA-08C
Page 350 of 430

Black plate (350,1)
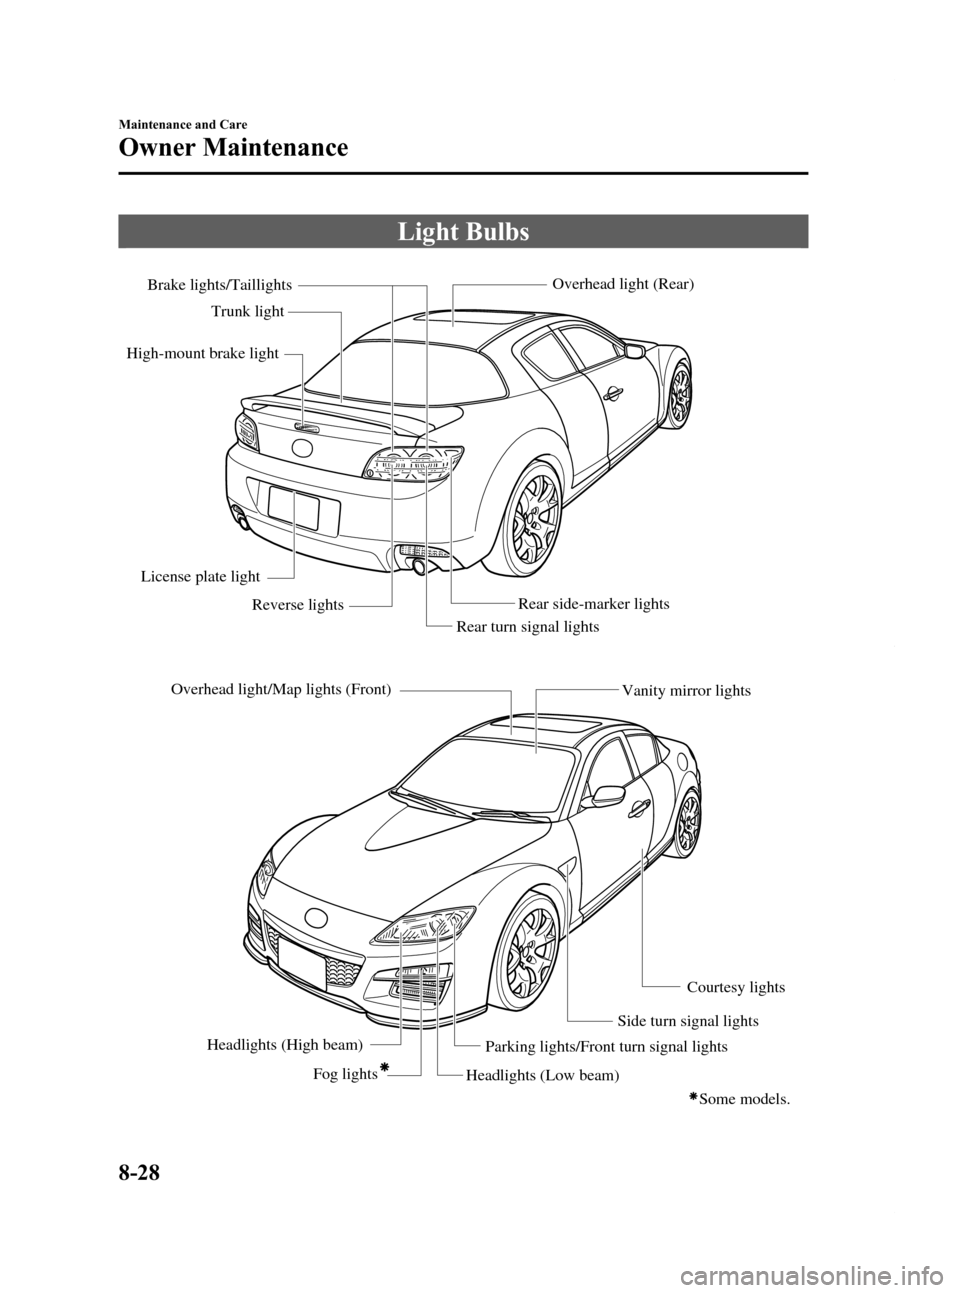
Light Bulbs
Overhead light/Map lights (Front)Headlights (High beam) Fog lights
Headlights (Low beam)Parking lights/Front turn signal lights
Side turn signal lightsCourtesy lights
Vanity mirror lights
Rear turn signal lights
Rear side-marker lightsOverhead light (Rear)
Brake lights/Taillights
Trunk light
High-mount brake light
License plate light Reverse lights
Some models.
8-28
Maintenance and Care
Owner Maintenance
RX-8_8Z09-EA-08C_Edition3 Page350
Thursday, July 3 2008 2:24 PM
Form No.8Z09-EA-08C
Page 353 of 430

Black plate (353,1)
3. Remove the fog light unit by pulling itdownward and then straight out using
both hands.
NOTE
When pulling out the fog light unit, be careful
not to allow the bulb socket to contact the oil
cooler.
4. Press the tab on the bulb socket anddisconnect the connector cord.
5. Rotate the bulb socket counterclockwise as shown in the
figure and remove it.
6. Replace the bulb.
7. Reinstall the bulb socket in the reverse
order of the removal procedure.
Front turn signal lights/Parking lights
1. Make sure the ignition switch is turnedoff and the headlight switch is off.
2. If you are changing the right bulb, start the engine, turn the steering wheel all
the way to the right, and turn off
engine. If you are changing the left
bulb, turn the steering wheel to the left.
3. Turn the center section of the plastic retainer counterclockwise and remove
the retainers and partially peel back the
mudguard.
Removal
Installation
4. Turn the socket and bulb assemblycounterclockwise and remove it.
5. Disconnect the bulb from the socket.
6. Install the new bulb in the reverse order of the removal procedure.
Maintenance and Care
Owner Maintenance
8-31
RX-8_8Z09-EA-08C_Edition3 Page353
Thursday, July 3 2008 2:24 PM
Form No.8Z09-EA-08C
Page 354 of 430

Black plate (354,1)
Side-turn signal lights
1. Slide the light unit rearward.
2. Rotate the light unit clockwise asshown in the figure and pull it out.
3. Press the tab on the bulb socket anddisconnect the connector cord.
4. Replace with a new light unit and
install it in the reverse order of the
removal procedure
NOTE
The side-turn signal light bulb cannot be
replaced. The entire light unit itself has to be
replaced, therefore consult an Authorized
Mazda Dealer for a replacement light unit.
Brake lights/Taillights
Due to the complexity and difficulty of
the procedure, the LED bulbs should be
replaced by an expert repairer, we
recommend an Authorized Mazda Dealer.
Rear turn signal lights, Reverse lights,
Rear side marker lights
1. Pull the center section of the plastic retainer and remove the retainers and
partially open the trunk side trim.
Removal
Installation
2. Turn the socket and bulb assemblycounterclockwise and remove it.
3. Disconnect the bulb from the socket.
Rear turn signal lights
8-32
Maintenance and Care
Owner Maintenance
RX-8_8Z09-EA-08C_Edition3 Page354
Thursday, July 3 2008 2:24 PM
Form No.8Z09-EA-08C
Page 355 of 430

Black plate (355,1)
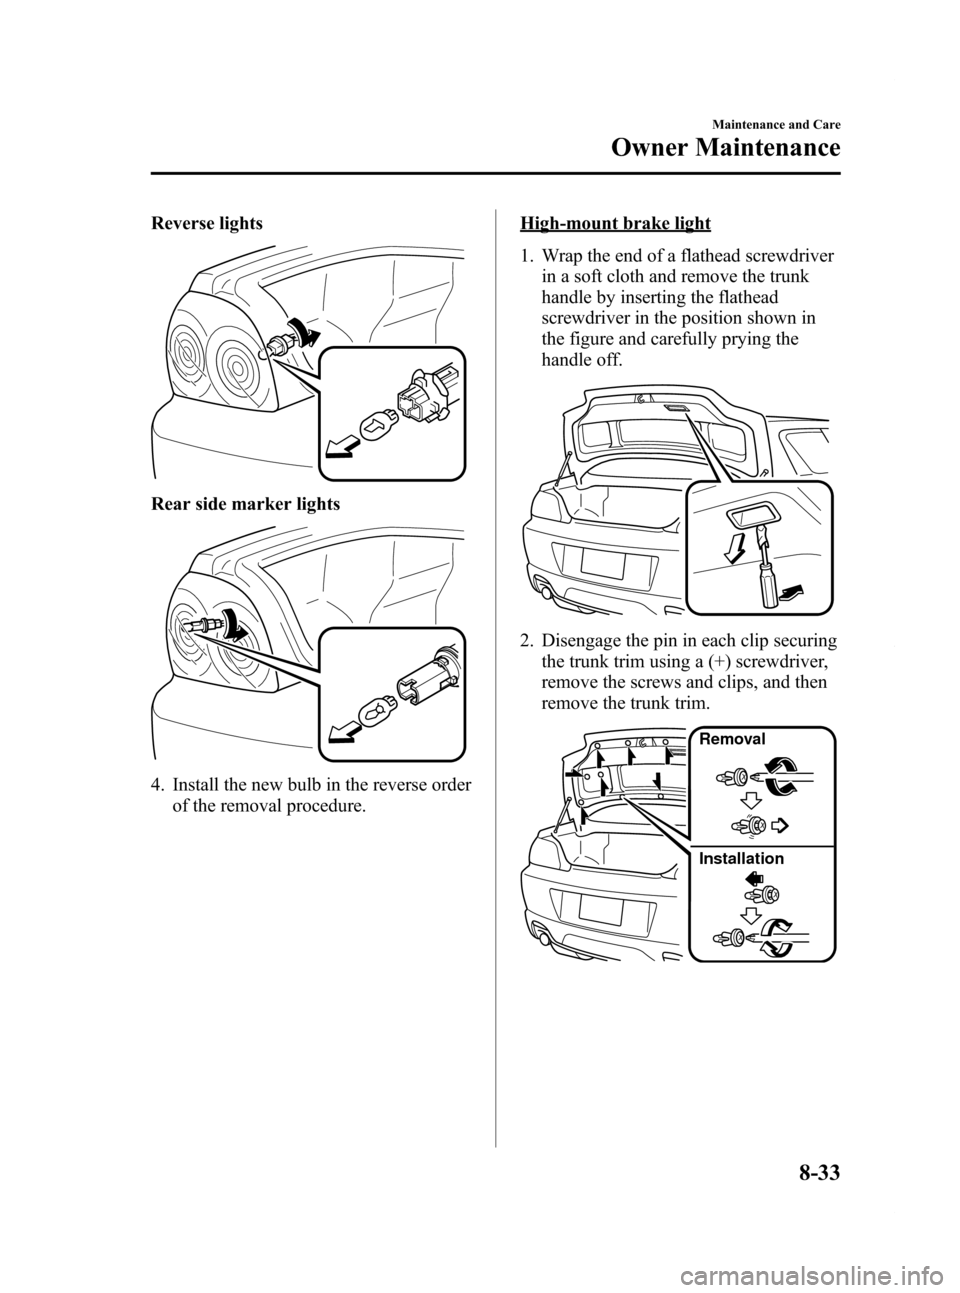
Reverse lights
Rear side marker lights
4. Install the new bulb in the reverse orderof the removal procedure.
High-mount brake light
1. Wrap the end of a flathead screwdriverin a soft cloth and remove the trunk
handle by inserting the flathead
screwdriver in the position shown in
the figure and carefully prying the
handle off.
2. Disengage the pin in each clip securing
the trunk trim using a (+) screwdriver,
remove the screws and clips, and then
remove the trunk trim.
Removal
Installation
Maintenance and Care
Owner Maintenance
8-33
RX-8_8Z09-EA-08C_Edition3 Page355
Thursday, July 3 2008 2:24 PM
Form No.8Z09-EA-08C
Page 357 of 430

Black plate (357,1)
qReplacing Interior Light Bulbs
Overhead light/Map lights (Front)
1. Remove the screws with a Phillips
screwdriver.
2. Wrap a flathead screwdriver with a soft cloth to prevent damage to the trim and
gently insert it in the overhead light as
shown in the figure, and then remove
the overhead light unit.
3. Turn the socket and bulb assembly
counterclockwise and remove it.
4. Disconnect the bulb from the socket.
5. Install the new bulb in the reverse order of removal.
Overhead light (Rear), Courtesy lights,
Vanity mirror lights
1. Wrap a small flathead screwdriver witha soft cloth to prevent damage to the
lens and remove the lens by carefully
prying on the edge of the lens with the
screwdriver.
2. Disconnect the bulb by pulling it out.
Maintenance and Care
Owner Maintenance
8-35
RX-8_8Z09-EA-08C_Edition3 Page357
Thursday, July 3 2008 2:24 PM
Form No.8Z09-EA-08C
Page 358 of 430

Black plate (358,1)
3. Install the new bulb in the reverse orderof removal.
Trunk light
1. Press both sides of the lens cap toremove it.
2. Disconnect the bulb by pulling it out.
3. Install the new bulb in the reverse order of removal.
Fuses
Your vehicle's electrical system is
protected by fuses.
If any lights, accessories, or controls don't
work, inspect the appropriate circuit
protector. If a fuse has blown, the inside
element will be melted.
If the same fuse blows again, avoid using
that system and consult an Authorized
Mazda Dealer as soon as possible.
qFuse Replacement
Replacing the fuses on the driver's side
If the electrical system does not work,
first inspect the fuses on the driver's side.
1. Turn off the ignition switch and other
switches.
2. Open the fuse panel cover.
8-36
Maintenance and Care
Owner Maintenance
RX-8_8Z09-EA-08C_Edition3 Page358
Thursday, July 3 2008 2:24 PM
Form No.8Z09-EA-08C