buttons MAZDA MODEL TRIBUTE 2006 Quick Tips (in English)
[x] Cancel search | Manufacturer: MAZDA, Model Year: 2006, Model line: MODEL TRIBUTE, Model: MAZDA MODEL TRIBUTE 2006Pages: 12, PDF Size: 1.19 MB
Page 5 of 12

LOCKS
Always check the Owner’s Manual for more operating information and safety features
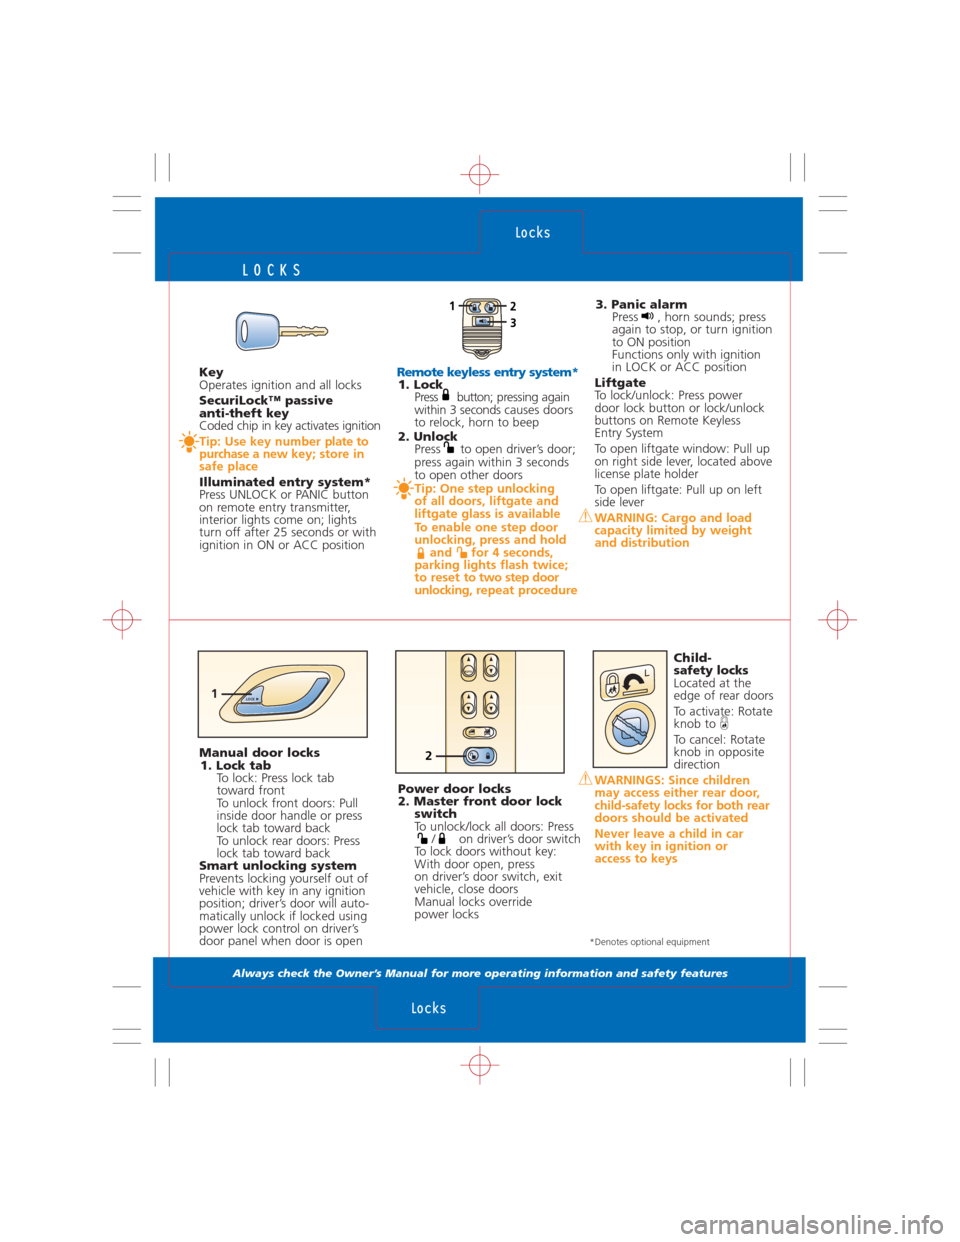
Remote keyless entry system*1. Lock
Press button; pressing again
within 3 secondscauses doors
to relock, horn to beep
2. Unlock
Press to open driver’s door;
press again within 3 seconds
to open other doors
Tip: One step unlocking
of all doors, liftgate and
liftgate glass is available
To enable one step door
unlocking, press and hold
and for 4 seconds,
parking lights flash twice;
to reset to two step door
unlocking, repeat procedure
3. Panic alarm
Press , horn sounds; press
again to stop, or turn ignition
to ON position
Functions only with ignition
in LOCK or ACC position
Liftgate
To lock/unlock: Press power
door lock button or lock/unlock
buttons on Remote Keyless
Entry System
To open liftgate window: Pull up
on right side lever, located above
license plate holder
To open liftgate: Pull up on left
side lever
WARNING: Cargo and load
capacity limited by weight
and distribution
Child-
safety locks
Located at the
edge of rear doors
To activate: Rotate
knob to
To cancel: Rotate
knob in opposite
direction
WARNINGS: Since children
may access either rear door,
child-safety locks for both rear
doors should be activated
Never leave a child in car
with key in ignition or
access to keys
Locks
Locks
*Denotes optional equipment
Manual door locks
1. Lock tab
To lock: Press lock tab
toward front
To unlock front doors: Pull
inside door handle or press
lock tab toward back
To unlock rear doors: Press
lock tab toward back
Smart unlocking system
Prevents locking yourself out of
vehicle with key in any ignition
position; driver’s door will auto-
matically unlock if locked using
power lock control on driver’s
door panel when door is open Key
Operates ignition and all locks
SecuriLock™ passive
anti-theft key
Coded chip in key activates ignition
Tip: Use key number plate to
purchase a newkey; store in
safe place
Illuminated entry system*
Press UNLOCK or PANIC button
on remote entry transmitter,
interior lights come on; lights
turn off after 25 seconds or with
ignition in ON or ACC position
Power door locks
2. Master front door lock
switch
To unlock/lock all doors: Press
/ on driver’s door switch
To lock doors without key:
With door open, press
on driver’s door switch, exit
vehicle, close doors
Manual locks override
power locks
AUTO
2
12
3
LOCK1
Page 7 of 12

SEATS
Always check the Owner’s Manual for more operating information and safety features
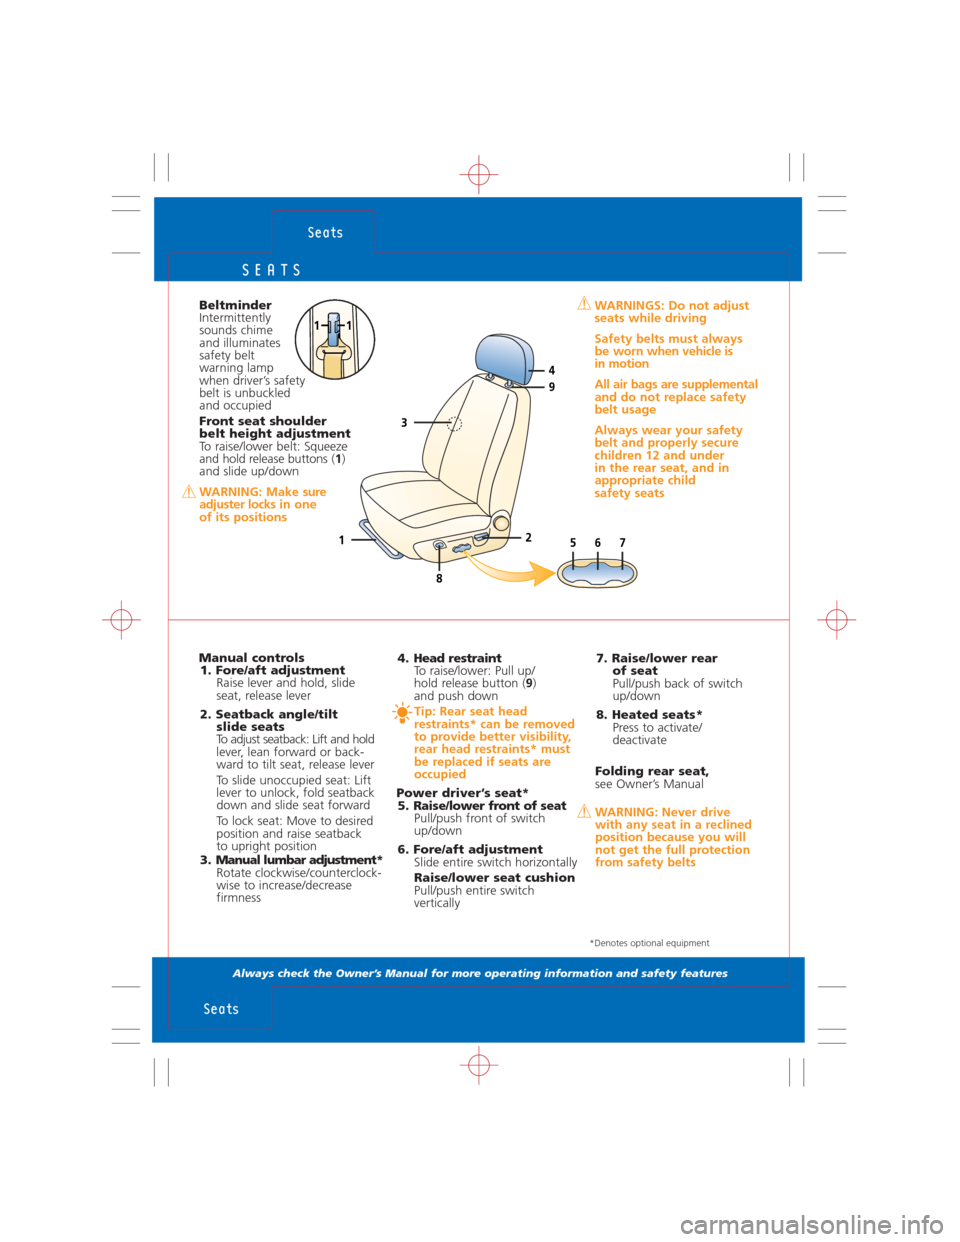
Beltminder
Intermittently
sounds chime
and illuminates
safety belt
warning lamp
when driver’s safety
belt is unbuckled
and occupied
Front seat shoulder
belt height adjustment
To raise/lower belt: Squeeze
and hold release buttons (1)
and slide up/down
WARNING: Make sure
adjuster locks in one
of its positions
Manual controls
1. Fore/aft adjustment
Raise lever and hold, slide
seat, release lever
2. Seatback angle/tilt
slide seats
To adjust seatback: Lift and hold
lever, lean forward or back-
ward to tilt seat, release lever
To slide unoccupied seat: Lift
lever to unlock, fold seatback
down and slide seat forward
To lock seat: Move to desired
position and raise seatback
to upright position
3 . Manual lumbar adjustment*
Rotate clockwise/counterclock-
wise to increase/decrease
firmness4. Head restraint
To raise/lower: Pull up/
hold release button (9)
and push down
Tip: Rear seat head
restraints* can be removed
to provide better visibility,
rear head restraints* must
be replaced if seats are
occupied
Power driver’s seat*
5. Raise/lower front of seat
Pull/push front of switch
up/down
6. Fore/aft adjustment
Slide entire switch horizontally
Raise/lower seat cushion
Pull/push entire switch
vertically
Seats
Seats
*Denotes optional equipment
7. Raise/lower rear
of seat
Pull/push back of switch
up/down
8. Heated seats*
Press to activate/
deactivate
Folding rear seat,
see Owner’s Manual
WARNING: Never drive
with any seat in a reclined
position because you will
not get the full protection
from safety belts
9
765
3
12
4
8
WARNINGS: Do not adjust
seats while driving
Safety belts must always
be worn when vehicle is
in motion
All air bags are supplemental
and do not replace safety
belt usage
Always wear your safety
belt and properly secure
children 12 and under
in the rear seat, and in
appropriate child
safety seats
11
Page 9 of 12

RADIO/COMPACT DISC
Always check the Owner’s Manual for more operating information and safety features
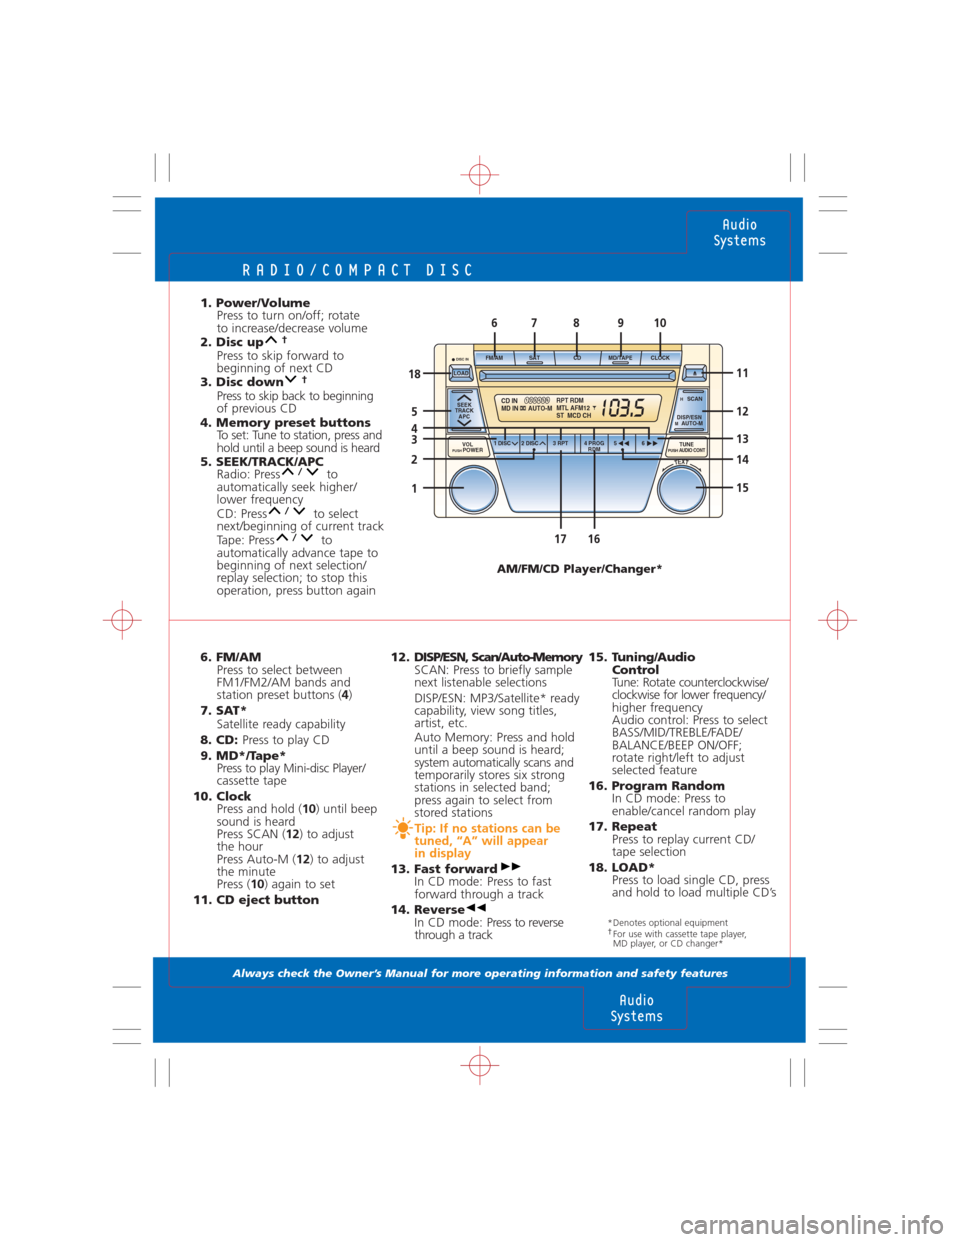
6. FM/AM
Press to select between
FM1/FM2/AM bands and
station preset buttons (4)
7. SAT*
Satellite ready capability
8. CD: Press to play CD
9. MD*/Tape*
Press to play Mini-disc Player/
cassette tape
10. Clock
Press and hold (10) until beep
sound is heard
Press SCAN (12) to adjust
the hour
Press Auto-M (12) to adjust
the minute
Press (10) again to set
11. CD eject button1. Power/Volume
Press to turn on/off; rotate
to increase/decrease volume
2. Disc up
†
Press to skip forward to
beginning of next CD
3. Disc down
†
Press to skip back to beginning
of previous CD
4. Memory preset buttons
To set: Tune to station, press and
hold until a beep sound is heard
5. SEEK/TRACK/APC
Radio: Press to
automatically seek higher/
lower frequency
CD: Press to select
next/beginning of current track
Tape: Press to
automatically advance tape to
beginning of next selection/
replay selection; to stop this
operation, press button again
12. DISP/ESN, Scan/Auto-Memory
SCAN: Press to briefly sample
next listenable selections
DISP/ESN: MP3/Satellite* ready
capability, view song titles,
artist, etc.
Auto Memory: Press and hold
until a beep sound is heard;
system automatically scans and
temporarily stores six strong
stations in selected band;
press again to select from
stored stations
Tip: If no stations can be
tuned, “A” will appear
in display
13. Fast forward
In CD mode: Press to fast
forward through a track
14. Reverse
In CD mode: Press to reverse
through a track
15. Tuning/Audio
Control
Tune: Rotate counterclockwise/
clockwise for lower frequency/
higher frequency
Audio control: Press to select
BASS/MID/TREBLE/FADE/
BALANCE/BEEP ON/OFF;
rotate right/left to adjust
selected feature
16. Program Random
In CD mode: Press to
enable/cancel random play
17. Repeat
Press to replay current CD/
tape selection
18. LOAD*
Press to load single CD, press
and hold to load multiple CD’s
Audio
Systems
Audio
Systems
AM/FM/CD Player/Changer*
SEEK
TRACK
APC
1 DISC 2 DISC 3 RPT 4 PROG
RDM56 FM/AM SAT CD MD/TAPE CLOCKH SCAN
M AUTO-M DISP/ESN
TUNE
PUSH AUDIO CONTVOLPUSH POWER
DISC IN
TEXT
RPT RDM
MTL AFM12
ST MCD CHCD IN
MD IN AUTO-M123456
1617
678910
5
18
3
2
115
11
12
13
14 4
LOAD
*Denotes optional equipment†For use with cassette tape player,
MD player, or CD changer*