ECU MAZDA MODEL TRIBUTE 2009 (in English) Owner's Guide
[x] Cancel search | Manufacturer: MAZDA, Model Year: 2009, Model line: MODEL TRIBUTE, Model: MAZDA MODEL TRIBUTE 2009Pages: 304, PDF Size: 1.97 MB
Page 130 of 304

2. Pull down on the shoulder beltand then grasp the shoulder
belt and lap belt together.
3. While holding the shoulder and lap belt portions together, route
the tongue through the child
seat according to the child seat
manufacturer’s instructions. Be
sure the belt webbing is not
twisted.
4. Insert the belt tongue into the proper buckle (the buckle
closest to the direction the
tongue is coming from) for that
seating position until you hear a
snap and feel the latch engage.
Make sure the tongue is latched
securely by pulling on it.
2009 Tribute (j14)
Owners Guide, 1st Printing
USA (fus)
Seating and Safety Restraints
130
Page 132 of 304

10. Before placing the child in the seat, forcibly move the seat forwardand back to make sure the seat is securely held in place. To check
this, grab the seat at the belt path and attempt to move it side to
side and forward and back. There should be no more than one inch
(2.5 cm) of movement for proper installation.
11. Mazda recommends checking with a NHTSA Certified Child Passenger Safety Technician (CPST) to make certain the child
restraint is properly installed.
Attaching child safety seats with LATCH
(Lower Anchors and Tethers for Children) attachments for child
seat anchors
The LATCH system is composed of three vehicle anchor points: two (2)
lower anchors located where the vehicle seat back and seat cushion meet
(called the “seat bight”) and one (1) top tether anchor located behind
that seating position.
LATCH compatible child safety seats have two rigid or webbing mounted
attachments that connect to the two lower anchors at the LATCH
equipped seating positions in your vehicle. This type of attachment
method eliminates the need to use seat belts to attach the child seat,
however the seat belt can still be used to attach the child seat. For
forward-facing child seats, the top tether strap must also be attached to
the proper top tether anchor, if a top tether strap has been provided
with your child seat. Mazda Motor Corporation recommends the use of a
child safety seat having a top tether strap. See Attaching child safety
seats with tether straps andRecommendations for attaching safety
restraints for children in this chapter for more information.
Your vehicle has LATCH lower anchors for child seat installation at the
seating positions marked with the child seat symbol.
2009 Tribute (j14)
Owners Guide, 1st Printing
USA (fus)
Seating and Safety Restraints
132
Page 134 of 304

If you install a child seat with rigid LATCH attachments, and have
attached the top tether strap to the proper top tether anchor, do not
tighten the tether strap enough to lift the child seat off the vehicle seat
cushion when the child is seated in it. Keep the tether strap just snug
without lifting the front of the child seat. Keeping the child seat just
touching the vehicle seat gives the best protection in a severe crash.
Each time you use the safety seat, check that the seat is properly
attached to the lower anchors and tether anchor, if applicable. Tug the
child seat from side to side and forward and back where it is secured to
the vehicle. The seat should move less than one inch when you do this
for a proper installation.
If the safety seat is not anchored properly, the risk of a child being
injured in a crash greatly increases.
Combining seat belt and LATCH lower anchors for attaching child
safety seats
When used in combination, either the seat belt or the LATCH lower
anchors may be attached first, provided a proper installation is achieved.
Attach the tether strap afterward, if included with the child seat. Refer
toRecommendations for attaching safety restraints for children in
this chapter.
Attaching child safety seats with tether straps
Many forward-facing child safety seats include a tether strap which
extends from the back of the child safety seat and hooks to an anchoring
point called the top tether anchor. Tether straps are available as an
accessory for many older safety seats. Contact the manufacturer of your
child seat for information about ordering a tether strap, or to obtain a
longer tether strap if the tether strap on your safety seat does not reach
the appropriate top tether anchor in the vehicle.
The rear seating positions of your vehicle are equipped with built-in
tether strap anchors located behind the seats on the roof panel in the
cargo area.
2009 Tribute (j14)
Owners Guide, 1st Printing
USA (fus)
Seating and Safety Restraints
134
Page 136 of 304

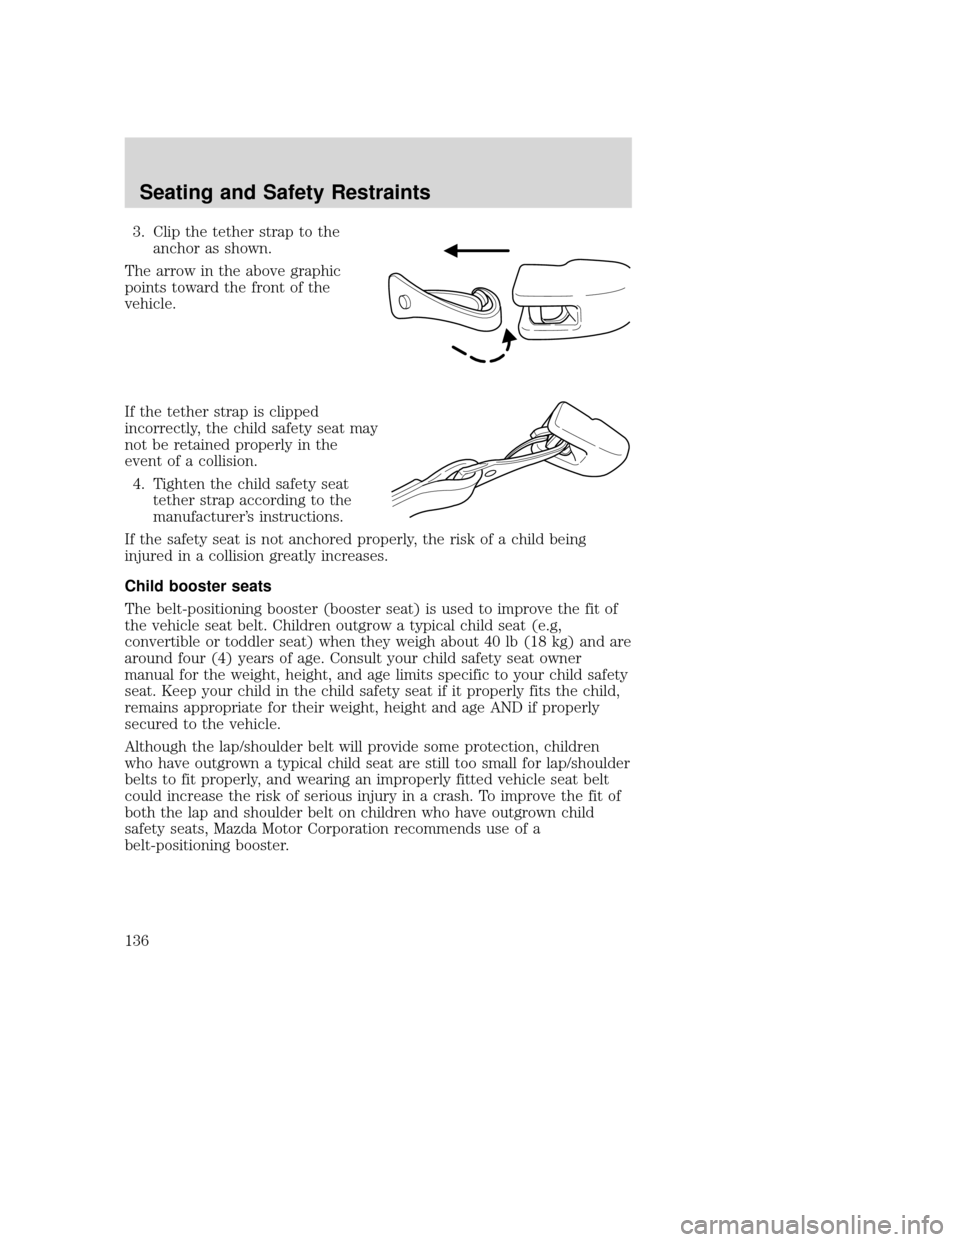
3. Clip the tether strap to theanchor as shown.
The arrow in the above graphic
points toward the front of the
vehicle.
If the tether strap is clipped
incorrectly, the child safety seat may
not be retained properly in the
event of a collision. 4. Tighten the child safety seat tether strap according to the
manufacturer’s instructions.
If the safety seat is not anchored properly, the risk of a child being
injured in a collision greatly increases.
Child booster seats
The belt-positioning booster (booster seat) is used to improve the fit of
the vehicle seat belt. Children outgrow a typical child seat (e.g,
convertible or toddler seat) when they weigh about 40 lb (18 kg) and are
around four (4) years of age. Consult your child safety seat owner
manual for the weight, height, and age limits specific to your child safety
seat. Keep your child in the child safety seat if it properly fits the child,
remains appropriate for their weight, height and age AND if properly
secured to the vehicle.
Although the lap/shoulder belt will provide some protection, children
who have outgrown a typical child seat are still too small for lap/shoulder
belts to fit properly, and wearing an improperly fitted vehicle seat belt
could increase the risk of serious injury in a crash. To improve the fit of
both the lap and shoulder belt on children who have outgrown child
safety seats, Mazda Motor Corporation recommends use of a
belt-positioning booster.
2009 Tribute (j14)
Owners Guide, 1st Printing
USA (fus)
Seating and Safety Restraints
136
Page 164 of 304

SNOW TIRES AND CHAINS
WARNING:Snow tires must be the same size, load index, speed
rating as those originally provided by Mazda. Use of any tire or
wheel not recommended by Mazda can affect the safety and
performance of your vehicle, which could result in an increased risk of
loss of vehicle control, vehicle rollover, personal injury and death.
Additionally, the use of non-recommended tires and wheels could cause
steering, suspension, axle or transfer case/power transfer unit failure.
The tires on your vehicle have all-weather treads to provide traction in
rain and snow. However, in some climates, using snow tires and traction
devices may be necessary. If you need to use snow tires and cables, it is
recommended that steel wheels are used of the same size and
specification as those originally installed.
Follow these guidelines when using snow tires and traction devices:
• SAE class “S” cables should ONLY be used on the front axle for
P235/70R16 tires.
• Install cables securely, verifying that the cables do not touch any
wiring, brake lines or fuel lines.
Drive cautiously. If you hear the cables rub or bang against the
vehicle, stop and retighten them. If this does not work, remove
the cables to prevent vehicle damage.
• Avoid overloading your vehicle.
• Remove the cables when they are no longer needed.
• Do not use cables on dry roads.
• The suspension insulation and bumpers will help prevent vehicle
damage. Do not remove these components from the vehicle when
using snow tires and traction devices.
• Do not exceed 30 mph (48 km/h) with tire cables on your vehicle.
VEHICLE LOADING – WITH AND WITHOUT A TRAILER
This section will guide you in the proper loading of your vehicle and/or
trailer, to keep your loaded vehicle weight within its design rating
capability, with or without a trailer. Properly loading your vehicle will
provide maximum return of vehicle design performance. Before loading
your vehicle, familiarize yourself with the following terms for determining
your vehicle’s weight ratings, with or without a trailer, from the vehicle’s
Tire Label or Safety Compliance Certification Label:
Base Curb Weight – is the weight of the vehicle including a full tank of
fuel and all standard equipment. It does not include passengers, cargo, or
optional equipment.
2009 Tribute (j14)
Owners Guide, 1st Printing
USA (fus)
Tires, Wheels and Loading
164
Page 186 of 304

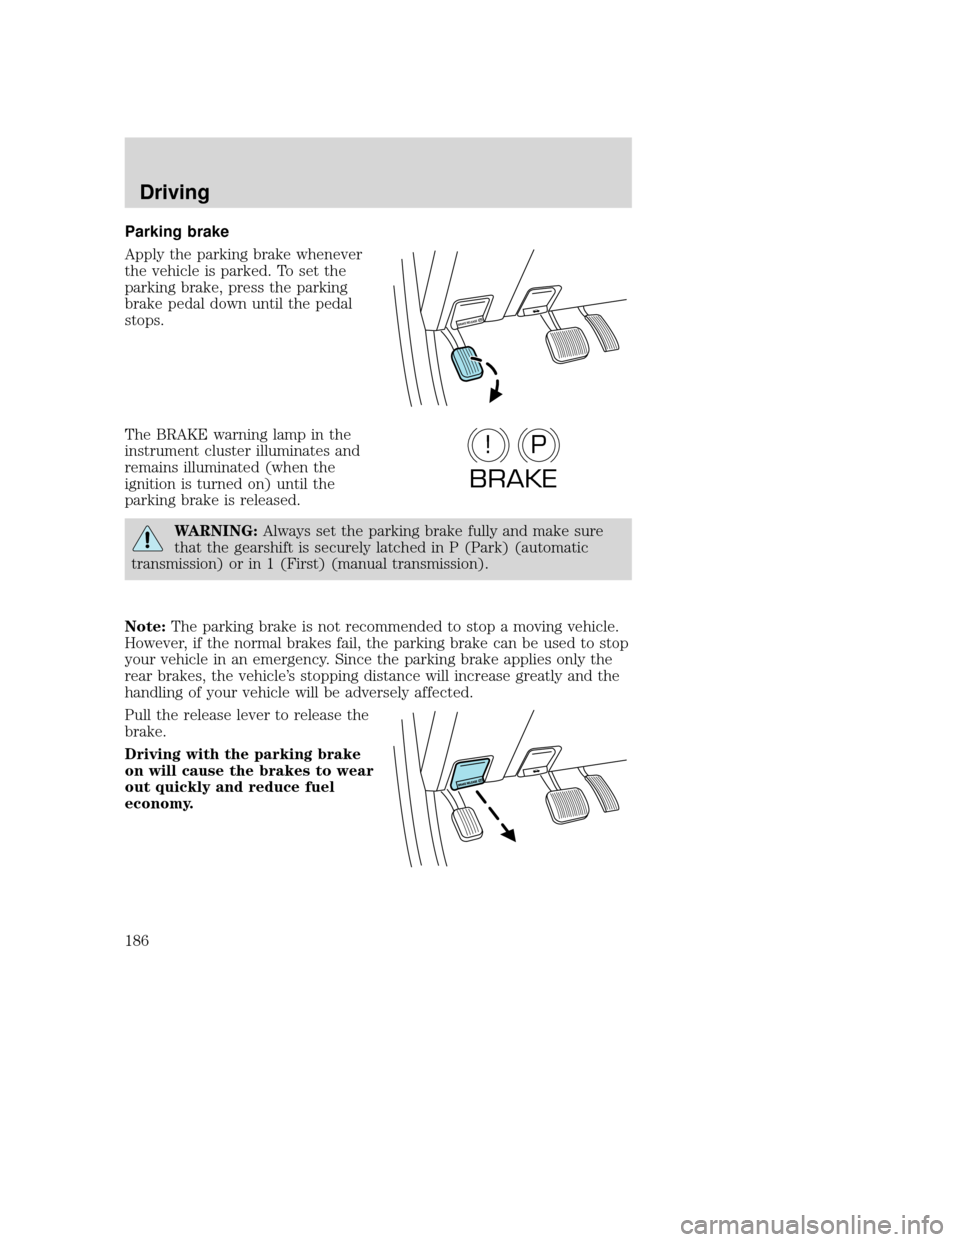
Parking brake
Apply the parking brake whenever
the vehicle is parked. To set the
parking brake, press the parking
brake pedal down until the pedal
stops.
The BRAKE warning lamp in the
instrument cluster illuminates and
remains illuminated (when the
ignition is turned on) until the
parking brake is released.
WARNING:Always set the parking brake fully and make sure
that the gearshift is securely latched in P (Park) (automatic
transmission) or in 1 (First) (manual transmission).
Note: The parking brake is not recommended to stop a moving vehicle.
However, if the normal brakes fail, the parking brake can be used to stop
your vehicle in an emergency. Since the parking brake applies only the
rear brakes, the vehicle’s stopping distance will increase greatly and the
handling of your vehicle will be adversely affected.
Pull the release lever to release the
brake.
Driving with the parking brake
on will cause the brakes to wear
out quickly and reduce fuel
economy.
BRAKE RELEASE P
P!
BRAKE
2009 Tribute (j14)
Owners Guide, 1st Printing
USA (fus)
Driving
186
Page 195 of 304

Automatic Transmission Adaptive Learning
Your transmission is equipped with an adaptive learning strategy found in
the vehicle computer. This feature is designed to increase durability and
provide consistent shift feel over the life of the vehicle. A new vehicle or
transmission may have firm and/or soft shifts. This operation is
considered normal and will not affect function or durability of the
transmission. Over time, the adaptive learning process will fully update
transmission operation. Additionally, whenever the battery is
disconnected or a new battery installed, the strategy must be relearned.
Understanding the gearshift positions of the 6–speed automatic
transmission
P (Park)
This position locks the transmission and prevents the front wheels from
turning.
To put your vehicle in gear:
•Depress the brake pedal
• Move the gearshift lever into the desired gear
To put your vehicle in P (Park):
• Come to a complete stop
• Move the gearshift lever and securely latch it in P (Park)
2009 Tribute (j14)
Owners Guide, 1st Printing
USA (fus)
Driving
195
Page 218 of 304

Stopping and securing the vehicle1. Park on a level surface, set the parking brake and activate
hazard flashers.
2. Place gearshift lever in P (Park) (automatic transmission) or R
(Reverse) (manual
transmission) and turn engine
off.
Removing the jack and tools
The jack and tools are located under
the carpeted load floor.
Pull back the carpet away from the
liftgate, and remove the hardboard
cover. If your vehicle is equipped
with a cargo management system,
the jack and tools are in the forward
compartment under a lid.
Unbuckle the strap and remove the
jack and tools by pulling the right
side up first. Remove the tools from
the jack in order to remove the
spare tire from under the vehicle.
BRAKE RELEASE P
2009 Tribute (j14)
Owners Guide, 1st Printing
USA (fus)
Roadside Emergencies
218
Page 226 of 304

carrier will ratchet when the tire is in the fully stowed position. The
spare tire carrier has a built-in ratchet feature that will not allow you
to overtighten. If the spare tire carrier ratchets with very little effort,
take the vehicle to your authorized Mazda dealer for assistance at
your earliest convenience. If your vehicle is equipped with a trailer
hitch, guide the tire with one hand; keep the rear of the tire tilted
down until the tire clears the bumper.
6. Check that the tire lies flat against the frame assembly. Push against the tire to make sure it is tightly seated under the vehicle. Loosen
and retighten, if necessary. (Make sure that the tire does not contact
the bumper.)
WARNING: Failure to stow the spare tire may result in the
failure of the winch cable and the loss of the spare tire. A loose
tire on the highway is a very dangerous object to other people on the
road. Check to be sure the tire is firmly mounted; go to an authorized
dealer to have it re-mounted if you have any doubt about spare tire
security.
7. Repeat this tightness check procedure when servicing the spare tire pressure (every six months), or at any time that the spare tire is
disturbed through service of other components.
WHEEL LUG NUT TORQUE SPECIFICATIONS
Retighten the lug nuts to the specified torque at 500 miles (800 km)
after any wheel disturbance (tire rotation, changing a flat tire, wheel
removal, etc.).
Bolt size Wheel lug nut torque*
lb.ft. N•m
M12 x 1.5 100135
* Torque specifications are for nut and bolt threads free of dirt and
rust. Use only Mazda recommended replacement fasteners.
WARNING: When a wheel is installed, always remove any
corrosion, dirt or foreign materials present on the mounting
surfaces of the wheel or the surface of the wheel hub, brake drum or
brake disc that contacts the wheel. Ensure that any fasteners that
attach the rotor to the hub are secured so they do not interfere with
the mounting surfaces of the wheel. Installing wheels without correct
metal-to-metal contact at the wheel mounting surfaces can cause the
wheel nuts to loosen and the wheel to come off while the vehicle is in
motion, resulting in loss of control.
2009 Tribute (j14)
Owners Guide, 1st Printing
USA (fus)
Roadside Emergencies
226
Page 260 of 304

•Manual transmission:
1. Set the parking brake, depress the clutch and place the gearshift in 1 (First).
2. Turn off the engine and remove the key.
3. Block the wheels.
Working with the engine on
• Automatic transmission:
1. Set the parking brake and shift to P (Park).
2. Block the wheels.
• Manual transmission:
1. Set the parking brake, depress the clutch and place the gearshift in N (Neutral).
2. Block the wheels.
WARNING: To reduce the risk of vehicle damage and/or
personal burn injuries, do not start your engine with the air
cleaner removed and do not remove it while the engine is running.
OPENING THE HOOD 1. Inside the vehicle, pull the hood release handle located under
the bottom of the instrument
panel.
2. At the front of the vehicle, lift up on the auxiliary latch handle
located in the center between
the hood and the grille.
3. Lift the hood open and secure it with the prop rod.
2009 Tribute (j14)
Owners Guide, 1st Printing
USA (fus)
Maintenance and Specifications
260