navigation system MAZDA MODEL TRIBUTE HEV 2009 User Guide
[x] Cancel search | Manufacturer: MAZDA, Model Year: 2009, Model line: MODEL TRIBUTE HEV, Model: MAZDA MODEL TRIBUTE HEV 2009Pages: 81, PDF Size: 1.49 MB
Page 15 of 81

JOBNAME: No Job Name PAGE: 15 SESS: 1 OUTPUT: Thu Mar 6 14:57:32 2008
/ford_pdm/ford/supplement/ng2/navi
QUICK REFERENCE CHART
Below is a quick listing of the functions of your steering wheel controls
and navigation system controls.
Navigation
bezel control Steering wheel
control Function
SEEK,
,
Press to access the previous/next
track.
N/A OK Press to confirm your selection.
MEDIA N/A Press repeatedly to access all available media sources in your
vehicle such as: CD, DVD, Jukebox
and Line In.
SYSTEM MENU FEATURES
Your system has many menu features such as allowing you to adjust the
touchscreen brightness, adjusting the time and languages, adjusting the
feedback and system settings. To access, press the MENU hard button on
the navigation system.
Setting the clock
1. Press the MENU hard button on
the navigation system.
2. Select the `Clock' tab on the
touchscreen. Select from the
following display options:
Time set buttons: To set the time,
press +, Ð to increase/decrease the
time and select AM or PM.
Display clock: Press to turn the
clock display on/off.
Format: Press to select between 12 hour and 24 hour format.
Auto time zone: If enabled, the system will automatically adjust the
time when you enter into a new time zone. If disabled, you will have to
manually adjust the time when entering different time zones.
Restore defaults: Select `Reset' to reset to the default settings.
CIMS #1683384
com_swchart.maz
itdseq=10
CIMS #1675935
com_menufts-intro
itdseq=11
CIMS #1658261
com_clock.ngn itdseq=12
art=expec264_a
REVIEW COPY ÐÐ
2009 Nav in a Box (ng2), Supplement(supplement),Market:USA(fus)
PAGE: 15OP: root EDIT SESSION: 1DATE: MAR 6 2008 at 14:57JOB:@ibm2/ford_pdm/CLS_ford/GRP_supplement/JOB_ng2/DIV_navi
System overview
15
Page 16 of 81
JOBNAME: No Job Name PAGE: 16 SESS: 1 OUTPUT: Thu Mar 6 14:57:32 2008
/ford_pdm/ford/supplement/ng2/navi
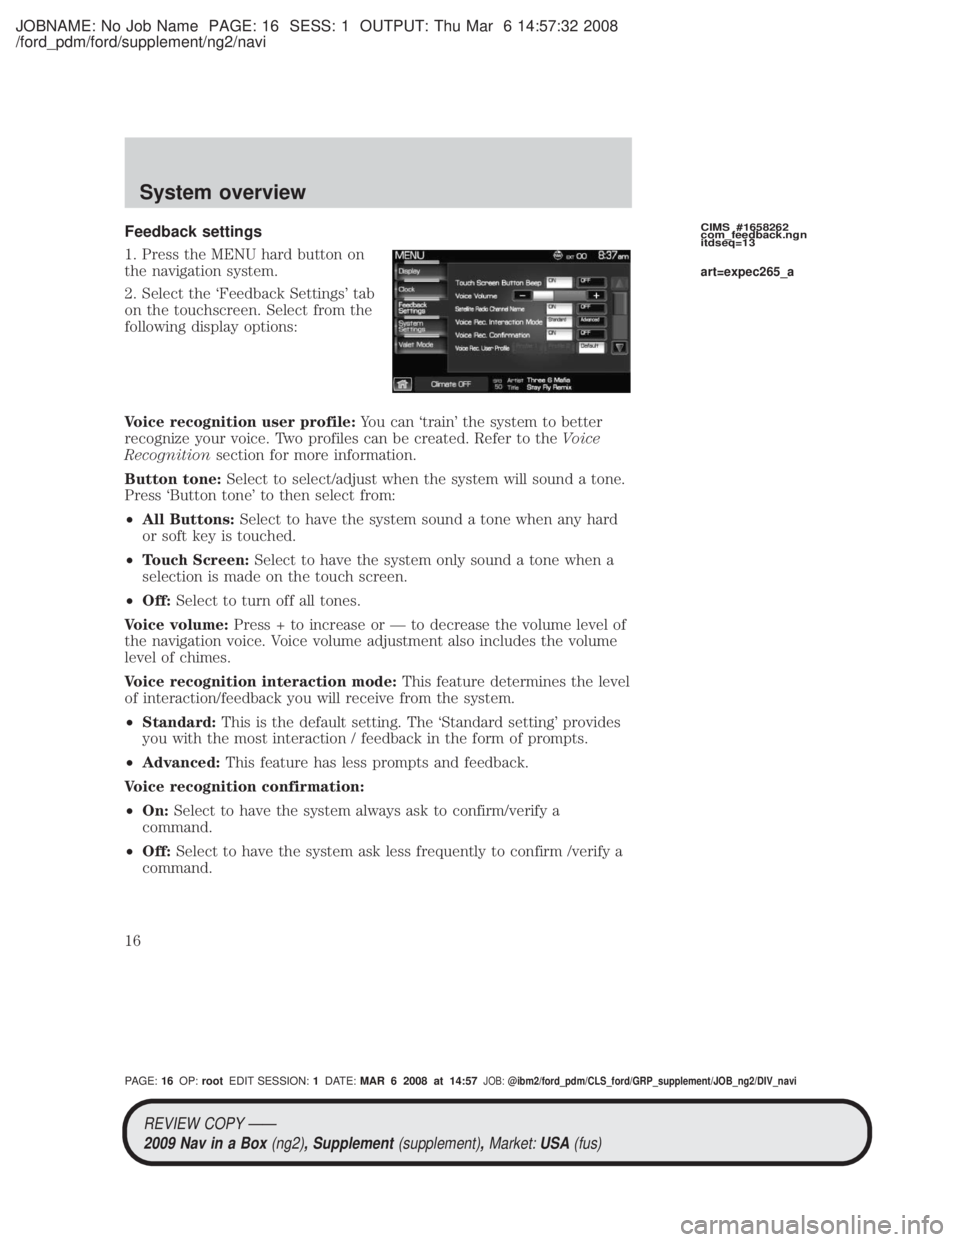
Feedback settings
1. Press the MENU hard button on
the navigation system.
2. Select the `Feedback Settings' tab
on the touchscreen. Select from the
following display options:
Voice recognition user profile:You can `train' the system to better
recognize your voice. Two profiles can be created. Refer to the Voice
Recognition section for more information.
Button tone: Select to select/adjust when the system will sound a tone.
Press `Button tone' to then select from:
² All Buttons: Select to have the system sound a tone when any hard
or soft key is touched.
² Touch Screen: Select to have the system only sound a tone when a
selection is made on the touch screen.
² Off: Select to turn off all tones.
Voice volume: Press + to increase or Ð to decrease the volume level of
the navigation voice. Voice volume adjustment also includes the volume
level of chimes.
Voice recognition interaction mode: This feature determines the level
of interaction/feedback you will receive from the system.
² Standard: This is the default setting. The `Standard setting' provides
you with the most interaction / feedback in the form of prompts.
² Advanced: This feature has less prompts and feedback.
Voice recognition confirmation:
² On: Select to have the system always ask to confirm/verify a
command.
² Off: Select to have the system ask less frequently to confirm /verify a
command.CIMS #1658262
com_feedback.ngn
itdseq=13
art=expec265_a
REVIEW COPY ÐÐ
2009 Nav in a Box (ng2), Supplement(supplement),Market:USA(fus)
PAGE: 16OP: root EDIT SESSION: 1DATE: MAR 6 2008 at 14:57JOB:@ibm2/ford_pdm/CLS_ford/GRP_supplement/JOB_ng2/DIV_navi
System overview
16
Page 17 of 81
JOBNAME: No Job Name PAGE: 17 SESS: 1 OUTPUT: Thu Mar 6 14:57:32 2008
/ford_pdm/ford/supplement/ng2/navi
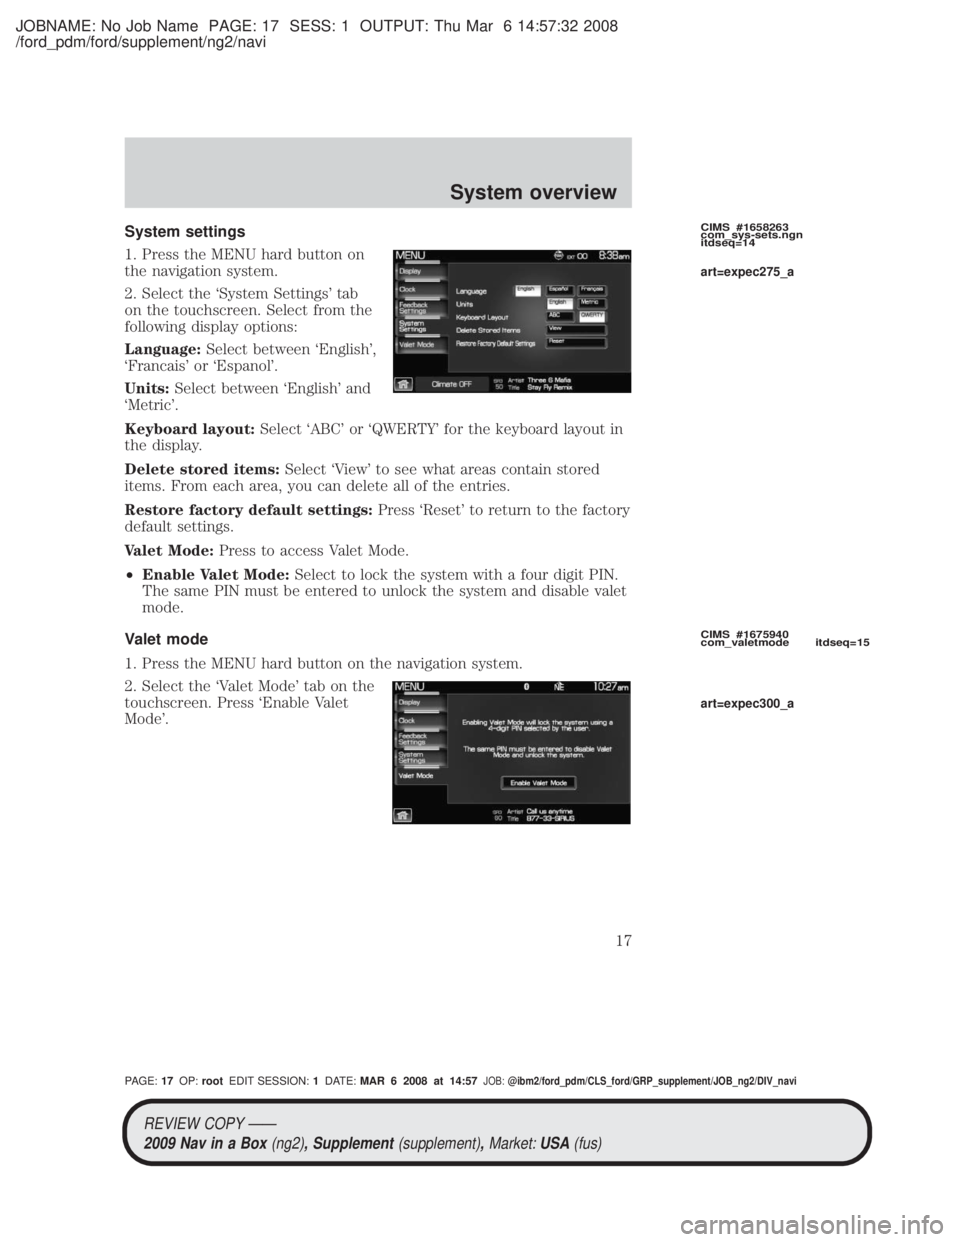
System settings
1. Press the MENU hard button on
the navigation system.
2. Select the `System Settings' tab
on the touchscreen. Select from the
following display options:
Language:Select between `English',
`Francais' or `Espanol'.
Units: Select between `English' and
`Metric'.
Keyboard layout: Select `ABC' or `QWERTY' for the keyboard layout in
the display.
Delete stored items: Select `View' to see what areas contain stored
items. From each area, you can delete all of the entries.
Restore factory default settings: Press `Reset' to return to the factory
default settings.
Valet Mode: Press to access Valet Mode.
² Enable Valet Mode: Select to lock the system with a four digit PIN.
The same PIN must be entered to unlock the system and disable valet
mode.
Valet mode
1. Press the MENU hard button on the navigation system.
2. Select the `Valet Mode' tab on the
touchscreen. Press `Enable Valet
Mode'.CIMS #1658263
com_sys-sets.ngn
itdseq=14
CIMS #1675940
com_valetmode itdseq=15
art=expec275_a
art=expec300_a
REVIEW COPY ÐÐ 2009 Nav in a Box (ng2), Supplement(supplement),Market:USA(fus)
PAGE: 17OP: root EDIT SESSION: 1DATE: MAR 6 2008 at 14:57JOB:@ibm2/ford_pdm/CLS_ford/GRP_supplement/JOB_ng2/DIV_navi
System overview
17
Page 18 of 81

JOBNAME: No Job Name PAGE: 18 SESS: 1 OUTPUT: Thu Mar 6 14:57:32 2008
/ford_pdm/ford/supplement/ng2/navi
3. Enter a four digit Personal
Identification Number (PIN) and
press `Enter'. The system will ask
you to re-enter the PIN. Once
entered, select `Enable' to activate
Valet mode. The system is then
locked until the correct four digit
PIN is entered.
Note:The PIN can be reset by simultaneously pressing and holding
presets 1 and 5 while on the PIN entry screen. After approximately five
seconds, the system will transition to the Valet mode screen indicating
that the PIN is reset. Once you have reset the PIN, the system will then
allow you to set a new PIN.
Display options
1. Press the MENU hard button on
the navigation system.
2. Select the `Display' tab on the
touchscreen. Select from the
following display options:
Brightness: Select AUTO DIM to
manually adjust the brightness by
pressing + or Ð.
Contrast: Press + to increase and
Ð to decrease the level of contrast on the screen.
Day/Night Mode: Select `Day' to always display day mode or `Night' to
always display night mode. Select `Auto' for the screen to automatically
change between day and night mode.
CIMS #1683160
com_displayopts.maz
itdseq=16
art=expec301_a
art=expec243_a
REVIEW COPY ÐÐ
2009 Nav in a Box (ng2), Supplement(supplement),Market:USA(fus)
PAGE: 18OP: root EDIT SESSION: 1DATE: MAR 6 2008 at 14:57JOB:@ibm2/ford_pdm/CLS_ford/GRP_supplement/JOB_ng2/DIV_navi
System overview
18
Page 19 of 81

JOBNAME: No Job Name PAGE: 19 SESS: 1 OUTPUT: Thu Mar 6 14:57:32 2008
/ford_pdm/ford/supplement/ng2/navi
SONY AUDIO SYSTEM (IF EQUIPPED)
Your vehicle may be equipped with
the SONY premium audio system.
This system creates optimal acoustic
quality and offers an advanced
speaker system, amplifier, subwoofer
and equalizer.
AM
1. Ensure that the system is on.
2. Press the RADIO hard button on
the navigation face.
3. Select the `AM' tab on the
touchscreen. Once in AM mode, you may select from `Show options' and
`Show presets'.
4. Press `Show Options' to select from:
²Scan: Press for a brief sampling
of all listenable stations. Press
again to disable and remain on
the current selection.
² Scan Presets: Press for a brief
sampling of all the stations held
in the memory presets.
² Autoset Presets: The autoset
feature allows you to set strong
radio stations without losing your
original preset stations. This feature is helpful on trips when traveling
between cities with different radio stations.
To enable, select AUTOSET PRESETS and the six strongest stations
in your current area will be set as presets. To return to your original
presets, press AUTOSET PRESETS again and the feature will disable.
² Rear Zone: Press to access the functionality of the Family
Entertainment System (if equipped).
5. Press SHOW PRESETS to view the preset stations. To set or change a
preset station, press and hold any of the memory presets buttons (1±6)CIMS # com_sony-maz
itdseq=17
CIMS #1656280
com_am-mode itdseq=18
art=expec554_a
art=expec217_a
art=expec263_a
REVIEW COPY ÐÐ 2009 Nav in a Box (ng2), Supplement(supplement),Market:USA(fus)
PAGE: 19OP: root EDIT SESSION: 1DATE: MAR 6 2008 at 14:57JOB:@ibm2/ford_pdm/CLS_ford/GRP_supplement/JOB_ng2/DIV_navi
Audio features
19
Page 20 of 81
JOBNAME: No Job Name PAGE: 20 SESS: 1 OUTPUT: Thu Mar 6 14:57:32 2008
/ford_pdm/ford/supplement/ng2/navi
or any of the soft key memory preset buttons on the screen while on the
desired station. The new station will replace the previous one recorded.
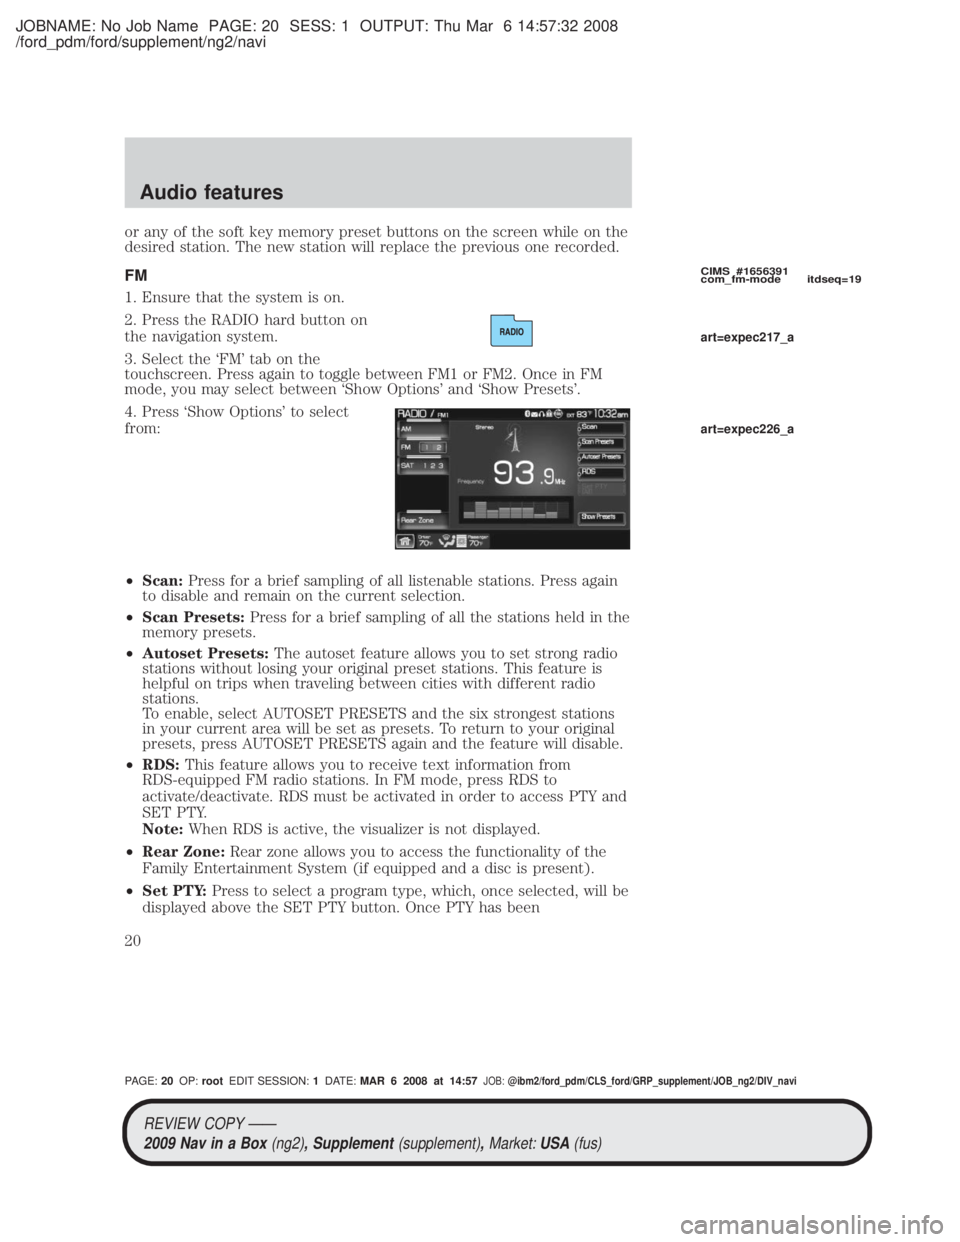
FM
1. Ensure that the system is on.
2. Press the RADIO hard button on
the navigation system.
3. Select the `FM' tab on the
touchscreen. Press again to toggle between FM1 or FM2. Once in FM
mode, you may select between `Show Options' and `Show Presets'.
4. Press `Show Options' to select
from:
²Scan: Press for a brief sampling of all listenable stations. Press again
to disable and remain on the current selection.
² Scan Presets: Press for a brief sampling of all the stations held in the
memory presets.
² Autoset Presets: The autoset feature allows you to set strong radio
stations without losing your original preset stations. This feature is
helpful on trips when traveling between cities with different radio
stations.
To enable, select AUTOSET PRESETS and the six strongest stations
in your current area will be set as presets. To return to your original
presets, press AUTOSET PRESETS again and the feature will disable.
² RDS: This feature allows you to receive text information from
RDS-equipped FM radio stations. In FM mode, press RDS to
activate/deactivate. RDS must be activated in order to access PTY and
SET PTY.
Note: When RDS is active, the visualizer is not displayed.
² Rear Zone: Rear zone allows you to access the functionality of the
Family Entertainment System (if equipped and a disc is present).
² Set PTY: Press to select a program type, which, once selected, will be
displayed above the SET PTY button. Once PTY has been
CIMS #1656391
com_fm-mode itdseq=19
art=expec217_a
art=expec226_a
REVIEW COPY ÐÐ
2009 Nav in a Box (ng2), Supplement(supplement),Market:USA(fus)
PAGE: 20OP: root EDIT SESSION: 1DATE: MAR 6 2008 at 14:57JOB:@ibm2/ford_pdm/CLS_ford/GRP_supplement/JOB_ng2/DIV_navi
Audio features
20
Page 21 of 81

JOBNAME: No Job Name PAGE: 21 SESS: 1 OUTPUT: Thu Mar 6 14:57:32 2008
/ford_pdm/ford/supplement/ng2/navi
programmed, press SEEK or SCAN to initiate a search up or down the
frequency. The search will stop when the desired program type has
been reached.
Note: The system will scan the frequency band three times for the
chosen program type. If the program type is unavailable in your
reception range, the system will return to the previous station.
5. Press `Show Presets' to view the preset stations. To set or change a
preset station, press and hold any of the presets while on the desired
station. The new station will replace the previous one recorded.
SATELLITE RADIO (SAT) IF ACTIVATED
Once the Satellite Radio feature is activated, your navigation system will
have additional features.
1. Ensure that the navigation system is on.
2. Press the RADIO hard button on the navigation system.
3. Select the `SAT' tab on the touchscreen to enter satellite radio mode
(if activated).
4. Press `Show Options' to select from:
Sat 123: You will be able to access
three different Satellite Radio
modes, SAT1, SAT2 and SAT3.
Scan: Press to hear a brief sampling of satellite radio channels within
the currently selected genre. Press again to stop.
Scan Presets: Press to hear a brief sampling of all preset channels.
Channel Guide: Press to display a list of satellite radio channels sorted
by genre and also to skip or lock out certain channels. Select the desired
genre and choose a channel by pressing the channel name button. You
can then choose to `Skip' or `Lock' a certain channel. A `skipped' channel
will not be accessible using the tune knob, scan or seek functions. (To
access the skipped channel, select `Direct Tune' and enter the channel
number.) A `locked' channel can only be accessed by entering the
`Channel Guide' and then entering the PIN.
CIMS #1656392
com_satmode itdseq=20
art=expec272_a
REVIEW COPY ÐÐ
2009 Nav in a Box (ng2), Supplement(supplement),Market:USA(fus)
PAGE: 21OP: root EDIT SESSION: 1DATE: MAR 6 2008 at 14:57JOB:@ibm2/ford_pdm/CLS_ford/GRP_supplement/JOB_ng2/DIV_navi
Audio features
21
Page 22 of 81
JOBNAME: No Job Name PAGE: 22 SESS: 1 OUTPUT: Thu Mar 6 14:57:32 2008
/ford_pdm/ford/supplement/ng2/navi
Note:The PIN can be reset by simultaneously pressing and holding
presets 1 and 5 while on the PIN entry screen. After approximately five
seconds, the system will transition to the Channel Guide screen
indicating that the PIN is reset. Once you have reset the PIN, the system
will then allow you to set a new PIN.
Direct Tune: Press to enter a specific channel using the keypad and go
directly to that channel.
Set Genre: Press to choose from a list of possible satellite radio genres.
Once a genre is chosen and you press SEEK, it will only seek within the
selected genre.
Memo: The MEMO feature allows you to save a song title and artist to
the system. When the saved song is playing on any satellite radio
channel, the system will alert you with a pop-up in the lower status bar.
You can then choose to tune to the station or to ignore the pop-up.
When you are in the MEMO screen, the following options are available:
² Refresh: Press to refresh the current artist and title information.
² Song Alert: Press to store the song information displayed in the Title
Field. When the stored song is played in the future, an audio and
visual notification will be initiated.
² Artist Alert: Press to store the artist information currently displayed
in the Artist Field. When that artist is played again, the system will
alert you with a pop-up.
² Alert On/Off: Press to enable/disable the audio and visual song and
artists alerts.
Show Presets: Press to display presets at the bottom of the screen.
Satellite radio (if activated)
Your vehicle is equipped with satellite radio capability. The factory
installed SIRIUS satellite radio system includes a limited subscription
term which begins on the date of sale / lease of the vehicle. Extended
subscription terms are available, please contact SIRIUS at
1±888±539±7474.
You will need to give SIRIUS your Satellite Radio ESN Number for
activation. The ESN number is found on the System Information Screen
(SR ESN:XXXXXXXXXXXX). Press the I button (
) on the navigation
system and select the `System Info' tab on the touchscreen.
Satellite radio channels: SIRIUS broadcasts a variety of music, news,
sports, weather, traffic and entertainment satellite radio channels. For
CIMS #1660663
com_satgeninfo.ngn
itdseq=21
REVIEW COPY ÐÐ
2009 Nav in a Box (ng2), Supplement(supplement),Market:USA(fus)
PAGE: 22OP: root EDIT SESSION: 1DATE: MAR 6 2008 at 14:57JOB:@ibm2/ford_pdm/CLS_ford/GRP_supplement/JOB_ng2/DIV_navi
Audio features
22
Page 24 of 81
JOBNAME: No Job Name PAGE: 24 SESS: 1 OUTPUT: Thu Mar 6 14:57:32 2008
/ford_pdm/ford/supplement/ng2/navi
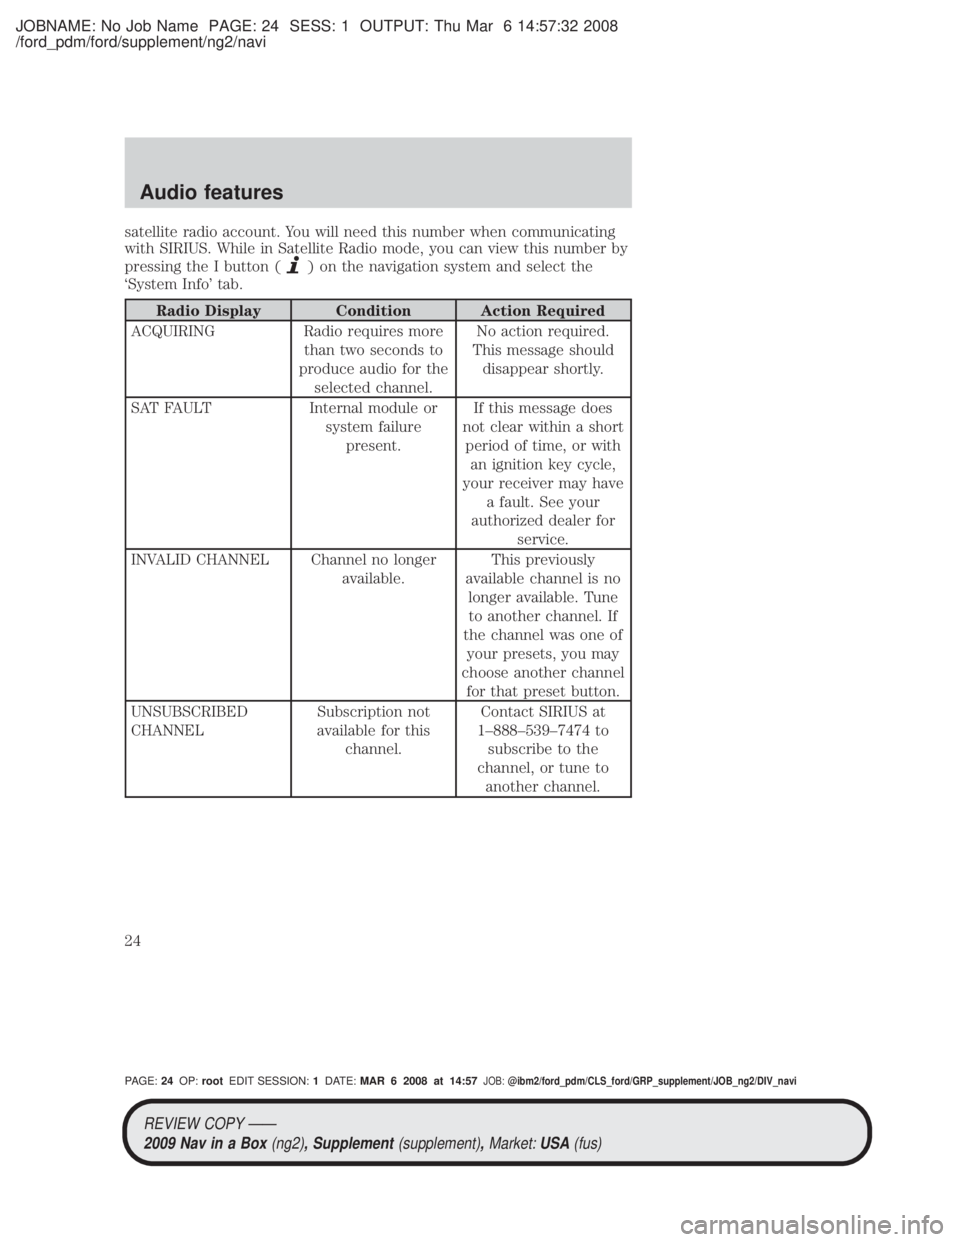
satellite radio account. You will need this number when communicating
with SIRIUS. While in Satellite Radio mode, you can view this number by
pressing the I button (
) on the navigation system and select the
`System Info' tab.
Radio Display Condition Action Required
ACQUIRING Radio requires more than two seconds to
produce audio for the selected channel. No action required.
This message should disappear shortly.
SAT FAULT Internal module or system failurepresent. If this message does
not clear within a short period of time, or with an ignition key cycle,
your receiver may have a fault. See your
authorized dealer for service.
INVALID CHANNEL Channel no longer available.This previously
available channel is no longer available. Tuneto another channel. If
the channel was one of your presets, you may
choose another channel for that preset button.
UNSUBSCRIBED
CHANNEL Subscription not
available for this channel. Contact SIRIUS at
1±888±539±7474 to subscribe to the
channel, or tune to another channel.
REVIEW COPY ÐÐ2009 Nav in a Box (ng2), Supplement(supplement),Market:USA(fus)
PAGE: 24OP: root EDIT SESSION: 1DATE: MAR 6 2008 at 14:57JOB:@ibm2/ford_pdm/CLS_ford/GRP_supplement/JOB_ng2/DIV_navi
Audio features
24
Page 26 of 81

JOBNAME: No Job Name PAGE: 26 SESS: 1 OUTPUT: Thu Mar 6 14:57:32 2008
/ford_pdm/ford/supplement/ng2/navi
You can access any of the following
options in CD mode:
Scan:Press for a brief sampling of all listenable CD tracks.
Compress (Compression) : Press to engage/disengage the compression
feature. Compression boosts more quiet music and lowers louder music
to minimize the need for volume adjustments.
Repeat: Press to engage / disengage the repeat feature. The system will
keep playing the same track continually.
Shuffle: Press to engage / disengage the shuffle feature. The system will
play all tracks on the disc randomly.
Track List: Press to view a list of tracks on the CD.
Record: Press to record and save the CD or any track(s) on the CD to
the Jukebox. You can then later access/play the saved tracks / CD.
: Press to access the previous track. Press and hold to reverse in
the current track.
/(Play/Pause) : Press to play or pause the current track.
: Press to access the next track. Press and hold to advance within
the current track.
Press
SEEKhard button on your navigation system to listen to
the next (
) or previous () track.
MP3
If you press the CD/DVD tab and there is not a disc loaded into the
system, NO DISC will appear in the status bar and you will not be able to
access the CD screen.
² Insert a disc into the slot. The disc will begin to play.
CIMS #1682641
com_mp3.ngn itdseq=23
art=expec302_a
REVIEW COPY ÐÐ
2009 Nav in a Box (ng2), Supplement(supplement),Market:USA(fus)
PAGE: 26OP: root EDIT SESSION: 1DATE: MAR 6 2008 at 14:57JOB:@ibm2/ford_pdm/CLS_ford/GRP_supplement/JOB_ng2/DIV_navi
Audio features
26