buttons MAZDA MODEL TRIBUTE HEV 2009 Owners Manual
[x] Cancel search | Manufacturer: MAZDA, Model Year: 2009, Model line: MODEL TRIBUTE HEV, Model: MAZDA MODEL TRIBUTE HEV 2009Pages: 81, PDF Size: 1.49 MB
Page 2 of 81
JOBNAME: No Job Name PAGE: 2 SESS: 8 OUTPUT: Thu Mar 6 14:57:32 2008
/ford_pdm/ford/supplement/ng2/navi
Quick touch buttons61
Map icons 62
Navigation route preferences 65
Map preferences 67
Route preferences 68
General Information 72
Navigation end user license agreement 72
Glossary 78
Index 81
All rights reserved. Reproduction by any means, electronic or mechanical
including photocopying, recording or by any information storage and retrieval
system or translation in whole or part is not permitted without written
authorization from Ford Motor Company. Ford may change the contents without
notice and without incurring obligation.
Copyright 2008 Ford Motor Company
Table of Contents
2
PAGE:2OP: root EDIT SESSION: 8DATE: MAR 6 2008 at 14:57JOB:@ibm2/ford_pdm/CLS_ford/GRP_supplement/JOB_ng2/DIV_navi
REVIEW COPY ÐÐ
2009 Nav in a Box (ng2), Supplement(supplement),Market:USA(fus)
Page 12 of 81

JOBNAME: No Job Name PAGE: 12 SESS: 1 OUTPUT: Thu Mar 6 14:57:32 2008
/ford_pdm/ford/supplement/ng2/navi
16.VOL (On/off/volume): Press to
turn the audio system on/off. Press
and hold to turn the navigation
radio completely off. Turn to adjust
the volume of the audio system or the navigation voice prompts as they
are being given.
Note: If a route is active when the navigation system is turned off, the
route is resumed when the system is turned on again.
After the system initializes, the screen will be divided in two sections:
² Status bars: This is the top and bottom portion of screen that
displays the clock or date and useful information, depending on the
current mode.
² Display area: The interactive screen that is activated by finger touch
and changes depending on current system operation. Graphical
buttons are displayed in this area depending on the current screen for
you to make choices.
SCREEN DIFFERENCES
Depending on your vehicle line and option package, your navigation
screen may vary in appearance from the screens shown in this
supplement. These differences could include: background color, tab
options, climate controls and other features. Your features may also be
limited depending on your market. (For example, SIRIUS Travel Link is
only available in the continental United States). Please check with your
authorized dealer for availability.
Display options
You can choose to turn your navigation screen on/off and also if you
would like to view the status bars on the top and bottom of the screen.
To access:
Press DISP on the navigation system repeatedly to cycle through these
options.
STATUS BARS
Your navigation screens may have status bars on the top and bottom of
each screen.
CIMS #1678491
com_differnces.ngn
itdseq=5
CIMS #1659995
com_display-button
itdseq=6
CIMS #1655927
com_statusbars itdseq=7
art=expec206_a
REVIEW COPY ÐÐ 2009 Nav in a Box (ng2), Supplement(supplement),Market:USA(fus)
PAGE: 12OP: root EDIT SESSION: 1DATE: MAR 6 2008 at 14:57JOB:@ibm2/ford_pdm/CLS_ford/GRP_supplement/JOB_ng2/DIV_navi
System overview
12
Page 15 of 81

JOBNAME: No Job Name PAGE: 15 SESS: 1 OUTPUT: Thu Mar 6 14:57:32 2008
/ford_pdm/ford/supplement/ng2/navi
QUICK REFERENCE CHART
Below is a quick listing of the functions of your steering wheel controls
and navigation system controls.
Navigation
bezel control Steering wheel
control Function
SEEK,
,
Press to access the previous/next
track.
N/A OK Press to confirm your selection.
MEDIA N/A Press repeatedly to access all available media sources in your
vehicle such as: CD, DVD, Jukebox
and Line In.
SYSTEM MENU FEATURES
Your system has many menu features such as allowing you to adjust the
touchscreen brightness, adjusting the time and languages, adjusting the
feedback and system settings. To access, press the MENU hard button on
the navigation system.
Setting the clock
1. Press the MENU hard button on
the navigation system.
2. Select the `Clock' tab on the
touchscreen. Select from the
following display options:
Time set buttons: To set the time,
press +, Ð to increase/decrease the
time and select AM or PM.
Display clock: Press to turn the
clock display on/off.
Format: Press to select between 12 hour and 24 hour format.
Auto time zone: If enabled, the system will automatically adjust the
time when you enter into a new time zone. If disabled, you will have to
manually adjust the time when entering different time zones.
Restore defaults: Select `Reset' to reset to the default settings.
CIMS #1683384
com_swchart.maz
itdseq=10
CIMS #1675935
com_menufts-intro
itdseq=11
CIMS #1658261
com_clock.ngn itdseq=12
art=expec264_a
REVIEW COPY ÐÐ
2009 Nav in a Box (ng2), Supplement(supplement),Market:USA(fus)
PAGE: 15OP: root EDIT SESSION: 1DATE: MAR 6 2008 at 14:57JOB:@ibm2/ford_pdm/CLS_ford/GRP_supplement/JOB_ng2/DIV_navi
System overview
15
Page 16 of 81
JOBNAME: No Job Name PAGE: 16 SESS: 1 OUTPUT: Thu Mar 6 14:57:32 2008
/ford_pdm/ford/supplement/ng2/navi
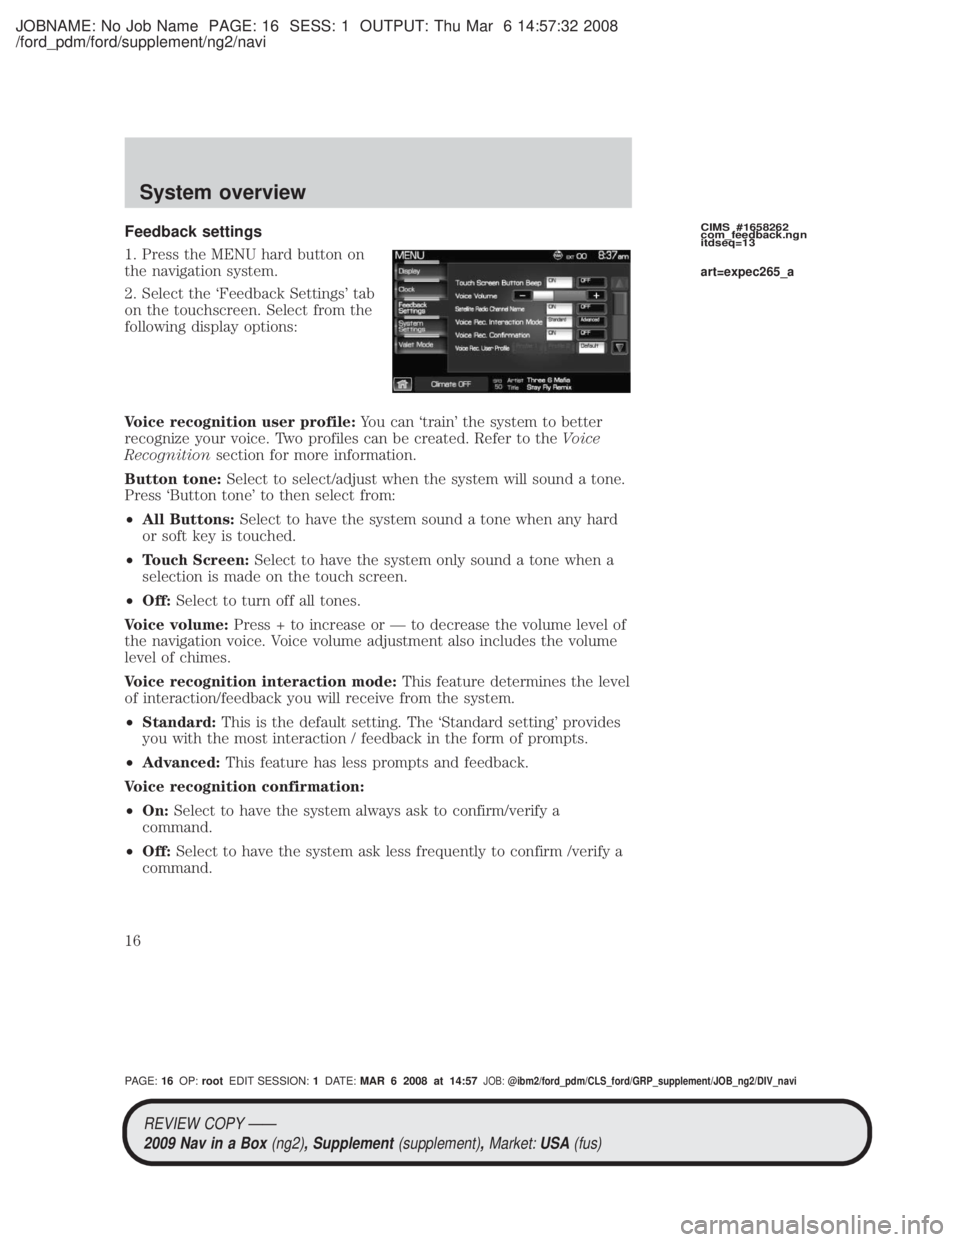
Feedback settings
1. Press the MENU hard button on
the navigation system.
2. Select the `Feedback Settings' tab
on the touchscreen. Select from the
following display options:
Voice recognition user profile:You can `train' the system to better
recognize your voice. Two profiles can be created. Refer to the Voice
Recognition section for more information.
Button tone: Select to select/adjust when the system will sound a tone.
Press `Button tone' to then select from:
² All Buttons: Select to have the system sound a tone when any hard
or soft key is touched.
² Touch Screen: Select to have the system only sound a tone when a
selection is made on the touch screen.
² Off: Select to turn off all tones.
Voice volume: Press + to increase or Ð to decrease the volume level of
the navigation voice. Voice volume adjustment also includes the volume
level of chimes.
Voice recognition interaction mode: This feature determines the level
of interaction/feedback you will receive from the system.
² Standard: This is the default setting. The `Standard setting' provides
you with the most interaction / feedback in the form of prompts.
² Advanced: This feature has less prompts and feedback.
Voice recognition confirmation:
² On: Select to have the system always ask to confirm/verify a
command.
² Off: Select to have the system ask less frequently to confirm /verify a
command.CIMS #1658262
com_feedback.ngn
itdseq=13
art=expec265_a
REVIEW COPY ÐÐ
2009 Nav in a Box (ng2), Supplement(supplement),Market:USA(fus)
PAGE: 16OP: root EDIT SESSION: 1DATE: MAR 6 2008 at 14:57JOB:@ibm2/ford_pdm/CLS_ford/GRP_supplement/JOB_ng2/DIV_navi
System overview
16
Page 19 of 81

JOBNAME: No Job Name PAGE: 19 SESS: 1 OUTPUT: Thu Mar 6 14:57:32 2008
/ford_pdm/ford/supplement/ng2/navi
SONY AUDIO SYSTEM (IF EQUIPPED)
Your vehicle may be equipped with
the SONY premium audio system.
This system creates optimal acoustic
quality and offers an advanced
speaker system, amplifier, subwoofer
and equalizer.
AM
1. Ensure that the system is on.
2. Press the RADIO hard button on
the navigation face.
3. Select the `AM' tab on the
touchscreen. Once in AM mode, you may select from `Show options' and
`Show presets'.
4. Press `Show Options' to select from:
²Scan: Press for a brief sampling
of all listenable stations. Press
again to disable and remain on
the current selection.
² Scan Presets: Press for a brief
sampling of all the stations held
in the memory presets.
² Autoset Presets: The autoset
feature allows you to set strong
radio stations without losing your
original preset stations. This feature is helpful on trips when traveling
between cities with different radio stations.
To enable, select AUTOSET PRESETS and the six strongest stations
in your current area will be set as presets. To return to your original
presets, press AUTOSET PRESETS again and the feature will disable.
² Rear Zone: Press to access the functionality of the Family
Entertainment System (if equipped).
5. Press SHOW PRESETS to view the preset stations. To set or change a
preset station, press and hold any of the memory presets buttons (1±6)CIMS # com_sony-maz
itdseq=17
CIMS #1656280
com_am-mode itdseq=18
art=expec554_a
art=expec217_a
art=expec263_a
REVIEW COPY ÐÐ 2009 Nav in a Box (ng2), Supplement(supplement),Market:USA(fus)
PAGE: 19OP: root EDIT SESSION: 1DATE: MAR 6 2008 at 14:57JOB:@ibm2/ford_pdm/CLS_ford/GRP_supplement/JOB_ng2/DIV_navi
Audio features
19
Page 20 of 81
JOBNAME: No Job Name PAGE: 20 SESS: 1 OUTPUT: Thu Mar 6 14:57:32 2008
/ford_pdm/ford/supplement/ng2/navi
or any of the soft key memory preset buttons on the screen while on the
desired station. The new station will replace the previous one recorded.
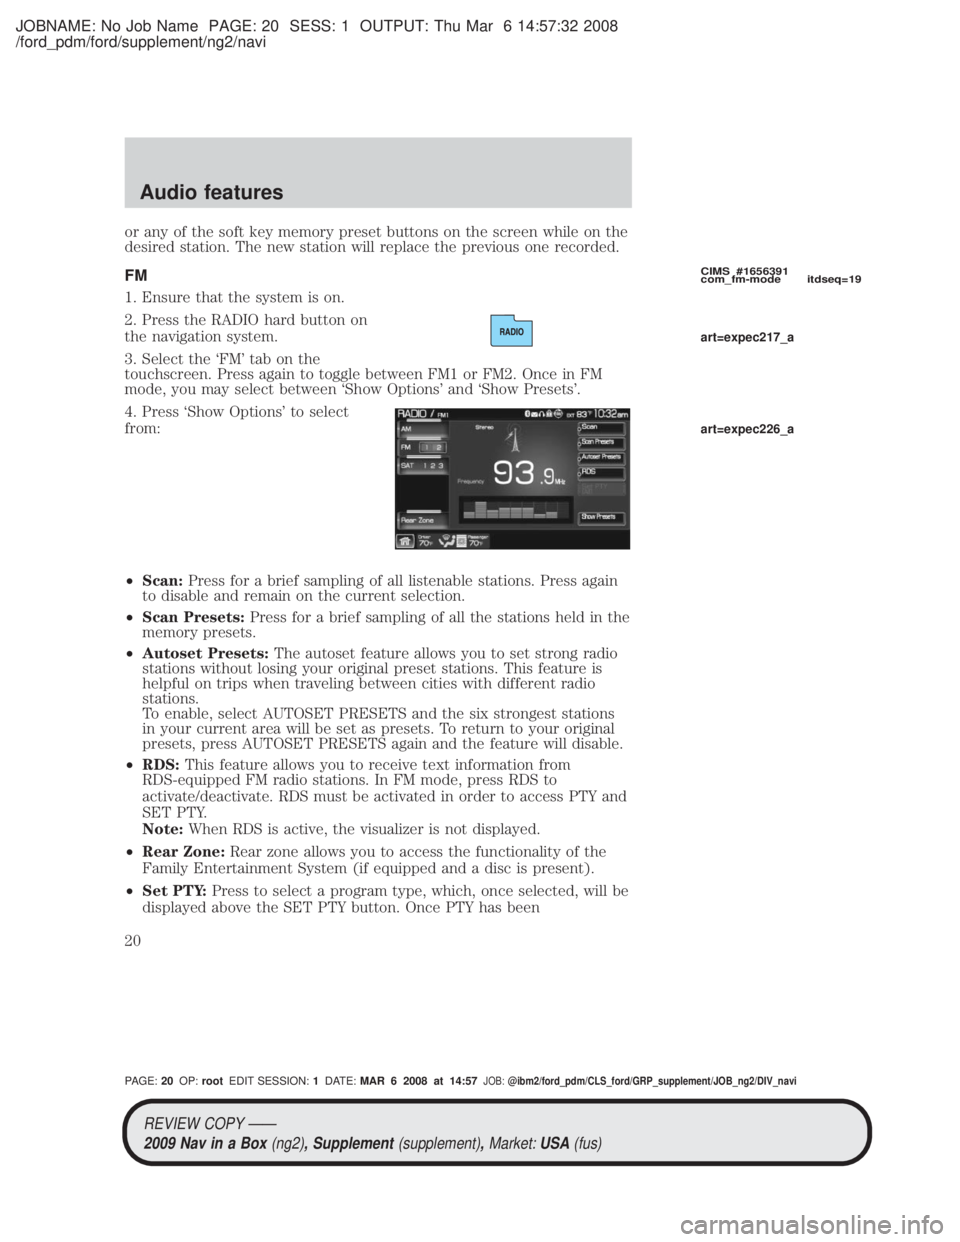
FM
1. Ensure that the system is on.
2. Press the RADIO hard button on
the navigation system.
3. Select the `FM' tab on the
touchscreen. Press again to toggle between FM1 or FM2. Once in FM
mode, you may select between `Show Options' and `Show Presets'.
4. Press `Show Options' to select
from:
²Scan: Press for a brief sampling of all listenable stations. Press again
to disable and remain on the current selection.
² Scan Presets: Press for a brief sampling of all the stations held in the
memory presets.
² Autoset Presets: The autoset feature allows you to set strong radio
stations without losing your original preset stations. This feature is
helpful on trips when traveling between cities with different radio
stations.
To enable, select AUTOSET PRESETS and the six strongest stations
in your current area will be set as presets. To return to your original
presets, press AUTOSET PRESETS again and the feature will disable.
² RDS: This feature allows you to receive text information from
RDS-equipped FM radio stations. In FM mode, press RDS to
activate/deactivate. RDS must be activated in order to access PTY and
SET PTY.
Note: When RDS is active, the visualizer is not displayed.
² Rear Zone: Rear zone allows you to access the functionality of the
Family Entertainment System (if equipped and a disc is present).
² Set PTY: Press to select a program type, which, once selected, will be
displayed above the SET PTY button. Once PTY has been
CIMS #1656391
com_fm-mode itdseq=19
art=expec217_a
art=expec226_a
REVIEW COPY ÐÐ
2009 Nav in a Box (ng2), Supplement(supplement),Market:USA(fus)
PAGE: 20OP: root EDIT SESSION: 1DATE: MAR 6 2008 at 14:57JOB:@ibm2/ford_pdm/CLS_ford/GRP_supplement/JOB_ng2/DIV_navi
Audio features
20
Page 46 of 81
JOBNAME: No Job Name PAGE: 46 SESS: 1 OUTPUT: Thu Mar 6 14:57:32 2008
/ford_pdm/ford/supplement/ng2/navi
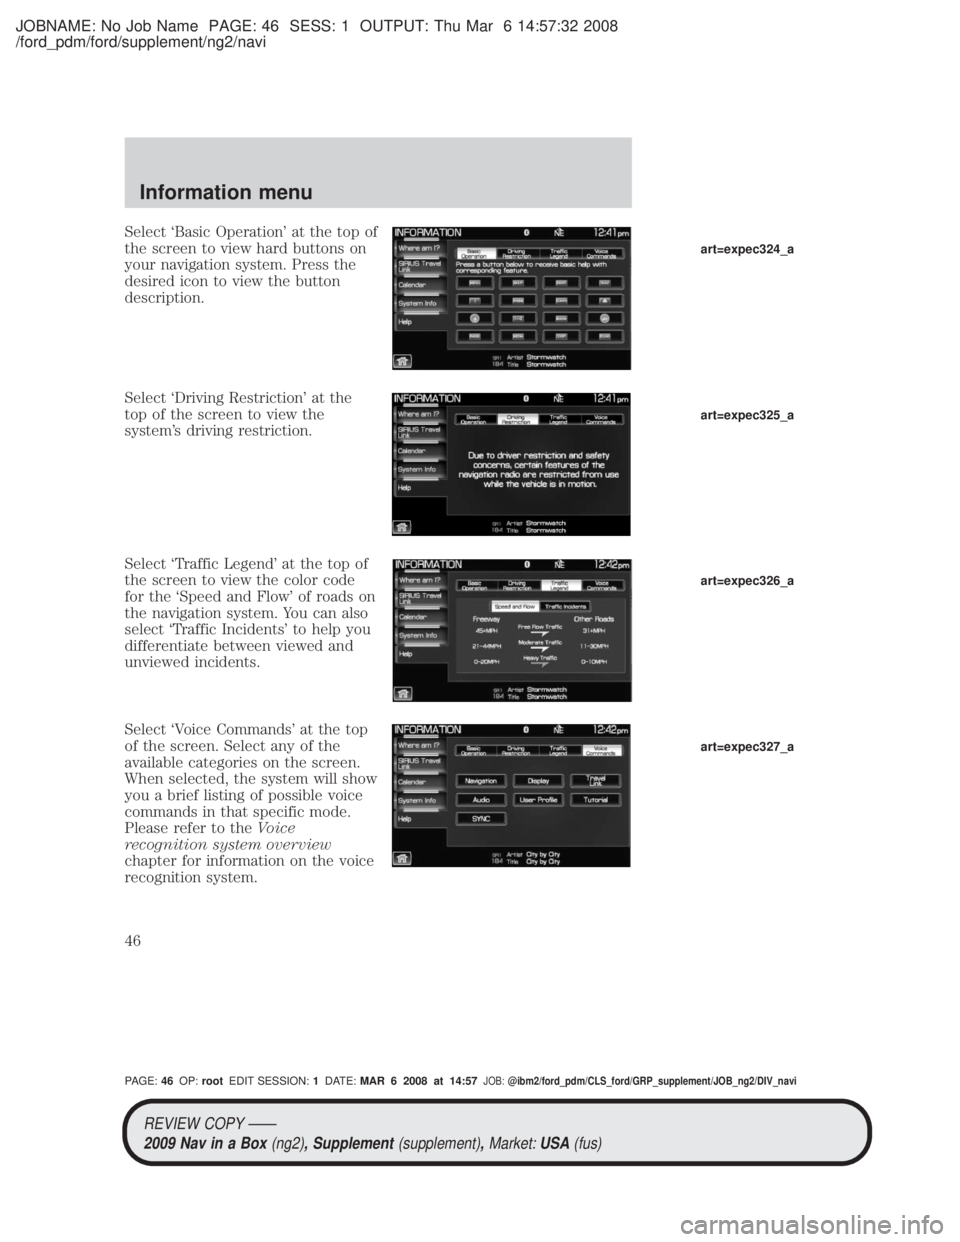
Select `Basic Operation' at the top of
the screen to view hard buttons on
your navigation system. Press the
desired icon to view the button
description.
Select `Driving Restriction' at the
top of the screen to view the
system's driving restriction.
Select `Traffic Legend' at the top of
the screen to view the color code
for the `Speed and Flow' of roads on
the navigation system. You can also
select `Traffic Incidents' to help you
differentiate between viewed and
unviewed incidents.
Select `Voice Commands' at the top
of the screen. Select any of the
available categories on the screen.
When selected, the system will show
you a brief listing of possible voice
commands in that specific mode.
Please refer to theVoice
recognition system overview
chapter for information on the voice
recognition system.
art=expec324_a
art=expec325_a
art=expec326_a
art=expec327_a
REVIEW COPY ÐÐ
2009 Nav in a Box (ng2), Supplement(supplement),Market:USA(fus)
PAGE: 46OP: root EDIT SESSION: 1DATE: MAR 6 2008 at 14:57JOB:@ibm2/ford_pdm/CLS_ford/GRP_supplement/JOB_ng2/DIV_navi
Information menu
46
Page 50 of 81
JOBNAME: No Job Name PAGE: 50 SESS: 1 OUTPUT: Thu Mar 6 14:57:32 2008
/ford_pdm/ford/supplement/ng2/navi
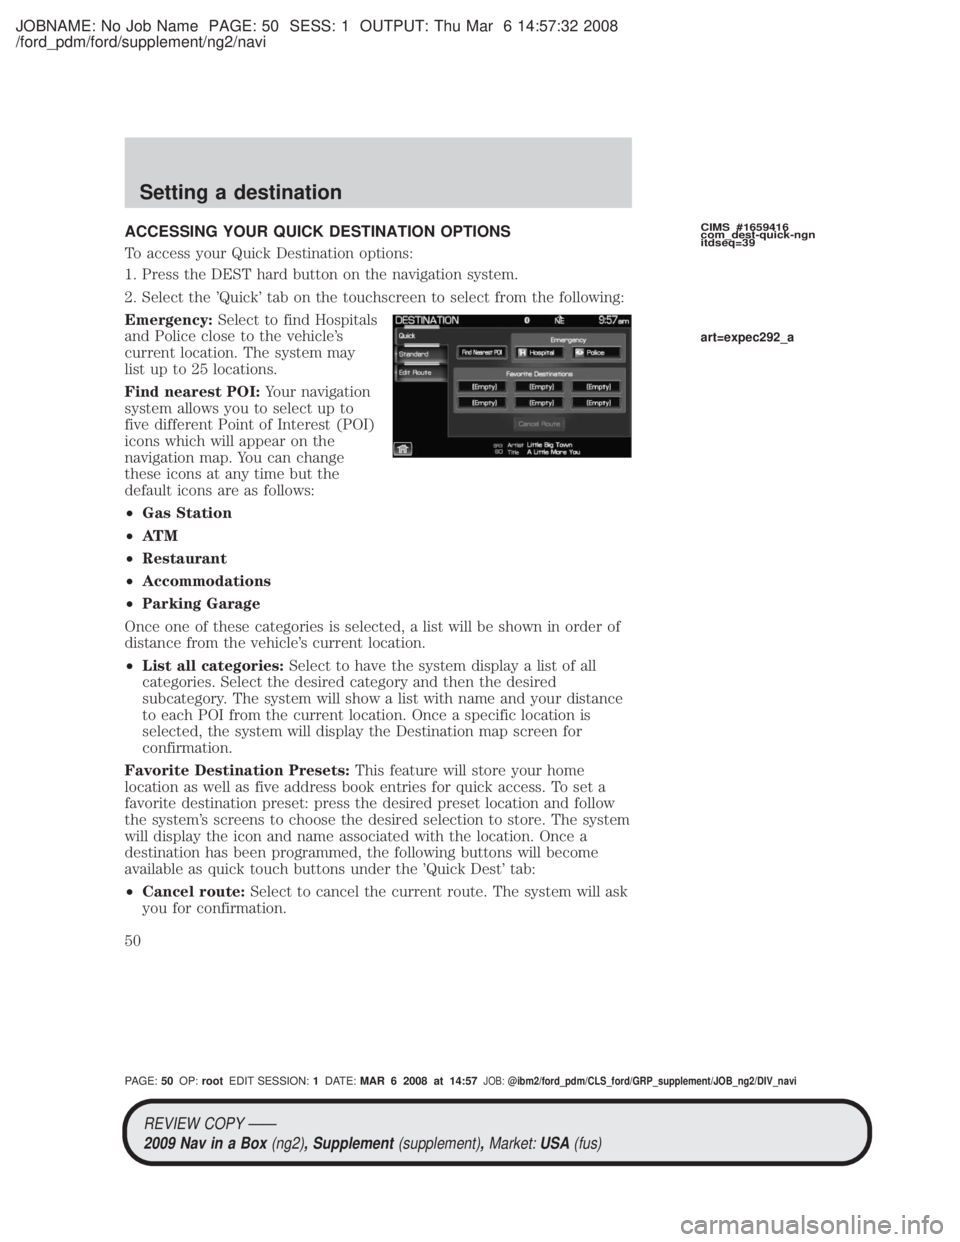
ACCESSING YOUR QUICK DESTINATION OPTIONS
To access your Quick Destination options:
1. Press the DEST hard button on the navigation system.
2. Select the 'Quick' tab on the touchscreen to select from the following:
Emergency:Select to find Hospitals
and Police close to the vehicle's
current location. The system may
list up to 25 locations.
Find nearest POI: Your navigation
system allows you to select up to
five different Point of Interest (POI)
icons which will appear on the
navigation map. You can change
these icons at any time but the
default icons are as follows:
² Gas Station
² AT M
² Restaurant
² Accommodations
² Parking Garage
Once one of these categories is selected, a list will be shown in order of
distance from the vehicle's current location.
² List all categories: Select to have the system display a list of all
categories. Select the desired category and then the desired
subcategory. The system will show a list with name and your distance
to each POI from the current location. Once a specific location is
selected, the system will display the Destination map screen for
confirmation.
Favorite Destination Presets: This feature will store your home
location as well as five address book entries for quick access. To set a
favorite destination preset: press the desired preset location and follow
the system's screens to choose the desired selection to store. The system
will display the icon and name associated with the location. Once a
destination has been programmed, the following buttons will become
available as quick touch buttons under the 'Quick Dest' tab:
² Cancel route: Select to cancel the current route. The system will ask
you for confirmation.CIMS #1659416
com_dest-quick-ngn
itdseq=39
art=expec292_a
REVIEW COPY ÐÐ
2009 Nav in a Box (ng2), Supplement(supplement),Market:USA(fus)
PAGE: 50OP: root EDIT SESSION: 1DATE: MAR 6 2008 at 14:57JOB:@ibm2/ford_pdm/CLS_ford/GRP_supplement/JOB_ng2/DIV_navi
Setting a destination
50
Page 61 of 81
JOBNAME: No Job Name PAGE: 61 SESS: 1 OUTPUT: Thu Mar 6 14:57:32 2008
/ford_pdm/ford/supplement/ng2/navi
²Heading up: In this mode, the
direction of forward travel is
always upward direction on
screen. Available for map scales up to 2.5 mi /5km. For scales above
that, the setting for Heading-Up is remembered, but the map is shown
in North-Up only. If the scale returns below this level, then the
Heading-Up setting is restored.
² North up: In this mode, the
Northern Direction is always
upward direction on screen.
MAP SCALE
The map display scale on the map
has 12 levels, ranging from
0.02 miles to 160 miles. In MAP
mode, you can also zoom in or out,
changing the display scale by pressing on one of the arrows on the
button appearing on the left side of the screen. When in Full Screen Map
Mode, touching this button will cause the Zoom Direct buttons to appear.
The Zoom Direct buttons represent the most common scales and can be
pressed directly to show the map at the desired scale. The scale is
approximate and based on the width of the display button (A). The size
of the scale will vary based on the screen size.
Map road colors and building representation on the map:
² Roads: Will be displayed in a variety of colors.
² Building footprints: Will display areas of major buildings in the 20
largest cities in the U.S. These areas will be displayed depending on
their size and the map zoom level.
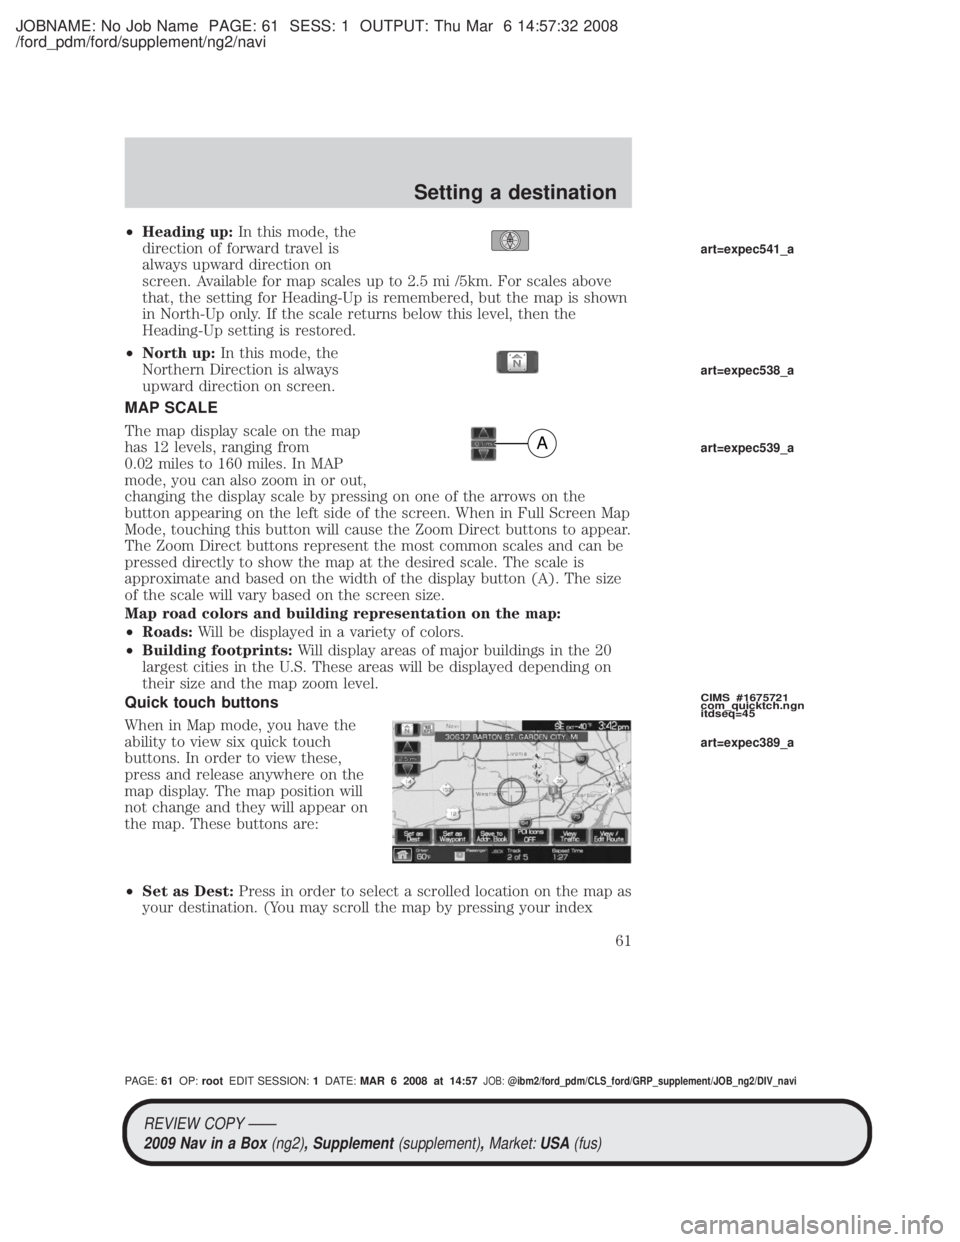
Quick touch buttons
When in Map mode, you have the
ability to view six quick touch
buttons. In order to view these,
press and release anywhere on the
map display. The map position will
not change and they will appear on
the map. These buttons are:
² Set as Dest: Press in order to select a scrolled location on the map as
your destination. (You may scroll the map by pressing your index
A
CIMS #1675721
com_quicktch.ngn
itdseq=45
art=expec541_a
art=expec538_a
art=expec539_a
art=expec389_a
REVIEW COPY ÐÐ
2009 Nav in a Box (ng2), Supplement(supplement),Market:USA(fus)
PAGE: 61OP: root EDIT SESSION: 1DATE: MAR 6 2008 at 14:57JOB:@ibm2/ford_pdm/CLS_ford/GRP_supplement/JOB_ng2/DIV_navi
Setting a destination
61
Page 70 of 81
JOBNAME: No Job Name PAGE: 70 SESS: 1 OUTPUT: Thu Mar 6 14:57:32 2008
/ford_pdm/ford/supplement/ng2/navi
Average speed: Main RoadsWhen this feature is enabled, the system
will display the average speed on a main road, initially set to 45 mph
(72 km/h). You can adjust the setting for specific roads. You can adjust
the setting using + or Ð for your specific driving preferences. These
settings help the system better estimate your arrival time at a destination
based on your driving preferences.
Average speed: Freeways When this feature is enabled, the system will
display the average speed on a freeway, initially set to 65 mph
(105 km/h). You can adjust the setting for specific roads. You can adjust
the setting using + or Ð for your specific driving preferences. These
settings help the system better estimate your arrival time at a destination
based on your driving preferences.
Parking POI Notification: When enabled, this feature will display
available parking accommodations around a destination (when part of a
route).
Low Fuel POI Notification: When enabled, this feature will display
local gas stations when the fuel level is low.
Fuel Price Display: When enabled, this feature will display fuel prices
at local gas stations. You can choose to display Unleaded or Diesel. Note:
Requires SIRIUS Travel Link (if activated).
Calibrate
² Position: You can adjust the direction of the vehicle by pressing the
arrow buttons on the screen.
² Distance: Press to have the system re-calibrate the distance to the
destination as the vehicle is in motion.
Restore Default Settings: Press to return to the factory default
settings.
Avoid Areas: When enabled, you can select an area you would like the
system to avoid when creating a navigation route.
AVOID AREAS
You can tell the navigation system to avoid certain areas when
calculating a route.
1. Press the NAV hard button on the navigation system.
CIMS #1659392
com_avoid-areas.ngn
itdseq=51
REVIEW COPY ÐÐ
2009 Nav in a Box (ng2), Supplement(supplement),Market:USA(fus)
PAGE: 70OP: root EDIT SESSION: 1DATE: MAR 6 2008 at 14:57JOB:@ibm2/ford_pdm/CLS_ford/GRP_supplement/JOB_ng2/DIV_navi
Navigation route preferences
70