engine oil MAZDA MX-5 1997 Factory Repair Manual
[x] Cancel search | Manufacturer: MAZDA, Model Year: 1997, Model line: MX-5, Model: MAZDA MX-5 1997Pages: 514, PDF Size: 17.89 MB
Page 160 of 514
Submerge other end of hose in container of brake fluid.
2. Fill reservoir with DOT 3 brake fluid. Have an assistant press and release clutch pedal several times, then
hold pedal down. With pedal pressed, loosen bleeder screw to let air and fluid escape.
3. Repeat step 2) until no more air bubbles emerge from hose. Tighten bleeder screw. Fill reservoir. Operate
clutch while inspecting for leaks. Check clutch and brake operation.
REMOVAL & INSTALLATION
CLUTCH ASSEMBLY
Removal (B2300, B2500, B3000 & B4000)
1. Disconnect negative battery cable. Shift transmission into Neutral. Remove gearshift lever. Raise and
support vehicle. Mark drive shaft flanges for installation reference. Remove drive shaft. Using Clutch
Disconnect Tool (T88T-70522-A), disconnect hydraulic line at transmission. See Fig. 2
. Plug hydraulic
line to prevent contamination. Disconnect wiring at transmission.
2. Remove starter. Remove exhaust components as necessary for clearance. On 4WD models, remove skid
plate and transfer case. On all models, secure transmission jack under transmission. Remove transmission
mount-to-crossmember nuts and bolts.
3. Remove nuts securing crossmember to frame side rails, and remove crossmember. Lower transmission
enough to gain access to transmission-to-engine block bolts. Remove transmission-to-engine block bolts.
Remove transmission.
4. If clutch parts are going to be reused, mark clutch cover and flywheel for reassembly reference. Loosen
pressure plate bolts evenly in crisscross pattern until springs are not under tension. Remove clutch cover
and clutch disc.
Inspection (B2300, B2500, B3000 & B4000)
1. Inspect disc for loose rivets, worn or defective springs, excessive wear, or oil contamination. Inspect
flywheel and clutch cover for burns, scoring, or grooves.
2. Measure flywheel and clutch cover runout. Resurface or replace flywheel and clutch cover if beyond
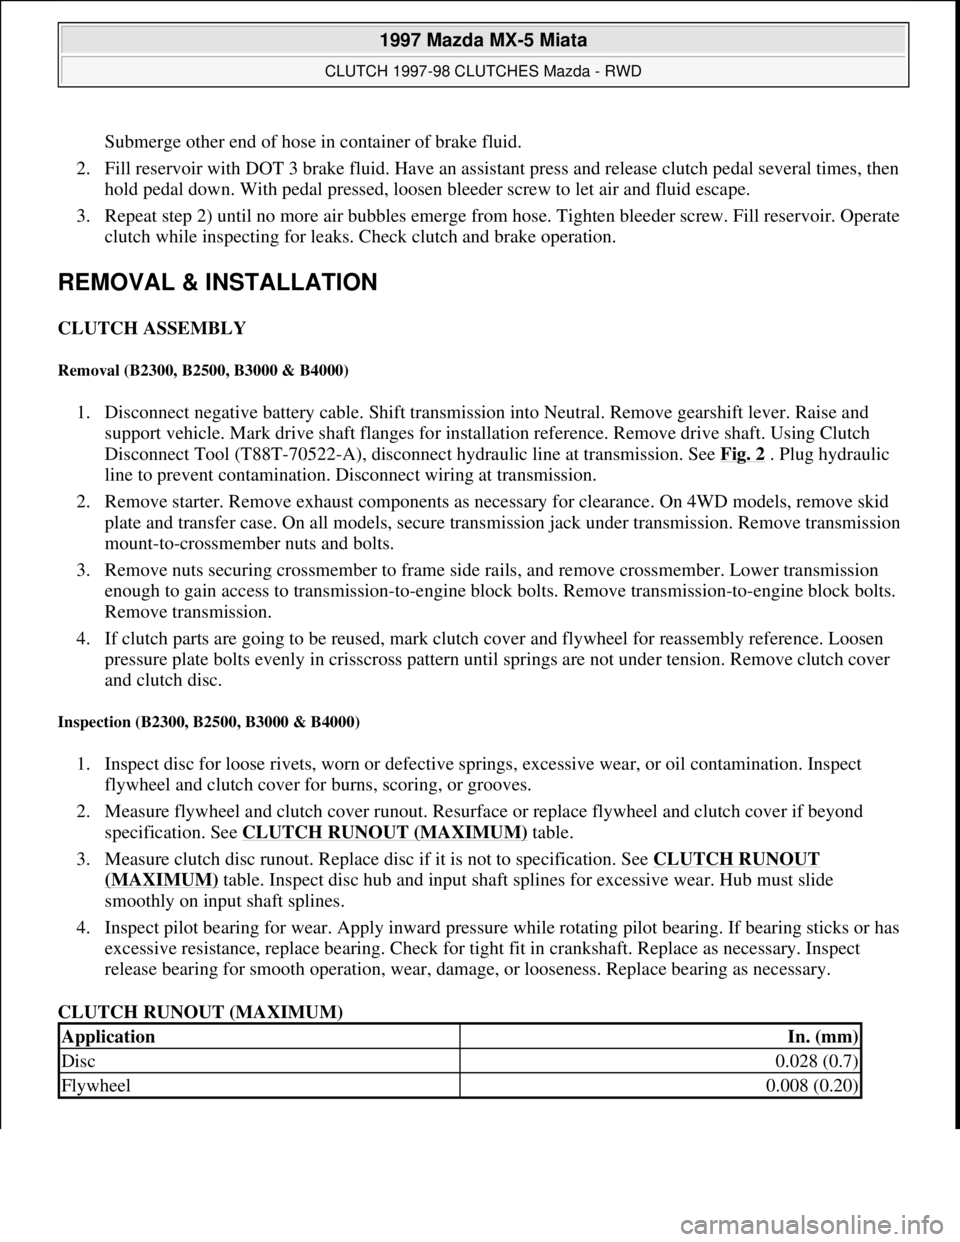
specification. See CLUTCH RUNOUT (MAXIMUM)
table.
3. Measure clutch disc runout. Replace disc if it is not to specification. See CLUTCH RUNOUT
(MAXIMUM) table. Inspect disc hub and input shaft splines for excessive wear. Hub must slide
smoothly on input shaft splines.
4. Inspect pilot bearing for wear. Apply inward pressure while rotating pilot bearing. If bearing sticks or has
excessive resistance, replace bearing. Check for tight fit in crankshaft. Replace as necessary. Inspect
release bearing for smooth operation, wear, damage, or looseness. Replace bearing as necessary.
CLUTCH RUNOUT (MAXIMUM)
ApplicationIn. (mm)
Disc0.028 (0.7)
Flywheel0.008 (0.20)
1997 Mazda MX-5 Miata
CLUTCH 1997-98 CLUTCHES Mazda - RWD
Microsoft
Sunday, July 05, 2009 1:36:47 PMPage 4 © 2005 Mitchell Repair Information Company, LLC.
Page 165 of 514
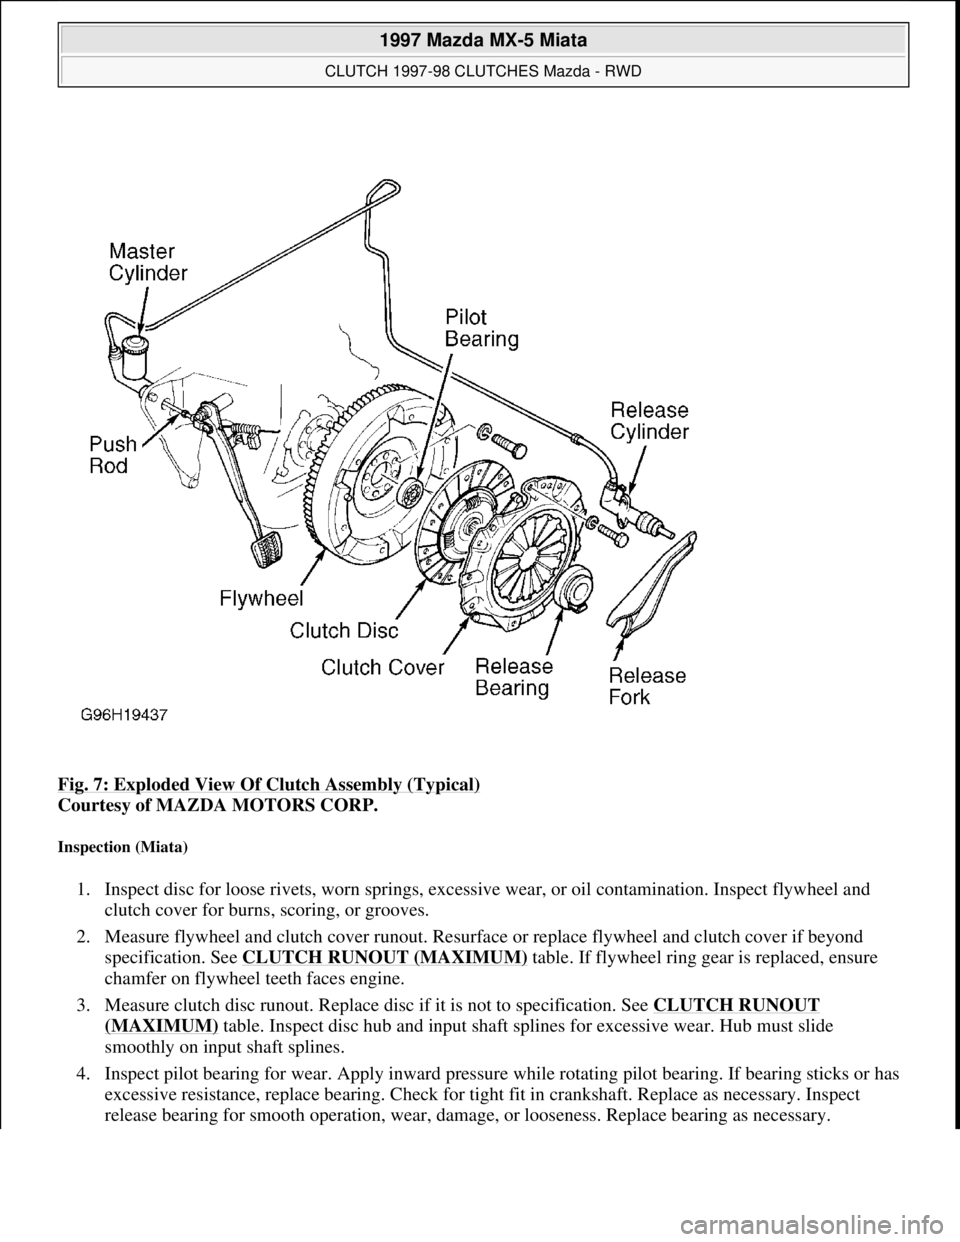
Fig. 7: Exploded View Of Clutch Assembly (Typical)
Courtesy of MAZDA MOTORS CORP.
Inspection (Miata)
1. Inspect disc for loose rivets, worn springs, excessive wear, or oil contamination. Inspect flywheel and
clutch cover for burns, scoring, or grooves.
2. Measure flywheel and clutch cover runout. Resurface or replace flywheel and clutch cover if beyond
specification. See CLUTCH RUNOUT (MAXIMUM)
table. If flywheel ring gear is replaced, ensure
chamfer on flywheel teeth faces engine.
3. Measure clutch disc runout. Replace disc if it is not to specification. See CLUTCH RUNOUT
(MAXIMUM) table. Inspect disc hub and input shaft splines for excessive wear. Hub must slide
smoothly on input shaft splines.
4. Inspect pilot bearing for wear. Apply inward pressure while rotating pilot bearing. If bearing sticks or has
excessive resistance, replace bearing. Check for tight fit in crankshaft. Replace as necessary. Inspect
release bearing for smooth operation, wear, damage, or looseness. Replace bearing as necessary.
1997 Mazda MX-5 Miata
CLUTCH 1997-98 CLUTCHES Mazda - RWD
Microsoft
Sunday, July 05, 2009 1:36:47 PMPage 9 © 2005 Mitchell Repair Information Company, LLC.
Page 166 of 514
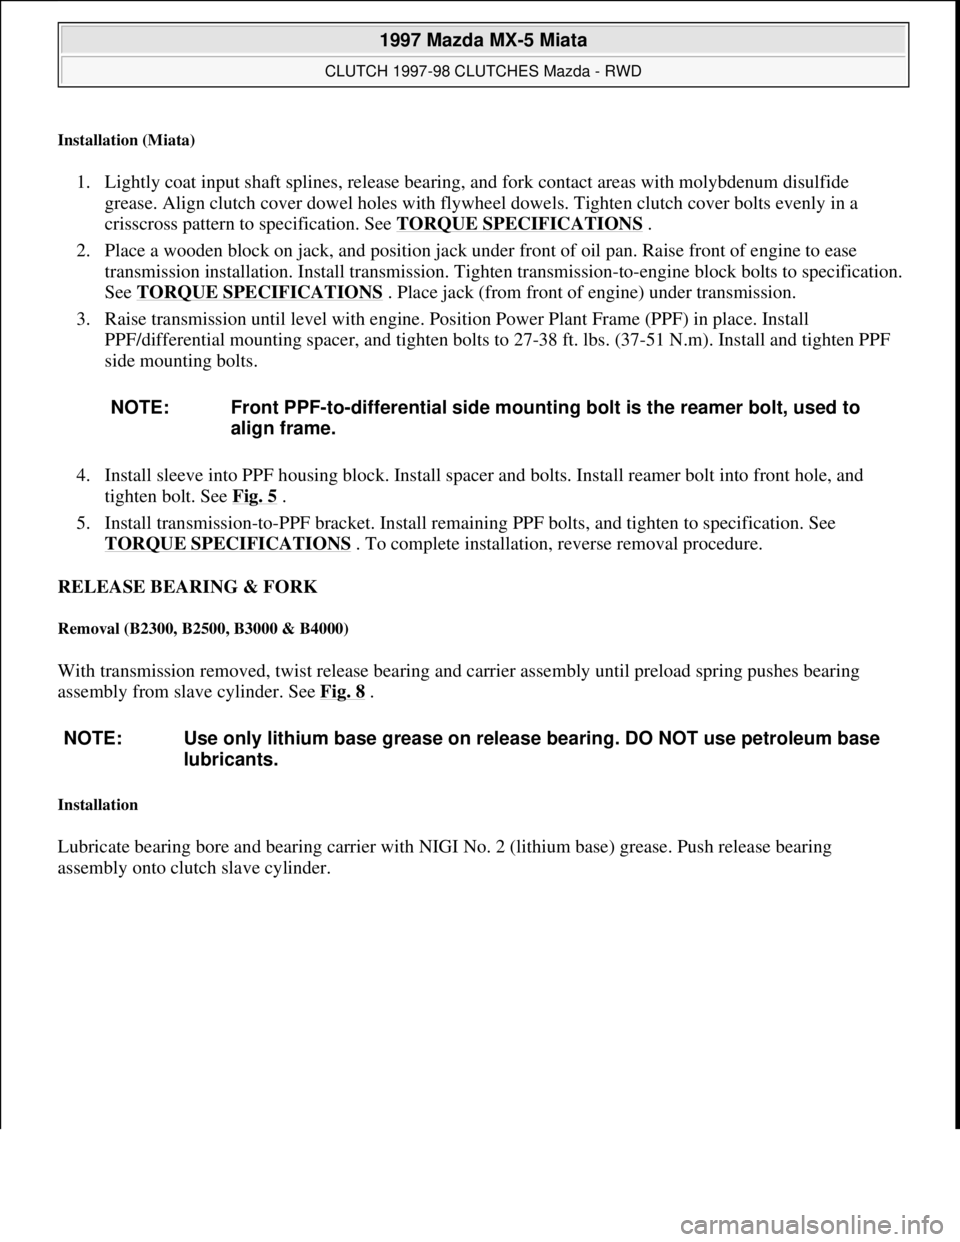
Installation (Miata)
1. Lightly coat input shaft splines, release bearing, and fork contact areas with molybdenum disulfide
grease. Align clutch cover dowel holes with flywheel dowels. Tighten clutch cover bolts evenly in a
crisscross pattern to specification. See TORQUE SPECIFICATIONS
.
2. Place a wooden block on jack, and position jack under front of oil pan. Raise front of engine to ease
transmission installation. Install transmission. Tighten transmission-to-engine block bolts to specification.
See TORQUE SPECIFICATIONS
. Place jack (from front of engine) under transmission.
3. Raise transmission until level with engine. Position Power Plant Frame (PPF) in place. Install
PPF/differential mounting spacer, and tighten bolts to 27-38 ft. lbs. (37-51 N.m). Install and tighten PPF
side mounting bolts.
4. Install sleeve into PPF housing block. Install spacer and bolts. Install reamer bolt into front hole, and
tighten bolt. See Fig. 5
.
5. Install transmission-to-PPF bracket. Install remaining PPF bolts, and tighten to specification. See
TORQUE SPECIFICATIONS
. To complete installation, reverse removal procedure.
RELEASE BEARING & FORK
Removal (B2300, B2500, B3000 & B4000)
With transmission removed, twist release bearing and carrier assembly until preload spring pushes bearing
assembly from slave cylinder. See Fig. 8
.
Installation
Lubricate bearing bore and bearing carrier with NIGI No. 2 (lithium base) grease. Push release bearing
assembl
y onto clutch slave cylinder. NOTE: Front PPF-to-differential side mounting bolt is the reamer bolt, used to
align frame.
NOTE: Use only lithium base grease on release bearing. DO NOT use petroleum base
lubricants.
1997 Mazda MX-5 Miata
CLUTCH 1997-98 CLUTCHES Mazda - RWD
Microsoft
Sunday, July 05, 2009 1:36:47 PMPage 10 © 2005 Mitchell Repair Information Company, LLC.
Page 200 of 514
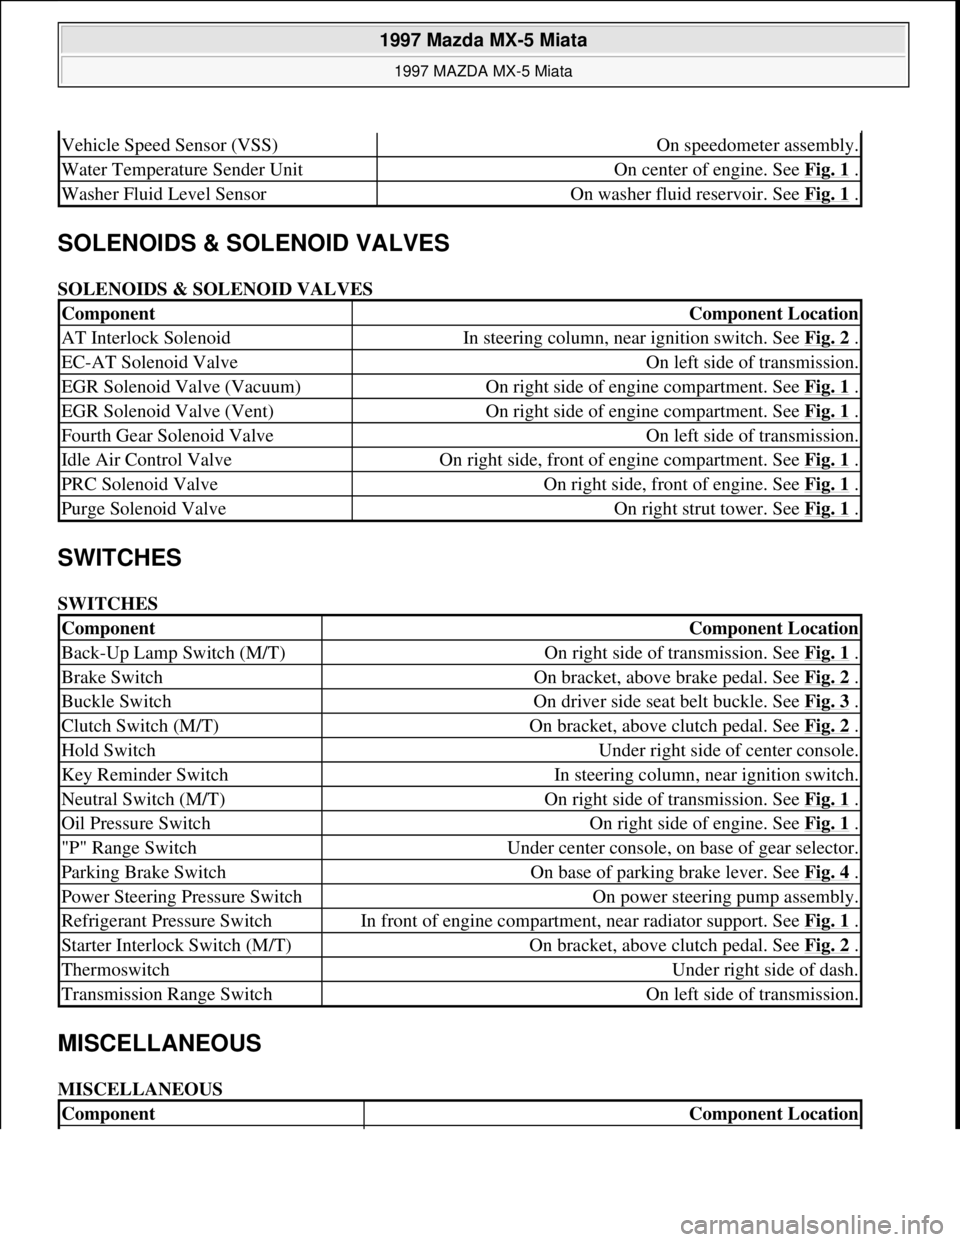
SOLENOIDS & SOLENOID VALVES
SOLENOIDS & SOLENOID VALVES
SWITCHES
SWITCHES
MISCELLANEOUS
MISCELLANEOUS
Vehicle Speed Sensor (VSS)On speedometer assembly.
Water Temperature Sender UnitOn center of engine. See Fig. 1 .
Washer Fluid Level SensorOn washer fluid reservoir. See Fig. 1 .
ComponentComponent Location
AT Interlock SolenoidIn steering column, near ignition switch. See Fig. 2 .
EC-AT Solenoid ValveOn left side of transmission.
EGR Solenoid Valve (Vacuum)On right side of engine compartment. See Fig. 1 .
EGR Solenoid Valve (Vent)On right side of engine compartment. See Fig. 1 .
Fourth Gear Solenoid ValveOn left side of transmission.
Idle Air Control ValveOn right side, front of engine compartment. See Fig. 1 .
PRC Solenoid ValveOn right side, front of engine. See Fig. 1 .
Purge Solenoid ValveOn right strut tower. See Fig. 1 .
ComponentComponent Location
Back-Up Lamp Switch (M/T)On right side of transmission. See Fig. 1 .
Brake SwitchOn bracket, above brake pedal. See Fig. 2 .
Buckle SwitchOn driver side seat belt buckle. See Fig. 3 .
Clutch Switch (M/T)On bracket, above clutch pedal. See Fig. 2 .
Hold SwitchUnder right side of center console.
Key Reminder SwitchIn steering column, near ignition switch.
Neutral Switch (M/T)On right side of transmission. See Fig. 1 .
Oil Pressure SwitchOn right side of engine. See Fig. 1 .
"P" Range SwitchUnder center console, on base of gear selector.
Parking Brake SwitchOn base of parking brake lever. See Fig. 4 .
Power Steering Pressure SwitchOn power steering pump assembly.
Refrigerant Pressure SwitchIn front of engine compartment, near radiator support. See Fig. 1 .
Starter Interlock Switch (M/T)On bracket, above clutch pedal. See Fig. 2 .
ThermoswitchUnder right side of dash.
Transmission Range SwitchOn left side of transmission.
ComponentComponent Location
1997 Mazda MX-5 Miata
1997 MAZDA MX-5 Miata
Microsoft
Sunday, July 05, 2009 1:54:00 PMPage 3 © 2005 Mitchell Repair Information Company, LLC.
Page 201 of 514
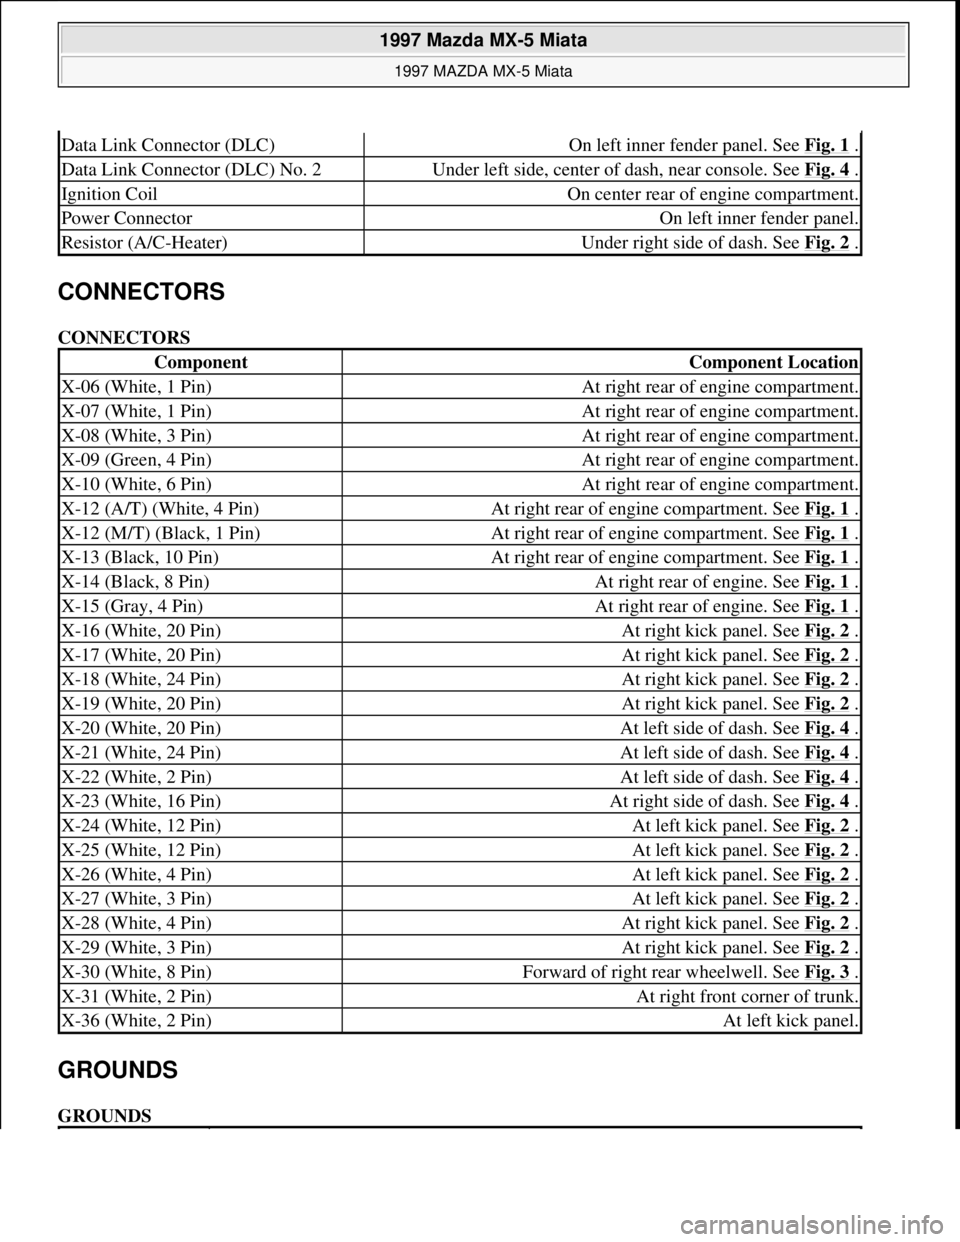
CONNECTORS
CONNECTORS
GROUNDS
GROUNDS
Data Link Connector (DLC)On left inner fender panel. See Fig. 1 .
Data Link Connector (DLC) No. 2Under left side, center of dash, near console. See Fig. 4 .
Ignition CoilOn center rear of engine compartment.
Power ConnectorOn left inner fender panel.
Resistor (A/C-Heater)Under right side of dash. See Fig. 2 .
ComponentComponent Location
X-06 (White, 1 Pin)At right rear of engine compartment.
X-07 (White, 1 Pin)At right rear of engine compartment.
X-08 (White, 3 Pin)At right rear of engine compartment.
X-09 (Green, 4 Pin)At right rear of engine compartment.
X-10 (White, 6 Pin)At right rear of engine compartment.
X-12 (A/T) (White, 4 Pin)At right rear of engine compartment. See Fig. 1 .
X-12 (M/T) (Black, 1 Pin)At right rear of engine compartment. See Fig. 1 .
X-13 (Black, 10 Pin)At right rear of engine compartment. See Fig. 1 .
X-14 (Black, 8 Pin)At right rear of engine. See Fig. 1 .
X-15 (Gray, 4 Pin)At right rear of engine. See Fig. 1 .
X-16 (White, 20 Pin)At right kick panel. See Fig. 2 .
X-17 (White, 20 Pin)At right kick panel. See Fig. 2 .
X-18 (White, 24 Pin)At right kick panel. See Fig. 2 .
X-19 (White, 20 Pin)At right kick panel. See Fig. 2 .
X-20 (White, 20 Pin)At left side of dash. See Fig. 4 .
X-21 (White, 24 Pin)At left side of dash. See Fig. 4 .
X-22 (White, 2 Pin)At left side of dash. See Fig. 4 .
X-23 (White, 16 Pin)At right side of dash. See Fig. 4 .
X-24 (White, 12 Pin)At left kick panel. See Fig. 2 .
X-25 (White, 12 Pin)At left kick panel. See Fig. 2 .
X-26 (White, 4 Pin)At left kick panel. See Fig. 2 .
X-27 (White, 3 Pin)At left kick panel. See Fig. 2 .
X-28 (White, 4 Pin)At right kick panel. See Fig. 2 .
X-29 (White, 3 Pin)At right kick panel. See Fig. 2 .
X-30 (White, 8 Pin)Forward of right rear wheelwell. See Fig. 3 .
X-31 (White, 2 Pin)At right front corner of trunk.
X-36 (White, 2 Pin)At left kick panel.
1997 Mazda MX-5 Miata
1997 MAZDA MX-5 Miata
Microsoft
Sunday, July 05, 2009 1:54:00 PMPage 4 © 2005 Mitchell Repair Information Company, LLC.
Page 207 of 514
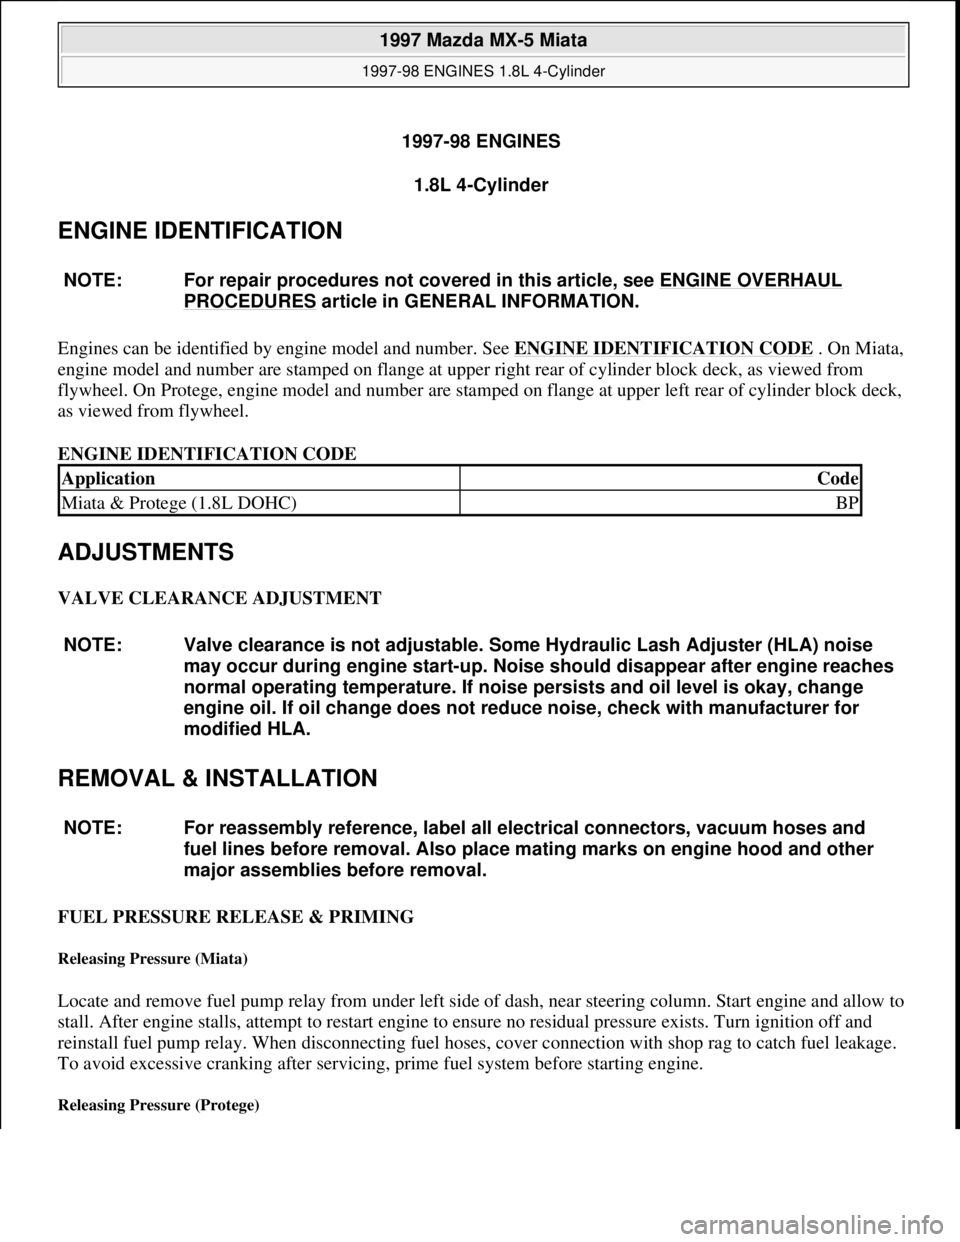
1997-98 ENGINES
1.8L 4-Cylinder
ENGINE IDENTIFICATION
Engines can be identified by engine model and number. See ENGINE IDENTIFICATION CODE. On Miata,
engine model and number are stamped on flange at upper right rear of cylinder block deck, as viewed from
flywheel. On Protege, engine model and number are stamped on flange at upper left rear of cylinder block deck,
as viewed from flywheel.
ENGINE IDENTIFICATION CODE
ADJUSTMENTS
VALVE CLEARANCE ADJUSTMENT
REMOVAL & INSTALLATION
FUEL PRESSURE RELEASE & PRIMING
Releasing Pressure (Miata)
Locate and remove fuel pump relay from under left side of dash, near steering column. Start engine and allow to
stall. After engine stalls, attempt to restart engine to ensure no residual pressure exists. Turn ignition off and
reinstall fuel pump relay. When disconnecting fuel hoses, cover connection with shop rag to catch fuel leakage.
To avoid excessive cranking after servicing, prime fuel system before starting engine.
Releasing Pressure (Protege)
NOTE: For repair procedures not covered in this article, see ENGINE OVERHAUL
PROCEDURES article in GENERAL INFORMATION.
ApplicationCode
Miata & Protege (1.8L DOHC)BP
NOTE: Valve clearance is not adjustable. Some Hydraulic Lash Adjuster (HLA) noise
may occur during engine start-up. Noise should disappear after engine reaches
normal operating temperature. If noise persists and oil level is okay, change
engine oil. If oil change does not reduce noise, check with manufacturer for
modified HLA.
NOTE: For reassembly reference, label all electrical connectors, vacuum hoses and
fuel lines before removal. Also place mating marks on engine hood and other
major assemblies before removal.
1997 Mazda MX-5 Miata
1997-98 ENGINES 1.8L 4-Cylinder
1997 Mazda MX-5 Miata
1997-98 ENGINES 1.8L 4-Cylinder
Microsoft
Sunday, July 05, 2009 1:55:15 PMPage 1 © 2005 Mitchell Repair Information Company, LLC.
Microsoft
Sunday, July 05, 2009 1:55:19 PMPage 1 © 2005 Mitchell Repair Information Company, LLC.
Page 210 of 514
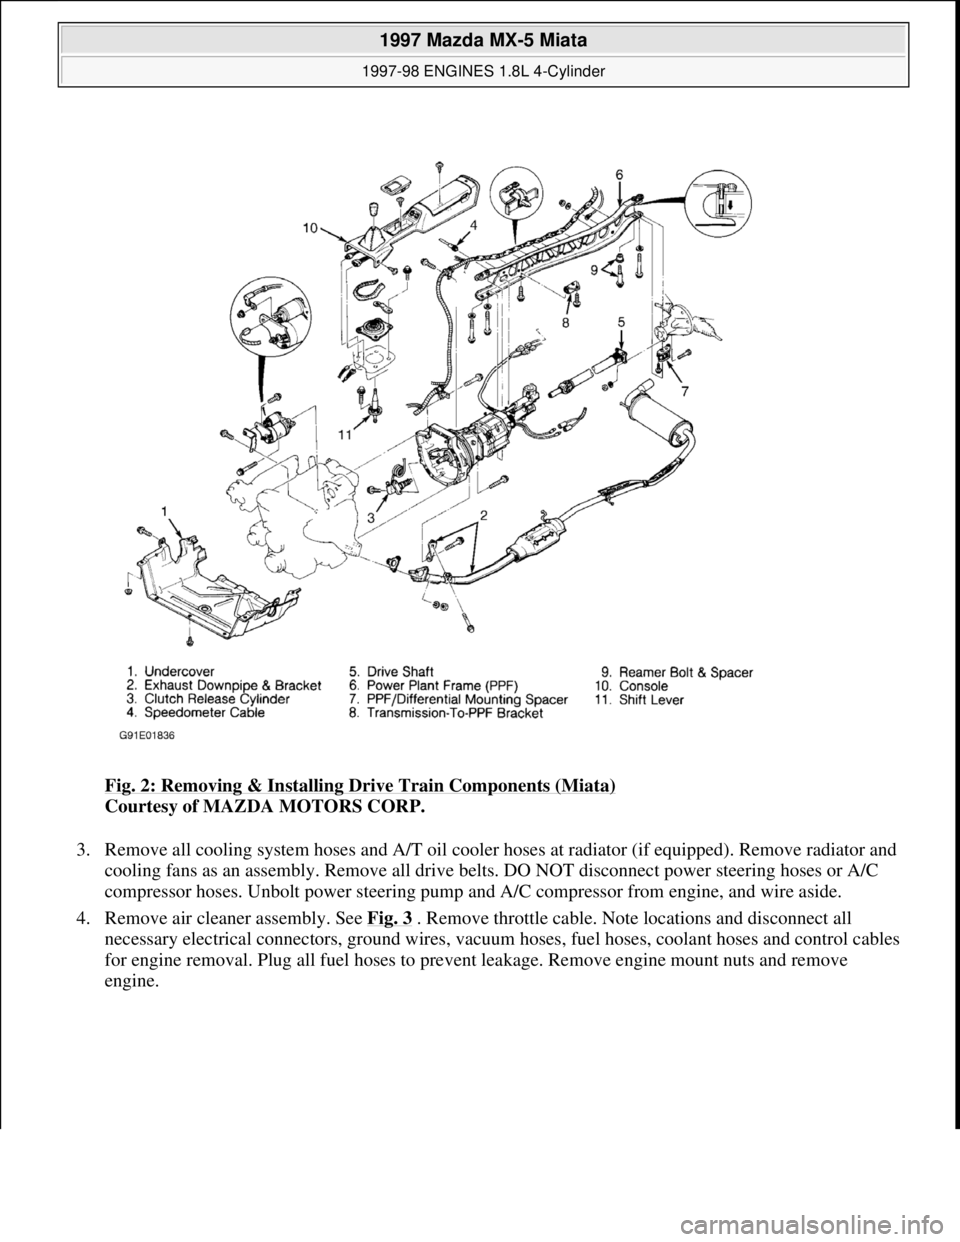
Fig. 2: Removing & Installing Drive Train Components (Miata)
Courtesy of MAZDA MOTORS CORP.
3. Remove all cooling system hoses and A/T oil cooler hoses at radiator (if equipped). Remove radiator and
cooling fans as an assembly. Remove all drive belts. DO NOT disconnect power steering hoses or A/C
compressor hoses. Unbolt power steering pump and A/C compressor from engine, and wire aside.
4. Remove air cleaner assembly. See Fig. 3
. Remove throttle cable. Note locations and disconnect all
necessary electrical connectors, ground wires, vacuum hoses, fuel hoses, coolant hoses and control cables
for engine removal. Plug all fuel hoses to prevent leakage. Remove engine mount nuts and remove
en
gine.
1997 Mazda MX-5 Miata
1997-98 ENGINES 1.8L 4-Cylinder
Microsoft
Sunday, July 05, 2009 1:55:15 PMPage 4 © 2005 Mitchell Repair Information Company, LLC.
Page 212 of 514
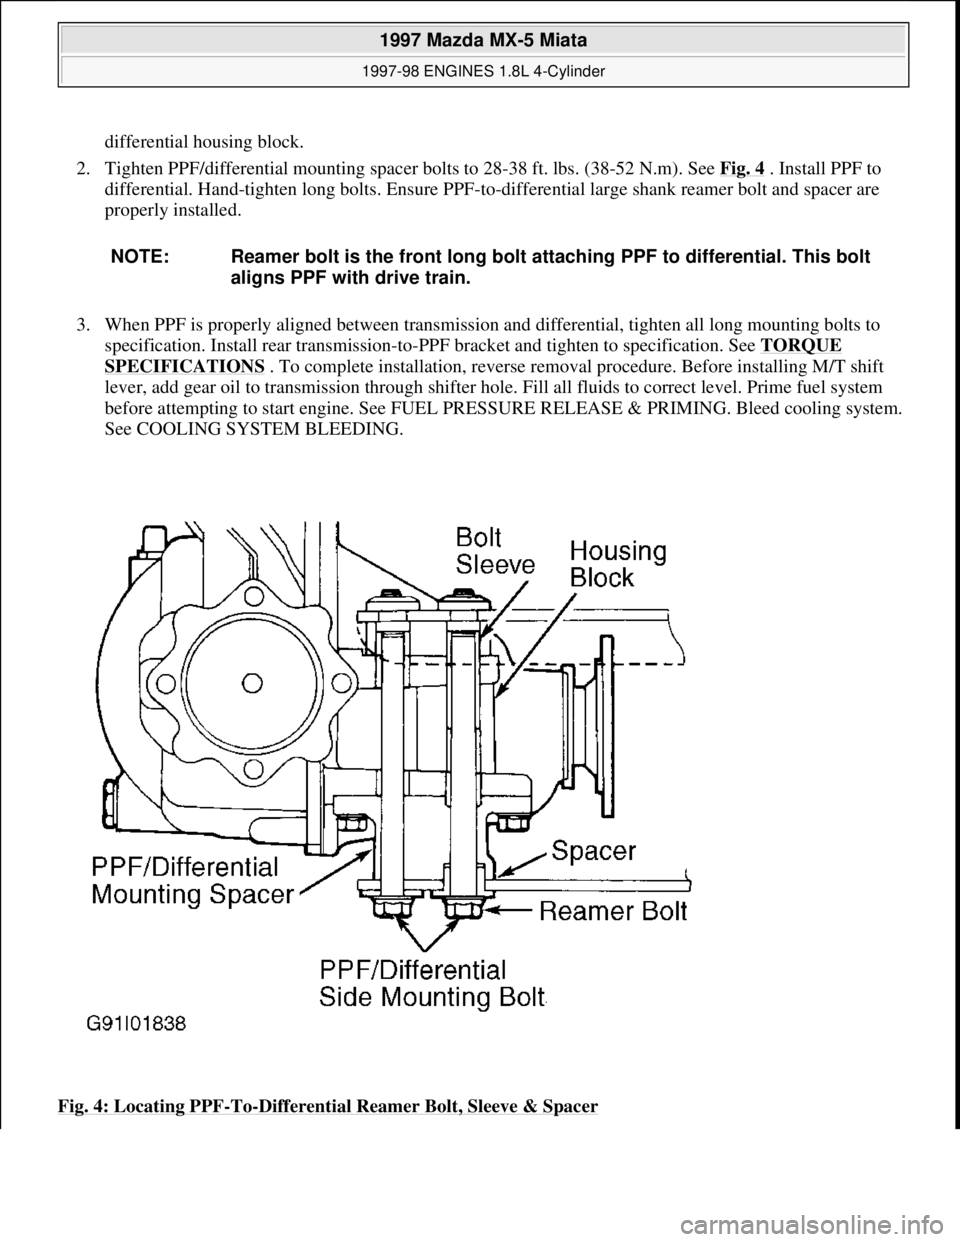
differential housing block.
2. Tighten PPF/differential mounting spacer bolts to 28-38 ft. lbs. (38-52 N.m). See Fig. 4
. Install PPF to
differential. Hand-tighten long bolts. Ensure PPF-to-differential large shank reamer bolt and spacer are
properly installed.
3. When PPF is properly aligned between transmission and differential, tighten all long mounting bolts to
specification. Install rear transmission-to-PPF bracket and tighten to specification. See TORQUE
SPECIFICATIONS . To complete installation, reverse removal procedure. Before installing M/T shift
lever, add gear oil to transmission through shifter hole. Fill all fluids to correct level. Prime fuel system
before attempting to start engine. See FUEL PRESSURE RELEASE & PRIMING. Bleed cooling system.
See COOLING SYSTEM BLEEDING.
Fig. 4: Locating PPF
-To-Differential Reamer Bolt, Sleeve & Spacer
NOTE: Reamer bolt is the front long bolt attaching PPF to differential. This bolt
aligns PPF with drive train.
1997 Mazda MX-5 Miata
1997-98 ENGINES 1.8L 4-Cylinder
Microsoft
Sunday, July 05, 2009 1:55:15 PMPage 6 © 2005 Mitchell Repair Information Company, LLC.
Page 218 of 514
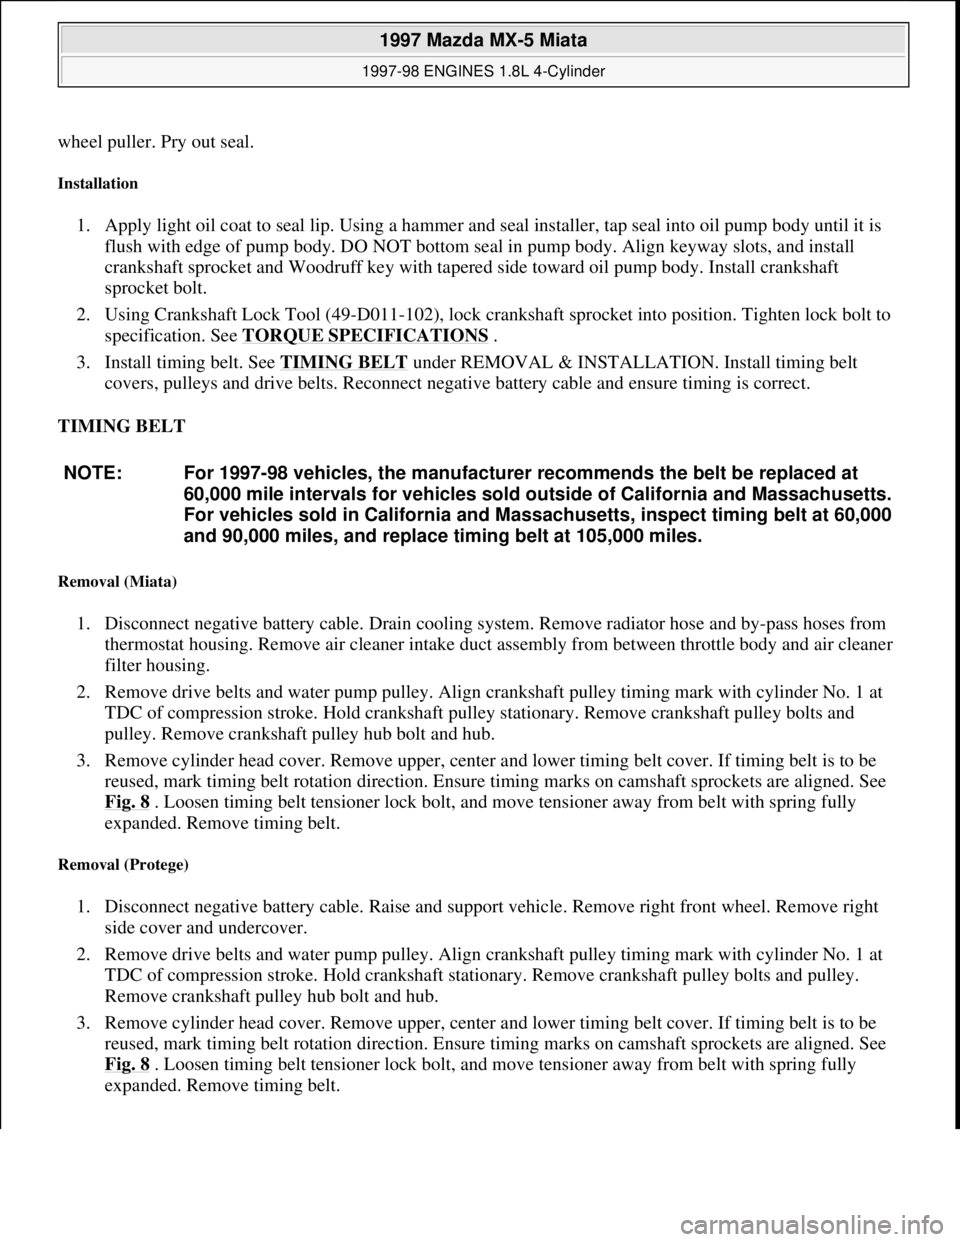
wheel puller. Pry out seal.
Installation
1. Apply light oil coat to seal lip. Using a hammer and seal installer, tap seal into oil pump body until it is
flush with edge of pump body. DO NOT bottom seal in pump body. Align keyway slots, and install
crankshaft sprocket and Woodruff key with tapered side toward oil pump body. Install crankshaft
sprocket bolt.
2. Using Crankshaft Lock Tool (49-D011-102), lock crankshaft sprocket into position. Tighten lock bolt to
specification. See TORQUE SPECIFICATIONS
.
3. Install timing belt. See TIMING BELT
under REMOVAL & INSTALLATION. Install timing belt
covers, pulleys and drive belts. Reconnect negative battery cable and ensure timing is correct.
TIMING BELT
Removal (Miata)
1. Disconnect negative battery cable. Drain cooling system. Remove radiator hose and by-pass hoses from
thermostat housing. Remove air cleaner intake duct assembly from between throttle body and air cleaner
filter housing.
2. Remove drive belts and water pump pulley. Align crankshaft pulley timing mark with cylinder No. 1 at
TDC of compression stroke. Hold crankshaft pulley stationary. Remove crankshaft pulley bolts and
pulley. Remove crankshaft pulley hub bolt and hub.
3. Remove cylinder head cover. Remove upper, center and lower timing belt cover. If timing belt is to be
reused, mark timing belt rotation direction. Ensure timing marks on camshaft sprockets are aligned. See
Fig. 8
. Loosen timing belt tensioner lock bolt, and move tensioner away from belt with spring fully
expanded. Remove timing belt.
Removal (Protege)
1. Disconnect negative battery cable. Raise and support vehicle. Remove right front wheel. Remove right
side cover and undercover.
2. Remove drive belts and water pump pulley. Align crankshaft pulley timing mark with cylinder No. 1 at
TDC of compression stroke. Hold crankshaft stationary. Remove crankshaft pulley bolts and pulley.
Remove crankshaft pulley hub bolt and hub.
3. Remove cylinder head cover. Remove upper, center and lower timing belt cover. If timing belt is to be
reused, mark timing belt rotation direction. Ensure timing marks on camshaft sprockets are aligned. See
Fig. 8
. Loosen timing belt tensioner lock bolt, and move tensioner away from belt with spring fully
expanded. Remove timin
g belt. NOTE: For 1997-98 vehicles, the manufacturer recommends the belt be replaced at
60,000 mile intervals for vehicles sold outside of California and Massachusetts.
For vehicles sold in California and Massachusetts, inspect timing belt at 60,000
and 90,000 miles, and replace timing belt at 105,000 miles.
1997 Mazda MX-5 Miata
1997-98 ENGINES 1.8L 4-Cylinder
Microsoft
Sunday, July 05, 2009 1:55:15 PMPage 12 © 2005 Mitchell Repair Information Company, LLC.
Page 219 of 514
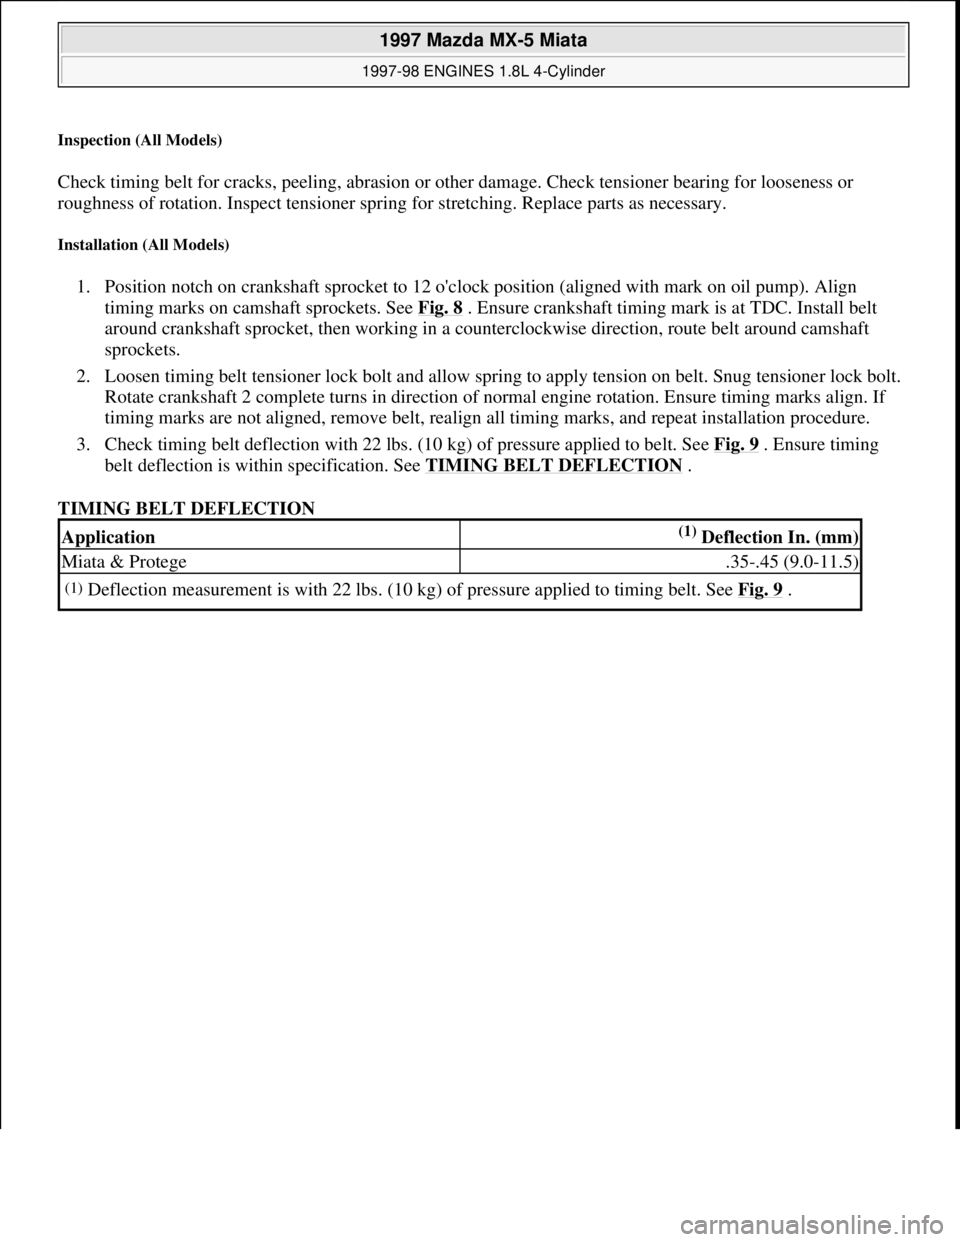
Inspection (All Models)
Check timing belt for cracks, peeling, abrasion or other damage. Check tensioner bearing for looseness or
roughness of rotation. Inspect tensioner spring for stretching. Replace parts as necessary.
Installation (All Models)
1. Position notch on crankshaft sprocket to 12 o'clock position (aligned with mark on oil pump). Align
timing marks on camshaft sprockets. See Fig. 8
. Ensure crankshaft timing mark is at TDC. Install belt
around crankshaft sprocket, then working in a counterclockwise direction, route belt around camshaft
sprockets.
2. Loosen timing belt tensioner lock bolt and allow spring to apply tension on belt. Snug tensioner lock bolt.
Rotate crankshaft 2 complete turns in direction of normal engine rotation. Ensure timing marks align. If
timing marks are not aligned, remove belt, realign all timing marks, and repeat installation procedure.
3. Check timing belt deflection with 22 lbs. (10 kg) of pressure applied to belt. See Fig. 9
. Ensure timing
belt deflection is within specification. See TIMING BELT DEFLECTION
.
TIMING BELT DEFLECTION
Application(1) Deflection In. (mm)
Miata & Protege.35-.45 (9.0-11.5)
(1)Deflection measurement is with 22 lbs. (10 kg) of pressure applied to timing belt. See Fig. 9 .
1997 Mazda MX-5 Miata
1997-98 ENGINES 1.8L 4-Cylinder
Microsoft
Sunday, July 05, 2009 1:55:15 PMPage 13 © 2005 Mitchell Repair Information Company, LLC.