open bonnet MERCEDES-BENZ A CLASS 2012 Owners Manual
[x] Cancel search | Manufacturer: MERCEDES-BENZ, Model Year: 2012, Model line: A CLASS, Model: MERCEDES-BENZ A CLASS 2012Pages: 356, PDF Size: 4.96 MB
Page 8 of 356
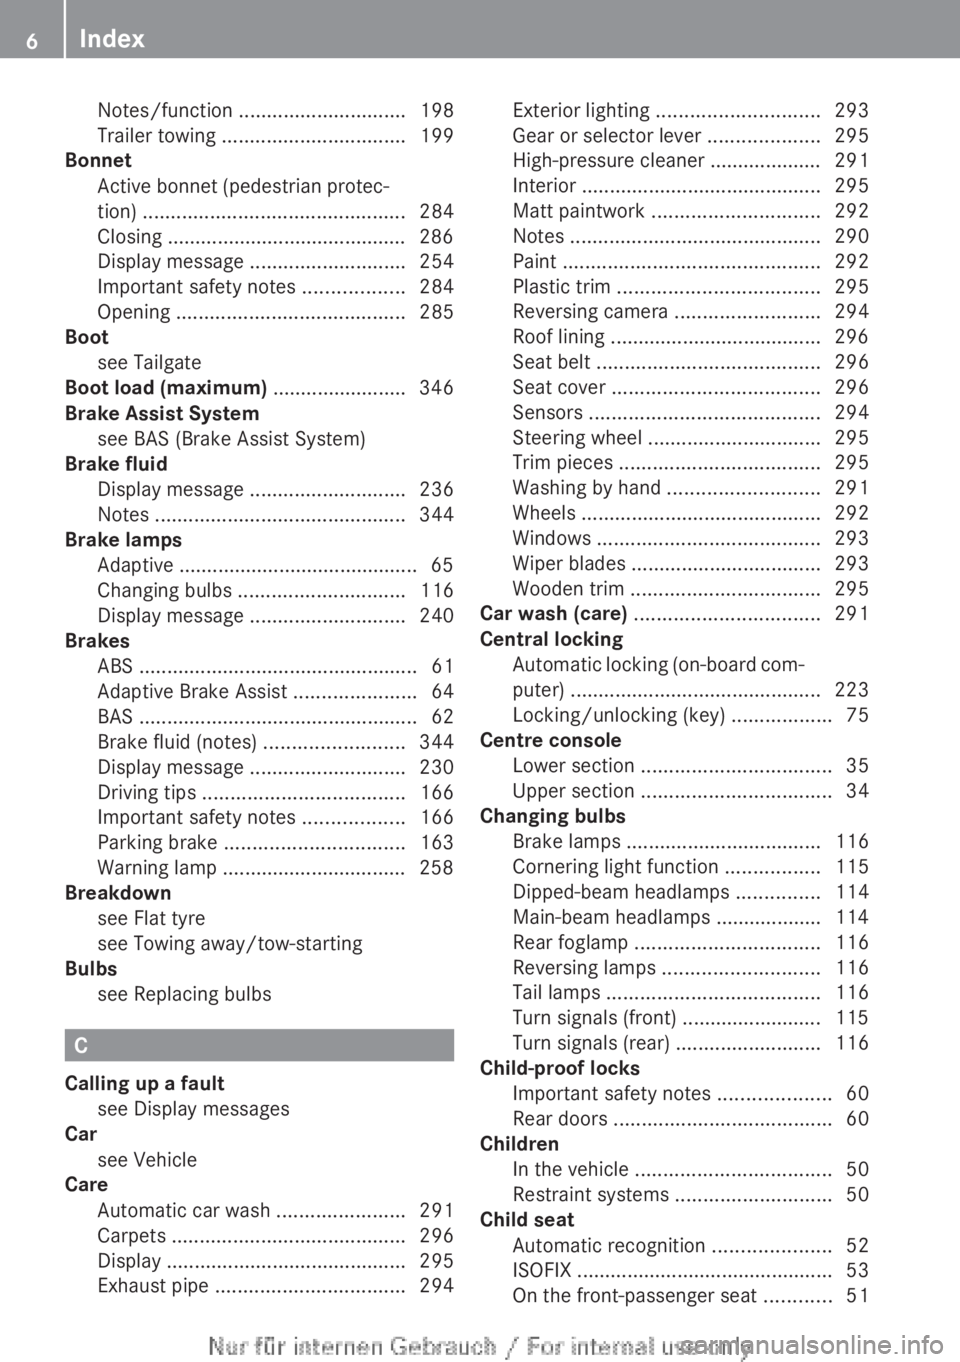
Notes/function
.............................. 198
Trailer towing ................................. 199
Bonnet
Active
bonnet (pedestrian protec-
tion) ............................................... 284
Closing ........................................... 286
Display message ............................ 254
Important safety notes .................. 284
Opening ......................................... 285
Boot
see Tailgate
Boot load (maximum) ........................ 346
Brake Assist System see BAS (Brake Assist System)
Brake fluid
Display message ............................ 236
Notes ............................................. 344
Brake lamps
Adaptive ........................................... 65
Changing bulbs .............................. 116
Display message ............................ 240
Brakes
ABS .................................................. 61
Adaptive Brake Assist ......................64
BAS .................................................. 62
Brake fluid (notes) .........................344
Display message ............................ 230
Driving tips .................................... 166
Important safety notes .................. 166
Parking brake ................................ 163
Warning lamp ................................. 258
Breakdown
see Flat tyre
see Towing away/tow-starting
Bulbs
see Replacing bulbs C
Calling up a fault see Display messages
Car
see Vehicle
Care
Automatic car wash ....................... 291
Carpets .......................................... 296
Display ........................................... 295
Exhaust pipe .................................. 294Exterior lighting
............................. 293
Gear or selector lever ....................295
High-pressure cleaner ....................
291
Interior ........................................... 295
Matt paintwork .............................. 292
Notes ............................................. 290
Paint .............................................. 292
Plastic trim .................................... 295
Reversing camera ..........................294
Roof lining ...................................... 296
Seat belt ........................................ 296
Seat cover ..................................... 296
Sensors ......................................... 294
Steering wheel ............................... 295
Trim pieces .................................... 295
Washing by hand ........................... 291
Wheels ........................................... 292
Windows ........................................ 293
Wiper blades .................................. 293
Wooden trim .................................. 295
Car wash (care) ................................. 291
Central locking Automatic locking (on-board com-
puter) ............................................. 223
Locking/unlocking (key) ..................75
Centre console
Lower section .................................. 35
Upper section .................................. 34
Changing bulbs
Brake lamps ................................... 116
Cornering light function .................115
Dipped-beam headlamps ............... 114
Main-beam headlamps ................... 114
Rear foglamp ................................. 116
Reversing lamps ............................ 116
Tail lamps ...................................... 116
Turn signals (front) ......................... 115
Turn signals (rear) .......................... 116
Child-proof locks
Important safety notes .................... 60
Rear doors ....................................... 60
Children
In the vehicle ................................... 50
Restraint systems ............................ 50
Child seat
Automatic recognition ..................... 52
ISOFIX .............................................. 53
On the front-passenger seat ............516
Index
Page 30 of 356
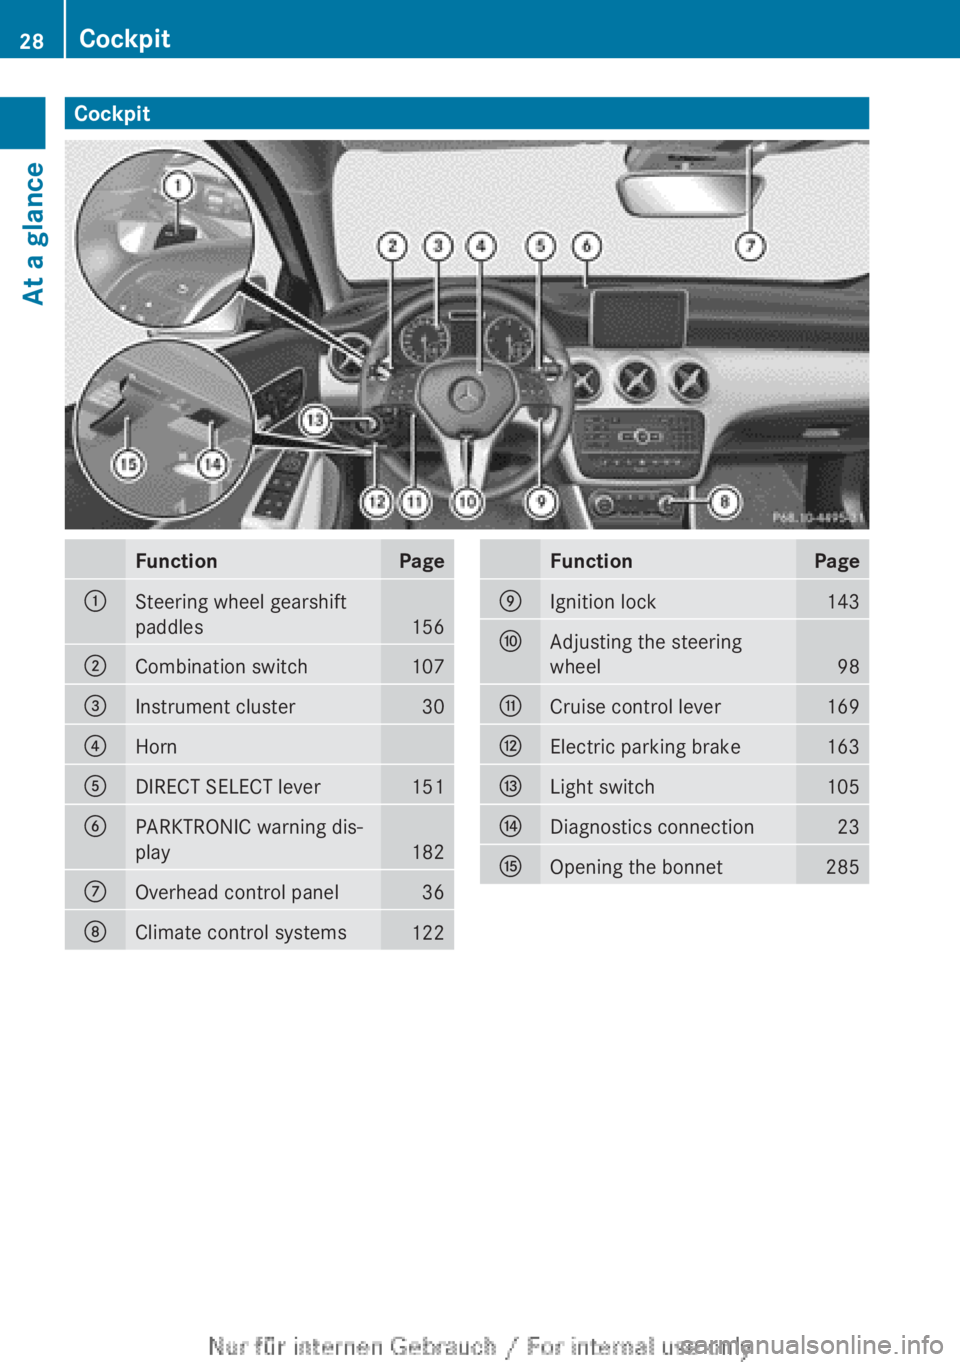
Cockpit
Function Page
:
Steering wheel gearshift
paddles
156
;
Combination switch 107
=
Instrument cluster 30
?
Horn
A
DIRECT SELECT lever 151
B
PARKTRONIC warning dis-
play
182
C
Overhead control panel 36
D
Climate control systems
122 Function Page
E
Ignition lock 143
F
Adjusting the steering
wheel
98
G
Cruise control lever 169
H
Electric parking brake 163
I
Light switch 105
J
Diagnostics connection 23
K
Opening the bonnet 28528
CockpitAt a glance
Page 31 of 356
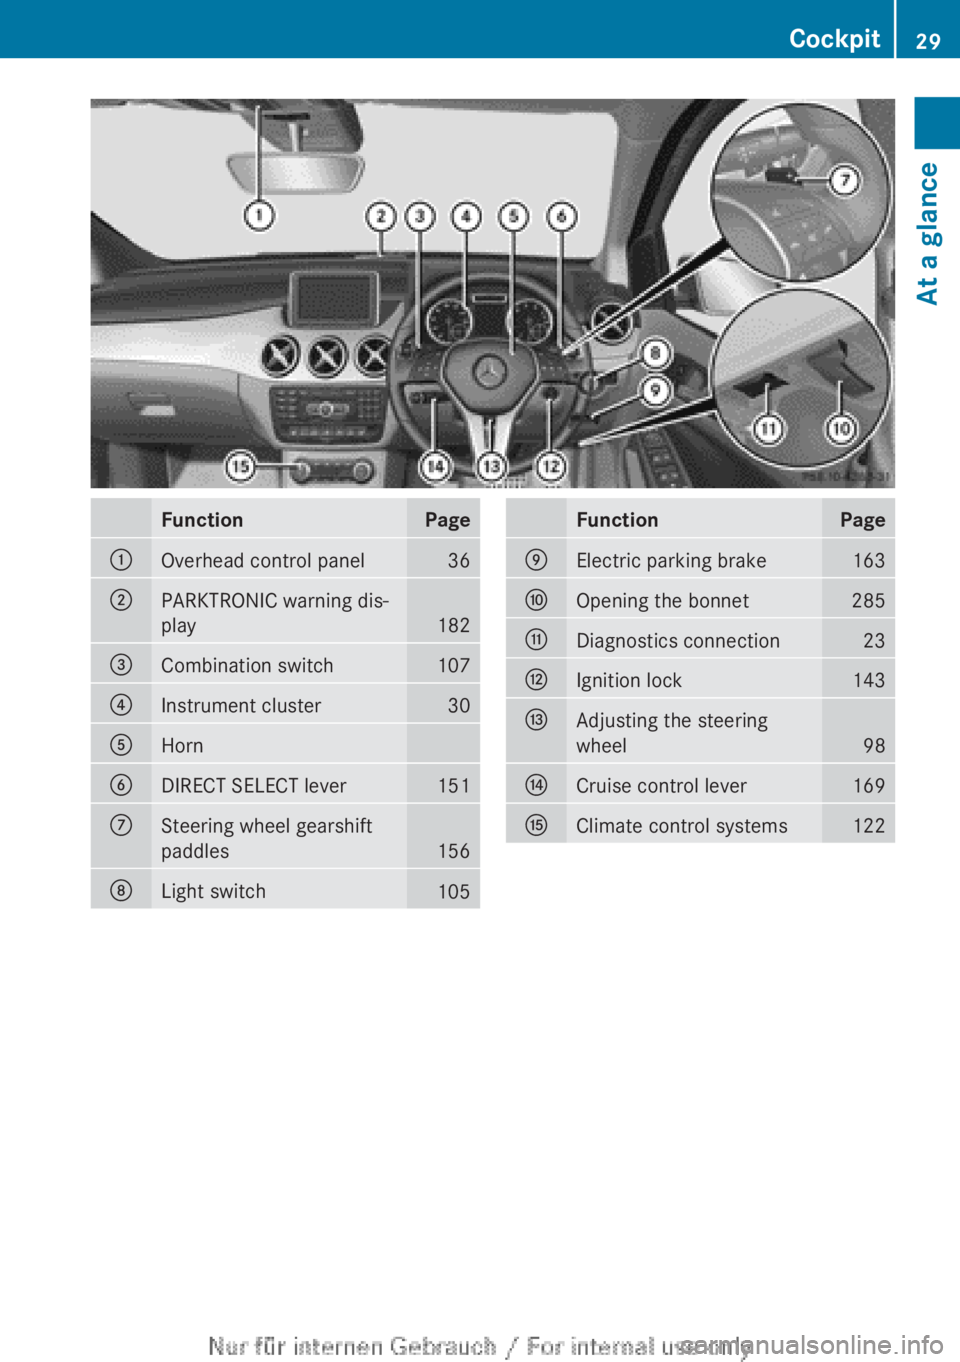
Function Page
:
Overhead control panel 36
;
PARKTRONIC warning dis-
play
182
=
Combination switch 107
?
Instrument cluster 30
A
Horn
B
DIRECT SELECT lever 151
C
Steering wheel gearshift
paddles
156
D
Light switch
105 Function Page
E
Electric parking brake 163
F
Opening the bonnet 285
G
Diagnostics connection 23
H
Ignition lock 143
I
Adjusting the steering
wheel
98
J
Cruise control lever 169
K
Climate control systems 122Cockpit
29At a glance
Page 72 of 356
A visual and audible alarm is triggered if the
alarm system is primed and you open:
R
the vehicle with the emergency key ele-
ment
R a door
R the tailgate
R the bonnet
X To stop the alarm: insert the key into the
ignition lock.
The alarm is switched off.
or
X Press the % or & button on the key.
The alarm is switched off.
The alarm is not switched off, even if you
close the open door that has triggered it, for
example. Tow-away protection
Function An audible and visual alarm is triggered if your
vehicle's angle of inclination is altered while
tow-away
protection is primed. This can occur
if the vehicle is jacked up on one side, for
example.
Activating X
Make sure that:
R
the doors are closed.
R the tailgate is closed.
Only then is the tow-away protection
primed.
X Lock the vehicle with the key.
Tow-away protection is primed after
approximately
60 seconds.
Deactivating X
Unlock the vehicle with the key.
or
X Insert the key into the ignition lock.
Tow-away protection is switched off auto-
matically. Deactivating
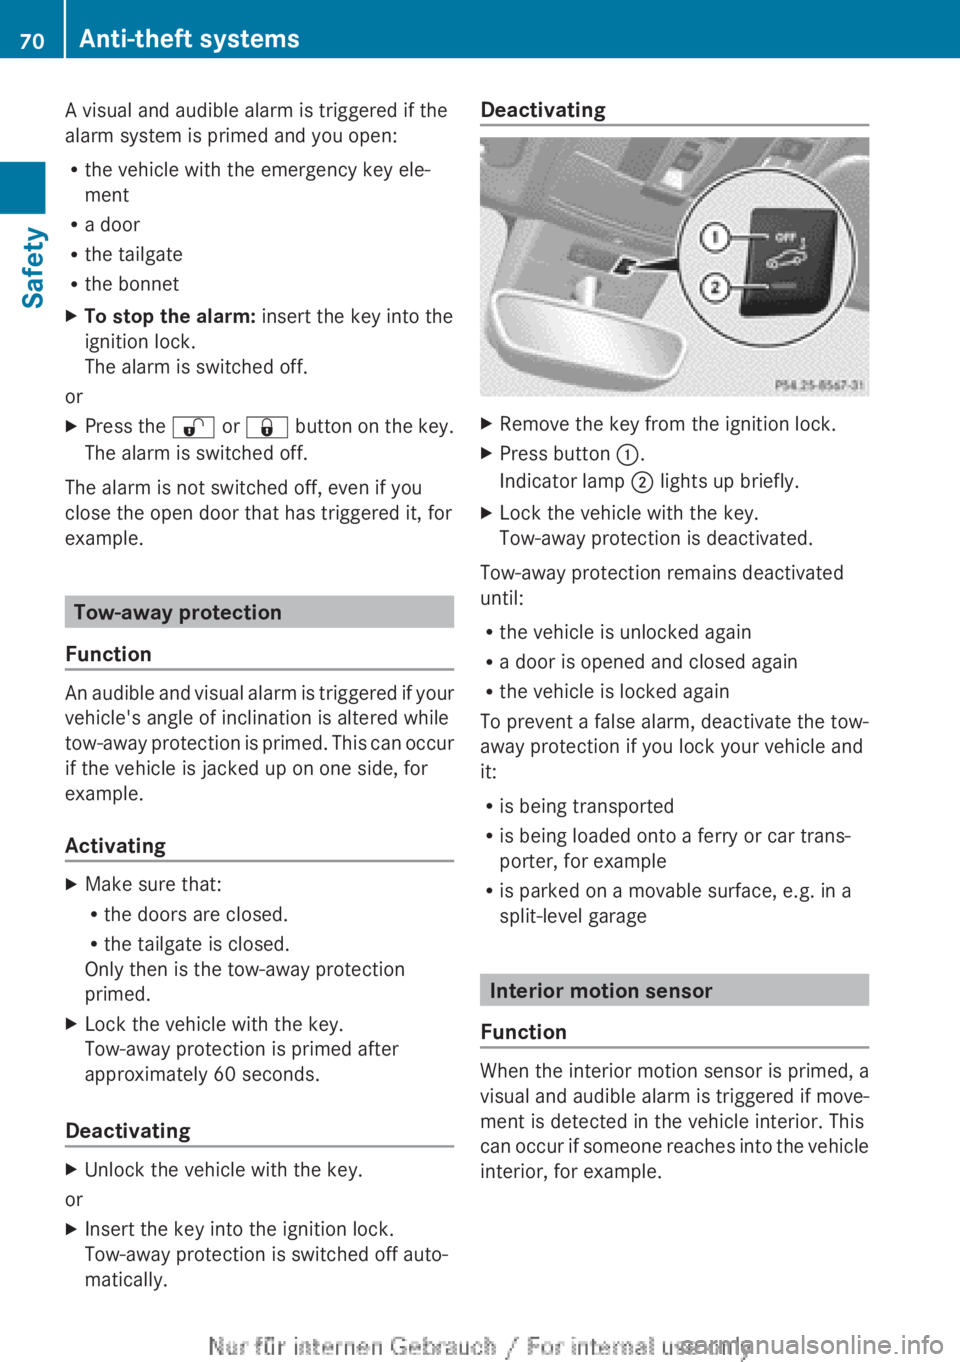
X
Remove the key from the ignition lock.
X Press button :.
Indicator lamp ; lights up briefly.
X Lock the vehicle with the key.
Tow-away protection is deactivated.
Tow-away protection remains deactivated
until:
R the vehicle is unlocked again
R a door is opened and closed again
R the vehicle is locked again
To prevent a false alarm, deactivate the tow-
away protection if you lock your vehicle and
it:
R is being transported
R is being loaded onto a ferry or car trans-
porter, for example
R is parked on a movable surface, e.g. in a
split-level garage Interior motion sensor
Function When the interior motion sensor is primed, a
visual
and audible alarm is triggered if move-
ment is detected in the vehicle interior. This
can occur if someone reaches into the vehicle
interior, for example. 70
Anti-theft systems
Safety
Page 116 of 356
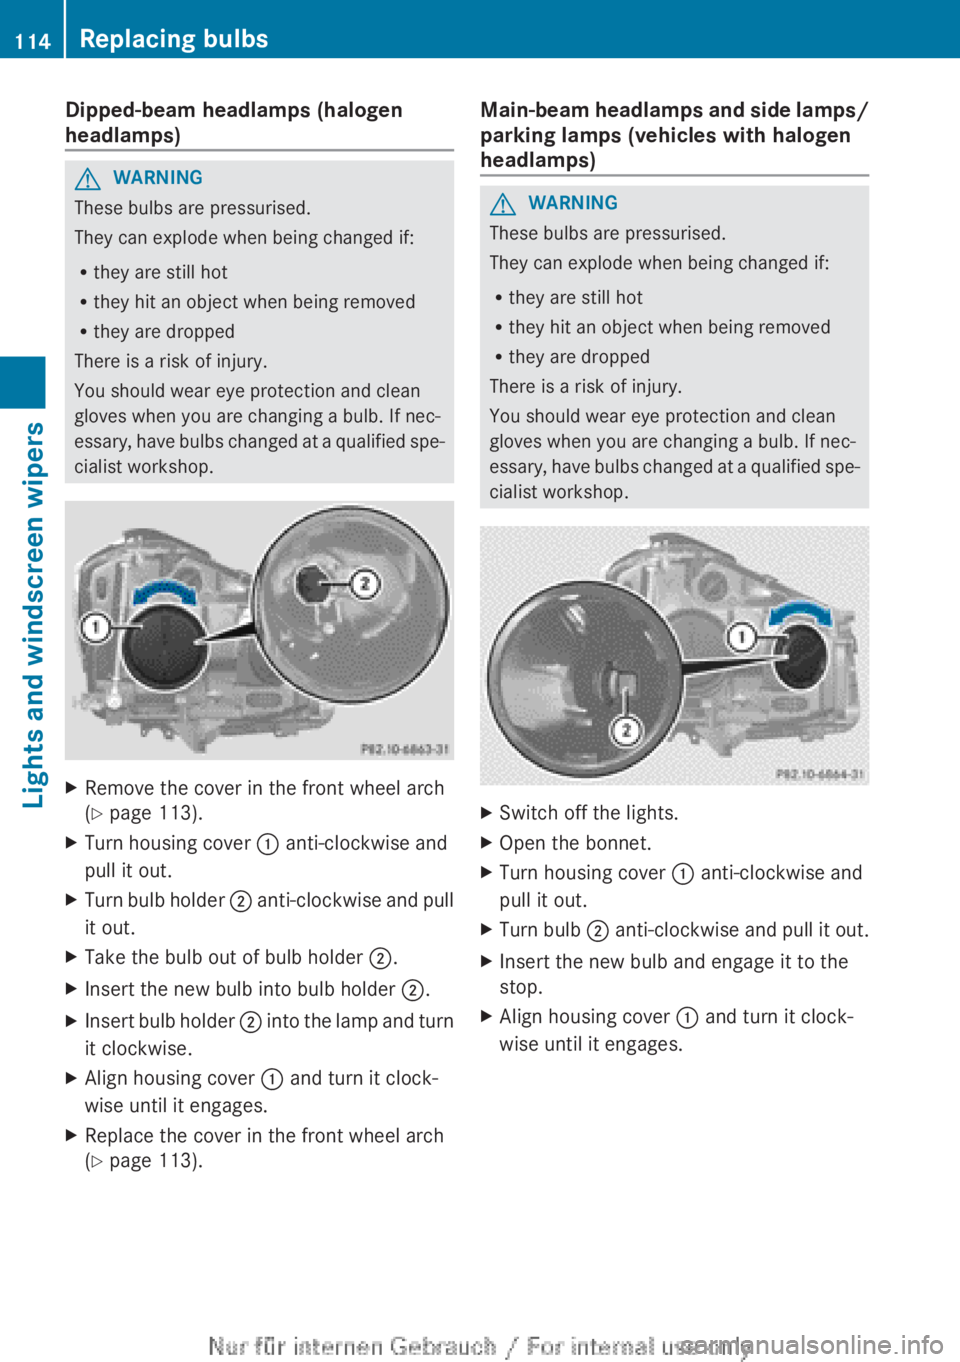
Dipped-beam headlamps (halogen
headlamps)
G
WARNING
These bulbs are pressurised.
They can explode when being changed if:
R they are still hot
R they hit an object when being removed
R they are dropped
There is a risk of injury.
You should wear eye protection and clean
gloves when you are changing a bulb. If nec-
essary,
have bulbs changed at a qualified spe-
cialist workshop. X
Remove the cover in the front wheel arch
(Y page 113).
X Turn housing cover : anti-clockwise and
pull it out.
X Turn bulb holder ;
anti-clockwise and pull
it out.
X Take the bulb out of bulb holder ;.
X Insert the new bulb into bulb holder ;.
X Insert bulb holder ;
into the lamp and turn
it clockwise.
X Align housing cover : and turn it clock-
wise until it engages.
X Replace the cover in the front wheel arch
(Y page 113). Main-beam headlamps and side lamps/
parking lamps (vehicles with halogen
headlamps) G
WARNING
These bulbs are pressurised.
They can explode when being changed if:
R they are still hot
R they hit an object when being removed
R they are dropped
There is a risk of injury.
You should wear eye protection and clean
gloves when you are changing a bulb. If nec-
essary,
have bulbs changed at a qualified spe-
cialist workshop. X
Switch off the lights.
X Open the bonnet.
X Turn housing cover : anti-clockwise and
pull it out.
X Turn bulb ;
anti-clockwise and pull it out.
X Insert the new bulb and engage it to the
stop.
X Align housing cover : and turn it clock-
wise until it engages.114
Replacing bulbs
Lights and windscreen wipers
Page 117 of 356
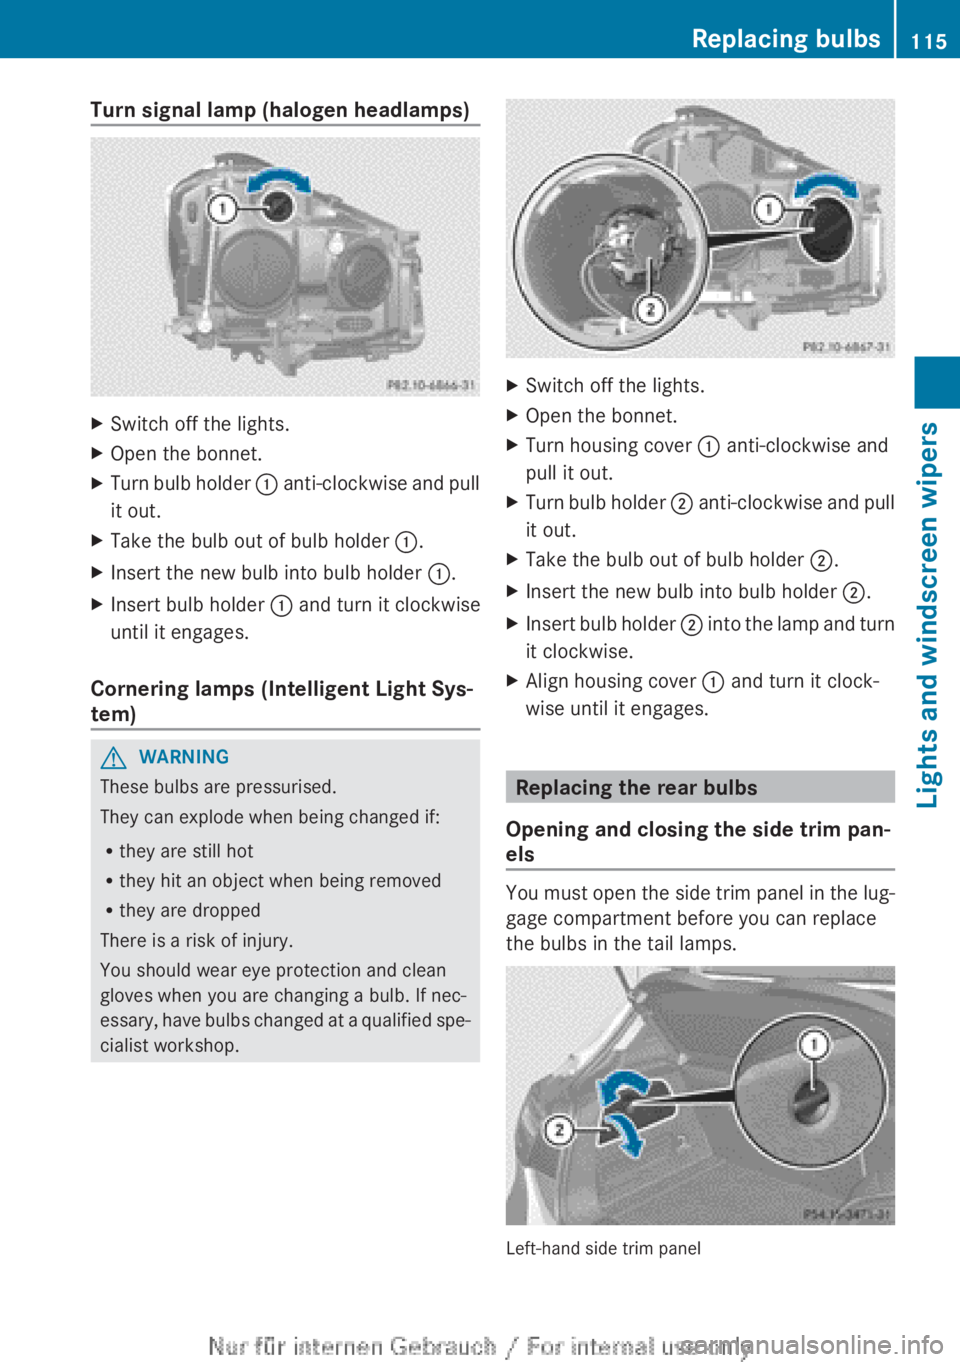
Turn signal lamp (halogen headlamps)
X
Switch off the lights.
X Open the bonnet.
X Turn bulb holder : anti-clockwise and pull
it out.
X Take the bulb out of bulb holder :.
X Insert the new bulb into bulb holder :.
X Insert bulb holder : and turn it clockwise
until it engages.
Cornering lamps (Intelligent Light Sys-
tem) G
WARNING
These bulbs are pressurised.
They can explode when being changed if:
R they are still hot
R they hit an object when being removed
R they are dropped
There is a risk of injury.
You should wear eye protection and clean
gloves when you are changing a bulb. If nec-
essary,
have bulbs changed at a qualified spe-
cialist workshop. X
Switch off the lights.
X Open the bonnet.
X Turn housing cover : anti-clockwise and
pull it out.
X Turn bulb holder ;
anti-clockwise and pull
it out.
X Take the bulb out of bulb holder ;.
X Insert the new bulb into bulb holder ;.
X Insert bulb holder ;
into the lamp and turn
it clockwise.
X Align housing cover : and turn it clock-
wise until it engages. Replacing the rear bulbs
Opening and closing the side trim pan-
els You must open the side trim panel in the lug-
gage compartment before you can replace
the bulbs in the tail lamps.
Left-hand side trim panel Replacing bulbs
115
Lights and windscreen wipers Z
Page 120 of 356
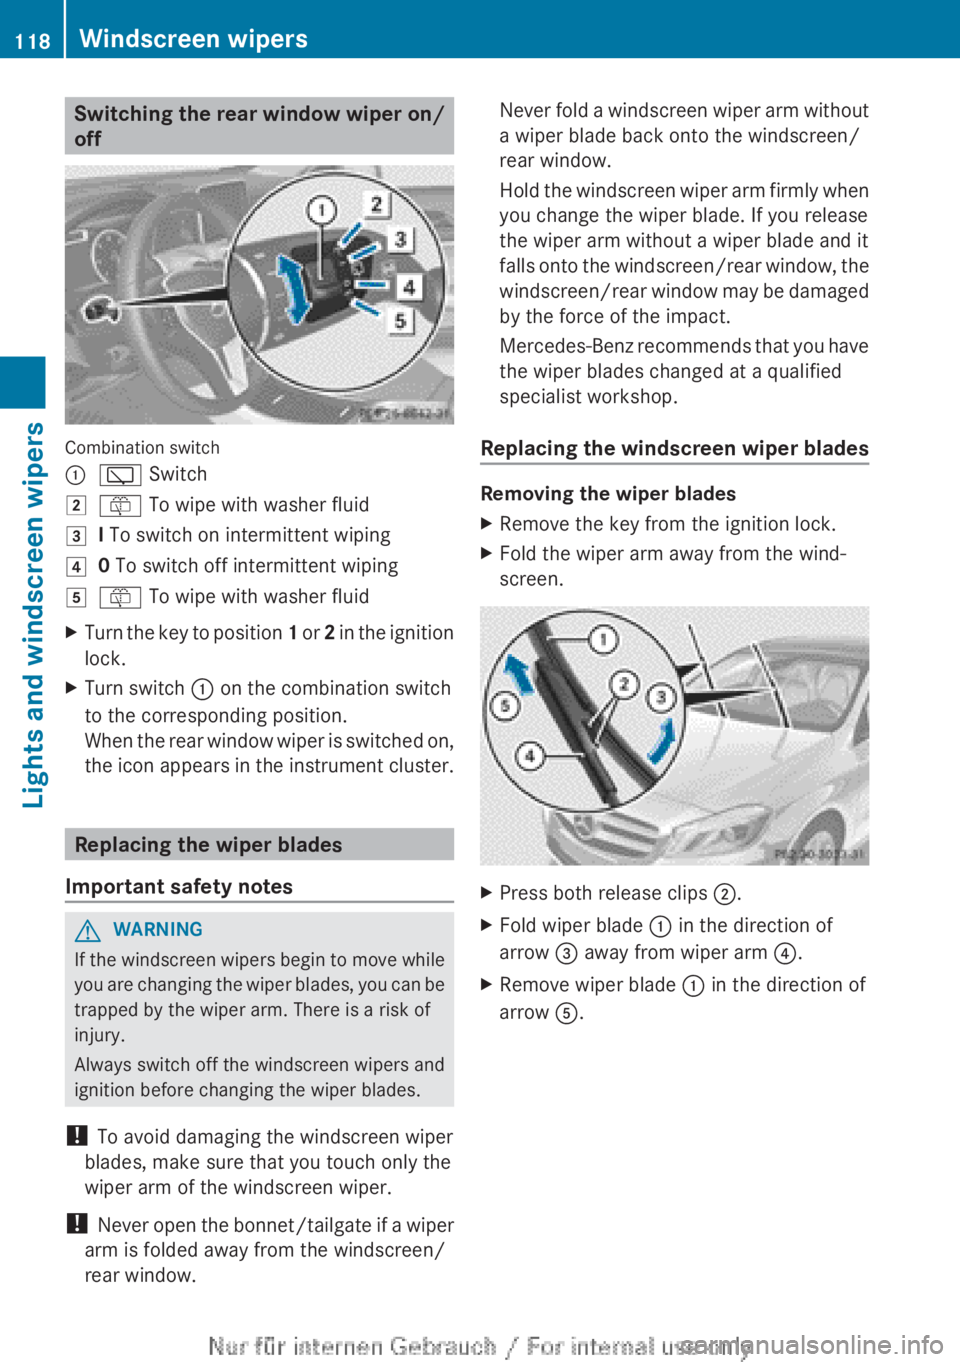
Switching the rear window wiper on/
off
Combination switch
:
è Switch
2 ô To wipe with washer fluid
3 I To switch on intermittent wiping
4 0 To switch off intermittent wiping
5 ô To wipe with washer fluid
X Turn the key to position 1 or 2 in the ignition
lock.
X Turn switch : on the combination switch
to the corresponding position.
When
the rear window wiper is switched on,
the icon appears in the instrument cluster. Replacing the wiper blades
Important safety notes G
WARNING
If the windscreen wipers begin to move while
you
are changing the wiper blades, you can be
trapped by the wiper arm. There is a risk of
injury.
Always switch off the windscreen wipers and
ignition before changing the wiper blades.
! To avoid damaging the windscreen wiper
blades, make sure that you touch only the
wiper arm of the windscreen wiper.
! Never open the bonnet/tailgate if a wiper
arm is folded away from the windscreen/
rear window. Never fold a windscreen wiper arm without
a wiper blade back onto the windscreen/
rear window.
Hold
the windscreen wiper arm firmly when
you change the wiper blade. If you release
the wiper arm without a wiper blade and it
falls onto the windscreen/rear window, the
windscreen/rear window may be damaged
by the force of the impact.
Mercedes-Benz recommends that you have
the wiper blades changed at a qualified
specialist workshop.
Replacing the windscreen wiper blades Removing the wiper blades
X
Remove the key from the ignition lock.
X Fold the wiper arm away from the wind-
screen. X
Press both release clips ;.
X Fold wiper blade : in the direction of
arrow = away from wiper arm ?.
X Remove wiper blade : in the direction of
arrow A.118
Windscreen wipers
Lights and windscreen wipers
Page 141 of 356
Display messages Possible causes/consequences and
M SolutionsThe auxiliary heating cannot be switched on or has switched itself
off.
There is too little fuel in the fuel tank.
X
Refuel at the nearest filling station.
X Make another attempt to switch on the auxiliary heating using
the remote control. The auxiliary heating cannot be switched on or has switched itself
off.
The auxiliary heating is faulty.
X
Have the auxiliary heating checked at a qualified specialist
workshop. Adjusting the air vents
Important safety notes
G
WARNING
Very hot or very cold air can flow from the air
vents. This could result in burns or frostbite in
the immediate vicinity of the air vents. There
is a risk of injury.
Make sure that all vehicle occupants always
maintain a sufficient distance to the air out-
lets. If necessary, redirect the airflow to
another area of the vehicle interior.
In order to ensure the direct flow of fresh air
through the air vents into the vehicle interior,
please observe the following notes:
R keep the air inlet between the windscreen
and the bonnet free of blockages, such as
ice, snow or leaves.
R never cover the vents or ventilation grilles
in the vehicle interior.
i Move the adjusters for the air vents ver-
tically or horizontally, to set the direction of
the airflow.
i Optimal climate control function is ach-
ieved by opening the air vents fully and set-
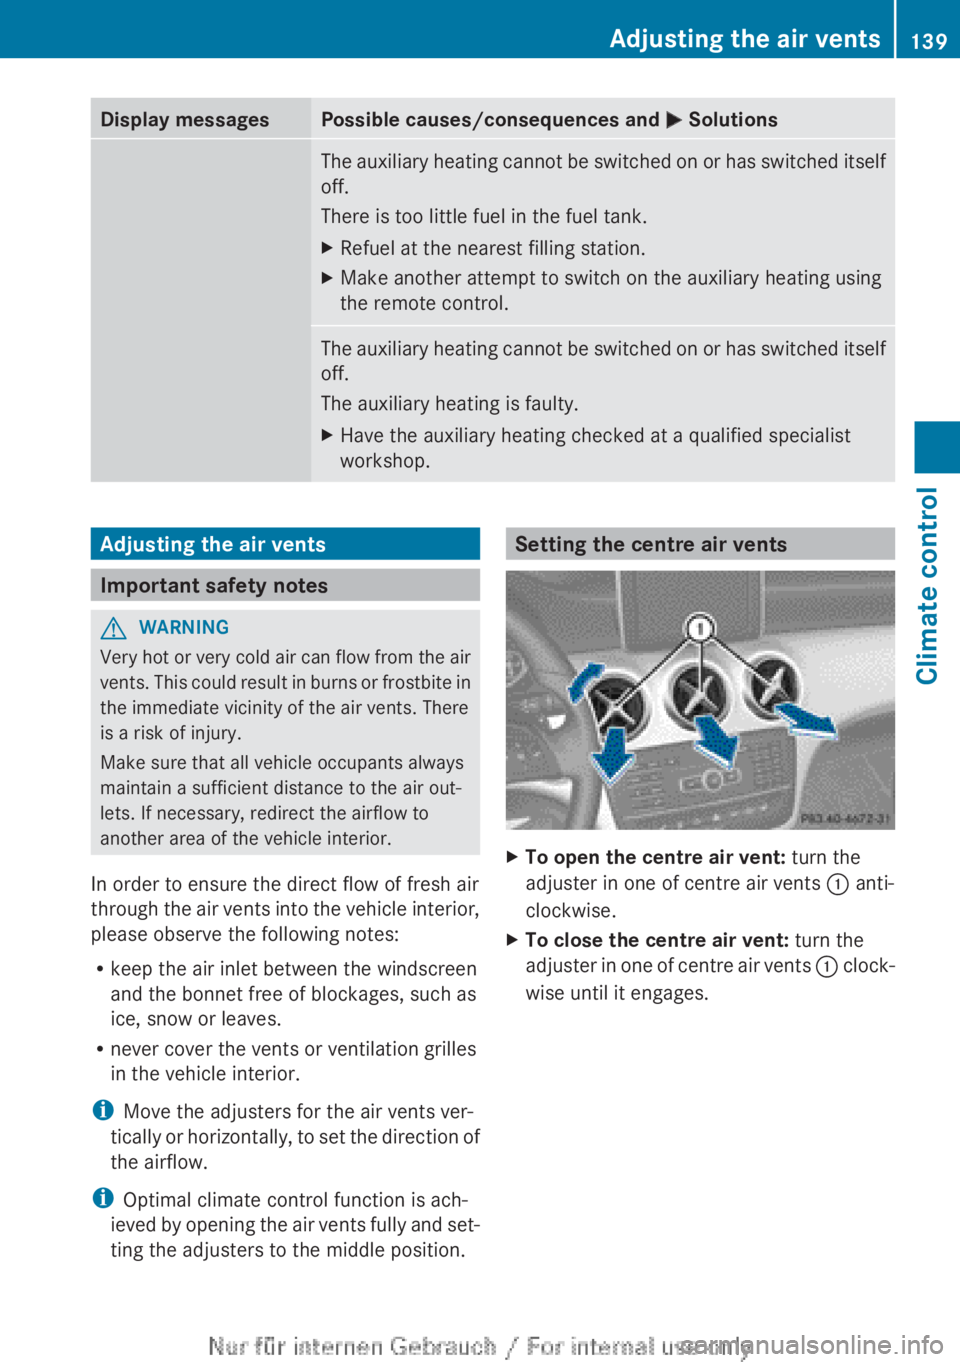
ting the adjusters to the middle position. Setting the centre air vents
X
To open the centre air vent: turn the
adjuster in one of centre air vents : anti-
clockwise.
X To close the centre air vent: turn the
adjuster
in one of centre air vents : clock-
wise until it engages. Adjusting the air vents
139
Climate control Z
Page 183 of 356
The electric parking brake secures the vehicle
automatically if the HOLD function is activa-
ted and:
R
the driver's door is open and the driver's
seat belt is unfastened
R the
engine is switched off, unless it is auto-
matically switched off by the ECO start/
stop function
R a system fault occurs
R the power supply is not sufficient
Vehicles with automatic transmission
If a fault occurs, then the transmission may
also be shifted into position P automatically.
Vehicles with manual transmission
The Brake immediately message can also
appear in the multifunction display.
X Immediately depress the brake pedal firmly
until
the warning message in the multifunc-
tion display goes out.
The HOLD function is deactivated.
A horn will sound at regular intervals if you
turn off the engine, take off your seat belt or
open the driver's door when the HOLD func-
tion is activated. The horn alerts you to the
fact that the HOLD function is still activated.
If you attempt to lock the vehicle, the tone
becomes louder. The vehicle cannot be
locked until you have deactivated the HOLD
function.
i Once you have switched off the engine,
you cannot restart it until you have deacti-
vated the HOLD function. RACE START
Important safety notes RACE START enables optimum acceleration
from a standing start. The precondition for
this is a suitable high-grip road surface.
Only
activate RACE START on dedicated race
circuits. i
RACE
START is only available in AMG vehi-
cles.
Activation conditions You can activate RACE START if:
R
the doors, the bonnet and the tailgate are
closed
R the
engine is running and the transmission,
traction control and engine are at operating
temperature
R SPORT handling mode is activated
(Y page 66)
R the steering wheel is in the straight-ahead
position.
R the vehicle is stationary and the brake
pedal is depressed (left foot)
R the transmission is in position D.
R drive program M is selected ( Y page 155).
Activating RACE START X
Depress the brake pedal with your left foot
and keep it depressed.
X Pull and hold both steering wheel gearshift
paddles.
X The RACE START Confirm: Paddle UP
Cancel: Paddle DOWN message appears
in the multifunction display.
X Release both steering wheel gearshift pad-
dles.
i If the activation conditions are no longer
fulfilled, RACE START is cancelled. The
RACE START not possible See Own‐
er's
Manual message appears in the mul-
tifunction display.
X To cancel:
pull the left steering wheel shift
paddle (Y page 156).
or
X To confirm: pull the right steering wheel
shift paddle
(Y page 156).
The RACE START available Depress
accelerator message appears in the mul-
tifunction display. Driving systems
181
Driving and parking Z
Page 246 of 356
Display messages Possible causes/consequences and
M Solutions?
Coolant Stop vehi‐
cle Switch engine
off The coolant is too hot.
A warning tone also sounds.
G WARNING
Never drive with an overheated engine. Driving when your engine
is overheated can cause some fluids which may have leaked into
the engine compartment to catch fire.
Steam
from an overheated engine can cause serious burns, which
can occur just by opening the bonnet.
There is a risk of injury.
X Stop the vehicle immediately, paying attention to road and traf-
fic conditions, and switch off the engine.
X Secure the vehicle against rolling away ( Y page 162).
X Wait until the engine has cooled down.
X Make sure that the air supply to the engine radiator is not
blocked, e.g. by frozen slush.
X Do not start the engine again until the display message goes out
and the coolant temperature is below
120 †. The engine may
otherwise be damaged.
X Pay attention to the coolant temperature display.
X If the temperature increases again, visit a qualified specialist
workshop immediately.
Under normal operating conditions and with the specified coolant
level, the coolant temperature may rise to
120 †.# The battery is not being charged.
A warning tone also sounds.
Possible causes:
R
faulty alternator
R torn poly-V-belt
R a malfunction in the electronics
X Stop the vehicle immediately, paying attention to road and traf-
fic conditions, and switch off the engine.
X Open the bonnet.
X Check whether the poly-V-belt is torn.
If the poly-V-belt is torn:
! Do
not continue driving. The engine could otherwise overheat.
X Consult a qualified specialist workshop.
If the poly-V-belt is OK:
X Visit a qualified specialist workshop immediately.244
Display messages
On-board computer and displays