MERCEDES-BENZ A-CLASS HATCHBACK 2008 Owners Manual
Manufacturer: MERCEDES-BENZ, Model Year: 2008, Model line: A-CLASS HATCHBACK, Model: MERCEDES-BENZ A-CLASS HATCHBACK 2008Pages: 305, PDF Size: 5.43 MB
Page 111 of 305

On-board computer
108 Lighting submenu
R
Constant headlamp mode (daytime driv-
ing lights) (Y page 109)
R Surround lighting* (Y page 110)
R Exterior lighting delayed switch-off*
(Y page 110)
R Interior lighting delayed switch-off
(Y page 110) Vehicle submenu
R
Permanent Speedtronic* (Y page 120)
R Radio station selection *( Ypage 111)
R Automatic locking feature (Y page 111)Convenience submenu*
R
Fold the exterior mirrors in when locking
the vehicle* (Y page 111) Selecting the unit of measurement for
distance
The selected unit of measurement for dis-
tance applies to:
R
the total distance recorder and the trip
meter
R the trip computer
R the digital speedometer 15
R the navigation instruction in the Naviga-
tion* menu
R Speedtronic*
X Press the èor· button to select the
Settings menu.
X Press the jbutton to select submenus.
X Press the æorç button to select the
Inst. cluster submenu.
X Press the jbutton to select Display
unit Speed/odom.
X Press æorç to select km(kilome-
tres) or milesas the unit of measurement
for distance.
X Press the j,èorÿ button to
select a different display. Selecting the language X
Press the èor· button to select the
Settings menu.
X Press the jbutton to select submenus.
X Press the æorç button to select the
Inst. cluster submenu.
X Press the jbutton to select Lan-
guage .
X Press the æorç button to select the
desired language.
X Press the j,èorÿ button to
select a different display.
Selecting the status line display Vehicles for the United Kingdom: this func-
tion is not available.
X
Press the èor· button to select the
Settings menu.
X Press the jbutton to select submenus.
X Press the æorç button to select the
Instr. cluster submenu.
X Press the jbutton to select Status
line display.
15 Vehicles for the United Kingdom: the digital speedometer always displays km/h. Controls
* optional
169_AKB; 2; 4, en-GB
wdomann,
Version: 2.10.6
2008-07-16T08:52:06+02:00 - Seite 108 Dateiname: 6515_0315_02_buchblock.pdf; preflight
Page 112 of 305

On-board computer
109
X
Press the æorç button to select the
status line display: outside temperature
(Outside temp. ) or speed (Speed).
The selected display now appears con-
stantly in the lower multi-function display.
When you scroll through the Operation
menu (Y page 102), you will see the display
you have not selected.
X Press the j,èorÿ button to
select a different display.
Setting the date and time Your vehicle may be equipped with one of the
following audio systems*:
A:
Audio 5* or Audio 20*
B: Audio 50 APS*
C: COMAND APS*
X You can see which audio system *is fitted
in your vehicle by referring to the separate
operating instructions.
Depending on the audio system*, the time
and date are received from GPS satellites and
cannot be set using the on-board computer
(see the following table). A B C
Set using the on-board com-
puter X
Automatic GPS satellite recep-
tion X X
X
Press the èor· button to select the
Settings menu.
X Press the jbutton to select submenus.
X Press the æorç button to select the
Time/Date submenu.
Setting the time
X Press the jbutton to select Time
Hours (orTime Minutes).
X Press the æorç button to set a
value. Setting the date
X
Press the jbutton to select Date Set
day (orDate Set month orDate Set
year ).
X Press the æorç button to set the
date.
X Press the j,èorÿ button to
select a different display.
Setting constant headlamp mode (day-
time driving lights) When you activate constant headlamp mode
and the light switch is set to
MorU,
the parking lamps, dipped-beam headlamps
and licence plate lighting are switched on
automatically when the engine is running.
Turning the light switch to a different position
switches on the corresponding lights. Turn
the light switch to BorU first if you
wish to switch off constant headlamp mode
while driving in the dark.
In countries in which constant headlamp
mode is a legal requirement, Constantis the
factory setting.
X Press the èor· button to select the
Settings menu.
X Press the jbutton to select submenus. Controls
* optional
169_AKB; 2; 4, en-GB
wdomann,
Version: 2.10.6 2008-07-16T08:52:06+02:00 - Seite 109 ZDateiname: 6515_0315_02_buchblock.pdf; preflight
Page 113 of 305

On-board computer
110
X
Press the æorç button to select the
Lighting submenu.
X Press the jbutton to select Headlamp
mode.
X Press the æorç button to set the
switch-on mode for the headlamps to Man-
ual orConstant (constant headlamp
mode).
X Press the j,èorÿ button to
select a different display.
Switching the surround lighting*on/off If the surround lighting is switched on, the
following lights will be switched on automat-
ically in the dark after you have unlocked the
vehicle using the key:
R the side lamps
R the licence plate lighting
R the front foglamps*
The surround lighting switches off automati-
cally after 40 seconds or when the driver's
door is opened.
X Press the èor· button to select the
Settings menu.
X Press the jbutton to select submenus. X
Press the æorç button to select the
Lighting submenu.
X Press the jbutton to select Surround
lighting.
X Press the æorç button to switch
the Surround lighting on or off.
X Press the j,èorÿ button to
select a different display.
Activating or deactivating the exterior
lighting delayed switch-off* When you activate the
Headl. delayed
switch-off function, the exterior lighting
remains on for another 15 seconds after clos-
ing the doors when it is dark. If the engine is
switched off and then none of the doors are
opened, or if an open door is not closed, the
exterior lighting goes out after 60 seconds.
If you have activated the delayed switch-off
function and switched off the engine, the fol-
lowing remain lit:
R the side lamps
R the licence plate lighting
R the front foglamps* X
Press the èor· button to select the
Settings menu.
X Press the jbutton to select submenus.
X Press the æorç button to select the
Lighting submenu.
X Press the jbutton to select Headl.
delayed switch-off .
X Press the æorç button to activate
or deactivate the Headl. delayed
switch-off function.
X Press the j,èorÿ button to
select a different display.
To temporarily deactivate the switch-off
delay:
X Before leaving the vehicle, turn the key to
position 0in the ignition lock.
X Turn the key to position 2in the ignition
lock and back to position 0.
Delayed switch-off is deactivated.
When you start the engine again, the switch-
off delay is reactivated.
Activating/deactivating the interior
lighting delayed switch-off If you remove the key from the ignition lock
while the
Interior lighting delayed Controls
* optional
169_AKB; 2; 4, en-GB
wdomann,
Version: 2.10.6
2008-07-16T08:52:06+02:00 - Seite 110 Dateiname: 6515_0315_02_buchblock.pdf; preflight
Page 114 of 305
On-board computer
111
switch off
function is activated, the interior
lighting remains on for 10 seconds if it is dark.
X Press the èor· button to select the
Settings menu.
X Press the jbutton to select submenus.
X Press the æorç button to select the
Lighting submenu.
X Press the jbutton to select Inter.
lighting delay.sw.off.
X Press the æorç button to activate
or deactivate Inter. lighting
delay.sw.off.
X Press the j,èorÿ button to
select a different display.
Setting the radio station selection* This function is only available in conjunction
with Audio 5*.
The
Audio Search allows you to set whether
a new station is searched for every time you
switch on the radio* or a previously stored
station is selected.
X Press the èor· button to select the
Settings menu.
X Press the jbutton to select submenus. X
Press the æorç button to select the
Vehicle submenu.
X Press the jbutton to select Audio
search.
X Press the æorç button to select the
Frequency orMemory setting.
If the Frequency setting is selected, the
station search is started. If the Memoryset-
ting is selected, the next stored station is
selected.
X Press the j,èorÿ button to
select a different display.
Activating/deactivating the automatic
door locking feature When you activate the
Automatic door
locking function, your vehicle will be cen-
trally locked above a speed of approx.
15 km/h.
i For more information on the automatic
door locking feature, see (Y page 61).
X Press the èor· button to select the
Settings menu.
X Press the jbutton to select submenus.
X Press the æorç button to select the
Vehicle submenu. X
Press the jbutton to select Automatic
door lock.
X Press the æorç button to switch
the Automatic door lock feature on or
off.
X Press the j,èorÿ button to
select a different display.
Activating or deactivating the Fold in
mirrors when locking*function When you activate the
Fold mirr. in when
locking function, the exterior mirrors are
folded in when the vehicle is locked. If you
unlock the vehicle and then open the driver's
or front-passenger door, the exterior mirrors
fold out again.
When you fold the exterior mirrors in using
the button on the door with the Fold in mirrors
when locking function activated (Y page 72),
the exterior mirrors do not fold out automat-
ically. The exterior mirrors can then only be
folded out using the button on the door.
X Press the èor· button to select the
Settings menu.
X Press the jbutton to select submenus.
X Press the æorç button to select the
Convenience submenu. Controls
* optional
169_AKB; 2; 4, en-GB
wdomann,
Version: 2.10.6 2008-07-16T08:52:06+02:00 - Seite 111 ZDateiname: 6515_0315_02_buchblock.pdf; preflight
Page 115 of 305
On-board computer
112
X
Press the jbutton to select Fold in
mirrors when locking.
X Press the æorç button to activate
or deactivate Fold in mirrors when
locking.
X Press the j,èorÿ button to
select a different display. Trip computer menu
You can use the Trip computermenu to call
up or reset statistical data for your vehicle.
i Please refer to the menu overview
(Y page 101).
You can select kmormiles as the unit of
measurement for distance (Y page 108).
Use the buttons on the multi-function steer-
ing wheel.
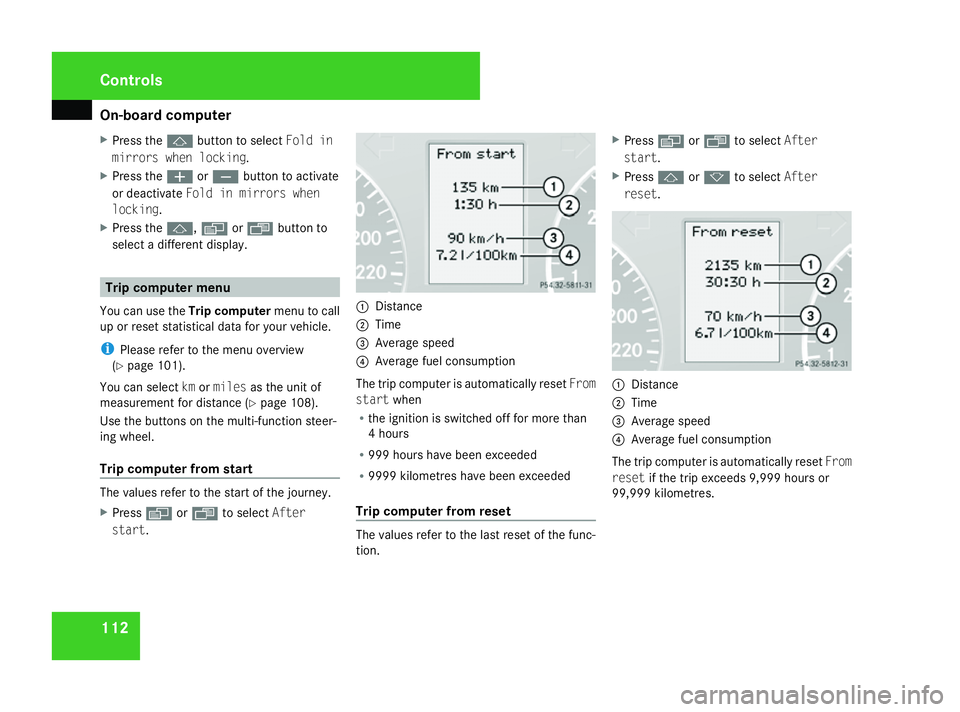
Trip computer from start The values refer to the start of the journey.
X Press èor· to select After
start . 1
Distance
2 Time
3 Average speed
4 Average fuel consumption
The trip computer is automatically reset From
start when
R the ignition is switched off for more than
4 hours
R 999 hours have been exceeded
R 9999 kilometres have been exceeded
Trip computer from reset The values refer to the last reset of the func-
tion.X
Press èor· to select After
start .
X Press jork to select After
reset . 1
Distance
2 Time
3 Average speed
4 Average fuel consumption
The trip computer is automatically reset From
reset if the trip exceeds 9,999 hours or
99,999 kilometres. Controls
169_AKB; 2; 4, en-GB
wdomann,
Version: 2.10.6
2008-07-16T08:52:06+02:00 - Seite 112 Dateiname: 6515_0315_02_buchblock.pdf; preflight
Page 116 of 305
On-board computer
113
Resetting X
Using èor·, select From start.
X Press the jork button to select the
function that you wish to reset.
X Press and hold the reset button on the left
of the instrument cluster until the values
have reverted to "0".
Calling up the range X
Using èor·, select From start.
X Press the jork button to select
Range:.
The multi-function display shows the esti-
mated range of the vehicle, based on the
current driving style and the fuel level. If
there is only a small amount of fuel remain-
ing in the fuel tank, a vehicle refuelling
¿ appears instead of the range. Telephone menu*
Functions and displays depend on the
optional equipment installed in your vehicle.
You can place your mobile phone in the
mobile phone bracket* (Y page 164), or set
up a Bluetooth connection to the audio sys-
tem* or COMAND APS* (see separate oper-
ating instructions). G
Risk of accident
You must observe the legal requirements
for the country in which you are currently
driving when operating a mobile phone in
the vehicle.
If it is permitted to operate a mobile phone
while the vehicle is in motion, only operate
it when road and traffic conditions permit.
You could otherwise be distracted from the
traffic conditions, cause an accident and
injure yourself and others.
i Please refer to the menu overview
(Y page 101).
Use the buttons on the multi-function steer-
ing wheel. X
Switch on the mobile phone and audio
equipment* or COMAND APS* (see sepa-
rate operating instructions).
X Press the èor· button to select the
Telephone menu.
Mobile phone on PIN code not yet entered
Once you have inserted the mobile phone into
the mobile phone bracket*, the multi-func-
tion display shows the
PINdisplay message.
X Enter the PIN using the mobile phone, Lin-
guatronic*, the audio system *or COMAND
APS*.
The mobile phone will search for a network.
Mobile phone operational
You will see Readyor the name of the mobile
phone network provider in the multi-function
display. If the operational readiness symbol
of the mobile phone goes out, your vehicle is
outside the transmission and reception
range. In this case you will see No Service
in the multi-function display. Controls
* optional
169_AKB; 2; 4, en-GB
wdomann,
Version: 2.10.6 2008-07-16T08:52:06+02:00 - Seite 113 ZDateiname: 6515_0315_02_buchblock.pdf; preflight
Page 117 of 305
On-board computer
114
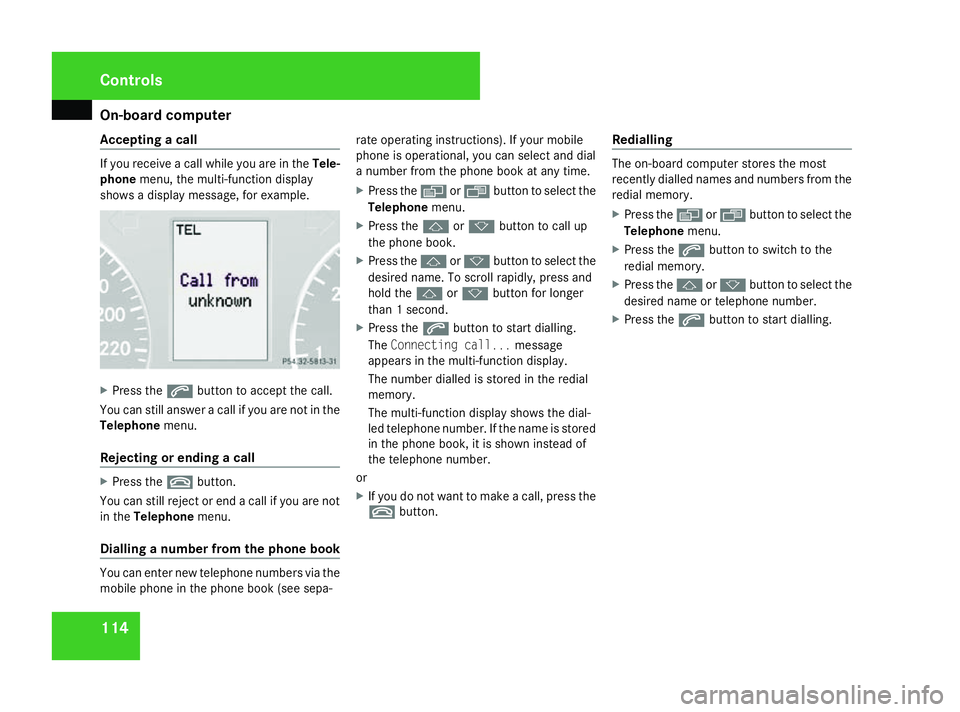
Accepting a call If you receive a call while you are in the
Tele-
phone menu, the multi-function display
shows a display message, for example. X
Press the sbutton to accept the call.
You can still answer a call if you are not in the
Telephone menu.
Rejecting or ending a call X
Press the tbutton.
You can still reject or end a call if you are not
in the Telephone menu.
Dialling a number from the phone book You can enter new telephone numbers via the
mobile phone in the phone book (see sepa- rate operating instructions). If your mobile
phone is operational, you can select and dial
a number from the phone book at any time.
X
Press the èor· button to select the
Telephone menu.
X Press the jork button to call up
the phone book.
X Press the jork button to select the
desired name. To scroll rapidly, press and
hold the jork button for longer
than 1 second.
X Press the sbutton to start dialling.
The Connecting call... message
appears in the multi-function display.
The number dialled is stored in the redial
memory.
The multi-function display shows the dial-
led telephone number. If the name is stored
in the phone book, it is shown instead of
the telephone number.
or
X If you do not want to make a call, press the
t button. Redialling The on-board computer stores the most
recently dialled names and numbers from the
redial memory.
X
Press the èor· button to select the
Telephone menu.
X Press the sbutton to switch to the
redial memory.
X Press the jork button to select the
desired name or telephone number.
X Press the sbutton to start dialling. Controls
169_AKB; 2; 4, en-GB
wdomann,
Version: 2.10.6
2008-07-16T08:52:06+02:00 - Seite 114 Dateiname: 6515_0315_02_buchblock.pdf; preflight
Page 118 of 305
Driving sys
tems 115Driving systems
Overview of driving systems
The vehicle's driving systems are described
on the following pages:
R Cruise control* and Speedtronic*, which
are used to control the speed of the vehicle
R Parktronic * and active parking assist*,
which can help you to find a parking space,
to manoeuvre and park
R ECO Start-Stop function*, helps you to
save fuel
The ABS, BAS, adaptive brake lights, ESP ®
and STEER CONTROL driving safety systems
are described in the "Driving safety systems"
section ( Ypage 55). Cruise control*
Cruise control maintains a constant road
speed for you. You must select a low gear in
good time on long and steep downhill gradi-
ents, especially if the vehicle is laden or tow-
ing a trailer. By doing so you will make use of
the braking effect of the engine, which
relieves the load on the brake system and
prevents the brakes from overheating and
wearing too quickly. G
Risk of accident
Never depress the brake pedal continu-
ously while the vehicle is in motion, e.g.
never cause the brakes to rub by applying
constant slight pedal pressure. This causes
the brake system to overheat, increases
the braking distance and can lead to the
brakes failing completely. G
Risk of accident
Do not change down for additional engine
braking on a slippery road surface. This
could cause the drive wheels to lose their
grip and the vehicle could skid.
Use cruise control only if road and traffic con-
ditions make it appropriate to maintain a
steady speed for a prolonged period. You can
store any road speed above 30 km/h. G
Risk of accident
Cruise control cannot take account of road
and traffic conditions.
Always pay attention to traffic conditions
even when cruise control is activated.
Cruise control is only an aid designed to
assist driving. You are responsible for the
vehicle's speed and for braking in good
time. G
Risk of accident
Do not use cruise control:
R in road and traffic conditions which do
not allow you to maintain a constant
speed (e.g. heavy traffic or winding
roads). You could otherwise cause an
accident.
R on slippery roads. Braking or accelerat-
ing could cause the drive wheels to lose
traction and the vehicle could then skid.
R when there is poor visibility, e.g. due to
fog, heavy rain or snow
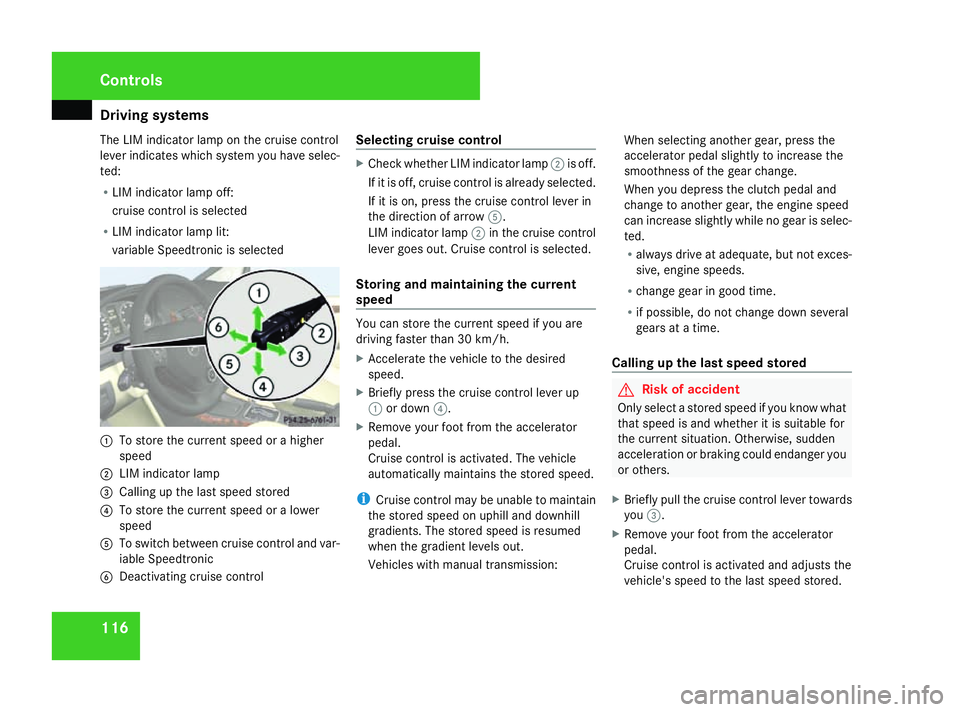
Cruise control lever You can operate cruise control and variable
Speedtronic with the cruise control lever. Controls
* optional
169_AKB; 2; 4, en-GB
wdomann,
Version: 2.10.6 2008-07-16T08:52:06+02:00 - Seite 115 ZDateiname: 6515_0315_02_buchblock.pdf; preflight
Page 119 of 305
Driving sys
tems 116
The LIM indicator lamp on the cruise control
lever indicates which system you have selec-
ted:
R LIM indicator lamp off:
cruise control is selected
R LIM indicator lamp lit:
variable Speedtronic is selected 1
To store the current speed or a higher
speed
2 LIM indicator lamp
3 Calling up the last speed stored
4 To store the current speed or a lower
speed
5 To switch between cruise control and var-
iable Speedtronic
6 Deactivating cruise control Selecting cruise control X
Check whether LIM indicator lamp 2is off.
If it is off, cruise control is already selected.
If it is on, press the cruise control lever in
the direction of arrow 5.
LIM indicator lamp 2in the cruise control
lever goes out. Cruise control is selected.
Storing and maintaining the current
speed You can store the current speed if you are
driving faster than 30 km/
h.
X Accelerate the vehicle to the desired
speed.
X Briefly press the cruise control lever up
1 or down 4.
X Remove your foot from the accelerator
pedal.
Cruise control is activated. The vehicle
automatically maintains the stored speed.
i Cruise control may be unable to maintain
the stored speed on uphill and downhill
gradients. The stored speed is resumed
when the gradient levels out.
Vehicles with manual transmission: When selecting another gear, press the
accelerator pedal slightly to increase the
smoothness of the gear change.
When you depress the clutch pedal and
change to another gear, the engine speed
can increase slightly while no gear is selec-
ted.
R
always drive at adequate, but not exces-
sive, engine speeds.
R change gear in good time.
R if possible, do not change down several
gears at a time.
Calling up the last speed stored G
Risk of accident
Only select a stored speed if you know what
that speed is and whether it is suitable for
the current situation. Otherwise, sudden
acceleration or braking could endanger you
or others.
X Briefly pull the cruise control lever towards
you 3.
X Remove your foot from the accelerator
pedal.
Cruise control is activated and adjusts the
vehicle's speed to the last speed stored. Controls
169_AKB; 2; 4, en-GB
wdomann,
Version: 2.10.6
2008-07-16T08:52:06+02:00 - Seite 116 Dateiname: 6515_0315_02_buchblock.pdf; preflight
Page 120 of 305
Driving sys
tems 117
Setting a speed X
Press the cruise control lever up 1for a
higher speed or down 4for a lower speed.
X Keep the cruise control lever pressed until
the desired speed is reached.
X Release the cruise control lever.
The new speed is stored.
i Cruise control is not deactivated if you
depress the accelerator pedal. For exam-
ple, if you accelerate briefly to overtake,
cruise control adjusts the vehicle's speed
to the last speed stored after you have fin-
ished overtaking.
i Vehicles with AUTOTRONIC*:
When you decelerate the vehicle using the
cruise control lever, AUTOTRONIC changes
down if deceleration is insufficient.
Making fine adjustments in
1 km/hincrements X
Briefly press the cruise control lever up
1 for a higher speed or down 4for a
lower speed.
The last speed stored is increased or
reduced. Deactivating cruise control There are several ways to deactivate cruise
control:
X Briefly press the cruise control lever for-
wards 6.
or
X Brake.
or
X Briefly press the cruise control lever in the
direction of arrow 5.
Variable Speedtronic is selected. LIM indi-
cator lamp 2in the cruise control lever
lights up.
Cruise control is automatically deactivated if,
for example:
R aquaplaning is detected
R you press the clutch pedal for more than
four seconds on vehicles with a manual
transmission
R you move the selector lever to Nwhile driv-
ing in vehicles with AUTOTRONIC*
i The last speed stored is cleared when you
switch off the engine. Speedtronic*
Speedtronic is used to make sure that you do
not exceed a stored speed. You must select
a low gear in good time on long and steep
downhill gradients, especially if the vehicle is
laden or towing a trailer. By doing so you will
make use of the braking effect of the engine,
which relieves the load on the brake system
and prevents the brakes from overheating
and wearing too quickly. G
Risk of accident
Never depress the brake pedal continu-
ously while the vehicle is in motion, e.g.
never cause the brakes to rub by applying
constant slight pedal pressure. This causes
the brake system to overheat, increases
the braking distance and can lead to the
brakes failing completely. G
Risk of accident
Do not change down for additional engine
braking on a slippery road surface. This
could cause the drive wheels to lose their
grip and the vehicle could skid. Controls
* optional
169_AKB; 2; 4, en-GB
wdomann,
Version: 2.10.6 2008-07-16T08:52:06+02:00 - Seite 117 ZDateiname: 6515_0315_02_buchblock.pdf; preflight