warning lights MERCEDES-BENZ A-CLASS HATCHBACK 2008 User Guide
[x] Cancel search | Manufacturer: MERCEDES-BENZ, Model Year: 2008, Model line: A-CLASS HATCHBACK, Model: MERCEDES-BENZ A-CLASS HATCHBACK 2008Pages: 305, PDF Size: 5.43 MB
Page 100 of 305

Instrument cluster
97Instrument cluster
Points to remember
You will find an illustration of the instrument
cluster in the "At a glance" section
(Y page 26). G
Risk of accident
No further messages can be displayed if the
instrument cluster and/or the multi-func-
tion display fails.
This means that you will not see information
about the driving situation, such as the
speed, outside temperature, warning/indi-
cator lamps, display messages or system
failures. The vehicle's handling character-
istics may be affected. Adjust your driving
style and speed accordingly.
Immediately consult a qualified specialist
workshop which has the necessary special-
ist knowledge and tools to carry out the
work required. Mercedes-Benz recom-
mends that you use a Mercedes-Benz
Service Centre for this purpose. In particu-
lar, work relevant to safety or on safety-
related systems must be carried out at a
qualified specialist workshop. Activating the multi-function display
X Switch on the ignition. The multi-function display is also activated
when you:
R
switch on the lights
R press reset button 1
R open the driver's door Adjusting the instrument cluster
ligh
ting
X Brighter or dimmer: briefly turn reset but-
ton 1clockwise or anti-clockwise to the
stop and release.
The brightness of the instrument cluster
lighting changes by one level. There are
several possible levels. Coolant temperature gauge
The coolant temperature gauge is in the
instrument cluster on the left-hand side.
Under normal operating conditions and with
the specified coolant level, the coolant tem-
perature may rise to 120 †. The coolant tem-
perature may rise to the top end of the scale
at high outside temperatures and on long
uphill stretches. Controls
169_AKB; 2; 4, en-GB
wdomann, Version: 2.10.6 2008-07-16T08:52:06+02:00 - Seite 97 ZDateiname: 6515_0315_02_buchblock.pdf; preflight
Page 122 of 305
Driving sys
tems 119
Storing the current speed You can use the cruise control lever to limit
the speed to any speed above 30 km/h while
the engine is running.
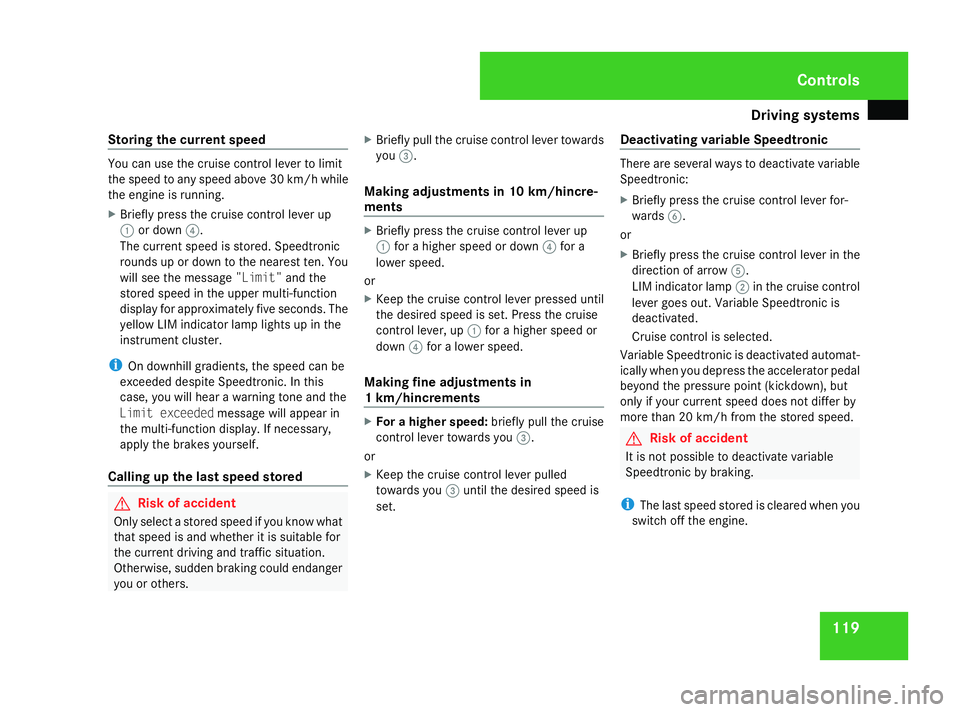
X Briefly press the cruise control lever up
1 or down 4.
The current speed is stored. Speedtronic
rounds up or down to the nearest ten. You
will see the message "Limit"and the
stored speed in the upper multi-function
display for approximately five seconds. The
yellow LIM indicator lamp lights up in the
instrument cluster.
i On downhill gradients, the speed can be
exceeded despite Speedtronic. In this
case, you will hear a warning tone and the
Limit exceeded message will appear in
the multi-function display. If necessary,
apply the brakes yourself.
Calling up the last speed stored G
Risk of accident
Only select a stored speed if you know what
that speed is and whether it is suitable for
the current driving and traffic situation.
Otherwise, sudden braking could endanger
you or others. X
Briefly pull the cruise control lever towards
you 3.
Making adjustments in 10 km/hincre-
ments X
Briefly press the cruise control lever up
1 for a higher speed or down 4for a
lower speed.
or
X Keep the cruise control lever pressed until
the desired speed is set. Press the cruise
control lever, up 1for a higher speed or
down 4for a lower speed.
Making fine adjustments in
1 km/hincrements X
For a higher speed: briefly pull the cruise
control lever towards you 3.
or
X Keep the cruise control lever pulled
towards you 3until the desired speed is
set. Deactivating variable Speedtronic There are several ways to deactivate variable
Speedtronic:
X
Briefly press the cruise control lever for-
wards 6.
or
X Briefly press the cruise control lever in the
direction of arrow 5.
LIM indicator lamp 2in the cruise control
lever goes out. Variable Speedtronic is
deactivated.
Cruise control is selected.
Variable Speedtronic is deactivated automat-
ically when you depress the accelerator pedal
beyond the pressure point (kickdown), but
only if your current speed does not differ by
more than 20 km/h from the stored speed. G
Risk of accident
It is not possible to deactivate variable
Speedtronic by braking.
i The last speed stored is cleared when you
switch off the engine. Controls
169_AKB; 2; 4, en-GB
wdomann,
Version: 2.10.6 2008-07-16T08:52:06+02:00 - Seite 119 ZDateiname: 6515_0315_02_buchblock.pdf; preflight
Page 129 of 305
Driving sys
tems 126
i
In tight parking spaces, you will achieve
the best parking results by reversing as far
as possible. When doing so, also observe
the Parktronic messages.
X Stop as soon as Parktronic sounds the con-
tinuous warning tone, if not before.
Manoeuvring may be required in tight park-
ing spaces.
Vehicles with manual transmission: the mes-
sage Park Assist active Please shift
to a forward gear appears in the multi-
function display.
Vehicles with AUTOTRONIC*: the message
Park Assist active Please shift to
D appears in the multi-function display.
X Vehicles with manual transmission: When
the car is stationary, shift to first gear.
Vehicles with AUTOTRONIC*: When the car
is stationary, set the selector lever to posi-
tion R.
Active parking assist immediately steers in
the other direction.
On the multi-function display, the message:
Park Assist active Please acceler- ate and brake the vehicle yourself
appears.
i You will achieve the best parking results
by waiting for the steering procedure to
complete before moving forwards.
X Drive forwards and be ready to brake at all
times.
X Stop as soon as Parktronic sounds the con-
tinuous warning tone, if not before.
Vehicles with manual transmission: the mes-
sage Park Assist active Please shift
into reverse gear appears in the multi-
function display.
Vehicles with AUTOTRONIC*, the message
Park Assist active Please shift to
R appears in the multi-function display.
X Further gear changes* may be necessary.
As soon as the parking procedure is com-
plete, the message Parking assistance
finished Please take over appears.
Active parking assist is now deactivated.
Parktronic is still available.
X Manoeuvre if necessary.
X Always observe the warning messages dis-
played by Parktronic (Y page 121).Cancelling active parking assist You can cancel active parking assist at any
time.
X
Stop the movement of the multi-function
steering wheel or steer yourself.
Active parking assist will be cancelled at
once. The multi-function display shows the
message: Park Assist cancelled.
or
X Press the Parktronic button on the centre
console (Y page 122).
Parktronic is switched off and active park-
ing assist is immediately cancelled. The
multi-function display shows the message:
Park Assist cancelled.
Active parking assist is cancelled automati-
cally if:
R a gear is changed* too early
R parking using active parking assist is no
longer possible
R you are driving faster than 10 km/h
R a wheel spins, ESP ®
is activated or fails. In
such cases the vwarning lamp lights
up in the instrument cluster. Controls
* optional
169_AKB; 2; 4, en-GB
wdomann,
Version: 2.10.6
2008-07-16T08:52:06+02:00 - Seite 126 Dateiname: 6515_0315_02_buchblock.pdf; preflight
Page 159 of 305
Loading and stowing
156
X
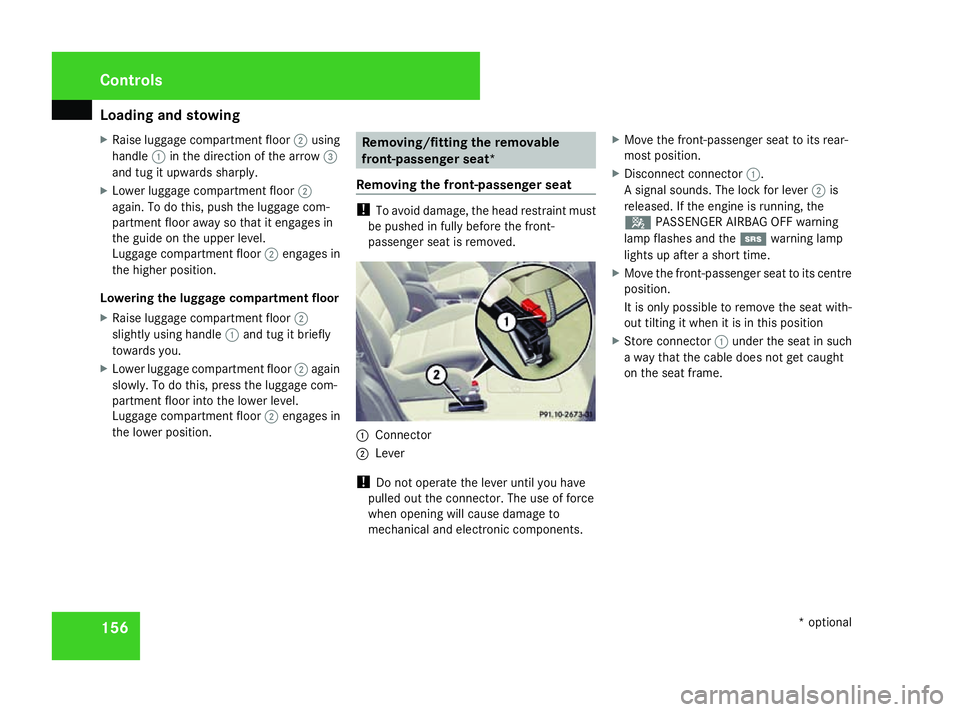
Raise luggage compartment floor 2using
handle 1in the direction of the arrow 3
and tug it upwards sharply.
X Lower luggage compartment floor 2
again. To do this, push the luggage com-
partment floor away so that it engages in
the guide on the upper level.
Luggage compartment floor 2engages in
the higher position.
Lowering the luggage compartment floor
X Raise luggage compartment floor 2
slightly using handle 1and tug it briefly
towards you.
X Lower luggage compartment floor 2again
slowly. To do this, press the luggage com-
partment floor into the lower level.
Luggage compartment floor 2engages in
the lower position. Removing/fitting the removable
front-passenger seat*
Removing the front-passenger seat !
To avoid damage, the head restraint must
be pushed in fully before the front-
passenger seat is removed. 1
Connector
2 Lever
! Do not operate the lever until you have
pulled out the connector. The use of force
when opening will cause damage to
mechanical and electronic components. X
Move the front-passenger seat to its rear-
most position.
X Disconnect connector 1.
A signal sounds. The lock for lever 2is
released. If the engine is running, the
5 PASSENGER AIRBAG OFF warning
lamp flashes and the 1warning lamp
lights up after a short time.
X Move the front-passenger seat to its centre
position.
It is only possible to remove the seat with-
out tilting it when it is in this position
X Store connector 1under the seat in such
a way that the cable does not get caught
on the seat frame. Controls
* optional
169_AKB; 2; 4, en-GB
wdomann,
Version: 2.10.6
2008-07-16T08:52:06+02:00 - Seite 156 Dateiname: 6515_0315_02_buchblock.pdf; preflight
Page 160 of 305
Loading and stowing
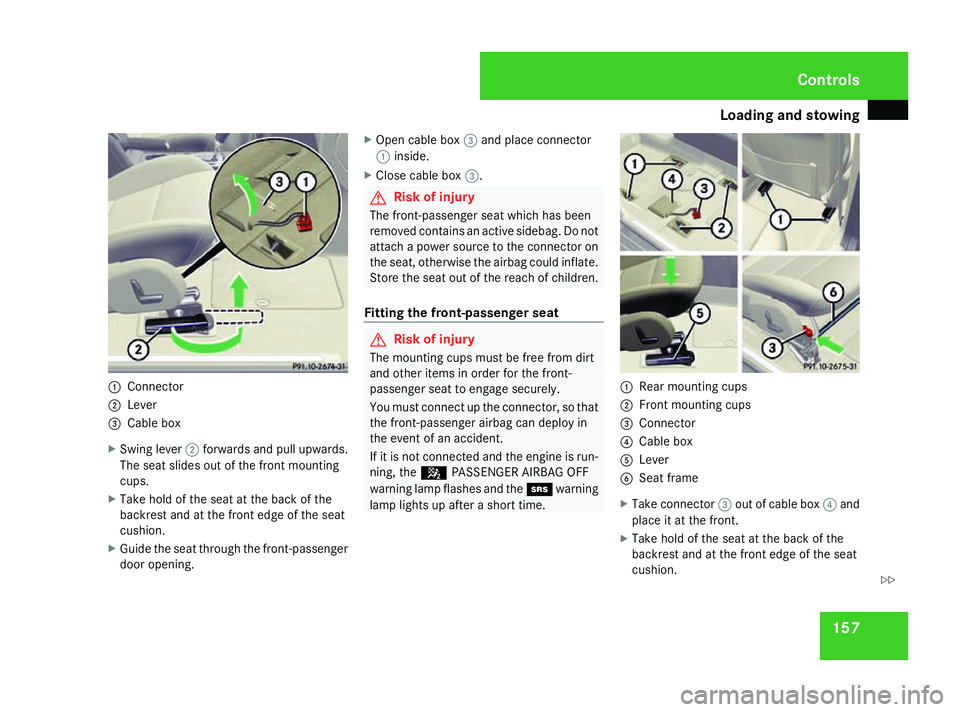
1571
Connector
2 Lever
3 Cable box
X Swing lever 2forwards and pull upwards.
The seat slides out of the front mounting
cups.
X Take hold of the seat at the back of the
backrest and at the front edge of the seat
cushion.
X Guide the seat through the front-passenger
door opening. X
Open cable box 3and place connector
1 inside.
X Close cable box 3. G
Risk of injury
The front-passenger seat which has been
removed contains an active sidebag. Do not
attach a power source to the connector on
the seat, otherwise the airbag could inflate.
Store the seat out of the reach of children.
Fitting the front-passenger seat G
Risk of injury
The mounting cups must be free from dirt
and other items in order for the front-
passenger seat to engage securely.
You must connect up the connector, so that
the front-passenger airbag can deploy in
the event of an accident.
If it is not connected and the engine is run-
ning, the 5PASSENGER AIRBAG OFF
warning lamp flashes and the 1warning
lamp lights up after a short time. 1
Rear mounting cups
2 Front mounting cups
3 Connector
4 Cable box
5 Lever
6 Seat frame
X Take connector 3out of cable box 4and
place it at the front.
X Take hold of the seat at the back of the
backrest and at the front edge of the seat
cushion. Controls
169_AKB; 2; 4, en-GB
wdomann,
Version: 2.10.6
2008-07-16T08:52:06+02:00 - Seite 157 ZDateiname: 6515_0315_02_buchblock.pdf; preflight
Page 225 of 305
Troubleshooting
222 Troubleshooting
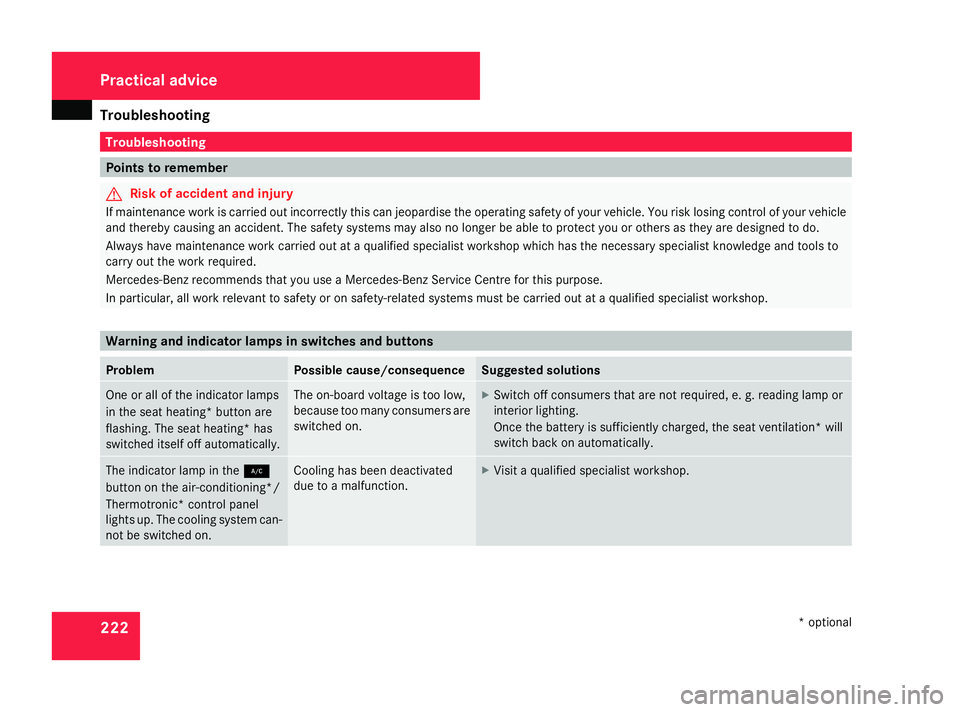
Points to remember
G
Risk of accident and injury
If maintenance work is carried out incorrectl y this can jeopardise the operating safety of your vehicle. You risk losing control of your vehicle
and thereby causing an accident. The safety systems may also no longer be able to protect you or others as they are designed to do.
Always have maintenance work carried out at a qualified specialist workshop which has the necessary specialist knowledge and tools to
carry out the work required.
Mercedes-Benz recommends that you use a Mercedes-Benz Service Centre for this purpose.
In particular, all work relevant to safety or on safety-related systems must be carried out at a qualified specialist workshop. Warning and indicator lamps in switches and buttons
Problem Possible cause/consequence Suggested solutions
One or all of the indicator lamps
in the seat heating* button are
flashing. The seat heating* has
switched itself off automatically. The on-board voltage is too low,
because too many consumers are
switched on. X
Switch off consumers that are not required, e. g. reading lamp or
interior lighting.
Once the battery is sufficiently charged, the seat ventilation* will
switch back on automatically. The indicator lamp in the
2
button on the air-conditioning*/
Thermotronic* control panel
lights up. The cooling system can-
not be switched on. Cooling has been deactivated
due to a malfunction. X
Visit a qualified specialist workshop. Practical advice
* optional
169_AKB; 2; 4, en-GB
wdomann
,V ersion: 2.10.6
2008-07-16T08:52:06+02:00 - Seite 222 Dateiname: 6515_0315_02_buchblock.pdf; preflight
Page 230 of 305
Troubleshooting
227Problem Possible cause/consequence Suggested solutions
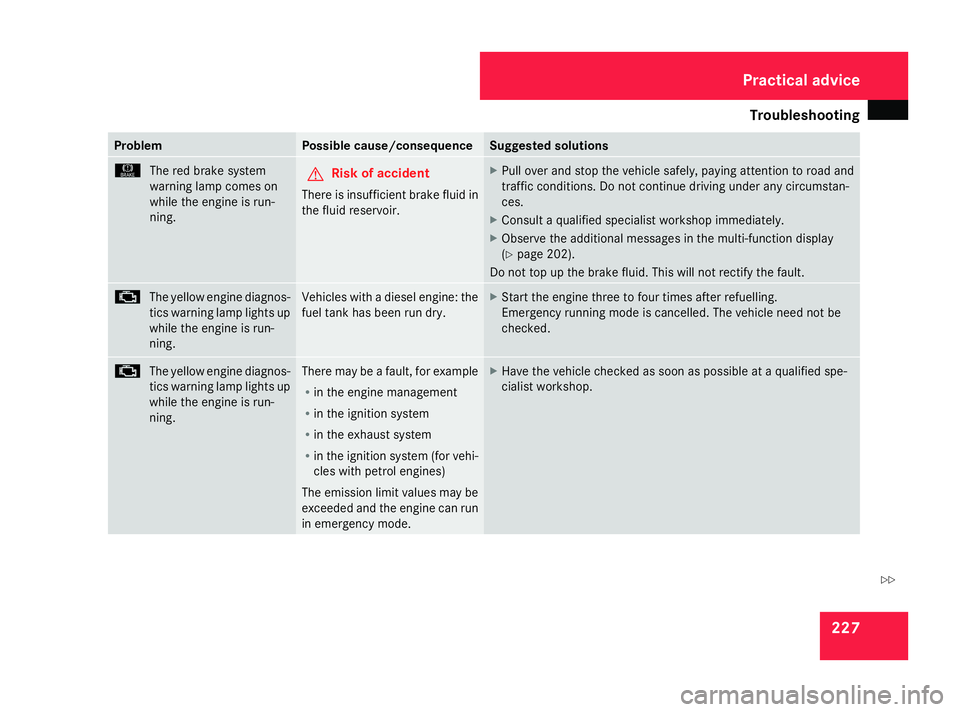
H
The red brake system
warning lamp comes on
while the engine is run-
ning. G
Risk of accident
There is insufficient brake fluid in
the fluid reservoir. X
Pull over and stop the vehicle safely, pa ying attention to road and
traffic conditions. Do not continue driving under any circumstan-
ces.
X Consult a qualified specialist workshop immediately.
X Observe the additional messages in the multi-function display
(Y page 202).
Do not top up the brake fluid. This will not rectify the fault. ±
The yellow engine diagnos-
tics warning lamp lights up
while the engine is run-
ning. Vehicles with a diesel engine: the
fuel tank has been run dry. X
Start the engine three to four times after refuelling.
Emergency running mode is cancelled. The vehicle need not be
checked. ±
The yellow engine diagnos-
tics warning lamp lights up
while the engine is run-
ning. There may be a fault, for example
R
in the engine management
R in the ignition system
R in the exhaust system
R in the ignition system (for vehi-
cles with petrol engines)
The emission limit values may be
exceeded and the engine can run
in emergency mode. X
Have the vehicle checked as soon as possible at a qualified spe-
cialist workshop. Practical advice
169_AKB; 2; 4, en-GB
wdomann
,V ersion: 2.10.6
2008-07-16T08:52:06+02:00 - Seite 227 ZDateiname: 6515_0315_02_buchblock.pdf; preflight
Page 231 of 305
Troubleshooting
228 Problem Possible cause/consequence Suggested solutions
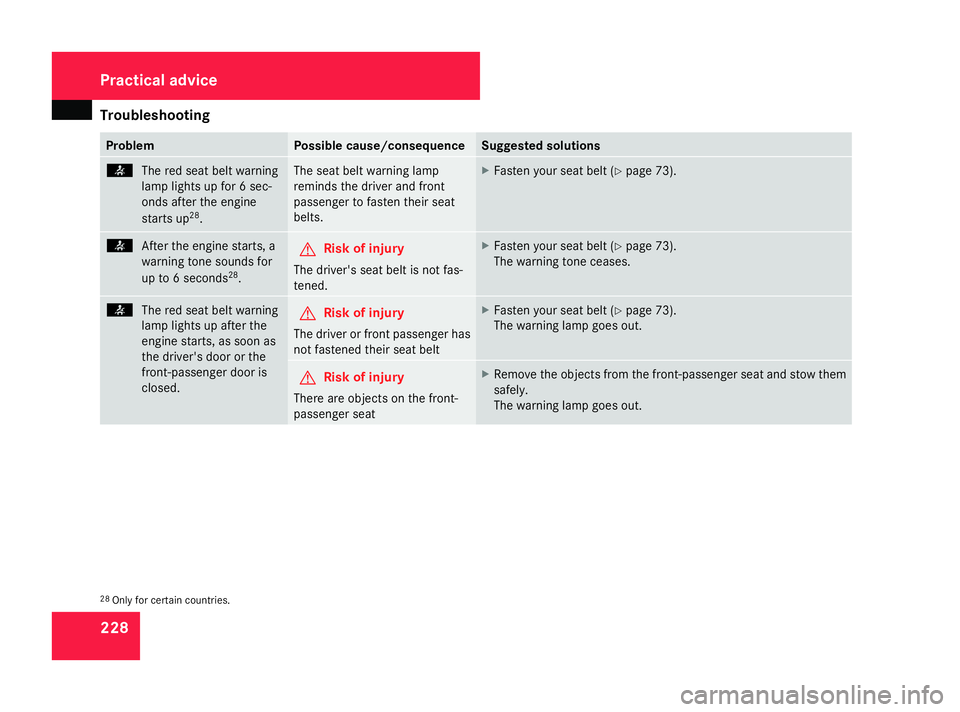
<
The red seat belt warning
lamp lights up for 6 sec-
onds after the engine
starts up 28
. The seat belt warning lamp
reminds the driver and front
passenger to fasten their seat
belts. X
Fasten your seat belt ( Ypage 73). <
After the engine starts, a
warning tone sounds for
up to 6 seconds 28
. G
Risk of injury
The driver's seat belt is not fas-
tened. X
Fasten your seat belt ( Ypage 73).
The warning tone ceases. <
The red seat belt warning
lamp lights up after the
engine starts, as soon as
the driver's door or the
front-passenger door is
closed. G
Risk of injury
The driver or front passenger has
not fastened their seat belt X
Fasten your seat belt ( Ypage 73).
The warning lamp goes out. G
Risk of injury
There are objects on the front-
passenger seat X
Remove the objects from the front-passenger seat and stow them
safely.
The warning lamp goes out. 28
Only for certain countries. Practical advice
169_AKB; 2; 4, en-GB
wdomann
,V ersion: 2.10.6
2008-07-16T08:52:06+02:00 - Seite 228 Dateiname: 6515_0315_02_buchblock.pdf; preflight
Page 232 of 305
Troubleshooting
229Problem Possible cause/consequence Suggested solutions
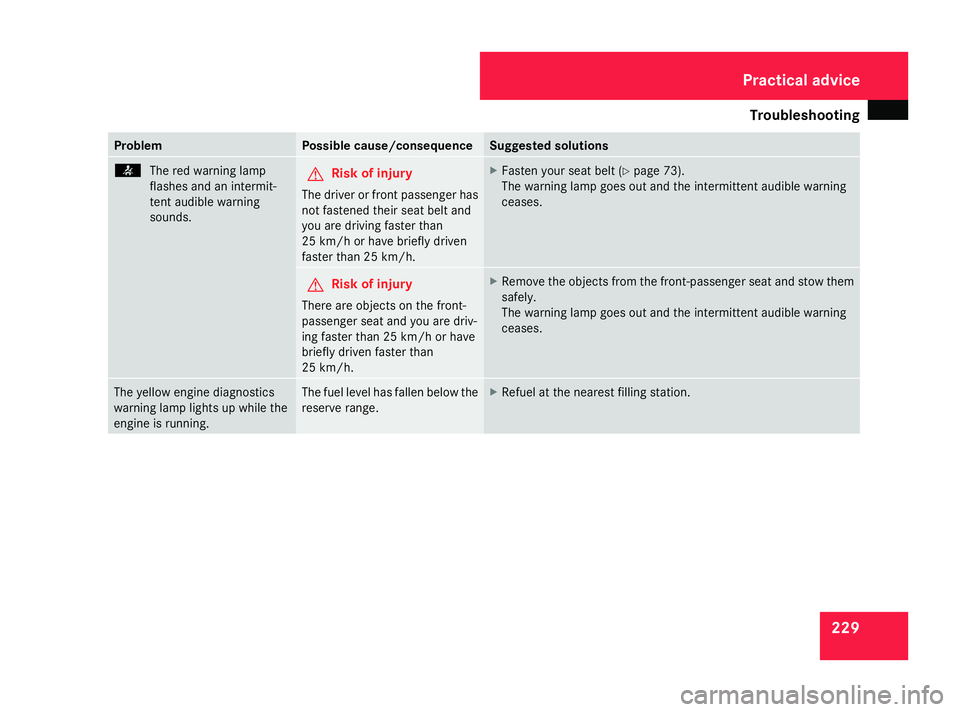
<
The red warning lamp
flashes and an intermit-
tent audible warning
sounds. G
Risk of injury
The driver or front passenger has
not fastened their seat belt and
you are driving faster than
25 km/h or have briefly driven
faster than 25 km/h. X
Fasten your seat belt ( Ypage 73).
The warning lamp goes out and the intermittent audible warning
ceases. G
Risk of injury
There are objects on the front-
passenger seat and you are driv-
ing faster than 25 km/h or have
briefly driven faster than
25 km/h. X
Remove the objects from the front-passenger seat and stow them
safely.
The warning lamp goes out and the intermittent audible warning
ceases. The yellow engine diagnostics
warning lamp lights up while the
engine is running. The fuel level has fallen below the
reserve range. X
Refuel at the nearest filling station. Practical advice
169_AKB; 2; 4, en-GB
wdomann
,V ersion: 2.10.6
2008-07-16T08:52:06+02:00 - Seite 229 ZDateiname: 6515_0315_02_buchblock.pdf; preflight
Page 239 of 305

Troubleshooting
236 Parktronic*
Problem Possible cause/consequence Suggested solutions
Onl
y the red segments in the
Parktronic warning display are lit.
You also hear a warning tone for
approximately two seconds.
Parktronic is deactivated after
approximately 20 seconds and
the indicator lamp in the Park-
tronic button lights up. Parktronic has malfunctioned
and has switched itself off. X
If problems persist, have Parktronic checked at a qualified spe-
cialist workshop. Only the red segments in the
Parktronic warning display are lit.
Parktronic is deactivated after
approximately 20 seconds. The Parktronic sensors are dirty
or there is interference. X
Clean the Parktronic sensors (Y page 196).
X Switch the ignition back on. Only the red segments in the
Parktronic warning display are lit.
Parktronic is deactivated after
approximately 20 seconds. The problem may be caused by an
external source of radio or ultra-
sound waves. X
See if Parktronic functions in a different location. Practical advice
* optional
169_AKB; 2; 4, en-GB
wdomann
,V ersion: 2.10.6
2008-07-16T08:52:06+02:00 - Seite 236 Dateiname: 6515_0315_02_buchblock.pdf; preflight