MERCEDES-BENZ A-CLASS HATCHBACK 2008 Repair Manual
Manufacturer: MERCEDES-BENZ, Model Year: 2008, Model line: A-CLASS HATCHBACK, Model: MERCEDES-BENZ A-CLASS HATCHBACK 2008Pages: 305, PDF Size: 5.43 MB
Page 61 of 305

Anti-theft syste
ms58 Tow-away protection* and interior
motion sensor*
When tow-away protection and the interior
motion sensor have been primed, a visual and
audible alarm is triggered, if:
R motion is detected in the vehicle interior,
e.g. if the side windows of the vehicle are
smashed.
R the inclination of your vehicle changes, e.g.
if one end of your vehicle is raised.
Priming tow-away protection and inte-
rior motion sensor X
Make sure that:
R the side windows are closed
R the panorama louvred sliding sunroof* is
closed.
R there are no objects, e.g. mascots, hanging
on the rear-view mirror or on the grab han-
dles on the roof trim.
This will prevent false alarms.
X Lock the vehicle using the key.
Tow-away protection and the interior
motion sensor are primed after approxi-
mately 30 seconds. Deactivating tow-away protection and
interior motion sensor To prevent a false alarm, deactivate the tow-
away protection and the interior motion sen-
sor if your vehicle:
R
is being transported or towed
R is being loaded, e.g. onto a ferry or car
transporter
R is parked on a movable surface, e.g. split-
level garages
R is locked while persons or animals remain
inside
R is locked while the side windows remain
open
R is locked and the panorama louvred sliding
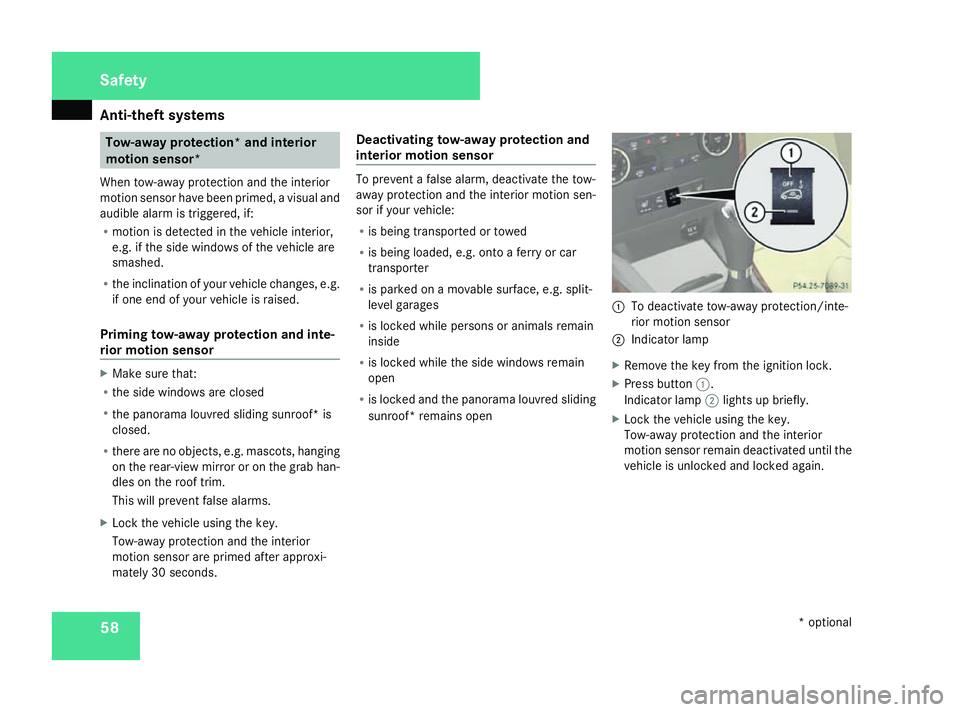
sunroof* remains open 1
To deactivate tow-away protection/inte-
rior motion sensor
2 Indicator lamp
X Remove the key from the ignition lock.
X Press button 1.
Indicator lamp 2lights up briefly.
X Lock the vehicle using the key.
Tow-away protection and the interior
motion sensor remain deactivated until the
vehicle is unlocked and locked again. Safety
* optional
169_AKB; 2; 4, en-GB
wdomann,
Version: 2.10.6
2008-07-16T08:52:06+02:00 - Seite 58 Dateiname: 6515_0315_02_buchblock.pdf; preflight
Page 62 of 305

59
Opening and closing
...........................60
Key positions ....................................... 62
Seats .................................................... 63
Steering wheel .................................... 70
Mirrors ................................................. 70
Seat belts ............................................. 73
Lights ................................................... 77
Windscreen wipers .............................83
Side windows ...................................... 84Driving and parking
............................87
Transmission ....................................... 92
Instrument cluster ..............................97
On-board computer .............................98
Driving systems ................................ 115
Air conditioning ................................. 129
Roof .................................................... 142
Loading and stowing ........................144
Features ............................................. 162 Controls
169_AKB; 2; 4, en-GB
wdomann,
Version: 2.10.6 2008-07-16T08:52:06+02:00 - Seite 59Dateiname: 6515_0315_02_buchblock.pdf; preflight
Page 63 of 305

Opening and closing
60 Opening and closing
Key
The key centrally locks/unlocks:
R the doors
R the tailgate
R the fuel filler flap G
Risk of accident
If children are left unsupervised in the vehi-
cle, they could:
R open a door from the inside at any time,
even if it has been locked
R start the vehicle using a key which has
been left in the vehicle
R release the parking brake
They could endanger themselves and oth-
ers. Never leave children unsupervised in
the vehicle. Always take the key with you
when leaving the vehicle, even if you are
only leaving it for a short time. 1
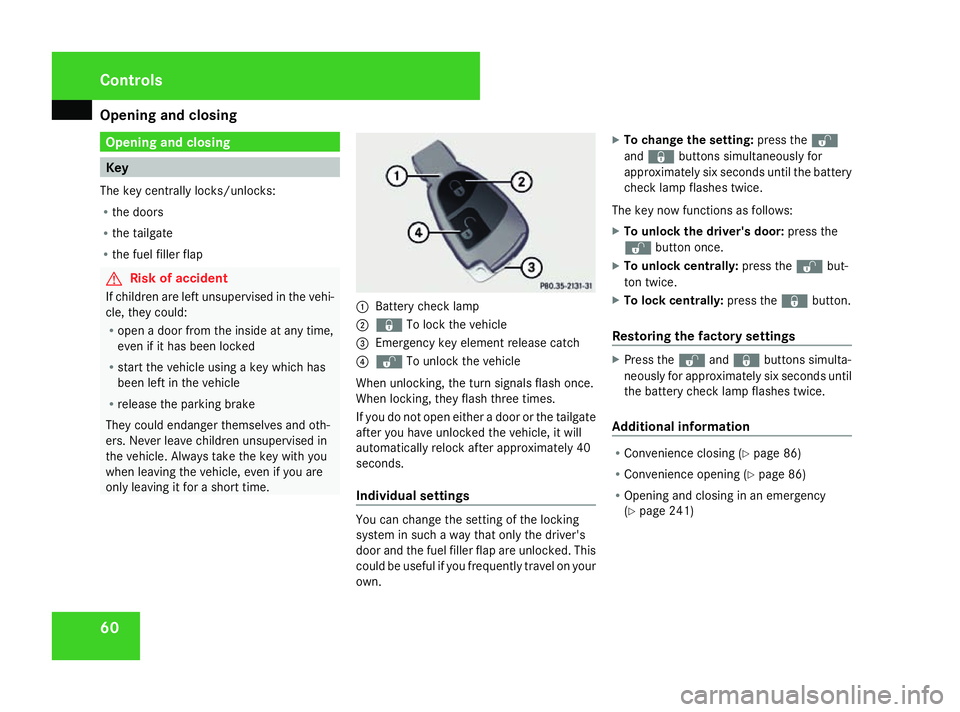
Battery check lamp
2 j To lock the vehicle
3 Emergency key element release catch
4 k To unlock the vehicle
When unlocking, the turn signals flash once.
When locking, they flash three times.
If you do not open either a door or the tailgate
after you have unlocked the vehicle, it will
automatically relock after approximately 40
seconds.
Individual settings You can change the setting of the locking
system in such a way that only the driver's
door and the fuel filler flap are unlocked. This
could be useful if you frequently travel on your
own.X
To change the setting: press thek
and j buttons simultaneously for
approximately six seconds until the battery
check lamp flashes twice.
The key now functions as follows:
X To unlock the driver's door: press the
k button once.
X To unlock centrally: press thekbut-
ton twice.
X To lock centrally: press thejbutton.
Restoring the factory settings X
Press the kandj buttons simulta-
neously for approximately six seconds until
the battery check lamp flashes twice.
Additional information R
Convenience closing (Y page 86)
R Convenience opening (Y page 86)
R Opening and closing in an emergency
(Y page 241) Controls
169_AKB; 2; 4, en-GB
wdomann,
Version: 2.10.6 2008-07-16T08:52:06+02:00 - Seite 60Dateiname: 6515_0315_02_buchblock.pdf; preflight
Page 64 of 305

Opening and closing
61Opening the doors from the inside
You can open a door from the inside at any
time, even if it has been locked. X
Pull door handle 2.
If the door is locked, locking knob 1pops
up. The door is unlocked and can be
opened. Automatic locking feature
The vehicle will lock automatically once you
have pulled away.
You can switch off the automatic locking
function via the on-board computer
(Y page 111).
i The vehicle is locked automatically when
the ignition is switched on and the wheels
begin to turn. There is therefore a risk of
being locked out when the vehicle is being
pushed or tested on a dynamometer. Locking/unlocking the vehicle from
the inside
You can centrally lock or unlock the vehicle
from the inside. This feature may be useful if,
for example, you wish to unlock the
passenger door from the inside or lock the
vehicle before you pull away. G
Risk of accident
Do not leave children unsupervised in the
vehicle. They could open a door from the
inside – even if it is locked – and thereby
endanger themselves and others. X
To lock: press button 1.
X To unlock: press button 2. Tailgate
G
Risk of poisoning
Exhaust fumes could enter the vehicle inte-
rior if the engine is running and the tailgate
is open. This could poison you. You should
therefore make sure that the tailgate is
always closed when the engine is running.
! The tailgate swings upwards and to the
rear when opened. Therefore, make sure
that there is sufficient clearance above and
behind the tailgate. Controls
169_AKB; 2; 4, en-GB
wdomann,
Version: 2.10.6
2008-07-16T08:52:06+02:00 - Seite 61 ZDateiname: 6515_0315_02_buchblock.pdf; preflight
Page 65 of 305

Key positions
62
Opening from the outside You can only open the tailgate after unlocking
it first.
X To unlock centrally: press thekbut-
ton on the key. X
Pull handle 1.
X Raise the tailgate.
Closing from the outside G
Risk of injury
Make sure that nobody can become trap-
ped as you close the tailgate.
i Do not leave the key in the luggage com-
partment. You could otherwise lock your-
self out. X
Pull the tailgate down using recess 1.
X Push the tailgate closed from the outside.
X Lock the vehicle if necessary with
the ‹ button on the key. Key positions
}
To remove the key
$ Power supply for some consumers, such
as the windscreen wipers
% Ignition (power supply for all consumers)
and drive position
& To start the engine
i Even if the key is not for the vehicle in
question, it will still turn in the ignition lock.
The ignition is not switched on. The engine
cannot be started. Cont
rols
169_AKB; 2; 4, en-GB
wdomann,
Version: 2.10.6
2008-07-16T08:52:06+02:00 - Seite 62 Dateiname: 6515_0315_02_buchblock.pdf; preflight
Page 66 of 305

Seats
63Seats
Points to remember
You can find information about enlarging the
luggage compartment (folding forwards/
removing the rear seats) on (Y page 150).
Depending on the vehicle's equipment, the
seats can be adjusted either manually or elec-
trically. G
Risk of injury
The seats can be adjusted when the key is
removed and the door is open. For this rea-
son, children should never be left unsuper-
vised in the vehicle. They could become
trapped when adjusting a seat. G
Risk of accident
Only adjust the driver's seat when the vehi-
cle is stationary. You will otherwise be dis-
tracted from the road and traffic conditions
and you could lose control of the vehicle as
a result of the seat moving. This could
cause an accident. G
Risk of injury
Make sure that nobody can become trap-
ped when you adjust the seat. Observe the notes concerning the airbag
system.
Secure children as recommended; see
"Children in the vehicle" section.
! When you move the seats, make sure that
there are no objects in the footwell or
behind the seats. Otherwise, you could
damage the seats and the objects.
i The front seats are fitted with active head
restraints (Y page 42). For this reason, it is
not possible to remove the head restraints
from the front seats.
The rear-compartment head restraints can
be removed (Y page 66).
Please contact a Mercedes-Benz Service
Centre for more information. Adjusting the seat manually
1
Seat fore-and-aft adjustment
2 Seat cushion angle*
3 Seat height
4 Backrest angle
Seat fore-and-aft adjustment X
Lift handle 1and slide the seat forwards
or backwards.
X Release handle 1again.
Make sure that you hear the seat engage
into position. Controls
* optional
169_AKB; 2; 4, en-GB
wdomann,
Version: 2.10.6 2008-07-16T08:52:06+02:00 - Seite 63 ZDateiname: 6515_0315_02_buchblock.pdf; preflight
Page 67 of 305

Seats
64
Backrest angle X
Relieve the pressure on the backrest.
X Turn handwheel 4forwards or backwards.
Seat height X
Pull up or push down handle 3repeatedly
until the seat has reached the desired
height.
Seat cushion angle* Adjust the angle so that your thighs are lightly
supported.
X Turn handwheel 2forwards or backwards.
Head restraint height G
Risk of injury
Make sure that the central area of the head
restraint supports the back of your head at
about eye level. You could seriously injure
your neck if your head is not correctly sup-
ported by the head restraint in the event of
an accident. Never travel without a cor-
rectly adjusted and engaged head restraint. 1
Release catch
X To raise: pull the head restraint up to the
desired position.
X To lower: press release catch 1in direc-
tion of arrow and push the head restraint
down to the desired position. Head restraint angle X
Push or pull the upper edge of the head
restraint in direction of arrow. Controls
* optional
169_AKB; 2; 4, en-GB
wdomann,
Version: 2.10.6
2008-07-16T08:52:06+02:00 - Seite 64 Dateiname: 6515_0315_02_buchblock.pdf; preflight
Page 68 of 305

Seats
65Adjusting the seat electrically*
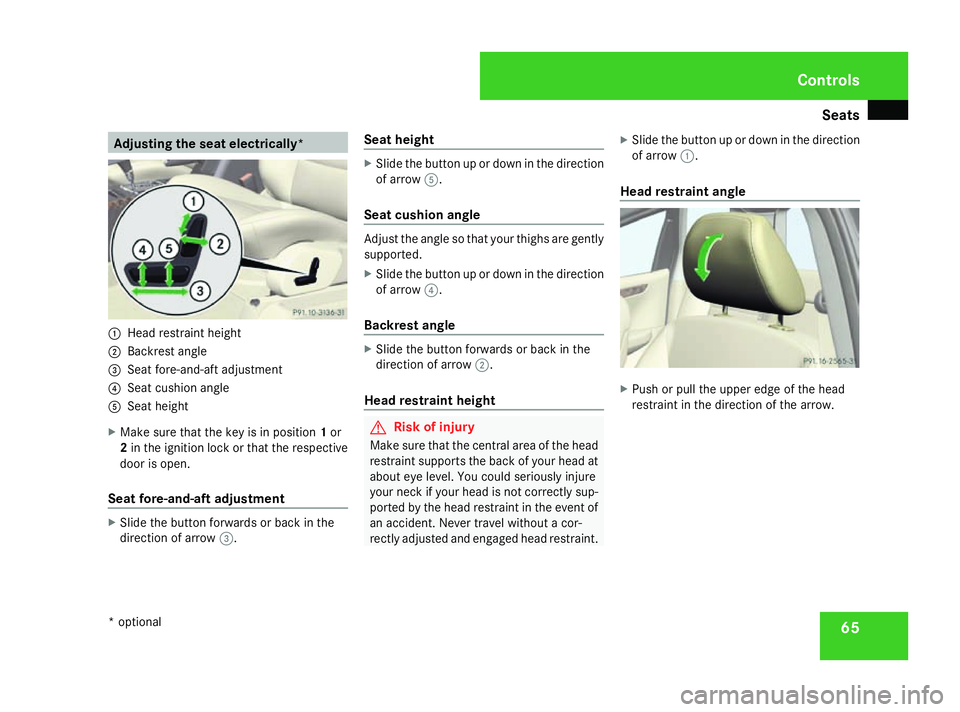
1
Head restraint height
2 Backrest angle
3 Seat fore-and-aft adjustment
4 Seat cushion angle
5 Seat height
X Make sure that the key is in position 1or
2 in the ignition lock or that the respective
door is open.
Seat fore-and-aft adjustment X
Slide the button forwards or back in the
direction of arrow 3. Seat height X
Slide the button up or down in the direction
of arrow 5.
Seat cushion angle Adjust the angle so that your thighs are gently
supported.
X
Slide the button up or down in the direction
of arrow 4.
Backrest angle X
Slide the button forwards or back in the
direction of arrow 2.
Head restraint height G
Risk of injury
Make sure that the central area of the head
restraint supports the back of your head at
about eye level. You could seriously injure
your neck if your head is not correctly sup-
ported by the head restraint in the event of
an accident. Never travel without a cor-
rectly adjusted and engaged head restraint. X
Slide the button up or down in the direction
of arrow 1.
Head restraint angle X
Push or pull the upper edge of the head
restraint in the direction of the arrow. Controls
* optional
169_AKB; 2; 4, en-GB
wdomann,
Version: 2.10.6 2008-07-16T08:52:06+02:00 - Seite 65 ZDateiname: 6515_0315_02_buchblock.pdf; preflight
Page 69 of 305

Seats
66 Rear seat head restraints
Adjusting the head restraint height G
Risk of injury
Make sure that the central area of the head
restraint supports the back of your head at
about eye level. You could seriously injure
your neck if your head is not correctly sup-
ported by the head restraint in the event of
an accident. Never travel without a cor-
rectly adjusted and engaged head restraint. 1
Release catch X
To raise: pull the head restraint up to the
desired height.
X To lower: press release catch 1and push
the head restraint down until it is in the
desired position.
Adjusting the angle of the outer head
restraints X
Pull the bottom of the head restraint for-
wards or push it backwards. Fitting and removing the rear-compart-
ment head restraints G
Risk of injury
Occupants should only travel sitting on
seats which have the head restraints instal-
led. This reduces the risk of injury to the
passengers in the rear in the event of an
accident. Controls
169_AKB; 2; 4, en-GB
wdomann,
Version: 2.10.6
2008-07-16T08:52:06+02:00 - Seite 66 Dateiname: 6515_0315_02_buchblock.pdf; preflight
Page 70 of 305

Seats
671
Release catch
X Fold the rear seat backrest forwards
slightly in order to remove the head
restraint.
X To remove: pull the head restraint up to
the stop.
X Press release catch 1and pull the head
restraint out of the guides.
X To refit: insert the head restraint so that
the notches on the bar are on the left when
viewed in the direction of travel.
X Push the head restraint down until you hear
it click into place. Armrest* between the front seats
You can slide the armrest forwards or back-
wards. G
Risk of injury
There is a risk of entrapment when you
move the armrest.
i There is a small stowage compartment
underneath the armrest at the rear. This
becomes accessible after you have moved
the armrest forwards. 1
Armrest
Moving the armrest X
Slide armrest 1into the desired position. Folding the front seat backrests for-
wards/EASY-ENTRY feature (3-door
vehicle) 1
Seat release
i For easier access to the rear, you can
slide the seat further forwards once you
have folded the backrest forwards, as long
as the seat is in the rear half of the adjust-
ment range. Controls
* optional
169_AKB; 2; 4, en-GB
wdomann,
Version: 2.10.6 2008-07-16T08:52:06+02:00 - Seite 67 ZDateiname: 6515_0315_02_buchblock.pdf; preflight