bulb MERCEDES-BENZ A-CLASS HATCHBACK 2008 Owners Manual
[x] Cancel search | Manufacturer: MERCEDES-BENZ, Model Year: 2008, Model line: A-CLASS HATCHBACK, Model: MERCEDES-BENZ A-CLASS HATCHBACK 2008Pages: 305, PDF Size: 5.43 MB
Page 7 of 305
4
Axle load, maximum permissible
.................................................... .287, 289 B
Backrest Removing/fitting. ........................... 152
Bag hook............................................. 158
Ball coupling Fitting ............................................. 186
Removing....................................... .190
BAS (Brake Assist)............................... 55
Battery Changing (key).. .............................. 244
Charging. ........................................ 265
Checking (key). ............................... 244
Check lamp (key). ........................... 244
Disconnecting ................................. 265
Display message ............................. 213
Jump starting. ................................. 266
Maintenance (vehicle)..................... 263
Reconnecting.................................. 266
Removing/fitting. ........................... 265
Vehicle battery. .............................. 263
Belt force limiters
Activation.......................................... 37
Belt height adjustment........................ 75
Belt tensioners Activation.......................................... 37
Belt warning.......................................... 75 Bonnet
Bonnet catch .................................. 172
Opening/closing ............................ 171
Bonnet release lever
Release leve r.................................. 171
Brake Assist
see BAS
Brake fluid.......................................... 300
Display message ............................. 214
Brake lamps
Adaptive............................................ 56
Display message ............................. 217
Brakes
Parking brake................................... .90
Warning lamp..................................2 26
Brake system
Display message ............................. 213
Bulbs
Brake lamp. .................................... 250
Cornering light. ............................... 248
Dipped-beam headlamps ................247
Display messages ........................... 216
Licence plate lamp.......................... 250
Main-beam headlamps ...................248
Overview. ........................................ 245
Parking lamp.................................. .248
Rear foglamp. ................................. 250
Replacing............................... .247, 249
Reversing lamp. .............................. 250
Side lamp........................................ 248 Tail lamp
......................................... 250
Turn signal lamp. ....................249, 250 C
Calling up a malfunction see Message memory menu
Care..................................................... 192
Automatic car wash. .......................193
Exhaust tail pipes............................ 196
Headlamps. .................................... 194
High-pressure cleaners. ..................193
Parktronic. ...................................... 196
Plastic trim. .................................... 195
Rear window. .................................. 194
Side windows.................................. 194
Trailer tow hitch. ............................. 196
CD player/CD changer
Operating (on-board computer)
....................................................... 104
Central locking
Automatic locking (on-board com-
puter). ............................................. 111
Key. .................................................. 60
Central locking/unlocking button...... 61
Central unlocking Key. .................................................. 60
Centre console
Lower section. .................................. 32
Upper section. .................................. 31Index
169_AKB; 2; 4, en-GB
wdomann,
Version: 2.10.6
2008-07-16T08:52:06+02:00 - Seite 4 Dateiname: 6515_0315_02_buchblock.pdf; preflight
Page 11 of 305
8
Indicator lamps
see Warning and indicator lamps
Instrument cluster............................... 97
Overview. .......................................... 26
Selecting the language (on-board
computer). ...................................... 108
Instrument lighting.............................. 97
Integrated child seat............................ 50
Interior lighting Automatic control system .................82
Delayed switch-off (on-board
computer). ...................................... 110
Emergency lighting. ..........................83
Manual control.................................. 82
Reading lamp .................................... 82
Interior motion sensor......................... 58
ISOFIX child seat securing system..... 48J
Jack...................................................... 200 Operation........................................ 259
Jump-starting ...................................... 266
Jump leads ...................................... 266K
Key......................................................... 60 Changing the battery ......................244
Checking the battery ......................244
Display message ............................. 220Loss.
............................................... 239
Malfunction..................................... 239
Modifying the programming. .............60
Key positions
Key. .................................................. 62
Kickdown.............................................. 96 L
Lamps see Warning and indicator lamps
Lashing eyelets.................................. 146
Licence plate lighting Display message ............................. 218
Light bulbs
see Bulbs
Lighting
see Lights
Lights
Automatic headlamp mode. ..............78
Constant headlamp mode. ................78
Cornering light function ....................81
Dipped-beam headlamps ..................78
Display messages ........................... 216
Foglamps. ......................................... 79
Hazard warning lamps. .....................80
Headlamp flasher.............................. 80
Headlamp range. .............................. 80
Light switch. ..................................... 77
Main-beam headlamps..................... .80
Rear fog lamp ................................... 79Switching off (display message)...... 218
Turn signals.
..................................... 79
LIM indicator lamp
Cruise control. ................................ 116
Variable Speedtronic. .....................118
Load compartment load, maximum
..................................................... 288, 289
Loading guidelines............................. 145
Locking Automatic. ........................................ 61
Emergency locking .........................242
From the inside (central locking
button) .............................................. 61
Luggage compartment enlarge-
ment.................................................... 150
Luggage compartment floor Adjusting the height .......................155
stowage well, unde r........................ 154
Luggage cover.................................... 159
Luggage net........................................ 145
Lumbar support.................................... 68 M
Main-beam headlamps Display message ............................. 218
Main fuse box..................................... 271
Maintenance Battery ............................................ 263Index
169_AKB; 2; 4, en-GB
wdomann,
Version: 2.10.6
2008-07-16T08:52:06+02:00 - Seite 8 Dateiname: 6515_0315_02_buchblock.pdf; preflight
Page 193 of 305
Trailer towing*
190note that the power output of the engine,
and consequently the vehicle's gradient-
climbing capability, decrease with increas-
ing altitude.
If the trailer swings from side to side:
X Do not accelerate.
X Do not counter-steer.
X Brake if necessary. G
Risk of accident
On no account should you attempt to draw
the vehicle/trailer combination out by
increasing speed. Removing the ball coupling
X Pull the protective cap off the lock in the
handwheel.
X Insert the key into the lock in the hand-
wheel.
X Turn the key clockwise.
The lock is unlocked.
X Hold the ball coupling. Pull the handwheel
away from the ball coupling and turn it
clockwise until it engages.
The green area on the ball coupling is
aligned with the red mark on the hand-
wheel. X
Pull out the ball coupling downwards.
X Clean the ball coupling if it is dirty.
X Vehicles without ECO start/stop func-
tion*: open the stowage compartment on
the right of the luggage compartment.
X Fold the trim downwards.
X Vehicles with start/stop function*:
open the luggage compartment floor.
X Remove the protective cap from the ball
coupling recess.
X Press the protective cap into the ball cou-
pling recess until it engages.
Storing the ball coupling X
Store the ball coupling with the key inser-
ted in the ball coupling recess.
X Vehicle without ECO start/stop func-
tion: Secure the ball coupling in place using
the retainer strap. G
Risk of accident
Never transport an unsecured ball coupling
in the interior of the vehicle.
Otherwise, vehicle occupants could be
injured by the ball coupling being thrown if
you: R
brake sharply
R change direction suddenly
R have an accident Trailer po
wer supply
When it leaves the factory, your vehicle's
trailer socket outlet is equipped with a per-
manent power supply and a power supply that
is switched on via the ignition lock.
The permanent power supply is supplied via
trailer socket pin 9.
The power supply that is switched on via the
ignition lock is supplied via trailer socket pin
10.
! You can connect consumers with a power
rating of up to 240 W to the permanent
power supply and up to 180 W to the power
supply that is switched on via the ignition
lock.
You must not charge a trailer battery using
the power supply.
The trailer's turn signal lamps are only guar-
anteed to function when bulbs are used.
You can obtain further information about
installing the trailer electrics from a qualified Operation
* optional
169_AKB; 2; 4, en-GB
wdomann,
Version: 2.10.6
2008-07-16T08:52:06+02:00 - Seite 190 Dateiname: 6515_0315_02_buchblock.pdf; preflight
Page 202 of 305
199
Where will I find...?
...........................200
Display messages ............................. 202
Troubleshooting ................................ 222
Locking/unlocking in an emer-
gency ................................................. 241
Changing the batteries .....................244
Changing the bulbs ...........................245
Replacing the wiper blades ..............251
Flat tyre ............................................. 253
Battery ............................................... 263
Jump-starting .................................... 266
Towing and tow-starting ..................268
Fuses .................................................. 271 Practical advice
169_AKB; 2; 4, en-GB
wdomann,
Version: 2.10.6 2008-07-16T08:52:06+02:00 - Seite 199Dateiname: 6515_0315_02_buchblock.pdf; preflight
Page 219 of 305

Display
messages 216 Display messages Possible cause/consequence Possible solution
. Cornering light
left
or
Cornering light
right The left-hand or right-hand cornering
light* is fa
ulty. X
Change the bulb (Y page 245).. Dipped-beam left
or
Dipped-beam right Vehicles with the light and visibility pack-
age*: the left-hand or right-hand dipped-
beam headlamp is faulty. X
Halogen headlamp: replace the bulbs
(Y page 245).
X Bi-xenon headlamp*: visit a qualified special-
ist workshop. . AUTO lights inop-
erative The light sensor is faulty. The constant
headlamp mode (daytime driving lights) is
switched on. X
Switch the lights to manual control in the on-
board computer (Y page 109).
X Switch the lights on and off using the light
switch. . Trailer turn sig-
nal left
or
Trailer turn sig-
nal right The left-hand or right-hand trailer turn sig-
nal lamp is faulty. X
Change the bulb. . Trailer tail lamp
left
or
Trailer tail lamp
right The left-hand or right-hand trailer tail light
is faulty. X
Change the bulb. Practical advice
* optional
169_AKB; 2; 4, en-GB
wdomann
,V ersion: 2.10.6
2008-07-16T08:52:06+02:00 - Seite 216 Dateiname: 6515_0315_02_buchblock.pdf; preflight
Page 220 of 305
Display
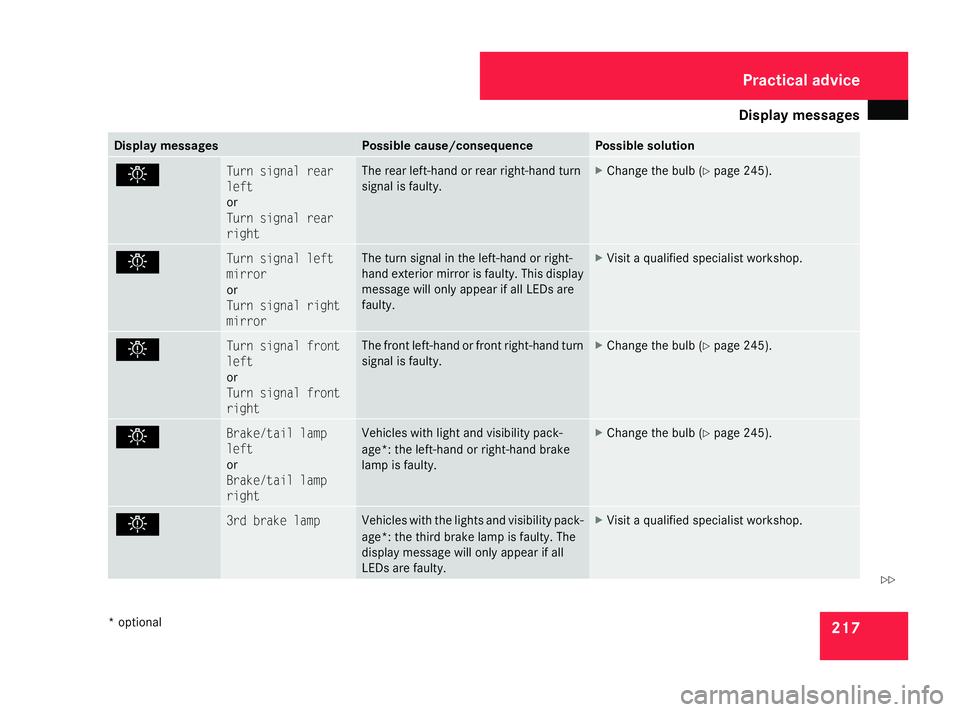
messages 217Display messages Possible cause/consequence Possible solution
. Turn signal rear
left
or
Turn signal rear
right The rear left-hand or rear right-hand turn
signal is fa
ulty. X
Change the bulb (Y page 245). . Turn signal left
mirror
or
Turn signal right
mirror The turn signal in the left-hand or right-
hand exterior mirror is faulty. This display
message will only appear if all LEDs are
faulty. X
Visit a qualified specialist workshop. . Turn signal front
left
or
Turn signal front
right The front left-hand or front right-hand turn
signal is faulty. X
Change the bulb (Y page 245). . Brake/tail lamp
left
or
Brake/tail lamp
right Vehicles with light and visibility pack-
age*: the left-hand or right-hand brake
lamp is faulty. X
Change the bulb (Y page 245). . 3rd brake lamp Vehicles with the lights and visibility pack-
age*: the third brake lamp is faulty. The
display message will only appear if all
LEDs are faulty. X
Visit a qualified specialist workshop. Practical advice
* optional
169_AKB; 2; 4, en-GB
wdomann
,V ersion: 2.10.6
2008-07-16T08:52:06+02:00 - Seite 217 ZDateiname: 6515_0315_02_buchblock.pdf; preflight
Page 221 of 305
Display
messages 218 Display messages Possible cause/consequence Possible solution
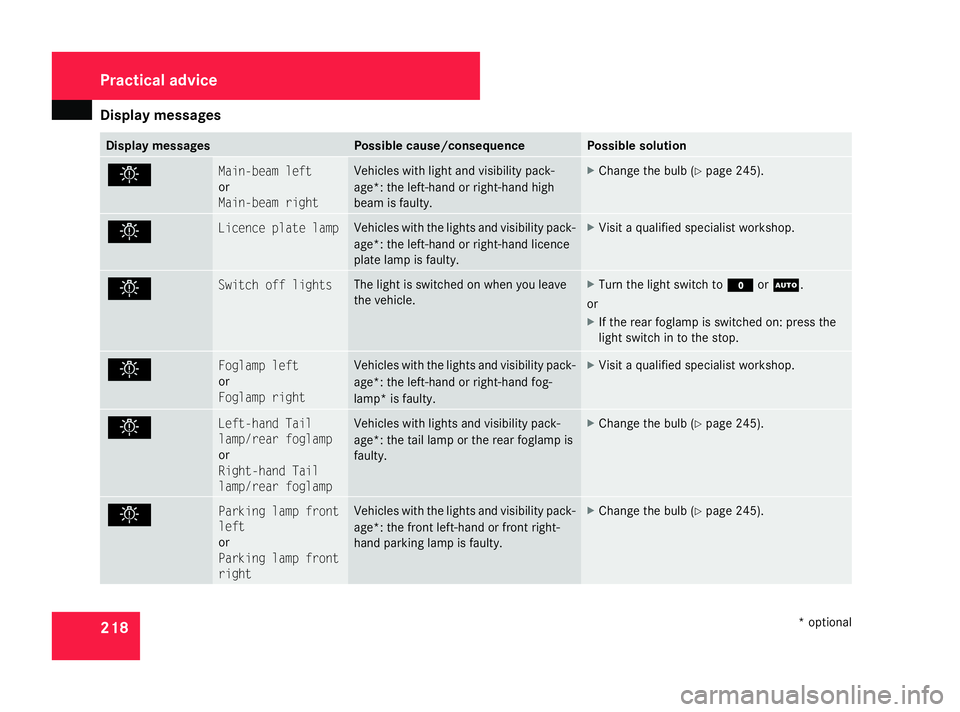
. Main-beam left
or
Main-beam right Vehicles with light and visibility pack-
age*: the left-hand or right-hand high
beam is fa
ulty. X
Change the bulb (Y page 245).. Licence plate lamp Vehicles with the lights and visibility pack-
age*: the left-hand or right-hand licence
plate lamp is faulty. X
Visit a qualified specialist workshop. . Switch off lights The light is switched on when you leave
the vehicle. X
Turn the light switch to MorU.
or
X If the rear foglamp is switched on: press the
light switch in to the stop. . Foglamp left
or
Foglamp right Vehicles with the lights and visibility pack-
age*: the left-hand or right-hand fog-
lamp* is faulty. X
Visit a qualified specialist workshop. . Left-hand Tail
lamp/rear foglamp
or
Right-hand Tail
lamp/rear foglamp Vehicles with lights and visibility pack-
age*: the tail lamp or the rear foglamp is
faulty. X
Change the bulb (Y page 245).. Parking lamp front
left
or
Parking lamp front
right Vehicles with the lights and visibility pack-
age*: the front left-hand or front right-
hand parking lamp is faulty. X
Change the bulb (Y page 245).Practical advice
* optional
169_AKB; 2; 4, en-GB
wdomann
,V ersion: 2.10.6
2008-07-16T08:52:06+02:00 - Seite 218 Dateiname: 6515_0315_02_buchblock.pdf; preflight
Page 222 of 305
Display
messages 219Display messages Possible cause/consequence Possible solution
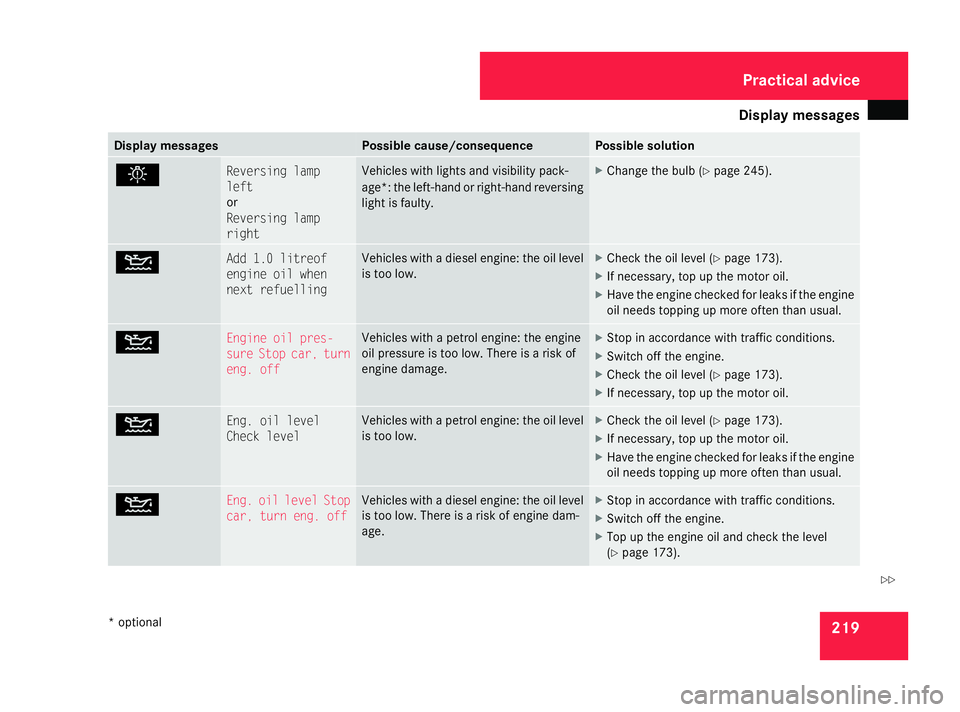
. Reversing lamp
left
or
Reversing lamp
right Vehicles with lights and visibility pack-
age*: the left-hand or right-hand reversing
light is fa
ulty. X
Change the bulb (Y page 245). N Add 1.0 litreof
engine oil when
next refuelling Vehicles with a diesel engine: the oil level
is too low. X
Check the oil level (Y page 173).
X If necessary, top up the motor oil.
X Have the engine checked for leaks if the engine
oil needs topping up more often than usual. N Engine oil pres-
sure Stop car, turn
eng. off Vehicles with a petrol engine: the engine
oil pressure is too low. There is a risk of
engine damage. X
Stop in accordance with traffic conditions.
X Switch off the engine.
X Check the oil level (Y page 173).
X If necessary, top up the motor oil. N Eng. oil level
Check level Vehicles with a petrol engine: the oil level
is too low. X
Check the oil level (Y page 173).
X If necessary, top up the motor oil.
X Have the engine checked for leaks if the engine
oil needs topping up more often than usual. N Eng. oil level Stop
car, turn eng. off Vehicles with a diesel engine: the oil level
is too low. There is a risk of engine dam-
age. X
Stop in accordance with traffic conditions.
X Switch off the engine.
X Top up the engine oil and check the level
(Y page 173). Practical advice
* optional
169_AKB; 2; 4, en-GB
wdomann
,V ersion: 2.10.6
2008-07-16T08:52:06+02:00 - Seite 219 ZDateiname: 6515_0315_02_buchblock.pdf; preflight
Page 248 of 305
Changing the bulbs
245Changing the bulbs
Notes on changing bulbs
Bulbs and lamps are an important aspect of
vehicle safety. You must therefore make sure
that these function correctly at all times. G
Risk of injury
Bulbs and lamps can be very hot. You
should therefore allow them to cool down
before you change them. Otherwise, you
could be burned if you touch them.
Keep bulbs out of the reach of children.
Otherwise, they could damage them, for
example, and injure themselves.
Never use a bulb which has been dropped.
Such a bulb may explode and injure you.
H7 bulbs are pressurised and could explode
when you change them, particularly if they
are very hot. You should therefore wear eye
protection and gloves when you are chang-
ing them. G
Risk of injury
Xenon bulbs carry a high voltage. You could
get an electric shock and be seriously or
even fatally injured if you touch the electric contacts on xenon bulbs. Therefore, never
remove the cover from xenon bulbs.
Do not change xenon bulbs yourself, but
have them replaced at a qualified specialist
workshop which has the necessary special-
ist knowledge and tools to carry out the
work required.
Mercedes-Benz recommends that you use
a Mercedes-Benz Service Centre for this
purpose. In particular, work relevant to
safety or on safety-related systems must be
carried out at a qualified specialist work-
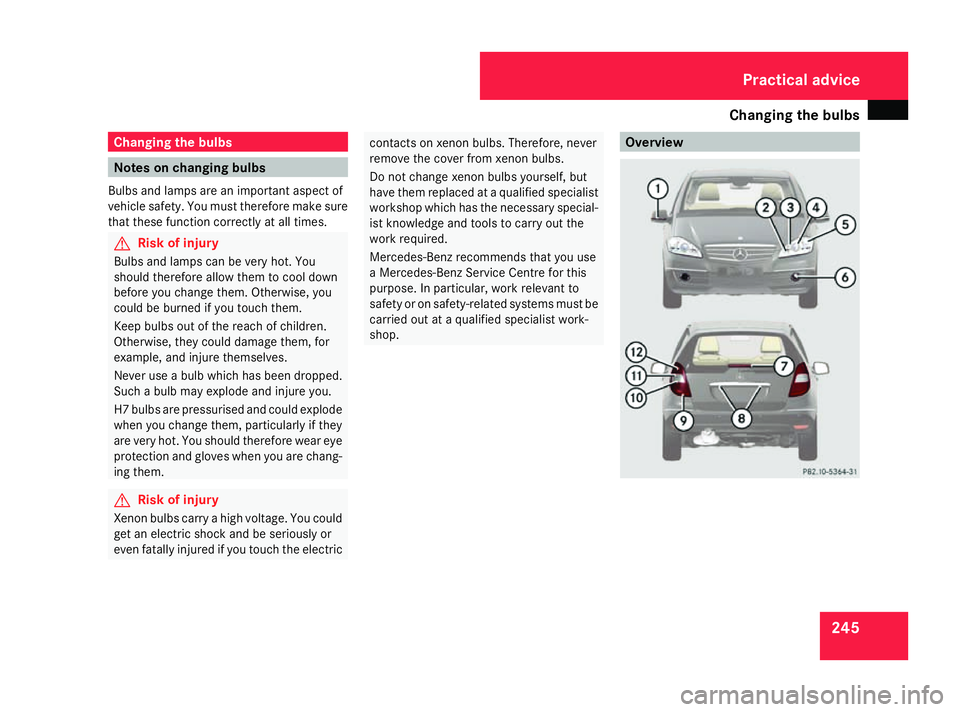
shop. Overview Practical advice
169_AKB; 2; 4, en-GB
wdomann
, Version: 2.10.6 2008-07-16T08:52:06+02:00 - Seite 245 ZDateiname: 6515_0315_02_buchblock.pdf; preflight
Page 249 of 305

Changing the bulbs
246
Front bulbs Bulb Type
1
Additional turn
signal lamp
LEDs
29 2
Parking lamp/
side lamp W 5 W
3
Main-beam
headlamps
30
/
cornering
light* 31 H7 55 W
4
Dipped-beam
headlamps
H7 55 W
30
or
D1S 35 W* 32 5
Turn signal lamp PY 21 W
6
Front foglamps* H11 55 W
33 Rear bulbs
Bulb Type
7
Third brake
lamp
LED
29 8
Licence plate
lamp C 5 W
9
Rear foglamp P 21 W
Tail lamp P 4 W
a
Turn signal lamp PY 21 W
b
Reversing lamp P 21 W
c
Brake lamp P 21 W
Before changing bulbs
You can replace the following bulbs:
R
Dipped-beam headlamps (halogen head-
lamps)
R Main-beam headlamps (halogen head-
lamps) R
Side lamp/parking lamp (halogen head-
lamps)
R Cornering light* (vehicles with bi-xenon
headlamps*)
R Front turn signal lamp
R Brake lamp
R Reversing lamp
R Rear foglamp/tail lamp
R Turn signal lamp (rear)
R Licence plate lamp
Observe the following points:
R Use only the bulb types specified here.
R To prevent a short-circuit, switch off the
lights before changing a bulb.
R Only hold bulbs with a clean, lint-free cloth.
R Do not work with wet or greasy fingers.
R If the new bulb still does not light up, con-
sult a qualified specialist workshop, e.g. a
Mercedes-Benz Service Centre.
29 LEDs must not be replaced, as they are designed to have an unlimited service life.
30 Vehicles with halogen headlamps.
31 Vehicles with bi-xenon headlamps*
32 Vehicles with xenon headlamps*: always have these bulbs changed at a qualified specialist workshop, e.g. a Mercedes-Benz Service Centre.
33 These bulbs must be replaced at a qualified specialist workshop, e.g. a Mercedes-Benz Service Centre. Practical advice
* optional
169_AKB; 2; 4, en-GB
wdomann
,V ersion: 2.10.6
2008-07-16T08:52:06+02:00 - Seite 246 Dateiname: 6515_0315_02_buchblock.pdf; preflight