tire type MERCEDES-BENZ A-CLASS HATCHBACK 2008 Owners Manual
[x] Cancel search | Manufacturer: MERCEDES-BENZ, Model Year: 2008, Model line: A-CLASS HATCHBACK, Model: MERCEDES-BENZ A-CLASS HATCHBACK 2008Pages: 305, PDF Size: 5.43 MB
Page 198 of 305

Care
195
You could otherwise scratch or damage the
surface of the lenses.
Cleaning the plastic trim !
Do not use dry, coarse or hard cloths and
do not scrub. Doing so will scratch or dam-
age the surfaces.
! In order to protect the vehicle's high-qual-
ity surfaces and to retain the overall
appearance, avoid contact with cosmetics
and suntan lotion.
X Wipe plastic parts with a damp, lint-free
cloth (e.g. a microfibre cloth).
X Light soiling: use a low-foaming soap (e.g.
a light liquid hand soap) diluted in water.
X Heavy soiling: use a cleaning agent that is
solvent-free and non-corrosive. Mercedes-
Benz recommends that you use a
Mercedes-Benz cleaning product for this
purpose.
Cleaning the steering wheel boss and
dashboard X
Moisten a clean lint-free cloth with water.
X Clean the plastic parts and the dashboard.
X If particularly dirty, use a mild detergent. G
Risk of injury
Do not use cleaners and cockpit care
sprays containing solvents to clean the
cockpit and steering wheel boss. Cleaners
containing solvents cause the surface to
become porous and in the event of an air-
bag being triggered, plastic parts that have
become loose could cause considerable
injuries.
Cleaning the leather upholstery* !
Cleaning
R Clean genuine leather covers using a
damp cloth, then wipe the covers down
using a dry cloth. Make sure that the
leather does not become soaked. For
leather care, use leather care foam A 001
986 59 71 10. You can purchase this
from any Mercedes-Benz Service Centre.
R Clean artificial leather covers with a cloth
moistened with a solution containing 1%
detergent (e. g. washing-up liquid).
R Clean fabric covers with a microfibre
cloth moistened with a solution contain-
ing 1% detergent (e. g. washing-up liquid).
When cleaning, take care not to rub too
vigorously and always wipe entire seat
sections to avoid leaving visible lines. Leave the seat to dry afterwards. Clean-
ing results depend on the type of dirt and
how long it has been there.
R Clean Alcantara covers with a damp
cloth. Make sure you wipe entire seat
sections to avoid leaving visible lines.
i Note that leather covers are a natural
product and as such are subject to a natural
ageing process and may react differently
(e.g. increased wrinkling) to certain envi-
ronmental influences (such as high humid-
ity, intense heat).
Note that regular care is essential to ensure
that the quality (both appearance and com-
fort) of the covers is retained over time.
Cleaning the trim strips (three-door
vehicles) !
Do not use dry cloths, abrasive products,
solvents or cleaning agents containing sol-
vents to clean the trim strips below the side
windows. You may otherwise damage the
surface of the trim strips.
Cleaning the padded table* The plastic parts of the padded table can be
cleaned using a detergent solution. Operation
* optional
169_AKB; 2; 4, en-GB
wdomann
,V ersion: 2.10.6
2008-07-16T08:52:06+02:00 - Seite 195 ZDateiname: 6515_0315_02_buchblock.pdf; preflight
Page 257 of 305

Flat tyre
254
X
Do not remove any foreign objects which
have penetrated the tyre, e.g. screws or
nails.
X Remove TIREFIT, the accompanying "max.
80 km/h" sticker and the electric air pump
from the stowage compartment
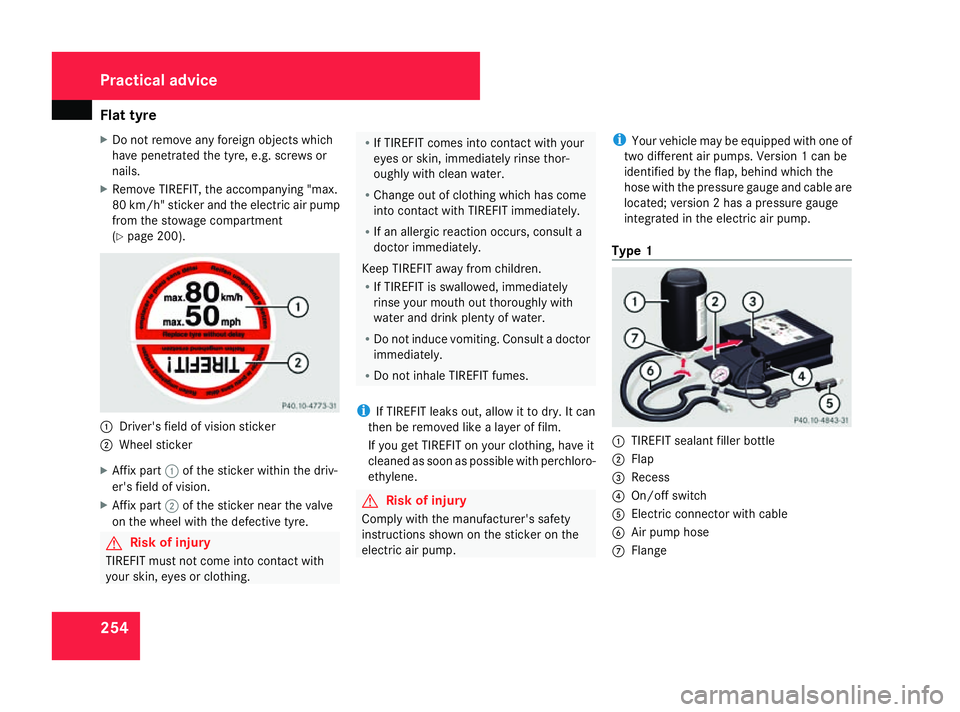
(Y page 200). 1
Driver's field of vision sticker
2 Wheel sticker
X Affix part 1of the sticker within the driv-
er's field of vision.
X Affix part 2of the sticker near the valve
on the wheel with the defective tyre. G
Risk of injury
TIREFIT must not come into contact with
your skin, eyes or clothing. R
If TIREFIT comes into contact with your
eyes or skin, immediately rinse thor-
oughly with clean water.
R Change out of clothing which has come
into contact with TIREFIT immediately.
R If an allergic reaction occurs, consult a
doctor immediately.
Keep TIREFIT away from children.
R If TIREFIT is swallowed, immediately
rinse your mouth out thoroughly with
water and drink plenty of water.
R Do not induce vomiting. Consult a doctor
immediately.
R Do not inhale TIREFIT fumes.
i If TIREFIT leaks out, allow it to dry. It can
then be removed like a layer of film.
If you get TIREFIT on your clothing, have it
cleaned as soon as possible with perchloro-
ethylene. G
Risk of injury
Comply with the manufacturer's safety
instructions shown on the sticker on the
electric air pump. i
Your vehicle may be equipped with one of
two different air pumps. Version 1 can be
identified by the flap, behind which the
hose with the pressure gauge and cable are
located; version 2 has a pressure gauge
integrated in the electric air pump.
Type 1 1
TIREFIT sealant filler bottle
2 Flap
3 Recess
4 On/off switch
5 Electric connector with cable
6 Air pump hose
7 Flange Practical advice
169_AKB; 2; 4, en-GB
wdomann
, Version: 2.10.6 2008-07-16T08:52:06+02:00 - Seite 254Dateiname: 6515_0315_02_buchblock.pdf; preflight
Page 259 of 305

Flat tyre
256 ommends that you use a Mercedes-Benz
Service Centre for this purpose. In particu-
lar, work relevant to safety or on safety-
related systems must be carried out at a
qualified specialist workshop.
If a tyre pressure of 1.8 bar is reached:
X Press on/off switch 4on the electric air
pump to 0.
The electric air pump is switched off.
X Disconnect the electric air pump and stow
it away.
X Fold up the warning triangle and stow it
away.
X Pull away immediately.
This distributes the TIREFIT more evenly
around the tyre.
X Stop after driving for approximately ten
minutes and check the tyre pressure with
the electric air pump. G
Risk of accident
If the tyre pressure is now lower than
1.3 bar, the tyre is too badly damaged. Do
not drive any further. Consult a qualified
specialist workshop which has the neces-
sary specialist knowledge and tools to carry
out the work required. Mercedes-Benz rec-
ommends that you use a Mercedes-Benz Service Centre for this purpose. In particu-
lar, work relevant to safety or on safety-
related systems must be carried out at a
qualified specialist workshop.
X If the tyre pressure is still at least 1.3 bar,
correct it (see fuel filler flap for values).
To increase the tyre pressure: switch on
the electric air pump.
To reduce the tyre pressure: open pres-
sure release screw aon pressure
gauge b.
X Drive to the nearest workshop and have the
tyre changed there.
X Have the TIREFIT kit replaced as soon as
possible at a qualified specialist workshop,
e.g. at a Mercedes-Benz Service Centre. G
Risk of accident
Do not exceed the maximum speed of
80 km/h.
The "max. 80 km/h "sticker must be affixed
within the driver's field of vision.
The vehicle's handling characteristics may
be affected. H
Environmental note
Have the used TIREFIT kit disposed of pro-
fessionally, e.g. at a Mercedes-Benz
Service Centre.
X Have the TIREFIT kit replaced every four
years at a qualified specialist workshop,
e.g. a Mercedes-Benz Service Centre.
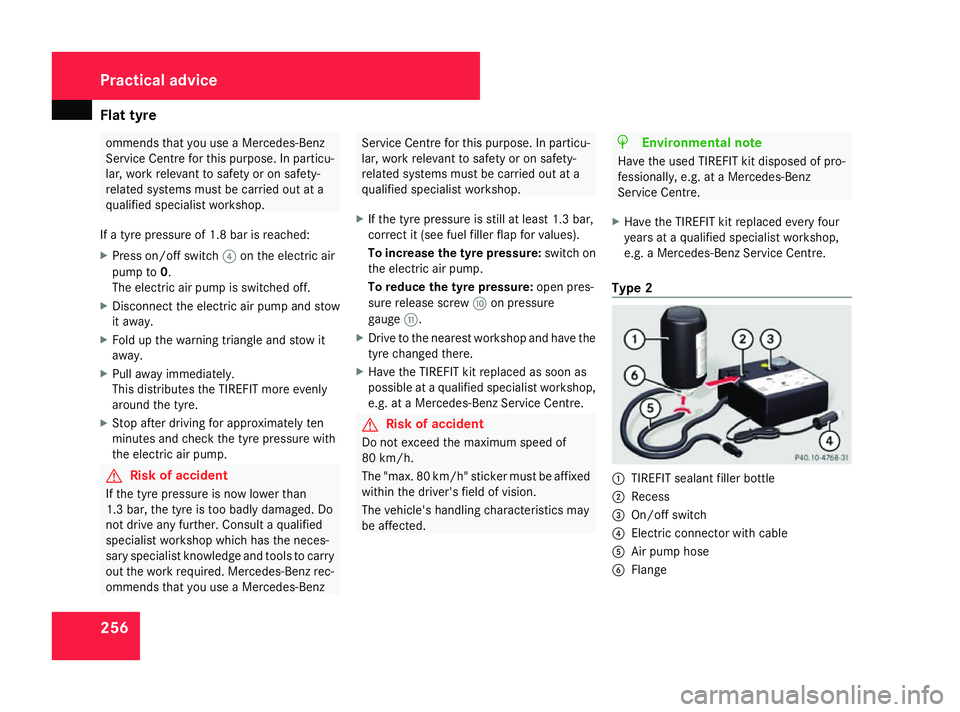
Type 2 1
TIREFIT sealant filler bottle
2 Recess
3 On/off switch
4 Electric connector with cable
5 Air pump hose
6 Flange Practical advice
169_AKB; 2; 4, en-GB
wdomann,
Version: 2.10.6 2008-07-16T08:52:06+02:00 - Seite 256Dateiname: 6515_0315_02_buchblock.pdf; preflight