sensor MERCEDES-BENZ A-CLASS HATCHBACK 2012 User Guide
[x] Cancel search | Manufacturer: MERCEDES-BENZ, Model Year: 2012, Model line: A-CLASS HATCHBACK, Model: MERCEDES-BENZ A-CLASS HATCHBACK 2012Pages: 357, PDF Size: 11.61 MB
Page 66 of 357

In such cases, the distance warning function
may:
R give an unnecessary warning
R not give a warning
There is a risk of an accident.
Always pay careful attention to the traffic sit-
uation; do not rely on the distance warning
function alone.
Function X To activate/deactivate: activate or deac-
tivate the distance warning function in the
on-board computer (Y page 218).
Vehicles with a black and white multi-
function display: when the distance warning
function is activated, the Äsymbol
appears in the status overview in the multi-
function display.
Vehicles with a colour multifunction dis-
play: when the distance warning function is
deactivated, the æsymbol appears in the
assistance graphics in the multifunction dis-
play.
The distance warning function can help you to
minimise the risk of a front-end collision with a vehicle ahead or reduce the effects of such
a collision. If the distance warning function
detects that there is a risk of a collision, you
will be warned visually and acoustically. With- out your intervention, the distance warning
function cannot prevent a collision.
The distance warning function issues a warn- ing at speeds:
R of around 30 km/h or more, if, over several
seconds, the distance maintained to the
vehicle travelling in front is insufficient. The · distance warning lamp then lights up
in the instrument cluster.
R of around 7 km/h or higher, if you very
quickly approach a vehicle in front. An
intermittent warning tone will then sound,
and the ·distance warning lamp will
light up in the instrument cluster. X
Brake immediately in order to increase the
distance from the vehicle in front.
or
X Take evasive action provided it is safe to do
so.
Due to the nature of the system, particularly
complicated but non-critical driving condi-
tions may also cause the system to display a
warning.
With the help of the radar sensor system, the distance warning function can detect obsta-
cles that are in the path of your vehicle for an
extended period of time.
Up to a speed of around 70 km/h, the dis-
tance warning function can also react to sta-
tionary obstacles, such as stopped or parked vehicles.
If you approach an obstacle and the distance
warning function detects a risk of a collision,
the system will alert you both visually and
acoustically.
In particular, the detection of obstacles can
be impaired in the case of:
R dirt on the sensors or obscured sensors
R snow or heavy rain
R interference by other radar sources
R strong radar reflections, for example, in
multi-storey car parks
R a narrow vehicle travelling in front, e.g. a
motorcycle
R a vehicle travelling in front on a different
line
Following damage to the front end of the vehi- cle, have the configuration and operation of
the radar sensor checked at a qualified spe-
cialist workshop. This also applies to colli-
sions at slow speeds where there is no visible
damage to the front of the vehicle.
Adaptive Brake Assist i
Observe the "Important safety notes" sec-
tion for driving safety systems (Y page 61). Driving safety systems
63Safety Z
Page 67 of 357
G
WARNING
Adaptive Brake Assist cannot always clearly
identify objects and complex traffic situa-
tions. In these cases, Adaptive Brake Assist
may not intervene. There is a risk of an acci-
dent.
Always pay careful attention to the traffic sit- uation and be ready to brake. G
WARNING
Adaptive Brake Assist does not react:
R to people or animals
R to oncoming vehicles
R to crossing traffic
R to stationary obstacles
R when cornering
As a result, Adaptive Brake Assist may not
intervene in all critical conditions. There is a
risk of an accident.
Always pay careful attention to the traffic sit- uation and be ready to brake.
Adaptive Brake Assist aids you in braking dur-
ing hazardous situations at speeds above
30 km/h and uses the radar sensor system to evaluate the traffic situation.
With the help of a sensor system, adaptive
Brake Assist can detect obstacles that are in the path of your vehicle for an extended
period of time.
Should you approach an obstacle and adap-
tive Brake Assist has detected a risk of colli-
sion, adaptive Brake Assist calculates the
braking force necessary to avoid a collision.
Should you apply the brakes forcefully, adap- tive Brake Assist will automatically increase
the braking force to a level suitable for the
traffic conditions.
X Keep the brake pedal depressed until the
emergency braking situation is over.
ABS prevents the wheels from locking. The brakes will work normally again if:
R you release the brake pedal
R there is no longer any danger of a collision
R no obstacle is detected in front of your
vehicle
Adaptive Brake Assist is then deactivated.
Vehicles with PRE-SAFE ®
:if adaptive Brake
Assist requires particularly high brake pres-
sure, preventative passenger protection
measures (PRE-SAFE ®
) are deployed simul-
taneously.
Up to vehicle speeds of around 250 km/h,
adaptive Brake Assist is capable of reacting to
moving objects that have already been rec-
ognised as such at least once over the period of observation. Adaptive Brake Assist does
not react to stationary obstacles.
If adaptive Brake Assist is not available due to a malfunction in the radar sensor system, thebrake system remains available with full
brake boosting effect and BAS.
In particular, the detection of obstacles can
be impaired if there is:
R dirt on the sensors or anything else cover-
ing the sensors
R snow or heavy rain
R interference by other radar sources
R the possibility of strong radar reflections,
for example, in multi-storey car parks
R a narrow vehicle travelling in front, e.g. a
motorcycle
R a vehicle travelling in front on a different
line
Following damage to the front end of the vehi- cle, have the configuration and operation of
the radar sensor checked at a qualified spe-
cialist workshop. This also applies to colli-
sions at slow speeds where there is no visible
damage to the front of the vehicle. Adaptive brake lamps
If you brake sharply from a speed of more
than 50 km/h or if braking is assisted by BAS 64
Driving safety systemsSafety
Page 73 of 357
Tow-away protection
Function An audible and visual alarm is triggered if your
vehicle's angle of inclination is altered while
tow-away protection is primed. This can occur
if the vehicle is jacked up on one side, for
example.
Activating X
Make sure that:
R the doors are closed.
R the tailgate is closed.
Only then is the tow-away protection
primed.
X Lock the vehicle with the key.
Tow-away protection is primed after
approximately 60 seconds.
Deactivating X
Unlock the vehicle with the key.
or X Insert the key into the ignition lock.
Tow-away protection is switched off auto-
matically.
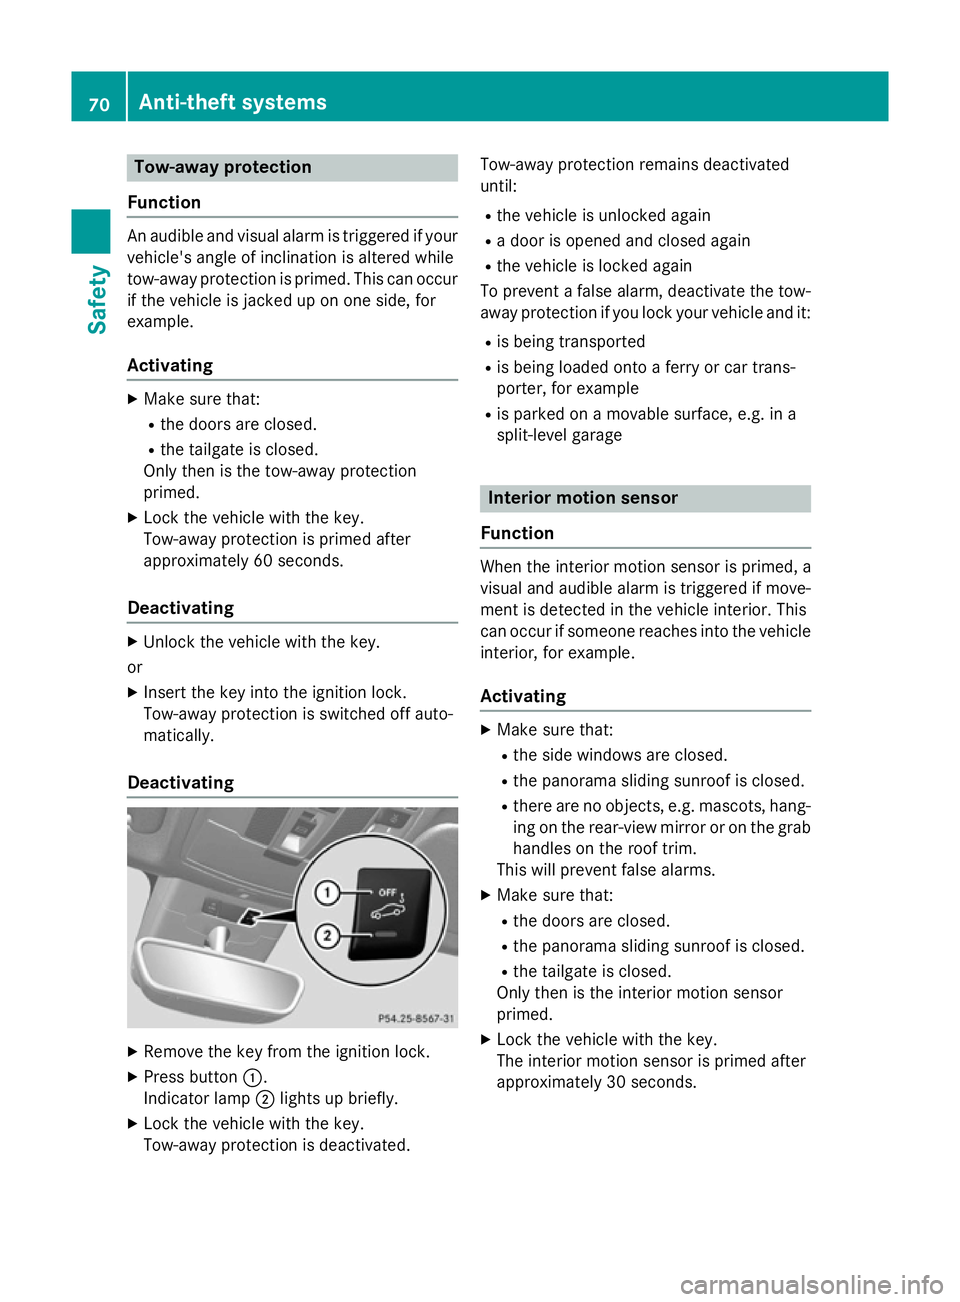
Deactivating X
Remove the key from the ignition lock.
X Press button :.
Indicator lamp ;lights up briefly.
X Lock the vehicle with the key.
Tow-away protection is deactivated. Tow-away protection remains deactivated
until:
R the vehicle is unlocked again
R a door is opened and closed again
R the vehicle is locked again
To prevent a false alarm, deactivate the tow-
away protection if you lock your vehicle and it:
R is being transported
R is being loaded onto a ferry or car trans-
porter, for example
R is parked on a movable surface, e.g. in a
split-level garage Interior motion sensor
Function When the interior motion sensor is primed, a
visual and audible alarm is triggered if move-
ment is detected in the vehicle interior. This
can occur if someone reaches into the vehicle interior, for example.
Activating X
Make sure that:
R the side windows are closed.
R the panorama sliding sunroof is closed.
R there are no objects, e.g. mascots, hang-
ing on the rear-view mirror or on the grab
handles on the roof trim.
This will prevent false alarms.
X Make sure that:
R the doors are closed.
R the panorama sliding sunroof is closed.
R the tailgate is closed.
Only then is the interior motion sensor
primed.
X Lock the vehicle with the key.
The interior motion sensor is primed after
approximately 30 seconds. 70
Anti-theft systemsSafety
Page 74 of 357
Deactivating
X
Unlock the vehicle with the key.
or
X Insert the key into the ignition lock.
The interior motion sensor is switched off
automatically.
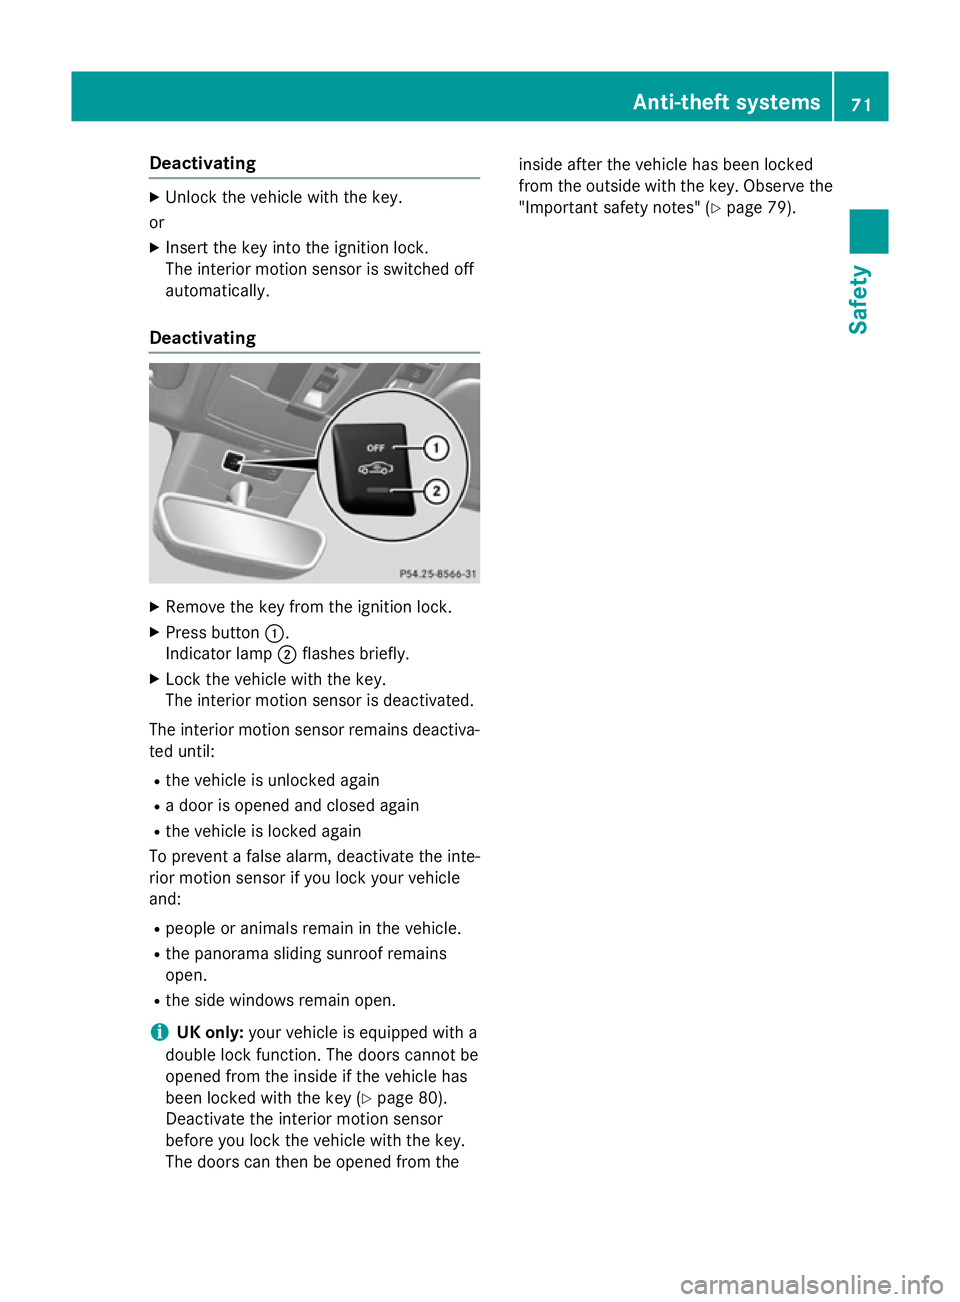
Deactivating X
Remove the key from the ignition lock.
X Press button :.
Indicator lamp ;flashes briefly.
X Lock the vehicle with the key.
The interior motion sensor is deactivated.
The interior motion sensor remains deactiva-
ted until:
R the vehicle is unlocked again
R a door is opened and closed again
R the vehicle is locked again
To prevent a false alarm, deactivate the inte-
rior motion sensor if you lock your vehicle
and:
R people or animals remain in the vehicle.
R the panorama sliding sunroof remains
open.
R the side windows remain open.
i UK only:
your vehicle is equipped with a
double lock function. The doors cannot be
opened from the inside if the vehicle has
been locked with the key (Y page 80).
Deactivate the interior motion sensor
before you lock the vehicle with the key.
The doors can then be opened from the inside after the vehicle has been locked
from the outside with the key. Observe the
"Important safety notes" (Y page 79). Anti-theft syste
ms
71Safety Z
Page 77 of 357
Useful information
i This Owner's Manual describes all mod-
els, series and optional equipment for your
vehicle that were available at the time of
going to press. National variations are pos- sible. Note that your vehicle may not be
equipped with all of the functions descri-
bed. This is also the case for systems and
functions relevant to safety.
i Read the information on qualified special-
ist workshops: (Y page 24). Key
Important safety notes
G
WARNING
If children are left unsupervised in the vehicle, they could:
R open the doors, thus endangering other
people or road users.
R get out and disrupt traffic.
R operate the vehicle's equipment.
Additionally, children could set the vehicle in
motion if, for example, they:
R release the parking brake.
R shift the automatic transmission out of
parking position P.
R shift the manual transmission into neutral.
R start the engine.
There is a risk of an accident and injury.
When leaving the vehicle, always take the key with you and lock the vehicle. Never leave
children or animals unattended in the vehicle.Always keep the key out of reach of children. G
WARNING
If persons (particularly children) are exposed
to heat or cold for a prolonged period, there is a risk of serious or even fatal injuries. Never
leave persons (particularly children) unatten-
ded in the vehicle. G
WARNING
If you attach heavy or large objects to the key, the key could be unintentionally turned in the
ignition lock. This could cause the engine to
be switched off. There is a risk of an accident.
Do not attach any heavy or large objects to the
key. Remove any bulky keyrings before insert-
ing the key into the ignition lock.
! Keep the key away from strong magnetic
fields. Otherwise, the remote control func-
tion could be affected.
Strong magnetic fields can occur in the
vicinity of powerful electrical installations.
Do not keep the key: R with electronic devices, e.g. a mobile
phone or another key
R with metallic objects, e.g. coins or metal
film
R inside metallic objects, e.g. a metal case
United Kingdom only: G
WARNING
When the double locks are activated, the
doors can no longer be opened from the
inside. People in the vehicle can no longer get out, e.g. in hazardous situations. There is a
risk of injury.
Therefore, do not leave any people unsuper-
vised in the vehicle, particularly children, eld-
erly people or people in need of special assis-
tance. Do not activate the double lock when
people are in the vehicle.
If the vehicle has been locked with the key,
then the double lock function is activated as
standard. You can deactivate the double lock
function by deactivating the interior motion
sensor (Y page 70). The doors can then be
opened from the inside after the vehicle has
been locked from the outside. The anti-theft
alarm system is triggered if the door is
opened from the inside. Switch off the alarm
(Y page 69). 74
KeyOpening and closing
Page 82 of 357

Problem
Possible causes/consequences and
M
MSolutions The engine cannot be
started using the key. The on-board voltage is too low.
X Switch off non-essential consumers, e.g. seat heating or interior
lighting, and try to start the engine again.
If this does not work:
X Check the starter battery and charge it if necessary
(Y page 304).
or
X Jump-start the vehicle (Y page 308).
or
X Consult a qualified specialist workshop. The engine cannot be
started using the key. The steering lock is mechanically blocked.
X Remove the key and reinsert it into the ignition lock. While doing
this, turn the steering wheel in both directions. Doors
Important safety notes
G
WARNING
If children are left unsupervised in the vehicle, they could:
R open the doors, thus endangering other
people or road users.
R get out and disrupt traffic.
R operate the vehicle's equipment.
Additionally, children could set the vehicle in
motion if, for example, they:
R release the parking brake.
R shift the automatic transmission out of
parking position P.
R shift the manual transmission into neutral.
R start the engine.
There is a risk of an accident and injury.
When leaving the vehicle, always take the key with you and lock the vehicle. Never leave
children or animals unattended in the vehicle.Always keep the key out of reach of children. G
WARNING
If persons (particularly children) are exposed
to heat or cold for a prolonged period, there is a risk of serious or even fatal injuries. Never
leave persons (particularly children) unatten-
ded in the vehicle.
United Kingdom only: G
WARNING
When the double locks are activated, the
doors can no longer be opened from the
inside. People in the vehicle can no longer get out, e.g. in hazardous situations. There is a
risk of injury.
Therefore, do not leave any people unsuper-
vised in the vehicle, particularly children, eld-
erly people or people in need of special assis-
tance. Do not activate the double lock when
people are in the vehicle.
If the vehicle has been locked with the key,
then the double lock function is activated as
standard. You can deactivate the double lock
function by deactivating the interior motion
sensor (Y page 70). The doors can then be
opened from the inside after the vehicle has
been locked from the outside. The anti-theft Doors
79Opening and closing Z
Page 83 of 357
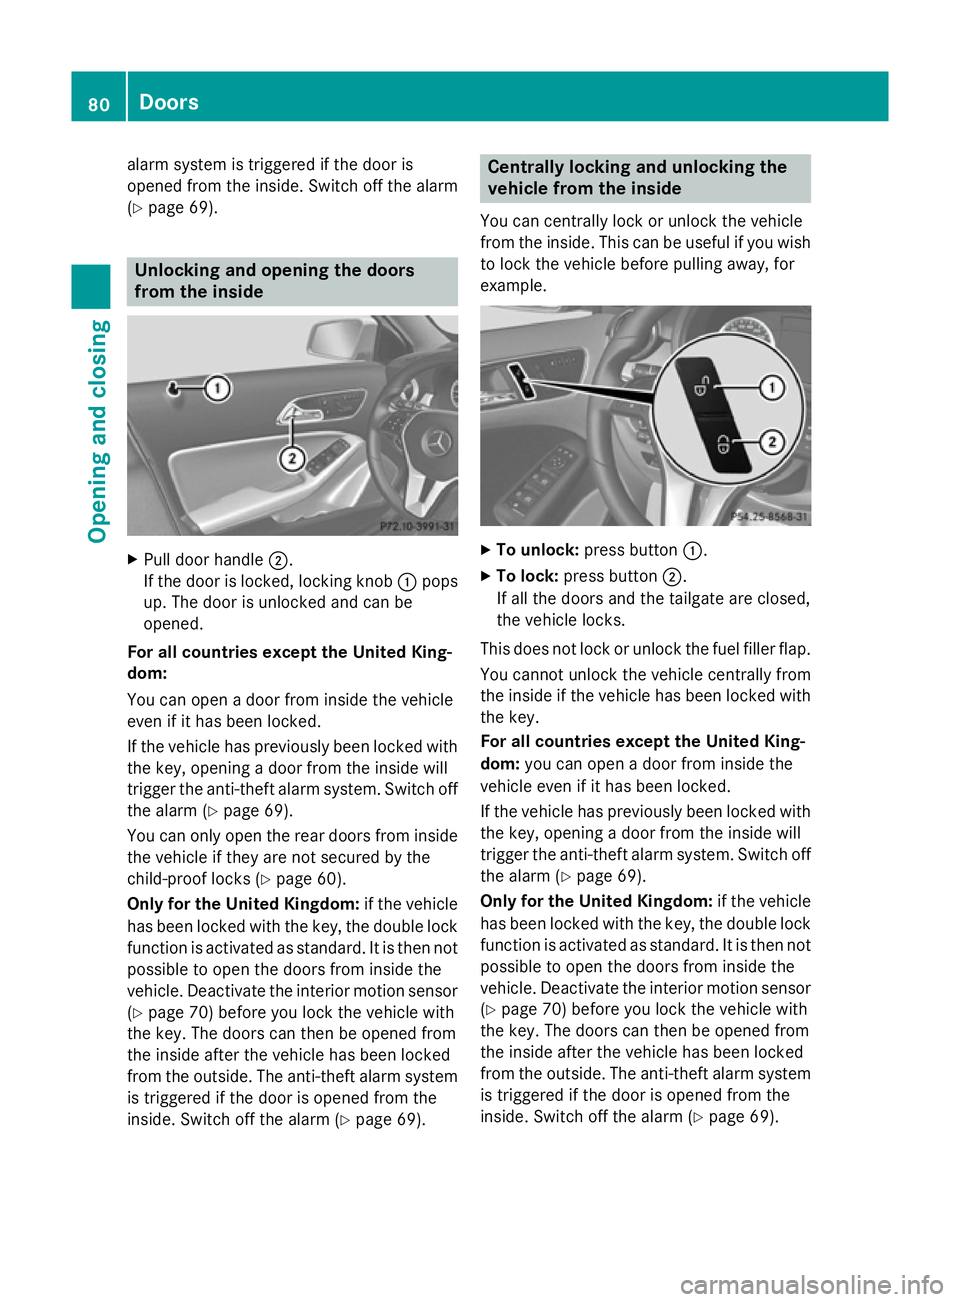
alarm system is triggered if the door is
opened from the inside. Switch off the alarm
(Y page 69). Unlocking and opening the doors
from the inside
X
Pull door handle ;.
If the door is locked, locking knob :pops
up. The door is unlocked and can be
opened.
For all countries except the United King-
dom:
You can open a door from inside the vehicle
even if it has been locked.
If the vehicle has previously been locked with
the key, opening a door from the inside will
trigger the anti-theft alarm system. Switch off
the alarm (Y page 69).
You can only open the rear doors from inside the vehicle if they are not secured by the
child-proof locks (Y page 60).
Only for the United Kingdom: if the vehicle
has been locked with the key, the double lock
function is activated as standard. It is then not
possible to open the doors from inside the
vehicle. Deactivate the interior motion sensor (Y page 70) before you lock the vehicle with
the key. The doors can then be opened from
the inside after the vehicle has been locked
from the outside. The anti-theft alarm system
is triggered if the door is opened from the
inside. Switch off the alarm (Y page 69). Centrally locking and unlocking the
vehicle from the inside
You can centrally lock or unlock the vehicle
from the inside. This can be useful if you wish to lock the vehicle before pulling away, for
example. X
To unlock: press button :.
X To lock: press button ;.
If all the doors and the tailgate are closed,
the vehicle locks.
This does not lock or unlock the fuel filler flap. You cannot unlock the vehicle centrally from
the inside if the vehicle has been locked with
the key.
For all countries except the United King-
dom: you can open a door from inside the
vehicle even if it has been locked.
If the vehicle has previously been locked with the key, opening a door from the inside will
trigger the anti-theft alarm system. Switch off
the alarm (Y page 69).
Only for the United Kingdom: if the vehicle
has been locked with the key, the double lock
function is activated as standard. It is then not
possible to open the doors from inside the
vehicle. Deactivate the interior motion sensor (Y page 70) before you lock the vehicle with
the key. The doors can then be opened from
the inside after the vehicle has been locked
from the outside. The anti-theft alarm system is triggered if the door is opened from the
inside. Switch off the alarm (Y page 69).80
DoorsOpening and closing
Page 91 of 357

tilation of the vehicle interior, you can raise
the sliding sunroof.
If contact is made with a roof carrier
approved by Mercedes-Benz, the sliding
sunroof lowers slightly but remains raised
at the rear.
Rain-closing feature The rain-closing feature is only available for
vehicles with a rain sensor.
When the key is in position 0in the ignition
lock or is removed, the sliding sunroof closes
automatically:
R if it starts to rain
R at extreme outside temperatures
R after six hours
R if there is a malfunction in the power supply
The sliding sunroof remains raised at the rear
in order to allow ventilation of the vehicle
interior.
i If the sliding sunroof is obstructed when
being closed by the rain-closing feature, it
opens again slightly. The rain-closing fea-
ture is then deactivated.
The sliding sunroof does not close if: R it is raised at the rear.
R it is blocked.
R no rain is falling on the area of the wind-
screen being monitored by the rain sensor,
e.g. because the vehicle is under a bridge. Operating the roller sunblinds for the
sliding sunroof
Important safety notes G
WARNING
When opening or closing the roller sunblind
parts of the body could be trapped between
the roller sunblind and the frame or sliding
sunroof. There is a risk of injury. When opening or closing make sure that no
parts of the body are in the sweep of the roller sunblind.
If someone is trapped:
R release the switch immediately or
R during automatic operation, press the
switch briefly in any direction
The opening/closing process is stopped.
The roller sunblinds shield the vehicle interior from sunlight. The two roller sunblinds can
only be opened and closed together when the sliding sunroof is closed.
Roller sunblind reversing feature The roller sunblinds are equipped with an
automatic reversing feature. If a solid object
blocks or restricts the roller blind during the
closing process, the roller blind opens again
automatically. However, the automatic
reversing feature is only an aid and does not
relieve you of the responsibility to pay atten-
tion when closing the roller blinds.
G
WARNING
The reversing feature especially does not
react to soft, light and thin objects, such as
small fingers. This means that the reversing
feature cannot prevent someone being trap-
ped in these situations. There is a risk of
injury.
When closing make sure that no parts of the
body are in the sweep of the roller sunblind.
If someone is trapped:
R release the switch immediately or
R during automatic operation, press the
switch briefly in any direction
The closing process is stopped. 88
Panorama sliding sunroofOpening and closing
Page 103 of 357

Folding the exterior mirrors in/out
automatically If the "Fold in mirrors when locking" function
is activated in the on-board computer
(Y page 225):
R the exterior mirrors fold in automatically as
soon as you lock the vehicle from the out-
side.
R the exterior mirrors fold out again automat-
ically as soon as you unlock the vehicle and
then open the driver's or front-passenger
door.
i If the exterior mirrors have been folded in
manually, they do not fold out.
Exterior mirror pushed out of position If an exterior mirror has been pushed out of
position, proceed as follows.
X Vehicles without electrically folding
exterior mirrors: move the exterior mirror
into the correct position manually.
X Vehicles with electrically folding exte-
rior mirrors: press and hold the mirror-
folding button (Y page 99) until you hear a
click and then the mirror engage in posi-
tion.
The mirror housing is engaged again and
you can adjust the exterior mirrors as usual
(Y page 99). Automatic anti-dazzle mirrors
The "Automatic anti-dazzle mirrors" function
is only available if the vehicle is equipped with
the "Mirror package".
The rear-view mirror and the exterior mirror
on the driver's side automatically go into anti- dazzle mode if:
R the ignition is switched on and
R incident light from headlamps strikes the
sensor in the rear-view mirror
The mirrors do not go into anti-dazzle mode if reverse gear is engaged or if the interior light-
ing is switched on. Parking position of the exterior mirror
on the front-passenger side
General notes The "Parking position for the exterior mirror
on the front-passenger side" function is only
available if the vehicle is equipped with the
"Memory package".
Setting and storing the parking position Using reverse gear
You can set the front-passenger side exterior
mirror so that you can see the rear wheel on
that side as soon as you engage reverse gear.
You can store this position. X
Make sure that the vehicle is stationary and
that the key is in position 2in the ignition
lock.
X Press button ;for the exterior mirror on
the front-passenger side.
X Engage reverse gear.
The exterior mirror on the front-passenger
side moves to the preset parking position.
X Use adjustment button =to adjust the
exterior mirror. You should see the rear
wheel and the kerb in the exterior mirror.
The parking position is stored.
i If you shift the transmission to another
position, the exterior mirror on the front-
passenger side returns to the driving posi-
tion. 100
MirrorsSeats, steering wheel and
mirrors
Page 108 of 357

Setting the exterior lighting
Setting options Exterior lighting can be set using the:
R light switch
R headlamp range control (vehicles with hal-
ogen headlamps only) (Y page 107)
R combination switch (Y page 107)
R on-board computer (Y page 221)
Light switch Operation
1W
Left-hand parking lamps
2X Right-hand parking lamps
3T Side lamps, licence plate and instru-
ment cluster lighting
4Ã Automatic headlamp mode, control-
led by the light sensor
5L Dipped-beam/main-beam head-
lamps
BR Rear foglamp
CN Foglamp (vehicles with front fog-
lamps only)
If you hear a warning tone when you leave the
vehicle, the lights may still be switched on.
X Turn the light switch to Ã.
The exterior lighting (except the side lamps/
parking lamps) switches off automatically if
you:
R remove the key from the ignition lock
R open the driver's door with the key in posi-
tion 0. Automatic headlamp mode G
WARNING
When the light switch is set to Ã, the
dipped-beam headlamps may not be switched on automatically if there is fog, snow or othercauses of poor visibility due to the weather
conditions such as spray. There is a risk of an
accident.
In such situations, turn the light switch to
L.
The automatic headlamp feature is only an
aid. The driver is responsible for the vehicle's lighting at all times.
à is the preferred light switch setting. The
light setting is automatically selected accord-
ing to the brightness of the ambient light
(exception: poor visibility due to weather con- ditions such as fog, snow or spray):
R Key in position 1in the ignition lock: the
side lamps are switched on or off automat- ically depending on the brightness of the
ambient light.
R With the engine running: if you have
switched on the daytime driving lights func-
tion in the on-board computer, the daytime
driving lights or the side lamps and dipped- beam headlamps are switched on or off
automatically depending on the brightnessof the ambient light.
X To switch on automatic headlamp
mode: turn the light switch to Ã.
The daytime driving lights improve the detect- ability of your vehicle during the day. Here,
the daytime driving lights function must be
switched on via the on-board computer
(Y page 221).
When the dipped-beam headlamps are
switched on, the Lindicator lamp in the
instrument cluster lights up and the daytime
driving lights switch off.
Dipped-beam headlamps
When the ignition is switched on and the light switch is in position L, the side lamps and
dipped-beam headlamps are switched on Exterior lighting
105Lights and windscreen wipers Z