display MERCEDES-BENZ A-CLASS HATCHBACK 2012 Owner's Manual
[x] Cancel search | Manufacturer: MERCEDES-BENZ, Model Year: 2012, Model line: A-CLASS HATCHBACK, Model: MERCEDES-BENZ A-CLASS HATCHBACK 2012Pages: 357, PDF Size: 11.61 MB
Page 36 of 357

Multifunction steering wheel
Function Page
:
Multifunction display 210
;
Audio/COMAND display;
see the separate operating
instructions = ?
Switches on LINGUA-
TRONIC; see the separate
operating instructions ? ~
Rejects or ends a call 215
Exits telephone book/
redial memory
6
Makes or accepts a call
Switches to the redial mem-
ory WX
Adjusts the volume
8
Mute Function Page
A =;
Selects a menu 209
9:
Selects a submenu or
scrolls through lists
209
a
Confirms the selection 209
Hiding display messages 229
B %
Back 209
Switches off LINGUA-
TRONIC; see the separate
operating instructionsMultifunction steering wheel
33At a glance
Page 52 of 357
the driver and the front passenger have fas-
tened their seat belts.
i For more information on the
7seat
belt warning lamp, see "Warning and indi-
cator lamps in the instrument cluster, seat
belt" (Y page 257).
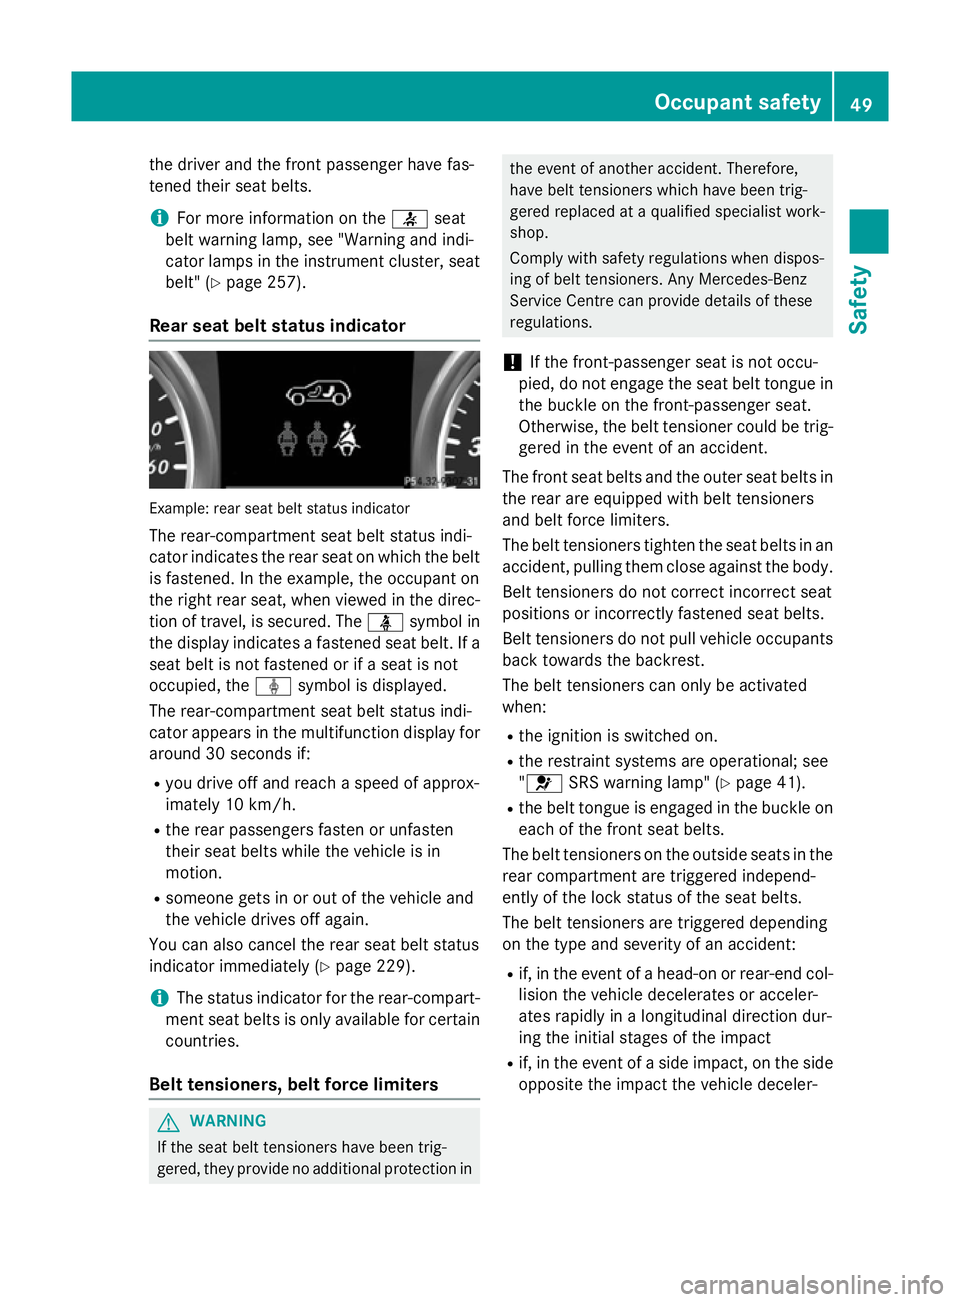
Rear seat belt status indicator Example: rear seat belt status indicator
The rear-compartment seat belt status indi-
cator indicates the rear seat on which the belt
is fastened. In the example, the occupant on
the right rear seat, when viewed in the direc- tion of travel, is secured. The üsymbol in
the display indicates a fastened seat belt. If a seat belt is not fastened or if a seat is not
occupied, the ýsymbol is displayed.
The rear-compartment seat belt status indi-
cator appears in the multifunction display for
around 30 second s if:
R you drive of f and reach a speed of approx-
imately 10 km/h.
R the rear passengers fasten or unfasten
their seat belts while the vehicle is in
motion.
R someone gets in or out of the vehicle and
the vehicle drives off again.
You can also cancel the rear seat belt status
indicator immediately (Y page 229).
i The status indicator for the rear-compart-
ment seat belts is only available for certain
countries.
Belt tensioners, belt force limiters G
WARNING
If the seat belt tensioners have been trig-
gered, they provide no additional protection in the event of another accident. Therefore,
have belt tensioners which have been trig-
gered replaced at a qualified specialist work-
shop.
Comply with safety regulations when dispos-
ing of belt tensioners. Any Mercedes-Benz
Service Centre can provide details of these
regulations.
! If the front-passenger seat is not occu-
pied, do not engage the seat belt tongue in
the buckle on the front-passenger seat.
Otherwise, the belt tensioner could be trig- gered in the event of an accident.
The front seat belts and the outer seat belts in
the rear are equipped with belt tensioners
and belt force limiters.
The belt tensioners tighten the seat belts in an
accident, pulling them close against the body.
Belt tensioners do not correct incorrect seat
positions or incorrectly fastened seat belts.
Belt tensioners do not pull vehicle occupants
back towards the backrest.
The belt tensioners can only be activated
when:
R the ignition is switched on.
R the restraint systems are operational; see
"6 SRS warning lamp" (Y page 41).
R the belt tongue is engaged in the buckle on
each of the front seat belts.
The belt tensioners on the outside seats in the
rear compartment are triggered independ-
ently of the lock status of the seat belts.
The belt tensioners are triggered depending
on the type and severity of an accident:
R if, in the event of a head-on or rear-end col-
lision the vehicle decelerates or acceler-
ates rapidly in a longitudinal direction dur-
ing the initial stages of the impact
R if, in the event of a side impact, on the side
opposite the impact the vehicle deceler- Occupant safety
49Safety Z
Page 65 of 357
ally, further driving safety systems are deac-
tivated. There is an increased danger of skid- ding and accidents.
Drive on carefully. Have ABS checked imme-
diately at a qualified specialist workshop.
If ABS is malfunctioning, other systems,
including driving safety systems, will also
become inoperative. Observe the information on the ABS warning lamp (Y page 258) and
display messages which may be shown in the
instrument cluster (Y page 230).
ABS regulates brake pressure in such a way
that the wheels do not lock when you brake.
This allows you to continue steering the vehi-
cle when braking.
ABS works from a speed of about 8 km/h
upwards, regardless of road-surface condi-
tions. ABS works on slippery surfaces, even
when you only brake gently.
The ! ABS warning lamp in the instrument
cluster lights up when the ignition is switched on. It goes out when the engine is running.
Braking X
If ABS intervenes: continue to depress the
brake pedal with force until the braking sit- uation is over.
X To make a full brake application:
depress the brake pedal with full force.
If ABS intervenes when braking, you will feel a
pulsing in the brake pedal.
The pulsating brake pedal can be an indica-
tion of hazardous road conditions, and func-
tions as a reminder to take extra care while
driving. BAS (Brake Assist)
i Observe the "Important safety notes" sec-
tion (Y page 61). G
WARNING
If BAS is malfunctioning, the braking distance
in an emergency braking situation is
increased. There is a risk of accident.
In an emergency braking situation, depress
the brake pedal with full force. ABS prevents
the wheels from locking.
BAS operates in emergency braking situa-
tions. If you depress the brake pedal quickly,
BAS automatically boosts the braking force,
thus shortening the stopping distance.
The brakes will function as usual once you
release the brake pedal. BAS is deactivated. COLLISION PREVENTION ASSIST
General notes COLLISION PREVENTION ASSIST consists of
the adaptive Brake Assist and the distance
warning signal, which are described in the
following.
Distance warning function Important safety notes
i Observe the "Important safety notes" sec-
tion for driving safety systems (Y page 61). G
WARNING
The distance warning function does not react:
R to people or animals
R to oncoming vehicles
R to crossing traffic
R when cornering
Thus, the distance warning function cannot
provide a warning in all critical situations.
There is a risk of an accident.
Always pay careful attention to the traffic sit-
uation and be ready to brake. G
WARNING
The distance warning function cannot always
clearly identify objects and complex traffic
situations. 62
Driving safety systemsSafety
Page 66 of 357

In such cases, the distance warning function
may:
R give an unnecessary warning
R not give a warning
There is a risk of an accident.
Always pay careful attention to the traffic sit-
uation; do not rely on the distance warning
function alone.
Function X To activate/deactivate: activate or deac-
tivate the distance warning function in the
on-board computer (Y page 218).
Vehicles with a black and white multi-
function display: when the distance warning
function is activated, the Äsymbol
appears in the status overview in the multi-
function display.
Vehicles with a colour multifunction dis-
play: when the distance warning function is
deactivated, the æsymbol appears in the
assistance graphics in the multifunction dis-
play.
The distance warning function can help you to
minimise the risk of a front-end collision with a vehicle ahead or reduce the effects of such
a collision. If the distance warning function
detects that there is a risk of a collision, you
will be warned visually and acoustically. With- out your intervention, the distance warning
function cannot prevent a collision.
The distance warning function issues a warn- ing at speeds:
R of around 30 km/h or more, if, over several
seconds, the distance maintained to the
vehicle travelling in front is insufficient. The · distance warning lamp then lights up
in the instrument cluster.
R of around 7 km/h or higher, if you very
quickly approach a vehicle in front. An
intermittent warning tone will then sound,
and the ·distance warning lamp will
light up in the instrument cluster. X
Brake immediately in order to increase the
distance from the vehicle in front.
or
X Take evasive action provided it is safe to do
so.
Due to the nature of the system, particularly
complicated but non-critical driving condi-
tions may also cause the system to display a
warning.
With the help of the radar sensor system, the distance warning function can detect obsta-
cles that are in the path of your vehicle for an
extended period of time.
Up to a speed of around 70 km/h, the dis-
tance warning function can also react to sta-
tionary obstacles, such as stopped or parked vehicles.
If you approach an obstacle and the distance
warning function detects a risk of a collision,
the system will alert you both visually and
acoustically.
In particular, the detection of obstacles can
be impaired in the case of:
R dirt on the sensors or obscured sensors
R snow or heavy rain
R interference by other radar sources
R strong radar reflections, for example, in
multi-storey car parks
R a narrow vehicle travelling in front, e.g. a
motorcycle
R a vehicle travelling in front on a different
line
Following damage to the front end of the vehi- cle, have the configuration and operation of
the radar sensor checked at a qualified spe-
cialist workshop. This also applies to colli-
sions at slow speeds where there is no visible
damage to the front of the vehicle.
Adaptive Brake Assist i
Observe the "Important safety notes" sec-
tion for driving safety systems (Y page 61). Driving safety systems
63Safety Z
Page 69 of 357

If the
÷ ESP®
warning lamp and the å
ESP ®
OFF warning lamp are lit continuously,
ESP ®
is not available due to a malfunction.
Observe the information on warning lamps
(Y page 260) and display messages which
may be shown in the instrument cluster
(Y page 230).
i Only use wheels with the recommended
tyre sizes. Only then will ESP ®
function
properly.
Characteristics of ESP ®General notes
If the
÷ ESP warning lamp goes out before
beginning the journey, ESP ®
is automatically
active.
If ESP ®
intervenes, the ÷ESP®
warning
lamp flashes in the instrument cluster.
If ESP ®
intervenes:
X Do not deactivate ESP ®
under any circum-
stances.
X When pulling away, only depress the accel-
erator pedal as far as is necessary.
X Adapt your driving style to suit the prevail-
ing road and weather conditions.
ECO start/stop function
The ECO start/stop function switches the
engine off automatically if the vehicle stops
moving. When pulling away again, the engine
starts automatically. ESP ®
remains in its pre-
viously selected status. Example:if ESP®
was deactivated before the engine was
switched off, ESP ®
remains deactivated when
the engine is switched on again.
The ECO start/stop function switches the
engine off automatically if the vehicle stops
moving. When pulling away again, the engine
starts automatically. ESP ®
remains in its pre-
viously selected status. Example:if ESP®
was deactivated before the engine was
switched off, ESP ®
remains deactivated when
the engine is switched on again. Deactivating/activating ESP
®
(AMG
vehicles) Important safety notes
i Observe the "Important safety notes" sec-
tion (Y page 61).
You can select between the following states
of ESP ®
:
R ESP ®
is activated.
R SPORT handling mode is activated.
R ESP ®
is deactivated. G
WARNING
When SPORT handling mode is activated,
there is a greater risk of skidding and acci-
dents.
Only activate SPORT handling mode in the sit- uations described in the following. G
WARNING
If you deactivate ESP ®
, ESP ®
no longer sta-
bilises the vehicle. There is an increased risk
of skidding and an accident.
Only deactivate ESP ®
in the situations descri-
bed in the following.
In the following situations, it may be better to activate SPORT handling mode or deactivate
ESP ®
:
R when using snow chains
R in deep snow
R on sand or gravel
R on specially designated roads when the
vehicle's own oversteering and understeer-
ing characteristics are desired
Driving in SPORT handling mode or without
ESP ®
requires an extremely qualified and
experienced driver.
i Activate ESP ®
as soon as the situations
described above no longer apply. ESP ®
will
otherwise not be able to stabilise the vehi-
cle if the vehicle starts to skid or a wheel
starts to spin. 66
Driving safety systemsSafety
Page 70 of 357

Deactivating/activating ESP
®X
To activate SPORT handling mode:
briefly press button :.
The M handling mode warning lamp in
the instrument cluster lights up. The
SPORT handling mode
SPORT handling mode message appears
in the multifunction display.
X To deactivate SPORT handling mode:
briefly press button :.
The M handling mode warning lamp in
the instrument cluster goes out.
X To deactivate ESP ®
:press button :until
the å ESP®
OFF warning lamp lights up
in the instrument cluster.
The ÷OFF OFFmessage appears in the mul-
tifunction display.
X To activate ESP ®
:briefly press button :.
The å ESP®
OFF warning lamp in the
instrument cluster goes out. The ÷
ESP ®
ON
ON message appears in the multifunc-
tion display.
Characteristics of activated SPORT han-
dling mode
If SPORT handling mode is activated and one
or more wheels start to spin, the ÷ESP®
warning lamp in the instrument cluster
flashes. ESP ®
only stabilises the vehicle to a
limited degree.
When SPORT handling mode is activated:
R ESP ®
only improves driving stability to a
limited degree.
R traction control is still activated. R
engine torque is restricted to a limited
degree and the drive wheels are able to
spin.
The spinning of the wheels results in a cut-
ting action for better traction on loose sur- faces.
R ESP ®
still provides support when you
brake.
Characteristics when ESP ®
is deactivated
If ESP ®
is deactivated and one or more wheels
start to spin, the ÷ESP®
warning lamp in
the instrument cluster does not flash. In such
situations, ESP ®
will not stabilise the vehicle.
If you deactivate ESP ®
:
R ESP ®
no longer improves driving stability.
R engine torque is no longer limited and the
drive wheels are able to spin.
The spinning of the wheels results in a cut-
ting action for better traction on loose sur-faces.
R traction control is still activated.
R PRE-SAFE ®
is no longer available; nor is it
activated if you brake firmly with assis-
tance from ESP ®
.
R COLLISION PREVENTION ASSIST is no lon-
ger available; nor is it activated if you brake
firmly with assistance from ESP ®
.
R COLLISION PREVENTION ASSIST is no lon-
ger available; nor is it activated if you brake
firmly with assistance from ESP ®
.
R ESP ®
still provides support when you
brake.
Deactivating/activating ESP ®
(except
AMG vehicles) Important safety notes
You can select between the following states
of ESP
®
:
R ESP ®
is activated.
R ESP ®
is deactivated. Driving safety syste
ms
67Safety Z
Page 95 of 357
Useful information
i This Owner's Manual describes all mod-
els, series and optional equipment for your
vehicle that were available at the time of
going to press. National variations are pos- sible. Note that your vehicle may not be
equipped with all of the functions descri-
bed. This is also the case for systems and
functions relevant to safety.
i Read the information on qualified special-
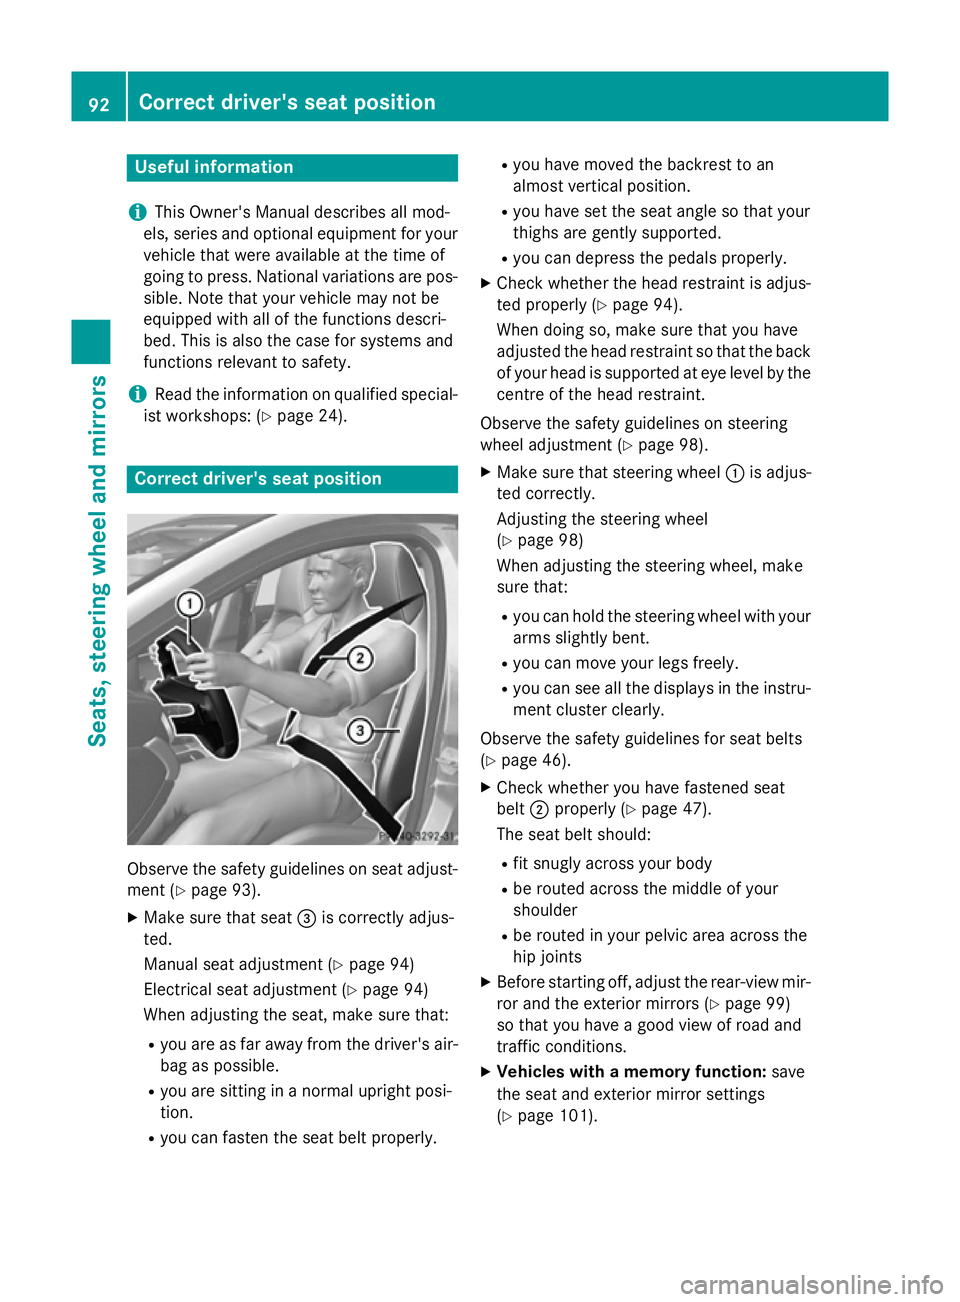
ist workshops: (Y page 24). Correct driver's seat position
Observe the safety guidelines on seat adjust-
ment (Y page 93).
X Make sure that seat =is correctly adjus-
ted.
Manual seat adjustment (Y page 94)
Electrical seat adjustment (Y page 94)
When adjusting the seat, make sure that:
R you are as far away from the driver's air-
bag as possible.
R you are sitting in a normal upright posi-
tion.
R you can fasten the seat belt properly. R
you have moved the backrest to an
almost vertical position.
R you have set the seat angle so that your
thighs are gently supported.
R you can depress the pedals properly.
X Check whether the head restraint is adjus-
ted properly (Y page 94).
When doing so, make sure that you have
adjusted the head restraint so that the back of your head is supported at eye level by the
centre of the head restraint.
Observe the safety guidelines on steering
wheel adjustment (Y page 98).
X Make sure that steering wheel :is adjus-
ted correctly.
Adjusting the steering wheel
(Y page 98)
When adjusting the steering wheel, make
sure that:
R you can hold the steering wheel with your
arms slightly bent.
R you can move your legs freely.
R you can see all the displays in the instru-
ment cluster clearly.
Observe the safety guidelines for seat belts
(Y page 46).
X Check whether you have fastened seat
belt ;properly (Y page 47).
The seat belt should:
R fit snugly across your body
R be routed across the middle of your
shoulder
R be routed in your pelvic area across the
hip joints
X Before starting off, adjust the rear-view mir-
ror and the exterior mirrors (Y page 99)
so that you have a good view of road and
traffic conditions.
X Vehicles with a memory function: save
the seat and exterior mirror settings
(Y page 101). 92
Correct driver's seat positionSeats, steering wheel and mirrors
Page 113 of 357
main-beam headlamps will not be deactivated
or activated regardless. There is a risk of an
accident.
Always carefully observe the traffic conditions
and switch off the main-beam headlamps in
good time.
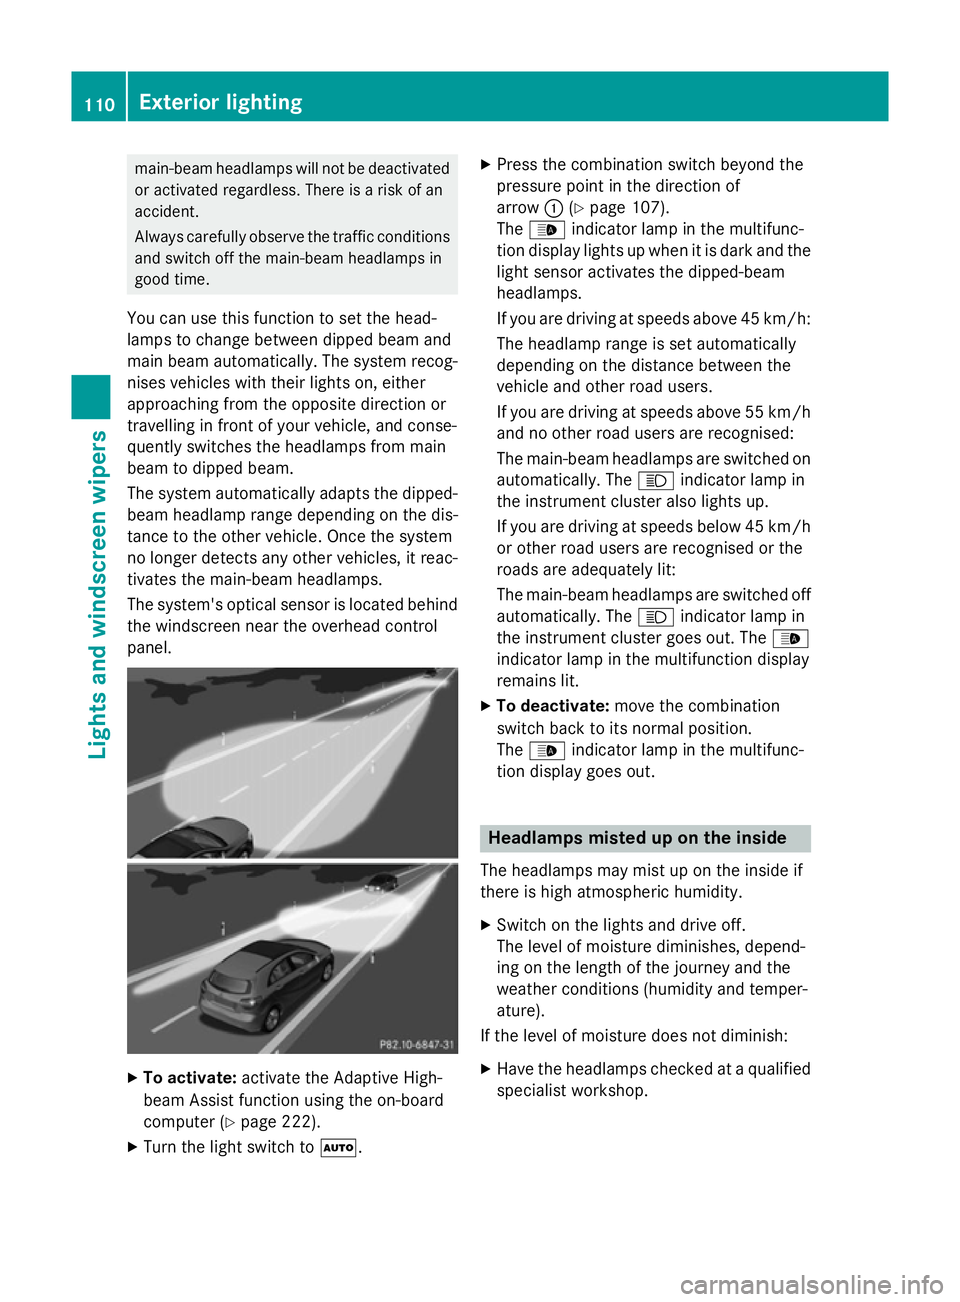
You can use this function to set the head-
lamps to change between dipped beam and
main beam automatically. The system recog-
nises vehicles with their lights on, either
approaching from the opposite direction or
travelling in front of your vehicle, and conse-
quently switches the headlamps from main
beam to dipped beam.
The system automatically adapts the dipped- beam headlamp range depending on the dis-
tance to the other vehicle. Once the system
no longer detects any other vehicles, it reac-
tivates the main-beam headlamps.
The system's optical sensor is located behind
the windscreen near the overhead control
panel. X
To activate: activate the Adaptive High-
beam Assist function using the on-board
computer (Y page 222).
X Turn the light switch to Ã.X
Press the combination switch beyond the
pressure point in the direction of
arrow :(Ypage 107).
The _ indicator lamp in the multifunc-
tion display lights up when it is dark and the light sensor activates the dipped-beam
headlamps.
If you are driving at speeds above 45 km/h:
The headlamp range is set automatically
depending on the distance between the
vehicle and other road users.
If you are driving at speeds above 55 km/h and no other road users are recognised:
The main-beam headlamps are switched on
automatically. The Kindicator lamp in
the instrument cluster also lights up.
If you are driving at speeds below 45 km/h or other road users are recognised or the
roads are adequately lit:
The main-beam headlamps are switched off
automatically. The Kindicator lamp in
the instrument cluster goes out. The _
indicator lamp in the multifunction display
remains lit.
X To deactivate: move the combination
switch back to its normal position.
The _ indicator lamp in the multifunc-
tion display goes out. Headlamps misted up on the inside
The headlamps may mist up on the inside if
there is high atmospheric humidity.
X Switch on the lights and drive off.
The level of moisture diminishes, depend-
ing on the length of the journey and the
weather conditions (humidity and temper-
ature).
If the level of moisture does not diminish:
X Have the headlamps checked at a qualified
specialist workshop. 110
Exterior lightingLights and windscreen wipers
Page 127 of 357

R
Only use air-recirculation mode briefly, e.g.
if there are unpleasant outside odours or
when in a tunnel. The windows could oth-
erwise mist up as no fresh air is drawn into
the vehicle in air-recirculation mode.
R If you change the settings of the climate
control system, the climate status display
appears for three seconds at the bottom of
the screen in the COMAND display. See
also the separate COMAND Online operat-
ing instructions 9
. You will see the current
settings of the various climate control func- tions.
ECO start/stop function During automatic engine switch-off, the cli-
mate control only operates at a reduced capa- city. If you require the full climate control out-
put, you can switch off the ECO start/stop
function by pressing the ECO button
(Y page 147).
9 Only for vehicles with "COMAND Online Multimedia System" optional equipment 124
Overview of climate control systemsClimate control
Page 128 of 357
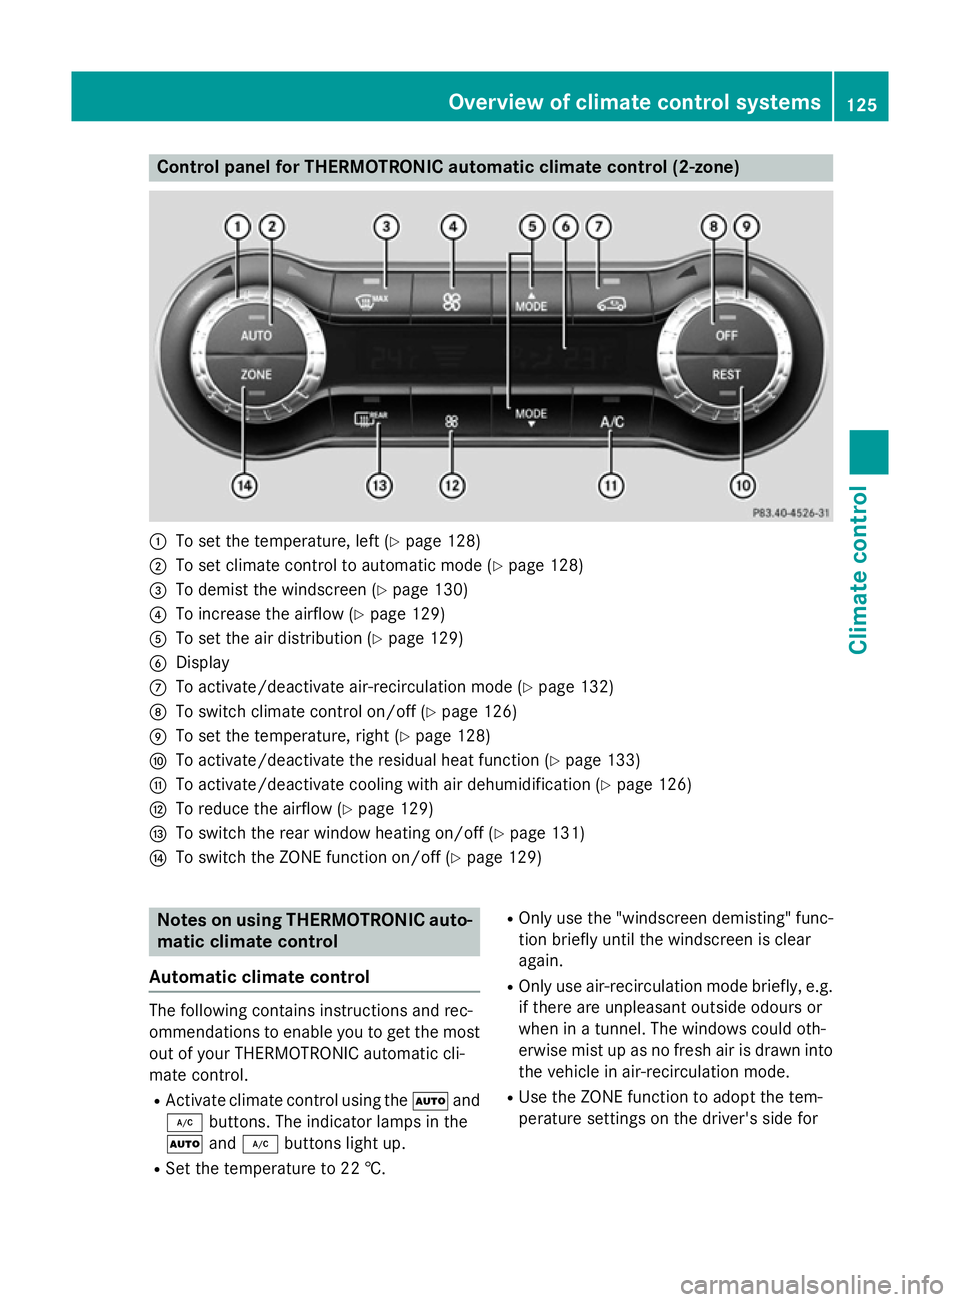
Control panel for THERMOTRONIC automatic climate control (2-zone)
:
To set the temperature, left (Y page 128)
; To set climate control to automatic mode (Y page 128)
= To demist the windscreen (Y page 130)
? To increase the airflow (Y page 129)
A To set the air distribution (Y page 129)
B Display
C To activate/deactivate air-recirculation mode (Y page 132)
D To switch climate control on/off (Y page 126)
E To set the temperature, right (Y page 128)
F To activate/deactivate the residual heat function (Y page 133)
G To activate/deactivate cooling with air dehumidification (Y page 126)
H To reduce the airflow (Y page 129)
I To switch the rear window heating on/off (Y page 131)
J To switch the ZONE function on/off (Y page 129)Notes on using THERMOTRONIC auto-
matic climate control
Automatic climate control The following contains instructions and rec-
ommendations to enable you to get the most
out of your THERMOTRONIC automatic cli-
mate control.
R Activate climate control using the Ãand
¿ buttons. The indicator lamps in the
à and¿ buttons light up.
R Set the temperature to 22 †. R
Only use the "windscreen demisting" func-
tion briefly until the windscreen is clear
again.
R Only use air-recirculation mode briefly, e.g.
if there are unpleasant outside odours or
when in a tunnel. The windows could oth-
erwise mist up as no fresh air is drawn into
the vehicle in air-recirculation mode.
R Use the ZONE function to adopt the tem-
perature settings on the driver's side for Overview of climate control systems
125Climate control