rear view mirror MERCEDES-BENZ A-CLASS HATCHBACK 2012 Owners Manual
[x] Cancel search | Manufacturer: MERCEDES-BENZ, Model Year: 2012, Model line: A-CLASS HATCHBACK, Model: MERCEDES-BENZ A-CLASS HATCHBACK 2012Pages: 357, PDF Size: 11.61 MB
Page 16 of 357
Loading guidelines
............................ 268
Locking
see Central locking
Locking (doors)
Automatic ........................................ 81
Emergency locking .......................... .81
From inside (central locking but-
ton) .................................................. 80
Locking centrally
see Central locking
Locking verification signal (on-
board computer) ............................... 223
Luggage compartment enlarge-
ment ................................................... 271
Important safety notes .................. 271
Luggage compartment floor
Important safety notes .................. 274
opening/closing ............................ 274
stowage well, under ....................... 274
Luggage net ....................................... 271
Lumbar support
Adjusting the 4-way lumbar sup-
port .................................................. 96 M
M+S tyres ........................................... 320
Main-beam headlamps
Changing bulb s.............................. 114
Display message ............................ 241
Switching Adaptive Highbeam
Assist on/of f................................. 109
Switching on/of f........................... 107
Maintenance
see ASSYST PLUS
Manual transmission
Engaging reverse gear ................... 151
Gear lever ...................................... 150
Pulling away ................................... 144
Shift recommendation ................... 151
Shifting to neutral .......................... 151
Starting the engine ........................ 144
Matt finish (cleaning instructions) .. 292
Memory card (audio) ......................... 215
Memory function ............................... 101
Mercedes-Benz Service Centre
see Qualified specialist workshop Message memory (on-board com-
puter) .................................................. 229
Messages
see Display messages
Mirrors
see Exterior mirrors
see Rear-view mirror
see Vanity mirror (in sun visor)
Mobile phone
Frequencies ................................... 336
Installation ..................................... 336
Menu (on-board computer) ............ 215
Notes/placing in the bracket ......... 279
Transmission output (maximum) .... 336
Mobile telephone
Pre-installed bracket ...................... 281
Modifying the programming (key) ..... 75
MOExtended tyres ............................. 300
Motorway mode ................................ 109
MP3
Operating ....................................... 215
see Separate operating instructions
Multifunction display
Function/note s............................. 210
Permanent display ......................... 220
Multifunction steering wheel
Operating the on-board compute r..2 09
Overview .......................................... 33 N
Navigation Menu (on-board computer) ............ 213
see separate operating instructions
Notes on running in a new vehicle .. 142 O
Occupant safety Children in the vehicle ..................... 50
Important safety notes .................... 40
Odometer .......................................... .211
see Total distance recorder
see Trip meter
Oil
see Engine oil
On-board computer
AMG menu ..................................... 226 Index
13
Page 17 of 357
Assistance menu ........................... 217
Audio menu ................................... 214
Convenience submenu .................. 225
Display message s.......................... 229
Displaying a service message ........ 290
Factory setting submenu ............... 225
Heating submenu ........................... 224
Important safety notes .................. 208
Instrument cluster submenu .......... 220
Light submenu ............................... 221
Menu overview .............................. 211
Message memory .......................... 229
Navigation menu ............................ 213
Operating the TV ............................ 215
Operating video DVD ..................... 215
Operation ....................................... 209
RACETIMER ................................... 226
Service menu ................................. 219
Settings menu ............................... 220
Standard display ............................ 211
Telephone menu ............................ 215
Trip menu ...................................... 211
Vehicle submenu ........................... 223
Opening and closing the side trim
panels ................................................. 115
Operating system
see On-board computer
Outside temperature display ........... 209
Overhead control panel ...................... 36
Override feature
Rear side window s........................... 61 P
Paint code .......................................... 338
Paintwork (cleaning instructions) ... 292
Panorama sliding sunroof
Important safety information ........... 86
Opening/closing .............................. 87
Opening/closing the roller sun-
blind ................................................. 89
Problem (malfunction) ..................... 89
Rain closing feature ......................... 88
Resetting ......................................... 89
Parking ............................................... 162
Important safety notes .................. 162
Parking brake ................................ 163 Position of exterior mirror, front-
passenger side ............................... 100
Reversing camera .......................... 191
see Active Parking Assist
see PARKTRONIC
Parking aid
Active Parking Assist ..................... 186
see Exterior mirrors
see PARKTRONIC
Parking aid
see PARKTRONIC
Parking brake
Display message ............................ 233
Electric parking brake .................... 163
Warning lamp ................................. 263
Parking lamps
Display message ............................ 241
Switching on/of f........................... 106
PARKTRONIC
Deactivating/activating ................. 185
Driving system ............................... 182
Function/note s............................. 182
Important safety notes .................. 182
Problem (fault) ............................... 186
Sensor rang e................................. 183
Trailer towing ................................. 185
Warning display ............................. 184
PASSENGER AIRBAG OFF warning
lamp ...................................................... 52
Petrol .................................................. 340
Plastic trim (cleaning instruc-
tions) .................................................. 295
Power windows
see Side windows
PRE-SAFE® (anticipatory occupant
protection)
Operation ......................................... 45
PRE-SAFE® (preventive occupant
safety system)
Display message ............................ 236
Program selector button .................. 155
Protection of the environment
General notes .................................. 21
Pulling away
Automatic transmission ................. 144
Manual transmission ...................... 144
Trailer ............................................ 145 14
Index
Page 18 of 357
Q
Qualified specialist workshop ........... 24R
RACE START (AMG vehicles) .............181
RACETIMER (on-board computer) .... 226
Radar sensor system
Activating/deactivating ................. 223
Country overview ........................... 350
Display message ............................ 246
Radio
Selecting a station ......................... 214
see separate operating instructions
Rain closing feature (panorama
sliding sunroof) ................................... 88
Reading lamp ..................................... 111
Rear bench seat
Folding the backrest forwards/
back ............................................... 272
Rear compartment
Setting the air vents ..................... .140
Rear foglamp
Changing bulbs .............................. 115
Display message ............................ 241
Switching on/off ........................... 106
Rear lamps
Changing bulbs .............................. 115
see Lights
Rear shelf .......................................... .273
Rear window heating
Problem (fault) ............................... 132
Switching on/off ........................... 131
Rear window wiper
Replacing the wiper blade .............. 118
Switching on/off ........................... 117
Rear-compartment seat belt sta-
tus indicator ........................................ 49
Rear-view mirror
Anti-dazzle mode (automatic) ....... .100
Dipping (manual) .............................. 98
Refuelling
Fuel gauge ....................................... 30
Important safety notes .................. 159
Notes for AMG vehicles ................. 340
Refuelling process ......................... 160
see Fuel Remote control
Auxiliary heating/ventilation .......... 135
Changing the batteries (auxiliary
heating) ......................................... 136
Replacing bulbs
Important safety notes .................. 112
Overview of bulb type s.................. 112
Removing/replacing the cover
(front wheel arch) .......................... 113
Replacing the battery (auxiliary
heating remote control) .................... 136
Reserve (fuel tank)
see Fuel
Reserve fuel
Display message ............................ 245
Warning lamp ................................. 264
Residual heat (climate control) ........ 133
Restraint system
see SRS (Supplemental Restraint
System)
Rev counter ........................................ 208
Reverse gear
Engaging (manual transmission) .... 151
Reverse gear (selector lever) ........... 153
Reversing camera
Cleaning instructions ..................... 294
Function/note s............................. 191
Switching on/of f........................... 191
Reversing feature
Panorama sliding sunroof ................ 87
Roller sunblinds ............................... 88
Side windows ................................... 83
Reversing lamp
Changing bulbs .............................. 115
Reversing lamps
Display message ............................ 241
Roller sunblind
Opening/closing .............................. 89
Panorama sliding sunroof ................ 88
Roof carrier ........................................ 275
Roof lining and carpets (cleaning
instructions) ...................................... 296
Roof load (maximum) ........................ 346
Route (navigation)
see Route guidance (navigation)
Route guidance (navigation) ............ 213 Index
15
Page 39 of 357
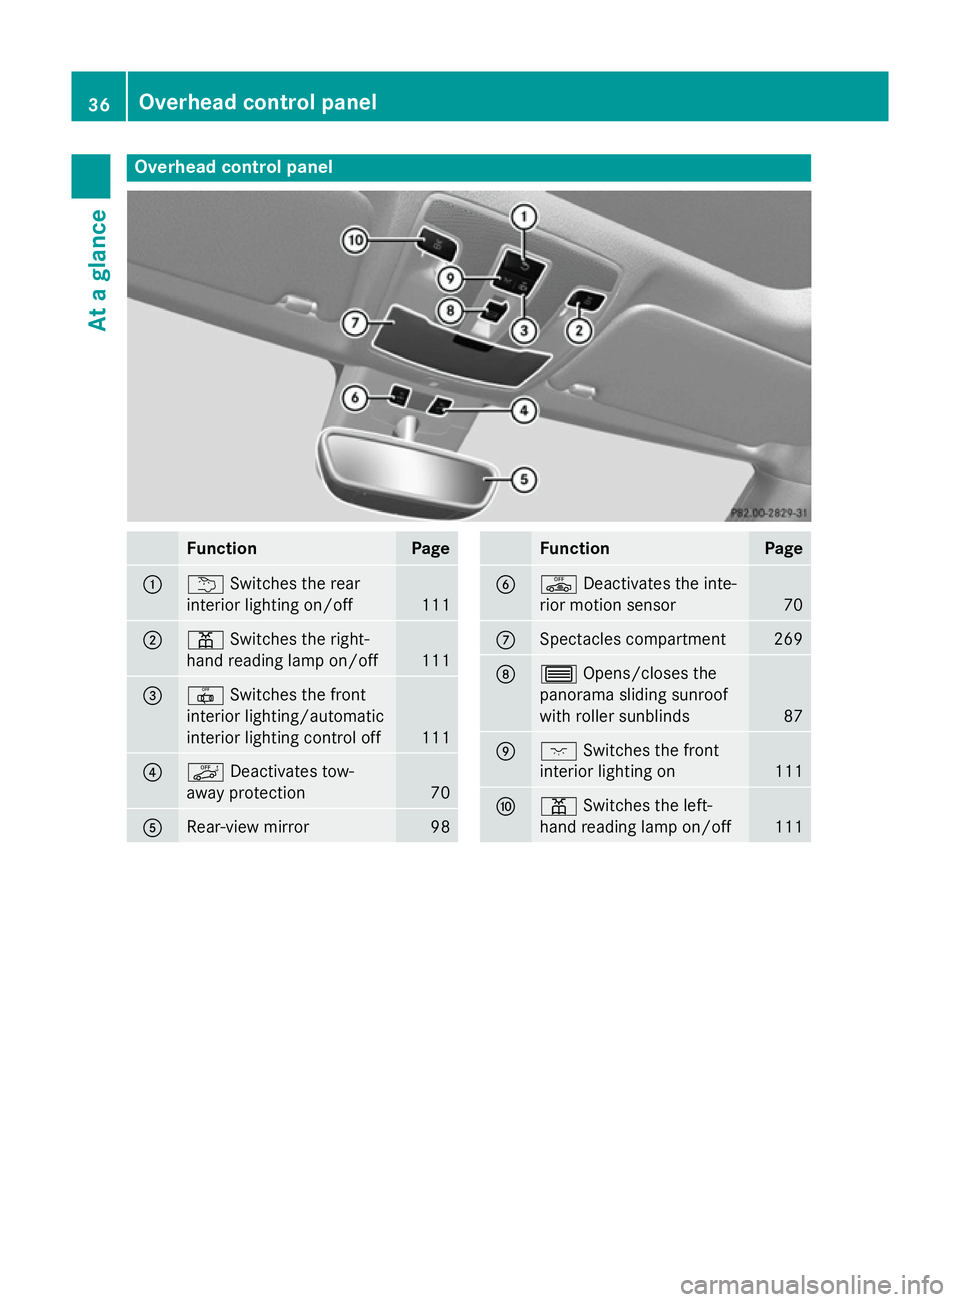
Overhead control panel
Function Page
:
u
Switches the rear
interior lighting on/off 111
;
p
Switches the right-
hand reading lamp on/off 111
=
|
Switches the front
interior lighting/automatic
interior lighting control off 111
?
ë
Deactivates tow-
away protection 70
A
Rear-view mirror 98 Function Page
B
ê
Deactivates the inte-
rior motion sensor 70
C
Spectacles compartment 269
D
3
Opens/closes the
panorama sliding sunroof
with roller sunblinds 87
E
c
Switches the front
interior lighting on 111
F
p
Switches the left-
hand reading lamp on/off 11136
Overhead control panelAt a glance
Page 73 of 357
Tow-away protection
Function An audible and visual alarm is triggered if your
vehicle's angle of inclination is altered while
tow-away protection is primed. This can occur
if the vehicle is jacked up on one side, for
example.
Activating X
Make sure that:
R the doors are closed.
R the tailgate is closed.
Only then is the tow-away protection
primed.
X Lock the vehicle with the key.
Tow-away protection is primed after
approximately 60 seconds.
Deactivating X
Unlock the vehicle with the key.
or X Insert the key into the ignition lock.
Tow-away protection is switched off auto-
matically.
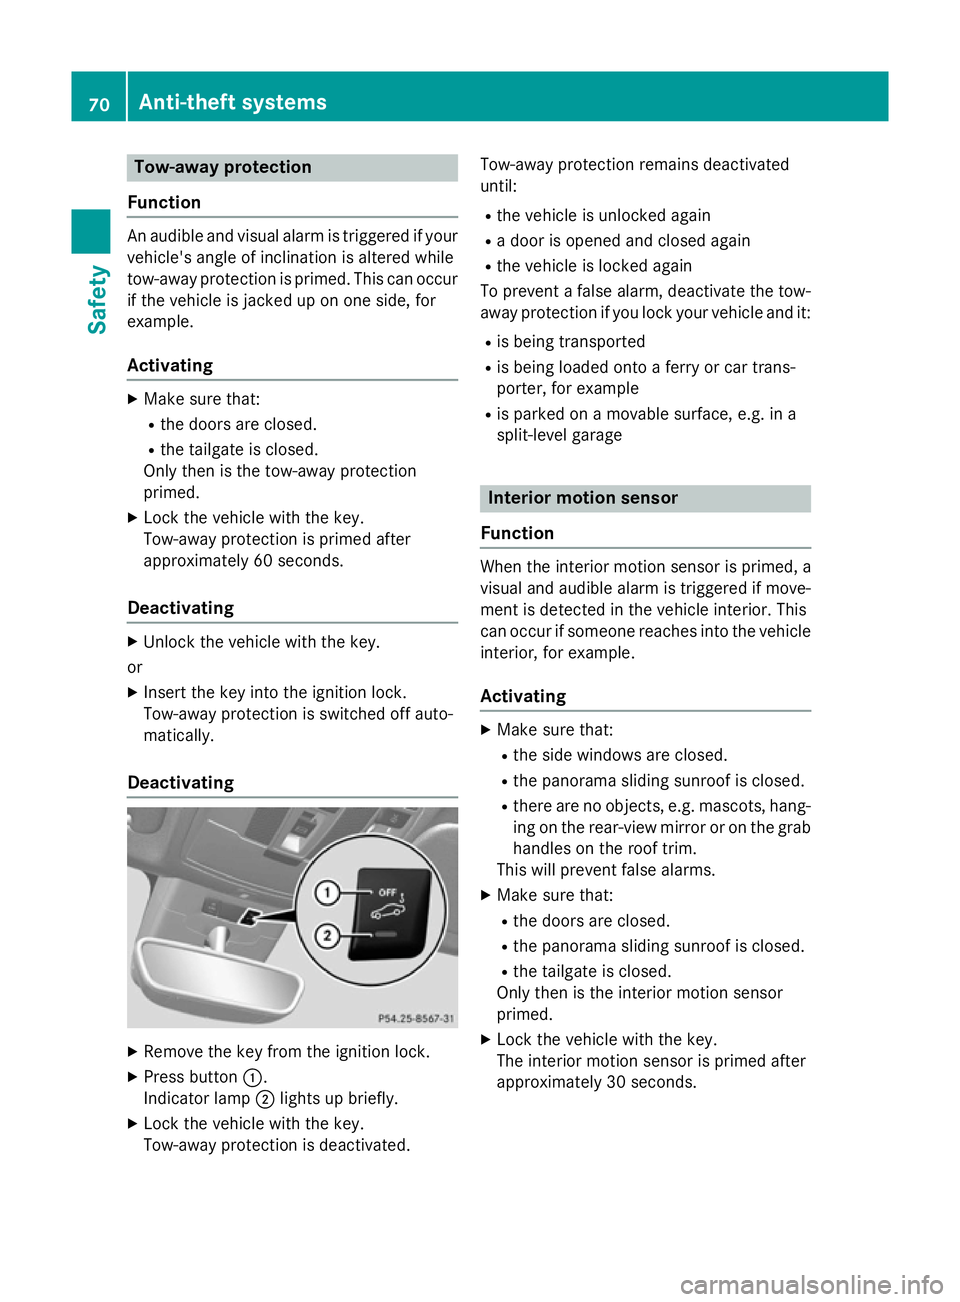
Deactivating X
Remove the key from the ignition lock.
X Press button :.
Indicator lamp ;lights up briefly.
X Lock the vehicle with the key.
Tow-away protection is deactivated. Tow-away protection remains deactivated
until:
R the vehicle is unlocked again
R a door is opened and closed again
R the vehicle is locked again
To prevent a false alarm, deactivate the tow-
away protection if you lock your vehicle and it:
R is being transported
R is being loaded onto a ferry or car trans-
porter, for example
R is parked on a movable surface, e.g. in a
split-level garage Interior motion sensor
Function When the interior motion sensor is primed, a
visual and audible alarm is triggered if move-
ment is detected in the vehicle interior. This
can occur if someone reaches into the vehicle interior, for example.
Activating X
Make sure that:
R the side windows are closed.
R the panorama sliding sunroof is closed.
R there are no objects, e.g. mascots, hang-
ing on the rear-view mirror or on the grab
handles on the roof trim.
This will prevent false alarms.
X Make sure that:
R the doors are closed.
R the panorama sliding sunroof is closed.
R the tailgate is closed.
Only then is the interior motion sensor
primed.
X Lock the vehicle with the key.
The interior motion sensor is primed after
approximately 30 seconds. 70
Anti-theft systemsSafety
Page 95 of 357
Useful information
i This Owner's Manual describes all mod-
els, series and optional equipment for your
vehicle that were available at the time of
going to press. National variations are pos- sible. Note that your vehicle may not be
equipped with all of the functions descri-
bed. This is also the case for systems and
functions relevant to safety.
i Read the information on qualified special-
ist workshops: (Y page 24). Correct driver's seat position
Observe the safety guidelines on seat adjust-
ment (Y page 93).
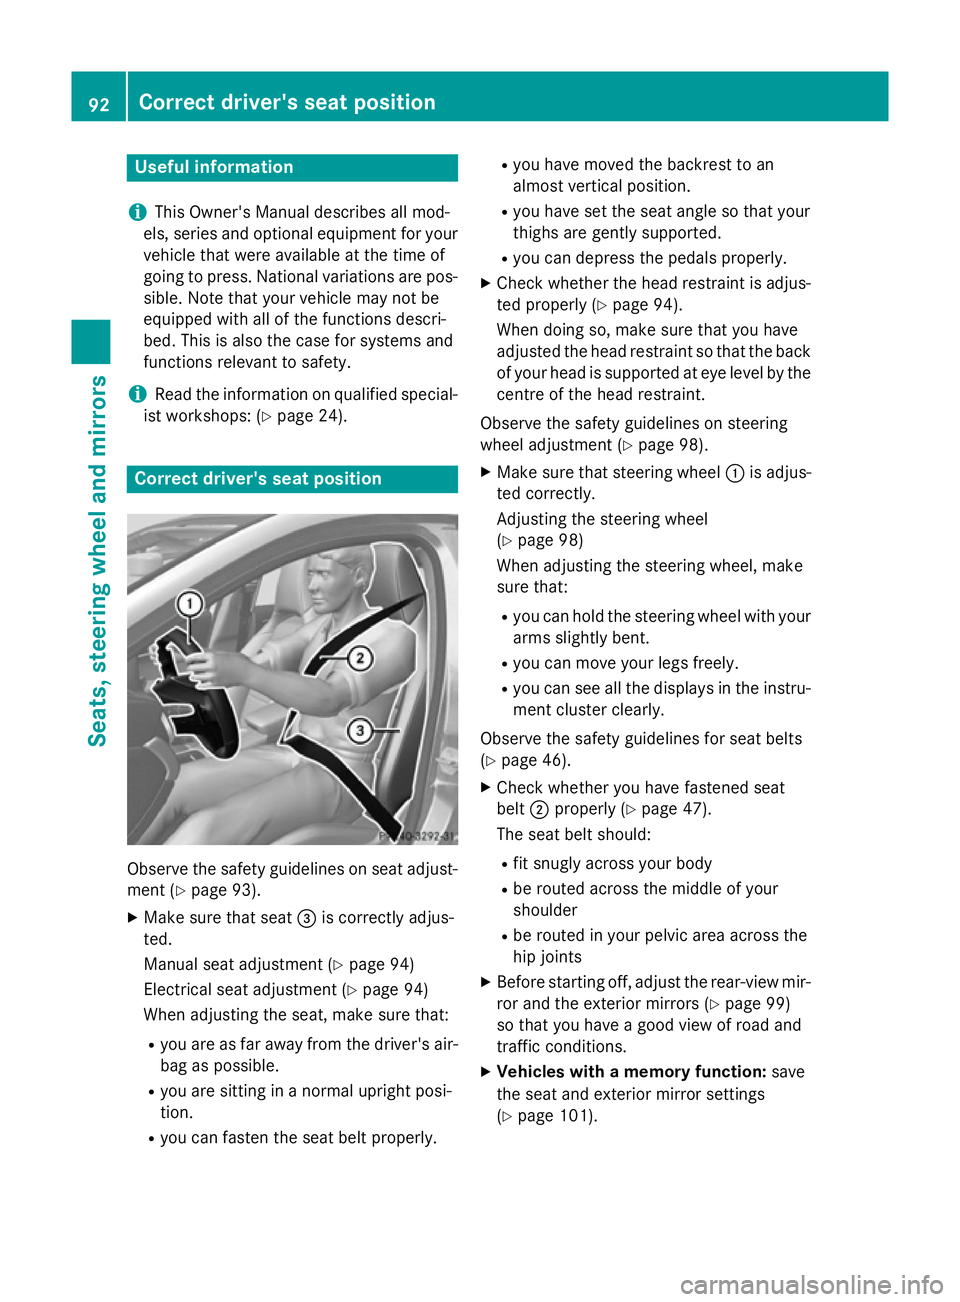
X Make sure that seat =is correctly adjus-
ted.
Manual seat adjustment (Y page 94)
Electrical seat adjustment (Y page 94)
When adjusting the seat, make sure that:
R you are as far away from the driver's air-
bag as possible.
R you are sitting in a normal upright posi-
tion.
R you can fasten the seat belt properly. R
you have moved the backrest to an
almost vertical position.
R you have set the seat angle so that your
thighs are gently supported.
R you can depress the pedals properly.
X Check whether the head restraint is adjus-
ted properly (Y page 94).
When doing so, make sure that you have
adjusted the head restraint so that the back of your head is supported at eye level by the
centre of the head restraint.
Observe the safety guidelines on steering
wheel adjustment (Y page 98).
X Make sure that steering wheel :is adjus-
ted correctly.
Adjusting the steering wheel
(Y page 98)
When adjusting the steering wheel, make
sure that:
R you can hold the steering wheel with your
arms slightly bent.
R you can move your legs freely.
R you can see all the displays in the instru-
ment cluster clearly.
Observe the safety guidelines for seat belts
(Y page 46).
X Check whether you have fastened seat
belt ;properly (Y page 47).
The seat belt should:
R fit snugly across your body
R be routed across the middle of your
shoulder
R be routed in your pelvic area across the
hip joints
X Before starting off, adjust the rear-view mir-
ror and the exterior mirrors (Y page 99)
so that you have a good view of road and
traffic conditions.
X Vehicles with a memory function: save
the seat and exterior mirror settings
(Y page 101). 92
Correct driver's seat positionSeats, steering wheel and mirrors
Page 99 of 357

Rear seat head restraints
Adjusting the rear seat head restraint
height
X
To raise: pull the head restraint up to the
desired position.
X To lower: press release catch :and push
the head restraint down until it is in the
desired position.
Removing and fitting the rear seat head
restraints G
WARNING
The head restraints cannot provide the inten-
ded protection unless they are fitted and
adjusted correctly. There is an increased risk of injury to the head and neck in the event of
an accident or sudden braking, for example.
Always drive with the head restraints fitted.
Ensure that the centre of the head restraints
support the back of each vehicle occupant's
head at eye level before driving off.
The rear head restraints on the outer seats
can be removed and refitted. X
Fold the seat backrest slightly forwards in
order to remove the head restraint
(Y page 272).
X To remove: pull the head restraint up to
the stop.
X Press release catch :and pull the head
restraint out of the guides.
X To refit: insert the head restraint so that
the notches on the bar are on the left when viewed in the direction of travel.
X Push the head restraint down until you hear
it engage in position. Adjusting the 4-way lumbar support
You can adjust the contour of the front seat
backrests individually to provide optimum
support for your back. :
To raise the backrest contour
; To soften the backrest contour
= To lower the backrest contour
? To harden the backrest contour Switching the seat heating on/off
Switching on/off G
WARNING
If you repeatedly switch on seat heating, the
seat cushion and backrest padding may
become very hot. The health of vehicle occu-
pants with limited temperature sensitivity or a limited ability to react to excessively high
temperatures may be affected or they may 96
SeatsSeats, steering wheel and mirrors
Page 101 of 357
Adjusting the seat backrest side bol-
sters X
To set the side bolsters of the seat
backrest narrower: press buttonA.
X To set the side bolsters of the seat
backrest wider: press buttonB. Steering wheel
Important safety notes
G
WARNING
You could lose control of the vehicle while
driving if you:
R adjust the driver's seat, steering wheel or
mirrors
R fasten the seat belt
There is a risk of an accident.
Adjust the driver's seat, head restraint, steer-
ing wheel and mirrors and fasten your seat
belt before starting the engine. G
WARNING
Children could become trapped by the steer-
ing wheel if they adjust it. There is a risk of
injury.
When leaving the vehicle, always take the key with you and lock the vehicle. Never leave
children unattended in the vehicle. Adjusting the steering wheel
G
WARNING
The steering wheel may move unexpectedly if you adjust it while driving. This could cause
you to lose control of the vehicle. There is a
risk of an accident.
Make sure that the steering wheel is locked
before driving off. Never unlock the steering
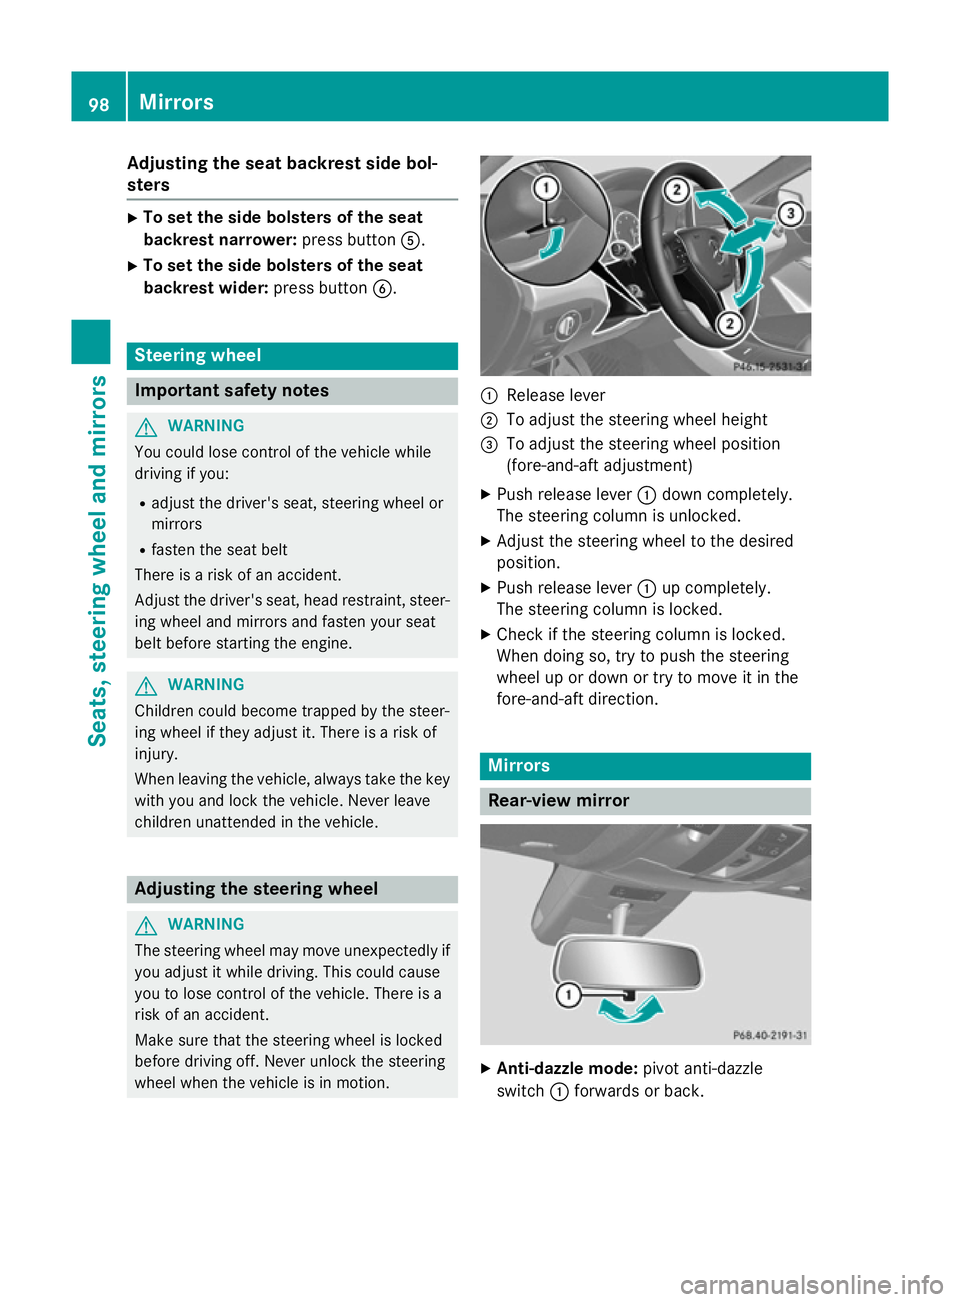
wheel when the vehicle is in motion. :
Release lever
; To adjust the steering wheel height
= To adjust the steering wheel position
(fore-and-aft adjustment)
X Push release lever :down completely.
The steering column is unlocked.
X Adjust the steering wheel to the desired
position.
X Push release lever :up completely.
The steering column is locked.
X Check if the steering column is locked.
When doing so, try to push the steering
wheel up or down or try to move it in the
fore-and-aft direction. Mirrors
Rear-view mirror
X
Anti-dazzle mode: pivot anti-dazzle
switch :forwards or back. 98
MirrorsSeats
, steering wheel and mirrors
Page 102 of 357
Exterior mirrors
Adjusting the exterior mirrors G
WARNING
The exterior mirrors reduce the size of the
image. Objects visible in the mirrors are
closer than they appear. You could misjudge
the distance from road users driving behind
you when changing lanes, for instance. There is a risk of an accident.
You should therefore always look over your
shoulder to determine the actual distance
from road users driving behind you. X
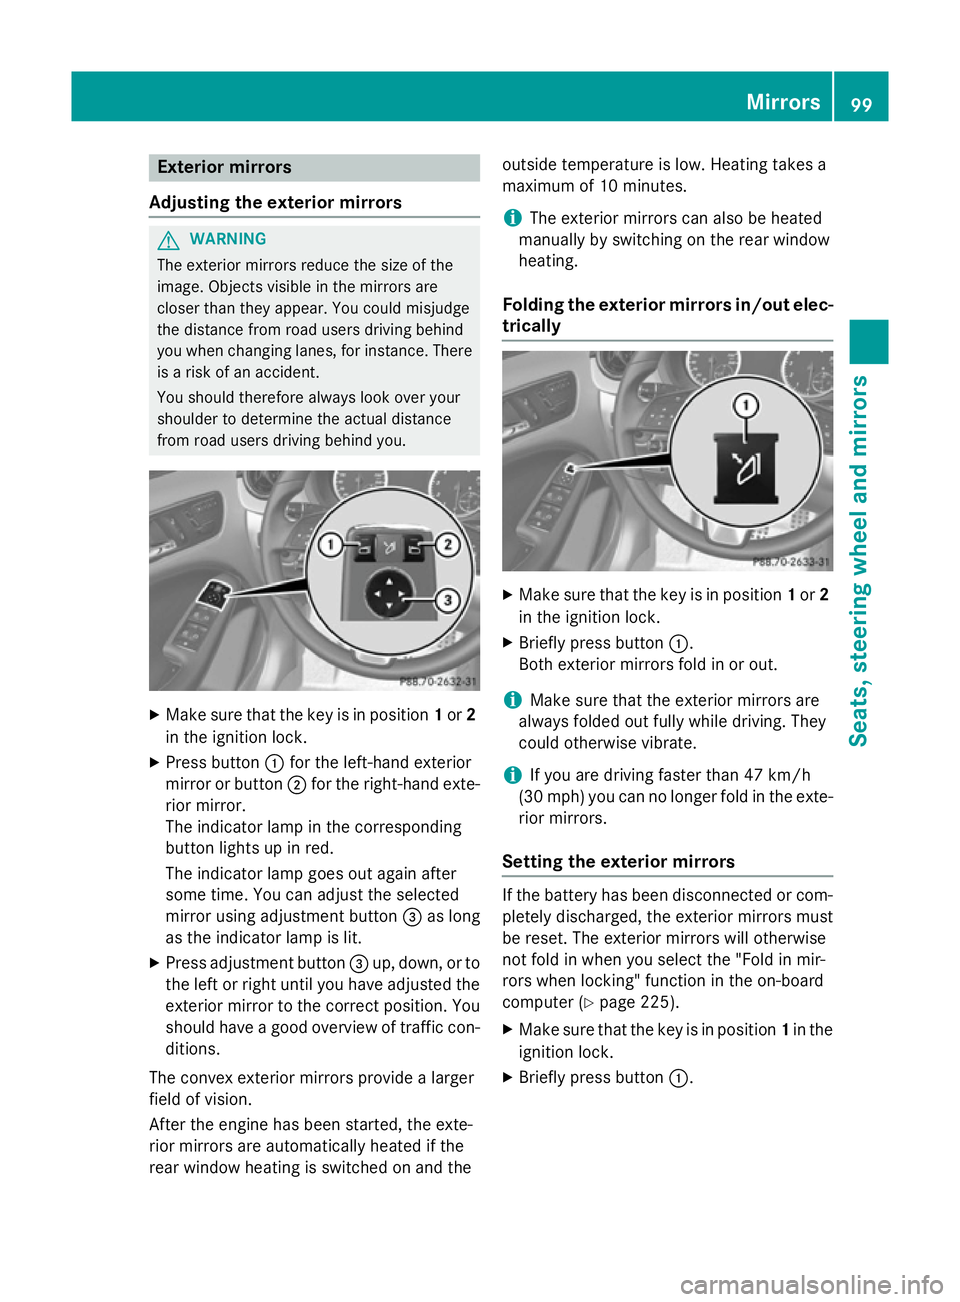
Make sure that the key is in position 1or 2
in the ignition lock.
X Press button :for the left-hand exterior
mirror or button ;for the right-hand exte-
rior mirror.
The indicator lamp in the corresponding
button lights up in red.
The indicator lamp goes out again after
some time. You can adjust the selected
mirror using adjustment button =as long
as the indicator lamp is lit.
X Press adjustment button =up, down, or to
the left or right until you have adjusted the
exterior mirror to the correct position. You
should have a good overview of traffic con- ditions.
The convex exterior mirrors provide a larger
field of vision.
After the engine has been started, the exte-
rior mirrors are automatically heated if the
rear window heating is switched on and the outside temperature is low. Heating takes a
maximum of 10 minutes.
i The exterior mirrors can also be heated
manually by switching on the rear window
heating.
Folding the exterior mirrors in/out elec-
trically X
Make sure that the key is in position 1or 2
in the ignition lock.
X Briefly press button :.
Both exterior mirrors fold in or out.
i Make sure that the exterior mirrors are
always folded out fully while driving. They
could otherwise vibrate.
i If you are driving faster than 47 km/h
(30 mp h) youcan no longer fold in the exte-
rior mirrors.
Setting the exterior mirrors If the battery has been disconnected or com-
pletely discharged, the exterior mirrors must
be reset. The exterior mirrors will otherwise
not fold in when you select the "Fold in mir-
rors when locking" function in the on-board
computer (Y page 225).
X Make sure that the key is in position 1in the
ignition lock.
X Briefly press button :. Mirrors
99Seats, steering wheel and mirrors Z
Page 103 of 357

Folding the exterior mirrors in/out
automatically If the "Fold in mirrors when locking" function
is activated in the on-board computer
(Y page 225):
R the exterior mirrors fold in automatically as
soon as you lock the vehicle from the out-
side.
R the exterior mirrors fold out again automat-
ically as soon as you unlock the vehicle and
then open the driver's or front-passenger
door.
i If the exterior mirrors have been folded in
manually, they do not fold out.
Exterior mirror pushed out of position If an exterior mirror has been pushed out of
position, proceed as follows.
X Vehicles without electrically folding
exterior mirrors: move the exterior mirror
into the correct position manually.
X Vehicles with electrically folding exte-
rior mirrors: press and hold the mirror-
folding button (Y page 99) until you hear a
click and then the mirror engage in posi-
tion.
The mirror housing is engaged again and
you can adjust the exterior mirrors as usual
(Y page 99). Automatic anti-dazzle mirrors
The "Automatic anti-dazzle mirrors" function
is only available if the vehicle is equipped with
the "Mirror package".
The rear-view mirror and the exterior mirror
on the driver's side automatically go into anti- dazzle mode if:
R the ignition is switched on and
R incident light from headlamps strikes the
sensor in the rear-view mirror
The mirrors do not go into anti-dazzle mode if reverse gear is engaged or if the interior light-
ing is switched on. Parking position of the exterior mirror
on the front-passenger side
General notes The "Parking position for the exterior mirror
on the front-passenger side" function is only
available if the vehicle is equipped with the
"Memory package".
Setting and storing the parking position Using reverse gear
You can set the front-passenger side exterior
mirror so that you can see the rear wheel on
that side as soon as you engage reverse gear.
You can store this position. X
Make sure that the vehicle is stationary and
that the key is in position 2in the ignition
lock.
X Press button ;for the exterior mirror on
the front-passenger side.
X Engage reverse gear.
The exterior mirror on the front-passenger
side moves to the preset parking position.
X Use adjustment button =to adjust the
exterior mirror. You should see the rear
wheel and the kerb in the exterior mirror.
The parking position is stored.
i If you shift the transmission to another
position, the exterior mirror on the front-
passenger side returns to the driving posi-
tion. 100
MirrorsSeats, steering wheel and
mirrors