winter tyres MERCEDES-BENZ A-CLASS HATCHBACK 2012 Owners Manual
[x] Cancel search | Manufacturer: MERCEDES-BENZ, Model Year: 2012, Model line: A-CLASS HATCHBACK, Model: MERCEDES-BENZ A-CLASS HATCHBACK 2012Pages: 357, PDF Size: 11.61 MB
Page 23 of 357

Windowbag
Display message ............................ 239
Operation ......................................... 45
Windows
Cleaning ......................................... 293
see Side windows
Windscreen
Demisting ...................................... 130
Windscreen washer fluid
see Windscreen washer system
Windscreen washer system
Notes ............................................. 345
Topping up .................................... .289
Windscreen wipers
Display message ............................ 256
Problem (malfunction) ................... 120
Rear window wiper ........................ 117
Replacing the wiper blades ............ 117
Switching on/off ........................... 116
Windscreen wipers
see Windscreen
Winter driving
General notes ................................ 320
Winter operation
Slippery road surfaces ................... 168
Snow chains .................................. 321
Winter tyres
Limiting the speed (on-board com-
puter) ............................................. 223
M+S tyres ...................................... 320
Wiper blades
Cleaning ......................................... 293
Important safety notes .................. 117
Replacing (on the rear window) ..... 118
Replacing (windscreen) .................. 118
Wooden trim (cleaning instruc-
tions) ................................................. .295
Workshop
see Qualified specialist workshop Z
ZONE function Switching on/off ........................... 129 20
Index
Page 64 of 357

opened from inside the vehicle. When the
vehicle is unlocked, the door can be opened
from the outside.
X To activate: press the child-proof lock
lever up in the direction of arrow :.
X Make sure that the child-proof locks are
working properly.
X To deactivate: press the child-proof lock
lever down in the direction of arrow ;.
Override feature for the rear side win-
dows X
To activate/deactivate: press button:.
If indicator lamp is lit, operation of the rear side windows is disabled. Operation is only
possible using the switches in the driver's
door. If the indicator lamp is off, operation
is possible using the switches in the rear
compartment. Driving safety systems
Driving safety systems overview
In this section, you will find information about the following driving safety systems:
R ABS ( Anti-lock BrakingSystem)
(Y page 61)
R BAS ( Brake Assist System) (Y page 62)
R COLLISION PREVENTION ASSIST (adaptive
Brake Assist and distance warning func-
tion) (Y page 62)
R Adaptive brake lamps (Y page 64)R
ESP ®
(Electronic StabilityProgram)
(Y page 65)
R EBD ( electronic brake force distribution)
(Y page 68)
R ADAPTIVE BRAKE (Y page 69)
R STEER CONTROL (Y page 69) Important safety notes
If you fail to adapt your driving style or if you
are inattentive, the driving safety systems can
neither reduce the risk of accident nor over-
ride the laws of physics. Driving safety sys-
tems are merely aids designed to assist driv- ing. You are responsible for the distance to
the vehicle in front, for vehicle speed and forbraking in good time. Always adapt your driv- ing style to suit the prevailing road, weather
and traffic conditions and maintain a safe dis-
tance from the vehicle in front. Drive care-
fully.
i The driving safety systems described only
work as effectively as possible when there
is adequate contact between the tyres and
the road surface. Pay particular attention to the information regarding tyres, recom-
mended minimum tyre tread depths etc. inthe "Wheels and tyres" section
(Y page 318).
In wintry driving conditions, always use
winter tyres (M+S tyres) and, if necessary,
snow chains. Only in this way will the driv-
ing safety systems described in this section work as effectively as possible. ABS (Anti-lock Braking System)
Important safety notes i
Observe the "Important safety notes" sec-
tion for driving safety systems (Y page 61). G
WARNING
If ABS is faulty, the wheels could lock when
braking. The steerability and braking charac-
teristics may be severely impaired. Addition- Driving safety systems
61Safety
Z
Page 170 of 357
Limited braking performance on salt-
treated roads If you drive on salted roads, a layer of salt
residue may form on the brake discs and
brake pads. This can result in a significantly
longer braking distance.
R Brake occasionally to remove any possible
salt residue. Make sure that you do not
endanger other road users when doing so.
R Carefully depress the brake pedal and the
beginning and end of a journey.
R Maintain a greater distance to the vehicle
ahead.
New brake pads/linings New and replaced brake pads and discs only
reach their optimum braking effect after sev-
eral hundred kilometres of driving. Compen-
sate for this by applying greater force to the
brake pedal.
For safety reasons, Mercedes-Benz recom-
mends that you only have brake pads/linings fitted to your vehicle which have been
approved for Mercedes-Benz vehicles or
which correspond to an equivalent quality
standard. Brake pads/linings which have not been approved for Mercedes-Benz vehicles or
which are not of an equivalent quality could
affect your vehicle's operating safety. Driving on wet roads
Aquaplaning If water has accumulated to a certain depth
on the road surface, there is a danger of aqua- planing occurring, even if:
R you are driving at low speeds
R the tyres have adequate tread depth
For this reason, do not drive in tyre ruts and
brake carefully. Driving on flooded roads !
Bear in mind that vehicles travelling in
front or in the opposite direction create
waves. This may cause the maximum per-
missible water depth to be exceeded.
These notes must be observed under all
circumstances. You could otherwise dam-
age the engine, the electronics or the trans- mission.
If you have to drive on stretches of road on
which water has collected, please bear in
mind that:
R the maximum permissible fording depth in
still water is 25 cm
R you should drive no faster than walking
pace Winter driving
General notes G
WARNING
If you shift down on a slippery road surface in an attempt to increase the engine's braking
effect, the drive wheels could lose their grip.
This increases the risk of skidding and having
an accident.
Do not shift down for additional engine brak-
ing on a slippery road surface. G
DANGER
If the exhaust pipe is blocked or adequate
ventilation is not possible, poisonous gases
such as carbon monoxide (CO) may enter the vehicle. This is the case, e.g. if the vehicle
becomes trapped in snow. There is a risk of
fatal injury.
If you leave the engine or the auxiliary heating
running, make sure the exhaust pipe and area
around the vehicle are clear of snow. To
ensure an adequate supply of fresh air, open a window on the side of the vehicle that is not
facing into the wind. Driving tips
167Driving and parking Z
Page 171 of 357
Have your vehicle winterproofed at a qualified
specialist workshop at the onset of winter.
Observe the notes in the "Winter operation"
section (Y page 320).
Driving with summer tyres Observe the notes in the "Winter operation"
section (Y page 320).
Slippery road surfaces G
WARNING
If you shift down on a slippery road surface in an attempt to increase the engine's braking
effect, the drive wheels could lose their grip.
This increases the risk of skidding and having
an accident.
Do not shift down for additional engine brak-
ing on a slippery road surface.
If the vehicle threatens to skid or cannot be
stopped when moving at low speed:
X Vehicles with manual transmission:
shift to neutral.
X Vehicles with automatic transmission:
shift the transmission to position N.
X Try to bring the vehicle under control by
using corrective steering.
You should drive particularly carefully on slip-
pery road surfaces. Avoid sudden accelera-
tion, steering and braking manoeuvres.
The outside temperature indicator is not
designed to serve as an ice-warning device
and is therefore unsuitable for that purpose.
Changes in the outside temperature are dis-
played after a short delay.
Indicated temperatures just above the freez-
ing point do not guarantee that the road sur-
face is free of ice. The road may still be icy,
especially in wooded areas or on bridges. You should pay special attention to road condi-
tions when temperatures are around freezing
point.
i For more information on driving with
snow chains, see (Y page 321). Driving systems
Cruise control
Important safety notes If you fail to adapt your driving style, cruise
control can neither reduce the risk of an acci-
dent nor override the laws of physics. Cruise
control cannot take into account road,
weather or traffic conditions. Cruise control is only an aid. You are responsible for the dis-
tance to the vehicle in front, for vehicle speed,
for braking in good time, and for staying in the lane.
Do not use cruise control:
R in road and traffic conditions which do not
allow you to maintain a constant speed
(e.g. in heavy traffic or on winding roads).
R on smooth or slippery roads. Braking or
accelerating can cause the drive wheels to
lose traction and the vehicle could then
skid.
R when there is poor visibility, e.g. due to fog,
heavy rain or snow.
If there is a change of drivers, advise the new driver of the speed stored.
General notes Cruise control maintains a constant road
speed for you. It brakes automatically in order
to avoid exceeding the set speed. You must
select a lower gear in good time on long and
steep downhill gradients, especially if the
vehicle is laden or towing a trailer. For vehi-
cles with automatic transmission, you need to have selected manual drive program
M(Y page 156). By doing so, you will make
use of the braking effect of the engine. This
relieves the load on the brake system and
prevents the brakes from overheating and
wearing too quickly.
Use cruise control only if road and traffic con-
ditions make it appropriate to maintain a
steady speed for a prolonged period. You can store any road speed above 30 km/h. 168
Driving systemsDriving and parking
Page 174 of 357
SPEEDTRONIC
Important safety notes SPEEDTRONIC brakes automatically so that
you do not exceed the set speed. On long and steep downhill gradients, especially if the
vehicle is laden or towing a trailer, you must
select shift range 1,2or 3in good time. By
doing so, you will make use of the braking
effect of the engine. This relieves the load on
the brake system and prevents the brakes
from overheating and wearing too quickly. If
you need additional braking, depress the
brake pedal repeatedly rather than continu-
ously.
If you fail to adapt your driving style, SPEED-
TRONIC can neither reduce the risk of an
accident nor override the laws of physics.
SPEEDTRONIC cannot take into account
road, weather or traffic conditions. SPEED-
TRONIC is only an aid. You are responsible for
the distance to the vehicle in front, for vehicle
speed, for braking in good time, and for stay- ing in the lane.
If there is a change of drivers, advise the new driver of the speed stored.
General notes You can set a variable or permanent limit
speed:
R variable for speed limits, e.g. in built-up
areas
R permanent for long-term speed restric-
tions, e.g. when driving with winter tyres
fitted (Y page 172)
i The speed indicated in the speedometer
may differ slightly from the limit speed
stored.
Variable SPEEDTRONIC General notes
With the cruise control lever, you can operate
cruise control or DISTRONIC PLUS and vari-
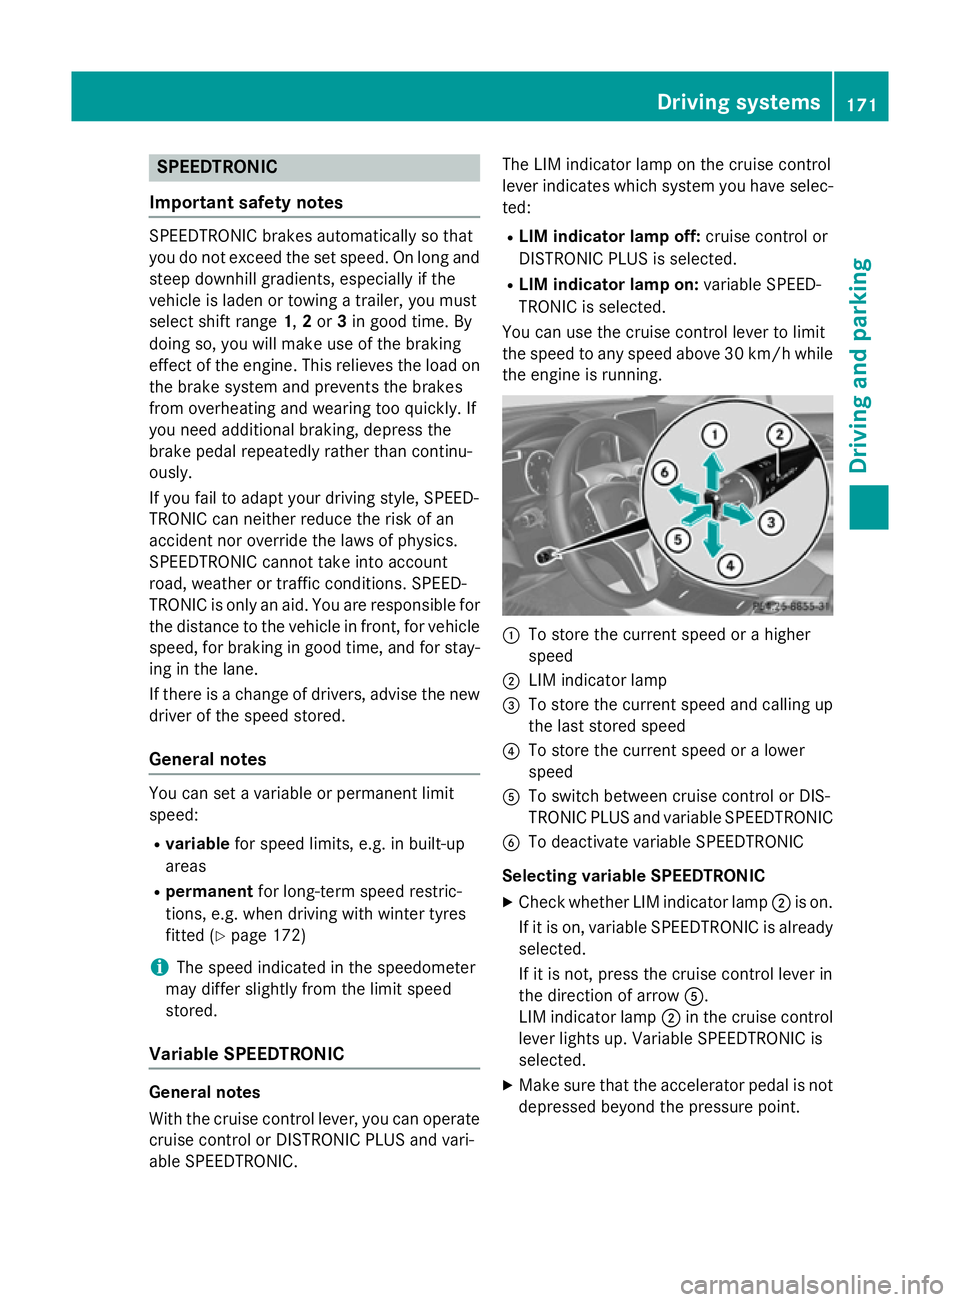
able SPEEDTRONIC. The LIM indicator lamp on the cruise control
lever indicates which system you have selec- ted:
R LIM indicator lamp off: cruise control or
DISTRONIC PLUS is selected.
R LIM indicator lamp on: variable SPEED-
TRONIC is selected.
You can use the cruise control lever to limit
the speed to any speed above 30 km/hw hile
the engine is running. :
To store the current speed or a higher
speed
; LIM indicator lamp
= To store the current speed and calling up
the last stored speed
? To store the current speed or a lower
speed
A To switch between cruise control or DIS-
TRONIC PLUS and variable SPEEDTRONIC
B To deactivate variable SPEEDTRONIC
Selecting variable SPEEDTRONIC
X Check whether LIM indicator lamp ;is on.
If it is on, variable SPEEDTRONIC is already
selected.
If it is not, press the cruise control lever in
the direction of arrow A.
LIM indicator lamp ;in the cruise control
lever lights up. Variable SPEEDTRONIC is
selected.
X Make sure that the accelerator pedal is not
depressed beyond the pressure point. Driving systems
171Driving and parking Z
Page 175 of 357
Storing the current speed
You can use the cruise control lever to limit
the speed to any speed above 30 km/hw hile
the engine is running.
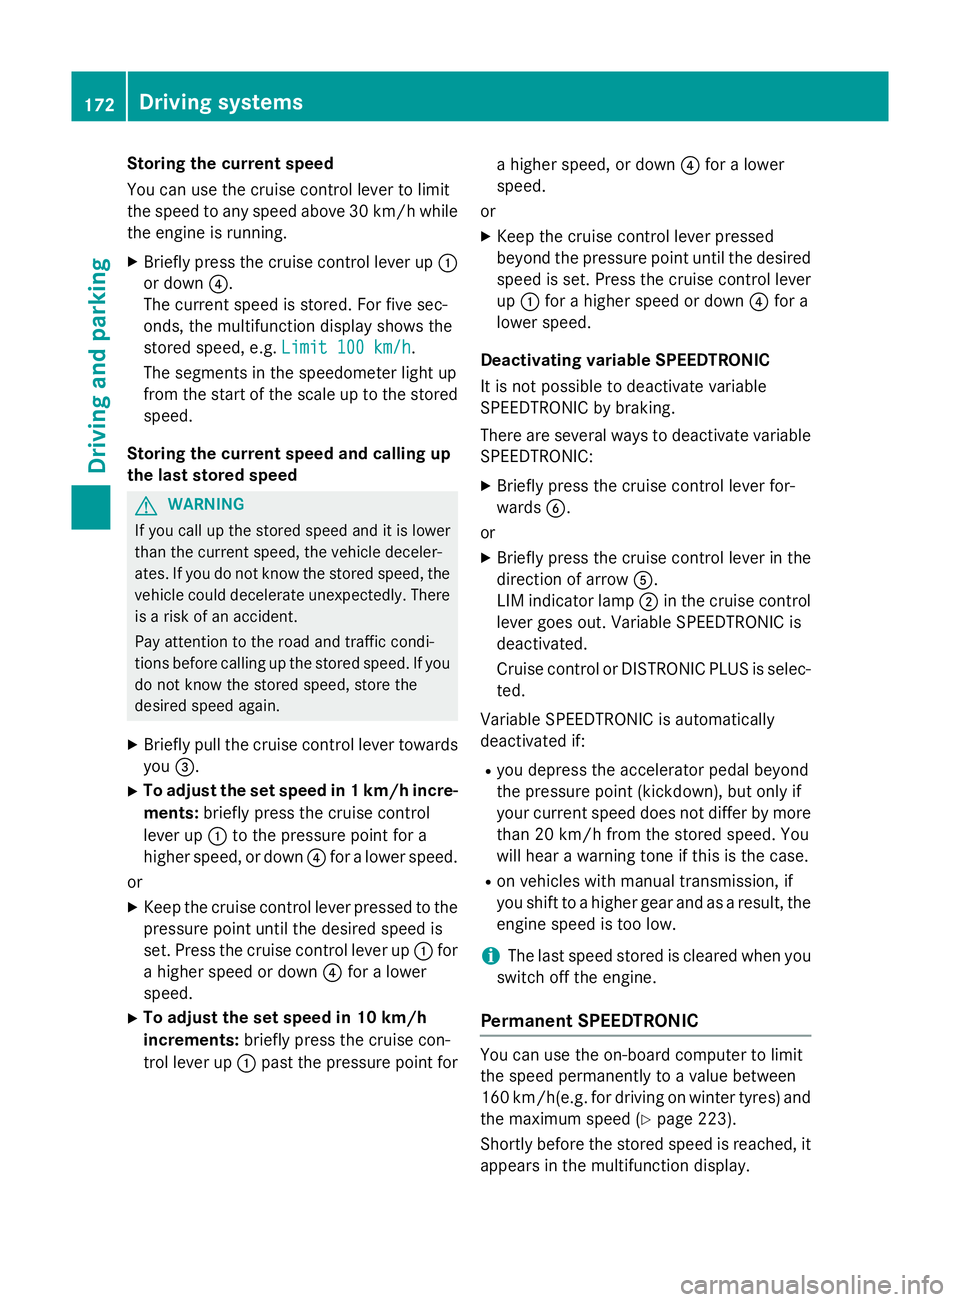
X Briefly press the cruise control lever up :
or down ?.
The current speed is stored. For five sec-
onds, the multifunction display shows the
stored speed, e.g. Limit 100 km/h Limit 100 km/h.
The segments in the speedometer light up
from the start of the scale up to the stored
speed.
Storing the current speed and calling up
the last stored speed G
WARNING
If you call up the stored speed and it is lower
than the current speed, the vehicle deceler-
ates. If you do not know the stored speed, the vehicle could decelerate unexpectedly. There
is a risk of an accident.
Pay attention to the road and traffic condi-
tions before calling up the stored speed. If you do not know the stored speed, store the
desired speed again.
X Briefly pull the cruise control lever towards
you =.
X To adjust the set speed in 1 km/h incre-
ments: briefly press the cruise control
lever up :to the pressure point for a
higher speed, or down ?for a lower speed.
or
X Keep the cruise control lever pressed to the
pressure point until the desired speed is
set. Press the cruise control lever up :for
a higher speed or down ?for a lower
speed.
X To adjust the set speed in 10 km/h
increments: briefly press the cruise con-
trol lever up :past the pressure point for a higher speed, or down
?for a lower
speed.
or
X Keep the cruise control lever pressed
beyond the pressure point until the desired
speed is set. Press the cruise control lever
up : for a higher speed or down ?for a
lower speed.
Deactivating variable SPEEDTRONIC
It is not possible to deactivate variable
SPEEDTRONIC by braking.
There are several ways to deactivate variable SPEEDTRONIC:
X Briefly press the cruise control lever for-
wards B.
or X Briefly press the cruise control lever in the
direction of arrow A.
LIM indicator lamp ;in the cruise control
lever goes out. Variable SPEEDTRONIC is
deactivated.
Cruise control or DISTRONIC PLUS is selec- ted.
Variable SPEEDTRONIC is automatically
deactivated if:
R you depress the accelerator pedal beyond
the pressure point (kickdown), but only if
your current speed does not differ by more
than 20 km/h from the stored speed. You
will hear a warning tone if this is the case.
R on vehicles with manual transmission, if
you shift to a higher gear and as a result, the
engine speed is too low.
i The last speed stored is cleared when you
switch off the engine.
Permanent SPEEDTRONIC You can use the on-board computer to limit
the speed permanently to a value between
160 km/h(e.g. for driving on winter tyres) and
the maximum speed (Y page 223).
Shortly before the stored speed is reached, it appears in the multifunction display. 172
Driving systemsDriving and parking
Page 185 of 357

i
If you do not depress the accelerator
pedal within a few seconds, RACE START is cancelled. The multifunction display shows
the RACE START cancelled
RACE START cancelled message.
X Fully depress the accelerator pedal.
The engine speed is increased.
The RACE START Release brake to RACE START Release brake to
start
start message appears in the multifunc-
tion display.
i If the brake pedal is not released after a
short while, RACE START is cancelled. The
multifunction display shows the RACE
RACE
START cancelled START cancelled message.
X Take your foot off the brake, but keep the
accelerator pedal depressed.
The vehicle pulls away at maximum accel-
eration.
The RACE RACE START
START active
active message appears
in the multifunction display.
RACE START is deactivated when the vehicle
reaches a speed of approximately 50 km/h.
Drive program Sis activated. SPORT handling
mode remains activated.
RACE START is deactivated immediately if
you release the accelerator pedal during
RACE START or if any of the activation condi-
tions are no longer fulfilled. The RACE
RACESTART
START
not possible
not possible orRACE START cancelled
RACE START cancelled
message appears in the multifunction dis-
play.
i After using it several times in short suc-
cession, RACE START will be unavailable
until a certain distance has been driven. 4MATIC (permanent all-wheel drive)
4MATIC ensures that all four wheels are per-
manently driven. Together with ESP ®
, it
improves the traction of your vehicle when-
ever a drive wheel spins due to insufficient
grip.
If you fail to adapt your driving style, 4MATIC
can neither reduce the risk of accident nor
override the laws of physics. 4MATIC cannot take account of road, weather and traffic con-
ditions. 4MATIC is only an aid. You are
responsible for the distance to the vehicle in
front, for vehicle speed, for braking in good
time, and for staying in the lane.
If a drive wheel spins due to insufficient grip:
R when pulling away, only depress the accel-
erator pedal as far as is necessary.
R accelerate less when driving.
! Never tow the vehicle with one axle
raised. This may damage the transfer case.
Damage of this sort is not covered by the
Mercedes-Benz implied warranty. All
wheels must remain either on the ground or be fully raised. Observe the instructions for
towing the vehicle with all wheels in full
contact with the ground.
i In wintry driving conditions, the maximum
effect of 4MATIC can only be achieved if
you use winter tyres (M+S tyres), with snow
chains if necessary. PARKTRONIC
Important safety notes PARKTRONIC is only an aid. It is not a substi-
tute for your attention to the immediate sur-
roundings. The responsibility for safe
manoeuvring and parking remains with you.
Make sure that there are no persons, animals
or objects in range while manoeuvring and
parking.
! When parking, pay particular attention to
objects above or below the sensors, such
as flower pots or trailer drawbars. PARK-
TRONIC does not detect such objects when they are in the immediate vicinity of the
vehicle. You could damage the vehicle or
the objects.
The sensors may not detect snow and
objects which absorb ultrasonic sources.
Ultrasonic sources, such as an automatic
car wash, a lorry's compressed-air brakes 182
Driving systemsDriving and parking
Page 226 of 357

Activating/deactivating the interior light-
ing delayed switch-off
If you activate the Lighting delayed sw.-
Lighting delayed sw.-
off
off function, the interior lighting remains on
for 20 seconds after you remove the key from the ignition lock.
X Press the =or; button on the steer-
ing wheel to select the Settings Settingsmenu.
X Press the :or9 button to select the
Lights
Lights submenu.
X Press ato confirm.
X Press the :or9 button to select the
Lighting delayed sw.-off
Lighting delayed sw.-off function.
If the Lighting delayed sw.-off
Lighting delayed sw.-off func-
tion has been switched on, the vehicle inte-
rior is displayed in orange in the multifunc-
tion display.
X Press the abutton to save the setting.
Vehicle Setting permanent SPEEDTRONIC
X Press the =or; button on the steer-
ing wheel to select the Settings
Settingsmenu.
X Press the :or9 button to select the
Vehicle
Vehicle submenu.
X Press ato confirm.
X Press the :or9 button to select the
Limit
Limit speed
speed(winter
(winter tyres):
tyres):function.
You will see the current setting.
X Press ato confirm.
X Press the :or9 button to adjust
permanent SPEEDTRONIC in increments of
ten (230 km/h 230 km/h to160 km/h
160 km/h). The Off
Offset-
ting switches permanent SPEEDTRONIC
off.
X Press the abutton to store the entry.
Using the Limit speed (winter tyres)
Limit speed (winter tyres)
function, you can set permanent SPEED-
TRONIC (Y page 172). Switching the automatic locking feature
on/off
X Press the =or; button on the steer-
ing wheel to select the Settings Settingsmenu.
X Press the :or9 button to select the
Vehicle Vehicle submenu.
X Press ato confirm.
X Press the :or9 button to select the
Automatic door locks
Automatic door locks function.
When the Automatic door locks
Automatic door locks func-
tion is activated, the vehicle doors are dis-
played in orange in the multifunction dis-
play.
X Press the abutton to save the setting.
If you activate the Automatic door locks Automatic door locks
function, the vehicle is centrally locked above
a speed of around 15 km/h.
For further information on the automatic lock- ing feature, see (Y page 81).
Activating/deactivating the acoustic
locking confirmation
If you switch on the Acoustic AcousticLock
Lockfunction,
an acoustic signal sounds when you lock the
vehicle.
X Press the =or; button on the steer-
ing wheel to select the Settings
Settings menu.
X Press the :or9 button to select the
Vehicle Vehicle submenu.
X Press ato confirm.
X Press the :or9 button to select the
Acoustic Lock
Acoustic Lock function.
If the Acoustic
Acoustic Lock
Lockfunction is activated,
the & symbol in the multifunction dis-
play lights up orange.
X Press the abutton to save the setting.
Activating/deactivating the radar sensor
system
X Press the =or; button on the steer-
ing wheel to select the Settings
Settings menu.
X Press the :or9 button to select the
Vehicle Vehicle submenu.
X Press ato confirm. Menus and submenus
223On-board computer and displays Z
Page 228 of 357
Flammable material such as leaves, grass or
twigs may ignite if they come into contact with hot parts of the exhaust system for extended periods. There is a risk of fire.
When the auxiliary heating is switched on,
make sure that no flammable material can
come into contact with hot vehicle compo-
nents.
! Operating the auxiliary heating/ventila-
tion draws on the vehicle battery. After you
have heated or ventilated the vehicle a
maximum of two times, drive for a longer
distance.
i Switch the auxiliary heating on regularly
once a month for about ten minutes.
Comfort Switching belt adjustment on/off
X Press the =or; button on the steer-
ing wheel to select the Settings Settingsmenu.
X Press the :or9 button to select the
Convenience
Convenience submenu.
X Press ato confirm.
X Press the :or9 button to select the
Belt adjustment
Belt adjustment function.
If the Belt adjustment
Belt adjustment function is activa-
ted, the vehicle seat belt is shown in orange
in the multifunction display.
X Press the abutton to save the setting.
For further information on belt adjustment,
see (Y page 47).
Switching the fold in mirrors when lock-
ing function on/off
This function is only available on vehicles with
a memory function (Y page 101).
When you activate the Auto.
Auto. fold-in fold-in mir‐
mir‐
rors
rors function, the exterior mirrors are folded
in when the vehicle is locked.
When you unlock the vehicle and then open a door, the exterior mirrors fold out again.
If you have switched on the Auto. Auto.fold-in
fold-in
mirrors
mirrors function and you fold in the exterior mirrors using the button on the door
(Y
page 99), they will not fold out automati-
cally. The exterior mirrors can then only be
folded out using the button on the door.
X Press the =or; button on the steer-
ing wheel to select the Settings Settingsmenu.
X Press the :or9 button to select the
Convenience
Convenience submenu.
X Press ato confirm.
X Press the :or9 button to select the
Auto. fold-in mirrors
Auto. fold-in mirrors function.
If the Auto.
Auto. fold-in
fold-in mirrors
mirrorsfunction is
activated, the vehicle's exterior mirror is
displayed in orange in the multifunction
display.
X Press the abutton to save the setting.
Resetting to factory settings X
Press the =or; button on the steer-
ing wheel to select the Settings Settingsmenu.
X Press the :or9 button to select the
Factory setting
Factory setting submenu.
X Press ato confirm.
The Reset all settings?
Reset all settings? message
appears.
X Press the :or9 button to select No
No
or Yes
Yes.
X Press the abutton to confirm the selec-
tion.
If you have selected Yes Yes, the multifunction
display shows a confirmation message.
For safety reasons, not all functions are reset: the Limit speed (winter tyres):
Limit speed (winter tyres): func-
tion in permanent SPEEDTRONIC can only be
set in the VEHICLE VEHICLEsubmenu. If you want to
reset the Daytime driving lights: Daytime driving lights: in the
Light
Light submenu, you must turn the key in the
ignition lock to position 1. Menus and submenus
225On-board computer and displays Z
Page 294 of 357
Regular care of your vehicle is a condition for
retaining the quality in the long term.
Use care products and cleaning agents rec-
ommended and approved by Mercedes-Benz. Care of the exterior
Automatic car wash G
WARNING
Braking efficiency is reduced after the vehicle has been washed. There is a risk of an acci-
dent.
After washing the vehicle, brake carefully
while paying attention to the traffic conditions in order to restore full braking efficiency.
! If DISTRONIC PLUS or the HOLD function
is activated, the vehicle brakes automati-
cally in certain situations. To prevent dam-
age to the vehicle, deactivate DISTRONIC
PLUS and the HOLD function in the follow-
ing or other similar situations:
R when towing the vehicle
R in the car wash
! Make sure that the automatic transmis-
sion is in position Nwhen washing your
vehicle in a tow-through car wash. The vehi-
cle could be damaged if the transmission is
in another position.
! Make sure that:
R the side windows and sliding sunroof are
closed completely.
R the blower for the ventilation/heating is
switched off (OFF button is depressed/
airflow control is turned to position 0).
R the windscreen wiper switch is at posi-
tion 0.
The vehicle could otherwise be damaged.
You can wash the vehicle in an automatic car
wash from the very start.
Wash off excess dirt before cleaning the vehi-
cle in an automatic car wash. After using an automatic car wash, wipe off
wax from the windscreen and the wiper
blades. This will prevent smears and reduce
wiping noises caused by residue on the wind- screen.
Washing by hand In some countries, washing by hand is only
allowed at wash bays that are specially
designed for this purpose. Observe the legal
requirements for each individual country.
X Do not use hot water and do not wash the
vehicle in direct sunlight.
X Use a soft sponge to clean.
X Use a mild cleaning agent, such as a car
shampoo approved by Mercedes-Benz.
X Thoroughly hose down the vehicle with a
gentle jet of water.
X Do not point the water jet directly towards
the air inlet.
X Use plenty of water and rinse out the
sponge frequently.
X Rinse the vehicle with clean water and dry
thoroughly with a chamois.
X Do not let the cleaning agent dry on the
paintwork.
When using the vehicle in winter, remove all
traces of road salt deposits carefully and as
soon as possible.
High-pressure cleaning equipment G
WARNING
The water jet of circular-jet nozzles (dirt grind- ers) can cause damage not visible from the
outside to tyres or chassis components. Com-
ponents damaged in this way can unexpect-
edly fail. There is a risk of an accident.
Do not use high-pressure cleaners with circu-
lar-jet nozzles to clean the vehicle. Have dam- aged tyres or chassis components replaced
immediately.
! Always maintain a distance of at least
30 cm between the vehicle and the high- Care
291Maintenance and care Z