child seat MERCEDES-BENZ A-CLASS HATCHBACK 2015 Owner's Manual
[x] Cancel search | Manufacturer: MERCEDES-BENZ, Model Year: 2015, Model line: A-CLASS HATCHBACK, Model: MERCEDES-BENZ A-CLASS HATCHBACK 2015Pages: 417, PDF Size: 11.91 MB
Page 66 of 417
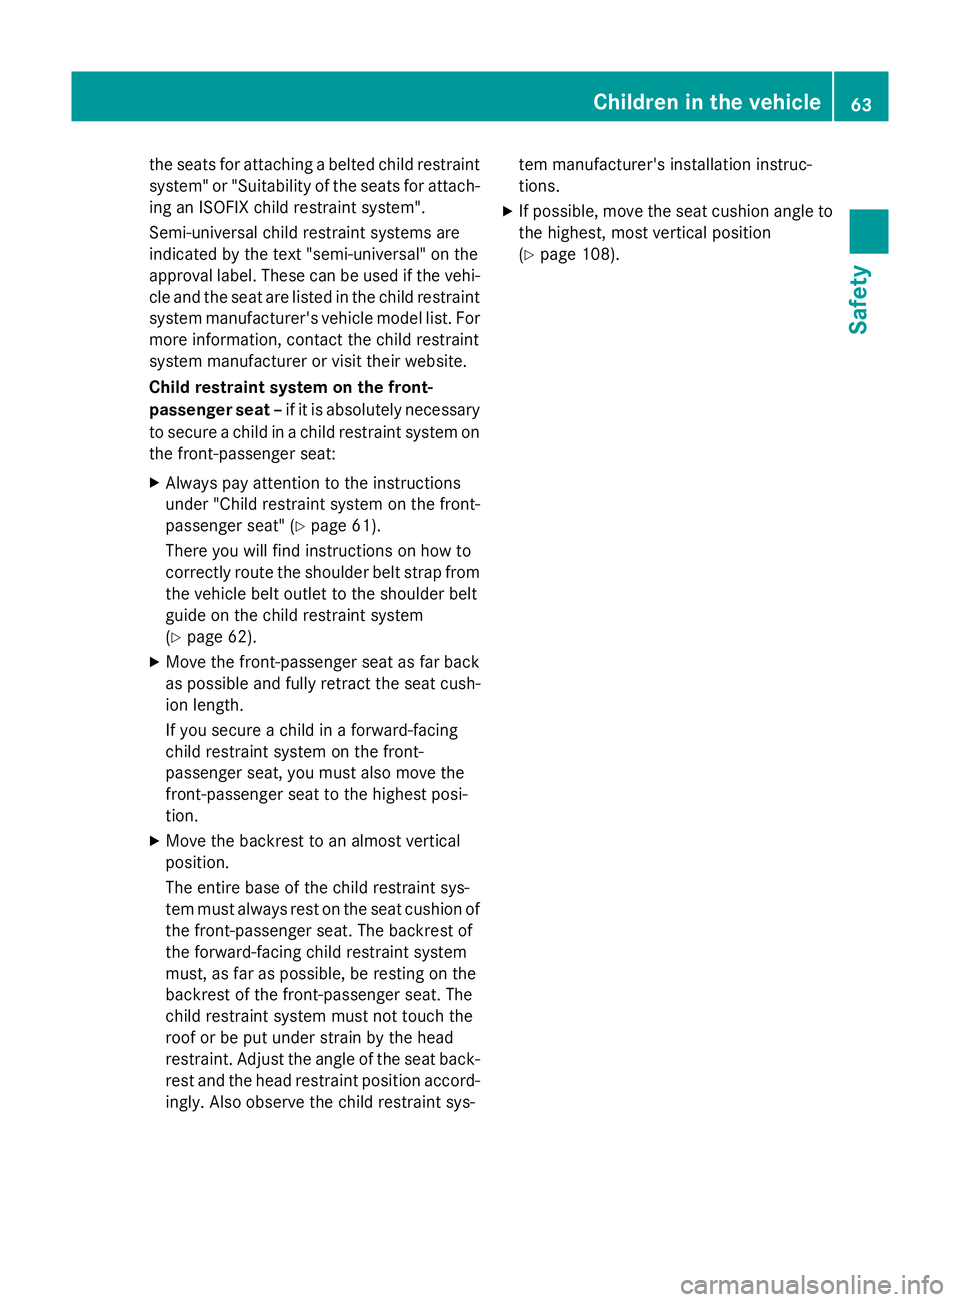
the seats for attaching a belted child restraint
system" or "Suitability of the seats for attach-
ing an ISOFIX child restraint system".
Semi-universal child restraint systems are
indicated by the text "semi-universal" on the
approval label. These can be used if the vehi- cle and the seat are listed in the child restraint
system manufacturer's vehicle model list. For more information, contact the child restraint
system manufacturer or visit their website.
Child restraint system on the front-
passenger seat – if it is absolutely necessary
to secure a child in a child restraint system on
the front-passenger seat:
X Always pay attention to the instructions
under "Child restraint system on the front-
passenger seat" (Y page 61).
There you will find instructions on how to
correctly route the shoulder belt strap from
the vehicle belt outlet to the shoulder belt
guide on the child restraint system
(Y page 62).
X Move the front-passenger seat as far back
as possible and fully retract the seat cush-
ion length.
If you secure a child in a forward-facing
child restraint system on the front-
passenger seat, you must also move the
front-passenger seat to the highest posi-
tion.
X Move the backrest to an almost vertical
position.
The entire base of the child restraint sys-
tem must always rest on the seat cushion of the front-passenger seat. The backrest of
the forward-facing child restraint system
must, as far as possible, be resting on the
backrest of the front-passenger seat. The
child restraint system must not touch the
roof or be put under strain by the head
restraint. Adjust the angle of the seat back- rest and the head restraint position accord-
ingly. Also observe the child restraint sys- tem manufacturer's installation instruc-
tions.
X If possible, move the seat cushion angle to
the highest, most vertical position
(Y page 108). Children in the vehicle
63Safety Z
Page 67 of 417
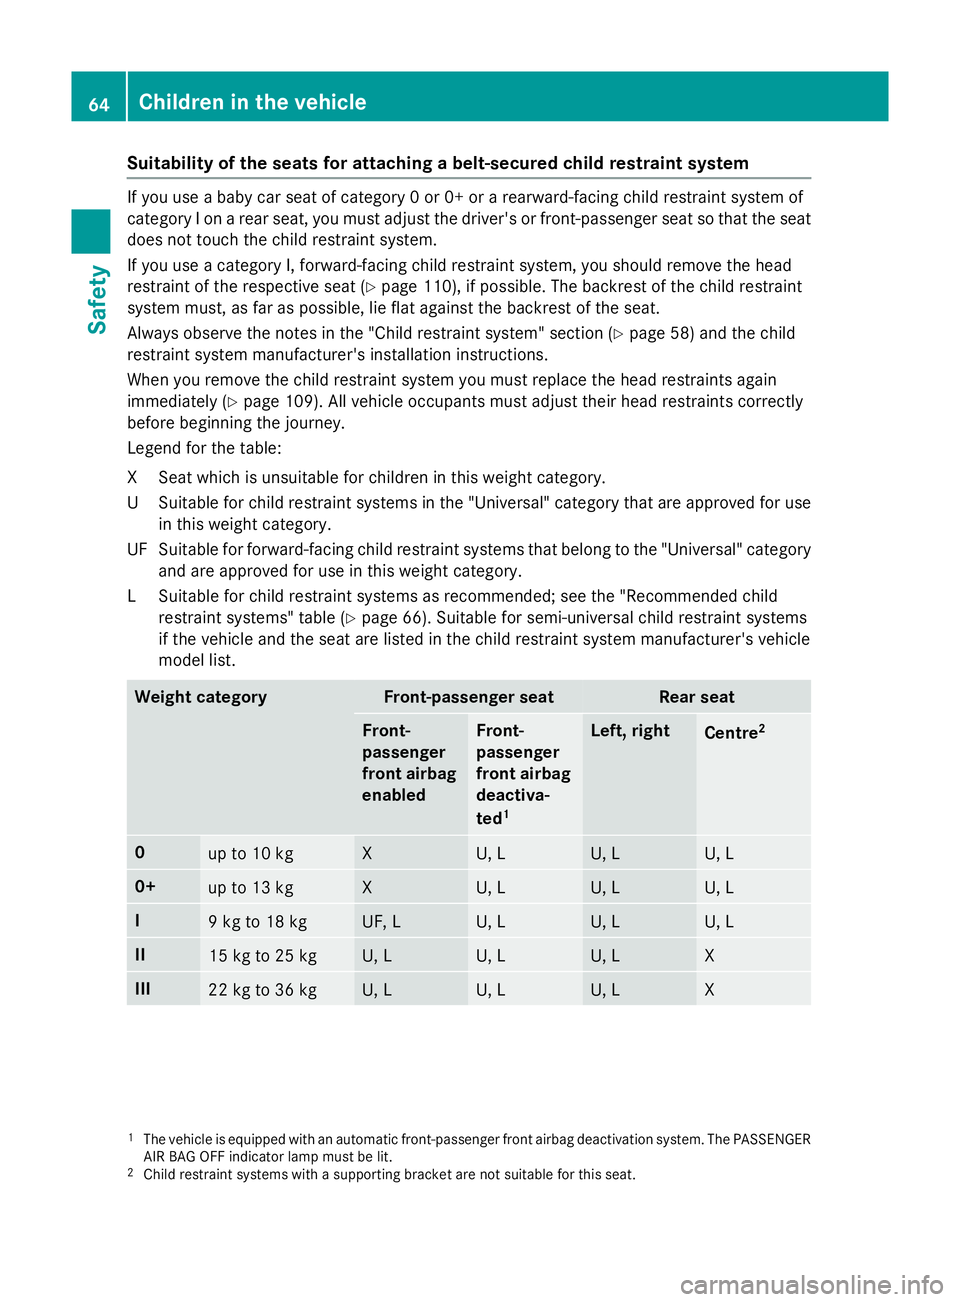
Suitability of the seats for attaching a belt-secured child restraint system
If you use a baby car seat of category 0 or 0+ or a rearward-facing child restraint system of
category I on a rear seat, you must adjust the driver's or front-passenger seat so that the seat
does not touch the child restraint system.
If you use a category I, forward-facing child restraint system, you should remove the head
restraint of the respective seat (Y page 110), if possible. The backrest of the child restraint
system must, as far as possible, lie flat against the backrest of the seat.
Always observe the notes in the "Child restraint system" section (Y page 58) and the child
restraint system manufacturer's installation instructions.
When you remove the child restraint system you must replace the head restraints again
immediately (Y page 109). All vehicle occupants must adjust their head restraints correctly
before beginning the journey.
Legend for the table:
XS eat which is unsuitable for children in this weight category.
US uitable for child restraint systems in the "Universal" category that are approved for use
in this weight category.
UF Suitable for forward-facing child restraint systems that belong to the "Universal" category and are approved for use in this weight category.
LS uitable for child restraint systems as recommended; see the "Recommended child
restraint systems" table (Y page 66). Suitable for semi-universal child restraint systems
if the vehicle and the seat are listed in the child restraint system manufacturer's vehicle
model list. Weight category Front-passenger seat Rear seat
Front-
passenger
front airbag
enabled Front-
passenger
front airbag
deactiva-
ted 1 Left, right
Centre
2 0
up to 10 kg X U, L U, L U, L
0+
up to 13 kg X U, L U, L U, L
I
9 kg to 18 kg UF, L U, L U, L U, L
II
15 kg to 25 kg U, L U, L U, L X
III
22 kg to 36 kg U, L U, L U, L X
1
The vehicle is equipped with an automatic front-passenger front airbag deactivation system. The PASSENGER
AIR BAG OFF indicator lamp must be lit.
2 Child restraint systems with a supporting bracket are not suitable for this seat. 64
Children in the vehicleSafety
Page 68 of 417
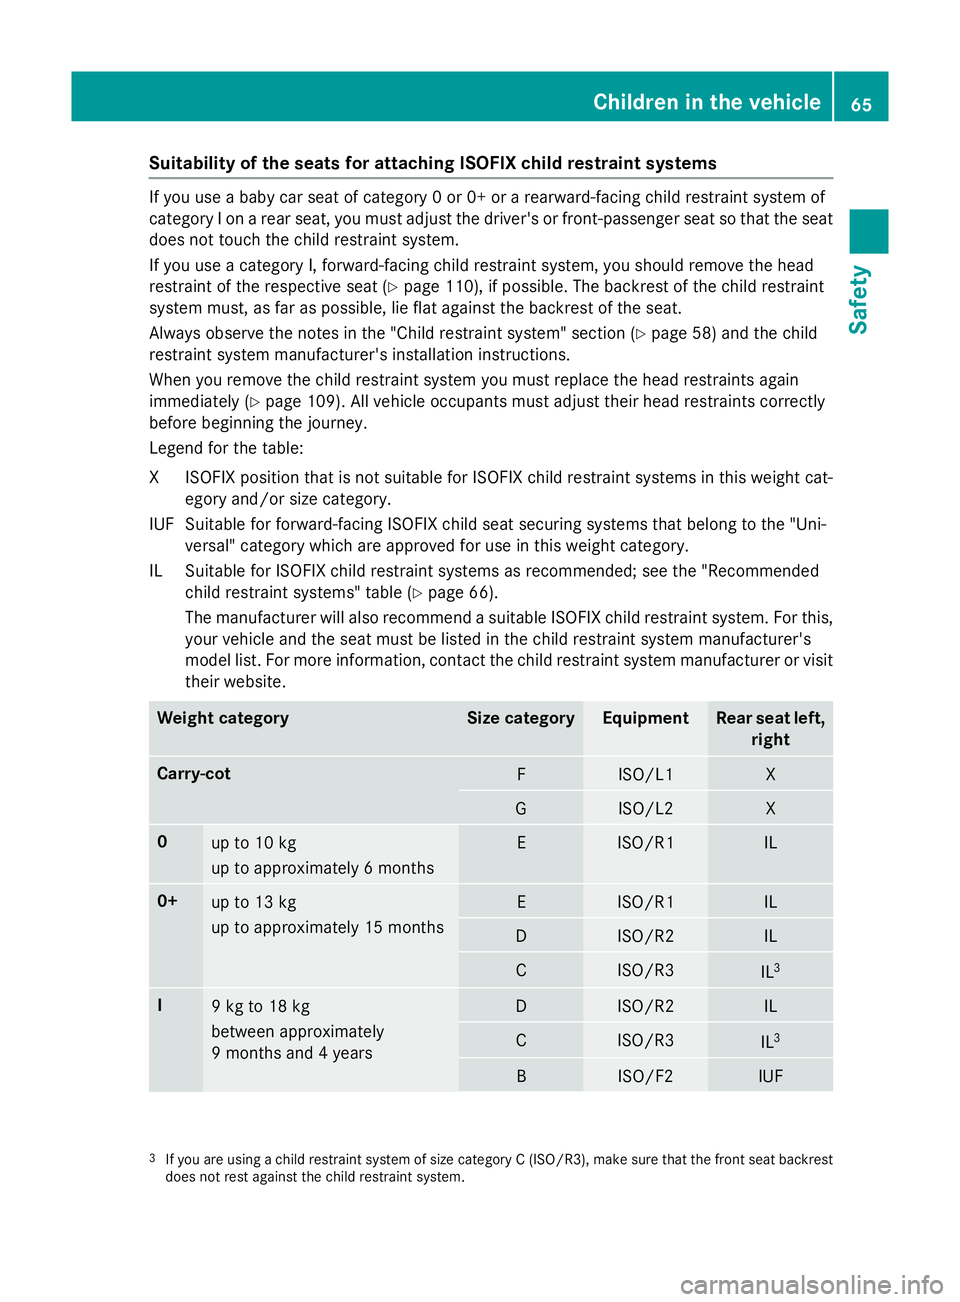
Suitability of the seats for attaching ISOFIX child restraint systems
If you use a baby car seat of category 0 or 0+ or a rearward-facing child restraint system of
category I on a rear seat, you must adjust the driver's or front-passenger seat so that the seat
does not touch the child restraint system.
If you use a category I, forward-facing child restraint system, you should remove the head
restraint of the respective seat (Y page 110), if possible. The backrest of the child restraint
system must, as far as possible, lie flat against the backrest of the seat.
Always observe the notes in the "Child restraint system" section (Y page 58) and the child
restraint system manufacturer's installation instructions.
When you remove the child restraint system you must replace the head restraints again
immediately (Y page 109). All vehicle occupants must adjust their head restraints correctly
before beginning the journey.
Legend for the table:
XI SOFIX position that is not suitable for ISOFIX child restraint systems in this weight cat-
egory and/or size category.
IUF Suitable for forward-facing ISOFIX child seat securing systems that belong to the "Uni- versal" category which are approved for use in this weight category.
IL Suitable for ISOFIX child restraint systems as recommended; see the "Recommended child restraint systems" table (Y page 66).
The manufacturer will also recommend a suitable ISOFIX child restraint system. For this,
your vehicle and the seat must be listed in the child restraint system manufacturer's
model list. For more information, contact the child restraint system manufacturer or visit
their website. Weight category Size category Equipment Rear seat left,
right Carry-cot
F ISO/L1 X
G ISO/L2 X
0
up to 10 kg
up to approximately 6 months E ISO/R1 IL
0+
up to 13 kg
up to approximately 15 months E ISO/R1 IL
D ISO/R2 IL
C ISO/R3
IL
3 I
9 kg to 18 kg
between approximately
9 months and 4 years D ISO/R2 IL
C ISO/R3
IL
3 B ISO/F2 IUF
3
If you are using a child restraint system of size category C (ISO/R3), make sure that the front seat backrest
does not rest against the child restraint system. Children in the vehicle
65Safety Z
Page 69 of 417
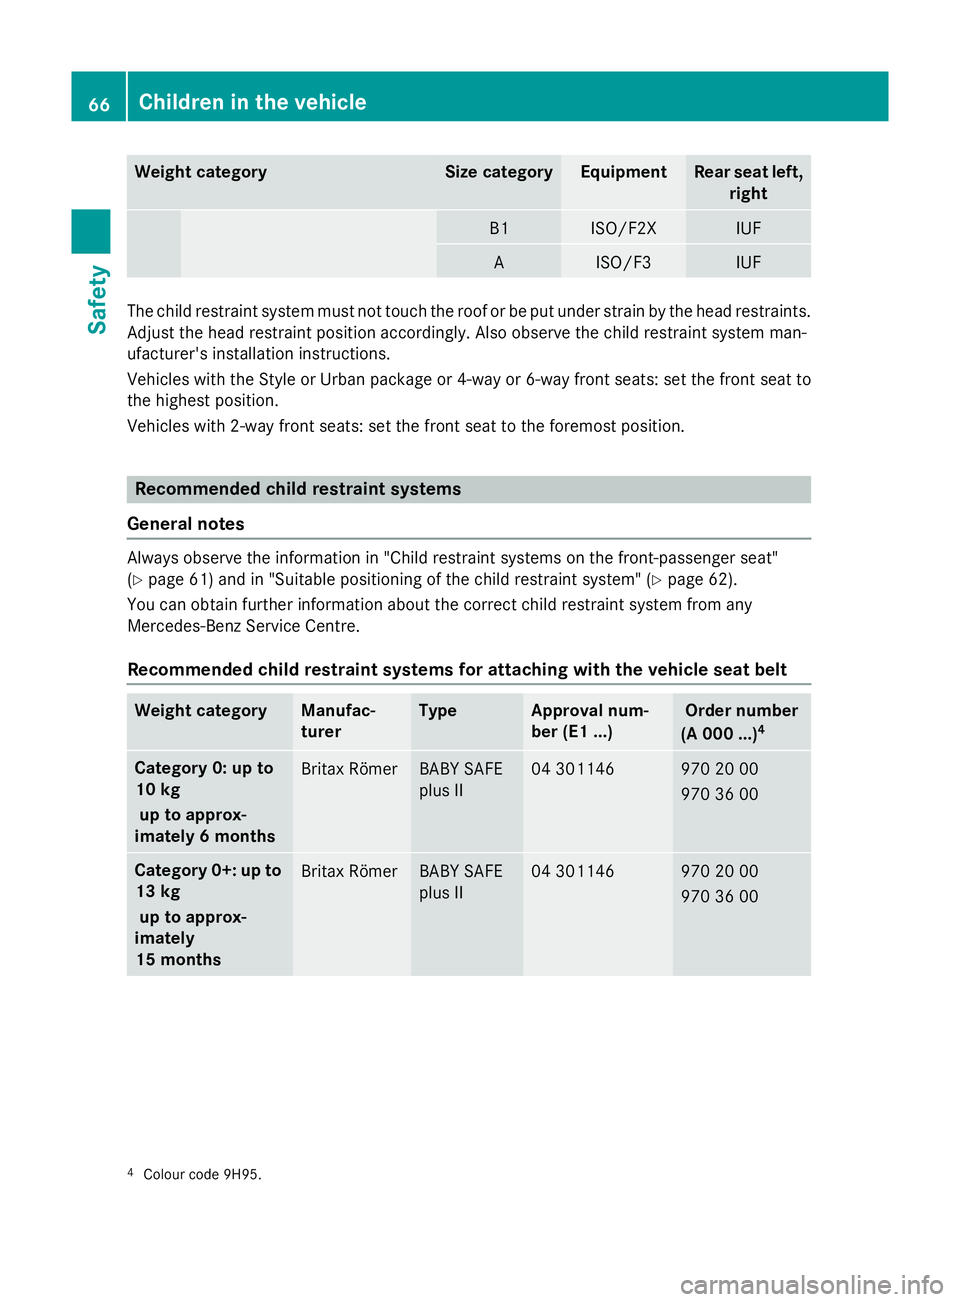
Weight category Size category Equipment Rear seat left,
right B1 ISO/F2X IUF
A ISO/F3 IUF
The child restraint system must not touch the roof or be put under strain by the head restraints.
Adjust the head restraint position accordingly. Also observe the child restraint system man-
ufacturer's installation instructions.
Vehicles with the Style or Urban package or 4-way or 6-way front seats: set the front seat to the highest position.
Vehicles with 2-way front seats: set the front seat to the foremost position. Recommended child restraint systems
General notes Always observe the information in "Child restraint systems on the front-passenger seat"
(Y page 61) and in "Suitable positioning of the child restraint system" (Y page 62).
You can obtain further information about the correct child restraint system from any
Mercedes-Benz Service Centre.
Recommended child restraint systems for attaching with the vehicle seat belt Weight category Manufac-
turer Type Approval num-
ber (E1 ...) Order number
(A 000 ...) 4 Category 0: up to
10 kg
up to approx-
imately 6 months Britax Römer BABY SAFE
plus II 04 301146 970 20 00
970 36 00
Category 0+: up to
13 kg
up to approx-
imately
15 months Britax Römer BABY SAFE
plus II 04 301146 970 20 00
970 36 00
4
Colour code 9H95. 66
Children in the vehicleSafety
Page 110 of 417
The seat belt should:
R fit snugly across your body
R be routed across the middle of your
shoulder
R be routed across your hips in the pelvic
area
X Before starting off, adjust the rear-view mir-
ror and the exterior mirrors (Y page 113)
so that you have a good view of road and
traffic conditions.
X Vehicles with a memory function: save
the seat and exterior mirror settings
(Y page 116). Seats
Important safety notes
G
WARNING
If children adjust the seats, they could
become trapped, especially if they are unat-
tended. There is a risk of injury.
When leaving the vehicle, always take the key with you and lock the vehicle. Never leave
children unattended in the vehicle.
The seats can still be adjusted when there is
no key in the ignition lock. G
WARNING
When adjusting a seat, you or another vehicle occupant could become trapped by the guiderail of the seat, for instance. There is a risk of
injury.
Make sure that no one has any part of their
body within the sweep of the seat when
adjusting it.
Observe the safety notes on "Airbags"
(Y page 46) and "Children in the Vehicle"
(Y page 57). G
WARNING
If the driver's seat is not correctly engaged, it could unexpectedly move while driving. This could cause you to lose control of the vehicle.
There is a risk of an accident.
Always ensure that the driver's seat is
engaged before starting the vehicle. G
WARNING
You could lose control of the vehicle while
driving if you:
R adjust the driver's seat, steering wheel or
mirrors
R fasten the seat belt
There is a risk of an accident.
Adjust the driver's seat, head restraint, steer-
ing wheel and mirrors and fasten your seat
belt before starting the engine. G
WARNING
If you adjust the seat height carelessly, you or other vehicle occupants could be trapped andthereby injured. Children in particular could
accidentally press the electrical seat adjust-
ment buttons and become trapped. There is a
risk of injury.
While moving the seats, make sure that your
hands or other body parts do not get under the
lever assembly of the seat adjustment sys-
tem.
! To avoid damage to the seats and the seat
heating, observe the following information:
R do not spill any liquids on the seats. If
liquid is spilled on the seats, dry them as
soon as possible.
R if the seat covers are damp or wet, do not
switch on the seat heating. The seat
heating should also not be used to dry
the seats.
R clean the seat covers as recommended;
see the "Interior care" section.
R do not transport heavy loads on the
seats. Do not place sharp objects on the
seat cushions, e.g. knives, nails or tools. Seats
107Seats, steering wheel and mirrors Z
Page 111 of 417
The seats should only be occupied by
passengers, if possible.
R when the seat heating is in operation, do
not cover the seats with insulating mate-
rials, e.g. blankets, coats, bags, seat cov- ers, child seats or booster seats.
! Make sure that there are no objects in the
footwell under or behind the seats when
moving the seats back. There is a risk that
the seats and/or the objects could be dam- aged.
i Further related subjects:
R Luggage compartment enlargement
(folding down the rear seats)
(Y page 309) Adjusting the seats manually
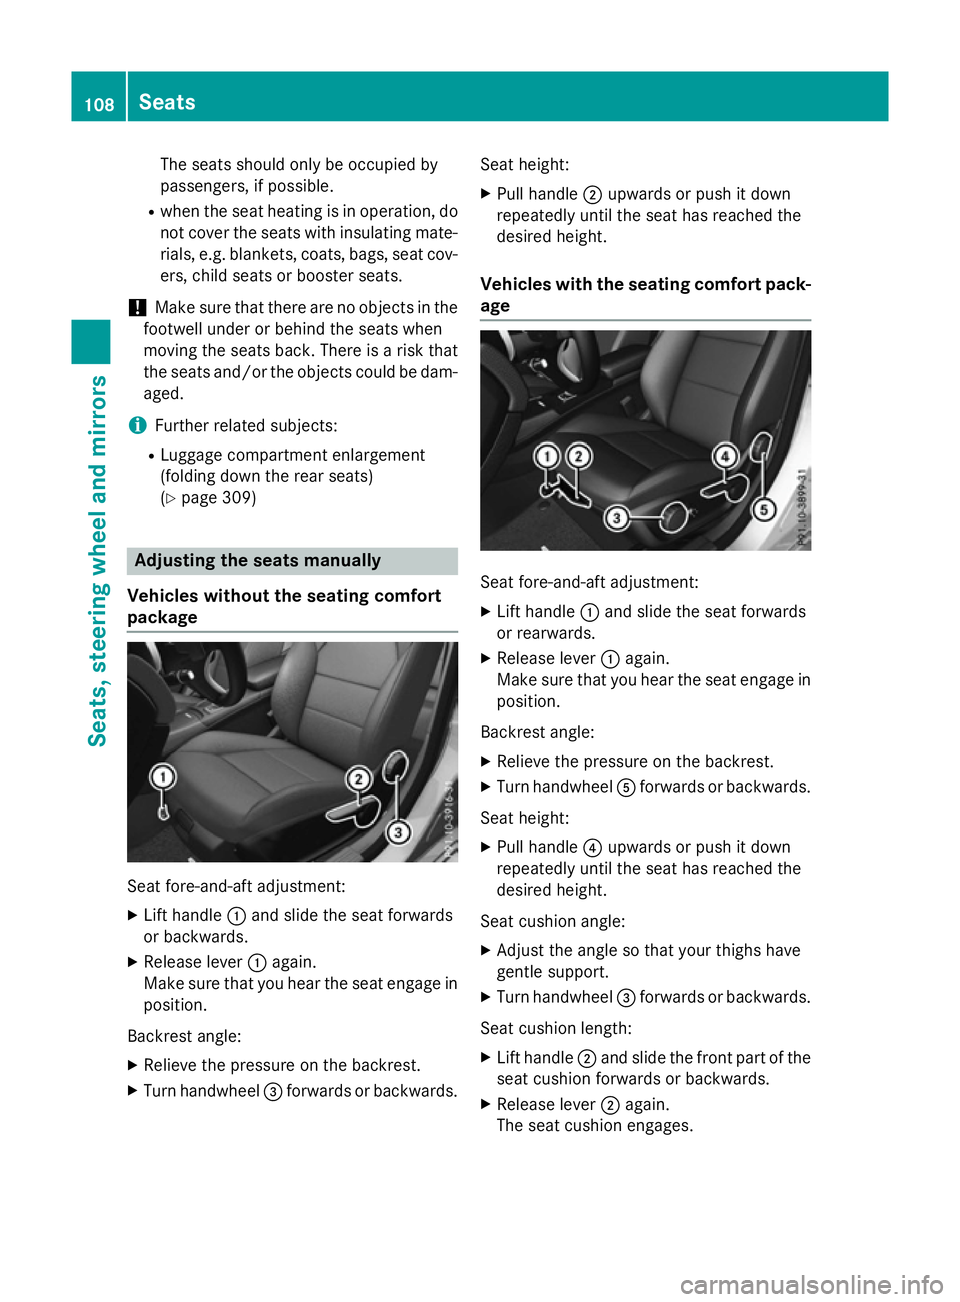
Vehicles without the seating comfort
package Seat fore-and-aft adjustment:
X Lift handle :and slide the seat forwards
or backwards.
X Release lever :again.
Make sure that you hear the seat engage in
position.
Backrest angle:
X Relieve the pressure on the backrest.
X Turn handwheel =forwards or backwards. Seat height:
X Pull handle ;upwards or push it down
repeatedly until the seat has reached the
desired height.
Vehicles with the seating comfort pack-
age Seat fore-and-aft adjustment:
X Lift handle :and slide the seat forwards
or rearwards.
X Release lever :again.
Make sure that you hear the seat engage in
position.
Backrest angle: X Relieve the pressure on the backrest.
X Turn handwheel Aforwards or backwards.
Seat height: X Pull handle ?upwards or push it down
repeatedly until the seat has reached the
desired height.
Seat cushion angle:
X Adjust the angle so that your thighs have
gentle support.
X Turn handwheel =forwards or backwards.
Seat cushion length: X Lift handle ;and slide the front part of the
seat cushion forwards or backwards.
X Release lever ;again.
The seat cushion engages. 108
SeatsSeats, steering wheel and mirrors
Page 115 of 417
Problems with the seat heating
Problem
Possible causes/consequences and
M
MSolutions The seat heating has
switched off prema-
turely or cannot be
switched on. The on-board voltage is too low because too many electrical con-
sumers are switched on.
X Switch off electrical consumers that you do not need, such as
the rear window heating or interior lighting.
Once the battery is sufficiently charged, the seat heating will
switch back on automatically. Steering wheel
Important safety notes
G
WARNING
You could lose control of the vehicle while
driving if you:
R adjust the driver's seat, steering wheel or
mirrors
R fasten the seat belt
There is a risk of an accident.
Adjust the driver's seat, head restraint, steer-
ing wheel and mirrors and fasten your seat
belt before starting the engine. G
WARNING
Children could become trapped by the steer-
ing wheel if they adjust it. There is a risk of
injury.
When leaving the vehicle, always take the key with you and lock the vehicle. Never leave
children unattended in the vehicle. Adjusting the steering wheel
G
WARNING
The steering wheel may move unexpectedly if you adjust it while driving. This could cause
you to lose control of the vehicle. There is a
risk of an accident.
Make sure that the steering wheel is locked
before driving off. Never unlock the steering
wheel when the vehicle is in motion. :
Release lever
; Adjusts the steering wheel height
= Adjusts the steering wheel position (fore-
and-aft adjustment)
X Push release lever :down completely.
The steering column is unlocked.
X Adjust the steering wheel to the desired
position.
X Push release lever :up as far as it will go.
The steering column is locked.
X Check if the steering column is locked.
When doing so, try to push the steering
wheel up or down or try to move it in the
fore-and-aft direction. 112
Steering wheelSeats, steering wheel and mirrors
Page 119 of 417
X
Press button ;for the exterior mirror on
the front-passenger side.
X Use adjustment button =to adjust the
exterior mirror. You should see the rear
wheel and the kerb in the exterior mirror.
X Press memory button M? and one of the
arrows on adjustment button =within
three seconds.
The parking position is stored if the exterior
mirror does not move.
X If the mirror moves out of position, repeat
the steps.
Calling up a stored parking position X
Turn the key to position 2in the ignition
lock (Y page 157).
X Adjust the exterior mirror on the front-
passenger side with the corresponding but-
ton (Y page 113).
X Engage reverse gear.
The exterior mirror on the front-passenger
side moves to the stored parking position.
The exterior mirror on the front-passenger
side moves back to its original position:
R as soon as you exceed a speed of
15 km/h
R about ten seconds after you have disen-
gaged reverse gear
R if you press button :for the exterior mir-
ror on the driver's side. Memory function
Important safety notes
G
WARNING
If you use the memory function on the driver's side while driving, the adjustments could
cause you to lose control of the vehicle. There
is a risk of an accident.
Only use the memory function on the driver's
side while the vehicle is stationary. G
WARNING
If the memory function adjusts the seat, you
and other vehicle occupants – particularly
children – could become trapped. There is a
risk of injury.
While the memory function is making adjust-
ments, make sure that no one has any part of their body within the sweep of the seat. If
someone becomes trapped, immediately
release the memory function position button.
The adjustment is stopped. G
WARNING
If children activate the memory function, they
could become trapped, especially if they are
unattended. There is a risk of injury.
When leaving the vehicle, always take the key with you and lock the vehicle. Never leave
children unattended in the vehicle.
The memory function can be used at any time,
e.g. even when the key is not in the ignition
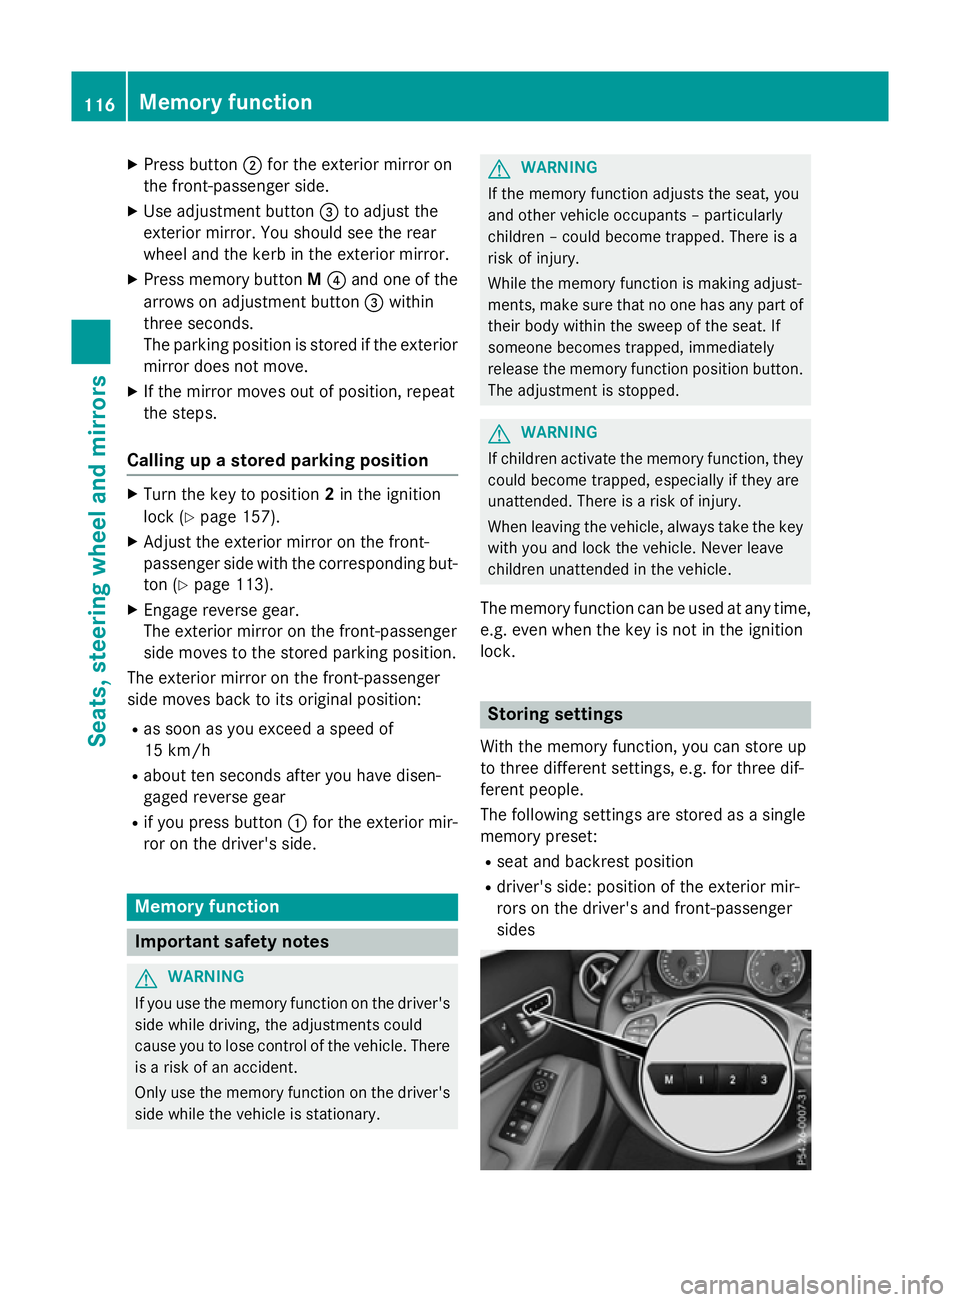
lock. Storing settings
With the memory function, you can store up
to three different settings, e.g. for three dif-
ferent people.
The following settings are stored as a single
memory preset:
R seat and backrest position
R driver's side: position of the exterior mir-
rors on the driver's and front-passenger
sides 116
Memory functionSeats, steering wheel and mirrors
Page 273 of 417
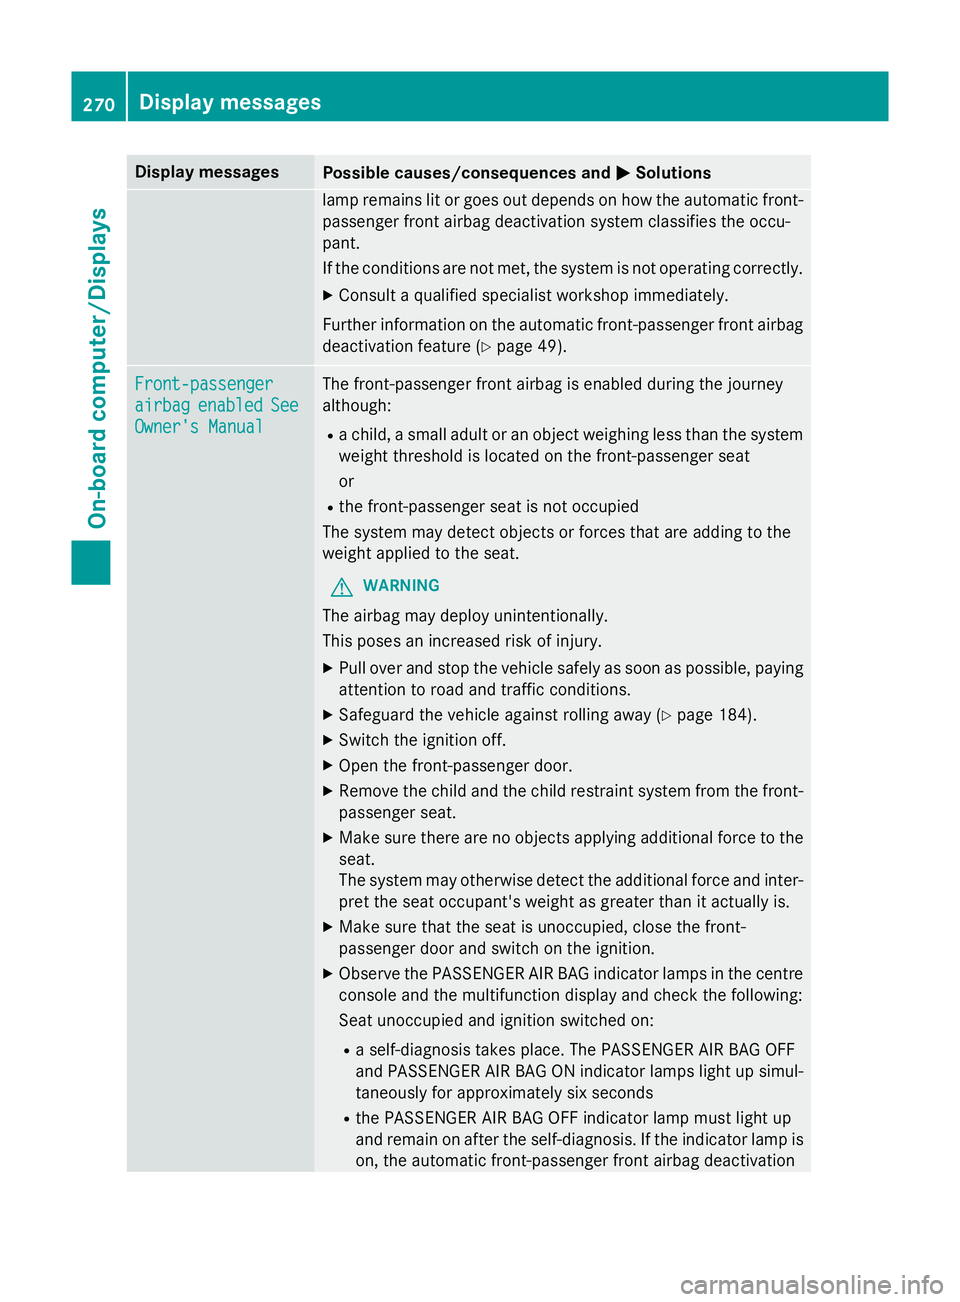
Display messages
Possible causes/consequences and
M
MSolutions lamp remains lit or goes out depends on how the automatic front-
passenger front airbag deactivation system classifies the occu-
pant.
If the conditions are not met, the system is not operating correctly.
X Consult a qualified specialist workshop immediately.
Further information on the automatic front-passenger front airbag deactivation feature (Y page 49).Front-passenger Front-passenger
airbag airbag
enabled
enabled See
See
Owner's Manual
Owner's Manual The front-passenger front airbag is enabled during the journey
although:
R a child, a small adult or an object weighing less than the system
weight threshold is located on the front-passenger seat
or
R the front-passenger seat is not occupied
The system may detect objects or forces that are adding to the
weight applied to the seat.
G WARNING
The airbag may deploy unintentionally.
This poses an increased risk of injury. X Pull over and stop the vehicle safely as soon as possible, paying
attention to road and traffic conditions.
X Safeguard the vehicle against rolling away (Y page 184).
X Switch the ignition off.
X Open the front-passenger door.
X Remove the child and the child restraint system from the front-
passenger seat.
X Make sure there are no objects applying additional force to the
seat.
The system may otherwise detect the additional force and inter-
pret the seat occupant's weight as greater than it actually is.
X Make sure that the seat is unoccupied, close the front-
passenger door and switch on the ignition.
X Observe the PASSENGER AIR BAG indicator lamps in the centre
console and the multifunction display and check the following:
Seat unoccupied and ignition switched on:
R a self-diagnosis takes place. The PASSENGER AIR BAG OFF
and PASSENGER AIR BAG ON indicator lamps light up simul-
taneously for approximately six seconds
R the PASSENGER AIR BAG OFF indicator lamp must light up
and remain on after the self-diagnosis. If the indicator lamp is
on, the automatic front-passenger front airbag deactivation 270
Display
messagesOn-board computer/Displays
Page 348 of 417
G
WARNING
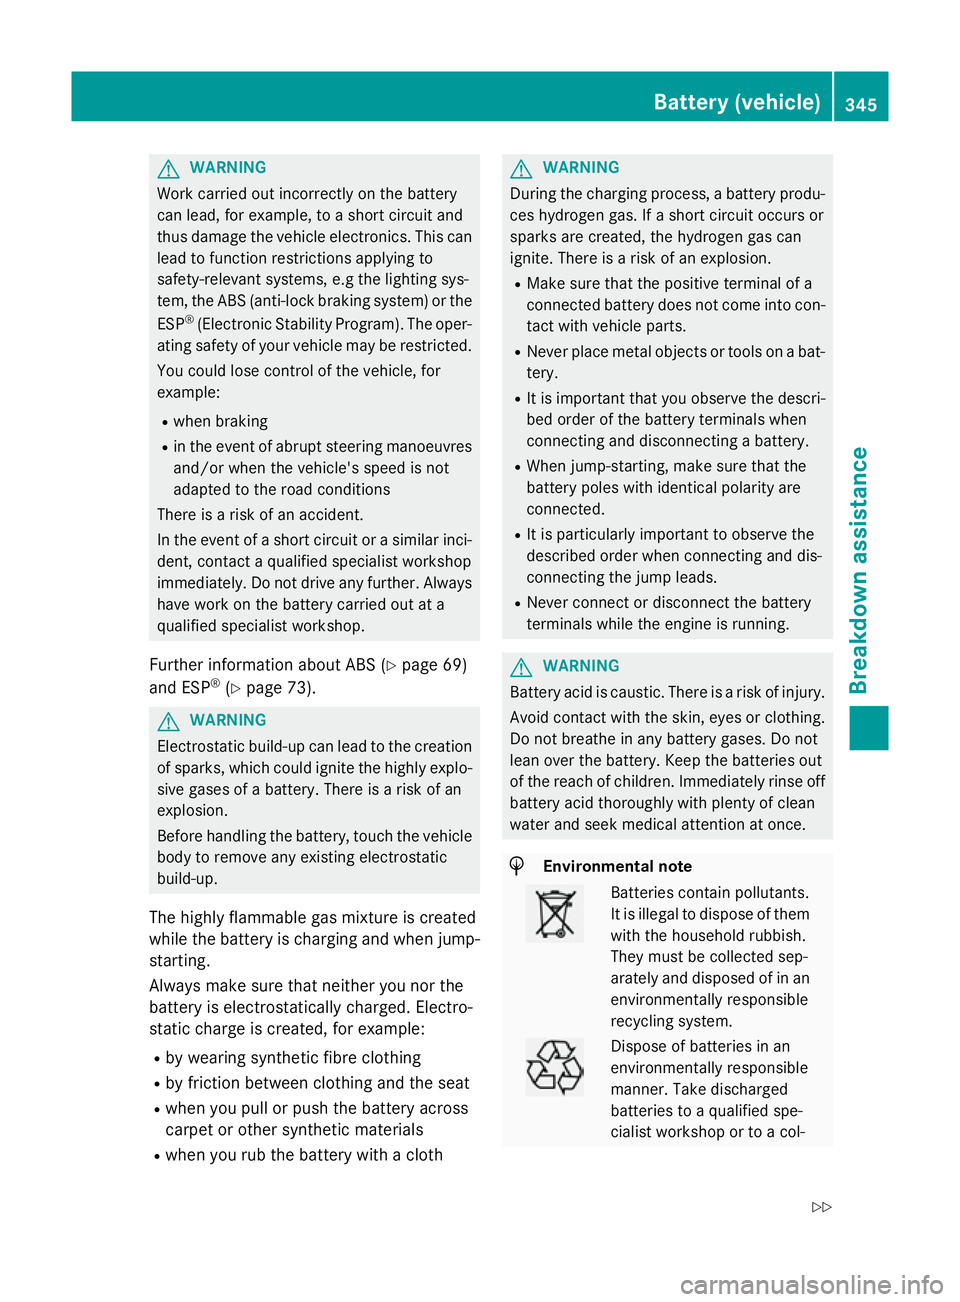
Work carried out incorrectly on the battery
can lead, for example, to a short circuit and
thus damage the vehicle electronics. This can lead to function restrictions applying to
safety-relevant systems, e.g the lighting sys-
tem, the ABS (anti-lock braking system) or the
ESP ®
(Electronic Stability Program). The oper-
ating safety of your vehicle may be restricted.
You could lose control of the vehicle, for
example:
R when braking
R in the event of abrupt steering manoeuvres
and/or when the vehicle's speed is not
adapted to the road conditions
There is a risk of an accident.
In the event of a short circuit or a similar inci- dent, contact a qualified specialist workshop
immediately. Do not drive any further. Always have work on the battery carried out at a
qualified specialist workshop.
Further information about ABS (Y page 69)
and ESP ®
(Y page 73). G
WARNING
Electrostatic build-up can lead to the creation of sparks, which could ignite the highly explo-
sive gases of a battery. There is a risk of an
explosion.
Before handling the battery, touch the vehicle body to remove any existing electrostatic
build-up.
The highly flammable gas mixture is created
while the battery is charging and when jump-
starting.
Always make sure that neither you nor the
battery is electrostatically charged. Electro-
static charge is created, for example:
R by wearing synthetic fibre clothing
R by friction between clothing and the seat
R when you pull or push the battery across
carpet or other synthetic materials
R when you rub the battery with a cloth G
WARNING
During the charging process, a battery produ- ces hydrogen gas. If a short circuit occurs or
sparks are created, the hydrogen gas can
ignite. There is a risk of an explosion.
R Make sure that the positive terminal of a
connected battery does not come into con-
tact with vehicle parts.
R Never place metal objects or tools on a bat-
tery.
R It is important that you observe the descri-
bed order of the battery terminals when
connecting and disconnecting a battery.
R When jump-starting, make sure that the
battery poles with identical polarity are
connected.
R It is particularly important to observe the
described order when connecting and dis-
connecting the jump leads.
R Never connect or disconnect the battery
terminals while the engine is running. G
WARNING
Battery acid is caustic. There is a risk of injury. Avoid contact with the skin, eyes or clothing.
Do not breathe in any battery gases. Do not
lean over the battery. Keep the batteries out
of the reach of children. Immediately rinse off
battery acid thoroughly with plenty of clean
water and seek medical attention at once. H
Environmental note Batteries contain pollutants.
It is illegal to dispose of them
with the household rubbish.
They must be collected sep-
arately and disposed of in anenvironmentally responsible
recycling system. Dispose of batteries in an
environmentally responsible
manner. Take discharged
batteries to a qualified spe-
cialist workshop or to a col- Battery (vehicle)
345Breakdown assistance
Z