fold seats MERCEDES-BENZ A-CLASS HATCHBACK 2018 Owners Manual
[x] Cancel search | Manufacturer: MERCEDES-BENZ, Model Year: 2018, Model line: A-CLASS HATCHBACK, Model: MERCEDES-BENZ A-CLASS HATCHBACK 2018Pages: 609, PDF Size: 10.73 MB
Page 96 of 609
#
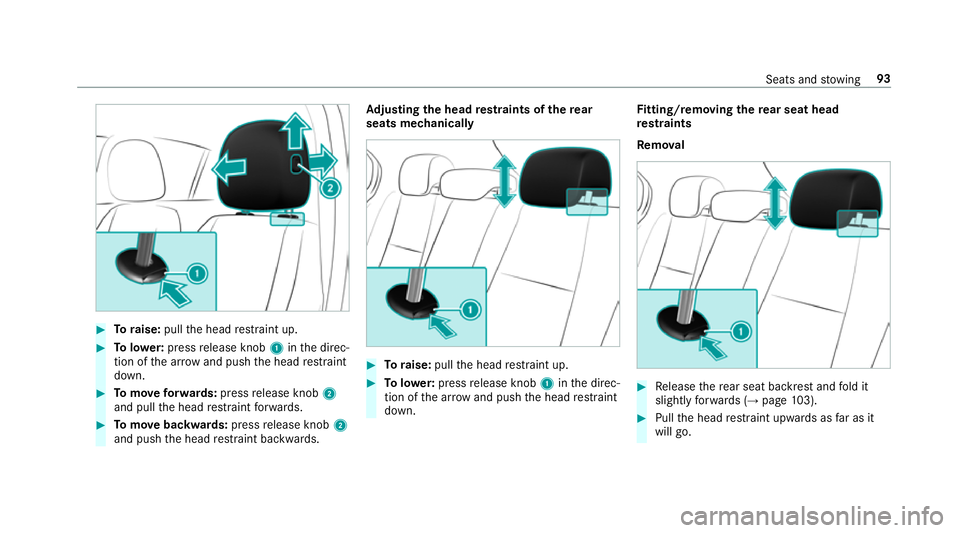
Toraise: pullthe head restra int up. #
Tolowe r:press release knob 1inthe direc‐
tion of the ar row and push the head restra int
down. #
Tomo veforw ards: press release knob 2
and pull the head restra int forw ards. #
Tomo vebackwards: pressrelease knob 2
and push the head restra int backwards. Ad
justing the head restra ints of there ar
seats mechanically #
Toraise: pullthe head restra int up. #
Tolowe r:press release knob 1inthe direc‐
tion of the ar row and push the head restra int
down. Fi
tting/ removing the rear seat head
re stra ints
Re mo val #
Release there ar seat backrest and fold it
slight lyforw ards (→ page103). #
Pull the head restra int upwards as far as it
will go. Seats and
stowing 93
Page 97 of 609
#
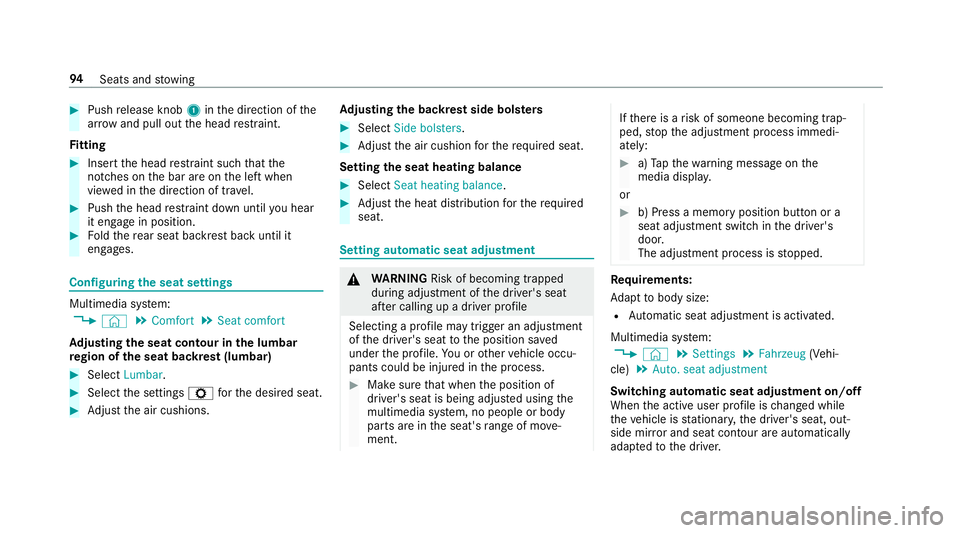
Push release knob 1inthe direction of the
ar row and pull out the head restra int.
Fi tting #
Inse rtthe head restra int such that the
notches on the bar are on the left when
vie we d in the direction of tra vel. #
Push the head restra int down until you hear
it en gage in position. #
Foldthere ar seat backrest back until it
engages. Configuring
the seat settings Multimedia sy
stem:
, © .
Comfort .
Seat comfort
Ad justing the seat contour in the lumbar
re gion of the seat backrest (lumbar) #
Select Lumbar . #
Select the settings Zforth e desired seat. #
Adjust the air cushions. Ad
justing the backrest side bols ters #
Select Side bolsters . #
Adjust the air cushion forth ere qu ired seat.
Setting the seat heating balance #
Select Seat heating balance. #
Adjust the heat distribution forth ere qu ired
seat. Setting automatic seat adju
stment &
WARNING Risk of becoming trapped
du ring adjustment of the driver's seat
af te r calling up a driver profile
Selecting a profile may trigger an adju stment
of the driver's seat tothe position sa ved
under the profile. You or other vehicle occu‐
pants could be injured in the process. #
Make sure that when the position of
driver's seat is being adjus ted using the
multimedia sy stem, no people or body
parts are in the seat's range of mo ve‐
ment. If
th ere is a risk of someone becoming trap‐
ped, stop the adjustment process immedi‐
ately: #
a)Tapth ewa rning message on the
media displa y.
or #
b) Press a memory position button or a
seat adjustment switch in the driver's
door.
The adjustment process is stopped. Re
quirements:
Ad apt tobody size:
R Automatic seat adju stment is activated.
Multimedia sy stem:
, © .
Settings .
Fahrzeug (Vehi‐
cle) .
Auto. seat adjustment
Switching automatic seat adjustment on/off
When the active user profile is changed while
th eve hicle is stationar y,the driver's seat, out‐
side mir ror and seat contour are auto matically
adapte dto the driver. 94
Seats and stowing
Page 106 of 609
#
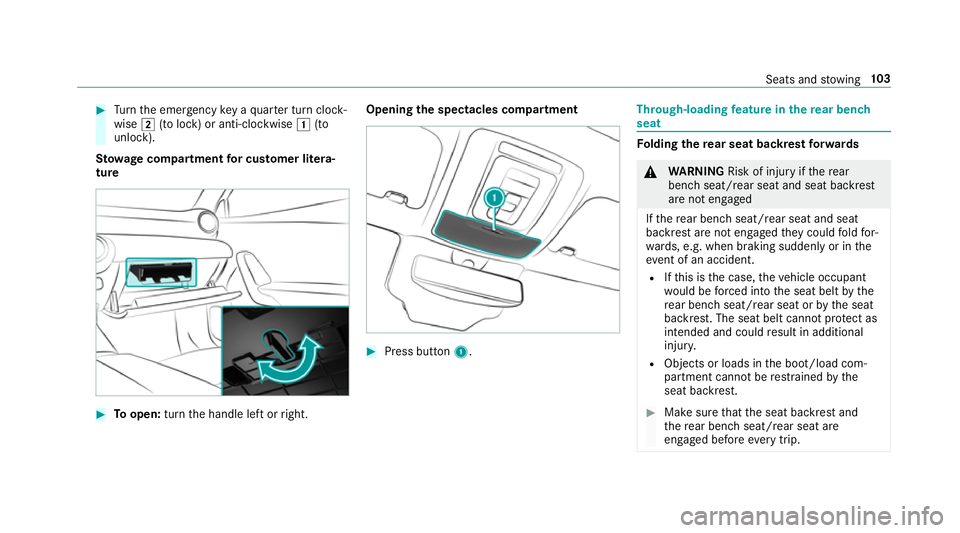
Turn the emer gency key a quarter turn clock‐
wise 2(to lock) or anti-clockwise 1(to
unlock).
St ow age comp artmentfor cu stomer li tera‐
ture #
Toopen: turnthe handle left or right. Opening
the spectacles compa rtment #
Press button 1. Through-loading
feature in there ar ben ch
seat Fo
lding there ar seat backrest forw ards &
WARNING Risk of inju ryifth ere ar
ben chseat/rear seat and seat backrest
are not engaged
If th ere ar ben chseat/rear seat and seat
backrest are not engaged they could fold for‐
wa rds, e.g. when braking suddenly or in the
ev ent of an accident.
R Ifth is is the case, theve hicle occupant
wo uld be forc ed into the seat belt bythe
re ar ben chseat/rear seat or bythe seat
backrest. The seat belt cann otprotect as
intended and could result in additional
injur y.
R Objects or loads in the boot/load com‐
partment cann otbe restra ined bythe
seat backrest. #
Make sure that the seat backrest and
th ere ar ben chseat/rear seat are
engaged before everytrip. Seats and
stowing 103
Page 107 of 609
Re
quirements:
R The centre seat backrest has been unloc ked.
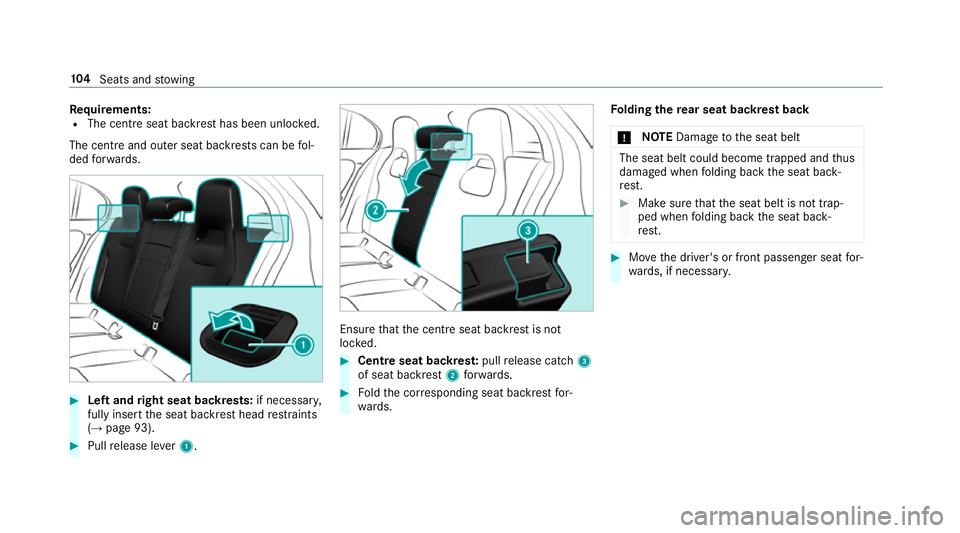
The centre and outer seat backrests can be fol‐
ded forw ards. #
Left and right seat backrests: if necessary,
fully insert the seat backrest head restra ints
(→ page 93). #
Pull release le ver1. Ensure
that the cent reseat backrest is not
loc ked. #
Centre seat backres t:pull release cat ch3
of seat backrest 2forw ards. #
Foldthe cor responding seat backrest for‐
wa rds. Fo
lding there ar seat backrest back
* NO
TEDama getothe seat belt The seat belt could become trapped and
thus
damaged when folding back the seat back‐
re st. #
Make sure that the seat belt is not trap‐
ped when folding back the seat back‐
re st. #
Movethe driver's or front passenger seat for‐
wa rds, if necessar y. 104
Seats and stowing
Page 108 of 609
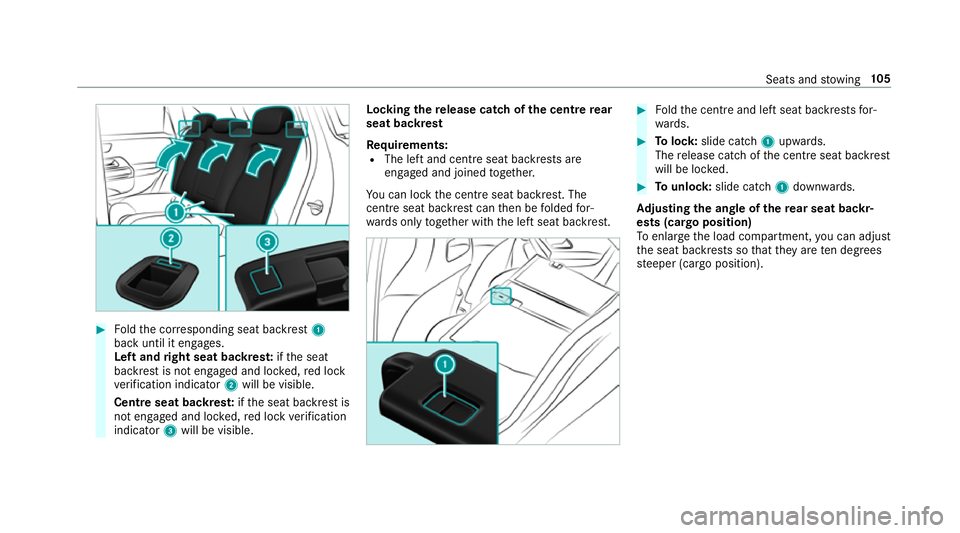
#
Foldthe cor responding seat backrest 1
back until it engages.
Left and right seat backres t:ifth e seat
backrest is not engaged and loc ked, red lock
ve rification indicator 2will be visible.
Centre seat backres t:ifth e seat backrest is
not engaged and loc ked, red lock verification
indicator 3will be visible. Lo
cking there lease catch of the centre rear
seat backrest
Re quirements:
R The left and centre seat backrests are
engaged and joined toge ther.
Yo u can lock the cent reseat backrest. The
centre seat backrest can then be folded for‐
wa rds only toge ther with the left seat backrest. #
Foldthe cent reand left seat backrests for‐
wa rds. #
Tolock: slide cat ch1 upwards.
The release cat chofthe cent reseat backrest
will be loc ked. #
Tounlo ck:slide catch 1down wards.
Ad justing the angle of the rear seat backr‐
ests (cargo position)
To enlar gethe load compartment, you can adjust
th e seat backrests so that they are ten degrees
st eeper (cargo position). Seats and
stowing 105
Page 109 of 609
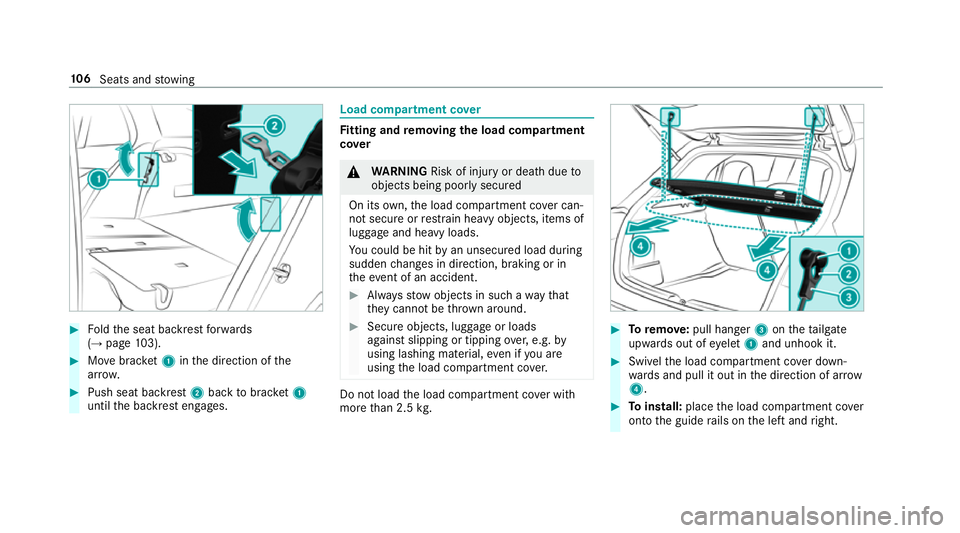
#
Foldthe seat backrest forw ards
(→ page 103). #
Movebrac ket1 inthe direction of the
ar row. #
Push seat backrest 2back tobrac ket1
until the backrest engages. Load compartment co
ver Fi
tting and removing the load co mpartment
co ver &
WARNING Risk of inju ryor death due to
objects being poorly secured
On its own,the load compartment co ver can‐
not secure or restra in heavy objects, items of
luggage and heavy loads.
Yo u could be hit byan unsecured load during
sudden changes in direction, braking or in
th eev ent of an accident. #
Alw aysstow objects in such a wayth at
th ey cannot be thro wn around. #
Secure objects, luggage or loads
against slipping or tipping over,e.g. by
using lashing material, even if you are
using the load compartment co ver. Do not load
the load compartment co ver with
more than 2.5 kg. #
Toremo ve:pull hanger 3ontheta ilgate
upwards out of eyelet1 and unhook it. #
Swivel the load compartment co ver down‐
wa rds and pull it out in the direction of ar row
4 . #
Toinstall: placethe load compartment co ver
onto the guide rails on the left and right. 106
Seats and stowing
Page 113 of 609
Opening or closing
thesto wage space under
th e load compa rtment floor &
WARNING Risk of inju rydue toan open
load compartment floor
If yo u drive when the load compartment floor
is open, objects could be thro wn around and
th ereby strike vehicle occupants. There is a
ri sk of injur y,particular lyin theeve nt of sud‐
den braking or a sudden change in direction. #
Alw ays close the load compartment
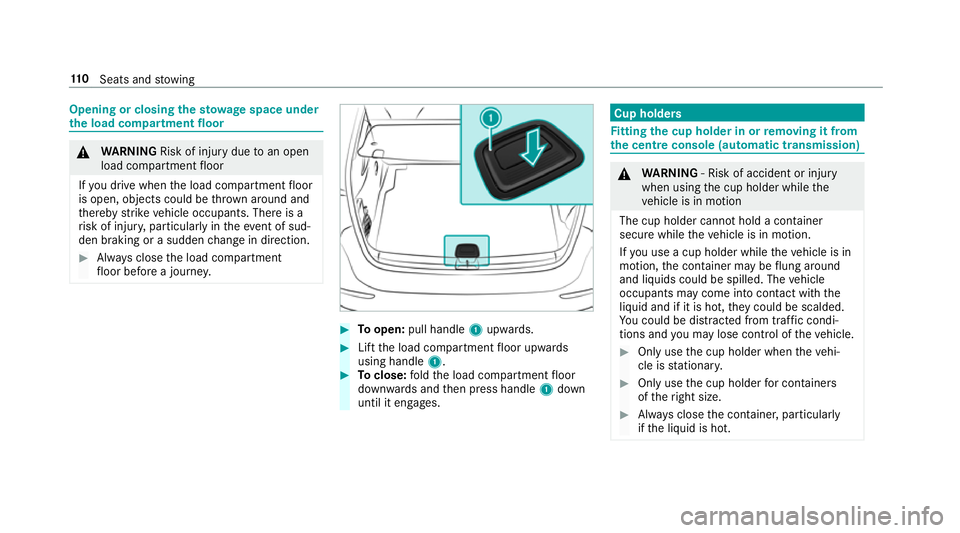
fl oor before a journe y. #
Toopen: pull handle 1upwards. #
Lift the load compartment floor upwards
using handle 1. #
Toclose: fold the load compartment floor
down wards and then press handle 1down
until it engages. Cup holders
Fi
tting the cup holder in or removing it from
the centre console (au tomatic transmission) &
WARNING ‑ Risk of accident or inju ry
when using the cup holder while the
ve hicle is in motion
The cup holder cannot hold a container
secure while theve hicle is in motion.
If yo u use a cup holder while theve hicle is in
motion, the conta iner may be flung around
and liquids could be spilled. The vehicle
occupants may come into contact with the
liquid and if it is hot, they could be scalded.
Yo u could be distracted from traf fic condi‐
tions and you may lose cont rol of theve hicle. #
Only use the cup holder when theve hi‐
cle is stationar y. #
Only use the cup holder for containers
of theright size. #
Alw ays close the conta iner, particularly
if th e liquid is hot. 11 0
Seats and stowing
Page 115 of 609
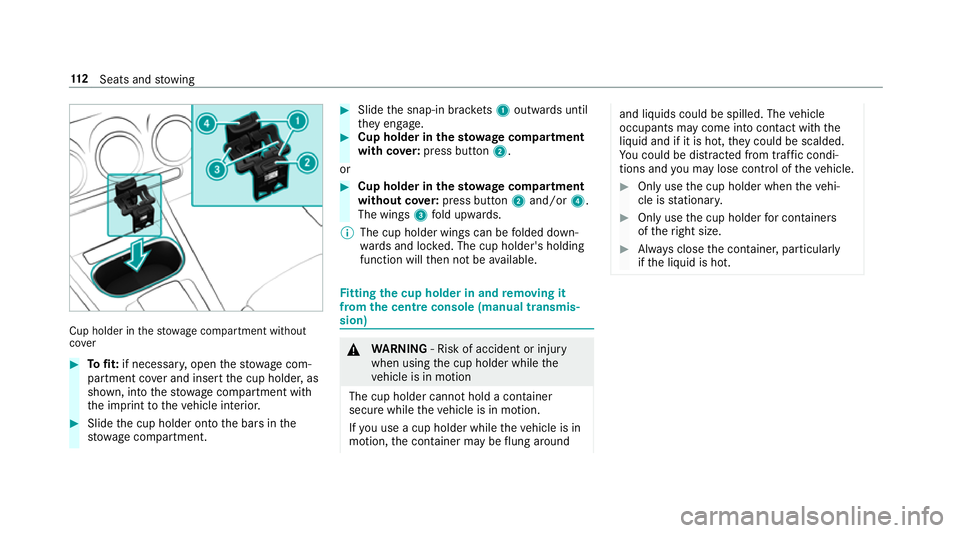
Cup holder in
thestow age compartment without
co ver #
Tofit: if necessar y,open thestow age com‐
partment co ver and insert the cup holder, as
shown, into thestow age compartment with
th e imprint totheve hicle interior. #
Slide the cup holder onto the bars in the
stow age compartment. #
Slide the snap-in brac kets 1 outwards until
th ey engage. #
Cup holder in thesto wage compa rtment
with co ver:press but ton2.
or #
Cup holder in the stowage compa rtment
without co ver:press but ton2 and/or 4.
The wings 3fold upwards.
% The cup holder wings can be folded down‐
wa rds and loc ked. The cup holder's holding
function will then not be available. Fi
tting the cup holder in and removing it
from the centre console (manual transmis‐
sion) &
WARNING ‑ Risk of accident or inju ry
when using the cup holder while the
ve hicle is in motion
The cup holder cannot hold a container
secure while theve hicle is in motion.
If yo u use a cup holder while theve hicle is in
motion, the conta iner may be flung around and liquids could be spilled. The
vehicle
occupants may come into contact with the
liquid and if it is hot, they could be scalded.
Yo u could be distracted from traf fic condi‐
tions and you may lose cont rol of theve hicle. #
Only use the cup holder when theve hi‐
cle is stationar y. #
Only use the cup holder for containers
of theright size. #
Alw ays close the conta iner, particularly
if th e liquid is hot. 11 2
Seats and stowing
Page 116 of 609
#
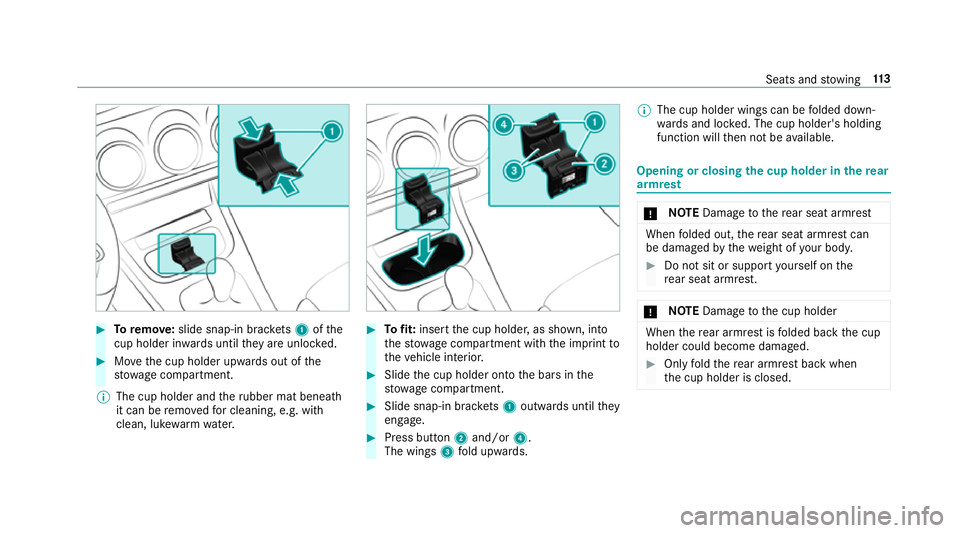
Toremo ve:slide snap-in brac kets 1 ofthe
cup holder in wards until they are unlo cked. #
Movethe cup holder upwards out of the
stow age compartment.
% The cup holder and theru bber mat beneath
it can be remo vedfo r cleaning, e.g. with
clean, luk ewarmwate r. #
Tofit: inse rtthe cup holder, as shown, into
th estow age compartment with the imprint to
th eve hicle interior. #
Slide the cup holder onto the bars in the
stow age compartment. #
Slide snap-in brac kets 1 outwards until they
engage. #
Press button 2and/or 4.
The wings 3fold upwards. %
The cup holder wings can be folded down‐
wa rds and loc ked. The cup holder's holding
function will then not be available. Opening or closing
the cup holder in there ar
armrest *
NO
TEDama getothere ar seat armrest When
folded out, there ar seat armrest can
be damaged bythewe ight of your body. #
Do not sit or suppo rtyo urself on the
re ar seat armrest. *
NO
TEDama getothe cup holder When
there ar armrest is folded back the cup
holder could become damaged. #
Only fold there ar armrest back when
th e cup holder is closed. Seats and
stowing 11 3
Page 117 of 609
#
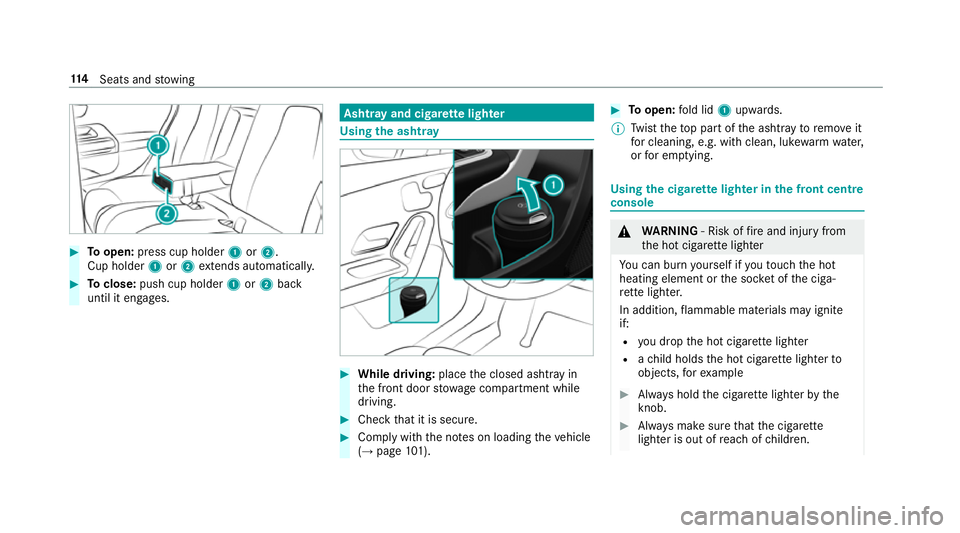
Toopen: press cup holder 1or2.
Cup holder 1or2 extends au tomatical ly. #
Toclose: push cup holder 1or2 back
until it engages. Asht
ray and cigar ette lighter Using
the ashtr ay #
While driving: placethe closed ashtray in
th e front door stowage compartment while
driving. #
Check that it is secure. #
Comply with the no tes on loading theve hicle
(→ page 101). #
Toopen: fold lid 1upwards.
% Twist theto p part of the ashtray toremo veit
fo r cleaning, e.g. with clean, luk ewarmwate r,
or for em ptying. Using
the cigar ette lighter in the front centre
console &
WARNING ‑ Risk of fire and injury from
th e hot cigar ette lighter
Yo u can burn yourself if youto uch the hot
heating element or the soc ket of the ciga‐
re tte lighter.
In addition, flammable materials may ignite
if:
R you drop the hot cigar ette lighter
R ach ild holds the hot cigar ette lighter to
objects, forex ample #
Alw ays hold the cigar ette lighter bythe
knob. #
Alw ays make sure that the cigar ette
lighter is out of reach of children. 11 4
Seats and stowing