MERCEDES-BENZ AMG GT 4-DOOR COUPE 2019 Owner's Manual
Manufacturer: MERCEDES-BENZ, Model Year: 2019, Model line: AMG GT 4-DOOR COUPE, Model: MERCEDES-BENZ AMG GT 4-DOOR COUPE 2019Pages: 530, PDF Size: 45.15 MB
Page 411 of 530
#
Onlyuse tiretypes that have been
appr ovedfo rth emaximum road spee d
se tand theve hicle. No
teson rotat ing whee ls &
WARNIN GRisk ofinju rythro ugh differ‚Äź
ent whee lsizes
Int erch ang ingthefront and rear wheels ifth e
wheels ortires have differe nt dimens ions
ma yse verely im pa irth edr iving charact eris‚Äź
tic s.
The wheel brak es orwheel suspension com ‚Äź
pon entsma yalso bedamag ed. #
Rotate front and rear wheels onlyifth e
wheels andtires areof thesame dimen‚Äź
sions. The
wearpat tern son thefront and rear wheels
dif fer:
R Front wheels wearmor eon theshoulder of
th etir e R
Rear wheels wearmor ein thecent erofthe
tir e
On vehicles that have thesame sizefront and
re ar wheels ,ro tat eth ewheels accordingtothe
int erva ls in thetir emanuf acturer'swarrant y
book inyour vehicle documents. Ifth is isno t
av ailable, rotate thetir es every
3,000 to6,000 miles(5 ,000 to10,000 km),
dependin gon thewe ar.En sur eth at thedir ect ion
of rotatio nis ma intained .
It is im pe rativ eto obser vetheins truction sand
saf etyno teson "Wheel chang e"when doingso. No
teson stor ing wheels R
Afterre mo ving whee ls,stor eth em inacool,
dr yand prefer ably darkplace.
R Protect thetir es from contact with oil, grease
or fuel. Ov
ervie wof thetir e-c han getool kit Apar
tfr om some country- specif icvariant s,vehi‚Äź
cles areno teq uipped withatir e-c hang eto ol kit. Fo
rmor einf ormation onwhi chtire-c hangeto ols
ar ere qu ired and appr ovedfo rper form ing a
wheel chang eon your vehicle, consult aqu alif ied
spec ialistwo rkshop.
Yo ure qu ire th efo llo wing tools, forins tance, to
ch ang eawheel:
R Jack
R Choc k
R Lugwr enc h
R Alignmen tbolt
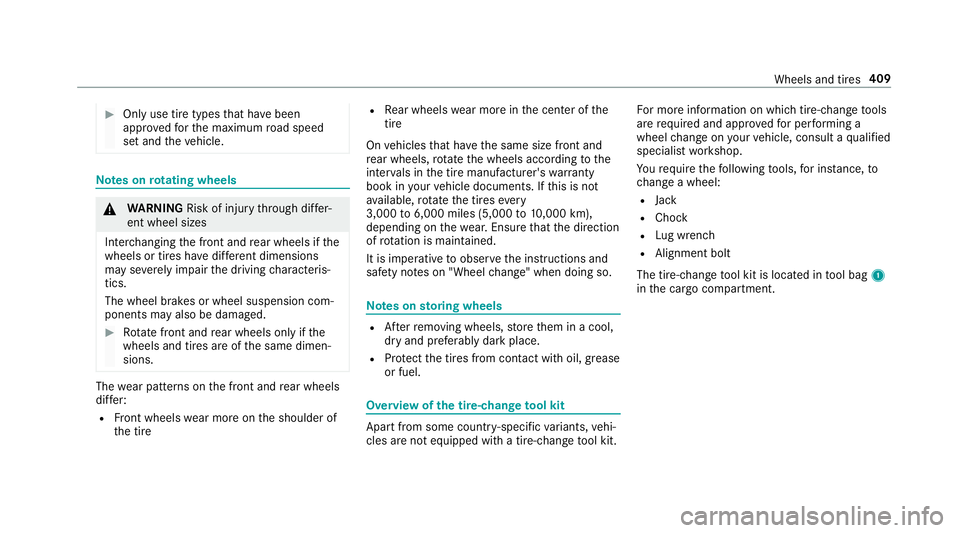
The tire-c hang eto ol kit islocat edintool bag 1
in thecar gocom partmen t. Wheels
andtires 409
Page 412 of 530
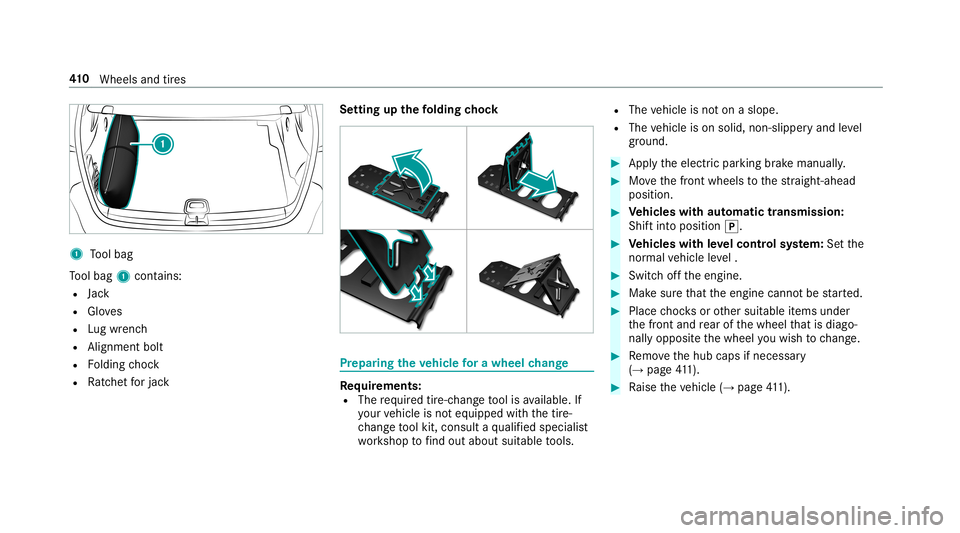
1
Tool bag
To ol bag 1cont ains:
R Jack
R Gloves
R Lugwr enc h
R Alignmen tbolt
R Folding choc k
R Ratche tfo rjac k Se
tting upthefo lding chock Pr
epa ring theve hicl efo ra wh eelch ang e Re
quirement s:
R The requ ired tire-c hang eto ol isavailable. If
yo ur vehicle isno teq uipped withth etir e-
ch ang eto ol kit, consult aqu alif ied spec ialist
wo rkshop tofind outab ou tsu itab letools. R
The vehicle isno ton aslope.
R The vehicle ison solid, non-slipper yand leve l
gr ou nd . #
Apply theelectr icpar king brak emanually . #
Movethefront wheels tothest ra ight -ahead
posit ion. #
Vehicl eswith automatic transmiss ion:
Shif tint oposi tion 005D. #
Vehicl eswith leve lcontr olsystem: Setth e
nor malve hicle leve l. #
Swit choffth eengine. #
Mak esur eth at theengine cannotbe star ted. #
Place choc ks orother suitable items under
th efront and rear ofthewheel that isdiago‚Äź
nall yoppos ite th ewheel youwish tochang e. #
Remo vethehub caps ifneces sary
(‚Üí pag e41 1). #
Raise theve hicle (‚Üípag e41 1). 41
0
Wheels andtires
Page 413 of 530
Re
mo ving and inst alli ng hub caps Re
quirement s:
R The vehicle isprepar edfora whee lch ang e
(‚Üí pag e41 0).
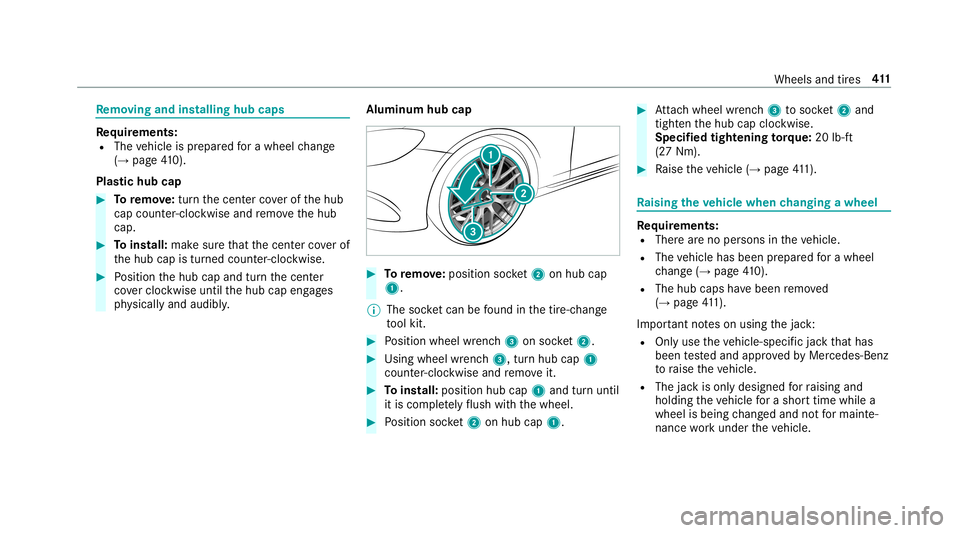
Plas tichub cap #
Toremo ve:tur nth ecent ercoverof thehub
cap count er-cloc kwise andremo vethehub
cap. #
Toins tall: makesur eth at thecent ercoverof
th ehub capistur ned count er-cloc kwise. #
Position thehub capand turnth ecent er
co vercloc kwise untilthehub capengages
ph ysicall yand audibly . Alum
inum hubcap #
Toremo ve:po sitio nsoc ket2 onhubcap
1.
% The socketcan befound inthetir e-c hang e
to ol kit. #
Position wheel wrenc h3 onsoc ket2. #
Usingwheelwr enc h3, turnhu bcap 1
cou nter-clo ckwise andremo veit. #
Toins tall: posit ionhub cap1and turnunt il
it is com pletely flush withth ewheel. #
Position socket2 onhubcap 1. #
Attach wheel wrenc h3 tosoc ket2 and
tig hten thehub capclockwise.
Specif iedtight ening torq ue: 20lb-ft
(2 7Nm). #
Raise theve hicle (‚Üípag e41 1). Ra
ising theve hicl ewhe nch angi ngawhe el Re
quirement s:
R Ther ear eno per sons intheve hicle.
R The vehicle hasbeen prepar edfora whee l
ch ang e(‚Üí pag e41 0).
R The hub caps have been remo ved
( ‚Üí pag e41 1).
Im po rtant noteson using thejac k:
R Onlyuse theve hicle-specif icjac kth at has
been tested and appr ovedby Mer cedes-Ben z
to raise theve hicle.
R The jackis onl ydesigned forra ising and
holdin gth eve hicle fora shor ttime whilea
whee lis being chang edand notfo rmaint e‚Äź
nance workund ertheve hicle. Wheels
andtires 41
1
Page 414 of 530
R
The jackmus tbe placed onafirm ,fl at and
no n-slip surface. Ifneces sary,use alar ge,
fl at, load- bearing,no n-slip unde rlay .
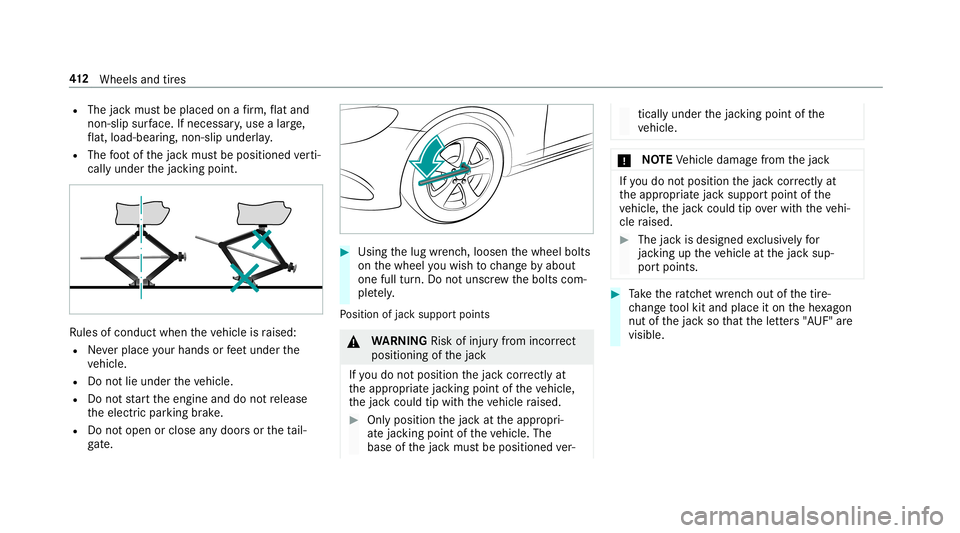
R The foot ofthejac kmus tbe position edverti‚Äź
call yunder thejac king point . Ru
les ofcon duct when theve hicle israised:
R Neverpla ceyour han dsorfeet und erthe
ve hicle.
R Donotlie under theve hicle.
R Donotst ar tth eengine anddonotre lease
th eelectr icpar king brak e.
R Donotopen orclose anydoor sor theta il‚Äź
ga te. #
Using thelug wrenc h,loosen thewheel bolts
on thewheel youwish tochang eby about
on efull turn.Do notuns crew thebolts com‚Äź
ple tely.
Po sition ofjac ksuppor tpoints &
WARNIN GRisk ofinju ryfrom incor rect
pos itioning ofthejac k
If yo udo notposi tionth ejac kcor rectl yat
th eappr opriatejac king point oftheve hicle,
th ejac kcould tipwithth eve hicle raised. #
Onlyposit ionthejac kat theappr opri‚Äź
at ejac king point oftheve hicle. The
base ofthejac kmus tbe position edver‚Äź tically
underthejac king point ofthe
ve hicle. *
NO
TEVehicle damag efrom thejac k If
yo udo notposi tionth ejac kcor rectl yat
th eappr opriatejac ksuppor tpoint ofthe
ve hicle, thejac kcould tipove rwit hth eve hi‚Äź
cle raised. #
The jackis design edexclu sively for
jac king uptheve hicle atthejac ksup‚Äź
por tpoint s. #
Take thera tche twrenc hou tof thetir e-
ch ang eto ol kit and place iton thehe xagon
nut ofthejac kso that theletter s"A UF" are
visible. 41
2
Wheels andtires
Page 415 of 530
#
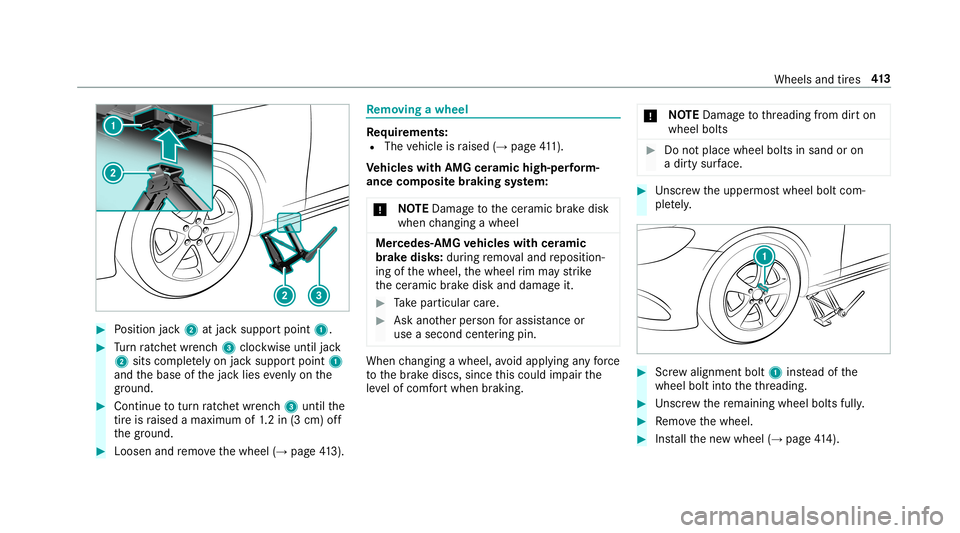
Position jack2 atjac ksuppor tpoint 1. #
Turn ratche twr enc h3 clockwise untiljac k
2 sitscom pletely on jacksuppor tpoint 1
and thebase ofthejac klies evenlyon the
gr ou nd . #
Con tinue totur nra tche twr enc h3 unti lth e
tir eis raised amaxim umof1.2 in (3 cm) off
th egr ound. #
Loosen andremo vethewheel (‚Üípag e41 3). Re
mo ving awh eel Re
quirement s:
R The vehicle israised (‚Üípag e41 1).
Ve hicl eswith AMG ceramic high-pe rfor m‚Äź
ance composit ebr aki ng system:
* NO
TEDama getothecer amic brak edisk
when chang ingawheel Mer
cedes -AMG vehicl eswith ceramic
br ak edis ks:dur ing remo valand reposition ‚Äź
ing ofthewheel, thewheel rim ma yst rike
th ecer amic brak edisk anddamag eit. #
Take par ticular care. #
Ask another per son forassi stanc eor
use asec ondcen tering pin. Whe
nch ang ingawheel, avoidapplyin gan yfo rc e
to thebr ak ediscs, sincethis could impair the
le ve lof com fort when brakin g. *
NO
TEDama getothre adin gfrom dirton
wheel bolts #
Donotplace wheel boltsin san dor on
a dir tysur face. #
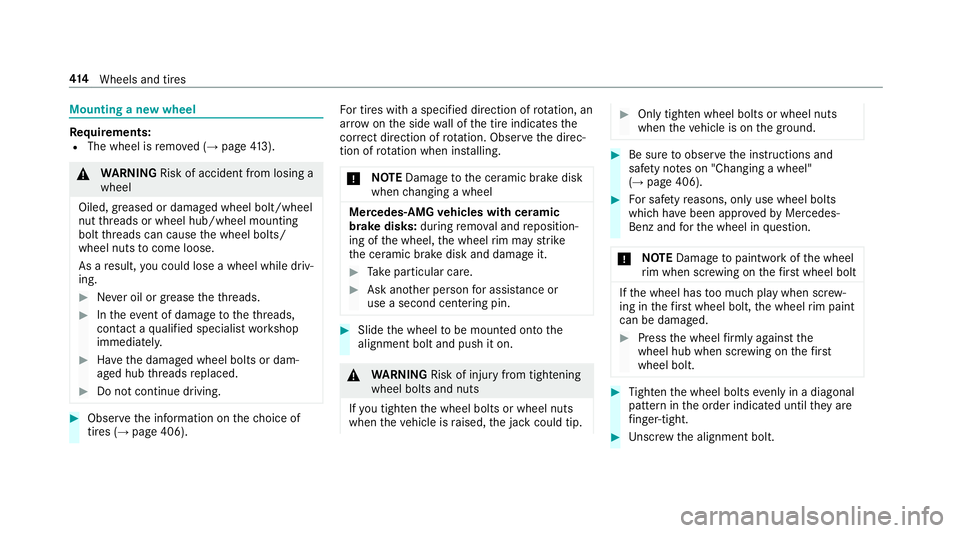
Unscr ew theupper mostwheel boltcom‚Äź
ple tely. #
Screw align mentbolt 1instead ofthe
wheel boltintoth eth re adin g. #
Unscr ew there maini ngwhee lbolts fully. #
Remo vethewheel. #
Installth ene wwheel (‚Üípag e41 4). Wh
eelsan dtir es 41
3
Page 416 of 530
Mountin
gane wwhe el Re
quirement s:
R The wheel isremo ved(‚Üí pag e41 3). &
WARNIN GRisk ofacci dent from losing a
whe el
Oil ed, grea sed ordamag edwhe elbol t/whe el
nut thre ads orwheel hub/wheel mounting
bolt thre ads can caus eth ewheel bolts/
wheel nutstocome loose.
As are sult, youco uld lose awheel whiledriv‚Äź
ing . #
Neveroil orgrease theth re ads. #
Intheeve ntofdamag eto theth re ads,
con tact aqu alif ied spec ialistwo rkshop
immediat ely. #
Have thedamag edwheel boltsordam‚Äź
ag ed hub thre ads replaced. #
Donotcon tinue driving. #
Obser vetheinf ormation onthech oice of
tir es (‚Üí pag e406). Fo
rtir es wit haspecif ieddirection ofrotatio n,an
ar row ontheside wallof thetir eindicat esthe
cor rect dire ction ofrotatio n.Ob serveth edir ec‚Äź
tion ofrotatio nwh en installing.
* NO
TEDama getothecer amic brak edisk
when chang ingawheel Mer
cedes -AMG vehicl eswith ceramic
br ak edis ks:dur ing remo valand reposition ‚Äź
ing ofthewheel, thewheel rim ma yst rike
th ecer amic brak edisk anddamag eit. #
Take par ticular care. #
Ask another per son forassi stanc eor
use asec ondcen tering pin. #
Slide thewheel tobe mount edont oth e
align mentbolt andpush iton . &
WARNIN GRisk ofinju ryfrom tight ening
whee lbol tsand nuts
If yo utig hten thewheel boltsorwheel nuts
when theve hicle israised, thejac kcould tip. #
Onlytight enwheel boltsorwheel nuts
when theve hicle ison thegr ound. #
Besureto obser vetheins truction sand
saf etyno teson "Cha nging awheel"
(‚Üí pag e406). #
Forsaf etyre ason s,on lyuse wheel bolts
whic hha ve been approvedby Mer cedes-
Benz andforth ewheel inqu estion .
* NO
TEDama getopaintw orkof thewheel
ri m when screwing onthefirs twh eelbo lt If
th ewheel hastoomuc hpla ywhen screw‚Äź
ing inthefirs twh eelbo lt, thewheel rim pai nt
can bedama ged. #
Press thewheel firm lyag ains tth e
wheel hubwhen screwing onthefirs t
wheel bolt. #
Tight enthewheel boltsevenlyin adi ag ona l
pa tter nin theor der indicat eduntil they are
fi ng er-tig ht. #
Unscr ew thealignment bolt. 41
4
Wheels andtires
Page 417 of 530
#
Tight enthelas twheel boltuntil itis fing er-
tig ht. #
Lowe rth eve hicle (‚Üípag e41 5). Lo
we ring theve hicl eaf te ra wh eelch ang e Re
quirement s:
R The newwheel hasbeen installed
(‚Üí pag e41 4). #
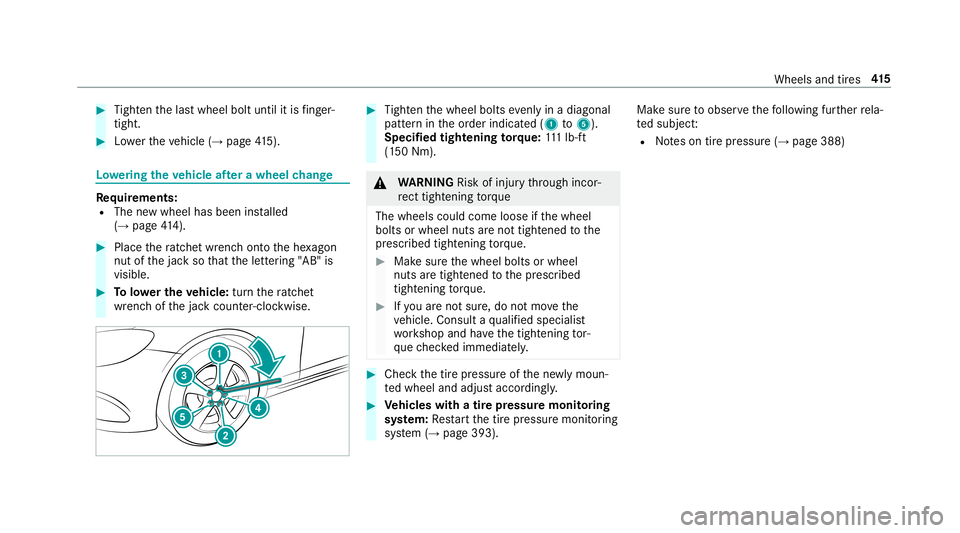
Placethera tche twr enc hont oth ehe xagon
nut ofthejac kso that theletter ing "AB" is
visible. #
Tolowe rthe vehicl e:tur nth era tche t
wr enc hof thejac kcount er-cloc kwise. #
Tight enthewheel boltsevenlyin adi ag ona l
pa tter nin theor der indicat ed(1 to5 ).
Specif iedtight ening torq ue: 111 lb-ft
(1 50 Nm). &
WARNIN GRisk ofinju rythro ugh incor‚Äź
re ct tigh tening torq ue
Th ewh eelscou ldcome looseifth ewheel
bolts orwheel nutsareno ttight ened tothe
pr escr ibed tighteningto rq ue. #
Makesur eth ewheel boltsorwheel
nuts aretight ened tothepr escr ibed
tight ening torq ue. #
Ifyo uar eno tsur e,do notmo vethe
ve hicle. Consult aqu alif ied spec ialist
wo rkshop andhave thetight ening tor‚Äź
qu ech eckedimmediat ely. #
Chec kth etir epr essur eof thene wlymoun‚Äź
te dwheel andadjus taccor dingly. #
Vehicl eswith atir epr ess uremonit oring
sy stem: Restar tth etir epr essur emonit oring
sy stem (‚Üípag e393). Mak
esur eto obser vethefo llo wing further rela‚Äź
te dsubjec t:
R Noteson tirepr essur e(‚Üí pag e388) Wheels
andtires 41
5
Page 418 of 530
No
teson tech nical data
The datast at ed onlyapplies tovehicles with
st andar deq uipme nt.Yo ucan obtain further
inf ormation from anaut hor ized Mercedes- Benz
Cent er. Ve
hicl eele ctroni cs Tw
o-w ayradio s No
teson installing two-w ayradio s &
WARNIN GRisk ofacci dent dueto
im proper workon two-w ayradios
The elect romagne ticradiation from two-w ay
ra dios caninterfere wit hth eon- boar delec‚Äź
tr onics ifRF transmit ters areman ipulat edor
re trof itt ed inco rrect ly.
This could jeopar dizetheoper ating safetyof
th eve hicle. #
Yousho uld have all workon electr ical
and electr oniccomponent scar ried out
at aqu alif ied spec ialistwo rkshop. &
WARNIN GRisk ofacci dent from incor ‚Äź
re ct ope ratio nof two-w ayradios
If yo uoper atetw o-wa yra dios incor rectl yin
th eve hicle, theelectr omagne ticradiation
could interfere wit hth eon- boar delectr onics,
e.g. :
R ifth etw o-w ayradio isno tcon nectedto
an exterior ant enna
R ifth eex terior ant enna isno tcor rectly
mou nted orisno tof low reflect ion
This could jeopar diestheoper ating safetyof
th eve hicle. #
Have thelow- reflect ion exterior
ant enna installed ataqu alif ied spec ial‚Äź
is two rkshop. #
When operating two-w ayradios inthe
ve hicle, alwaysconn ectthem tothe
lo w- reflect ion exterior ant enna. *
NO
TEInva lidation oftheoper ating per‚Äź
mit due tofailur eto com plywith the
ins truct ions forins tallation anduse The
oper atingper mit maybe inva lidat edif
th eins truction sfo rins tallation anduseof
tw o-w ayradios areno tobser ved. #
Onlyuse appr oved freq uency bands. #
Obser vethemaximum permissible out‚Äź
put powe rin these freq uency bands. #
Onlyuse appr oved ant enn aposition s. 41
6
Tech nica lda ta
Page 419 of 530
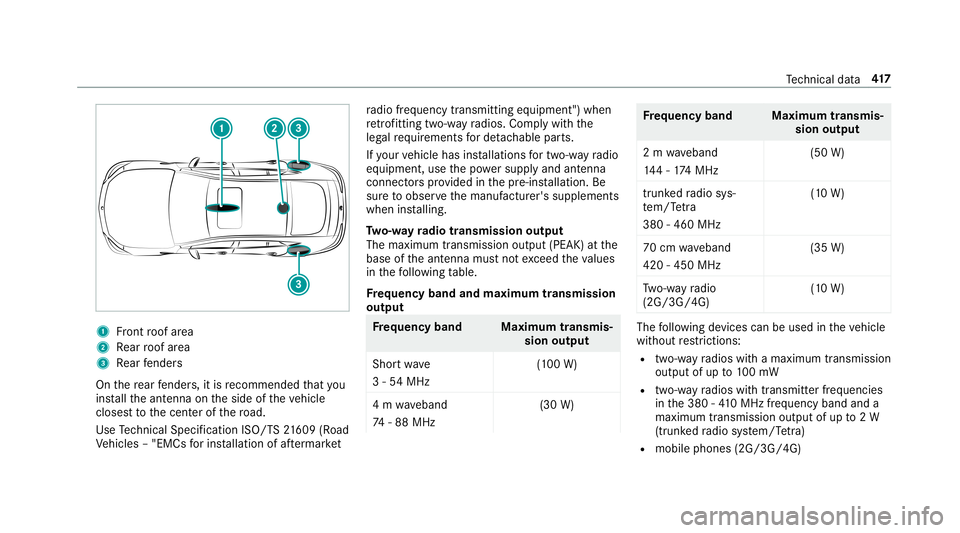
1
Front roof area
2 Rear roof area
3 Rear fende rs
On there ar fende rs,it is recomme ndedthat you
ins tallth eant enn aon theside oftheve hicle
closes tto thecent erofthero ad.
Use Tech nica lSpe cifica tionISO/T S21 609 (Road
Ve hicles ‚Äď"EMCs forins tallation ofafte rm arke t ra
dio freq uency transmit tingeq uipment ")when
re trof itti ng two-w ayradios. Complywithth e
leg alrequ iremen tsforde tach able parts.
If yo ur vehicle hasinstallation sfo rtw o-w ayradio
eq uipment ,use thepo we rsupp lyand antenn a
con nectors prov ided inthepr e-ins tallation .Be
sur eto obser vethemanuf acturer'ssupplement s
when installing.
Tw o-w ayradio transmi ssion output
The maxi mum transm ission outpu t(PEAK) atthe
base oftheant enn amus tno texc eed theva lues
in thefo llo wing table.
Fr eq uency bandandmaxim um transm ission
out put Fr
eq uency band Maximumtransm is‚Äź
sion output
Sho rtwa ve
3 -54 MHz (1
00 W)
4 m wav eband
74 -88 MHz (30
W) Fr
eq uency band Maximumtransm is‚Äź
sion output
2 m wav eband
14 4-17 4MHz (50
W)
tr unk edradio sys‚Äź
te m/T etra
380 -460 MHz (1
0 W)
70 cm wav eband
420 -450 MHz (35
W)
Tw o-w ayradio
(2G/3G/ 4G) (1
0 W) The
follo wing device scan beused intheve hicle
wit hout restrictions :
R two-w ayradios withamaximum transm ission
output ofup to100mW
R two-w ayradios withtra nsm itter freq uencies
in the380 -41 0MHz freq uency bandanda
maximu mtransmi ssionoutpu tof up to2W
(tr unk edradio system/T etra )
R mobil ephones (2G/3G/4G) Te
ch nica lda ta 41
7
Page 420 of 530
Ther
ear eno restrictions whenpos itioning the
ant enn aon theoutside oftheve hicle forth efo l‚Äź
lo wing wavebands:
R trunk edradio system/T etra
R 70cm wav eband
R 2G/3G/ 4G Ve
hicl eiden tificati onplat e,VIN and engine
number
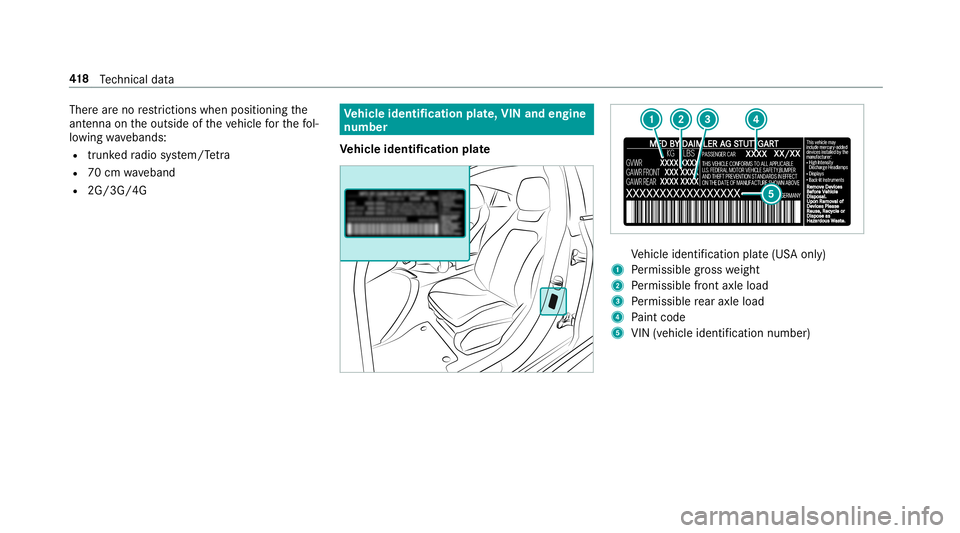
Ve hicl eiden tificati onplat e Ve
hicle identif ication plate(US Aonl y)
1 Perm issible gros swe ight
2 Perm issible front axle load
3 Perm issible rear axle load
4 Paint code
5 VIN (vehicle identificat ion numb er) 41
8
Tech nica lda ta