charging MERCEDES-BENZ AMG GT ROADSTER 2016 Owners Manual
[x] Cancel search | Manufacturer: MERCEDES-BENZ, Model Year: 2016, Model line: AMG GT ROADSTER, Model: MERCEDES-BENZ AMG GT ROADSTER 2016Pages: 289, PDF Size: 5.97 MB
Page 8 of 289
Hiding a service message .............. 237
Resetting the service interval dis-
play ................................................ 237
Service message ............................ 236
Special service requirements ......... 237
ATA (Anti-Theft Alarm system)
Activating/deactivating ................... 60
Function ........................................... 60
Switching off the alarm .................... 60
ATTENTION ASSIST
Activating/deactivating ................. 165
Display messag e............................ 185
Function/note s............................. 147
Authorised workshop
see Qualified specialist workshop
AUTO lights
Display message ............................ 182
see Lights
Automatic engine start (ECO start/
stop function) .................................... 106
Automatic engine switch-off (ECO
start/stop function) .......................... 105
Automatic front-passenger front
airbag deactivation system
Operation ......................................... 42
Problems ......................................... 45
System self-test ............................... 44
Automatic headlamp mode ................ 88
Automatic transmission
Accelerator pedal position ............. 112
Automatic drive program ............... 114
Changing gear ............................... 112
Display message ............................ 190
Double-clutch function .................. 112
Drive program display .................... 111
Driving tips .................................... 112
Emergency running mode .............. 117
Gliding mod e................................. 112
Kickdown ....................................... 112
Manual drive progra m.................... 114
Manual mod e................................. 115
Oil temperature (on-board com-
puter) ............................................. 167
Overview ........................................ 109
Problem (fault) ............................... 117
Pulling away ................................... 104
Rocking the vehicle free ................ 112
Starting the engine ........................ 104 Steering wheel gearshift paddle
s... 113
Transmission position display ........ 111
Transmission positions .................. 111
Automatic transmission emer-
gency running mode ......................... 117 B
Back button ....................................... 206
BAS (Brake Assist System) ................. 54
Battery (key)
Checking .......................................... 66
Important safety notes .................... 66
Replacing ......................................... 66
Battery (vehicle)
Charging ........................................ 252
Display message ............................ 184
Important safety notes .................. 250
Jump starting ................................. 253
Belt
see Seat belts
Belt tensioner
Activation ......................................... 46
Blind Spot Assist
Activating/deactivating (on-
board computer) ............................ 165
Display message ............................ 186
Notes/function .............................. 151
Bluetooth ®
Connecting a different mobile
phone ............................................ 212
Searching for a mobile phone ........ 211
See also Digital Owner's Manua l... 205
Telephony ...................................... 211
Bonnet
Closing ........................................... 233
Display message ............................ 192
Important safety notes .................. 232
Opening ......................................... 232
Boot load (maximum) ........................ 281
Boot separator ................................... 218
Brake
EBD .................................................. 60
Brake Assist
see BAS (Brake Assist System)
Brake fluid
Display message ............................ 176
Notes ............................................. 279 Index
5
Page 21 of 289
Connecting a Mobile phone (gen-
eral information) ............................ 211
Display message ............................ 193
Introduction ..................................
.162
Menu (on-board computer) ............ 162
Number from the phone book ....... .163
Redialling ....................................... 163
Rejecting/ending a call ................. 163
See also Digital Owner's Manual ... 205
Switching between mobile
phones .......................................... .212
Telephone compartment ................ 218
Telephone module with Bluetooth ®
(SAP profile) Activating and connecting the
module .......................................... .213
Charging a mobile phone .............. .215
Connecting the mobile phone ....... .214
Connecting the module via a USB
cable .............................................. 213
Data modem mode ........................ 214
Installing the module ..................... 213
Introduction ................................... 212
Saving/deleting the PIN for the
SIM card ........................................ 214
Settings ......................................... 214
SIM card mode .............................. 213
Text messages ............................... 215
Transferring the phone book .......... 214
Temperature
Coolant (display in the instrument
cluster) .......................................... 155
Engine oil (on-board computer) ...... 167
Outside temperature ..................... .155
Setting (climate control) .................. 97
Transmission oil (on-board com-
puter) ............................................. 167
TEMPOMAT
Function/notes ............................ .126
Text messages
Telephone module with Blue-
tooth ®
(SAP profile) ....................... 215
Timing (RACETIMER) ......................... 168
TIREFIT kit .......................................... 247
Important safety notes .................. 247
Storage location ............................ 246
Tyre pressure not reached ............. 249 Tyre pressure reached ................... 249
Total distance recorder .................... 157
Touchpad
Changing the station/music
track .............................................. 208
Character suggestions ................... 207
Deleting characters ....................... 207
Entering a space ............................ 207
Entering characters ....................... 207
Gesture control .............................. 206
Handwriting recognition ................ 207
Operating the touchpad ................. 206
Overview ........................................ 206
Quick access for audio .................. 208
Switching ....................................... 206
Switching input line ....................... 207
Tow-away protection
Activating ......................................... 61
Deactivating ..................................... 61
Function .......................................... .61
Tow-starting
Emergency engine starting ............ 259
Towing
Important safety notes .................. 256
Transporting the vehicle ................ 258
Towing away
Fitting the towing eye .................... 257
Removing the towing eye ............... 258
With both axles on the ground ....... 258
Towing eye ......................................... 246
Traffic Sign Assist
Activating/deactivating the warn-ing function .................................... 164
Display message ............................ 186
Function/note s............................. 148
Important safety notes .................. 149
Instrument cluster display ............. 149
Trailer towing
Lights display message .................. 182
Transmission
Driving tips .................................... 112
Selector lever ................................ 109
see Automatic transmission
Transmission position display ......... 111
Transmission positions .................... 111
Transporting the vehicle .................. 25818
Index
Page 94 of 289
In particular, the detection of obstacles can be
restricted if there is:
R poor visibility, e.g. due to fog, heavy rain or
snow
R dirt on the sensors or if the sensors are
obscured
Switching Adaptive Highbeam Assist
on/off X
To switch on: turn the light switch to the
à position.
X Press the combination switch beyond the
pressure point in the direction of arrow :.
The _ indicator lamp in the multifunction
display lights up when it is dark and the light
sensor switches on the dipped-beam head-
lamps.
If you are driving at speeds above approx-
imately 25 km/h:
The headlamp range is set automatically
depending on the distance between the vehi-
cle and other road users.
If you are driving at speeds above approx-
imately 30 km/h and no other road users are detected:
The main-beam headlamps are switched on
automatically. The Kindicator lamp in the
instrument cluster also lights up.
If you are driving at speeds below approx-
imately 25 km/h or other road users are
detected or the roads are adequately lit:
The main-beam headlamps are switched off
automatically. The Kindicator lamp in the
instrument cluster goes out. The _indi-
cator lamp in the multifunction display
remains lit.
X To switch off:move the combination switch
back to its normal position or move the light
switch to another position.
The _ indicator lamp in the instrument
cluster goes out. Headlamps misted up on the inside
Certain climatic and physical conditions may
cause moisture to form in the headlamp. This
moisture does not affect the functionality of the headlamp. Interior lighting
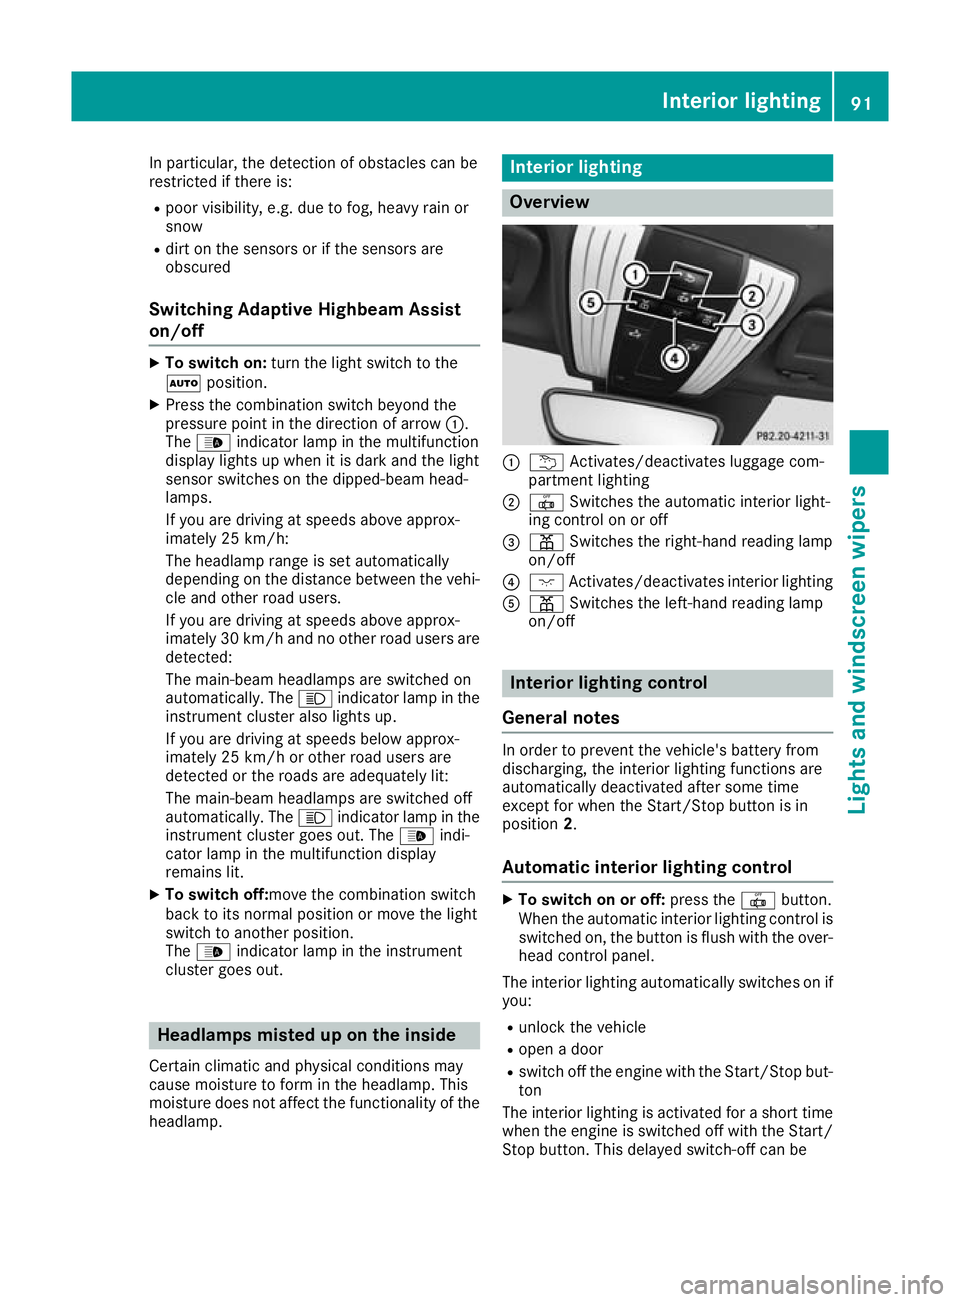
Overview
:
u Activates/deactivates luggage com-
partment lighting
; | Switches the automatic interior light-
ing control on or off
= p Switches the right-hand reading lamp
on/off
? c Activates/deactivates interior lighting
A p Switches the left-hand reading lamp
on/off Interior lighting control
General notes In order to prevent the vehicle's battery from
discharging, the interior lighting functions are
automatically deactivated after some time
except for when the Start/Stop button is in
position
2.
Automatic interior lighting control X
To switch on or off: press the|button.
When the automatic interior lighting control is
switched on, the button is flush with the over- head control panel.
The interior lighting automatically switches on if
you:
R unlock the vehicle
R open a door
R switch off the engine with the Start/Stop but-
ton
The interior lighting is activated for a short time when the engine is switched off with the Start/
Stop button. This delayed switch-off can be Interior lighting
91Lights and windscreen wipers Z
Page 125 of 289
In addition, at least one of the following condi-
tions must be fulfilled:
R there is a system malfunction
R the power supply is insufficient
R the vehicle is stationary for a lengthy period
The red !indicator lamp in the instrument
cluster lights up.
The electric parking brake is not automatically
applied if the engine is switched off by the ECO start/stop function.
Releasing automatically The electric parking brake of your vehicle is
released automatically when all the following
conditions are fulfilled:
R the engine is running
R the transmission is in position Dor R
R the seat belt is fastened
R you depress the accelerator pedal
If the transmission is in position R, the tailgate
must be closed.
If your seat belt is not fastened, the following
conditions must be fulfilled for the electric park- ing brake to be released automatically:
R the driver's door is closed
R you are shifting from transmission position P
or you have previously driven at speeds
greater than 3 km/h
Ensure that you do not depress the accelerator
pedal unintentionally. Otherwise, the parking
brake will be released and the vehicle will start
to move.
Emergency braking The vehicle can also be braked during an emer-
gency by using the electric parking brake.
X While driving, push handle :of the electric
parking brake (Y page 121).
The vehicle is braked as long as you keep
handle :of the electric parking brake
pressed. The longer electric parking brake
handle :is depressed, the greater the brak-
ing force. During braking:
R a warning tone sounds
R the Release parking brake
Release parking brake display mes-
sage appears
R the red !indicator lamp on the instrument
cluster flashes
When the vehicle has been braked to a stand-
still, the electric parking brake is applied. Parking up the vehicle
General notes If you leave the vehicle parked up for longer than
four weeks, the battery may be damaged by
exhaustive discharging.
If you leave the vehicle parked up for longer than
six weeks, it may suffer from lack of use.
X Contact a qualified specialist workshop and
seek advice.
i You can obtain information about trickle
chargers from a qualified specialist work-
shop.
Charge retention of the on-board elec-
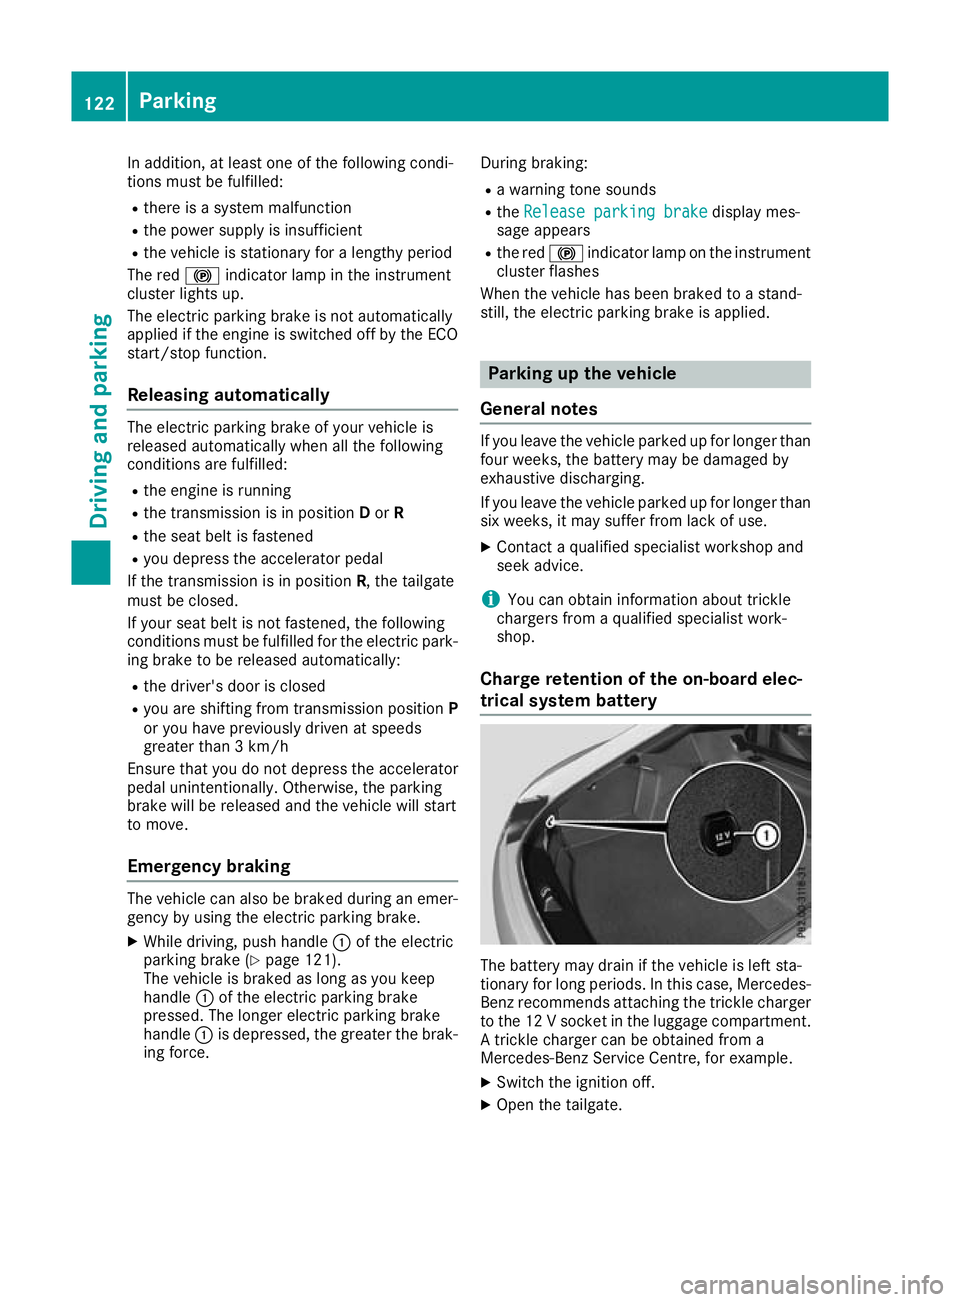
trical system battery The battery may drain if the vehicle is left sta-
tionary for long periods. In this case, Mercedes- Benz recommends attaching the trickle charger
to the 12 V socket in the luggage compartment. A trickle charger can be obtained from a
Mercedes-Benz Service Centre, for example.
X Switch the ignition off.
X Open the tailgate. 122
ParkingDriving and parking
Page 216 of 289
R
accessing the phone book of the mobile
phone (Y page 214)
R charging a mobile phone via the USB connec-
tion (Y page 215)
A list of compatible mobile phones can be found at:
http://www.mercedes-benz.com/connect
i The module is not available in all vehicles,
depending on the equipment.
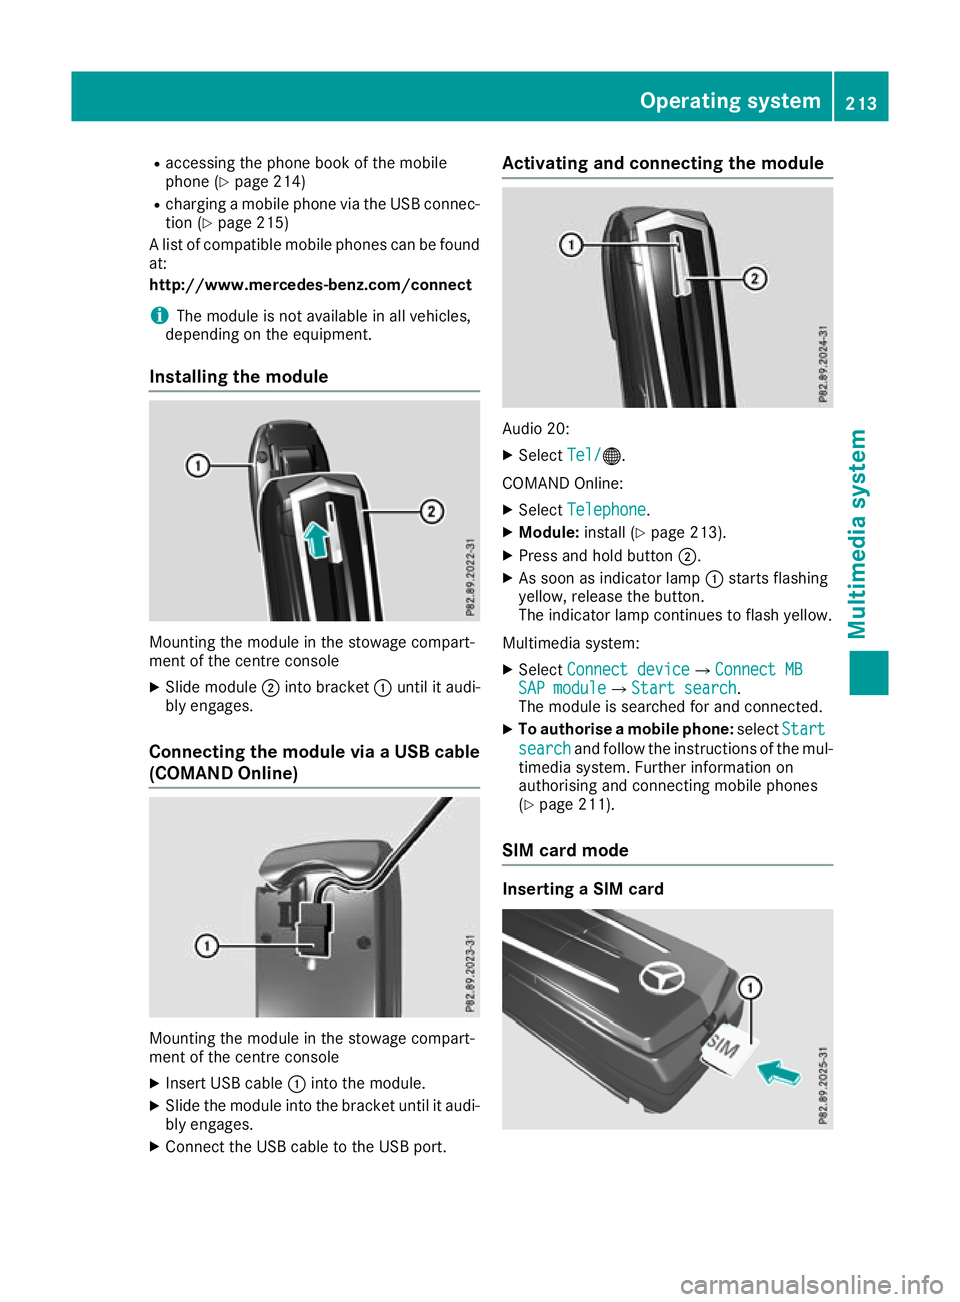
Installing the module Mounting the module in the stowage compart-
ment of the centre console
X Slide module ;into bracket :until it audi-
bly engages.
Connecting the module via a USB cable
(COMAND Online) Mounting the module in the stowage compart-
ment of the centre console
X Insert USB cable :into the module.
X Slide the module into the bracket until it audi-
bly engages.
X Connect the USB cable to the USB port. Activating and connecting the module
Audio 20:
X Select Tel/ Tel/®.
COMAND Online:
X Select Telephone
Telephone .
X Module: install (Y page 213).
X Press and hold button ;.
X As soon as indicator lamp :starts flashing
yellow, release the button.
The indicator lamp continues to flash yellow.
Multimedia system: X Select Connect device Connect device QConnect MBConnect MB
SAP module
SAP module QStart searchStart search .
The module is searched for and connected.
X To authorise a mobile phone: selectStart
Start
search
search and follow the instructions of the mul-
timedia system. Further information on
authorising and connecting mobile phones
(Y page 211).
SIM card mode Inserting a SIM card Operating system
213Multimedia system Z
Page 218 of 289
The transfer of data may take up to ten minutes.
Transmission occurs automatically after a Blue-
tooth ®
connection is automatically established.
Text messages Requirements
The module is connected with the mobile phone
(Y page 214) or is being used in the SIM card
mode (Y page 213).
Activating/deactivating text message
downloading from the mobile phone Dial number Function
00080 Text message down-
loading is deactiva-
ted.
00081 Text message down-
loading is activated.
For further information on receiving text mes-
sages when using the telephone module; see
Digital Owner's Manual.
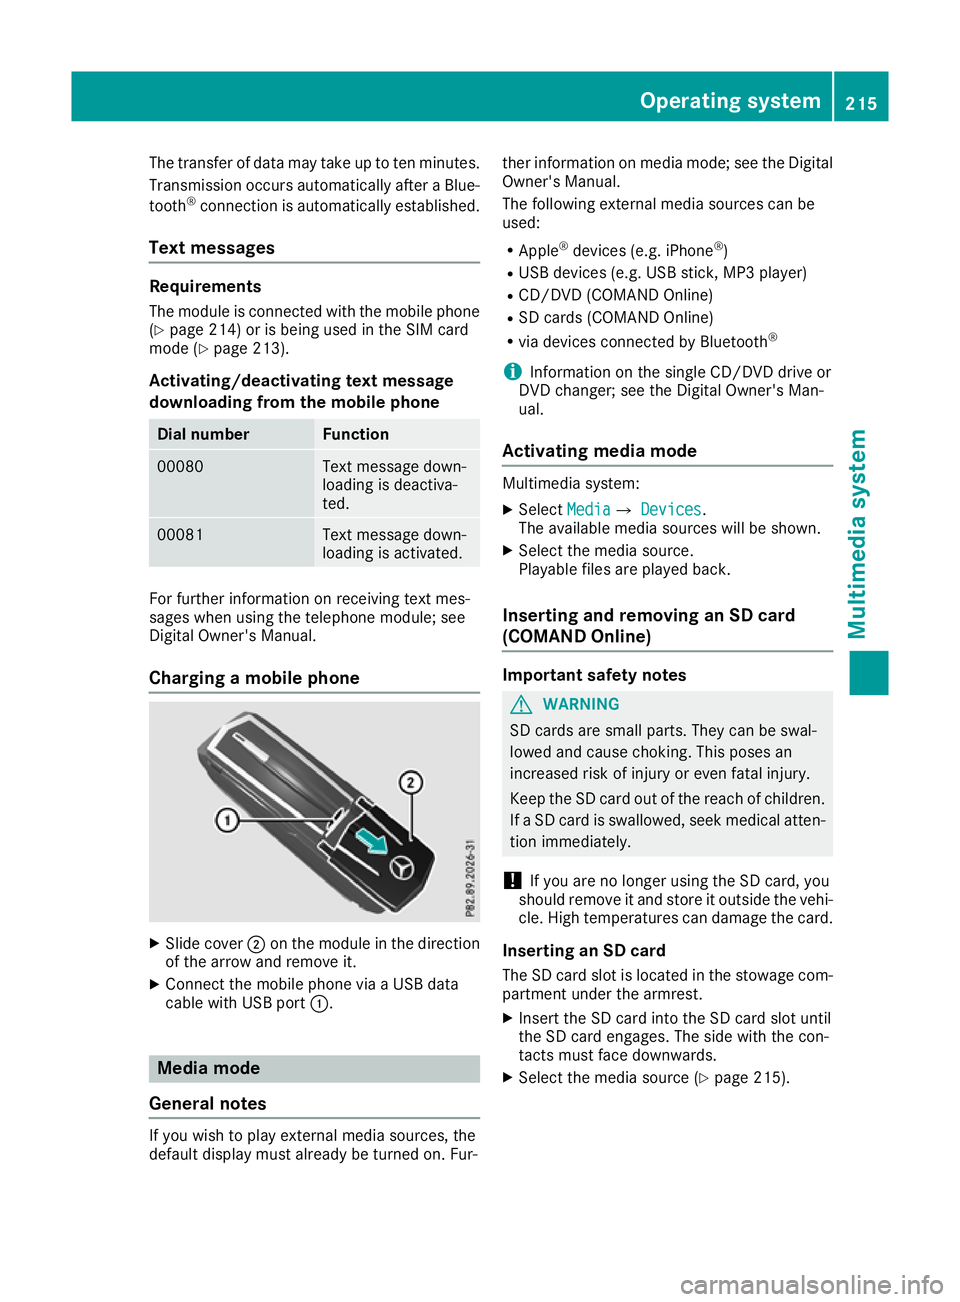
Charging a mobile phone X
Slide cover ;on the module in the direction
of the arrow and remove it.
X Connect the mobile phone via a USB data
cable with USB port :. Media mode
General notes If you wish to play external media sources, the
default display must already be turned on. Fur- ther information on media mode; see the Digital
Owner's Manual.
The following external media sources can be
used:
R Apple ®
devices (e.g. iPhone ®
)
R USB devices (e.g. USB stick, MP3 player)
R CD/DVD (COMAND Online)
R SD cards (COMAND Online)
R via devices connected by Bluetooth ®
i Information on the single CD/DVD drive or
DVD changer; see the Digital Owner's Man-
ual.
Activating media mode Multimedia system:
X Select Media MediaQ Devices
Devices.
The available media sources will be shown.
X Select the media source.
Playable files are played back.
Inserting and removing an SD card
(COMAND Online) Important safety notes
G
WARNING
SD cards are small parts. They can be swal-
lowed and cause choking. This poses an
increased risk of injury or even fatal injury.
Keep the SD card out of the reach of children. If a SD card is swallowed, seek medical atten-
tion immediately.
! If you are no longer using the SD card, you
should remove it and store it outside the vehi-
cle. High temperatures can damage the card.
Inserting an SD card
The SD card slot is located in the stowage com- partment under the armrest.
X Insert the SD card into the SD card slot until
the SD card engages. The side with the con-
tacts must face downwards.
X Select the media source (Y page 215). Operating system
215Multimedia system Z
Page 227 of 289
Using a mobile phone
To connect a mobile phone to the exterior aerial
and charge it, insert it into the mobile phone
bracket.
X Open the telephone compartment
(Y page 218).
X Place the mobile phone bracket into the pre-
installed fitting; see the separate installation
instructions for the mobile phone fitting.
X Insert the mobile phone into the mobile phone
bracket; see the separate installation instruc- tions for the mobile phone fitting.
i The mobile phone can also be operated
without being in the bracket. However, the
charging function and aerial function are not
available.
In order to use Bluetooth ®
(SAP profile) on your
telephone module, you must first insert the tele-
phone module into the pre-installed fitting. This connects it to the exterior aerial. If you wish to
charge the mobile phone, then you must con-
nect it to a USB port.
Further information on the telephone module
with Bluetooth ®
(SAP profile) can be found in the
Digital Owner's Manual.
Operating the mobile phone You can operate the telephone using the
6
and ~ buttons on the multifunction steering
wheel. You can operate other mobile phone
functions via the on-board computer
(Y page 162).
When you remove the key from the ignition lock, the mobile phone is disconnected from the vehi-cle. You can then no longer make calls using the
hands-free system.
If a call is active and you remove the key from
the ignition lock, the conversation is transferred over to the mobile phone. It is then possible to
continue the conversation on the mobile phone. Rear spoiler
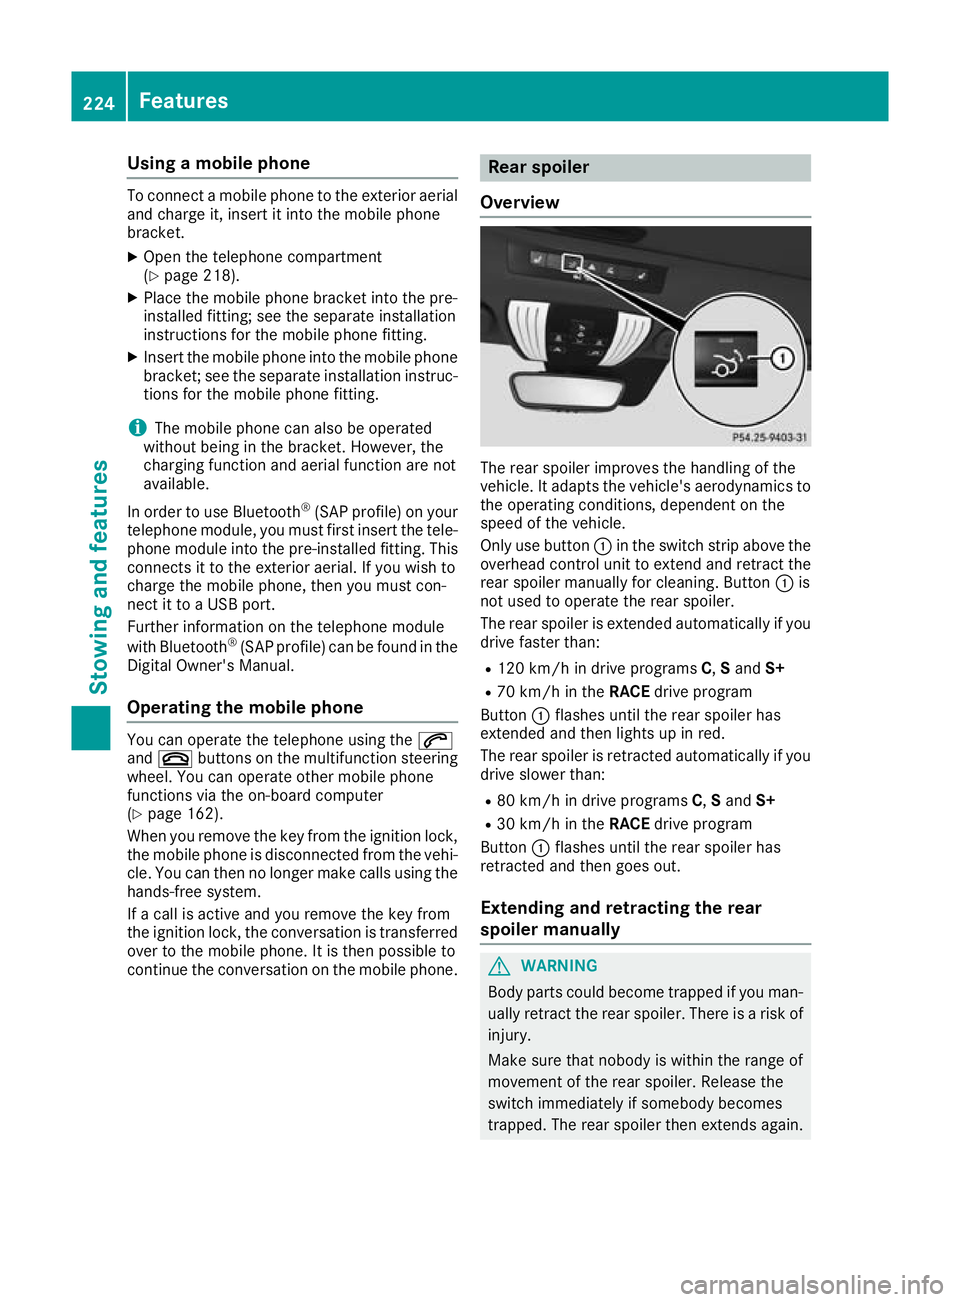
Overview The rear spoiler improves the handling of the
vehicle. It adapts the vehicle's aerodynamics to
the operating conditions, dependent on the
speed of the vehicle.
Only use button :in the switch strip above the
overhead control unit to extend and retract the
rear spoiler manually for cleaning. Button :is
not used to operate the rear spoiler.
The rear spoiler is extended automatically if you
drive faster than:
R 120 km/ hin drive programs C,Sand S+
R 70 km/h in the RACEdrive program
Button :flashes until the rear spoiler has
extended and then lights up in red.
The rear spoiler is retracted automatically if you
drive slower than:
R 80 km/h in drive programs C,Sand S+
R 30 km/h in the RACEdrive program
Button :flashes until the rear spoiler has
retracted and then goes out.
Extending and retracting the rear
spoiler manually G
WARNING
Body parts could become trapped if you man- ually retract the rear spoiler. There is a risk of
injury.
Make sure that nobody is within the range of
movement of the rear spoiler. Release the
switch immediately if somebody becomes
trapped. The rear spoiler then extends again. 224
FeaturesStowing and features
Page 254 of 289
All vehicles except vehicles with a lithium-
ion battery: G
WARNING
Electrostatic build-up can lead to the creation of sparks, which could ignite the highly explo-
sive gases of a battery. There is a risk of an
explosion.
Before handling the battery, touch the vehicle body to remove any existing electrostatic
build-up.
The highly flammable gas mixture is created
while the battery is charging and when jump-
starting.
Always make sure that neither you nor the bat-
tery is electrostatically charged. Electrostatic
charge is created, for example:
R by wearing synthetic-fibre clothing
R by friction between clothing and the seat
R if you pull or push the battery across carpet or
other synthetic materials
R if you rub the battery with a cloth G
WARNING
During the charging process, a battery produ- ces hydrogen gas. If a short circuit occurs or
sparks are created, the hydrogen gas can
ignite. There is a risk of an explosion.
R Make sure that the positive terminal of a
connected battery does not come into con- tact with vehicle parts.
R Never place metal objects or tools on a bat-
tery.
R It is important that you observe the descri-
bed order of the battery terminals when
connecting and disconnecting a battery.
R When jump-starting, make sure that the
battery poles with identical polarity are
connected.
R It is particularly important to observe the
described order when connecting and dis-
connecting the jump leads.
R Never connect or disconnect the battery
terminals while the engine is running. G
WARNING
Battery acid is caustic. There is a risk of injury. Avoid contact with the skin, eyes or clothing.
Do not breathe in any battery gases. Do not
lean over the battery. Keep the batteries out
of the reach of children. Immediately rinse off
battery acid thoroughly with plenty of clean
water and seek medical attention at once.
All vehicles: H
Environmental note Batteries contain pollutants.
It is illegal to dispose of them
with the household rubbish.
They must be collected sep-
arately and disposed of in anenvironmentally responsible
recycling system. Dispose of batteries in an
environmentally responsible
manner. Take discharged
batteries to a qualified spe-
cialist workshop or to a col-
lection point for used batter-
ies.
! Have the battery checked regularly at a
qualified specialist workshop.
Observe the service intervals in the Service
Booklet or contact a qualified specialist work- shop for more information.
! Always have work on the batteries carried
out at a qualified specialist workshop. Should
it, in exceptional circumstances, be abso-
lutely necessary to disconnect the 12-volt
battery yourself, please observe the follow-
ing:
R Secure the vehicle to prevent it from rolling
away.
R Switch off the ignition
R Disconnect the negative terminal first and
then the positive terminal
The transmission is locked in position Pafter
disconnecting the battery.
After the work is completed, securely refit the battery and the postive terminal cover. Battery (vehicle)
251Breakdown assistance Z
Page 255 of 289
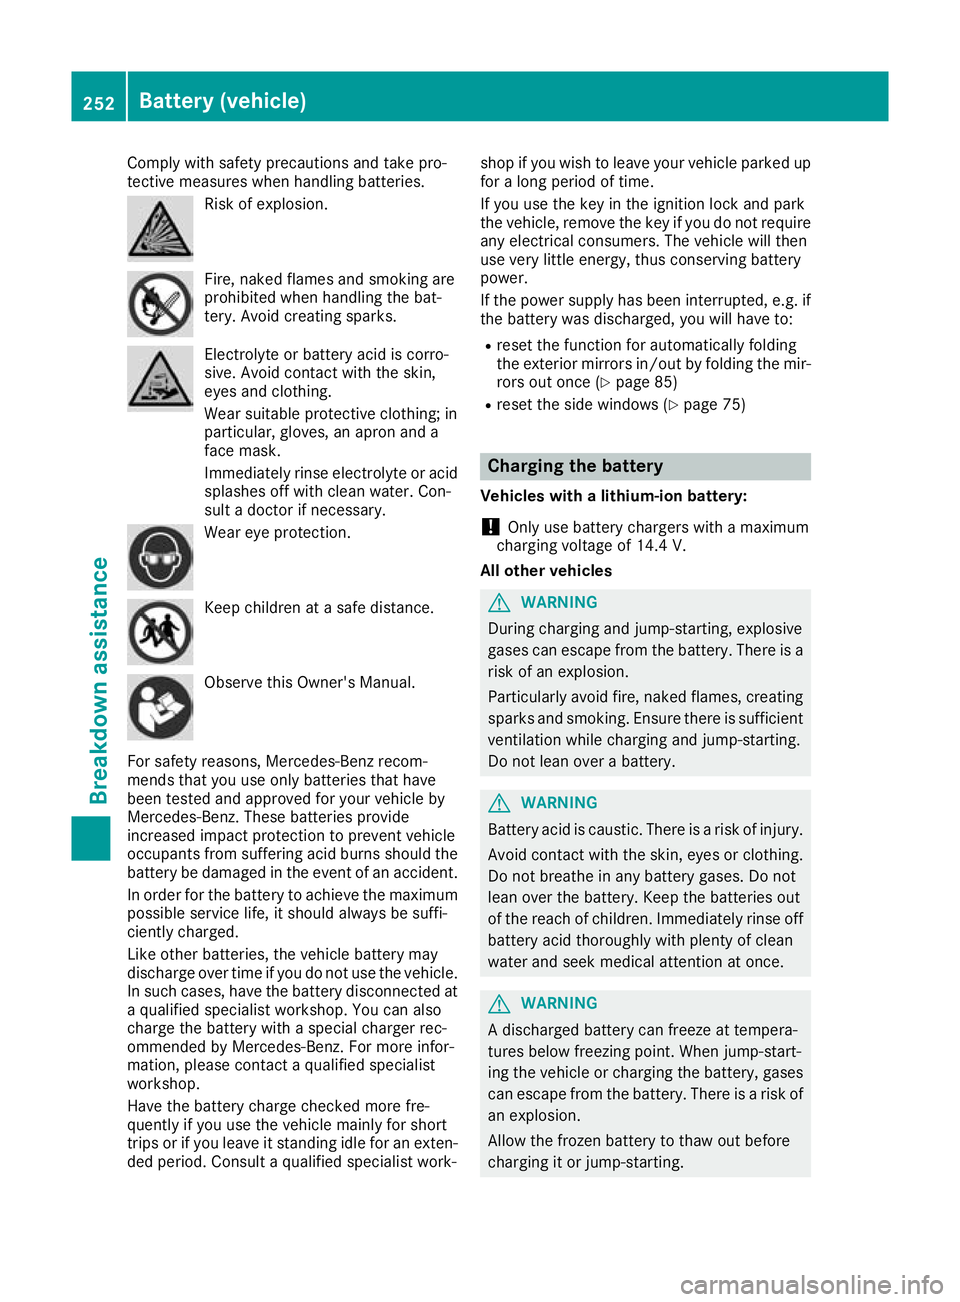
Comply with safety precautions and take pro-
tective measures when handling batteries. Risk of explosion.
Fire, naked flames and smoking are
prohibited when handling the bat-
tery. Avoid creating sparks.
Electrolyte or battery acid is corro-
sive. Avoid contact with the skin,
eyes and clothing.
Wear suitable protective clothing; in
particular, gloves, an apron and a
face mask.
Immediately rinse electrolyte or acid
splashes off with clean water. Con-
sult a doctor if necessary. Wear eye protection.
Keep children at a safe distance.
Observe this Owner's Manual.
For safety reasons, Mercedes-Benz recom-
mends that you use only batteries that have
been tested and approved for your vehicle by
Mercedes-Benz. These batteries provide
increased impact protection to prevent vehicle
occupants from suffering acid burns should the battery be damaged in the event of an accident.
In order for the battery to achieve the maximum possible service life, it should always be suffi-
ciently charged.
Like other batteries, the vehicle battery may
discharge over time if you do not use the vehicle.In such cases, have the battery disconnected ata qualified specialist workshop. You can also
charge the battery with a special charger rec-
ommended by Mercedes-Benz. For more infor-
mation, please contact a qualified specialist
workshop.
Have the battery charge checked more fre-
quently if you use the vehicle mainly for short
trips or if you leave it standing idle for an exten-
ded period. Consult a qualified specialist work- shop if you wish to leave your vehicle parked up
for a long period of time.
If you use the key in the ignition lock and park
the vehicle, remove the key if you do not require
any electrical consumers. The vehicle will then
use very little energy, thus conserving battery
power.
If the power supply has been interrupted, e.g. if
the battery was discharged, you will have to:
R reset the function for automatically folding
the exterior mirrors in/out by folding the mir-
rors out once (Y page 85)
R reset the side windows (Y page 75) Charging the battery
Vehicles with a lithium-ion battery:
! Only use battery chargers with a maximum
charging voltage of 14.4 V.
All other vehicles G
WARNING
During charging and jump-starting, explosive
gases can escape from the battery. There is a risk of an explosion.
Particularly avoid fire, naked flames, creating
sparks and smoking. Ensure there is sufficient
ventilation while charging and jump-starting.
Do not lean over a battery. G
WARNING
Battery acid is caustic. There is a risk of injury. Avoid contact with the skin, eyes or clothing.
Do not breathe in any battery gases. Do not
lean over the battery. Keep the batteries out
of the reach of children. Immediately rinse off
battery acid thoroughly with plenty of clean
water and seek medical attention at once. G
WARNING
A discharged battery can freeze at tempera-
tures below freezing point. When jump-start-
ing the vehicle or charging the battery, gases can escape from the battery. There is a risk of
an explosion.
Allow the frozen battery to thaw out before
charging it or jump-starting. 252
Battery (vehicle)Breakdown assistance
Page 256 of 289
!
Only use battery chargers with a maximum
charging voltage of 14.8 V.
All vehicles:
! Only charge the battery using the jump-start
connection point.
The jump-starting connection point is in the
engine compartment (Y page 253).
X Open the bonnet.
X Connect the battery charger to the positive
terminal and earth point in the same order as when connecting the donor battery in the
jump-starting procedure (Y page 253).
Keep away from fire and open flames. Do not
lean over the battery. Never charge the battery
if it is still fitted to the vehicle, unless you use a battery charger which has been tested and
approved by Mercedes-Benz. A battery charger
unit specially adapted for Mercedes-Benz vehi-
cles and tested and approved by Mercedes-
Benz is available as an accessory. This device
permits charging of the battery in position. Con- tact a Mercedes-Benz Service Centre for infor-
mation and availability. Read the battery charg-
er's operating instructions before charging the
battery.
All vehicles except vehicles with a lithium-
ion battery: if the indicator/warning lamps in
the instrument cluster do not light up at low
temperatures, it is very likely that the dis-
charged battery has frozen. In this case you may neither jump-start the vehicle nor charge the
battery. The service life of a battery that has
been thawed may be reduced. The starting char-
acteristics may be impaired, especially at low
temperatures. Have the thawed battery
checked at a qualified specialist workshop.
Vehicles with a lithium-ion battery: at low
temperatures, do not charge a battery which has
been removed using a battery charger. Allow the
battery to warm up gently first, if necessary.
Otherwise, the service life can be shortened and the starting characteristics impaired, especially at low temperatures. Jump-starting
For the jump-starting procedure, use only the jump-starting connection point, consisting of a pos- itive terminal and an earth point, in the engine compartment.
All vehicles except vehicles with a lithium-ion battery: G
WARNING
Battery acid is caustic. There is a risk of injury.
Avoid contact with the skin, eyes or clothing. Do not breathe in any battery gases. Do not lean over the battery. Keep the batteries out of the reach of children. Immediately rinse off battery acid
thoroughly with plenty of clean water and seek medical attention at once. G
WARNING
During charging and jump-starting, explosive gases can escape from the battery. There is a risk of an explosion.
Particularly avoid fire, naked flames, creating sparks and smoking. Ensure there is sufficient
ventilation while charging and jump-starting. Do not lean over a battery. G
WARNING
During the charging process, a battery produces hydrogen gas. If a short circuit occurs or sparks
are created, the hydrogen gas can ignite. There is a risk of an explosion.
R Make sure that the positive terminal of a connected battery does not come into contact with
vehicle parts.
R Never place metal objects or tools on a battery. Jump-starting
253Breakdown assistance
Z