oil temperature MERCEDES-BENZ AMG GT ROADSTER 2016 Owners Manual
[x] Cancel search | Manufacturer: MERCEDES-BENZ, Model Year: 2016, Model line: AMG GT ROADSTER, Model: MERCEDES-BENZ AMG GT ROADSTER 2016Pages: 289, PDF Size: 5.97 MB
Page 8 of 289
Hiding a service message .............. 237
Resetting the service interval dis-
play ................................................ 237
Service message ............................ 236
Special service requirements ......... 237
ATA (Anti-Theft Alarm system)
Activating/deactivating ................... 60
Function ........................................... 60
Switching off the alarm .................... 60
ATTENTION ASSIST
Activating/deactivating ................. 165
Display messag e............................ 185
Function/note s............................. 147
Authorised workshop
see Qualified specialist workshop
AUTO lights
Display message ............................ 182
see Lights
Automatic engine start (ECO start/
stop function) .................................... 106
Automatic engine switch-off (ECO
start/stop function) .......................... 105
Automatic front-passenger front
airbag deactivation system
Operation ......................................... 42
Problems ......................................... 45
System self-test ............................... 44
Automatic headlamp mode ................ 88
Automatic transmission
Accelerator pedal position ............. 112
Automatic drive program ............... 114
Changing gear ............................... 112
Display message ............................ 190
Double-clutch function .................. 112
Drive program display .................... 111
Driving tips .................................... 112
Emergency running mode .............. 117
Gliding mod e................................. 112
Kickdown ....................................... 112
Manual drive progra m.................... 114
Manual mod e................................. 115
Oil temperature (on-board com-
puter) ............................................. 167
Overview ........................................ 109
Problem (fault) ............................... 117
Pulling away ................................... 104
Rocking the vehicle free ................ 112
Starting the engine ........................ 104 Steering wheel gearshift paddle
s... 113
Transmission position display ........ 111
Transmission positions .................. 111
Automatic transmission emer-
gency running mode ......................... 117 B
Back button ....................................... 206
BAS (Brake Assist System) ................. 54
Battery (key)
Checking .......................................... 66
Important safety notes .................... 66
Replacing ......................................... 66
Battery (vehicle)
Charging ........................................ 252
Display message ............................ 184
Important safety notes .................. 250
Jump starting ................................. 253
Belt
see Seat belts
Belt tensioner
Activation ......................................... 46
Blind Spot Assist
Activating/deactivating (on-
board computer) ............................ 165
Display message ............................ 186
Notes/function .............................. 151
Bluetooth ®
Connecting a different mobile
phone ............................................ 212
Searching for a mobile phone ........ 211
See also Digital Owner's Manua l... 205
Telephony ...................................... 211
Bonnet
Closing ........................................... 233
Display message ............................ 192
Important safety notes .................. 232
Opening ......................................... 232
Boot load (maximum) ........................ 281
Boot separator ................................... 218
Brake
EBD .................................................. 60
Brake Assist
see BAS (Brake Assist System)
Brake fluid
Display message ............................ 176
Notes ............................................. 279 Index
5
Page 13 of 289
Checking the oil level using the
dipstick .......................................... 233
Checking the oil level using the
on-board computer ........................ 234
Display message ............................ 184
Filling capacity .............................. .279
Notes about oil grades ................... 279
Notes on oil level/consumption .... 233
Temperature (on-board com-
puter) ............................................. 167
Topping up ..................................... 234
Entering an address
See also Digital Owner's Manual ... 205
Environmental protection
Returning an end-of-life vehicle ....... 22
ESP ®
(Electronic Stability Pro-
gram)
AMG menu (on-board computer) ... 168
Characteristics ................................. 58
Deactivating/activating ................... 58
Display message ............................ 172
Function/notes ................................ 57
General notes .................................. 57
Important safety guidelines ............. 58
Warning lamp ................................. 197
ETS/4ETS (Electronic Traction Sys-
tem) ...................................................... 58
Exhaust pipe (cleaning instruc-
tions) ................................................. .242
Exterior lighting
Cleaning ......................................... 241
see Lights
Exterior mirrors
Adjusting ......................................... 84
Anti-dazzle mode (automatic) .......... 85
Folding in/out (automatically) ......... 85
Folding in/out (electrically) ............. 85
Out of position (troubleshooting) ..... 85
Parking position ............................... 86
Resetting ......................................... 85
Storing settings (memory func-
tion) ................................................. 87 F
Fault message see Display messages Favourites
Overview ........................................ 208
Features ............................................. 220
Filler cap
see Fuel filler flap
Fire extinguisher ............................... 245
First-aid kit ......................................... 245
Fitting a wheel
Fitting a wheel ............................... 271
Lowering the vehicle ...................... 272
Preparing the vehicle ..................... 268
Raising the vehicle ......................... 269
Removing a whee l.......................... 270
Securing the vehicle against roll-
ing away ........................................ 268
Flat tyre
Changing a wheel/fitting the
spare whee l................................... 267
Preparing the vehicle ..................... 247
TIREFIT kit ...................................... 247
see Emergency spare wheel
Floormat ............................................. 230
Frequencies
Garage door opener ....................... 228
Mobile phone ................................. 275
Two-way radio ................................ 275
Front-passenger front airbag deac-
tivation system
Operation ......................................... 42
Problems ......................................... 45
System self-test ............................... 44
Fuel
Additives ........................................ 279
Consumption statistics .................. 158
Displaying the current consump-
tion ................................................ 158
Displaying the range ...................... 158
Driving tip s.................................... 123
E10 ................................................ 278
Fuel gauge ....................................... 29
Grade (petrol) ................................ 278
Important safety notes .................. 277
Problem (malfunction) ................... 119
Refuelling ....................................... 117
Tank content/reserve fue l............. 278
Fuel filler flap
Closing ........................................... 118
General information ....................... 118 10
Index
Page 17 of 289
Restraint system introduction .......... 34
Restraint system warning lamp ........ 35
Seat belts ........................................ 36
Odometer .......................................... .157
Oil
see Engine oil
On-board computer
AMG menu ..................................... 167
Assistance graphic menu .............. .163
Assistance menu ........................... 164
Display messages .......................... 170
Displaying a service message ....... .237
DISTRONIC PLUS ........................... 136
Factory settings ............................ .166
G-Meter ......................................... 167
Important safety notes .................. 155
Instrument cluster menu .............. .165
Media menu ................................... 161
Menu overview .............................. 157
Message memory .......................... 171
Navigation menu ............................ 159
Operating video DVD ..................... 162
Operation ....................................... 156
RACETIMER ................................... 168
Radio menu ................................... 160
Service menu ................................. 164
Settings menu ............................... 164
Standard displa y............................ 157
Telephone menu ............................ 162
Trip menu ...................................... 157
Vehicle menu ................................. 166
Operating instructions
Vehicle equipment ........................... 23
Operating safety
Declaration of conformity ................ 24
Important safety note ...................... 23
Operating system
see On-board computer
Operation
Digital Owner's Manua l.................... 21
Outside temperature display ........... 155
Overhead control panel ...................... 32
Owner's Manual
Overview .......................................... 23 P
Paint code .......................................... 276 Paintwork (cleaning instructions)
... 239
Panic alarm .......................................... 34
Panorama roof ..................................... 77
Parking
Important safety notes .................. 119
Parking brake ................................ 121
Position of exterior mirror, front-
passenger side ................................. 86
Reversing camera .......................... 144
Switching off the engine ................ 120
see PARKTRONIC
Parking aid
see Exterior mirrors
see PARKTRONIC
Parking brake
Applying automaticall y................... 121
Applying or releasing manually ...... 121
Display message ............................ 174
Electric parking brake .................... 121
Emergency braking ........................ 122
General information ....................... 121
Releasing automaticall y................. 122
Warning lamp ................................. 199
Parking lamps
Display message ............................ 182
Switching on/of f.............................. 89
PARKTRONIC
Deactivating/activating ................. 143
Driving system ............................... 141
Function/note s............................. 141
Important safety notes .................. 141
Problem (fault) ............................... 143
Sensor rang e................................. 141
Warning display ............................. 142
PASSENGER AIR BAG
Display message ............................ 180
Indicator lamps ................................ 35
Problems (malfunctions) ................ 180
Petrol .................................................. 278
Pets in the vehicle ............................... 53
Phone book
See also Digital Owner's Manua l... 205
Plastic trim (cleaning instruc-
tions) .................................................. 242
Power windows
see Side windows 14
Index
Page 21 of 289
Connecting a Mobile phone (gen-
eral information) ............................ 211
Display message ............................ 193
Introduction ..................................
.162
Menu (on-board computer) ............ 162
Number from the phone book ....... .163
Redialling ....................................... 163
Rejecting/ending a call ................. 163
See also Digital Owner's Manual ... 205
Switching between mobile
phones .......................................... .212
Telephone compartment ................ 218
Telephone module with Bluetooth ®
(SAP profile) Activating and connecting the
module .......................................... .213
Charging a mobile phone .............. .215
Connecting the mobile phone ....... .214
Connecting the module via a USB
cable .............................................. 213
Data modem mode ........................ 214
Installing the module ..................... 213
Introduction ................................... 212
Saving/deleting the PIN for the
SIM card ........................................ 214
Settings ......................................... 214
SIM card mode .............................. 213
Text messages ............................... 215
Transferring the phone book .......... 214
Temperature
Coolant (display in the instrument
cluster) .......................................... 155
Engine oil (on-board computer) ...... 167
Outside temperature ..................... .155
Setting (climate control) .................. 97
Transmission oil (on-board com-
puter) ............................................. 167
TEMPOMAT
Function/notes ............................ .126
Text messages
Telephone module with Blue-
tooth ®
(SAP profile) ....................... 215
Timing (RACETIMER) ......................... 168
TIREFIT kit .......................................... 247
Important safety notes .................. 247
Storage location ............................ 246
Tyre pressure not reached ............. 249 Tyre pressure reached ................... 249
Total distance recorder .................... 157
Touchpad
Changing the station/music
track .............................................. 208
Character suggestions ................... 207
Deleting characters ....................... 207
Entering a space ............................ 207
Entering characters ....................... 207
Gesture control .............................. 206
Handwriting recognition ................ 207
Operating the touchpad ................. 206
Overview ........................................ 206
Quick access for audio .................. 208
Switching ....................................... 206
Switching input line ....................... 207
Tow-away protection
Activating ......................................... 61
Deactivating ..................................... 61
Function .......................................... .61
Tow-starting
Emergency engine starting ............ 259
Towing
Important safety notes .................. 256
Transporting the vehicle ................ 258
Towing away
Fitting the towing eye .................... 257
Removing the towing eye ............... 258
With both axles on the ground ....... 258
Towing eye ......................................... 246
Traffic Sign Assist
Activating/deactivating the warn-ing function .................................... 164
Display message ............................ 186
Function/note s............................. 148
Important safety notes .................. 149
Instrument cluster display ............. 149
Trailer towing
Lights display message .................. 182
Transmission
Driving tips .................................... 112
Selector lever ................................ 109
see Automatic transmission
Transmission position display ......... 111
Transmission positions .................... 111
Transporting the vehicle .................. 25818
Index
Page 105 of 289
!
Do not warm up the engine when the vehicle
is stationary. Drive off immediately. Avoid
high engine speeds and driving at full throttle
until the engine has reached its operating
temperature.
Only shift the automatic transmission to the
desired drive position when the vehicle is sta- tionary.
Where possible, avoid spinning the drive
wheels when pulling away on slippery roads.
You could otherwise damage the drive train.
! During a cold start with low engine oil tem-
peratures (below 0 †), the maximum engine
speed is restricted in order to protect the
engine. To protect the engine and maintain
smooth engine operation, avoid driving at full throttle when the engine is cold. Key positions
Start/Stop button General notes
All vehicles are equipped with a Start/Stop but-
ton.
The Start/Stop button is located on the centre
console and is illuminated when the vehicle is
unlocked.
The key must be in the vehicle.
Pressing the Start/Stop button several times in
succession corresponds to the different key
positions in the ignition lock. This is only the
case if you are not depressing the brake pedal.
If you depress the brake pedal and press the
Start/Stop button, the engine starts immedi-
ately.
A check which periodically establishes a radio
connection between the vehicle and the key
determines whether a valid key is in the vehicle. This occurs, for example, when starting the
engine.
If there is a key in the ignition lock, this takes
precedence over the KEYLESS-GO start func-
tion.
To start the vehicle without actively using the
key:
R the key must be in the vehicle
R the vehicle must not be locked with the key or
KEYLESS-GO (Y page 64) Do not keep the key:
R
with electronic devices, e.g. a mobile phone
or another key
R with metallic objects, e.g. coins or metal film
R inside metallic objects, e.g. a metal case
This can affect the key's functionality.
If you lock the vehicle with the key's remote
control or with KEYLESS-GO, after a short time:
R you will not be able to switch on the ignition
with the Start/Stop button
R you will not be able to start the engine with the
Start/Stop button until the vehicle is
unlocked again
If you lock the vehicle centrally using the button
on the driver's door (Y page 70), you can con-
tinue to start the engine with the Start/Stop
button.
The engine can be switched off while the vehicle is in motion by pressing and holding the Start/
Stop button for three seconds. This function
operates independently of the ECO start/stop
automatic engine switch-off function.
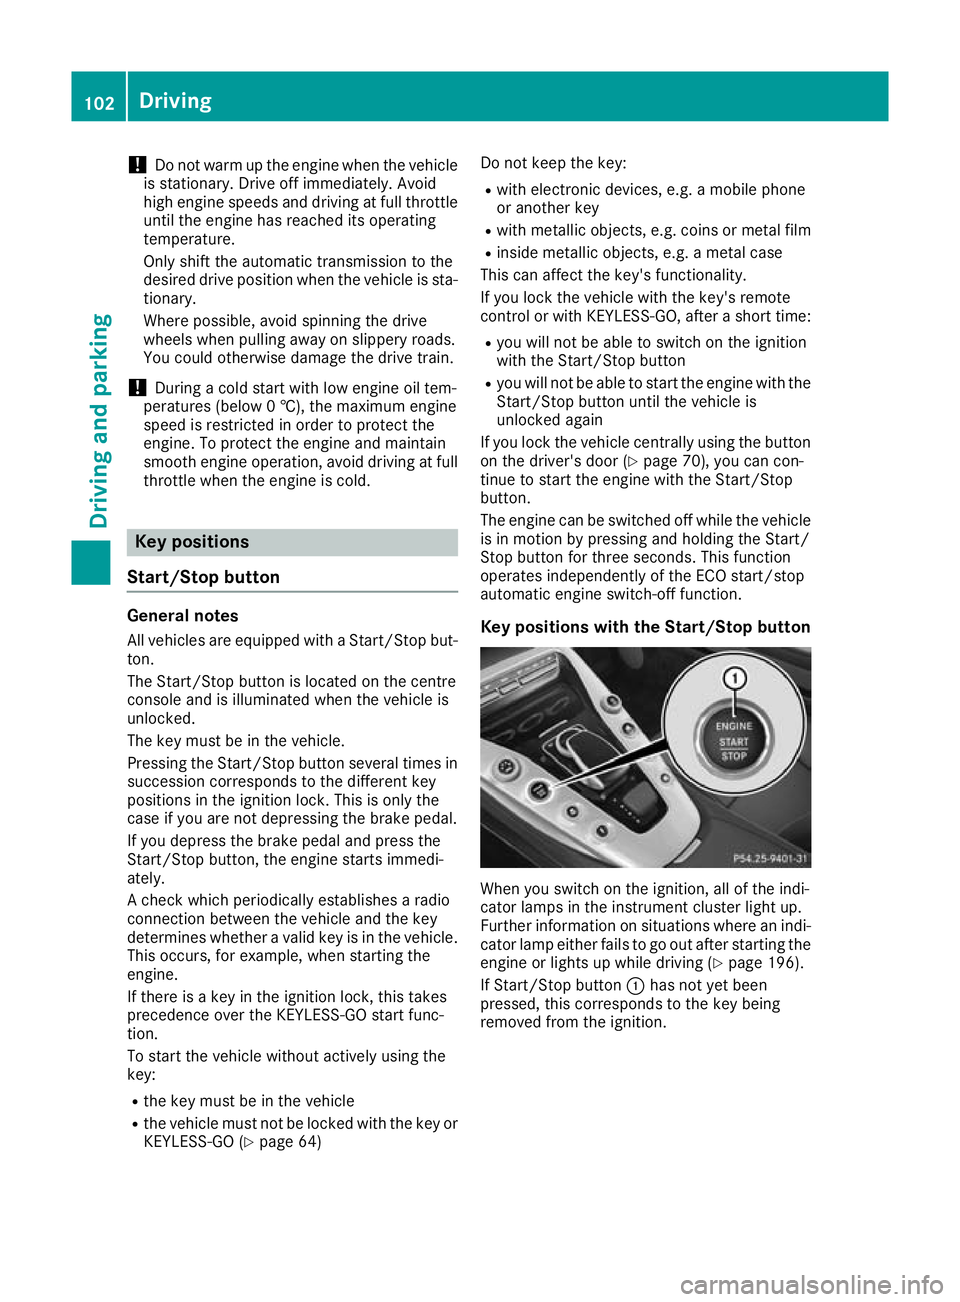
Key positions with the Start/Stop button When you switch on the ignition, all of the indi-
cator lamps in the instrument cluster light up.
Further information on situations where an indi-
cator lamp either fails to go out after starting the engine or lights up while driving (Y page 196).
If Start/Stop button :has not yet been
pressed, this corresponds to the key being
removed from the ignition. 102
DrivingDriving and parking
Page 142 of 289
i
After a short period, the vehicle is secured
by the electric parking brake, thus relieving
the service brake.
The electric parking brake secures the vehicle
automatically if the HOLD function is activated,
the vehicle is stationary and:
R the driver's seat belt is not fastened and the
driver's door is open
R the engine is switched off, unless it is auto-
matically switched off by the ECO start/stop
function
R a system fault occurs
R the power supply is insufficient
If the electric parking brake is not operational, a
horn will sound at regular intervals. The HOLD
function must then be deactivated.
If a malfunction occurs, the transmission may
also be shifted to position Pautomatically.
The Brake immediately Brake immediately message may also
appear in the multifunction display.
X Immediately depress the brake pedal firmly
until the warning message on the multifunc-
tion display goes out.
The HOLD function is deactivated. A horn will
sound at regular intervals if you turn off the
engine, take off your seat belt or open the driv-
er's door when the HOLD function is activated.
The horn alerts you to the fact that the HOLD
function is still activated. If you attempt to lock the vehicle, the tone becomes louder. The vehi-cle cannot be locked until you have deactivated
the HOLD function.
i Once you have switched off the engine, you
cannot restart it until you have deactivated
the HOLD function. RACE START
Important safety notes i
RACE START must not be used on normal
roads. RACE START must only be activated
and used on dedicated road circuits, outside
of public road use.
RACE START enables optimum acceleration
from a standing start. For this, a suitably high-
grip road surface is required, along with the
tyres and vehicle being in good condition. G
WARNING
If you use RACE START, individual tyres may
get into a spin and the vehicle could skid.
Depending on the selected ESP ®
mode, there
is an increased risk of skidding and having an accident. Make sure that no persons, animals
or obstacles are within range of the vehicle.
i Observe the safety notes on driving safety
systems (Y page 54).
Be sure to read the safety notes and informa-
tion on ESP ®
(Y page 57).
Activation conditions You can activate RACE START if:
R the doors are closed
R the engine is running and the engine and
transmission are at operating temperature.
This is the case when the oil temperature
gauge in the multifunction display is shown in white (Y page 167).
R ESP ®
is functioning correctly (Y page 58)
R the steering wheel is in the straight-ahead
position
R the vehicle is stationary and the brake pedal is
depressed sufficiently (left foot)
R the transmission is in position D
R drive program S,S+ orRACE is selected
(Y page 108)
Activating RACE START i
When manual mode (Y
page 115) is active,
the transmission automatically shifts up to
RACE START in the drive program. This func-
tion supports maximum acceleration with
RACE START. After going through an acceler- ating process once from a stationary position,
this function is automatically deactivated.
X Depress the brake pedal with your left foot
and keep it depressed.
X Pull and hold both steering wheel gearshift
paddles.
X The RACE START Confirm: Paddle UP RACE START Confirm: Paddle UP
Cancel: Paddle DOWN Cancel: Paddle DOWN message appears in
the multifunction display.
X Release both steering wheel gearshift pad-
dles. Driving systems
139Driving and parking Z
Page 170 of 289
manent SPEEDTRONIC function can only be set
in the Vehicle
Vehicle submenu. AMG menu
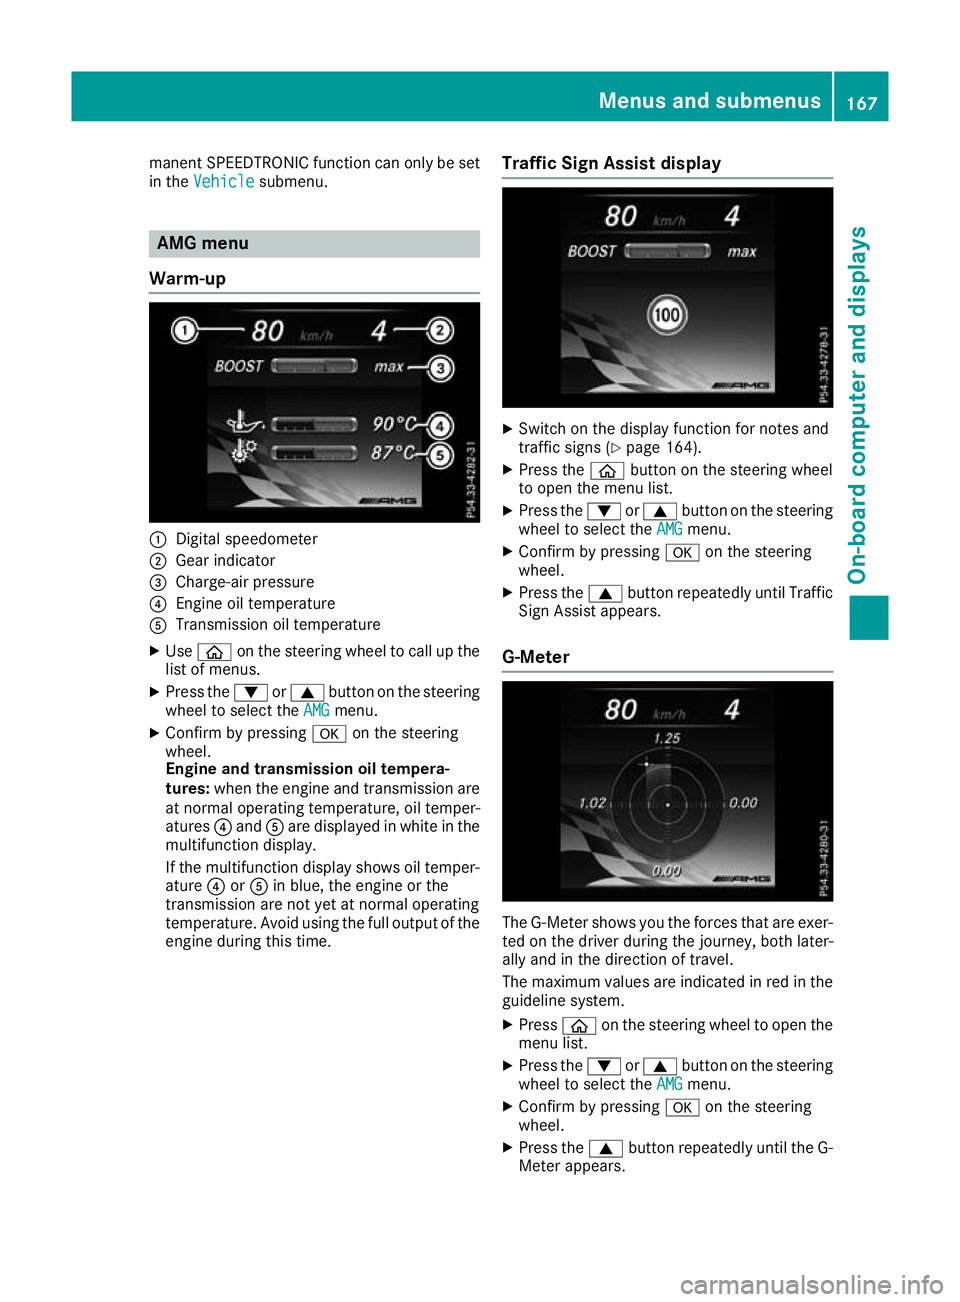
Warm-up :
Digital speedometer
; Gear indicator
= Charge-air pressure
? Engine oil temperature
A Transmission oil temperature
X Use ò on the steering wheel to call up the
list of menus.
X Press the :or9 button on the steering
wheel to select the AMG
AMG menu.
X Confirm by pressing aon the steering
wheel.
Engine and transmission oil tempera-
tures: when the engine and transmission are
at normal operating temperature, oil temper-
atures ?and Aare displayed in white in the
multifunction display.
If the multifunction display shows oil temper- ature ?orA in blue, the engine or the
transmission are not yet at normal operating
temperature. Avoid using the full output of the
engine during this time. Traffic Sign Assist display X
Switch on the display function for notes and
traffic signs (Y page 164).
X Press the òbutton on the steering wheel
to open the menu list.
X Press the :or9 button on the steering
wheel to select the AMG AMGmenu.
X Confirm by pressing aon the steering
wheel.
X Press the 9button repeatedly until Traffic
Sign Assist appears.
G-Meter The G-Meter shows you the forces that are exer-
ted on the driver during the journey, both later-
ally and in the direction of travel.
The maximum values are indicated in red in the
guideline system.
X Press òon the steering wheel to open the
menu list.
X Press the :or9 button on the steering
wheel to select the AMG AMGmenu.
X Confirm by pressing aon the steering
wheel.
X Press the 9button repeatedly until the G-
Meter appears. Menus and submenus
167On-board computer and displays Z
Page 195 of 289
Display messages
Possible causes/consequences and
M
MSolutions j
Parking lock mal‐ Parking lock mal‐
funct. Apply park‐ funct. Apply park‐
ing brake ing brake Transmission position
Pcannot be selected.
X Make sure that the electric parking brake is applied.
X Safeguard the vehicle against rolling away before you leave it
(Y page 268).
X Consult a qualified specialist workshop. d
Transmission oil Transmission oil
cooling Malfunction cooling Malfunction The transmission coolant pump is faulty. The transmission may over-
heat.
X In the on-board computer, select the AMG
AMG menu and check the
transmission oil temperature (Y page 167).
X Avoid excessive loading, e.g. due to dynamic driving.
X If the transmission oil temperature is less than 120 †, you can
continue driving to the nearest qualified specialist workshop. d
Trans. oil overhea‐ Trans. oil overhea‐
ted Drive on with ted Drive on with
care care The transmission oil has overheated.
Manual mode
Mand temporary manual drive program are no longer
available. Only the Comfort setting is available for the transmission.
The engine output is reduced according to the degree of overheating.
X Allow the transmission oil to cool by adopting a defensive driving
style. Electronic rear Electronic rear
axle differential axle differential
lock inoperative lock inoperative The electronic rear axle differential lock is inoperative.
X Consult a qualified specialist workshop. Electronic rear
Electronic rear
axle differential axle differential
lock currently lock currently
unavailable unavailable The electronic rear axle differential lock motor has overheated.
X Allow the electronic rear axle differential lock to cool by adopting a
defensive driving style. N The tailgate is open.
G WARNING
When the engine is running, exhaust gases can enter the vehicle inte- rior if the tailgate is open.
There is a risk of poisoning.
X Close the tailgate. M The bonnet is open. A warning tone also sounds.
G WARNING
The open bonnet may then block your view when the vehicle is in
motion.
There is a risk of an accident.
X Stop the vehicle safely as soon as possible, paying attention to road
and traffic conditions.
X Secure the vehicle against rolling away (Y page 119).
X Close the bonnet. 192
Display
messagesOn-board computer and displays
Page 236 of 289
X
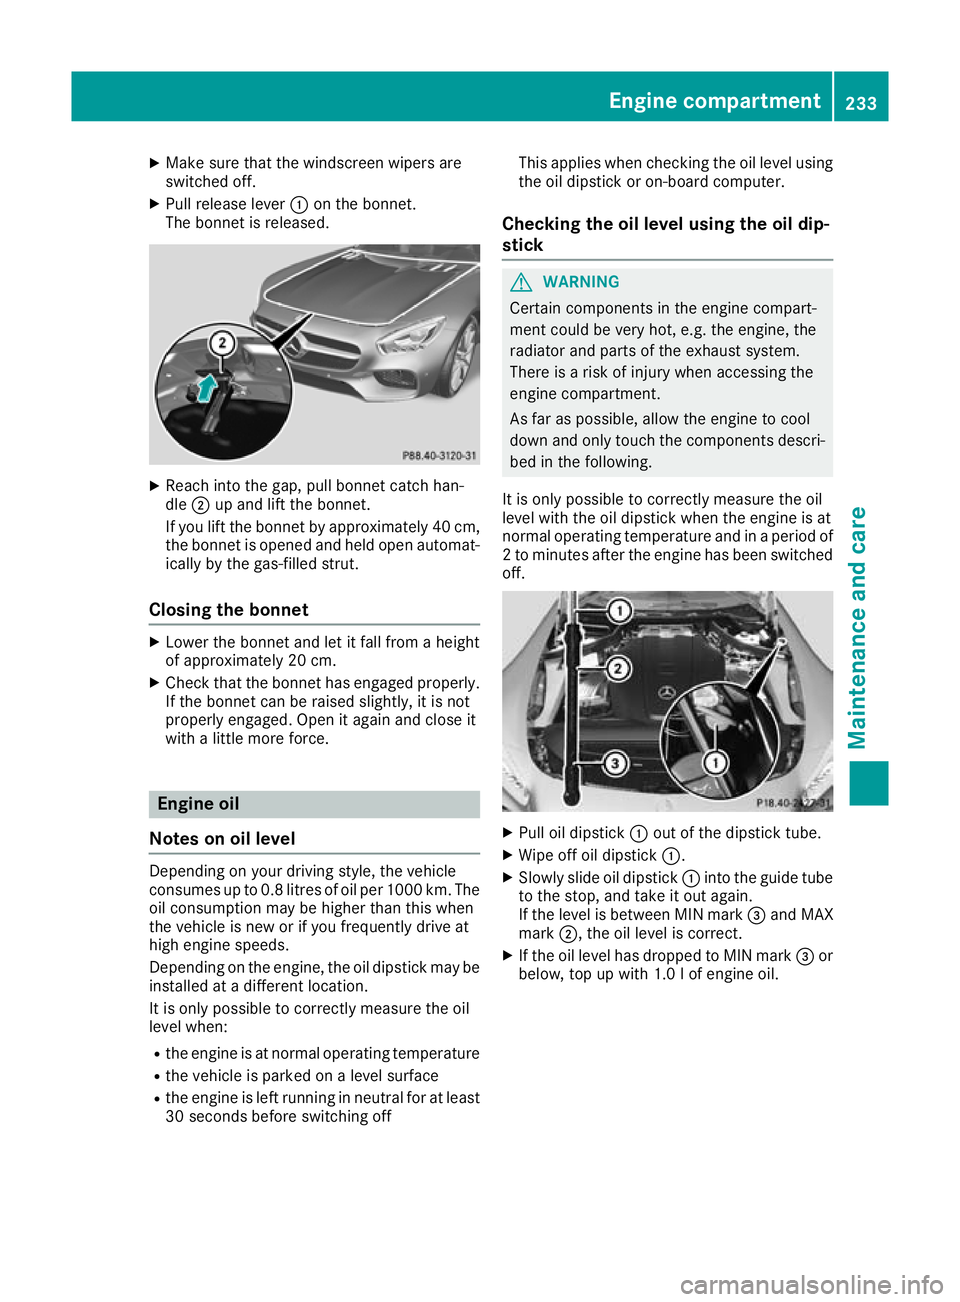
Make sure that the windscreen wipers are
switched off.
X Pull release lever :on the bonnet.
The bonnet is released. X
Reach into the gap, pull bonnet catch han-
dle ;up and lift the bonnet.
If you lift the bonnet by approximately 40 cm, the bonnet is opened and held open automat-
ically by the gas-filled strut.
Closing the bonnet X
Lower the bonnet and let it fall from a height
of approximately 20 cm.
X Check that the bonnet has engaged properly.
If the bonnet can be raised slightly, it is not
properly engaged. Open it again and close it
with a little more force. Engine oil
Notes on oil level Depending on your driving style, the vehicle
consumes up to 0.8 litres of oil per 1000 km. The
oil consumption may be higher than this when
the vehicle is new or if you frequently drive at
high engine speeds.
Depending on the engine, the oil dipstick may be installed at a different location.
It is only possible to correctly measure the oil
level when:
R the engine is at normal operating temperature
R the vehicle is parked on a level surface
R the engine is left running in neutral for at least
30 seconds before switching off This applies when checking the oil level using
the oil dipstick or on-board computer.
Checking the oil level using the oil dip-
stick G
WARNING
Certain components in the engine compart-
ment could be very hot, e.g. the engine, the
radiator and parts of the exhaust system.
There is a risk of injury when accessing the
engine compartment.
As far as possible, allow the engine to cool
down and only touch the components descri- bed in the following.
It is only possible to correctly measure the oil
level with the oil dipstick when the engine is at
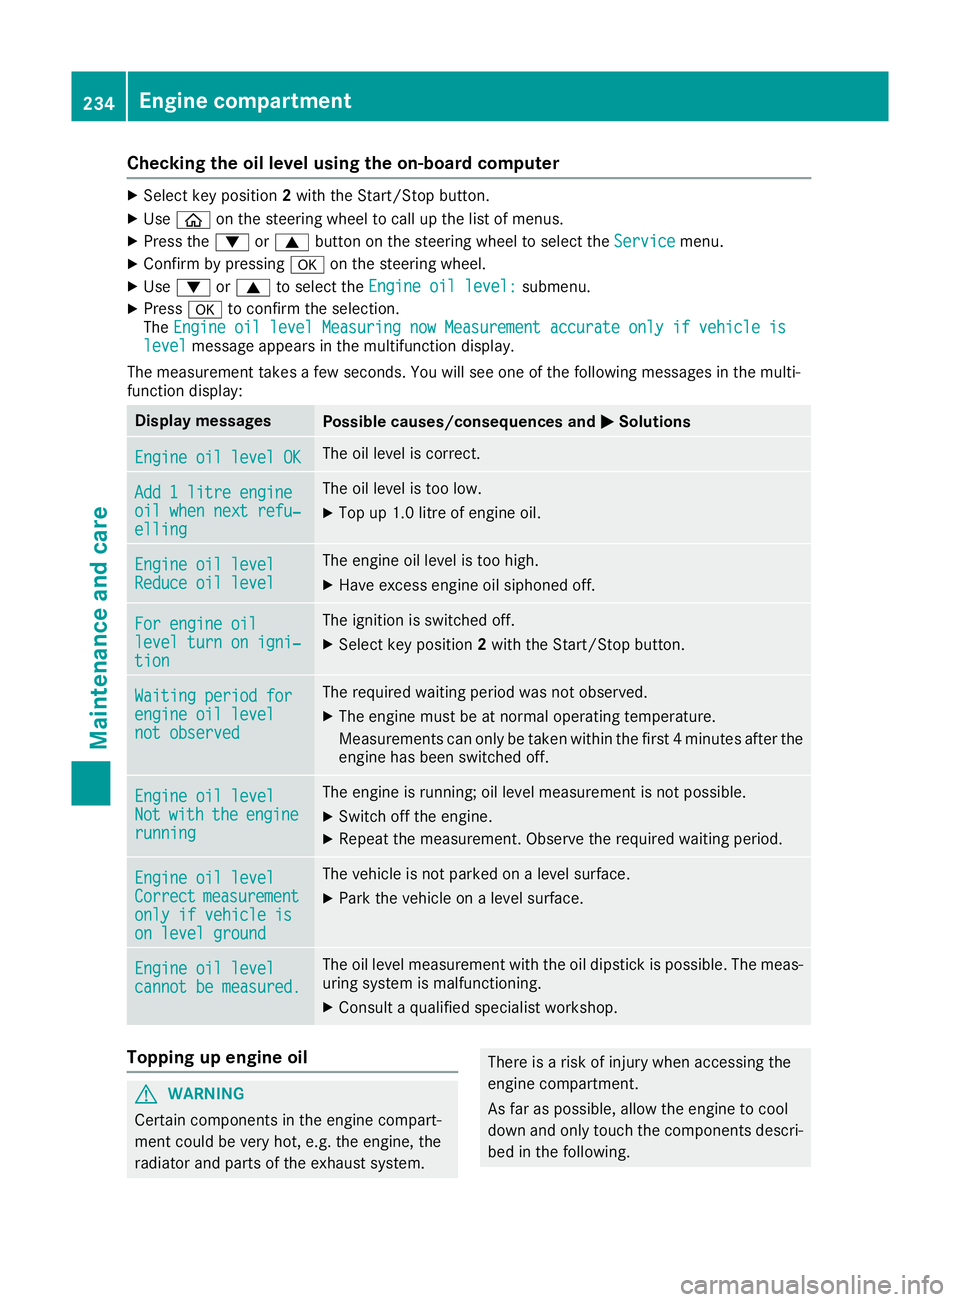
normal operating temperature and in a period of 2 to minutes after the engine has been switchedoff. X
Pull oil dipstick :out of the dipstick tube.
X Wipe off oil dipstick :.
X Slowly slide oil dipstick :into the guide tube
to the stop, and take it out again.
If the level is between MIN mark =and MAX
mark ;, the oil level is correct.
X If the oil level has dropped to MIN mark =or
below, top up with 1.0 lof engine oil. Engine compartment
233Maintenance and care Z
Page 237 of 289
Checking the oil level using the on-board computer
X
Select key position 2with the Start/Stop button.
X Use ò on the steering wheel to call up the list of menus.
X Press the :or9 button on the steering wheel to select the Service
Servicemenu.
X Confirm by pressing aon the steering wheel.
X Use : or9 to select the Engine oil level:
Engine oil level: submenu.
X Press ato confirm the selection.
The Engine oil level Measuring now Measurement accurate only if vehicle is
Engine oil level Measuring now Measurement accurate only if vehicle is
level
level message appears in the multifunction display.
The measurement takes a few seconds. You will see one of the following messages in the multi-
function display: Display messages
Possible causes/consequences and
M
MSolutions Engine oil level OK
Engine oil level OK The oil level is correct.
Add 1 litre engine
Add 1 litre engine
oil when next refu‐ oil when next refu‐
elling elling The oil level is too low.
X Top up 1.0 litre of engine oil. Engine oil level
Engine oil level
Reduce oil level Reduce oil level The engine oil level is too high.
X Have excess engine oil siphoned off. For engine oil
For engine oil
level turn on igni‐ level turn on igni‐
tion tion The ignition is switched off.
X Select key position 2with the Start/Stop button. Waiting period for
Waiting period for
engine oil level engine oil level
not observed not observed The required waiting period was not observed.
X The engine must be at normal operating temperature.
Measurements can only be taken within the first 4 minutes after the
engine has been switched off. Engine oil level Engine oil level
Not Not
with
with the
theengine
engine
running
running The engine is running; oil level measurement is not possible.
X Switch off the engine.
X Repeat the measurement. Observe the required waiting period. Engine oil level
Engine oil level
Correct Correct
measurement
measurement
only if vehicle is
only if vehicle is
on level ground on level ground The vehicle is not parked on a level surface.
X Park the vehicle on a level surface. Engine oil level
Engine oil level
cannot be measured. cannot be measured. The oil level measurement with the oil dipstick is possible. The meas-
uring system is malfunctioning.
X Consult a qualified specialist workshop. Topping up engine oil
G
WARNING
Certain components in the engine compart-
ment could be very hot, e.g. the engine, the
radiator and parts of the exhaust system. There is a risk of injury when accessing the
engine compartment.
As far as possible, allow the engine to cool
down and only touch the components descri- bed in the following. 234
Engine compartmentMaintenance and care