remote control MERCEDES-BENZ AMG GT ROADSTER 2016 Owners Manual
[x] Cancel search | Manufacturer: MERCEDES-BENZ, Model Year: 2016, Model line: AMG GT ROADSTER, Model: MERCEDES-BENZ AMG GT ROADSTER 2016Pages: 289, PDF Size: 5.97 MB
Page 18 of 289
PRE-SAFE
®
(anticipatory occupant
protection)
Operation ......................................... 48
PRE-SAFE ®
(preventive occupant
safety system)
Display message ............................1 77
Protection against theft
ATA (Anti-Theft Alarm system) ......... 60
Immobiliser ...................................... 60
Interior motion sensor ..................... 61
Tow-away protectio n ........................61
Protection of the environment
General notes .................................. 22
Pulling away
Automatic transmission ................. 104
General notes ................................ 104
Hill start assist ............................... 104 Q
QR code Mercedes-Benz Guide App ................. 1
Rescue card ..................................... 26
Qualified specialist workshop ........... 25
Quick access for audio and tele-
phone
Changing the station/music
track .............................................. 208 R
RACE START Activating ....................................... 139
important safety notes ................... 139
RACETIMER (on-board computer) .... 168
Radio
Selecting a station ......................... 160
Radio mode
See also Digital Owner's Manual ... 205
Radio-based vehicle components
Declaration of conformity ................ 24
Reading lamp ....................................... 91
Rear foglamp
Display message ............................ 182
Switching on/off .............................. 89
Rear lamps
see Lights Rear spoiler
Extending/retracting ..................... 224
Problem ......................................... 225
Rear window heating
Problem (fault) ................................. 99
Switching on/off .............................. 99
Rear wing
Display message ............................ 193
Rear-view mirror
Anti-dazzle mode (automatic) .......... 85
Dipping (manual ).............................. 84
Reflective safety vest ....................... 244
Refuelling
Fuel gaug e....................................... 29
Important safety notes .................. 117
Refuelling process ......................... 118
see Fuel
Remote control
Garage door opener ....................... 225
Programming (garage door
opener) .......................................... 226
Replacing bulbs
General notes .................................. 92
Rescue card ......................................... 26
Reserve (fuel tank)
see Fuel
Reserve fuel
Display message ............................ 185
Warning lamp ................................. 200
Restraint system
Display message ............................ 178
Introduction ..................................... 34
Warning lamp ................................. 199
Warning lamp (function) ................... 35
Rev counter ........................................ 155
Reversing camera
Cleaning instructions ..................... 241
Function/note s............................. 144
Switching on/of f........................... 144
Reversing feature
Side window s................................... 74
Reversing lamp (display message) .. 182
Roller sunblind of the panorama
roof
Opening and closing ........................ 77
Operating ......................................... 77 Index
15
Page 66 of 289
Key
Important safety notes
United Kingdom only: G
WARNING
When the double locks are activated, the
doors can no longer be opened from the
inside. People in the vehicle can no longer get out, e.g. in hazardous situations. There is a
risk of injury.
Therefore, do not leave any people unsuper-
vised in the vehicle, particularly children, eld-
erly people or people in need of special assis-
tance. Do not activate the double lock when
people are in the vehicle.
If the vehicle has been locked from the outside, the double lock function is activated as stand-
ard. It is then not possible to open the doors
from inside the vehicle. You can deactivate the
double lock function by deactivating the interior
motion sensor (Y page 62). The doors can then
be opened from the inside after the vehicle has
been locked from the outside. The anti-theft
alarm system is triggered if the door is opened
from the inside. Switch off the alarm
(Y page 60).
All countries: G
WARNING
If children are left unsupervised in the vehicle, they can:
R open doors and endanger other persons or
road users
R climb out and be injured by the traffic
R operate vehicle equipment and, for exam-
ple, trap themselves.
Children could also set the vehicle in motion, for example by:
R releasing the parking brake
R shifting the automatic transmission out of
park position P
R starting the engine.
There is a risk of an accident and injury.
When leaving the vehicle, always take the key
with you and lock the vehicle. Never leave children unattended in the vehicle. Always
keep the key out of reach of children.
G
WARNING
If you attach heavy or large objects to the key, the key could be unintentionally turned in the
ignition lock. This could cause the engine to
be switched off. There is a risk of an accident.
Do not attach any heavy or large objects to the
key. Remove any bulky keyrings before insert-
ing the key into the ignition lock.
! Keep the key away from strong magnetic
fields. Otherwise, the remote control function could be affected.
Strong magnetic fields can occur in the vicin-
ity of powerful electrical installations.
Do not keep the key: R with electronic devices, e.g. a mobile phone
or another key
R with metallic objects, e.g. coins or metal foil
R inside metallic objects, e.g. a metal case
This can impair the key's function.
Vehicles with KEYLESS-GO start function: do
not keep the key on the luggage compartment
cover or in the luggage compartment. Other-
wise, the key may not be detected, e.g. when
starting the engine using the Start/Stop button.
A check that periodically establishes a radio
connection between the vehicle and the key
determines whether a valid key is in or in the
direct vicinity of the vehicle. This occurs, for
example:
R during engine start
R during driving
R when using HANDS-FREE ACCESS
R when the external door handles are touched
R during convenience closing Key
63Opening and closing Z
Page 71 of 289
Problem
Possible causes/consequences and
M
MSolutions There is interference from a powerful source of radio waves.
X Unlock (Y page 70) or lock (Y page 70) the vehicle using the
emergency key element. There is a fault with KEYLESS-GO.
X Lock/unlock the vehicle using the remote control function of the
key.
X Have the vehicle and key checked at a qualified specialist work-
shop.
If the vehicle cannot be locked/unlocked even using the remote con-
trol function:
X Unlock (Y page 70) or lock (Y page 70) the vehicle using the
emergency key element.
X Have the vehicle and key checked at a qualified specialist work-
shop. The engine cannot be
started using the key. The on-board voltage is too low.
X Switch off non-essential consumers, e.g. seat heating or interior
lighting, and try to start the engine again.
If this does not work:
X Check the starter battery and charge it if necessary (Y page 252).
or X Jump-start the vehicle (Y page 253).
or X Consult a qualified specialist workshop. The engine cannot be
started using the Start/
Stop button. The key is in
the vehicle. The vehicle is locked.
X Unlock the vehicle and try to start the vehicle again. The key battery is discharged or nearly discharged.
X Check the key battery (Y page 66) and replace if necessary
(Y page 66).
If this does not work: X Start your vehicle with the key in the ignition lock. There is interference from a powerful source of radio waves.
X Start your vehicle with the key in the ignition lock. You have lost a key. X
Have the key deactivated at a qualified specialist workshop.
X Report the loss immediately to the vehicle insurers.
X If necessary, have the locks changed as well. You have lost the emer-
gency key element. X
Report the loss immediately to the vehicle insurers.
X If necessary, have the locks changed as well. 68
KeyOpening and closing
Page 105 of 289
!
Do not warm up the engine when the vehicle
is stationary. Drive off immediately. Avoid
high engine speeds and driving at full throttle
until the engine has reached its operating
temperature.
Only shift the automatic transmission to the
desired drive position when the vehicle is sta- tionary.
Where possible, avoid spinning the drive
wheels when pulling away on slippery roads.
You could otherwise damage the drive train.
! During a cold start with low engine oil tem-
peratures (below 0 †), the maximum engine
speed is restricted in order to protect the
engine. To protect the engine and maintain
smooth engine operation, avoid driving at full throttle when the engine is cold. Key positions
Start/Stop button General notes
All vehicles are equipped with a Start/Stop but-
ton.
The Start/Stop button is located on the centre
console and is illuminated when the vehicle is
unlocked.
The key must be in the vehicle.
Pressing the Start/Stop button several times in
succession corresponds to the different key
positions in the ignition lock. This is only the
case if you are not depressing the brake pedal.
If you depress the brake pedal and press the
Start/Stop button, the engine starts immedi-
ately.
A check which periodically establishes a radio
connection between the vehicle and the key
determines whether a valid key is in the vehicle. This occurs, for example, when starting the
engine.
If there is a key in the ignition lock, this takes
precedence over the KEYLESS-GO start func-
tion.
To start the vehicle without actively using the
key:
R the key must be in the vehicle
R the vehicle must not be locked with the key or
KEYLESS-GO (Y page 64) Do not keep the key:
R
with electronic devices, e.g. a mobile phone
or another key
R with metallic objects, e.g. coins or metal film
R inside metallic objects, e.g. a metal case
This can affect the key's functionality.
If you lock the vehicle with the key's remote
control or with KEYLESS-GO, after a short time:
R you will not be able to switch on the ignition
with the Start/Stop button
R you will not be able to start the engine with the
Start/Stop button until the vehicle is
unlocked again
If you lock the vehicle centrally using the button
on the driver's door (Y page 70), you can con-
tinue to start the engine with the Start/Stop
button.
The engine can be switched off while the vehicle is in motion by pressing and holding the Start/
Stop button for three seconds. This function
operates independently of the ECO start/stop
automatic engine switch-off function.
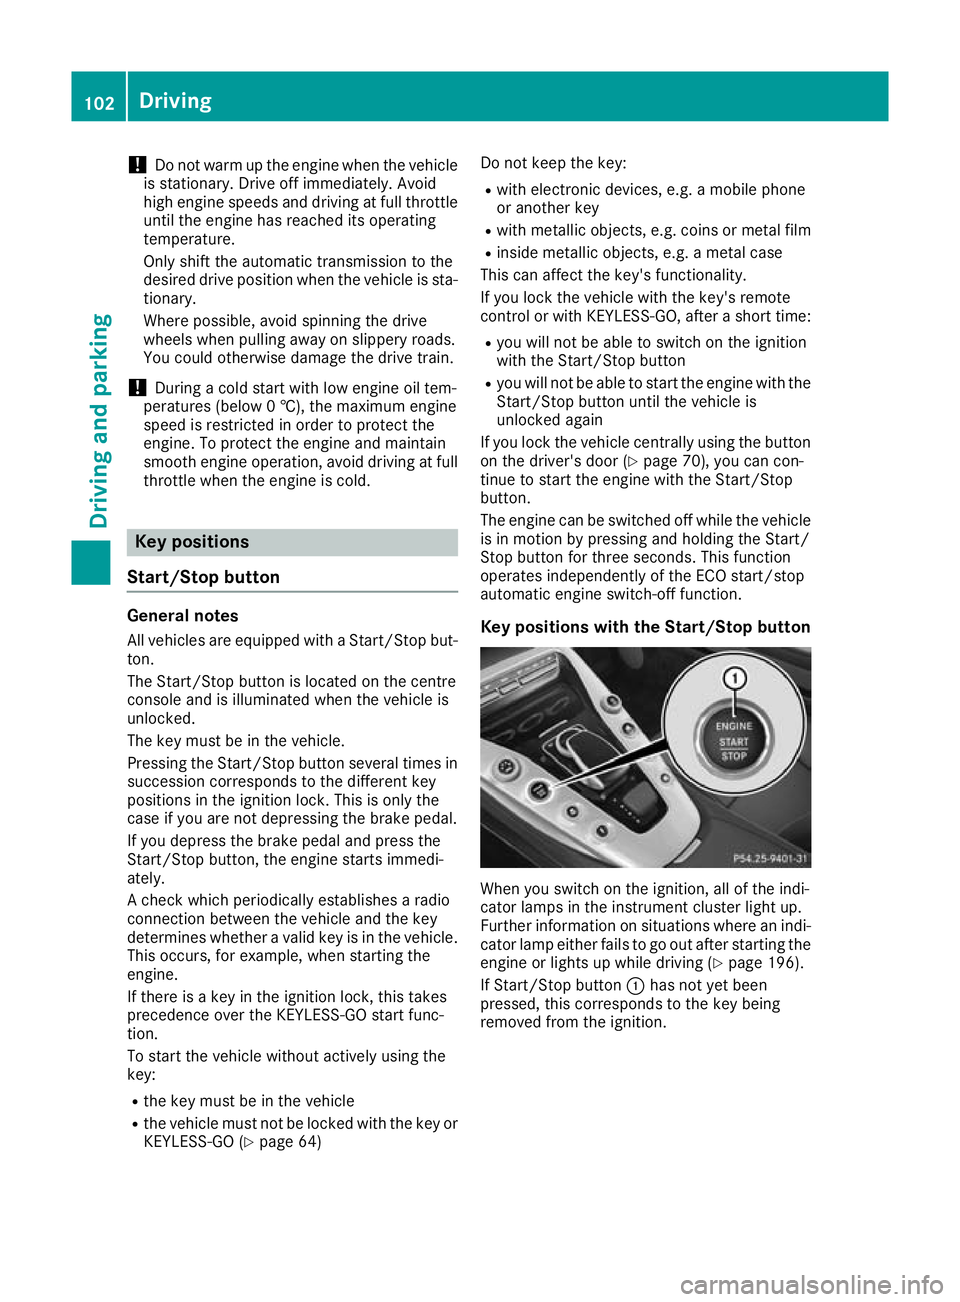
Key positions with the Start/Stop button When you switch on the ignition, all of the indi-
cator lamps in the instrument cluster light up.
Further information on situations where an indi-
cator lamp either fails to go out after starting the engine or lights up while driving (Y page 196).
If Start/Stop button :has not yet been
pressed, this corresponds to the key being
removed from the ignition. 102
DrivingDriving and parking
Page 228 of 289
When leaving the vehicle, always take the key
with you and lock the vehicle. Never leave
children unattended in the vehicle.
! Do not enter an automatic car wash with the
rear aerofoil extended. Otherwise, the rear
aerofoil may be damaged.
Only extend the rear aerofoil in order to wash
it by hand. Retract it again when you have fin- ished cleaning it.
You can extend and retract the rear spoiler man-
ually for cleaning.
X Close the tailgate.
X Select key position 2with the Start/Stop but-
ton (Y page 103). X
To extend: press button :.
The rear spoiler is extended.
Button :flashes until the rear spoiler has
extended and then lights up in red.
X To retract: press and hold button :until the
rear spoiler is completely retracted.
Button :flashes until the rear spoiler has
retracted and then goes out.
Rear spoiler retracts manually Rear spoiler retracts manually
appears in the display.
If you release button :while retracting the rear
spoiler, it extends again automatically.
Problems with the rear spoiler Problem
Possible causes/consequences and
M MSolutions The rear spoiler stops
before reaching the end
position when retracting
manually. You have opened the tailgate while manually retracting the rear
spoiler.
X Close the tailgate.
The rear spoiler extends or, if you press and hold the ¬button,
continues retracting. The rear spoiler stops
before reaching the end
position when retract-
ing/extending manually. You have switched off the ignition.
X Switch the ignition back on.
X Press the ¬button.
The rear spoiler extends/retracts. The rear spoiler cannot
be retracted again after
manually extending it. You have opened the tailgate while manually extending the rear
spoiler.
X Close the tailgate. The rear spoiler does not
extend or retract auto-
matically. The rear spoiler's movement is blocked, e.g. by an object jammed
between the body and the rear spoiler.
X Remove the object. Garage door opener
General notes The HomeLink
®
garage door opener integrated
in the rear-view mirror allows you to operate up
to three different door and gate systems.
Once programmed, the integrated garage door
opener in the rear-view mirror will assume the
function of the garage door system's remote control. Please also read the operating instruc-
tions for the garage door system.
When programming a garage door opener, park
the vehicle outside the garage. Do not run the
engine while programming.
The garage door opener is available only for cer- tain countries. Observe the legal requirements
for each individual country. Features
225Stowing and features Z
Page 229 of 289
The HomeLink
®
garage door opener is compat-
ible with most European garage and gate opener
drives.
More information on HomeLink ®
and/or com-
patible products is available:
R at a qualified specialist workshop
R via the HomeLink ®
hotline
(0) 08000 466 354 65 or alternatively
+49 (0) 6838 907-277
R on the Internet at http://www.homelink.com
Important safety notes G
WARNING
When you operate or program the garage door with the integrated garage door opener, per-
sons in the range of movement of the garage
door can become trapped or struck by the
garage door. There is a risk of injury.
When using the integrated garage door
opener, always make sure that nobody is
within the range of movement of the garage
door. G
WARNING
Combustion engines emit poisonous exhaust
gases such as carbon monoxide. Inhaling
these exhaust gases leads to poisoning. There is a risk of fatal injury. Therefore never leave
the engine running in enclosed spaces with-
out sufficient ventilation.
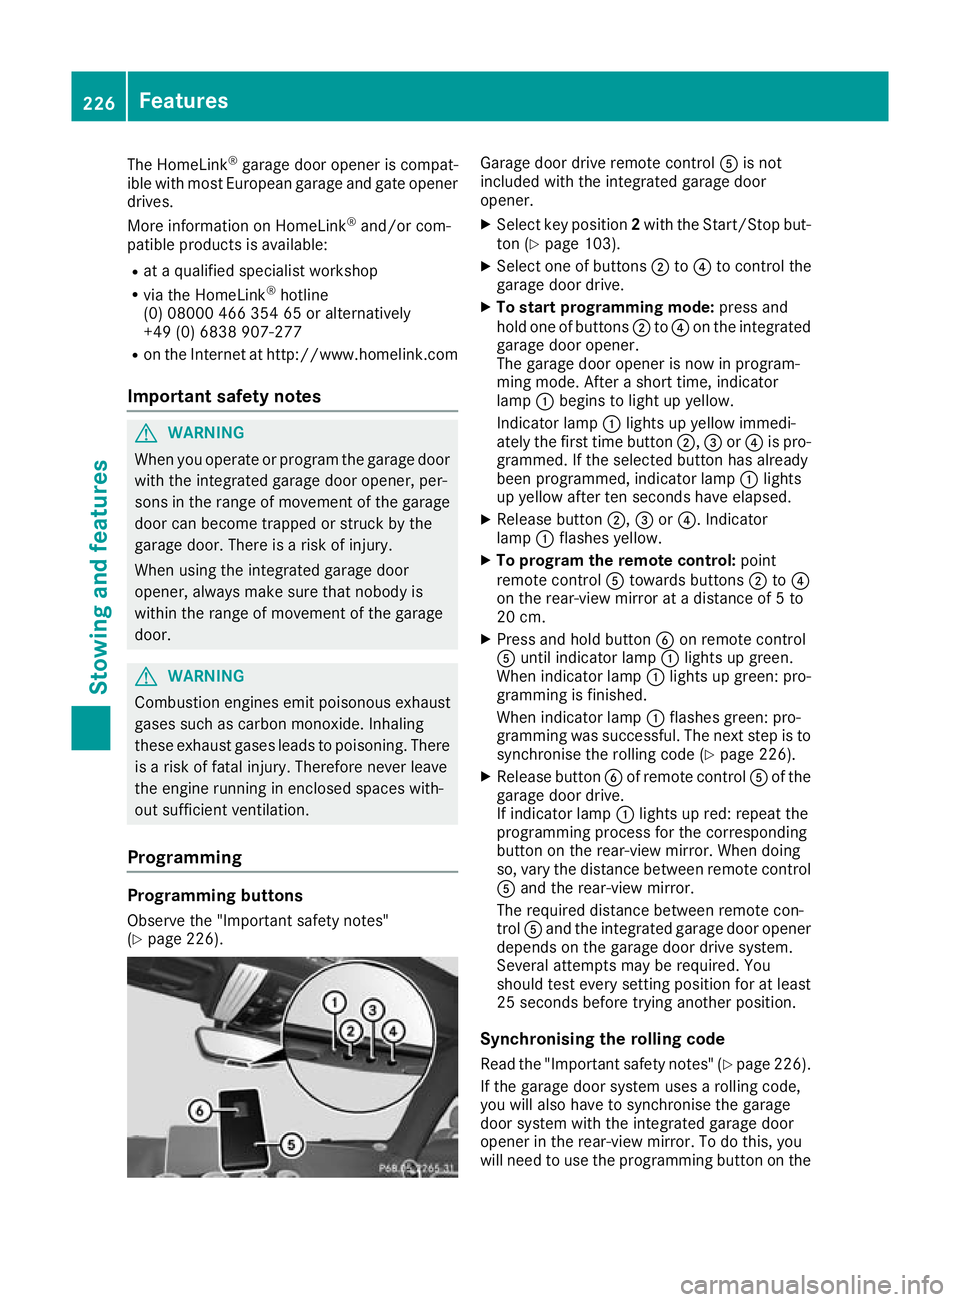
Programming Programming buttons
Observe the "Important safety notes"
(Y page 226). Garage door drive remote control
Ais not
included with the integrated garage door
opener.
X Select key position 2with the Start/Stop but-
ton (Y page 103).
X Select one of buttons ;to? to control the
garage door drive.
X To start programming mode: press and
hold one of buttons ;to? on the integrated
garage door opener.
The garage door opener is now in program-
ming mode. After a short time, indicator
lamp :begins to light up yellow.
Indicator lamp :lights up yellow immedi-
ately the first time button ;,=or? is pro-
grammed. If the selected button has already
been programmed, indicator lamp :lights
up yellow after ten seconds have elapsed.
X Release button ;,=or?. Indicator
lamp :flashes yellow.
X To program the remote control: point
remote control Atowards buttons ;to?
on the rear-view mirror at a distance of 5 to
20 cm.
X Press and hold button Bon remote control
A until indicator lamp :lights up green.
When indicator lamp :lights up green: pro-
gramming is finished.
When indicator lamp :flashes green: pro-
gramming was successful. The next step is to
synchronise the rolling code (Y page 226).
X Release button Bof remote control Aof the
garage door drive.
If indicator lamp :lights up red: repeat the
programming process for the corresponding
button on the rear-view mirror. When doing
so, vary the distance between remote control A and the rear-view mirror.
The required distance between remote con-
trol Aand the integrated garage door opener
depends on the garage door drive system.
Several attempts may be required. You
should test every setting position for at least
25 seconds before trying another position.
Synchronising the rolling code
Read the "Important safety notes" (Y page 226).
If the garage door system uses a rolling code,
you will also have to synchronise the garage
door system with the integrated garage door
opener in the rear-view mirror. To do this, you
will need to use the programming button on the 226
FeaturesStowing and features
Page 230 of 289
door drive control panel. The programming but-
ton may be placed at different locations depend- ing on the manufacturer. It is usually located on
the door drive unit on the garage ceiling.
Familiarise yourself with the garage door drive
operating instructions, e.g. under "Program-
ming of additional remote controls", before car-
rying out the following steps.
Your vehicle must be within range of the garage
door or gate opener drive. Make sure that nei-
ther your vehicle nor any persons/objects are
present within the sweep of the door or gate.
X Select key position 2with the Start/Stop but-
ton (Y page 103).
X Get out of the vehicle.
X Press the programming button on the door
drive unit.
Usually, you now have 30 seconds to initiate
the next step.
X Get into the vehicle.
X Press previously programmed button ;,=
or ? on the integrated garage door opener
repeatedly until the door closes.
Rolling code synchronisation is then com-
plete.
Problems when programming
If you have problems when programming the
integrated garage door opener on the rear-view mirror, please note the following:
R Check the transmitter frequency used by
garage door drive remote control Aand
whether it is supported. The transmitter fre-
quency can usually be found on the back of
remote control Afor the garage door drive.
R Replace the batteries in garage door drive
remote control A. This increases the likeli-
hood that garage door drive remote control
A will transmit a strong and precise signal to
the integrated garage door opener.
R When programming, hold remote control A
at varying distances and angles from but-
tons ;to? that you are programming. Try
various angles at a distance between 5and
20 cm or at the same angle but at varying
distances.
R If another remote control Ais available for
the same garage door drive, perform the pro-
gramming steps again using this remote con- trol A. Before performing these steps, make
sure that new batteries have been fitted in
garage door drive remote control A.R
Note that some remote controls transmit only
for a limited period (the indicator lamp on theremote control goes out). Press button Bon
remote control Aagain before transmission
ends.
R Align the aerial cable of the garage door
opener unit. This can improve signal recep-
tion/transmission.
Opening/closing the garage door Once programmed, the integrated garage door
opener will assume the function of the garage
door system's remote control. Please also read
the operating instructions for the garage door
system.
X Select key position 2with the Start/Stop but-
ton (Y page 103).
X Press button ;,=or? that you have pro-
grammed to operate the garage door.
Garage door system with a fixed code: indi-
cator lamp :lights up green.
Garage door system with a rolling code: indi-
cator lamp :flashes green.
The transmitter will transmit a signal for as
long as the button is pressed. The transmis-
sion is halted after a maximum of ten seconds and indicator lamp :lights up yellow.
X Press button ;,=or? again if necessary.
Clearing the memory Make sure that you clear the memory of the
integrated garage door opener before selling the
vehicle.
X Select key position 2with the Start/Stop but-
ton (Y page 103).
X Press and hold buttons ;and ?.
The indicator lamp initially lights up yellow
and then green.
X Release buttons ;and ?.
The memory of the integrated garage door
opener in the rear-view mirror is cleared. Features
227Stowing and features Z