run flat MERCEDES-BENZ AMG GT ROADSTER 2016 Owners Manual
[x] Cancel search | Manufacturer: MERCEDES-BENZ, Model Year: 2016, Model line: AMG GT ROADSTER, Model: MERCEDES-BENZ AMG GT ROADSTER 2016Pages: 289, PDF Size: 5.97 MB
Page 12 of 289
Driving tips
AMG high-performance and
ceramic brakes .............................. 124
Aquaplanin g .................................. .125
Automatic transmission ................. 112
Brakes .......................................... .123
DISTRONIC PLUS ........................... 136
Downhill gradient ........................... 123
Driving abroad ................................. 88
Driving in winter ............................ .125
Driving on flooded roads ................ 125
Driving on wet roads ..................... .125
Fuel ................................................ 123
General .......................................... 123
Icy road surfaces ........................... 125
Limited braking efficiency on sal-
ted roads ....................................... 124
New brake disks ............................ 124
New brake pads/linings ................ 124
Running-in tips ............................... 101
Snow chains .................................. 263
Subjecting brakes to a load ........... 123
Symmetrical dipped bea m............... 88
The first 1500 km .......................... 101
Wet road surface ........................... 124
DVD video
Operating (on-board computer) ..... 162
See also Digital Owner's Manua l... 205
DYNAMIC SELECT controller ............ 108E
E-SELECT lever ................................... 109
EASY-ENTRY feature
Function/note s................................ 83
EASY-EXIT feature
Function/note s................................ 83
EBD (electronic brake force distri-
bution)
Display message ............................ 174
Function/note s................................ 60
ECO start/stop function
Automatic engine switch-off .......... 105
Climate control
(THERMOTRONIC )............................ 96
Deactivating/activating ................. 106
General information ....................... 105
Important safety notes .................. 105 Introduction ................................... 105
Electromagnetic compatibility
Declaration of conformity ................ 24
Electronic Stability Program
see ESP ®
(Electronic Stability Program)
Emergency
Automatic measures after an acci-
dent ................................................. 48
Emergency key
Unlocking the driver's door .............. 70
Emergency key element
Function/note s................................ 65
General notes .................................. 65
Inserting .......................................... 66
Locking vehicle ................................ 70
Removing ......................................... 65
Emergency release
Driver's door .................................... 70
Emergency spare wheel
General notes ................................ 273
Important safety notes .................. 273
Inflating the collapsible spare
wheel ............................................. 274
Removing ....................................... 273
Technical data ............................... 273
Emergency unlocking
Tailgate ............................................ 73
Vehicle ............................................. 70
Engine
Display message ............................ 183
ECO start/stop function ................ 105
Engine number ............................... 277
Jump-starting ................................. 253
Running irregularly ......................... 107
Starting problems .......................... 107
Starting the engine with the key .... 104
Starting with the Start/Stop but-
ton ................................................. 104
Stopping ........................................ 120
Tow-starting (vehicle) ..................... 259
Warning lamp (engine diagnos-
tics) ............................................... 200
Engine electronics
Notes ............................................. 275
Problem (fault) ............................... 107
Engine oil
Additives ........................................ 279
Checking the oil level ..................... 233 Index
9
Page 252 of 289
X
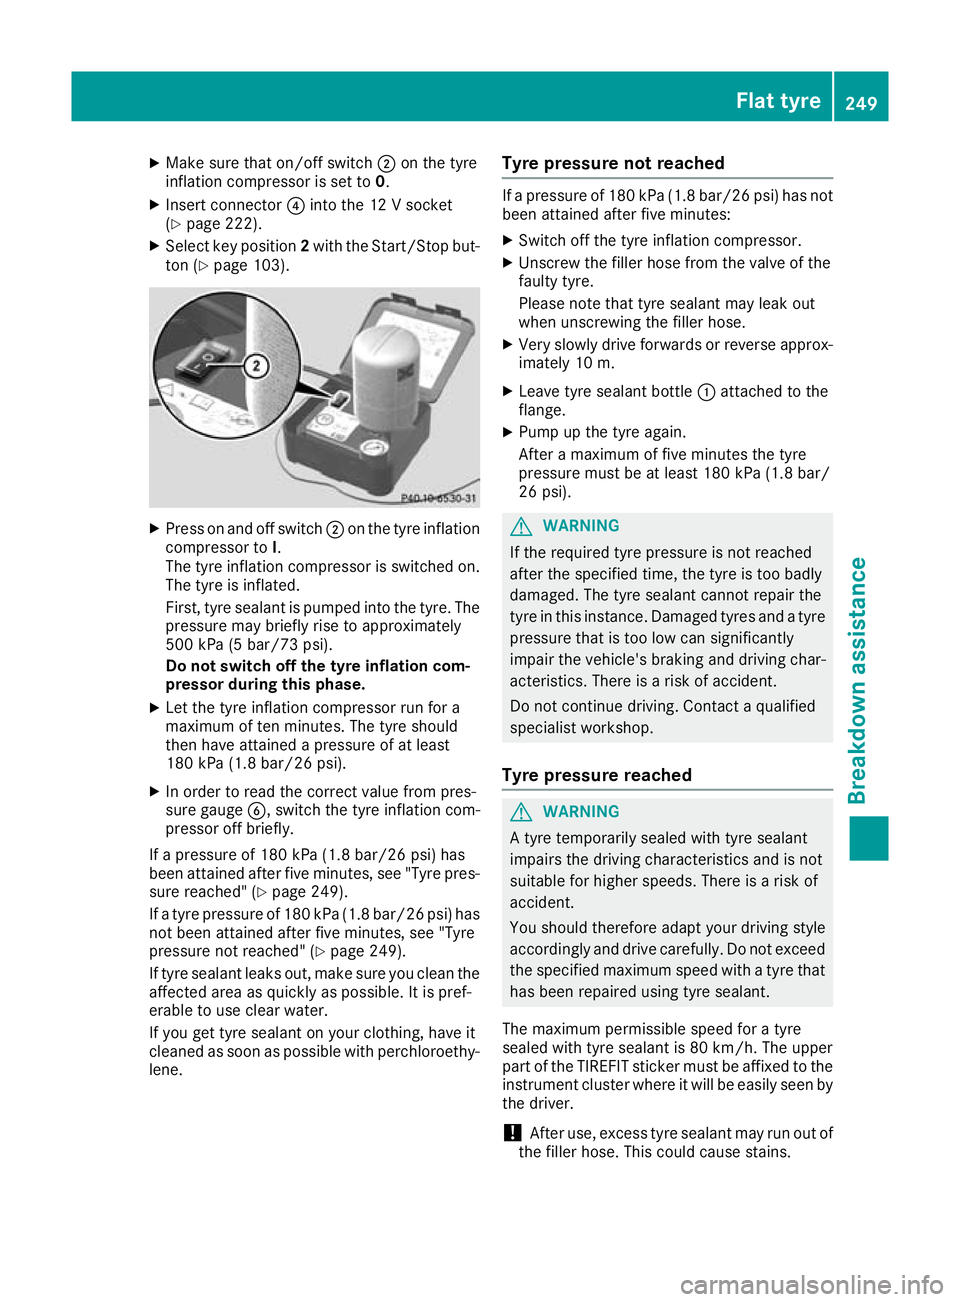
Make sure that on/off switch ;on the tyre
inflation compressor is set to 0.
X Insert connector ?into the 12 V socket
(Y page 222).
X Select key position 2with the Start/Stop but-
ton (Y page 103). X
Press on and off switch ;on the tyre inflation
compressor to I.
The tyre inflation compressor is switched on.
The tyre is inflated.
First, tyre sealant is pumped into the tyre. The pressure may briefly rise to approximately
500 kPa (5 bar/73 psi).
Do not switch off the tyre inflation com-
pressor during this phase.
X Let the tyre inflation compressor run for a
maximum of ten minutes. The tyre should
then have attained a pressure of at least
180 kPa (1.8 bar/26 psi).
X In order to read the correct value from pres-
sure gauge B, switch the tyre inflation com-
pressor off briefly.
If a pressure of 180 kPa (1.8 bar/26 psi) has
been attained after five minutes, see "Tyre pres-
sure reached" (Y page 249).
If a tyre pressure of 180 kPa (1.8 bar/26 psi) has
not been attained after five minutes, see "Tyre
pressure not reached" (Y page 249).
If tyre sealant leaks out, make sure you clean the
affected area as quickly as possible. It is pref-
erable to use clear water.
If you get tyre sealant on your clothing, have it
cleaned as soon as possible with perchloroethy-
lene. Tyre pressure not reached If a pressure of 180 kPa (1.8 bar/26 psi) has not
been attained after five minutes:
X Switch off the tyre inflation compressor.
X Unscrew the filler hose from the valve of the
faulty tyre.
Please note that tyre sealant may leak out
when unscrewing the filler hose.
X Very slowly drive forwards or reverse approx-
imately 10 m.
X Leave tyre sealant bottle :attached to the
flange.
X Pump up the tyre again.
After a maximum of five minutes the tyre
pressure must be at least 180 kPa (1.8 bar/
26 psi). G
WARNING
If the required tyre pressure is not reached
after the specified time, the tyre is too badly
damaged. The tyre sealant cannot repair the
tyre in this instance. Damaged tyres and a tyre pressure that is too low can significantly
impair the vehicle's braking and driving char-
acteristics. There is a risk of accident.
Do not continue driving. Contact a qualified
specialist workshop.
Tyre pressure reached G
WARNING
A tyre temporarily sealed with tyre sealant
impairs the driving characteristics and is not
suitable for higher speeds. There is a risk of
accident.
You should therefore adapt your driving style
accordingly and drive carefully. Do not exceed the specified maximum speed with a tyre that
has been repaired using tyre sealant.
The maximum permissible speed for a tyre
sealed with tyre sealant is 80 km/h. The upper
part of the TIREFIT sticker must be affixed to the
instrument cluster where it will be easily seen by
the driver.
! After use, excess tyre sealant may run out of
the filler hose. This could cause stains. Flat tyre
249Breakdown assistance Z
Page 260 of 289
the middle, e.g. with a white cloth
(30 x 30 cm). This makes other road users
aware that a vehicle is being towed.
R only secure the tow rope to the towing eye.
R observe the brake lamps of the towing vehi-
cle while driving. Always maintain a dis-
tance so that the tow rope does not sag.
R do not use steel cables or chains to tow
your vehicle. You could otherwise damage
the vehicle.
! Do not use the towing eyes for recovery pur-
poses as this could damage the vehicle. If in
doubt, recover the vehicle with a crane.
! When towing, pull away slowly and
smoothly. If the tractive power is too high, the
vehicles could be damaged.
! Shift the automatic transmission to
Nand
do not open the driver's or front passenger's
door during towing. The automatic transmis-
sion may otherwise shift to position P, which
could damage both vehicles.
! You may tow the vehicle for a maximum of
50km. A towing speed of 50 km/h must not
be exceeded.
For towing distances over 50 km, the entire
vehicle must be lifted up and transported.
! Observe the transmission fluid temperature
(AMG menu) in the on-board computer when
towing. The transmission fluid temperature
must not exceed 120 †. If this occurs, you
must stop towing immediately.
! Tow-starting the vehicle is not permitted.
The transmission may otherwise be damaged.
Also observe the following notes: R Observe the legal requirements in each indi-
vidual country when towing.
R If the engine does not start, try jump-starting
it (Y page 253). Tow-starting the vehicle is not
permitted.
R If it is not possible to jump-start the vehicle,
have it transported to the nearest qualified
specialist workshop, e.g. a Mercedes-Benz
Service Centre.
If the vehicle can no longer be driven because of an accident or breakdown, you have the follow-
ing options:
R transporting the vehicle As a rule, you should have the vehicle trans-
ported.
R towing the vehicle with a tow rope or tow bar
Only tow the vehicle in exceptional cases. The
engine must be running if you tow the vehicle with a tow rope or tow bar.
If the vehicle has suffered transmission damage, have it transported on a transporter or trailer.
Observe the display messages in the instrument
cluster.
The battery must be connected and charged.
Otherwise, you:
R will not be able to switch on the ignition with
the Start/Stop button
R cannot start the engine
R cannot release the electric parking brake
R cannot shift the automatic transmission to
position N
Deactivate the automatic locking feature before
towing the vehicle (Y page 70). You could oth-
erwise be locked out when pushing or towing
the vehicle.
Deactivate tow-away protection before the vehi-
cle is towed away (Y page 61). Fitting/removing the towing eye
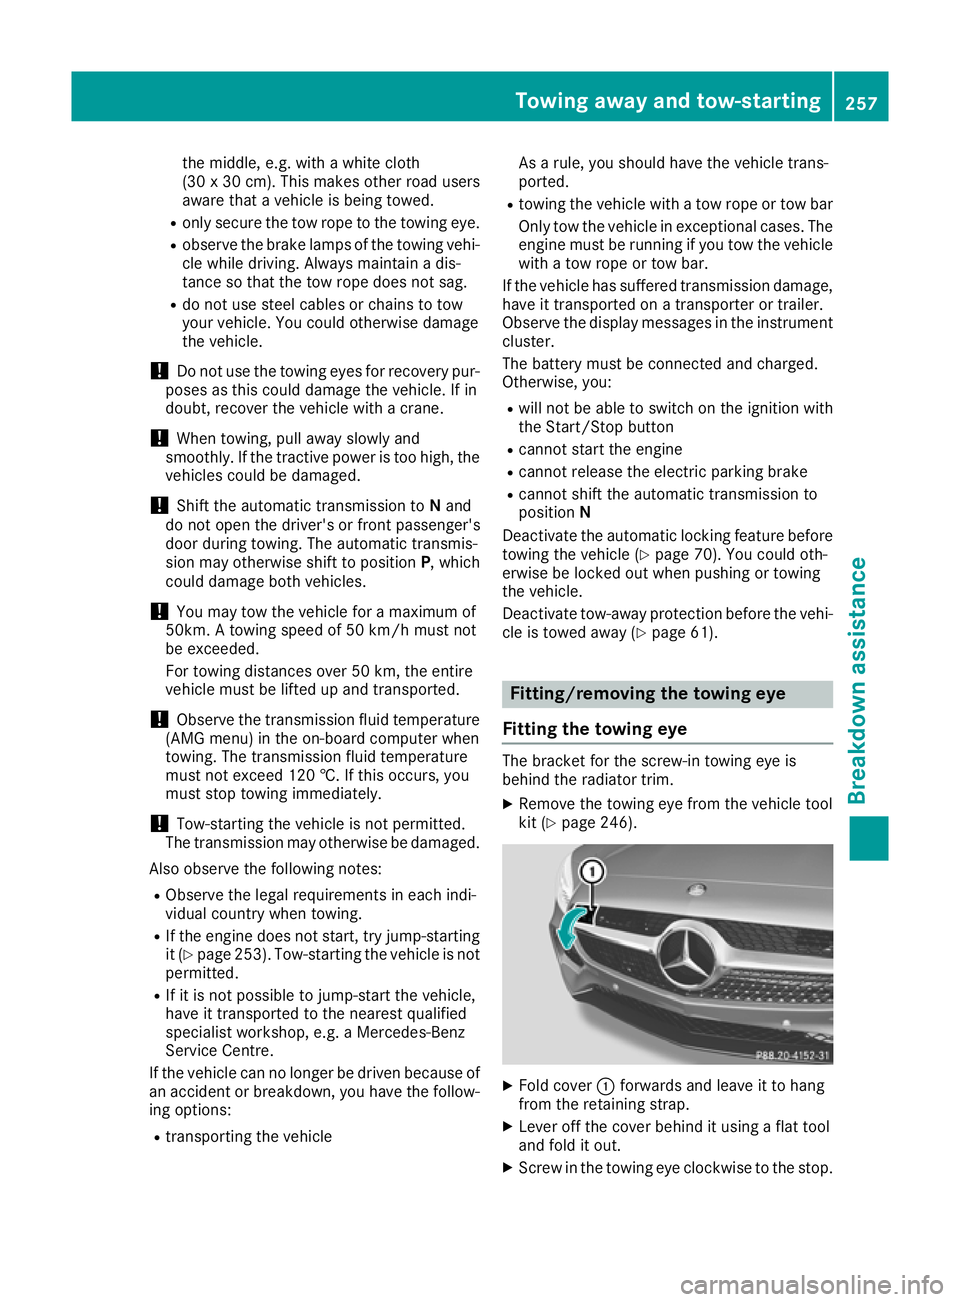
Fitting the towing eye The bracket for the screw-in towing eye is
behind the radiator trim.
X Remove the towing eye from the vehicle tool
kit (Y page 246). X
Fold cover :forwards and leave it to hang
from the retaining strap.
X Lever off the cover behind it using a flat tool
and fold it out.
X Screw in the towing eye clockwise to the stop. Towing away and tow-starting
257Breakdown assistance Z
Page 264 of 289
Important safety notes
G
WARNING
If wheels and tyres of the wrong size are used, the wheel brakes or suspension components
may be damaged. There is a risk of an acci-
dent.
Always replace wheels and tyres with those
that fulfil the specifications of the original
part.
When replacing wheels, make sure to fit the
correct:
R designation
R type
When replacing tyres, make sure to fit the
correct:
R designation
R manufacturer
R type G
WARNING
A flat tyre severely impairs the driving, steer-
ing and braking characteristics of the vehicle.
There is a risk of accident.
Tyres without run-flat characteristics:
R do not drive with a flat tyre.
R immediately replace the flat tyre with your
emergency spare wheel or spare wheel, or
consult a qualified specialist workshop.
Tyres with run-flat characteristics:
R pay attention to the information and warn-
ing notices on MOExtended tyres (tyres
with run-flat characteristics).
Accessories that are not approved for your vehi-
cle by Mercedes-Benz or are not being used cor- rectly can impair the operating safety.
Before purchasing and using non-approved
accessories, visit a qualified specialist work-
shop and enquire about:
R suitability
R legal stipulations
R factory recommendations Information on the sizes and types of wheels and
tyres for your vehicle can be found under
"Wheel/tyre combinations" (Y page 272).
Information on tyre pressure can be found:
R in the tyre pressure table in the fuel filler flap
(Y page 118)
R in the "Tyre pressure" section
Modification work on the brake system and
wheels is not permitted. The use of spacers or
brake dust shields is not permitted. This inva-
lidates the general operating permit for the vehi- cle.
i Further information on wheels and tyres can
be obtained at any qualified specialist work-
shop. Operation
Information on driving
Check the tyre pressures when the vehicle is
heavily laden and adjust prior to a trip.
While driving, pay attention to vibrations, noises
and unusual handling characteristics, e.g. pull-
ing to one side. This may indicate that the
wheels or tyres are damaged. If you suspect that a tyre is defective, reduce your speed immedi-
ately. Stop the vehicle as soon as possible to
check the wheels and tyres for damage. Hidden
tyre damage could also be causing the unusual
handling characteristics. If you find no signs of
damage, have the tyres and wheels checked at a qualified specialist workshop.
When parking your vehicle, make sure not to
squash the tyre sidewalls. If this cannot be avoi- ded, drive slowly over obstacles, e.g. kerbs, and
only at an obtuse angle. You could otherwise
damage the wheel rims and tyres. Notes on high performance tyres
G
WARNING
Due to the special tyre tread in combination
with the optimised rubber compound, there is an increased risk of aquaplaning and skidding
on a damp or wet road surface. Tyre grip is
also noticeably reduced at low outside tem-
peratures and low tyre operating tempera-
tures. There is a risk of an accident. Operation
261Wheels and ty res
Z
Page 266 of 289
information regarding tyres at specialist tyre
retailers, at qualified specialist workshops or at any Mercedes-Benz Service Centre.
R Only fit tyres and wheels of the same type and
make.
Exception: it is permissible to fit a different
type or make in the event of a flat tyre.
R Only fit tyres of the correct size onto the
wheels.
R Run in new tyres at moderate speeds for the
first 100 km. They only reach their full per-
formance after this distance.
R Do not drive with tyres which have too little
tread depth. This otherwise significantly
reduces the traction on wet roads (aquaplan-
ing).
R Replace the tyres after six years at the latest,
regardless of wear.
Observe the notes on the emergency spare
wheel (Y page 273). Winter operation
General notes
Have your vehicle winterproofed at a qualified
specialist workshop at the onset of winter.
Observe the notes in the "Changing a wheel"
section (Y page 267). Driving with summer tyres
At temperatures below +7 †, summer tyres lose
elasticity and therefore traction and braking
power. Change the tyres on your vehicle to
M+S tyres. Using summer tyres at very cold
temperatures could cause tears to form,
thereby damaging the tyres permanently.
Mercedes-Benz cannot accept responsibility for
this type of damage. G
WARNING
Damaged tyres can cause tyre inflation pres-
sure loss. As a result, you could lose control of your vehicle. There is a risk of accident.
Check the tyres regularly for signs of damageand replace any damaged tyres immediately. M+S tyres
G
WARNING
M+S tyres with a tyre tread depth of less than 4 mm are not suitable for use in winter as they
do not provide sufficient traction. There is a
risk of accident.
M+S tyres with a tread depth of less than
4 mm must be replaced.
At temperatures below +7 †, use winter tyres or all-season tyres. Both types of tyre are identified
by the M+S marking.
Only winter tyres bearing the isnowflake
symbol in addition to the M+S marking provide
the best possible grip in wintry road conditions. Only these tyres will allow driving safety sys-
tems such as ABS and ESP ®
to function opti-
mally in winter. These tyres have been devel-
oped specifically for driving in snow.
Use M+S tyres of the same make and tread on all
wheels to maintain safe handling characteris-
tics.
Always observe the maximum permissible
speed specified for the M+S tyres you have fit-
ted.
If you fit M+S tyre sthat have a lower maximum
permissible speed than that of the vehicle, affix
an appropriate warning label in the driver's field
of vision. This can be obtained at a qualified
specialist workshop.
Under these circumstances, you should also
restrict the maximum design speed of the vehi- cle using permanent SPEEDTRONIC so that it
does not exceed the maximum permissible
speed for the M+S tyres (Y page 130).
When you have fitted the M+S tyres:
X Check the tyre pressures (Y page 264).
X Restart the tyre pressure monitor
(Y page 267).
Information on driving with an emergency spare
wheel (Y page 273). Snow chains
G
WARNING
If you have fitted snow chains to the front
wheels, they may scrape against the vehicle
body or chassis components. This could Winter operation
263Wheels and tyres
Z
Page 275 of 289
Lowering the vehicle
G
WARNING
The wheels could work loose if the wheel nuts and bolts are not tightened to the specified
tightening torque. There is a risk of accident.
Have the tightening torque immediately
checked at a qualified specialist workshop
after a wheel is changed.
! Vehicles with a collapsible emergency
spare wheel: Inflate the collapsible emer-
gency spare wheel using the tyre inflation
compressor before lowering the vehicle. The
rim could otherwise be damaged.
X Turn the crank of the jack anti-clockwise until
the vehicle is once again standing firmly on
the ground.
X Place the jack to one side. X
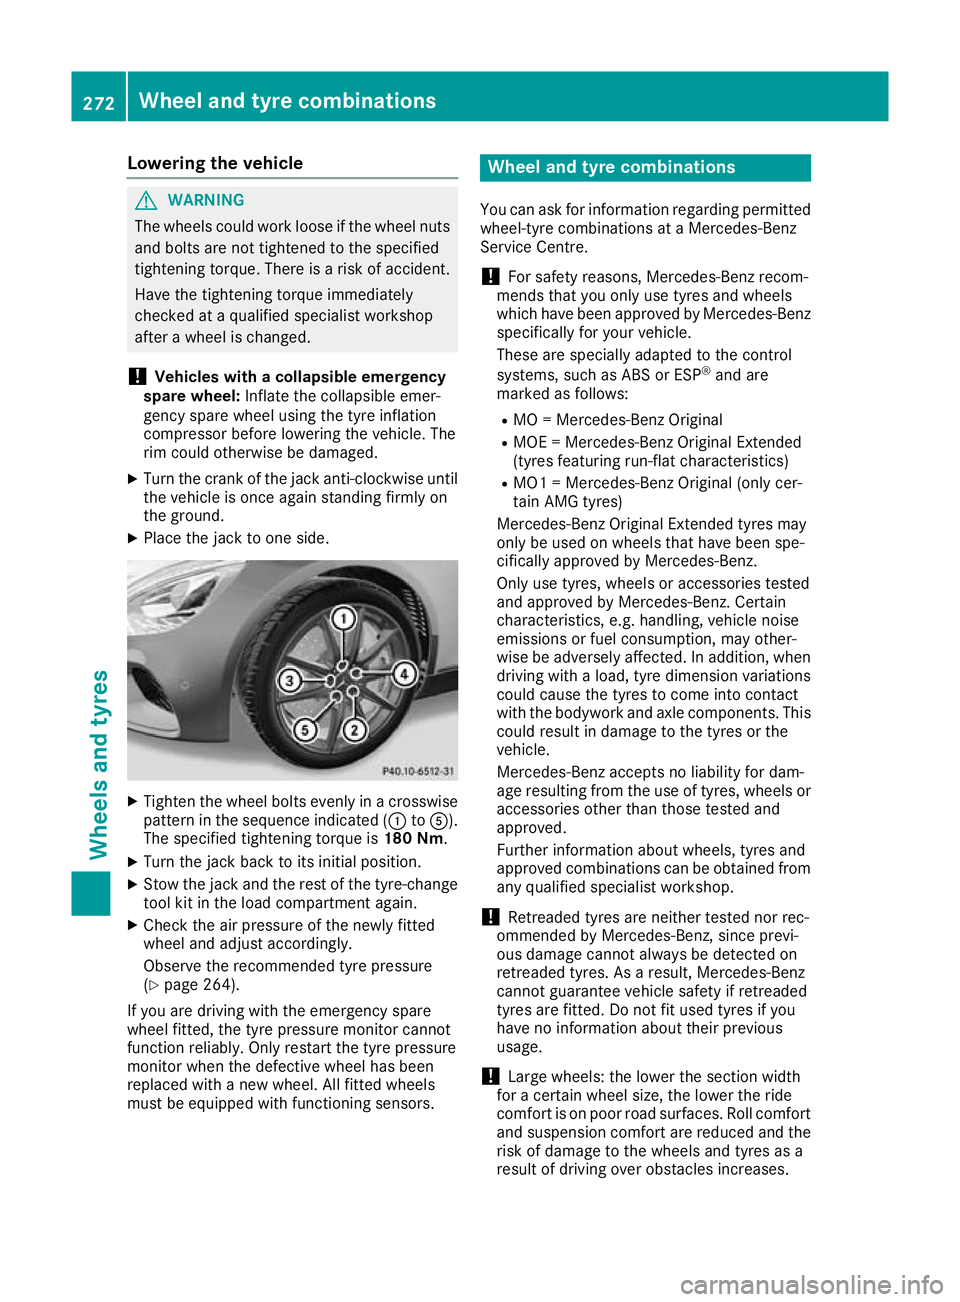
Tighten the wheel bolts evenly in a crosswise
pattern in the sequence indicated (: toA).
The specified tightening torque is 180 Nm.
X Turn the jack back to its initial position.
X Stow the jack and the rest of the tyre-change
tool kit in the load compartment again.
X Check the air pressure of the newly fitted
wheel and adjust accordingly.
Observe the recommended tyre pressure
(Y page 264).
If you are driving with the emergency spare
wheel fitted, the tyre pressure monitor cannot
function reliably. Only restart the tyre pressure
monitor when the defective wheel has been
replaced with a new wheel. All fitted wheels
must be equipped with functioning sensors. Wheel and tyre combinations
You can ask for information regarding permitted
wheel-tyre combinations at a Mercedes-Benz
Service Centre.
! For safety reasons, Mercedes-Benz recom-
mends that you only use tyres and wheels
which have been approved by Mercedes-Benz specifically for your vehicle.
These are specially adapted to the control
systems, such as ABS or ESP ®
and are
marked as follows:
R MO = Mercedes-Benz Original
R MOE = Mercedes-Benz Original Extended
(tyres featuring run-flat characteristics)
R MO1 = Mercedes-Benz Original (only cer-
tain AMG tyres)
Mercedes-Benz Original Extended tyres may
only be used on wheels that have been spe-
cifically approved by Mercedes-Benz.
Only use tyres, wheels or accessories tested
and approved by Mercedes-Benz. Certain
characteristics, e.g. handling, vehicle noise
emissions or fuel consumption, may other-
wise be adversely affected. In addition, when
driving with a load, tyre dimension variations
could cause the tyres to come into contact
with the bodywork and axle components. This
could result in damage to the tyres or the
vehicle.
Mercedes-Benz accepts no liability for dam-
age resulting from the use of tyres, wheels or accessories other than those tested and
approved.
Further information about wheels, tyres and
approved combinations can be obtained from
any qualified specialist workshop.
! Retreaded tyres are neither tested nor rec-
ommended by Mercedes-Benz, since previ-
ous damage cannot always be detected on
retreaded tyres. As a result, Mercedes-Benz
cannot guarantee vehicle safety if retreaded
tyres are fitted. Do not fit used tyres if you
have no information about their previous
usage.
! Large wheels: the lower the section width
for a certain wheel size, the lower the ride
comfort is on poor road surfaces. Roll comfort and suspension comfort are reduced and therisk of damage to the wheels and tyres as a
result of driving over obstacles increases. 272
Wheel and tyre combinationsWheels and tyres