fog light MERCEDES-BENZ AMG GT ROADSTER 2018 Owner's Manual
[x] Cancel search | Manufacturer: MERCEDES-BENZ, Model Year: 2018, Model line: AMG GT ROADSTER, Model: MERCEDES-BENZ AMG GT ROADSTER 2018Pages: 294, PDF Size: 4.8 MB
Page 14 of 294
Horn...................................................... 33
Hydroplaning ..................................... 134
I
Ignition key
see SmartKey
Ignition lock
see Key positions
Immobilizer .......................................... 64
Indicator lamps
see Warning and indicator lamps
Indicators
see Turn signals
Inspection
see ASSYST PLUS
Instrument cluster
Overview .......................................... 34
Warning and indicator lamps ...........3 4
Instrument cluster lighting .............. 169
Interior lighting
Automatic control .......................... 100
Overview .......................................... 99
Reading lamp .................................. .99
Setting the brightness of the dis-
play/switch (on-board computer) .. 169
iPod
®
see also Digital Operator's Man-
ual .................................................. 208
J
Jack Using ............................................. 280
Jump starting (engine) ...................... 254
K
Key positions
SmartKey ....................................... 111
Start/Stop button .......................... 110
KEYLESS-GO
Convenience closing feature ............ 78
Deactivation ..................................... 67
Locking ............................................ 67
Start function ................................... 67
Unlocking ......................................... 67
KEYLESS-GO start function
Start/Stop button .......................... 110 Kickdown
Driving tips .................................... 120
Knee bag .............................................. 46
L
Lamps
see Warning and indicator lamps
Lane detection (automatic)
see Lane Keeping Assist
Lane Keeping Assist
Activating/deactivating (on-
board computer) ............................ 169
Display message ............................ 189
Function/information .................... 157
Lane Tracking package ..................... 155
Lap time (RACETIMER) ...................... 172
License plate lamp (display mes-
sage) ................................................... 185
Light sensor (display message) ....... 185
Lights
Automatic headlamp mode .............. 96
Fogged up headlamps ...................... 99
Hazard warning lamps ..................... 98
High beam flasher ............................ 97
High-beam headlamps ..................... 97
Light switch ..................................... 96
Low-beam headlamps ...................... 97
Parking lamps .................................. 97
Rear fog lamp .................................. 97
Setting exterior lighting ................... 96
Setting the brightness of the dis-
play/switch (on-board computer) .. 169
Standing lamps ................................ 97
Switching the daytime running
lamps on/off (on-board com-
puter) ............................................. 169
Turn signals ..................................... 97
see Interior lighting
Loading guidelines ............................ 217
Locking (doors)
Automatic ........................................ 72
Emergency locking ........................... 73
From inside (central locking but-
ton) .................................................. 72
see KEYLESS-GO
Locking centrally
see Central locking
12Index
Page 18 of 294
Radio modesee also Digital Operator's Man-
ual .................................................. 208
Radio-wave reception/transmis-
sion in the vehicle
Declaration of conformity ................ 27
Reading lamp ....................................... 99
Rear axle steering
Function/notes .............................1 13
Rear fog lamp
Display message ............................ 185
Switching on/off .............................. 97
Rear lamps
see Lights
Rear spoiler
Display message ............................ 195
Extending/retracting ..................... 228
Problem ......................................... 229
Rear view camera
Cleaning instructions ..................... 245
Function/notes .............................1 50
Switching on/off ........................... 151
Rear window defroster
Problem (malfunction) ................... 107
Switching on/off ........................... 107
Rear-view mirror
Anti-glare (manual) .......................... 91
Dipping (automatic) ......................... 93
Recycling
see Protection of the environment
Reflective safety jacket .................... 248
Refrigerant (air-conditioning sys-
tem)
Important safety notes .................. 291
Refueling
Fuel gauge ....................................... 34
Important safety notes .................. 125
Refueling process .......................... 126
see Fuel
Remote control
Garage door opener ....................... 230
Replacing bulbs
General notes ................................ 100
Reporting safety defects .................... 28
Rescue card ......................................... 29
Reserve (fuel tank)
see Fuel Reserve fuel
Display message ............................ 188
Warning lamp ................................. 203
Restraint system
Display message ............................ 181
Introduction ..................................... 40
Warning lamp ................................. 202
Warning lamp (function) ................... 41
Reversing feature
Side windows ................................... 77
Reversing lamps (display mes-
sage) ................................................... 185
Roadside Assistance (breakdown) .... 26
Roll away protection
see HOLD function
Roof
see Soft top
Roof l
ining and carpets (cleaning
guidelines) ......................................... 247
Route guidance
see also Digital Operator's Man-
ual .................................................. 208
S
SafetyChildren in the vehicle ..................... 55
see Occupant safety
see Operating safety
Safety system
see Driving safety systems
SD card
Inserting/removing ........................ 216
SD memory card
see also Digital Operator's Man-
ual .................................................. 208
Selecting ........................................ 165
Search & Send
see also Digital Operator's Man-
ual .................................................. 208
Seat
Correct driver's seat position ........... 84
Seat belts
Adjusting the driver's and front-
passenger seat belt ......................... 44
Cleaning ......................................... 247
Correct usage .................................. 43
Fastening ......................................... 44
16Index
Page 35 of 294
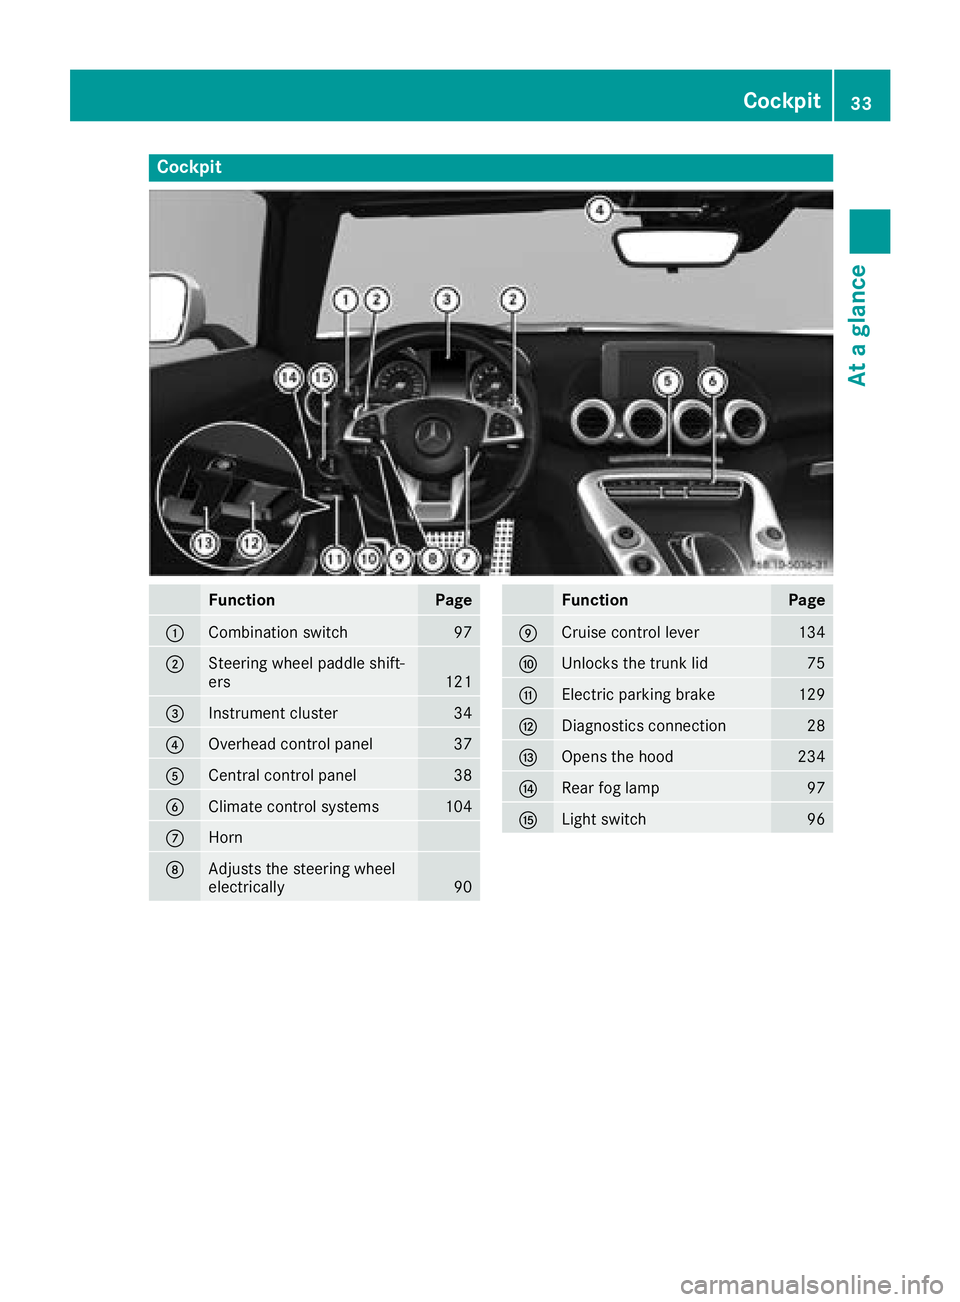
Cockpit
FunctionPage
:Combination switch97
;Steering wheel paddle shift-
ers121
=Instrument cluster34
?Overhead control panel37
ACentral control panel38
BClimate control systems104
CHorn
DAdjusts the steering wheel
electrically90
FunctionPage
ECruise control lever134
FUnlocks the trunk lid75
GElectric parking brake129
HDiagnostics connection28
IOpens the hood234
JRear fog lamp97
KLight switch96
Cockpit33
At a glance
Page 36 of 294
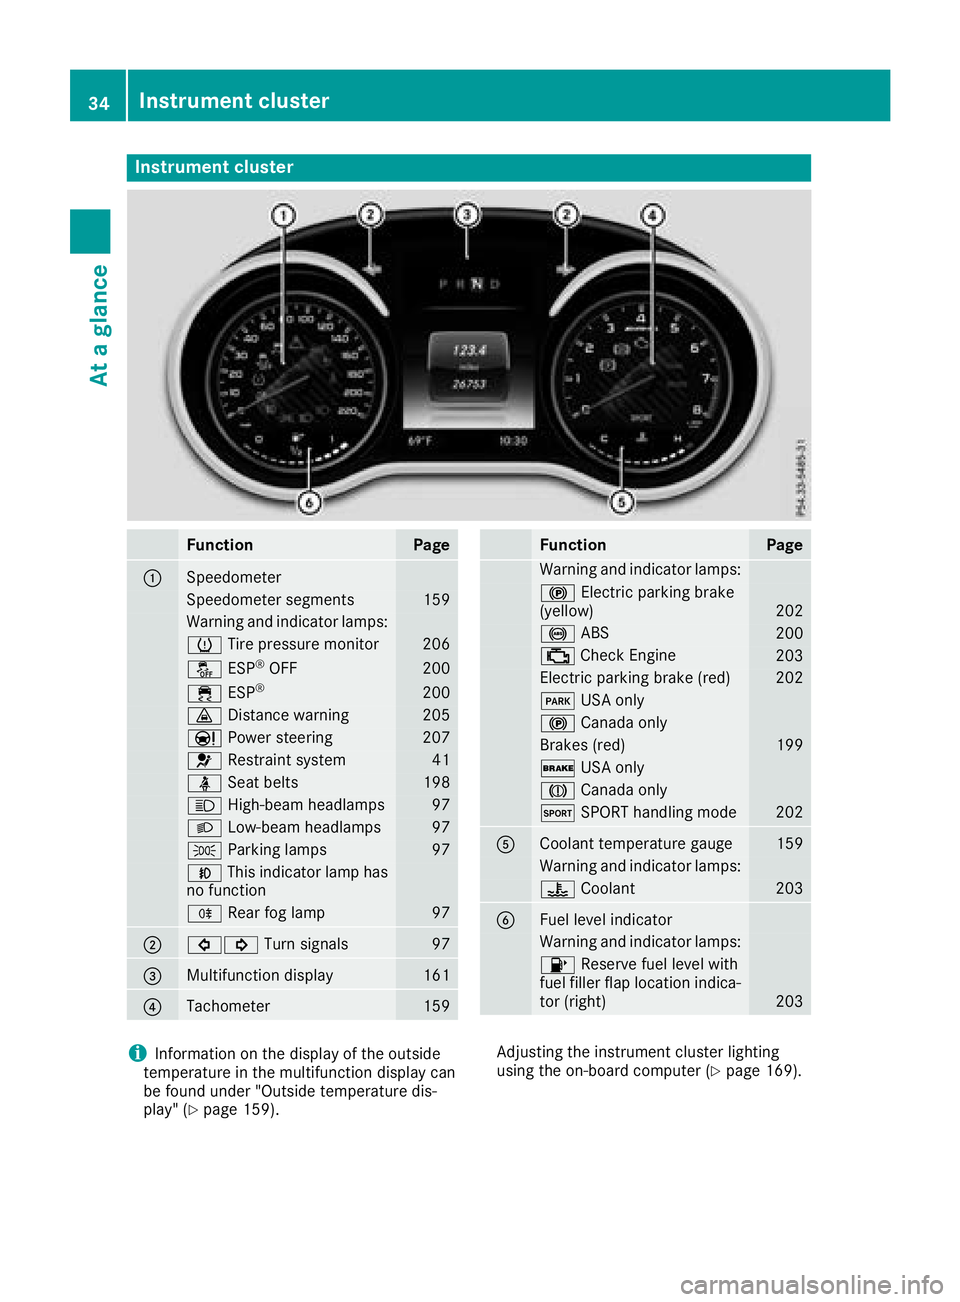
Instrument cluster
FunctionPage
:Speedometer
Speedometer segments159
Warning and indicator lamps:
h Tirepressur emonitor20 6
å ESP®OF F200
÷ ESP®20 0
· Distanc ewarning20 5
Ð Powersteering20 7
6 Restrain tsystem41
ü Seat belt s198
K High-beam headlamps97
LLow-beam headlamps97
TParking lamp s97
NThis indicator lamp has
no function
R Rear fog lamp97
;#! Turn signals97
=Multifunction display161
?Tachometer159
FunctionPag e
Warning and indicator lamps:
! Electric parking brak e
(yellow)20 2
! ABS200
; CheckEngin e203
Electric parking brak e(red)20 2
F USAonly
! Canad aonly
Brake s(red)19 9
$ USAonly
J Canad aonly
M SPORT handlin gmod e202
ACoolan ttemperature gauge15 9
Warning and indicator lamps:
? Coolan t203
BFue llevel indicator
Warning and indicator lamps:
8 Reserve fuel level wit h
fuel filler flap location indica-
to r(right )
203
iInformation on th edisplay of th eoutside
temperature in th emultifunction display can
be foun dunder "Outside temperature dis-
play" (
Ypage 159). Adjusting th
einstrumen tcluste rlighting
usin gth eon-board computer (
Ypage 169).
34Instrument cluster
At a glance
Page 98 of 294
Exterior lighting
General notes
For reasons of safety, Mercedes-Benz recom-
mends that you drive with the lights switched on
even during the daytime. In some countries,
operation of the headlamps varies due to legal
requirements and self-imposed obligations.
Setting the exterior lighting
Setting options
Exterior lighting can be set using the:
Rlight switch
Rcombination switch (Ypage 97)
Light switch
Operation
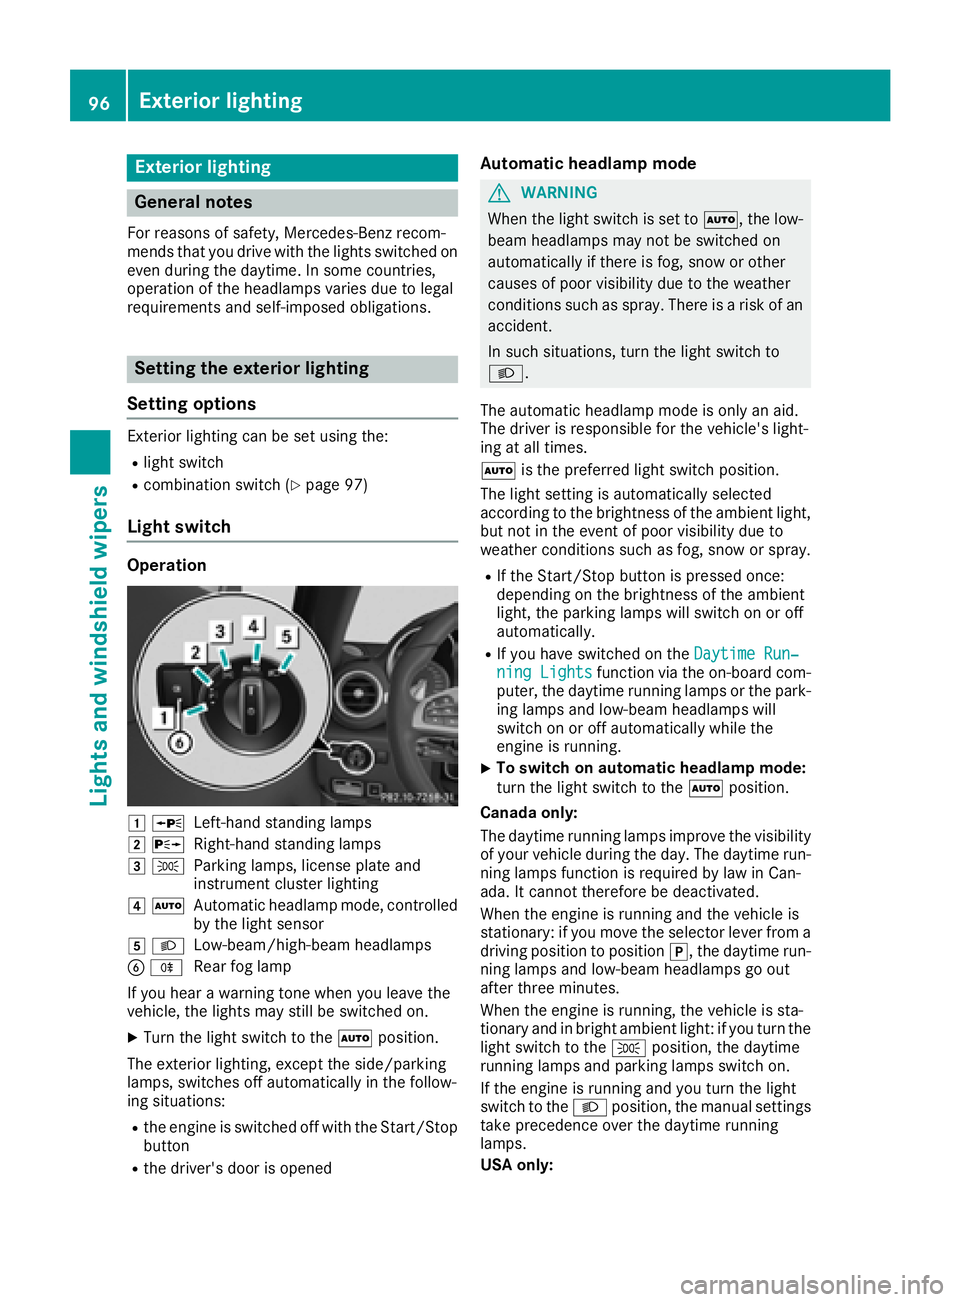
1 WLeft-hand standing lamps
2XRight-hand standing lamps
3TParking lamps, license plate and
instrument cluster lighting
4ÃAutomatic headlamp mode, controlled
by the light sensor
5 LLow-beam/high-beam headlamps
BRRear fog lamp
If you hear a warning tone when you leave the
vehicle, the lights may still be switched on.
XTurn the light switch to the Ãposition.
The exterior lighting, except the side/parking
lamps, switches off automatically in the follow-
ing situations:
Rthe engine is switched off with the Start/Stop button
Rthe driver's door is opened
Automatic headlamp mode
GWARNING
When the light switch is set to Ã, the low-
beam headlamps may not be switched on
automatically if there is fog, snow or other
causes of poor visibility due to the weather
conditions such as spray. There is a risk of an
accident.
In such situations, turn the light switch to
L.
The automatic headlamp mode is only an aid.
The driver is responsible for the vehicle's light-
ing at all times.
à is the preferred light switch position.
The light setting is automatically selected
according to the brightness of the ambient light,
but not in the event of poor visibility due to
weather conditions such as fog, snow or spray.
RIf the Start/Stop button is pressed once:
depending on the brightness of the ambient
light, the parking lamps will switch on or off
automatically.
RIf you have switched on the Daytime Run‐ning Lightsfunction via the on-board com-
puter, the daytime running lamps or the park-
ing lamps and low-beam headlamps will
switch on or off automatically while the
engine is running.
XTo switch on automatic headlamp mode:
turn the light switch to the Ãposition.
Canada only:
The daytime running lamps improve the visibility of your vehicle during the day. The daytime run-
ning lamps function is required by law in Can-
ada. It cannot therefore be deactivated.
When the engine is running and the vehicle is
stationary: if you move the selector lever from a
driving position to position j, the daytime run-
ning lamps and low-beam headlamps go out
after three minutes.
When the engine is running, the vehicle is sta-
tionary and in bright ambient light: if you turn the
light switch to the Tposition, the daytime
running lamps and parking lamps switch on.
If the engine is running and you turn the light
switch to the Lposition, the manual settings
take precedence over the daytime running
lamps.
USA only:
96Exterior lighting
Lights and windshield wipers
Page 99 of 294
The daytime running lamps improve the visibility
of your vehicle during the day. Here, theDay‐
time Running Lightsfunction must be
switched on via the on-board computer
(
Ypage 169).
If the engine is running and you turn the light
switch to the TorL position, the manual
settings take precedence over the daytime run-
ning lamps.
Low-beam headlamps
GWARNING
When the light switch is set to Ã, the low-
beam headlamps may not be switched on
automatically if there is fog, snow or other
causes of poor visibility due to the weather
conditions such as spray. There is a risk of an
accident.
In such situations, turn the light switch to
L.
When the ignition is switched on and the light
switch is in the Lposition, the parking lamps
and low-beam headlamps are switched on even
if the light sensor does not sense dark condi-
tions. This is a particularly useful function in the
event of rain and fog.
XTo switch on the low-beam headlamps:
select key position 2with the Start/Stop
button or start the engine.
XTurn the light switch to the Lposition.
The green Lindicator lamp in the instru-
ment cluster lights up.
Rear fog lamp
The rear fog lamp improves visibility of your
vehicle for the traffic behind in the event of thick
fog. You must observe the legal requirements
for the country in which you are currently driving when operating the rear fog lamp.
XTo switch on the rear fog lamp: select key
position 2with the Start/Stop button or
start the engine.
XTurn the light switch to the LorÃ
position.
XPress the Rbutton.
The yellow Rindicator lamp in the instru-
ment cluster lights up.
XTo switch off the rear fog lamp: press the
R button.
The yellow Rindicator lamp in the instru-
ment cluster goes out.
Parking lamps
!If the battery charge is very low, the parking
lamps or standing lamps are automatically
switched off to enable the next engine start.
Always park your vehicle safely and in a well lit
area, in accordance with the relevant legal
stipulations. Avoid using the Tparking
lamps over a period of several hours. If pos-
sible, switch on the right-hand Xor left-
hand W standing lamps.
XTo switch on the parking lamps: turn the
light switch to the Tposition.
The green Tindicator lamp in the instru-
ment cluster lights up.
Standing lamps
Switching on the standing lamps ensures the
correspondin g side of the vehicle is illuminated.
XTo switch on the standing lamps: switch off
the engine with the Start/Stop button.
XTurn the light switch to the Wposition (left-
hand side of the vehicle) or Xposition
(right-hand side of the vehicle).
Combination switch
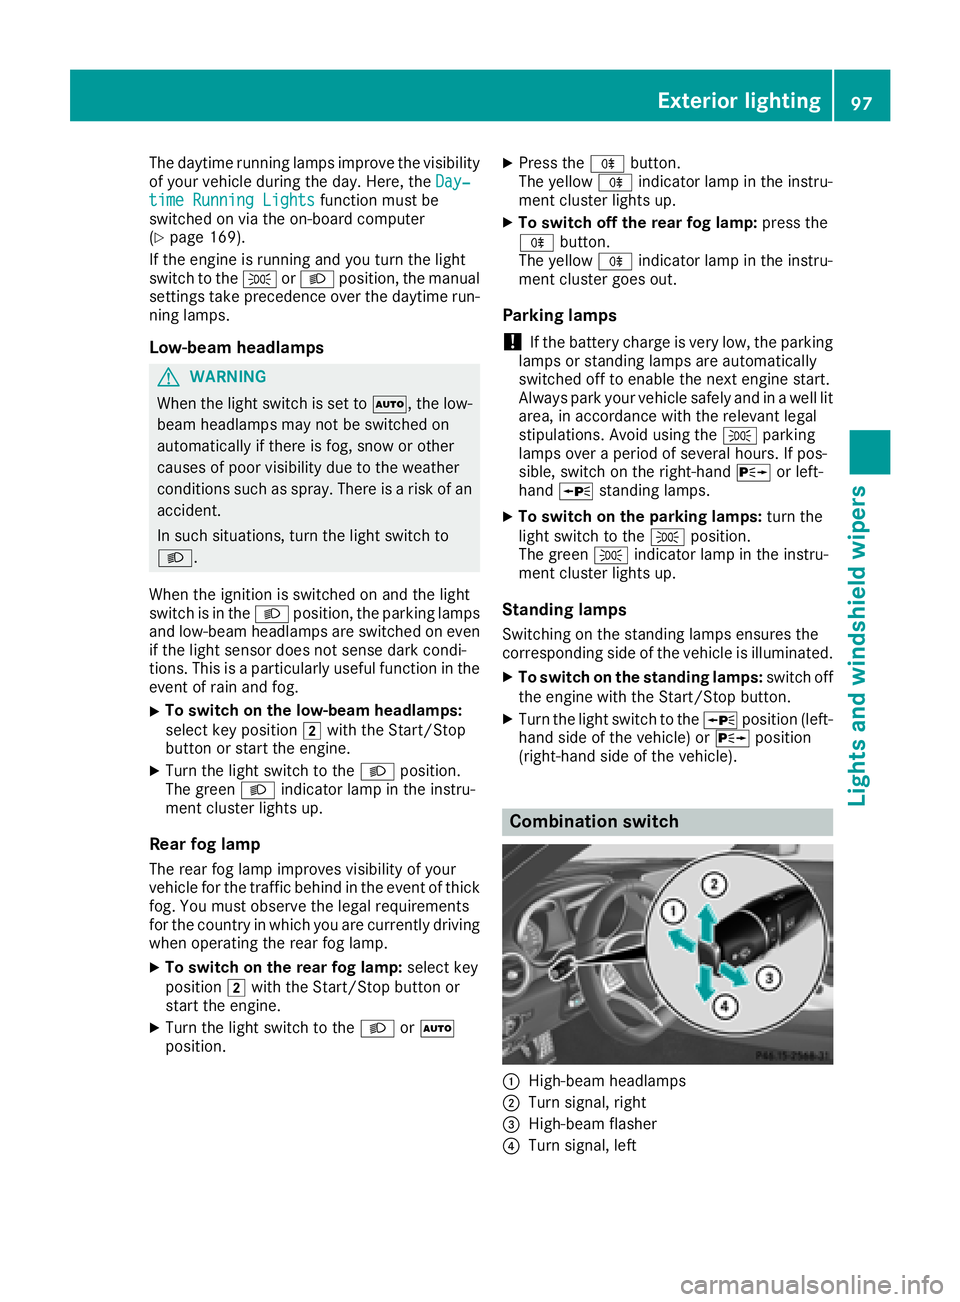
:High-beam headlamps
;Turn signal, right
=High-beam flasher
?Turn signal, left
Exterior lighting97
Lights and windshield wipers
Z
Page 101 of 294
On very rare occasions, Adaptive Highbeam
Assist may fail to recognize other road users
that have lights, or may recognize them too
late. In this, or in similar situations, the auto-
matic high-beam headlamps will not be deac-tivated or will be activated regardless. There is
a risk of an accident.
Always carefully observe the traffic conditions
and switch off the high-beam headlamps in
good time.
Adaptive Highbeam Assist cannot take into
account road, weather or traffic conditions.
Adaptive Highbeam Assist is only an aid. You are
responsible for adjusting the vehicle's lighting
to the prevailing light, visibility and traffic con-
ditions.
In particular, the detection of obstacles can be
restricted if there is:
Rpoor visibility, e.g. due to fog, heavy rain or
snow
Rdirt on the sensors or the sensors are
obscured
Switching Adaptive Highbeam Assist
on/off
XTo switch on: turn the light switch to the
à position.
XPress the combination switch beyond the
pressure point in the direction of arrow :.
The _ indicator lamp in the multifunction
display lights up when it is dark and the light
sensor activates the low-beam headlamps.
If you are driving at speeds above approx-
imately 16 mph (25 km/h):
The headlamp range is set automatically
depending on the distance between the vehi-
cle and other road users.
If you are driving at speeds above approx-
imately 19 mph (30 km/h) and no other road
users have been detected:
The high-beam headlamps are switched on
automatically. The Kindicator lamp in the
instrument cluster also lights up.
If you are driving at speeds below approx-
imately 16 mph (25 km/h) or other road users have been detected or the roads are ade-
quately lit:
The high-beam headlamps are switched off
automatically. The Kindicator lamp in the instrument cluster goes out. The
_indi-
cator lamp in the multifunction display
remains lit.
XTo switch off: move the combination switch
back to its normal position or move the light
switch to another position.
The _ indicator lamp in the instrument
cluster goes out.
Headlamps fogged up on the inside
Certain climatic and physical conditions may
cause moisture to form in the headlamp. This
moisture does not affect the functionality of the
headlamp.
Interior lighting
Overview
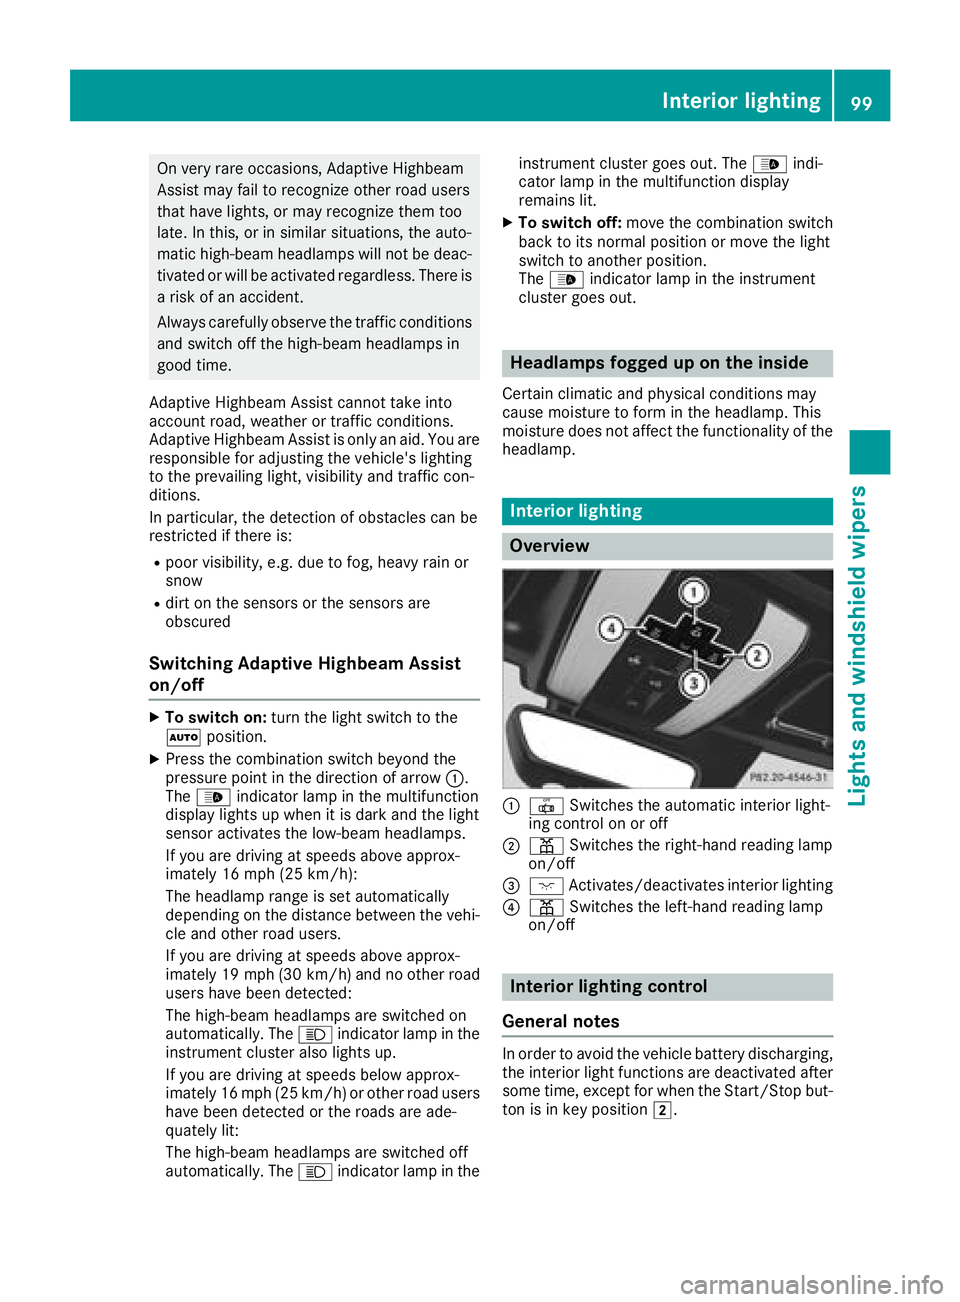
:| Switches the automatic interior light-
ing control on or off
;p Switches the right-hand reading lamp
on/off
=c Activates/deactivates interior lighting
?p Switches the left-hand reading lamp
on/off
Interior lighting control
General notes
In order to avoid the vehicle battery discharging,
the interior light functions are deactivated after
some time, except for when the Start/Stop but-
ton is in key position 2.
Interior lighting99
Lights and windshield wipers
Z
Page 106 of 294
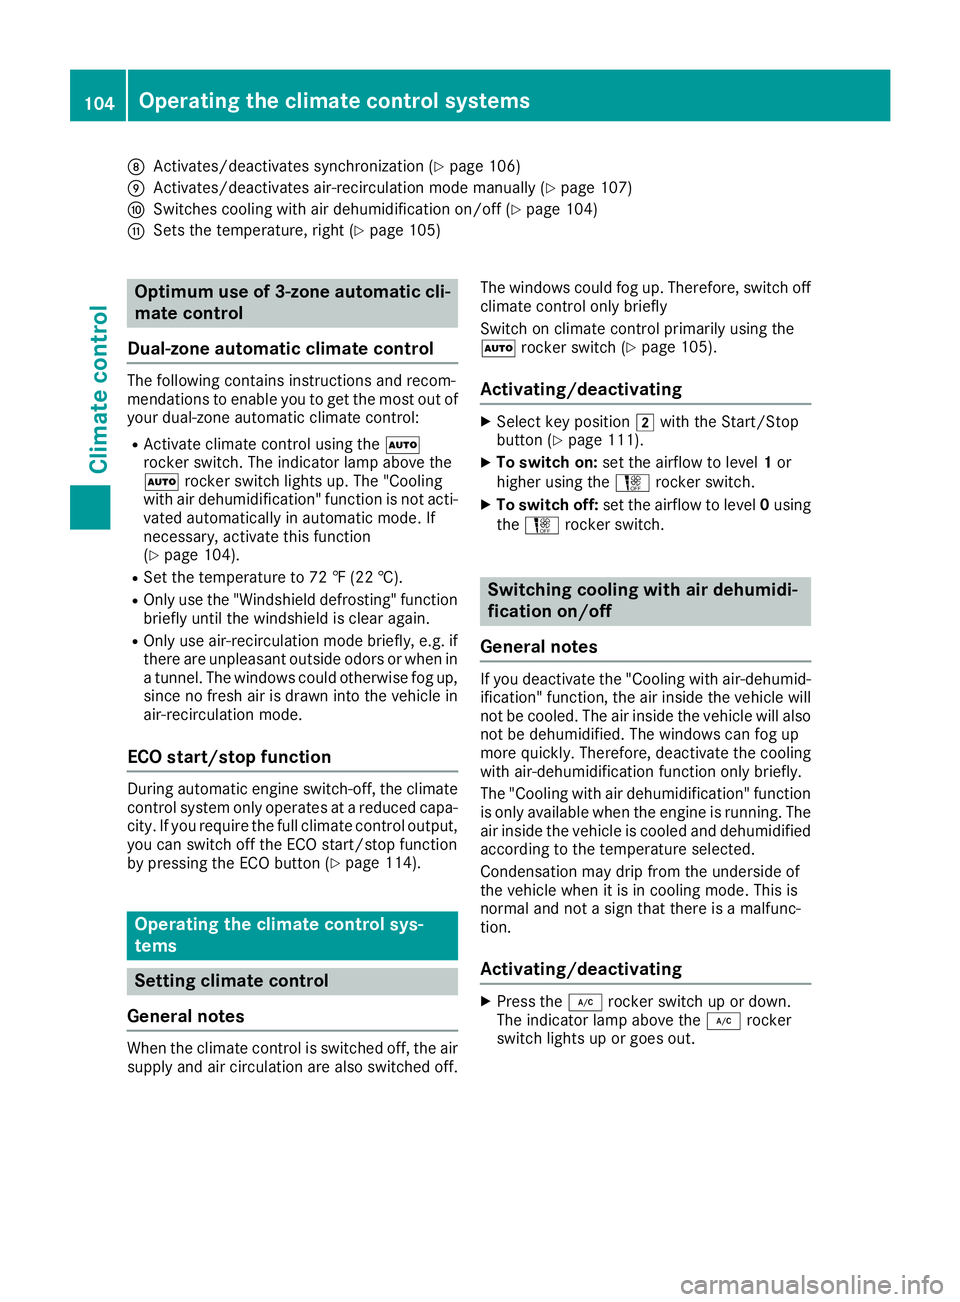
DActivates/deactivates synchronization (Ypage 106)
EActivates/deactivates air-recirculation mode manually (Ypage 107)
FSwitches cooling with air dehumidification on/off (Ypage 104)
GSets the temperature, right (Ypage 105)
Optimum use of 3-zone automatic cli-
mate control
Dual-zone automatic climate control
The following contains instructions and recom-
mendations to enable you to get the most out of
your dual-zone automatic climate control:
RActivate climate control using the Ã
rocker switch. The indicator lamp above the
à rocker switch lights up. The "Cooling
with air dehumidification" function is not acti-
vated automatically in automatic mode. If
necessary, activate this function
(
Ypage 104).
RSet the temperature to 72 ‡ (22 †).
ROnly use the "Windshield defrosting" function
briefly until the windshield is clear again.
ROnly use air-recirculation mode briefly, e.g. if
there are unpleasant outside odors or when in
a tunnel. The windows could otherwise fog up,
since no fresh air is drawn into the vehicle in
air-recirculation mode.
ECO start/stop function
During automatic engine switch-off, the climate
control system only operates at a reduced capa-
city. If you require the full climate control output,
you can switch off the ECO start/stop function
by pressing the ECO button (
Ypage 114).
Operating the climate control sys-
tems
Setting climate control
General notes
When the climate control is switched off, the air
supply and air circulation are also switched off. The windows could fog up. Therefore, switch off
climate control only briefly
Switch on climate control primarily using the
Ã
rocker switch (
Ypage 105).
Activating/deactivating
XSelect key position 2with the Start/Stop
button (Ypage 111).
XTo switch on: set the airflow to level 1or
higher using the Hrocker switch.
XTo switch off: set the airflow to level 0using
the H rocker switch.
Switching cooling with air dehumidi-
fication on/off
General notes
If you deactivate the "Cooling with air-dehumid-
ification" function, the air inside the vehicle will
not be cooled. The air inside the vehicle will also
not be dehumidified. The windows can fog up
more quickly. Therefore, deactivate the cooling
with air-dehumidification function only briefly.
The "Cooling with air dehumidification" function is only available when the engine is running. The
air inside the vehicle is cooled and dehumidified
according to the temperature selected.
Condensation may drip from the underside of
the vehicle when it is in cooling mode. This is
normal and not a sign that there is a malfunc-
tion.
Activating/deactivating
XPress the ¿rocker switch up or down.
The indicator lamp above the ¿rocker
switch lights up or goes out.
104Operating the climate control systems
Climate control
Page 108 of 294
Setting the airflow
XSelect key position2with the Start/Stop
button (Ypage 111).
XTo increase or reduce: press theH
rocker switch up or down.
Activating/deactivating synchroniza-
tion
General notes
Climate control can be set centrally using the
synchronization function. The temperature set-
ting is adopted for the front-passenger side.
Activating/deactivating
XPress the 0rocker switch up or down.
The indicator lamp above the 0rocker
switch lights up or goes out.
The synchronization function deactivates if the
settings for the front-passenger side are
changed.
Defrosting the windshield
General notes
You can use this function to defrost the wind-
shield or to clear a fogged up windshield and
side windows.
Switch off the "Windshield defrosting" function
as soon as the windshield is clear again.
Activating/deactivating
XSelect key position 2with the Start/Stop
button (Ypage 111).
XTo switch on: press the¬rocker switch
up or down.
The indicator lamp above the ¬rocker
switch lights up. The current climate control
settings are deactivated.
The climate control system switches to the
following functions:
Rhigh airflow
Rhigh temperature
Rair distribution to the windshield and front
side windows
Rair-recirculation mode off
iIf necessary, the "Cooling with air dehumid-
ification" function is activated. In this case,
the indicator lamp above the ¿rocker
switch remains switched off.
XTo switch off: press the¬rocker switch
up or down.
The indicator lamp above the ¬rocker
switch goes out. The previously selected set-
tings are restored. Air-recirculation mode
remains deactivated.
Defrosting the windows
Windows fogged up on the inside
XActivate the "Cooling with air dehumidifica-
tion" function with the ¿rocker switch.
XSwitch on automatic mode using the Ã
rocker switch.
XIf the windows continue to fog up, activate the "Windshield defrosting" function using the
¬ rocker switch.
iYou should only select this setting until the
windshield is clear again.
Windows fogged up on the outside
XActivate the windshield wipers.
XSwitch on automatic mode using the Ã
rocker switch.
iIf you clean the windows regularly, they do
not fog up so quickly.
Rear window defroster
General notes
The rear window defroster has a high current
draw. You should therefore switch it off as soon
as the rear window is clear. Otherwise, the rear
window defroster switches off automatically
after several minutes.
If the battery voltage is too low, the rear window defroster may switch off.
106Operating the climate control systems
Climate control
Page 109 of 294
Activating/deactivating
XSelectke yposition 2withth eStart/Sto p
butto n (Ypage 111).
XPress th e¤ rockerswitch up or down .
The indicator lamp abov eth e¤ rocker
switch lights up or goe sout .
Problems with the rear window defros ter
ProblemPossible causes/consequences and MSolutions
The rear window
defrosterhas deactiva-
te dprematurel yor can -
no tbe activated.The battery has no tbeen sufficientl ycharged.
XSwitc hoff any consumer sthat are no trequired, e.g. reading lamps,
interior lighting or th eseat heating .
When th ebattery is sufficientl ycharged, th erear window defroste r
can be activated again .
Switching air-recirculati on mode
on/off
Gene ral notes
You can also temporarily deactivat eth eflo wof
fresh air manually if unpleasant odor sare enter-
ing th evehicl efrom outside .The air already
inside th evehicl ewill then be recirculated.
If you switch on air-recirculation mode, th ewin -
dows can fog up mor equickly, in particular at
low temperatures .Only use air-recirculation
mod ebriefl yto preven tth ewindows from fog -
gin gup.
Activating/deactivating
XSelec tke yposition 2withth eStart/Sto p
butto n (Ypage 111).
XTo activate: press theg rockerswitch up
or down .
The indicator lamp abov eth eg rocker
switch lights up.
Air-recirculation mod eswitches on automati-
cally:
Rat high outside temperatures
Rin atunne l(vehicles wit h anavigation system
only)
The indicator lamp abov eth eg rocker
switch is no tlit when automatic air-recirculation
mod eis activated. Outside air is added after
about 30 minutes.
XTo deactivate: press theg rockerswitch
up or down .
The indicator lamp abov eth eg rocker
switch goe sout .
Air-recirculation mod edeactivates automati-
cally:
Rafter approximately fiv eminute sat outside
temperatures belo wapproximately 41 ‡
(5 †)
Rafter approximately five minutes if cooling
with air dehumidification is deactivated
Rafter approximately 30 minutes at outside
temperatures above approximately 41 ‡
(5 †) if the "Cooling with dehumidification"
function is activated
Air vents
Important safety notes
GWARNING
Very hot or very cold air can flow from the air
vents. This could result in burns or frostbite in
the immediate vicinity of the air vents. There
is a risk of injury.
Make sure that all vehicle occupants always
maintain a sufficient distance to the air out-
lets. If necessary, redirect the airflow to
another area of the vehicle interior.
Air vents107
Climate control
Z