glove box MERCEDES-BENZ AMG GT ROADSTER 2018 Owner's Manual
[x] Cancel search | Manufacturer: MERCEDES-BENZ, Model Year: 2018, Model line: AMG GT ROADSTER, Model: MERCEDES-BENZ AMG GT ROADSTER 2018Pages: 294, PDF Size: 4.8 MB
Page 13 of 294
Two-way radio ................................ 285
Front-passenger seat
see Seat
Fuel
Additives ........................................2 88
Consumption statistics .................. 162
Displaying the current consump-
tion ................................................ 162
Displaying the range ......................1 62
Driving tips ....................................1 31
E10 ................................................ 287
Fuel gauge ....................................... 34
Grade (gasoline) ............................ 287
Important safety notes .................. 287
Problem (malfunction) ................... 127
Refueling ........................................ 125
Tank content/reserve fuel ............. 287
Fuel filler flap
Closing ...........................................1 26
General information ....................... 126
Opening ......................................... 126
Problem (malfunction) ................... 127
Fuel level
Calling up the range (on-board
computer) ...................................... 162
Fuel tank
Capacity ........................................ 287
Problem (malfunction) ................... 127
Fuses
Allocation chart .............................2 60
Before changing .............................2 60
Fuse box in the front-passenger
footwell .......................................... 260
Fuse box in the rear compartment .. 260
Important safety notes .................. 259
G
G-Meter (on-board computer) .......... 171
Garage door opener
Clearing the memory ..................... 232
General notes ................................ 230
Important safety notes .................. 230
Opening/closing the garage door .. 232
Problems when programming ........2 32
Programming (button in the rear-
view mirror) ................................... 230
Synchronizing the rolling code ....... 231 Gasoline
............................................. 287
Gear indicator (on-board com-
puter) ..................................................1 70
Genuine parts ...................................... 24
Glove box ...........................................2 18
Google™ Local Search
see also Digital Operator's Man-
ual ..................................................2 08
H
Handling control system
see ESP®(Electronic Stability Program)
Handwriting recognition
Switching text reader function
on/off ............................................ 211
Touchpad ....................................... 210
Hazard warning lamps ........................ 98
Head bags
Operation ......................................... 47
Head level heating (AIRSCARF) .......... 89
Head restraints
Adjusting ......................................... 86
Headlamps
Cleaning system (notes) ................ 290
Fogging up ....................................... 99
see Automatic headlamp mode
Heating
see Climate control
High beam flasher ............................... 97
High-beam headlamps
Display message ............................ 185
Switching on/off .............................. 97
Hill start assist .................................. 112
HOLD function
Activating ....................................... 144
Activation conditions ..................... 144
Deactivating ................................... 145
Display message ............................ 189
General notes ................................ 144
Home address
see also Digital Operator's Man-
ual ..................................................2 08
Hood
Closing ...........................................2 35
Display message ............................ 195
Important safety notes .................. 234
Opening ......................................... 234
Index11
Page 20 of 294
SocketsGeneral notes ................................ 221
Trunk ............................................. 221
Soft top
Cleaning ......................................... 244
Important safety notes .................... 80
Opening/closing (SmartKey) ........... 81
Opening/closing (with soft-top
switch) ............................................. 80
Problem (malfunction) ..................... 83
Relocking ......................................... 81
Wind screen .....................................8 2
Soft-top switch .................................... 80
Sound
Switching on/off ........................... 209
Special seat belt retractor .................. 56
Specialist workshop ............................28
Speed, controlling
see Cruise control
Speedometer
Activating/deactivating the addi-
tional speedometer ........................ 170
Digital ............................................ 162
Segments ...................................... 159
Selecting the display unit ............... 169
SPORT handling mode
Activating/deactivating ...................6 2
Warning lamp ................................. 202
Sports exhaust system
see AMG sports exhaust system
Standing lamps
Display message ............................1 85
Switching on/off .............................. 97
Start/Stop button
General notes ................................ 110
Key positions ................................. 110
Starting the engine ........................ 112
Start/stop function
see ECO start/stop function
Starting (engine) ................................ 111
Starting the engine
see Starting (engine)
Steering
Display message ............................ 196
Warning lamps ............................... 207
Steering wheel
Adjusting (el ectricall
y) ..................... 90
Button overview ............................... 35 Buttons (on-board computer) ......... 160
Calling up a stored setting (mem-
ory function) ....................................9
5
Cleaning ........................................ .246
EASY ENTRY/EXIT feature ...............9 0
Important safety notes .................... 90
Paddle shifters ............................... 121
Storing settings (memory func-
tion) .................................................9 4
Steering wheel paddle shifters ........ 121
Stopwatch (RACETIMER) ...................172
Stowage areas ................................... 217
Stowage compartments
Armrest (front) ............................... 218
Armrest (under) .............................2 18
Cup holders ................................... 219
Glove box ....................................... 218
Important safety information ......... 217
Stowage net ................................... 218
see Stowage areas
Stowage net ....................................... 218
Summer opening
see Side windows
Summer tires
In winter ........................................ 263
Sun visor ............................................ 219
Suspension setting
AMG adaptive sport suspension
system ...........................................1 47
Suspension tuning
SETUP (on-board computer,
Mercedes-AMG vehicles) ...............1 71
Switching air-recirculation mode
on/off ................................................. 107
Switching on media mode
Via the device list .......................... 215
T
Tachometer ........................................ 159
Tail lamps
Display message ............................ 185
see Lights
Tank
see Fuel tank
Tank content
Fuel gauge ....................................... 34
18Index
Page 48 of 294
vehicle" (Ypage 55) in addition to the child
restraint system manufacturer's installation
and operating instructions.
Objects in the vehicle interior may prevent
an air bag from functioning correctly. Before
starting your journey and to avoid risks resulting
from the speed of the air bag as it deploys, make sure that:
Rthere are no people, animals or objects
between the vehicle occupants and an air bag
Rthere are no objects between the seat, door
and B-pillar
Rno accessories, such as cup holders, are
attached to the vehicle within the deployment
area of an air bag, e.g. to doors or side win-
dows
Rno heavy, sharp-edged or fragile objects are in
the pockets of your clothing. Store such
objects in a suitable place
GWARNING
If you modify the air bag cover or affix objects
such as stickers to it, the air bag can no longer
function correctly. There is an increased risk
of injury.
Never modify an air bag cover or affix objects
to it.
GWARNING
Sensors to control the air bags are located in
the doors. Modifications or work not per-
formed correctly to the doors or door panel-
ing, as well as damaged doors, can lead to the
function of the sensors being impaired. The air
bags might therefore not function properly
anymore. Consequently, the air bags cannot
protect vehicle occupants as they are
designed to do. There is an increased risk of
injury.
Never modify the doors or parts of the doors.
Always have work on the doors or door pan-
eling carried out at a qualified specialist work-
shop.
Front air bags
!Do not place heavy objects on the front-
passenger seat. This could cause the system
to identify the seat as being occupied. In the
event of an accident, the restraint systems on the front-passenger side may be triggered
and have to be replaced.
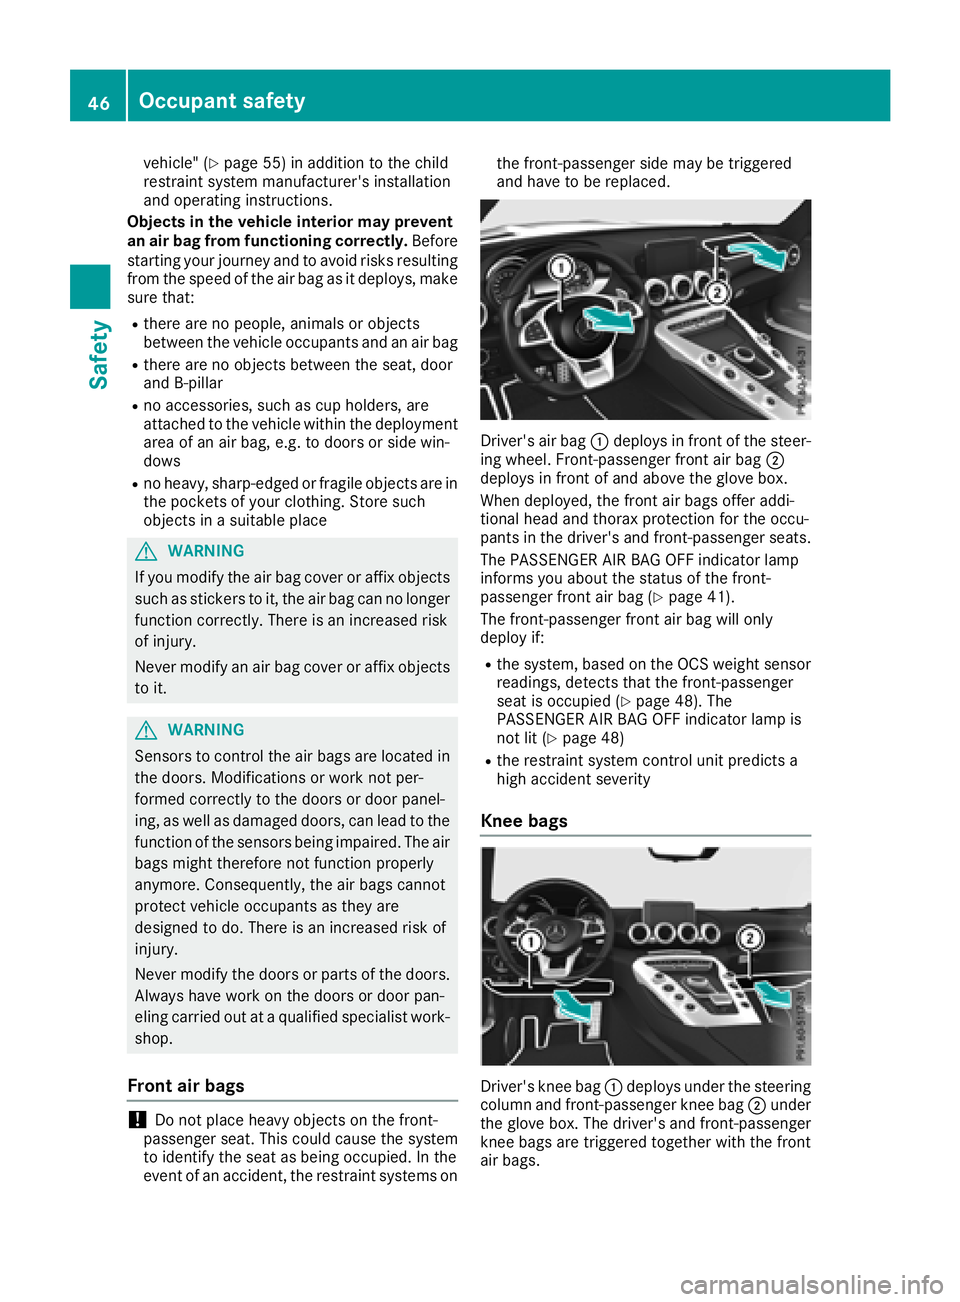
Driver's air bag
:deploys in front of the steer-
ing wheel. Front-passenger front air bag ;
deploys in front of and above the glove box.
When deployed, the front air bags offer addi-
tional head and thorax protection for the occu-
pants in the driver's and front-passenger seats.
The PASSENGER AIR BAG OFF indicator lamp
informs you about the status of the front-
passenger front air bag (
Ypage 41).
The front-passenger front air bag will only
deploy if:
Rthe system, based on the OCS weight sensor
readings, detects that the front-passenger
seat is occupied (
Ypage 48). The
PASSENGER AIR BAG OFF indicator lamp is
not lit (
Ypage 48)
Rthe restraint system control unit predicts a
high accident severity
Knee bags
Driver's knee bag :deploys under the steering
column and front-passenger knee bag ;under
the glove box. The driver's and front-passenger
knee bags are triggered together with the front
air bags.
46Occupant safety
Safety
Page 67 of 294
or
XInsert the SmartKey into the ignition lock.
A visual and audible alarm is triggered if the
alarm system is armed and you open:
Ra door
Rthe vehicle with the mechanical key
Rthe trunk lid
Rthe hood
Rthe glove box
XTo turn the alarm off with the SmartKey:
press the %or& button on the Smart-
Key.
The alarm is stopped.
or
XInsert the SmartKey into the ignition lock.
The alarm is stopped.
XTo stop the alarm using KEYLESS-GO:
grasp the outside door handle. The SmartKey
must be outside the vehicle.
The alarm is stopped.
or
XPress the Start/Stop button. The SmartKey
must be inside the vehicle.
The alarm is stopped.
The alarm is not switched off, even if you close
the open door that triggered it, for example.
iIf the alarm continues for more than
30 seconds, the mbrace emergency call sys-
tem automatically notifies the Customer
Assistance Center. This is done either by text
message or data connection.
The emergency call system sends a message
or establishes a data connection provided
that:
Ryou have subscribed to the mbrace service.
Rthe mbrace service has been activated
properly.
Rthe necessary mobile phone network is
available.
Protection against theft65
Safety
Z
Page 68 of 294
SmartKey
Important safety notes
GWARNING
If children are left unsupervised in the vehicle,
they could:
Ropen the doors, thus endangering other
people or road users.
Rget out and disrupt traffic.
Roperate the vehicle's equipment.
Additionally, children could set the vehicle in
motion if, for example, they:
Rrelease the parking brake.
Rshifting the automatic transmission out of
park position P
RStart the engine.
There is a risk of an accident and injury.
When leaving the vehicle, always take the
SmartKey with you and lock the vehicle. Never
leave children or animals unattended in the
vehicle. Always keep the SmartKey out of
reach of children.
GWARNING
If you attach heavy or large objects to the
SmartKey, the SmartKey could be uninten-
tionally turned in the ignition lock. This could
cause the engine to be switched off. There is a risk of an accident.
Do not attach any heavy or large objects to the
SmartKey. Remove any bulky key rings before
inserting the SmartKey into the ignition lock.
!Keep the SmartKey away from strong mag-
netic fields. Otherwise, the remote control
function could be affected.
Strong magnetic fields can occur in the vicin-
ity of powerful electrical installations.
Do not keep the SmartKey:
Rwith electronic devices, e.g. a mobile phone
or another SmartKey
Rwith metallic objects, e.g. coins or metal foil
Rinside metallic objects, e.g. a metal case
This can affect the functionality of the Smart-
Key. Vehicles with KEYLESS-GO start function:
do
not keep the SmartKey in the trunk. Otherwise,
the SmartKey may not be detected, e.g. when
starting the engine using the Start/Stop button.
A brief radio connection between the vehicle
and the SmartKey determines whether a valid
SmartKey is in, or in the direct vicinity of, the
vehicle. This occurs, for example:
Rwhen starting the engine
Rwhile driving
Rwhen using the trunk unlocking sensor
Rwhen the external door handles are touched
Rduring convenience closing
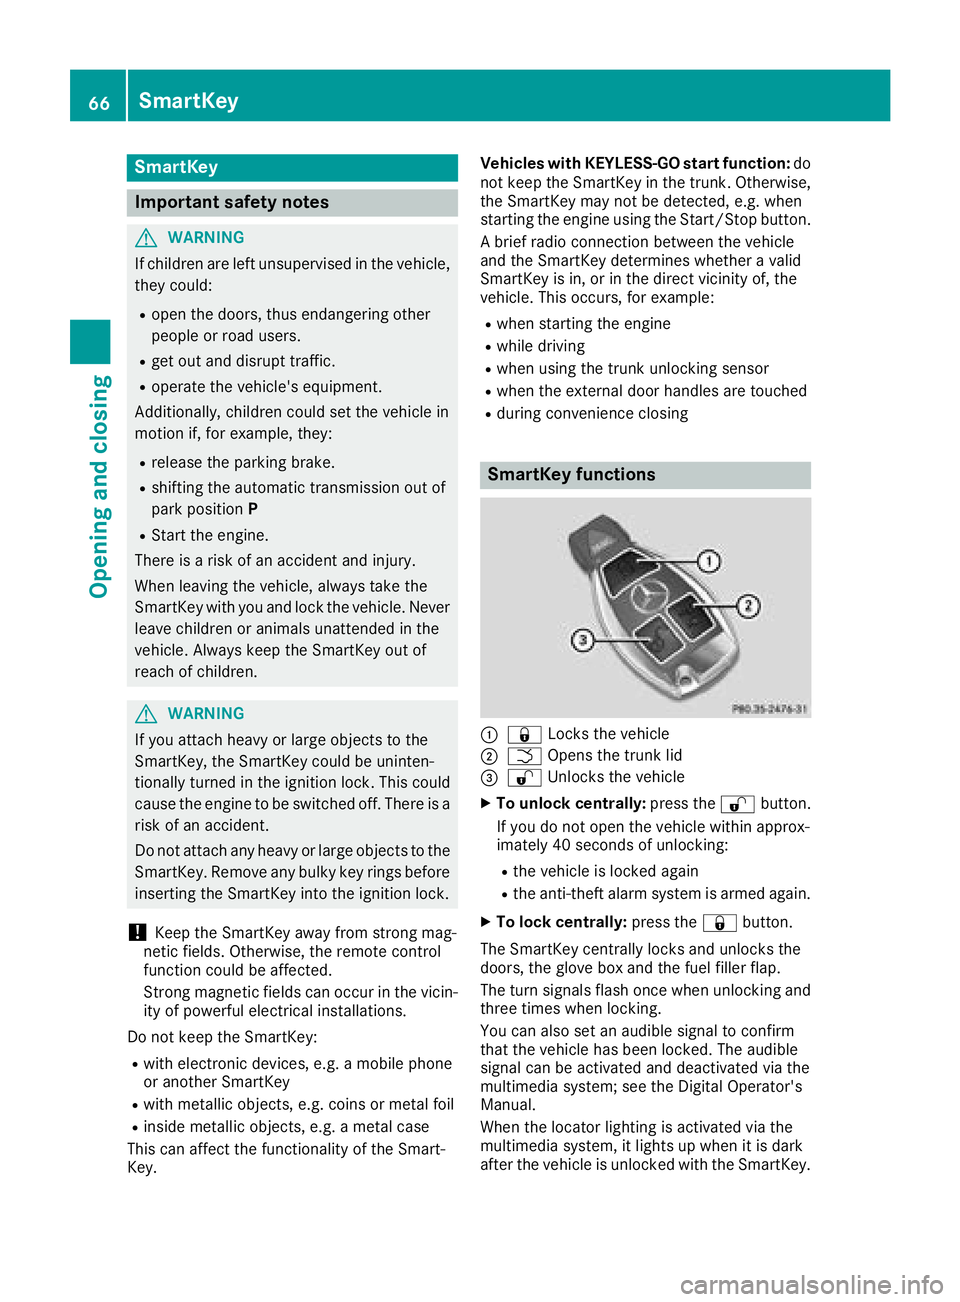
SmartKey functions
:& Locks the vehicle
;FOpens the trunk lid
=%Unlocks the vehicle
XTo unlock centrally: press the%button.
If you do not open the vehicle within approx-
imately 40 seconds of unlocking:
Rthe vehicle is locked again
Rthe anti-theft alarm system is armed again.
XTo lock centrally: press the&button.
The SmartKey centrally locks and unlocks the
doors, the glove box and the fuel filler flap.
The turn signals flash once when unlocking and
three times when locking.
You can also set an audible signal to confirm
that the vehicle has been locked. The audible
signal can be activated and deactivated via the
multimedia system; see the Digital Operator's
Manual.
When the locator lighting is activated via the
multimedia system, it lights up when it is dark
after the vehicle is unlocked with the SmartKey.
66SmartKey
Opening and closing
Page 78 of 294
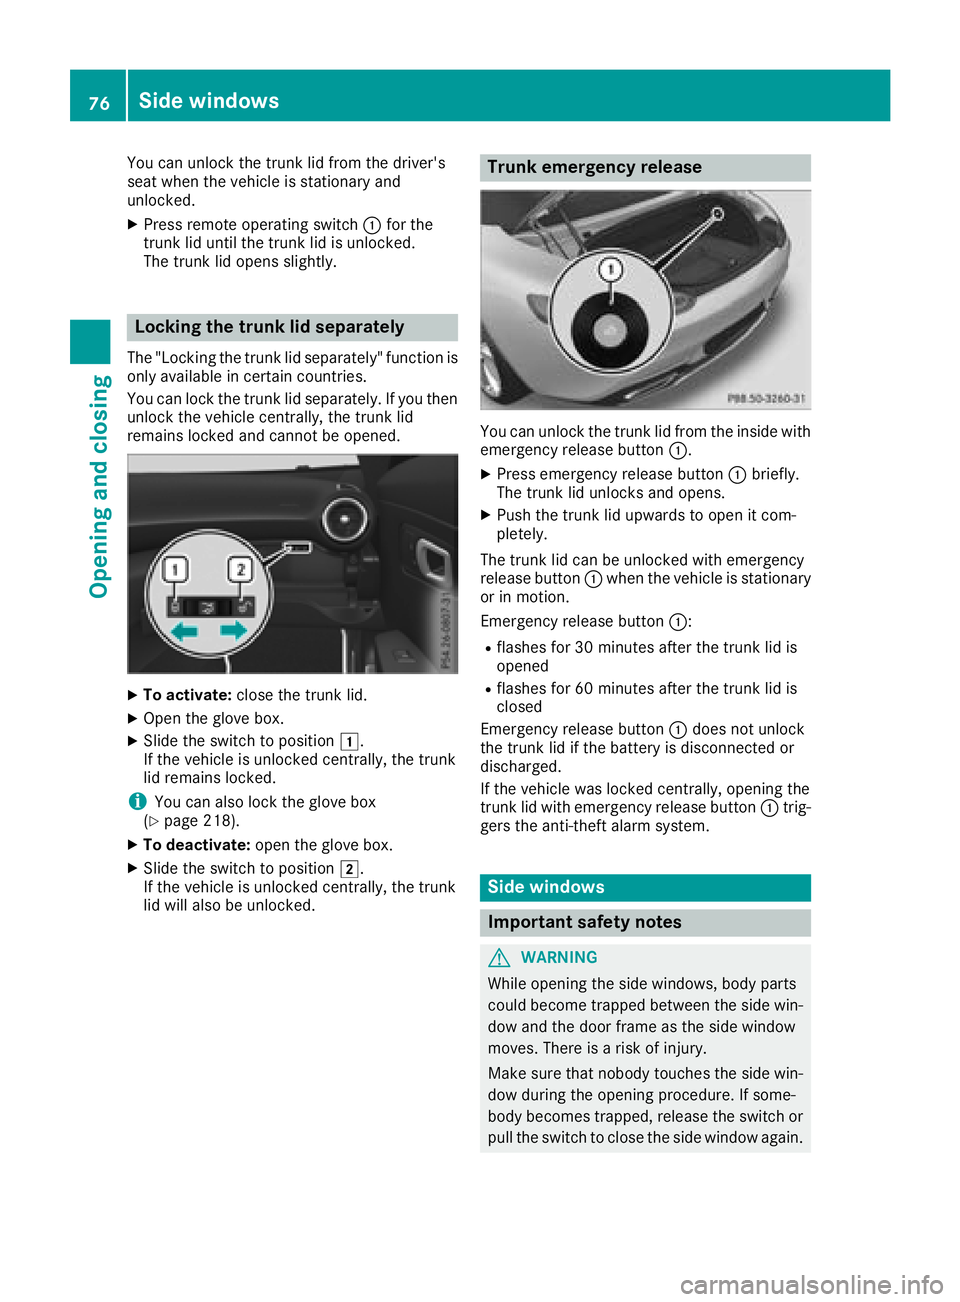
You can unlock the trunk lid from the driver's
seat when the vehicle is stationary and
unlocked.
XPress remote operating switch:for the
trunk lid until the trunk lid is unlocked.
The trunk lid opens slightly.
Locking the trunk lid separately
The "Locking the trunk lid separately" function is
only available in certain countries.
You can lock the trunk lid separately. If you then
unlock the vehicle centrally, the trunk lid
remains locked and cannot be opened.
XTo activate: close the trunk lid.
XOpen the glove box.
XSlide the switch to position 1.
If the vehicle is unlocked centrally, the trunk
lid remains locked.
iYou can also lock the glove box
(Ypage 218).
XTo deactivate: open the glove box.
XSlide the switch to position 2.
If the vehicle is unlocked centrally, the trunk
lid will also be unlocked.
Trunk emergency release
You can unlock the trunk lid from the inside with
emergency release button :.
XPress emergency release button :briefly.
The trunk lid unlocks and opens.
XPush the trunk lid upwards to open it com-
pletely.
The trunk lid can be unlocked with emergency
release button :when the vehicle is stationary
or in motion.
Emergency release button ::
Rflashes for 30 minutes after the trunk lid is
opened
Rflashes for 60 minutes after the trunk lid is
closed
Emergency release button :does not unlock
the trunk lid if the battery is disconnected or
discharged.
If the vehicle was locked centrally, opening the
trunk lid with emergency release button :trig-
gers the anti-theft alarm system.
Side windows
Important safety notes
GWARNING
While opening the side windows, body parts
could become trapped between the side win-
dow and the door frame as the side window
moves. There is a risk of injury.
Make sure that nobody touches the side win-
dow during the opening procedure. If some-
body becomes trapped, release the switch or
pull the switch to close the side window again.
76Side windows
Opening and closing
Page 220 of 294
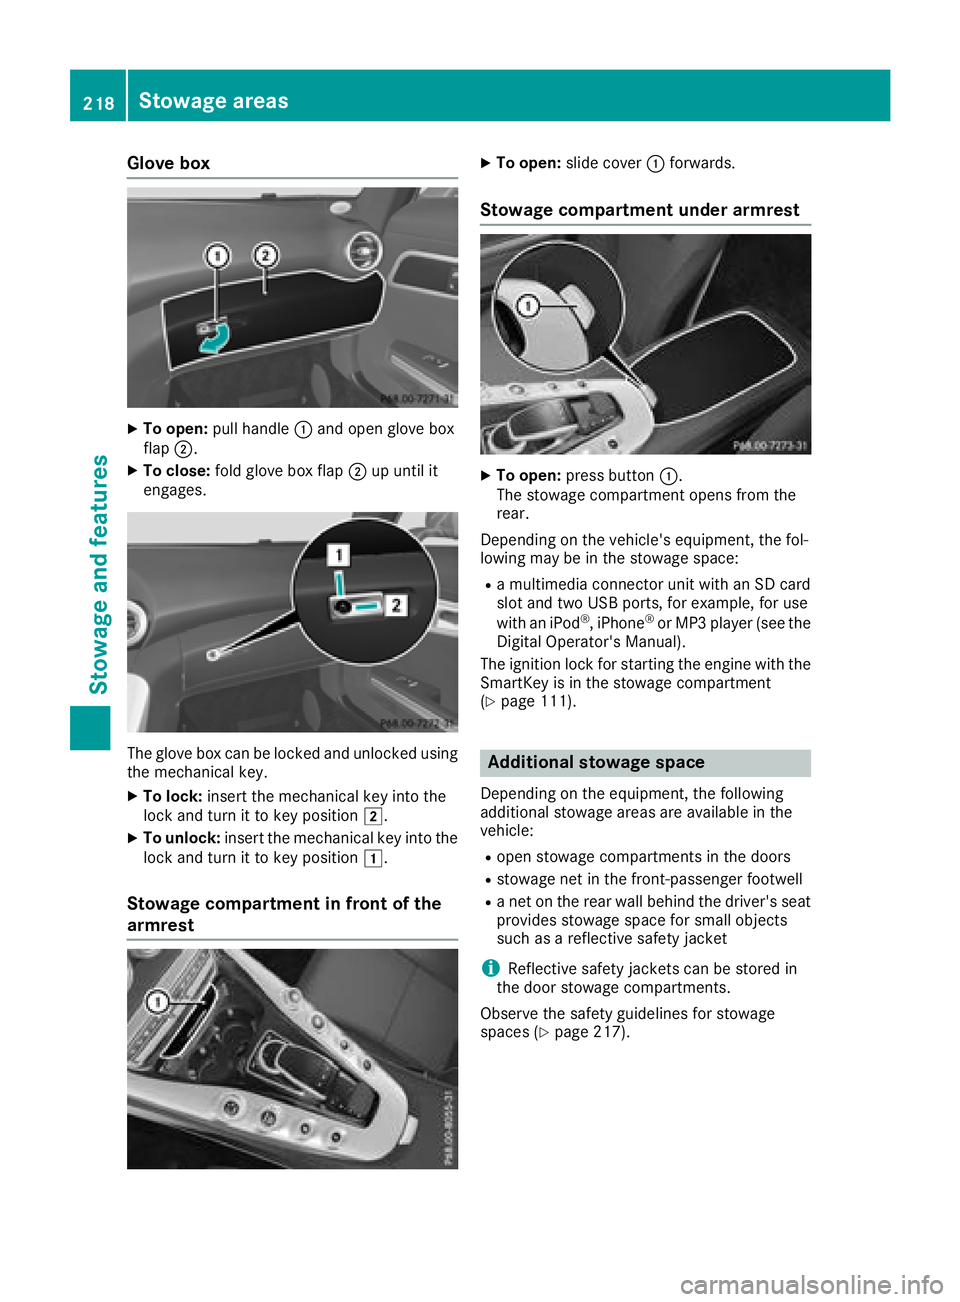
Glove box
XTo open:pull handle :and open glove box
flap ;.
XTo close: fold glove box flap ;up until it
engages.
The glove box can be locked and unlocked using
the mechanical key.
XTo lock: insert the mechanical key into the
lock and turn it to key position 2.
XTo unlock:insert the mechanical key into the
lock and turn it to key position 1.
Stowage compartment in front of the
armrest
XTo open:slide cover :forwards.
Stowage compartment under armrest
XTo open: press button :.
The stowage compartment opens from the
rear.
Depending on the vehicle's equipment, the fol-
lowing may be in the stowage space:
Ra multimedia connector unit with an SD card
slot and two USB ports, for example, for use
with an iPod
®, iPhone®or MP3 player (see the
Digital Operator's Manual).
The ignition lock for starting the engine with the
SmartKey is in the stowage compartment
(
Ypage 111).
Additional stowage space
Depending on the equipment, the following
additional stowage areas are available in the
vehicle:
Ropen stowage compartments in the doors
Rstowage net in the front-passenger footwell
Ra net on the rear wall behind the driver's seat
provides stowage space for small objects
such as a reflective safety jacket
iReflective safety jackets can be stored in
the door stowage compartments.
Observe the safety guidelines for stowage
spaces (
Ypage 217).
218Stowage areas
Stowage and features