Open MERCEDES-BENZ B-Class 2015 W246 Comand Manual
[x] Cancel search | Manufacturer: MERCEDES-BENZ, Model Year: 2015, Model line: B-Class, Model: MERCEDES-BENZ B-Class 2015 W246Pages: 270, PDF Size: 5.82 MB
Page 238 of 270
Your COMAND equipment
These operating instructions describe all the
standard and optional equipment for your
COMAND system, as available at the time of
going to print. Country-specific differences
are possible. Please note that your
COMAND system may not be equipped with
all the features described. Overview
Important safety notes
G
WARNING
The CD/DVD drive is a class 1 laser product. If you open the housing of the CD/DVD drive,
there is a risk of exposure to invisible laser
radiation. This laser radiation could damage
your retina. There is a risk of injury.
Never open the housing. Always have main-
tenance and repair work carried out at a quali- fied specialist workshop. G
WARNING
If objects such as headphones/headsets or
external audio/video sources are not secured in the passenger compartment, they can be
flung around and hit vehicle occupants. There
is a risk of injury, for example in the event of
sudden braking or a sudden change in direc-
tion.
Always stow these items or similar objects
carefully so that they cannot be flung around, for example in a lockable vehicle stowage
compartment. equipment
Observe that a range of Rear Seat Entertain-
ment Systems are available for Mercedes-
Benz vehicles. In this Operator's Manual, the
Rear Seat Entertainment System Code 864 is
used for illustration purposes. If you have a
different Rear Seat Entertainment System in your vehicle, please refer to the separate prin-
ted operating instructions . Components
The Rear Seat Entertainment System
includes:
R two screens for the rear behind the front-
seat head restraints
R two remote controls
R a CD/DVD drive
R AUX jacks on both screens (AUX display)
and on the CD/DVD drive (AUX drive)
R two sets of cordless headphones 236
OverviewRea
r Seat Entertainment System
Page 241 of 270
Cordless headphones
Overview X
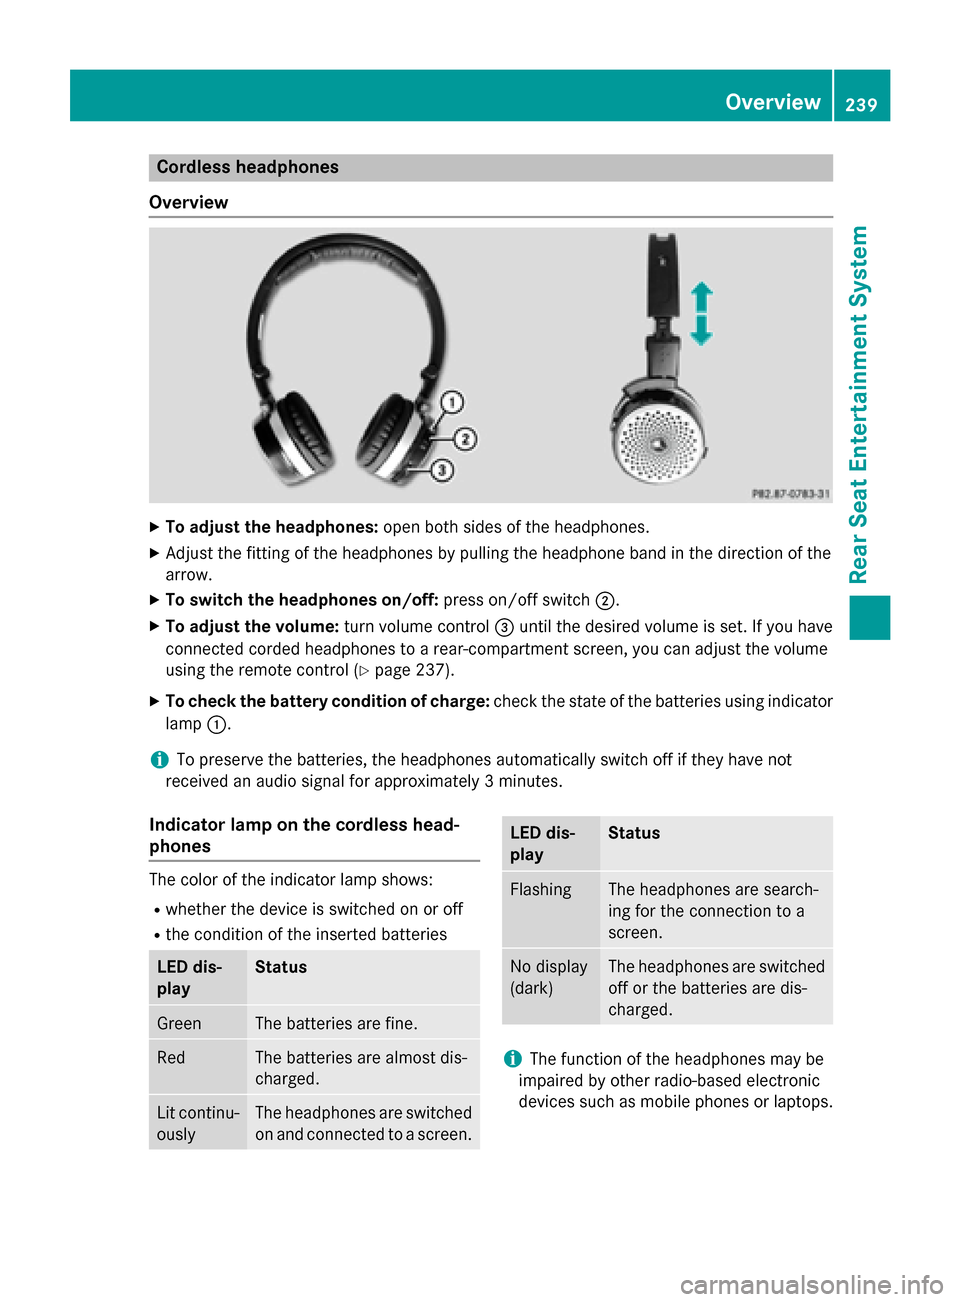
To adjust the headphones: open both sides of the headphones.
X Adjust the fitting of the headphones by pulling the headphone band in the direction of the
arrow.
X To switch the headphones on/off: press on/off switch0044.
X To adjust the volume: turn volume control0087until the desired volume is set. If you have
connected corded headphones to a rear-compartment screen, you can adjust the volume
using the remote control (Y page 237).
X To check the battery condition of charge: check the state of the batteries using indicator
lamp 0043.
i To preserve the batteries, the headphones automatically switch off if they have not
received an audio signal for approximately 3 minutes.
Indicator lamp on the cordless head-
phones The color of the indicator lamp shows:
R whether the device is switched on or off
R the condition of the inserted batteries LED dis-
play Status
Green The batteries are fine.
Red The batteries are almost dis-
charged.
Lit continu-
ously The headphones are switched
on and connected to a screen. LED dis-
play Status
Flashing The headphones are search-
ing for the connection to a
screen.
No display
(dark) The headphones are switched
off or the batteries are dis-
charged. i
The function of the headphones may be
impaired by other radio-based electronic
devices such as mobile phones or laptops. Overview
239Rear Seat Entertainment System Z
Page 243 of 270
X
To open the battery compartment:
remove battery compartment cover 0087on
the back of the remote control.
X To do so, press down retaining lug 0044and
take off battery compartment cover 0087.
X Remove discharged batteries 0083from the
tray.
X Insert the new batteries. Observe the polar-
ity markings on the batteries and battery
compartment when doing so.
Left-hand battery: the positive pole (+)
must face upwards.
Right-hand battery: the positive pole (+)
must face downwards.
X To close the battery compartment:
insert battery compartment cover 0087start-
ing with retaining lugs 0085into the battery
compartment and allow catch tab 0044to
engage in place.
Replacing cordless headphone batter-
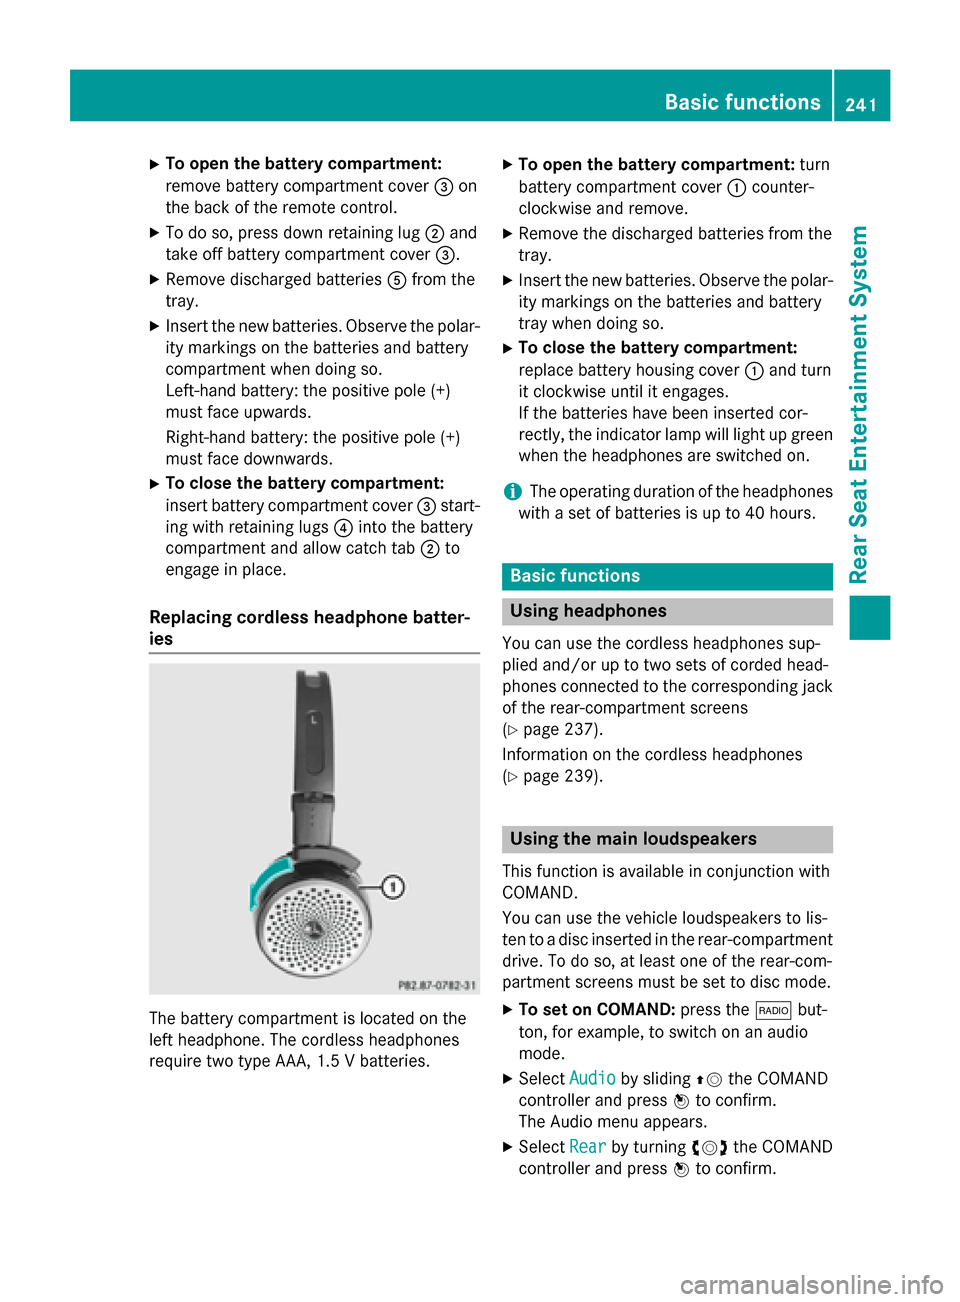
ies The battery compartment is located on the
left headphone. The cordless headphones
require two type AAA, 1.5 V batteries. X
To open the battery compartment: turn
battery compartment cover 0043counter-
clockwise and remove.
X Remove the discharged batteries from the
tray.
X Insert the new batteries. Observe the polar-
ity markings on the batteries and battery
tray when doing so.
X To close the battery compartment:
replace battery housing cover 0043and turn
it clockwise until it engages.
If the batteries have been inserted cor-
rectly, the indicator lamp will light up green
when the headphones are switched on.
i The operating duration of the headphones
with a set of batteries is up to 40 hours. Basic functions
Using headphones
You can use the cordless headphones sup-
plied and/or up to two sets of corded head-
phones connected to the corresponding jack
of the rear-compartment screens
(Y page 237).
Information on the cordless headphones
(Y page 239). Using the main loudspeakers
This function is available in conjunction with
COMAND.
You can use the vehicle loudspeakers to lis-
ten to a disc inserted in the rear-compartment drive. To do so, at least one of the rear-com-
partment screens must be set to disc mode.
X To set on COMAND: press the002Abut-
ton, for example, to switch on an audio
mode.
X Select Audio Audioby sliding 00970052the COMAND
controller and press 0098to confirm.
The Audio menu appears.
X Select Rear
Rear by turning 00790052007Athe COMAND
controller and press 0098to confirm. Basic functions
241Rear Seat Entertainment System Z
Page 246 of 270
Setting the brightness
X Select Settings
Settings using the0064button
and press 008Bto confirm.
X Select Brightness
Brightness using the00630064
buttons and press the 008Bbutton to confirm.
A scale appears.
X Adjust the brightness using the 00630064
buttons and press the 008Bbutton to confirm.
The brightness bar moves up or down. The picture becomes lighter or darker in
accordance with the scale. Showing/hiding the picture
X To hide the picture: selectDisplay Off Display Off
in the system menu using the 00640065
buttons on the remote control and press
the 008Bbutton to confirm.
The picture is hidden.
X To display the picture: press the008Bbut-
ton. CD/audio DVD and MP3 mode
Important safety notes
G
WARNING
The CD/DVD drive is a class 1 laser product. If you open the housing of the CD/DVD drive,
there is a risk of exposure to invisible laser
radiation. This laser radiation could damage
your retina. There is a risk of injury.
Never open the housing. Always have main-
tenance and repair work carried out at a quali- fied specialist workshop. General notes
You will find information on the following top- ics in the Audio section:
R notes on CDs/DVDs (Y page 204)
R notes on MP3 mode (Y page 202)
R notes on copyright (Y page 204) Inserting a CD/DVD
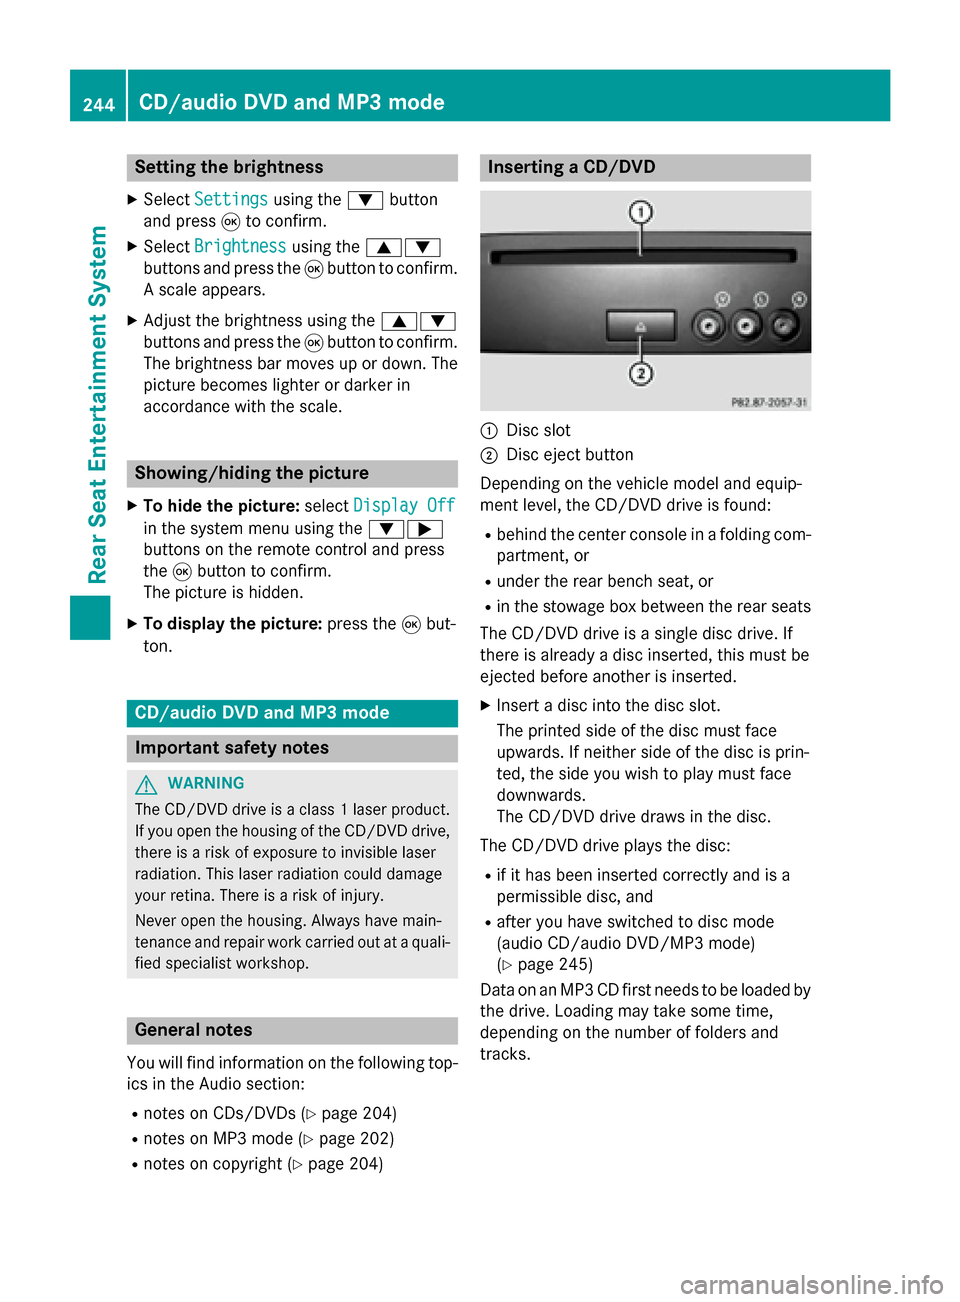
0043
Disc slot
0044 Disc eject button
Depending on the vehicle model and equip-
ment level, the CD/DVD drive is found:
R behind the center console in a folding com-
partment, or
R under the rear bench seat, or
R in the stowage box between the rear seats
The CD/DVD drive is a single disc drive. If
there is already a disc inserted, this must be
ejected before another is inserted.
X Insert a disc into the disc slot.
The printed side of the disc must face
upwards. If neither side of the disc is prin-
ted, the side you wish to play must face
downwards.
The CD/DVD drive draws in the disc.
The CD/DVD drive plays the disc:
R if it has been inserted correctly and is a
permissible disc, and
R after you have switched to disc mode
(audio CD/audio DVD/MP3 mode)
(Y page 245)
Data on an MP3 CD first needs to be loaded by the drive. Loading may take some time,
depending on the number of folders and
tracks. 244
CD/audio DVD and MP3 modeRear Seat Entertainment System
Page 249 of 270
X
To interrupt playback: select00DBusing
the 006400590065 buttons on the remote
control and press the 008Bbutton to confirm.
The 00CF display changes to 00D0.
X To continue playback: select00D0and
press the 008Bbutton to confirm.
Playback continues from the point where it
was interrupted.
X To stop playback: while playback is inter-
rupted, select 00DBagain and press the 008B
button to confirm.
Playback stops and returns to the begin-
ning of the DVD. 00D0is highlighted.
X To restart playback: select00D0and
press the 008Bbutton to confirm.
Playback starts from the beginning of the
DVD. Setting the audio format
The content of an audio DVD can be divided
into up to 9 groups. The availability and type
of group depends on the respective DVD. A
group can contain music in different sound
qualities (stereo and multichannel formats,
for example), or bonus tracks.
X Select DVD-Audio
DVD-Audio using
the 006400590065 buttons on the remote
control and press 008Bto confirm.
X Select Group
Group using the 00630064 buttons
and press the 008Bbutton to confirm.
The list of available audio formats appears. The 0036dot indicates the format currently
selected.
X Select an audio format using the 00630064
buttons and press the 008Bbutton to confirm.
X To exit the menu: press the0059or0065
button. Playback options
Further information on playback options is
available in the "Audio" section (Y page 202).X
Select CD
CD, DVD-Audio DVD-Audio orMP3
MP3 using
the 006400590065 buttons on the remote
control and press the 008Bbutton to confirm.
The options list appears. The 0036dot indi-
cates the option currently selected.
X Select Normal
Normal Track
TrackSequence
Sequence ,Random
Random
Tracks
Tracks orRandom Folder
Random Folder using the
00630064 buttons and press the 008Bbutton
to confirm.
The option is switched on. For all options
except Normal Track Sequence
Normal Track Sequence, you will
see a corresponding display in the display/
selection window.
i If you switch the data carrier which you
are currently listening to, the Normal
Normal
Track Sequence Track Sequence option is activated auto-
matically. If an option is selected, it
remains selected after the Rear Seat Enter- tainment System is switched on or off. Switching track information on/off
(MP3 mode only)
If the function is switched on, folder and track
names are displayed.
If the function is switched off, disc and file
names are displayed.
X Select MP3 MP3using the 006400590065 but-
tons on the remote control and press the
008B button to confirm.
X Select Display Track Information Display Track Information
using the 00630064 buttons and press the
008B button to confirm.
The function is switched on 0073or off 0053,
depending on the previous status. Video DVD mode
Important safety notes
G
WARNING
The CD/DVD drive is a class 1 laser product. If you open the housing of the CD/DVD drive,
there is a risk of exposure to invisible laser Video DVD mode
247Rear Seat Entertainment System
Z
Page 250 of 270
radiation. This laser radiation could damage
your retina. There is a risk of injury.
Never open the housing. Always have main-
tenance and repair work carried out at a quali- fied specialist workshop. General notes
DVD playback conditions Playback problems may occur when playing
copied discs. There is a large variety of discs, DVD authoring software, writing software and writers available. This variety means that
there is no guarantee that the Rear Seat
Entertainment System will be able to play
video DVDs that you have copied yourself.
Further information can be found under video
(Y page 227). Information regarding
COMAND also applies to the Rear Seat Enter- tainment System.
Function restrictions Depending on the DVD, it is possible that cer-
tain functions or actions described in this
section will be temporarily blocked or may not
function at all. As soon as you try to activate
these functions or actions, you will see the 0047
symbol in the display. Switching to video DVD mode
X Insert a video DVD (Y page 244).
The Rear Seat Entertainment System loads the disc.
If disc mode was the last mode selected, it
will now be active.
If it was not, switch on video DVD mode as described in the following instruction.
X Select Disc Discin the menu using the
006300590065 buttons on the remote
control and confirm by pressing the 008B
button.
If the video DVD fulfills the playback crite-
ria, the film either starts automatically or the menu stored on the DVD appears. If the
DVD menu appears, you must start the film
manually.
X Select the corresponding menu item in the
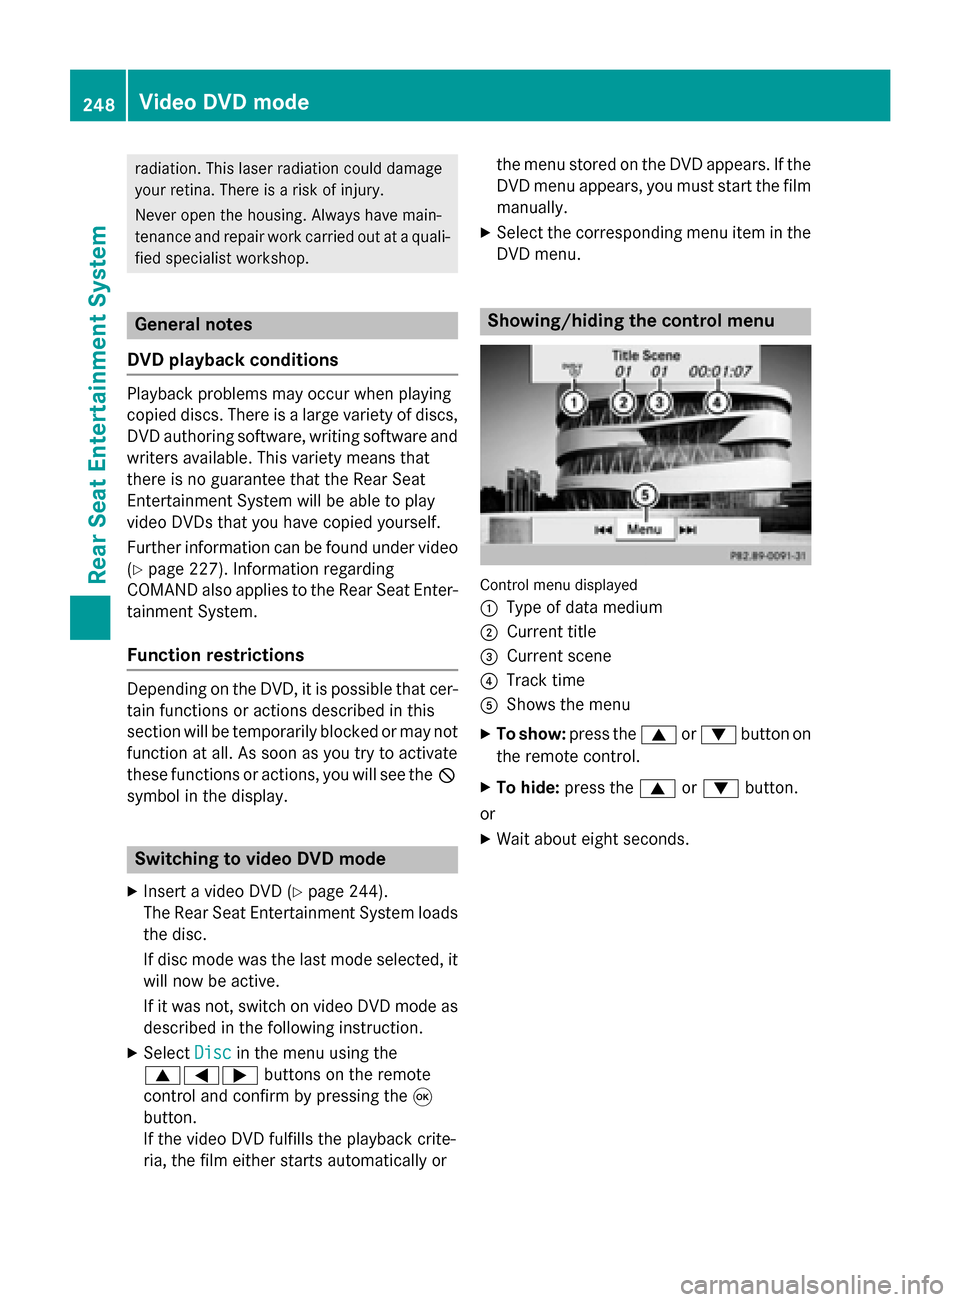
DVD menu. Showing/hiding the control menu
Control menu displayed
0043
Type of data medium
0044 Current title
0087 Current scene
0085 Track time
0083 Shows the menu
X To show: press the0063or0064 button on
the remote control.
X To hide: press the 0063or0064 button.
or
X Wait about eight seconds. 248
Video DVD modeRear Seat Entertainment System
Page 262 of 270
i
COMAND receives weather forecast data
from the nearest weather station at the
selected location. Selecting the location in the informa-
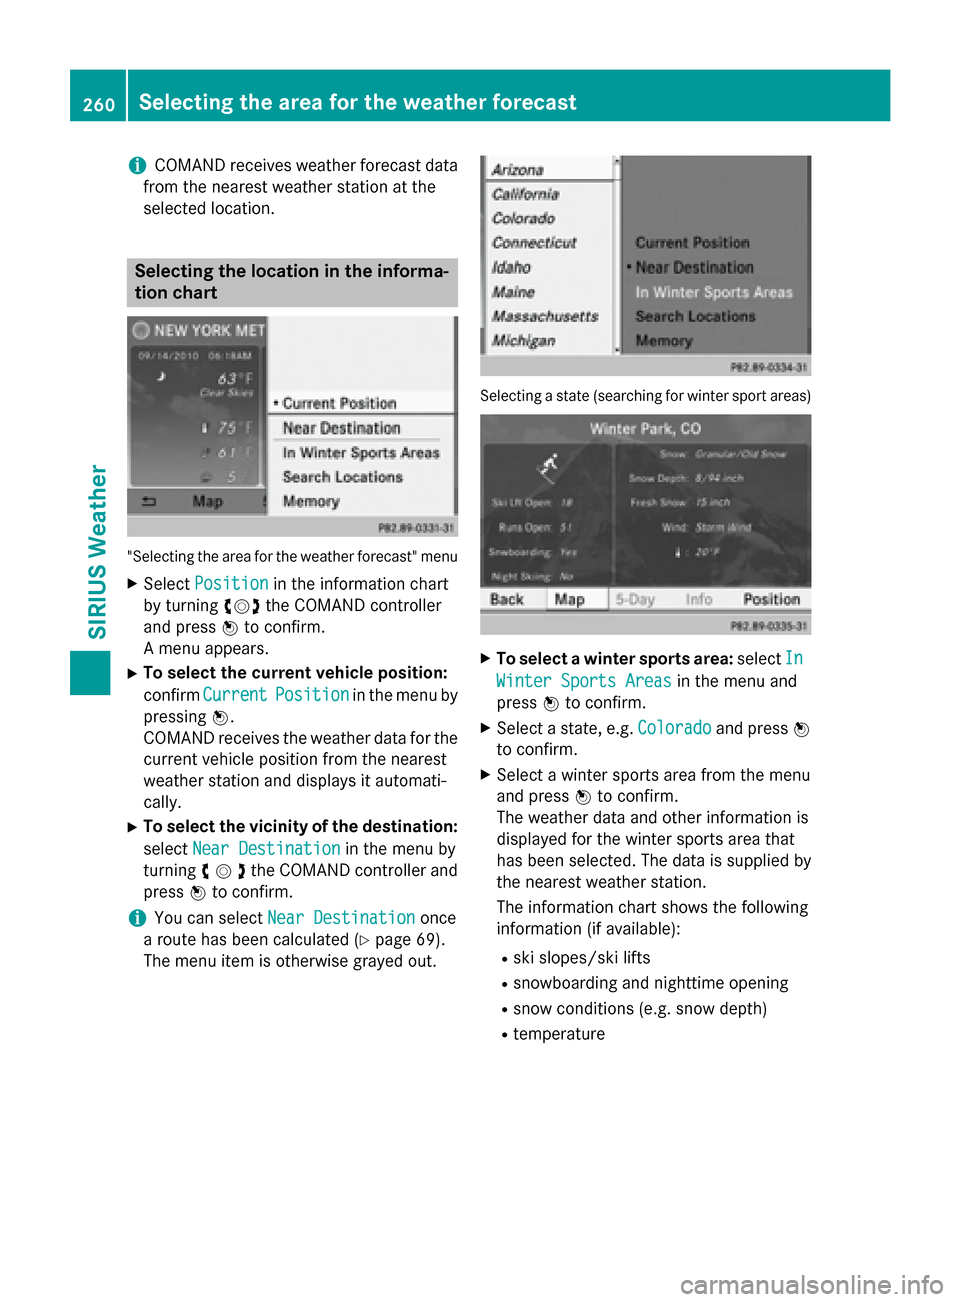
tion chart "Selecting the area for the weather forecast" menu
X Select Position
Position in the information chart
by turning 00790052007Athe COMAND controller
and press 0098to confirm.
A menu appears.
X To select the current vehicle position:
confirm Current
Current Position Position in the menu by
pressing 0098.
COMAND receives the weather data for the
current vehicle position from the nearest
weather station and displays it automati-
cally.
X To select the vicinity of the destination:
select Near Destination Near Destination in the menu by
turning 00790052007Athe COMAND controller and
press 0098to confirm.
i You can select
Near Destination
Near Destination once
a route has been calculated (Y page 69).
The menu item is otherwise grayed out. Selecting a state (searching for winter sport areas)
X
To select a winter sports area: selectIn
In
Winter Sports Areas
Winter Sports Areas in the menu and
press 0098to confirm.
X Select a state, e.g. Colorado
Coloradoand press0098
to confirm.
X Select a winter sports area from the menu
and press 0098to confirm.
The weather data and other information is
displayed for the winter sports area that
has been selected. The data is supplied by
the nearest weather station.
The information chart shows the following
information (if available):
R ski slopes/ski lifts
R snowboarding and nighttime opening
R snow conditions (e.g. snow depth)
R temperature 260
Selecting the area for the
weather forecastSIRIUS Weather