tire pressure MERCEDES-BENZ B-Class 2017 W246 Owner's Guide
[x] Cancel search | Manufacturer: MERCEDES-BENZ, Model Year: 2017, Model line: B-Class, Model: MERCEDES-BENZ B-Class 2017 W246Pages: 290, PDF Size: 19.81 MB
Page 267 of 290
the information on display messages
(Y page 185).
It may take up to ten minutes for a malfunction of the tire pressure monitor to be indicated. A
malfunction will be indicated by the tire pres-
sure warning lamp flashing for approximately
one minute and then remaining lit. When the
malfunction has been rectified, the tire pressure
warning lamp goes out after a few minutes of
driving.
The tire pressure values indicated by the on-
board computer may differ from those meas-
ured at a gas station with a pressure gauge. The
tire pressures shown by the on-board computer refer to those measured at sea level. At high
altitudes, the tire pressure values indicated by a
pressure gauge are higher than those shown by the on-board computer. In this case, do not
reduce the tire pressures.
The operation of the tire pressure monitor can
be affected by interference from radio transmit-
ting equipment (e.g. radio headphones, two-way radios) that may be being operated in or near the vehicle.
Checking the tire pressure electroni-
cally X
Make sure that the SmartKey is in position 2
in the ignition lock (Y page 109).
X Press 0059or0065 on the steering wheel to
select the Serv. Serv.menu.
X Press the 0063or0064 button to select
Tire Pressure
Tire Pressure.
X Press the 0076button.
The current tire pressure of each tire is shown
in the multifunction display.
If the vehicle was parked for longer than
20 minute s,the Tire pressure will be Tire pressure will be
displayed after driving a few minutes
displayed after driving a few minutes
message is shown.
After a teach-in process, the tire pressure mon- itor automatically detects new wheels or new
sensors. As long as a clear allocation of the tire
pressure value to the individual wheels is not
possible, the Tire TirePressure
Pressure Monitor
Monitor Active
Active
message is shown instead of the tire pressure
display. The tire pressures are already being
monitored. Tire pressure monitor warning mes-
sages If the tire pressure monitor detects a pressure
loss in one or more tires, a warning message is
shown in the multifunction display. The yellow
tire pressure warning lamp then lights up.
R If the Please Correct Tire Pressure Please Correct Tire Pressure
message appears in the multifunction display, the tire pressure in at least one tire is too low.
The tire pressure must be corrected when the
opportunity arises.
R If the Check Tire Pressure
Check Tire Pressure message
appears in the multifunction display, the tire
pressure in one or more tires has dropped
significantly. The tires must be checked.
R If the Tire Tire Pressure
Pressure Warning
WarningTire
TireFail‐
Fail‐
ure
ure message appears, the tire pressure in one
or more tires has dropped suddenly. The tires
must be checked.
Observe the instructions and safety notes in the display messages in the "Tires" section
(Y page 185).
If the wheel positions on the vehicle are rotated,
the tire pressures may be displayed for the
wrong positions for a short time. This is rectified after a few minutes of driving, and the tire pres-
sures are displayed for the correct positions.
Restarting the tire pressure monitor When you restart the tire pressure monitor, all
existing warning messages are deleted and the
warning lamps go out. The monitor uses the cur-
rently set tire pressures as the reference values for monitoring. In most cases, the tire pressure
monitor will automatically detect the new refer-
ence values after you have changed the tire
pressure. However, you can also set reference
values manually as described here. The tire
pressure monitor then monitors the new tire
pressure values.
X Set the tire pressure to the value recommen-
ded for the corresponding driving situation on
the Tire and Loading Information placard on
the driver's side B-pillar (Y page 260).
Additional tire pressure for various operating
conditions can be found in the tire pressure
table in the charge socket flap (Y page 124).
X Make sure that the tire pressure is correct on
all four wheels.
X Make sure that the SmartKey is in position 2
in the ignition lock (Y page 109). Tire pressure
265Wheels and tires Z
Page 268 of 290
X
Press 0059or0065 on the steering wheel to
select the Serv.
Serv.menu.
X Press the 0063or0064 button to select
Tire Pressure
Tire Pressure.
X Press the 0076button.
The multifunction display shows the current
tire pressure for each tire or the Tire pres‐
Tire pres‐
sure sure will
willbe
be displayed
displayed after
afterdriving
driving
a few minutes
a few minutes message.
X Press the 0064button.
The multifunction display shows the Use
Use
Current Pressures as New Reference
Current Pressures as New Reference
Values Values message.
If you wish to confirm the restart: X Press the 0076button.
The Tire
Tire Press.
Press. Monitor
Monitor Restarted
Restarted mes-
sage appears in the multifunction display.
After driving for a few minutes, the system
checks whether the current tire pressures are within the specified range. The new tire pres-sures are then accepted as reference values
and monitored.
If you wish to cancel the restart:
X Press the 0038button.
The tire pressure values stored at the last
restart will continue to be monitored.
Radio type approval for the tire pres-
sure monitor Country Radio type approval number
USA FCC ID: MRXMW2433A
FCC ID: MRXGG4
FCC ID: MRXMC34MA4
Canada IC: 2546A-MW2433A
IC: 2546A-GG4
IC: 2546A-MC34MA4
Loading the vehicle
Instruction labels for tires and loads
G
WARNING
Overloaded tires can overheat, causing a
blowout. Overloaded tires can also impair the steering and driving characteristics and lead
to brake failure. There is a risk of accident. Observe the load rating of the tires. The load
rating must be at least half of the GAWR of
your vehicle. Never overload the tires by
exceeding the maximum load.
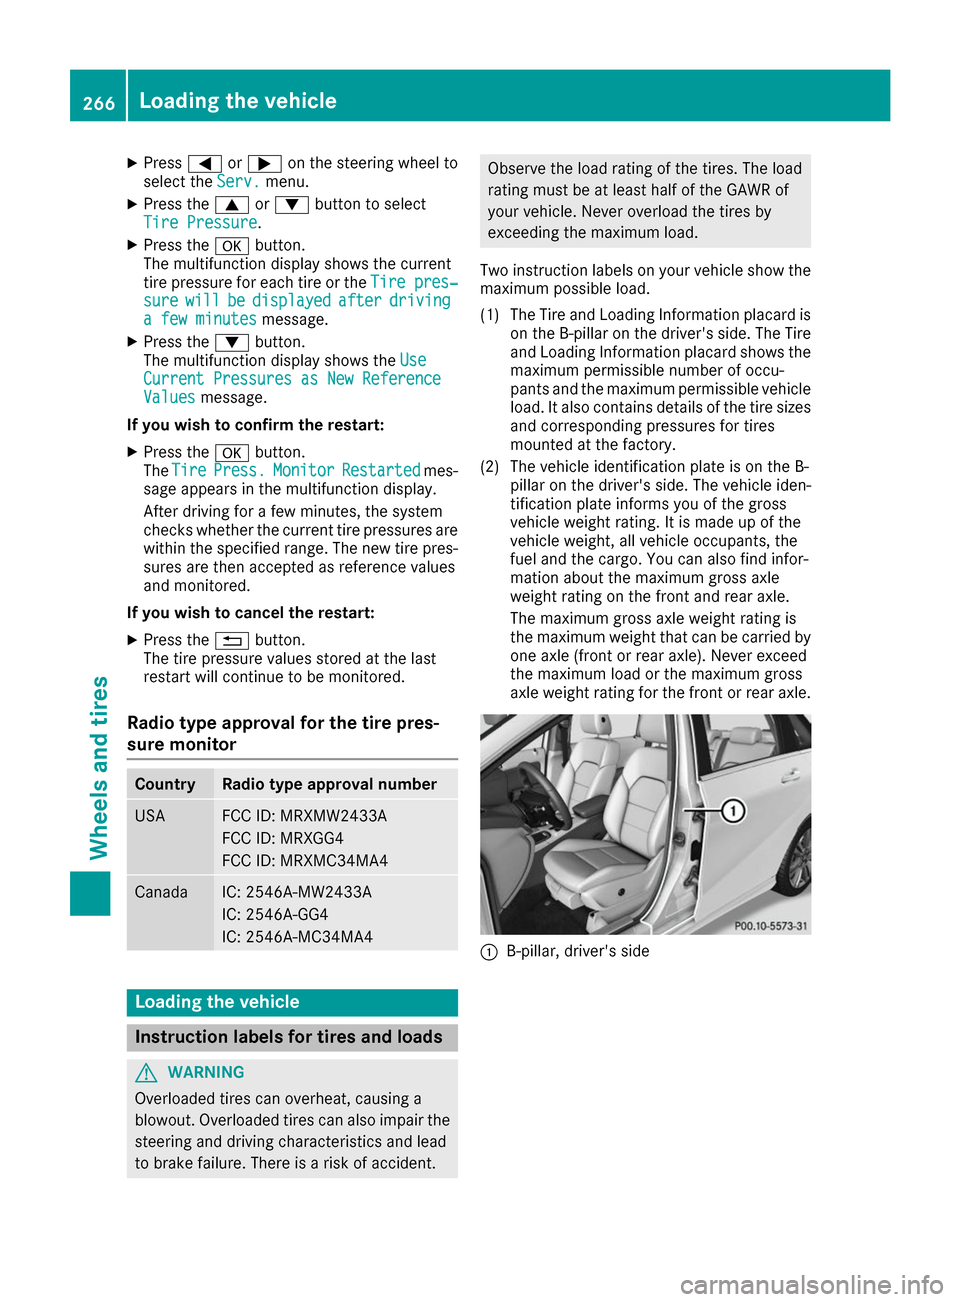
Two instruction labels on your vehicle show the
maximum possible load.
(1) The Tire and Loading Information placard is on the B-pillar on the driver's side. The Tireand Loading Information placard shows the
maximum permissible number of occu-
pants and the maximum permissible vehicle
load. It also contains details of the tire sizes
and corresponding pressures for tires
mounted at the factory.
(2) The vehicle identification plate is on the B- pillar on the driver's side. The vehicle iden-
tification plate informs you of the gross
vehicle weight rating. It is made up of the
vehicle weight, all vehicle occupants, the
fuel and the cargo. You can also find infor-
mation about the maximum gross axle
weight rating on the front and rear axle.
The maximum gross axle weight rating is
the maximum weight that can be carried by one axle (front or rear axle). Never exceed
the maximum load or the maximum gross
axle weight rating for the front or rear axle. 0043
B-pillar, driver's side 266
Loading the vehicleWheels and tires
Page 272 of 290
Observe the legally required minimum tire tread
depth (Y page 258). Winter tires can reduce the
braking distance on snow-covered surfaces in
comparison with summer tires. The braking dis-
tance is still much further than on surfaces that
are not icy or covered with snow. Take appro-
priate care when driving.
Further information on winter tires (M+S tires)
(Y page 259).
Temperature G
WARNING
The temperature grade for this tire is estab-
lished for a tire that is properly inflated and
not overloaded. Excessive speed, underinfla-
tion, or excessive loading, either separately or
in combination, can cause excessive heat
build-up and possible tire failure.
The temperature grades are A (the highest), B,
and C, representing the tire's resistance to the
generation of heat and its ability to dissipate
heat when tested under controlled conditions
on a specified indoor laboratory test wheel. Sus- tained high temperature can cause the material
of the tire to degenerate and reduce tire life, and excessive temperature can lead to sudden tire
failure. The grade C corresponds to a level of
performance which all passenger car tires must
meet under the Federal Motor Vehicle Safety
Standard No. 109. Grades B and A represent
higher levels of performance on the laboratory
test wheel than the minimum required by law. Tire labeling
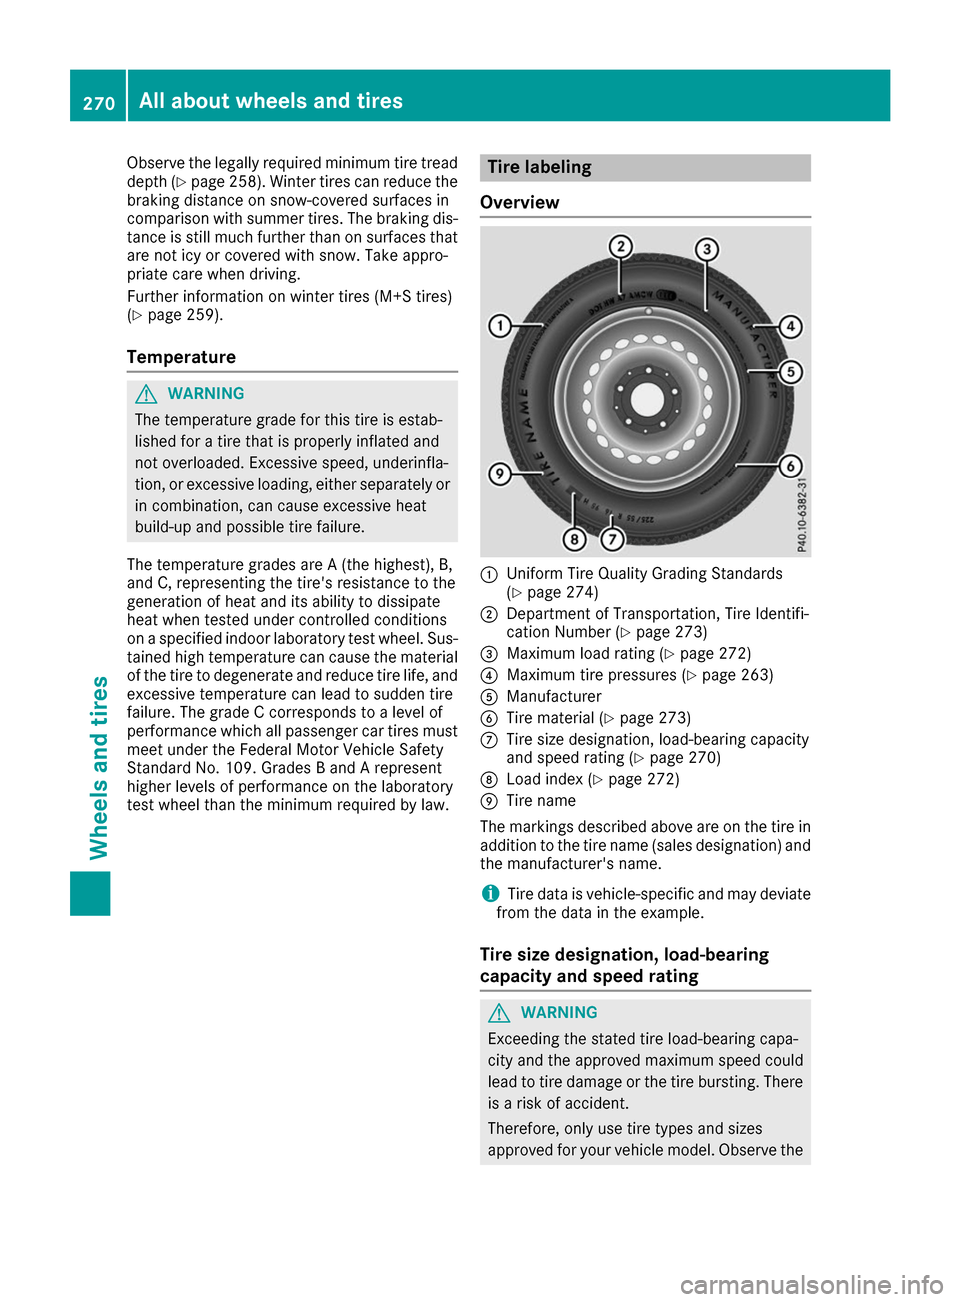
Overview 0043
Uniform Tire Quality Grading Standards
(Ypage 274)
0044 Department of Transportation, Tire Identifi-
cation Number (Y page 273)
0087 Maximum load rating (Y page 272)
0085 Maximum tire pressures (Y page 263)
0083 Manufacturer
0084 Tire material (Y page 273)
006B Tire size designation, load-bearing capacity
and speed rating (Y page 270)
006C Load index (Y page 272)
006D Tire name
The markings described above are on the tire in
addition to the tire name (sales designation) and the manufacturer's name.
i Tire data is vehicle-specific and may deviate
from the data in the example.
Tire size designation, load-bearing
capacity and speed rating G
WARNING
Exceeding the stated tire load-bearing capa-
city and the approved maximum speed could
lead to tire damage or the tire bursting. There is a risk of accident.
Therefore, only use tire types and sizes
approved for your vehicle model. Observe the 270
All about wheels and tiresWheels and tires
Page 273 of 290

tire load rating and speed rating required for
your vehicle. 0043
Tire width
0044 Nominal aspect ratio in %
0087 Tire code
0085 Rim diameter
0083 Load bearing index
0084 Speed rating
General: depending on the manufacturer's
standards, the size imprinted in the tire wall may not contain any letters or may contain one letterthat precedes the size description.
If there is no letter preceding the size descrip-
tion (as shown above): these are passenger
vehicle tires according to European manufac-
turing standards.
If "P" precedes the size description: these are
passenger vehicle tires according to U.S. man-
ufacturing standards.
If "LT" precedes the size description: these are
light truck tires according to U.S. manufacturing standards.
If "T" precedes the size description: compact
emergency wheels with high tire pressure that
are only designed for temporary use in an emer-
gency.
Tire width: tire width0043shows the nominal tire
width in millimeters.
Aspect ratio: aspect ratio0044is the size ratio
between the tire height and tire width and is
shown in percent. The aspect ratio is calculated by dividing the tire width by the tire height.
Tire code:tire code 0087specifies the tire type.
"R" represents radial tires; "D" represents diag-
onal tires; "B" represents diagonal radial tires.
Optionally, tires with a maximum speed of over
149 mph (240 km/h) may have "ZR" in the size description, depending on the manufacturer
(e.g. 245/40 ZR 18).
Rim diameter: rim diameter0085is the diameter
of the bead seat, not the diameter of the rim
flange. The rim diameter is specified in
inches (in).
Load-bearing index: load-bearing index0083is a
numerical code that specifies the maximum
load-bearing capacity of a tire.
Do not overload the tires by exceeding the
specified load limit. The maximum permissible
load can be found on the vehicle's Tire and
Loading Information placard on the B-pillar on
the driver's side (Y page 266).
Example:
Load-bearing index 91 indicates a maximum
load of 1,356 lb (615 kg) that the tires can bear.
For further information on the maximum tire
load in kilograms and lbs, see (Y page 272).
For further information on the load bearing
index, see "Load index" (Y page 272).
Speed rating: speed rating0084specifies the
approved maximum speed of the tire.
i Tire data is vehicle-specific and may deviate
from the data in the example.
Regardless of the speed rating, always observe
the speed limits. Drive carefully and adapt your
driving style to the traffic conditions.
Summer tires Index Speed rating
Q up to 100 mph (160 km/h)
R up to 106 mph (170 km/h)
S up to 112 mph (180 km/h)
T up to 118 mph (190 km/h)
H up to 130 mph (210 km/h)
V up to 149 mph (240 km/h)
W up to 168 mph (270 km/h)
Y up to 186 mph (300 km/h)
ZR...Y up to 186 mph (300 km/h)
ZR...(..Y) over 186 mph (300 km/h)
ZR over 149 mph (240 km/h)
R
Optionally, tires with a maximum speed of
over 149 mph (240 km/h) may have "ZR" in All about
wheels and tires
271Wheels and tires Z
Page 274 of 290
the size description, depending on the man-
ufacturer (e.g. 245/40 ZR18).
The service specification is made up of load-
bearing index
0083and speed rating 0084.
R If the size description of your tire includes
"ZR" and there are no service specifications,
ask the tire manufacturer in order to find out
the maximum speed.
If a service specification is available, the max-
imum speed is limited according to the speed
rating in the service specification. Example:
245/40 ZR18 97 Y.In this example, "97 Y" is
the service specification. The letter "Y" rep-
resents the speed rating. The maximum
speed of the tire is limited to 186 mph
(300 km/h).
R The size description for all tires with maxi-
mum speeds of over 186 mph (300 km/h)
must include "ZR" andthe service specifica-
tion must be given in parentheses. Example:
275/40 ZR 18 (99 Y). Speed rating "(Y)" indi- cates that the maximum speed of the tire is
over 186 mph (300 km/h). Ask the tire man-
ufacturer about the maximum speed.
All-weather tires and winter tires Index Speed rating
Q M+S
1 up to 100 mph (160 km/h)
T M+S
1 up to 118 mph (190 km/h)
H M+S
1 up to 130 mph (210 km/h)
V M+S
1 up to 149 mph (240 km/h)
i
Not all tires with the M+S marking provide
the driving characteristics of winter tires. In
addition to the M+S marking, winter tires also
have the 004Dsnowflake symbol on the tire
wall. Tires with this marking fulfill the require- ments of the Rubber Manufacturers Associa-
tion (RMA) and the Rubber Association of
Canada (RAC) regarding the tire traction on
snow. They have been especially developed
for driving on snow.
An electronic speed limiter prevents your vehi-
cle from exceeding a speed of 100 mph
(160 km/h).
The speed rating of tires mounted at the factory
may be higher than the maximum speed that the
electronic speed limiter permits. Make sure that your tires have the required
speed rating, e.g. when buying new tires. The
required speed rating for your vehicle can be
found in the "Tires" section (Y page 279).
Further information about reading tire data can
be obtained from any qualified specialist work-
shop.
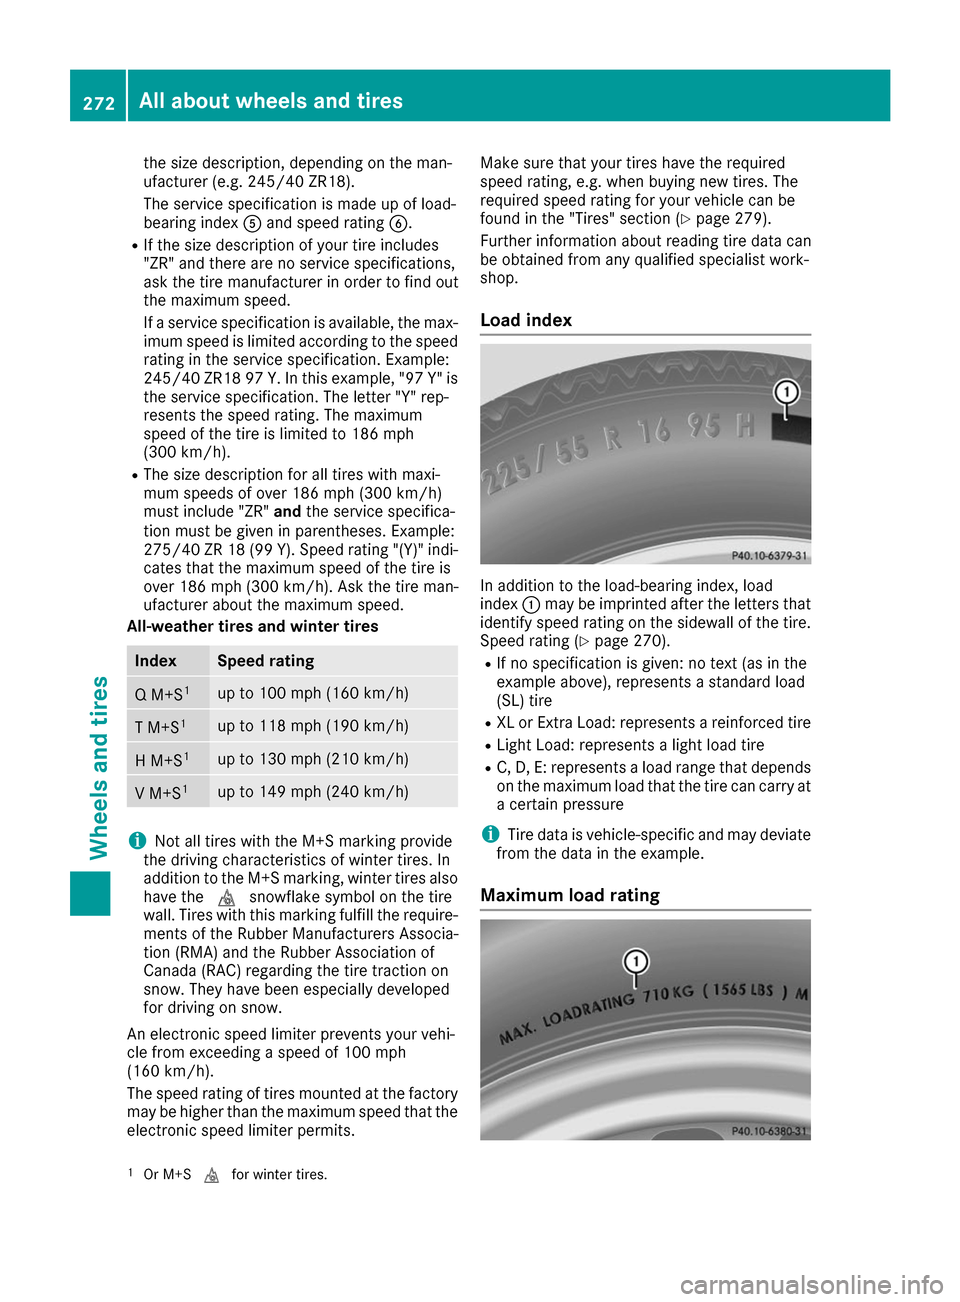
Load index In addition to the load-bearing index, load
index 0043may be imprinted after the letters that
identify speed rating on the sidewall of the tire.
Speed rating (Y page 270).
R If no specification is given: no text (as in the
example above), represents a standard load
(SL) tire
R XL or Extra Load: represents a reinforced tire
R Light Load: represents a light load tire
R C, D, E: represents a load range that depends
on the maximum load that the tire can carry at a certain pressure
i Tire data is vehicle-specific and may deviate
from the data in the example.
Maximum load rating 1
Or M+S 004Dfor winter tires. 272
All about wheels and tiresWheels and tires
Page 275 of 290

Maximum tire load
0043is the maximum permis-
sible weight for which the tire is approved.
Do not overload the tires by exceeding the
specified load limit. The maximum permissible
load can be found on the vehicle's Tire and
Loading Information placard on the B-pillar on
the driver's side (Y page 266).
i The actual values for tires are vehicle-spe-
cific and may deviate from the values in the
illustration.
DOT, Tire Identification Number (TIN) US tire regulations stipulate that every tire man-
ufacturer or retreader must imprint a TIN in or on the sidewall of each tire produced. The TIN is a unique identification number. The
TIN enables the tire manufacturers or retreaders to inform purchasers of recalls and other safety-
relevant matters. It makes it possible for the
purchaser to easily identify the affected tires.
The TIN is made up of manufacturer identifica-
tion code 0044, tire size 0087, tire type code 0085and
manufacturing date 0083.
DOT (Department of Transportation): tire
symbol 0043marks that the tire complies with the
requirements of the U.S. Department of Trans-
portation.
Manufacturer identification code: manufac-
turer identification code 0044provides details on
the tire manufacturer. New tires have a code
with two symbols. Retreaded tires have a code
with four symbols.
For further information about retreaded tires,
see (Y page 279).
Tire size: identifier0087describes the tire size.
Tire type code: tire type code0085can be used by
the manufacturer as a code to describe specific
characteristics of the tire. Date of manufacture:
date of manufacture0083
provides information about the age of a tire. The
first and second positions represent the week of manufacture, starting with "01" for the first cal-
endar week. Positions three and four represent
the year of manufacture. For example, a tire that
is marked with "3208", was manufactured in
week 32 in 2008.
i Tire data is vehicle-specific and may deviate
from the data in the example.
Tire characteristics This information describes the type of tire cord
and the number of layers in sidewall
0043and
under tire tread 0044.
i Tire data is vehicle-specific and may deviate
from the data in the example.
Definition of terms for tires and loading Tire ply composition and material used
Describes the number of plies or the number of
layers of rubber-coated fabric in the tire tread
and sidewall. These are made of steel, nylon,
polyester and other materials.
Bar
Metric unit for tire pressure. 14.5038 pounds
per square inch (psi) and 100 kilopascals (kPa)
are the equivalent of 1 bar.
DOT (Department of Transportation)
DOT-marked tires fulfill the requirements of the U S Department of Transportation.
Normal occupant weight
The number of occupants for which the vehicle
is designed multiplied by 68 kilograms (150 lbs). All about wheels and tires
273Wheels and tires Z
Page 276 of 290

Uniform Tire Quality Grading Standards
A uniform standard to grade the quality of tires
with regards to tread quality, tire traction and
temperature characteristics. The quality grad-
ing assessment is made by the manufacturer
following specifications from the U.S. govern-
ment. The ratings are molded into the sidewall of the tire.
Recommended tire pressures
The recommended tire pressure applies to the
tires mounted at the factory.
The Tire and Loading Information placard con-
tains the recommended tire pressures for cold
tires on a fully loaded vehicle and for the maxi-
mum permissible vehicle speed.
The tire pressure table contains the recommen-
ded pressures for cold tires for various operat-
ing conditions, i.e. differing load and speed con-
ditions.
Increased vehicle weight due to optional
equipment
The combined weight of all standard and
optional equipment available for the vehicle,
regardless of whether it is actually installed on
the vehicle or not.
Rim
This is the part of the wheel on which the tire is
mounted.
GAWR (Gross Axle Weight Rating)The GAWR is the maximum gross axle weight
rating. The actual load on an axle must never
exceed the gross axle weight rating. The gross
axle weight rating can be found on the vehicle
identification plate on the B-pillar on the driver's
side.
Speed rating
The speed rating is part of the tire identification.
It specifies the speed range for which the tire is approved.
GVW (Gross Vehicle Weight)
The gross vehicle weight includes the weight of
the vehicle including fuel, tools, the spare wheel, accessories installed, occupants, luggage and
the drawbar noseweight, if applicable. The gross vehicle weight must not exceed the gross vehi-
cle weight rating GVWR as specified on the vehi-
cle identification plate on the B-pillar on the
driver's side. GVWR (Gross Vehicle Weight Rating)
The GVWR is the maximum permissible gross
weight of a fully loaded vehicle (the weight of the
vehicle including all accessories, occupants,
fuel, luggage and the drawbar noseweight, if
applicable). The gross vehicle weight rating is
specified on the vehicle identification plate on
the B-pillar on the driver's side.
Maximum loaded vehicle weight
The maximum weight is the sum of:
R the curb weight of the vehicle
R the weight of the accessories
R the load limit
R the weight of the factory installed optional
equipment
Kilopascal (kPa) Metric unit for tire pressure. 6.9 kPa corre-
sponds to 1 psi. Another unit for tire pressure is
bar. 100 kilopascals (kPa) are the equivalent of
1 bar.
Load index
In addition to the load-bearing index, the load
index may also be imprinted on the sidewall of
the tire. This specifies the load-bearing capacity more precisely.
Curb weight
The weight of a vehicle with standard equipment
including the maximum capacity of fuel, oil and
coolant. It also includes the air-conditioning sys- tem and optional equipment if these are instal-
led in the vehicle, but does not include passen-
gers or luggage.
Maximum load rating
The maximum tire load is the maximum permis- sible weight in kilograms or lbs for which a tire is
approved.
Maximum permissible tire pressure
Maximum permissible tire pressure for one tire.
Maximum load on one tire
Maximum load on one tire. This is calculated by dividing the maximum axle load of one axle by
two. 274
All about wheels and tiresWheels and tires
Page 277 of 290
PSI (pounds per square inch)
A standard unit of measure for tire pressure.
Aspect ratio
Relationship between tire height and tire width
in percent.
Tire pressure
This is pressure inside the tire applying an out-
ward force to each square inch of the tire's sur-
face. The tire pressure is specified in pounds per
square inch (psi), in kilopascal (kPa) or in bar.
The tire pressure should only be corrected when
the tires are cold.
Cold tire pressure
The tires are cold:
R if the vehicle has been parked with the tires
out of direct sunlight for at least three hours
and
R if the vehicle has not been driven further than
1 mile (1.6 km)
Tread
The part of the tire that comes into contact with
the road.
BeadThe tire bead ensures that the tire sits securely
on the wheel. There are several steel wires in the
bead to prevent the tire from coming loose from the wheel rim.
Sidewall
The part of the tire between the tread and the
bead.
Weight of optional extras The combined weight of those optional extras
that weigh more than the replaced standard
parts and more than 2.3 kg (5 lbs). These
optional extras, such as high-performance
brakes, level control, a roof rack or a high-per-
formance battery, are not included in the curb
weight and the weight of the accessories.
TIN (Tire Identification Number) This is a unique identifier which can be used by
a tire manufacturer to identify tires, for example for a product recall, and thus identify the pur-
chasers. The TIN is made up of the manufactur-
er's identity code, tire size, tire type code and
the manufacturing date. Load bearing index
The load bearing index (also load index) is a code that contains the maximum load bearing capa-
city of a tire.
Traction
Traction is the result of friction between the tires and the road surface.
Treadwear indicatorsNarrow bars (tread wear bars) that are distrib-
uted over the tire tread. If the tire tread is level
with the bars, the wear limit of 00CDin (1.6 mm)
has been reached.
Occupant distribution The distribution of occupants in a vehicle at theirdesignated seating positions.
Total load limit Nominal load and luggage load plus 68 kg
(150 lbs) multiplied by the number of seats in
the vehicle. Changing a wheel
Flat tire
The "Breakdown assistance" section
(Y page 241) contains information and notes on
how to deal with a flat tire. Information on driv-
ing with MOExtended tires in the event of a flat
tire can be found under "MOExtended tires (tires with run-flat characteristics" (Y page 242). Rotating the wheels
G
WARNING
Interchanging the front and rear wheels may
severely impair the driving characteristics if
the wheels or tires have different dimensions. The wheel brakes or suspension components
may also be damaged. There is a risk of acci-
dent.
Rotate front and rear wheels only if the wheels and tires are of the same dimensions.
! On vehicles equipped with a tire pressure
monitor, electronic components are located
in the wheel. Changing a wheel
275Wheels and tires Z
Page 278 of 290
Tire-mounting tools should not be used near
the valve. This could damage the electronic
components.
Only have tires changed at a qualified spe-
cialist workshop.
Observe the instructions and safety notes in the "Changing a wheel" section (Y page 275).
The wear patterns on the front and rear tires
differ, depending on the operating conditions.
Rotate the wheels before a clear wear pattern
has formed on the tires. Front tires typically
wear more on the shoulders and the rear tires in
the center.
On vehicles that have the same size front and
rear wheels, you can rotate the wheels accord-
ing to the intervals in the tire manufacturer's
warranty book in your vehicle documents. If no
warranty book is available, the tires should be
rotated every 3,000 to 6,000 miles (5,000 to
10,000 km). Depending on tire wear, this may
be required earlier. Do not change the direction
of wheel rotation.
Clean the contact surfaces of the wheel and the brake disc thoroughly every time a wheel is rota-
ted. Check the tire pressure and reactivate the
tire pressure monitor if necessary. Direction of rotation
Tires with a specified direction of rotation have
additional benefits, e.g. if there is a risk of hydro-
planing. These advantages can only be gained if the tires are installed corresponding to the
direction of rotation.
An arrow on the sidewall of the tire indicates its correct direction of rotation. Storing wheels
Store wheels that are not being used in a cool,
dry and preferably dark place. Protect the tires
against oil and grease. Mounting a wheel
Preparing the vehicle X
Stop the vehicle on solid, non-slippery and
level ground.
X Apply the electric parking brake manually. X
Bring the front wheels into the straight-ahead
position.
X Shift the transmission to position P.
X Switch off the drive system.
X Vehicles without KEYLESS-GO: remove the
SmartKey from the ignition lock.
X Vehicles with KEYLESS-GO: open the driv-
er's door.
The vehicle electronics now have status 0.
This is the same as the SmartKey having been removed.
X If included in the vehicle equipment, remove
the tire-change tool kit from the vehicle.
X Safeguard the vehicle against rolling away
(Y page 128).
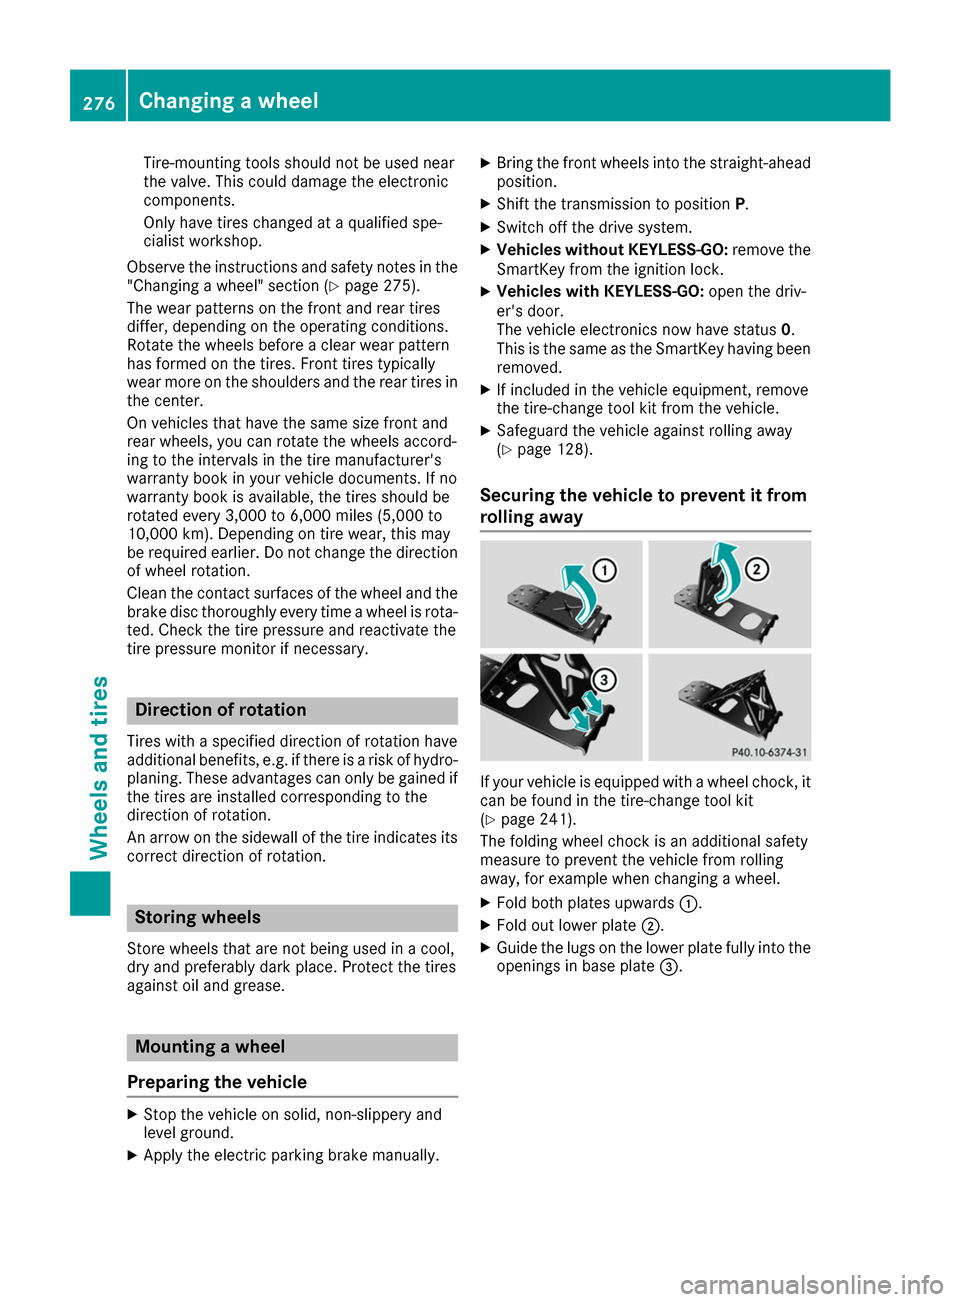
Securing the vehicle to prevent it from
rolling away If your vehicle is equipped with a wheel chock, it
can be found in the tire-change tool kit
(Y page 241).
The folding wheel chock is an additional safety
measure to prevent the vehicle from rolling
away, for example when changing a wheel.
X Fold both plates upwards 0043.
X Fold out lower plate 0044.
X Guide the lugs on the lower plate fully into the
openings in base plate 0087.276
Changing a wheelWheels and tires
Page 281 of 290
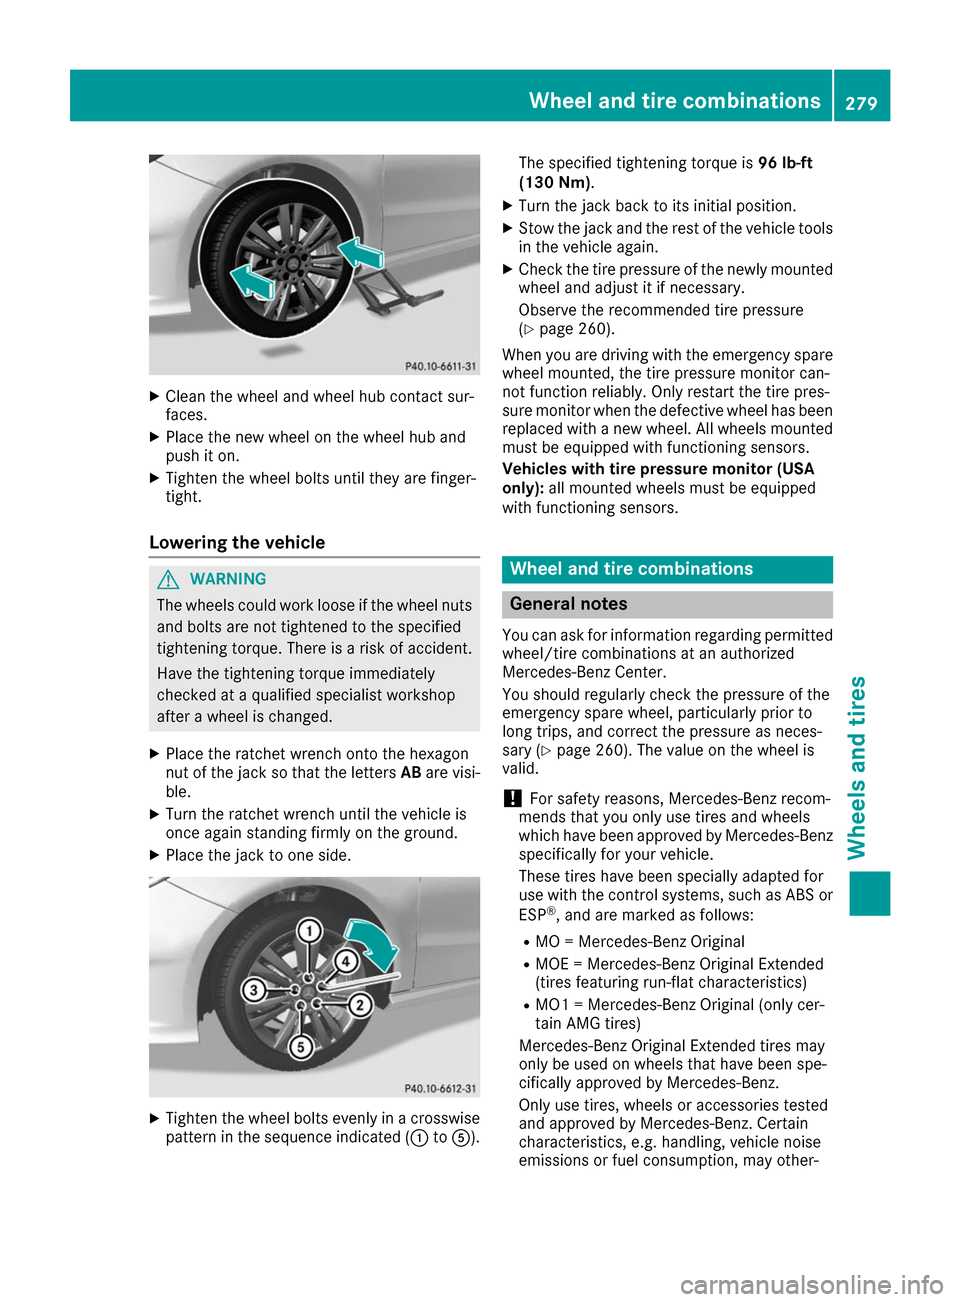
X
Clean the wheel and wheel hub contact sur-
faces.
X Place the new wheel on the wheel hub and
push it on.
X Tighten the wheel bolts until they are finger-
tight.
Lowering the vehicle G
WARNING
The wheels could work loose if the wheel nuts and bolts are not tightened to the specified
tightening torque. There is a risk of accident.
Have the tightening torque immediately
checked at a qualified specialist workshop
after a wheel is changed.
X Place the ratchet wrench onto the hexagon
nut of the jack so that the letters ABare visi-
ble.
X Turn the ratchet wrench until the vehicle is
once again standing firmly on the ground.
X Place the jack to one side. X
Tighten the wheel bolts evenly in a crosswise
pattern in the sequence indicated (0043 to0083). The specified tightening torque is
96 lb-ft
(130 Nm) .
X Turn the jack back to its initial position.
X Stow the jack and the rest of the vehicle tools
in the vehicle again.
X Check the tire pressure of the newly mounted
wheel and adjust it if necessary.
Observe the recommended tire pressure
(Y page 260).
When you are driving with the emergency spare
wheel mounted, the tire pressure monitor can-
not function reliably. Only restart the tire pres-
sure monitor when the defective wheel has been
replaced with a new wheel. All wheels mounted
must be equipped with functioning sensors.
Vehicles with tire pressure monitor (USA
only): all mounted wheels must be equipped
with functioning sensors. Wheel and tire combinations
General notes
You can ask for information regarding permitted wheel/tire combinations at an authorized
Mercedes-Benz Center.
You should regularly check the pressure of the
emergency spare wheel, particularly prior to
long trips, and correct the pressure as neces-
sary (Y page 260). The value on the wheel is
valid.
! For safety reasons, Mercedes-Benz recom-
mends that you only use tires and wheels
which have been approved by Mercedes-Benz specifically for your vehicle.
These tires have been specially adapted for
use with the control systems, such as ABS or
ESP ®
, and are marked as follows:
R MO = Mercedes-Benz Original
R MOE = Mercedes-Benz Original Extended
(tires featuring run-flat characteristics)
R MO1 = Mercedes-Benz Original (only cer-
tain AMG tires)
Mercedes-Benz Original Extended tires may
only be used on wheels that have been spe-
cifically approved by Mercedes-Benz.
Only use tires, wheels or accessories tested
and approved by Mercedes-Benz. Certain
characteristics, e.g. handling, vehicle noise
emissions or fuel consumption, may other- Wheel and tire combinations
279Wheels and tires Z