Button functions MERCEDES-BENZ B-Class 2017 W246 Owner's Manual
[x] Cancel search | Manufacturer: MERCEDES-BENZ, Model Year: 2017, Model line: B-Class, Model: MERCEDES-BENZ B-Class 2017 W246Pages: 290, PDF Size: 19.81 MB
Page 15 of 290
On-board computer
Assistance graphic menu ............... 162
Assistance menu ........................... 162
Audio menu ................................... 160
Display messages .......................... 167
Displaying a service message ........ 233
E‑CELL menu ................................. 163
Factory settings ............................. 166
Important safety notes .................. 152
Instrument cluster submenu ..........1 65
Lighting submenu .......................... 166
Menu overview .............................. 156
Message memory .......................... 167
Navigation menu ............................ 158
Operation ....................................... 154
Service menu ................................. 163
Settings menu ............................... 163
Standard displa y............................ 156
Telephone menu ............................ 160
Trip menu ...................................... 156
Vehicle submenu ........................... 166
Video DVD operation ..................... 160
Online access .................................... 127
Operating safety
Declaration of conformity ................ 26
Important safety notes .................... 24
Operating system
see On-board computer
Operation
Digital Operator's Manua l................ 21
Operator's Manual
Vehicle equipment ........................... 23
Outside temperature display ........... 152
Overhead control panel ...................... 37
Override feature
Rear side window s........................... 58 P
Paint code number ............................ 282
Paintwork (cleaning instructions) ... 235
Panic alarm .......................................... 38
Parking
Important safety notes .................. 128
Parking brake ................................ 130
Parking position for the exterior
mirror on the front-passenger
side .................................................. 85 Rear view camera .......................... 145
Parking aid
see Exterior mirrors
see Rear view camera
Parking Assist PARKTRONIC
Deactivating/activating ................. 141
Driving system ............................... 139
Function/note s............................. 139
Important safety notes .................. 139
Problems (malfunctions) ................ 141
Sensor rang e................................. 139
Warning display ............................. 140
Parking brake
Applying automaticall y................... 130
Applying or releasing manually ...... 130
Display message ............................ 171
Electric parking brake .................... 130
Emergency braking ........................ 131
General notes ................................ 130
Releasing automaticall y................. 131
Warning lamp ................................. 198
Parking lamps
Replacing bulb s............................... 92
Switching on/of f.............................. 88
Parking Pilot
Canceling ....................................... 145
Detecting parking spaces .............. 142
Display Message ............................ 183
Exiting a parking space .................. 144
Function/note s............................. 142
Important safety notes .................. 142
Parking .......................................... 143
PASSENGER AIR BAG
Display message ............................ 176
Indicator lamps ................................ 39
Problem (malfunction) ................... 176
Pets in the vehicle ............................... 58
Phone book
see also Digital Operator's Man-
ual .................................................. 201
Plastic trim (cleaning instruc-
tions) .................................................. 238
Power display .................................... 153
Power washers .................................. 235
Power windows
see Side windows
Program selector button .................. 114 Index
13
Page 21 of 290
From inside the vehicle (central
unlocking button) ............................. 72
USB devices
Connecting to the Media Inter-
face ............................................... 206 V
Vanity mirror (in the sun visor) ........ 217
Vehicle
Correct use ...................................... 27
Data acquisition ............................... 28
Display messag e............................ 186
Equipment ....................................... 23
Individual settings .......................... 163
Limited Warranty ............................. 28
Loading .......................................... 266
Locking (in an emergency) ............... 73
Locking (SmartKey) .......................... 66
Lowering ........................................ 279
Maintenance .................................... 24
Parking for a long period ................ 131
Raising ........................................... 277
Reporting problems ......................... 27
Securing from rolling away ............ 276
Starting .......................................... 110
Transporting .................................. 254
Unlocking (in an emergency) ........... 73
Unlocking (SmartKey) ...................... 66
Vehicle data ................................... 286
Vehicle data
Roof load (maximum) ..................... 286
Trunk load (maximum) ................... 286
Vehicle dimensions ........................... 286
Vehicle emergency locking ................ 73
Vehicle Homepage
Data protection .............................. 127
Functions ....................................... 128
General information ....................... 127
Internet connection ....................... 128
Vehicle identification number
see VIN
Vehicle identification plate .............. 282
Vehicle tool kit .................................. 241
Ventilation
Setting the vents ........................... 106
Video
Operating the DVD ......................... 160 see also Digital Operator's Man-
ual .................................................. 201
VIN
Seat ............................................... 283
Type plate ...................................... 282 W
Warning and indicator lamps ABS ................................................ 193
Active Brake Assist ........................ 199
Brakes ........................................... 192
Distance warning ........................... 199
ESP ®
.............................................. 195
ESP ®
OFF ....................................... 196
Overview .......................................... 32
PASSENGER AIR BAG ...................... 39
RBS (Recuperative Brake Sys-
tem) ............................................... 192
Restraint system ............................ 198
Seat belt ........................................ 190
Tire pressure monitor .................... 200
Warranty .............................................. 23
Washer fluid
Display message ............................ 188
Weather display (COMAND)
see also Digital Operator's Man-
ual.................................................. 201
Wheel and tire combinations
Tires ............................................... 279
Wheel bolt tightening torque ........... 279
Wheel chock ...................................... 276
Wheels
Changing a whee l.......................... 275
Checking ........................................ 257
Cleaning ......................................... 236
Important safety notes .................. 257
Information on driving .................... 257
Interchanging/changing ................ 275
Mounting a new whee l................... 278
Removing a whee l.......................... 278
Storing ........................................... 276
Tightening torque ........................... 279
Wheel size/tire size ....................... 279
Window curtain air bag
Display message ............................ 175
Operation ......................................... 45 Index
19
Page 23 of 290
Introduction
The printed Operator's Manual provides infor-
mation about the safe operation of your vehicle.
The Digital Operator's Manual provides compre- hensive and specifically adapted information on
your vehicle's equipment and multimedia sys-
tem. You can call up the Digital Operator's Man-
ual via the multimedia system.
i You will not incur any costs when calling up
the Digital Operator's Manual. The Digital
Operator's Manual works without connecting to the Internet.
There are three ways to access the topics of the Digital Operator's Manual:
R Visual search
The visual search allows you to explore your
vehicle "virtually". Starting from either the
vehicle exterior view or interior view, you can
access many of the different topics covered
by the Digital Operator's Manual. To access
the vehicle interior section, select the "Vehi-
cle interior" view.
R Keyword search
The keyword search allows you to search for a
keyword by entering characters.
R Contents
You can select individual sections in the con-
tents.
i The Digital Operator's Manual is deactiva-
ted for safety reasons while driving. Operation
Calling up the Digital Operator's Man-
ual
X Press the 00D4button in the center console.
The overview relating to the vehicle appears.
X Select the "Operator's Manual" menu item by
turning 3or pressing 7the controller.
X Confirm 7the message about the warning
and safety notes.
The basic menu for the Digital Operator's
Manual appears. Operating the Digital Operator's Man-
ual
General notes Please observe the information about the oper-
ation of the controller (Y page 202).
Content pages The content pages can be accessed by means of
a visual search, a keyword search or using the
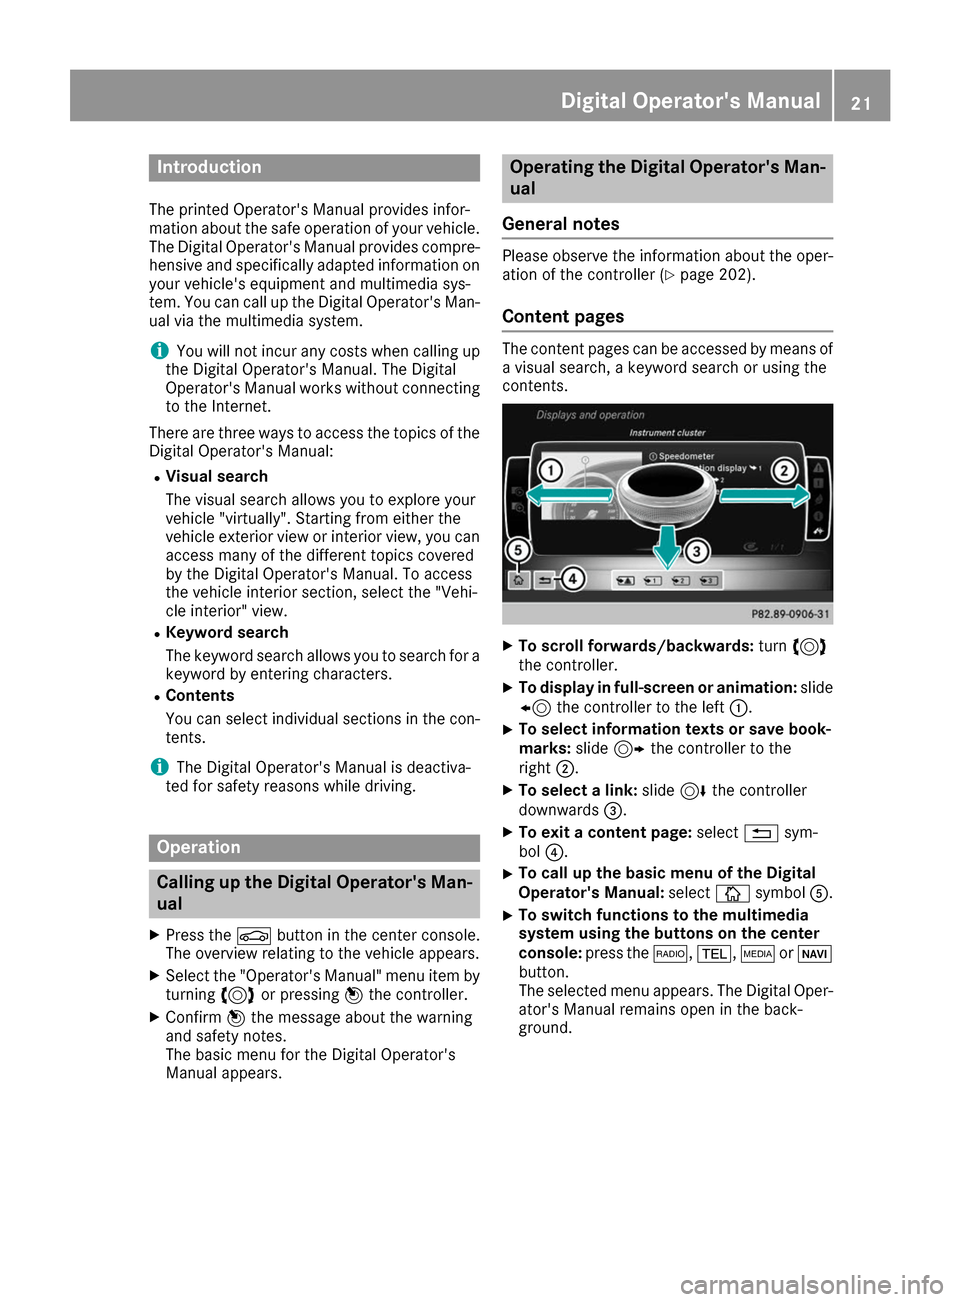
contents. X
To scroll forwards/backwards: turn3
the controller.
X To display in full-screen or animation: slide
8 the controller to the left 0043.
X To select information texts or save book-
marks:
slide9 the controller to the
right 0044.
X To select a link: slide6the controller
downwards 0087.
X To exit a content page: select0038sym-
bol 0085.
X To call up the basic menu of the Digital
Operator's Manual: select00DAsymbol 0083.
X To switch functions to the multimedia
system using the buttons on the center
console:
press the 002A,002B,00FDor00BE
button.
The selected menu appears. The Digital Oper-
ator's Manual remains open in the back-
ground. Digital Operator's Manual
21
Page 68 of 290
SmartKey
Important safety notes
G
WARNING
If children are left unsupervised in the vehicle, they could:
R open the doors, thus endangering other
people or road users.
R get out and disrupt traffic.
R operate the vehicle's equipment.
Additionally, children could set the vehicle in
motion if, for example, they:
R release the parking brake.
R shift the transmission out of park position P
R start the vehicle's drive system.
There is a risk of an accident and injury.
When leaving the vehicle, always take the
SmartKey with you and lock the vehicle. Never leave children or animals unattended in the
vehicle. Always keep the SmartKey out of
reach of children. G
WARNING
If you attach heavy or large objects to the
SmartKey, the SmartKey could be uninten-
tionally turned in the ignition lock. This could
cause the engine to be switched off. There is a risk of an accident.
Do not attach any heavy or large objects to the
SmartKey. Remove any bulky key rings before
inserting the SmartKey into the ignition lock.
! Keep the SmartKey away from strong mag-
netic fields. Otherwise, the remote control
function could be affected.
Strong magnetic fields can occur in the vicin- ity of powerful electrical installations.
Do not keep the SmartKey: R with electronic devices, e.g. a mobile phone
or another SmartKey.
R with metallic objects, e.g. coins or metal foil.
R inside metallic objects, e.g. a metal case SmartKey functions
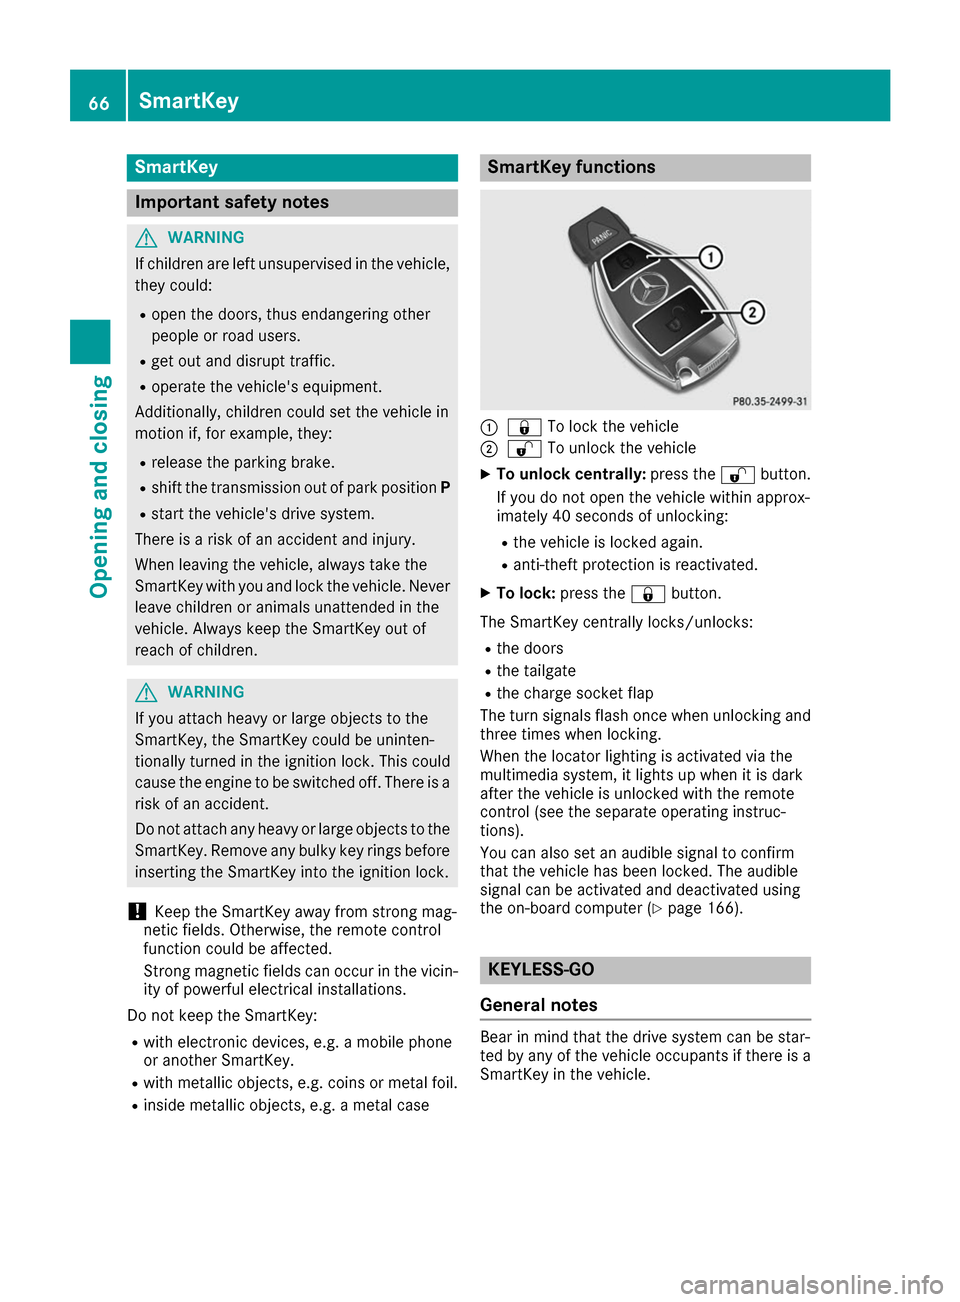
0043
0037 To lock the vehicle
0044 0036 To unlock the vehicle
X To unlock centrally: press the0036button.
If you do not open the vehicle within approx-
imately 40 seconds of unlocking:
R the vehicle is locked again.
R anti-theft protection is reactivated.
X To lock: press the 0037button.
The SmartKey centrally locks/unlocks: R the doors
R the tailgate
R the charge socket flap
The turn signals flash once when unlocking and
three times when locking.
When the locator lighting is activated via the
multimedia system, it lights up when it is dark
after the vehicle is unlocked with the remote
control (see the separate operating instruc-
tions).
You can also set an audible signal to confirm
that the vehicle has been locked. The audible
signal can be activated and deactivated using
the on-board computer (Y page 166). KEYLESS-GO
General notes Bear in mind that the drive system can be star-
ted by any of the vehicle occupants if there is a
SmartKey in the vehicle. 66
SmartKeyOpening and closing
Page 70 of 290
approximately six seconds until the battery
check lamp flashes twice (Y page 69).
If the setting of the locking system is changed
within the signal range of the vehicle, pressing
the 0037 or0036 button:
R locks or
R unlocks the vehicle
The SmartKey now functions as follows:
X To unlock: press the0036button once.
X To unlock centrally: press the0036button
twice.
X To lock centrally: press the0037button.
The KEYLESS-GO function is changed as fol-
lows: X To unlock the driver's door: touch the inner
surface of the door handle on the driver's
door.
X To unlock centrally: touch the inner surface
of the door handle on the front-passenger
door or the rear door.
X To lock centrally: touch the outer sensor
surface on one of the door handles.
X To restore the factory settings: press and
hold the 0036and0037 buttons simultane-
ously for approximately six seconds until the
battery check lamp flashes twice
(Y page 69). Mechanical key
General notes If the vehicle can no longer be locked or
unlocked with the SmartKey or KEYLESS-GO,
use the mechanical key.
If you use the mechanical key to unlock and
open the driver's door or the trunk lid, the anti-
theft alarm system will be triggered (Y page 65).
There are several ways to turn off the alarm:
X To deactivate the alarm with the key: press
the 0036 or0037 button on the key.
or X Insert the SmartKey into the ignition lock.
or X To deactivate the alarm with KEYLESS-GO:
press the Start/Stop button in the ignition
lock. The SmartKey must be in the vehicle. or
X Lock or unlock the vehicle using KEYLESS-
GO. The SmartKey must be outside the vehi-
cle.
If you unlock the vehicle using the mechanical
key, the charge socket flap will not be unlocked automatically.
X To unlock the charge socket flap: insert the
SmartKey into the ignition lock.
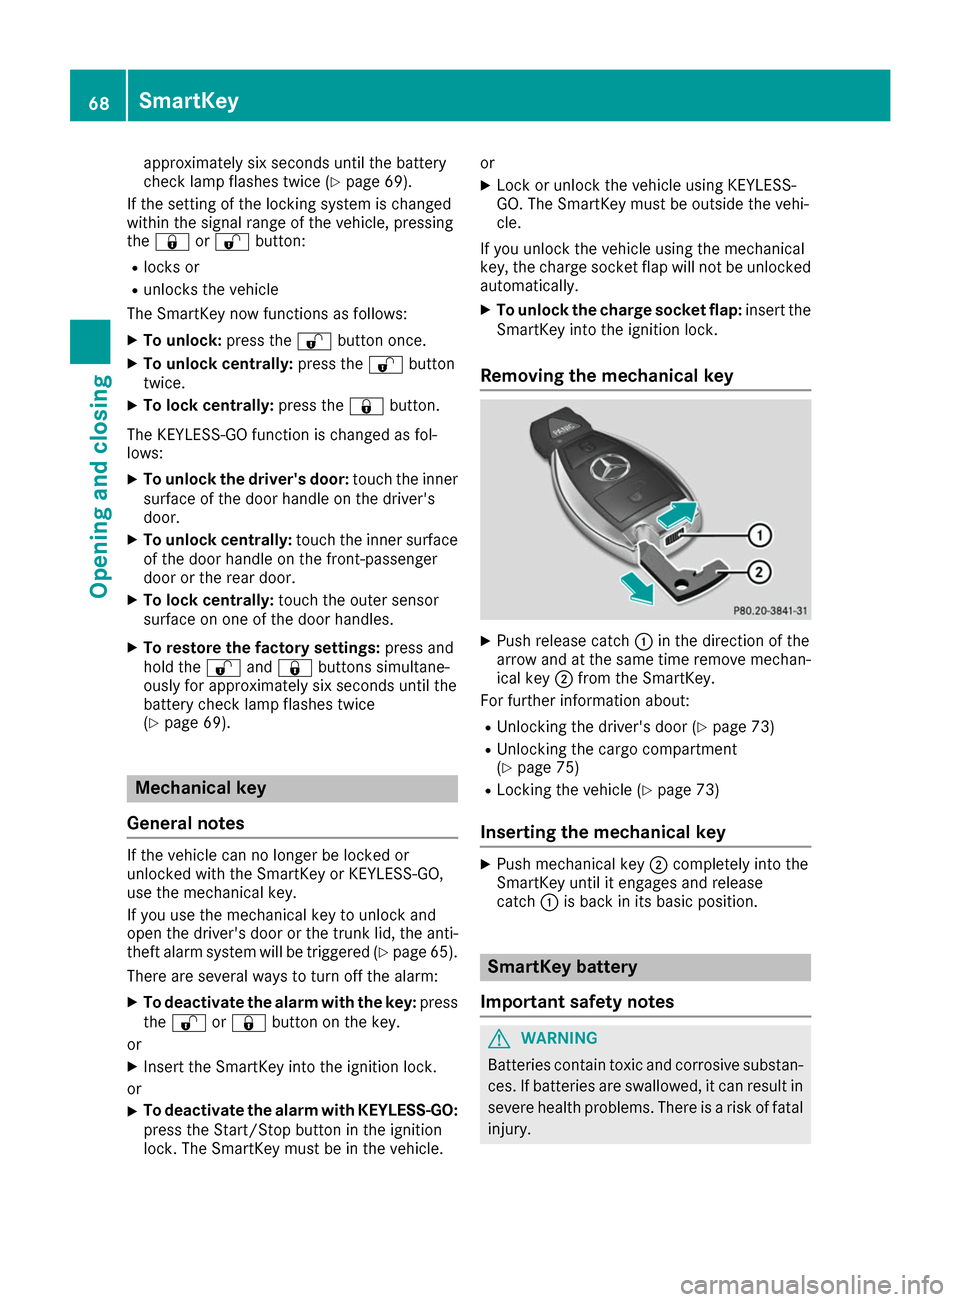
Removing the mechanical key X
Push release catch 0043in the direction of the
arrow and at the same time remove mechan- ical key 0044from the SmartKey.
For further information about:
R Unlocking the driver's door (Y page 73)
R Unlocking the cargo compartment
(Y page 75)
R Locking the vehicle (Y page 73)
Inserting the mechanical key X
Push mechanical key 0044completely into the
SmartKey until it engages and release
catch 0043is back in its basic position. SmartKey battery
Important safety notes G
WARNING
Batteries contain toxic and corrosive substan- ces. If batteries are swallowed, it can result in
severe health problems. There is a risk of fatal injury. 68
SmartKeyOpening and closing
Page 78 of 290
G
WARNING
The reversing feature does not react:
R to soft, light and thin objects, e.g. small fin-
gers
R while resetting
This means that the reversing feature cannot
prevent someone being trapped in these sit-
uations. There is a risk of injury.
Make sure that no body parts are in close
proximity during the closing procedure. If
someone becomes trapped, press the switch
to open the side window again. Opening and closing the side win-
dows
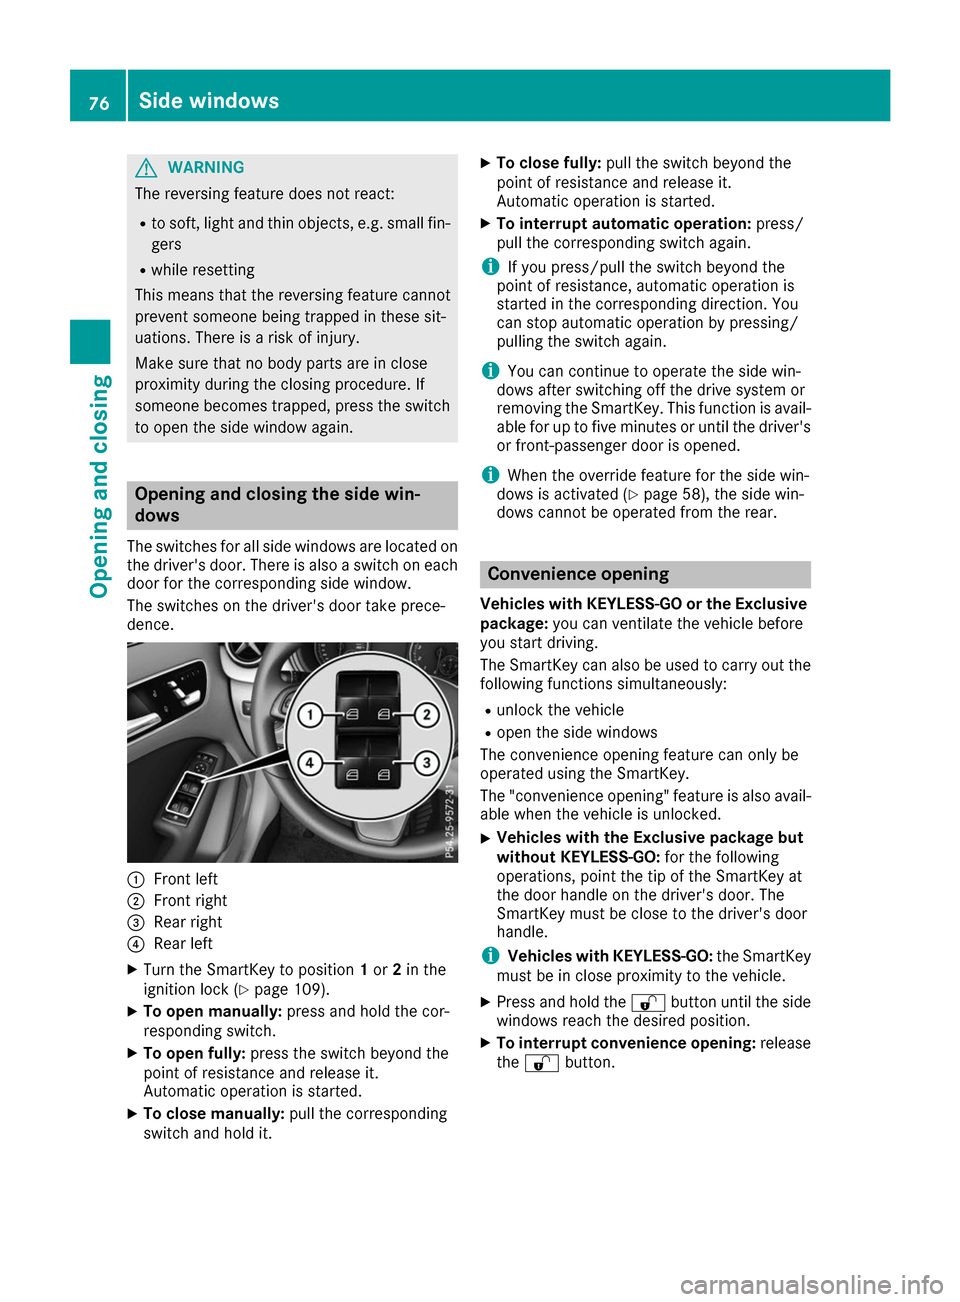
The switches for all side windows are located on the driver's door. There is also a switch on each
door for the corresponding side window.
The switches on the driver's door take prece-
dence. 0043
Front left
0044 Front right
0087 Rear right
0085 Rear left
X Turn the SmartKey to position 1or 2in the
ignition lock (Y page 109).
X To open manually: press and hold the cor-
responding switch.
X To open fully: press the switch beyond the
point of resistance and release it.
Automatic operation is started.
X To close manually: pull the corresponding
switch and hold it. X
To close fully: pull the switch beyond the
point of resistance and release it.
Automatic operation is started.
X To interrupt automatic operation: press/
pull the corresponding switch again.
i If you press/pull the switch beyond the
point of resistance, automatic operation is
started in the corresponding direction. You
can stop automatic operation by pressing/
pulling the switch again.
i You can continue to operate the side win-
dows after switching off the drive system or
removing the SmartKey. This function is avail- able for up to five minutes or until the driver's
or front-passenger door is opened.
i When the override feature for the side win-
dows is activated (Y page 58), the side win-
dows cannot be operated from the rear. Convenience opening
Vehicles with KEYLESS-GO or the Exclusive package: you can ventilate the vehicle before
you start driving.
The SmartKey can also be used to carry out the following functions simultaneously:
R unlock the vehicle
R open the side windows
The convenience opening feature can only be
operated using the SmartKey.
The "convenience opening" feature is also avail-
able when the vehicle is unlocked.
X Vehicles with the Exclusive package but
without KEYLESS-GO:
for the following
operations, point the tip of the SmartKey at
the door handle on the driver's door. The
SmartKey must be close to the driver's door
handle.
i Vehicles with KEYLESS-GO:
the SmartKey
must be in close proximity to the vehicle.
X Press and hold the 0036button until the side
windows reach the desired position.
X To interrupt convenience opening: release
the 0036 button. 76
Side windowsOpening and closing
Page 88 of 290
While the memory function is making adjust-
ments, make sure that no one has any body
parts in the sweep of the seat. If somebody
becomes trapped, immediately release the
memory function position button. The adjust- ment process is stopped. G
WARNING
Children could become trapped if they acti-
vate the memory function, particularly when
unattended. There is a risk of injury.
When leaving the vehicle, always take the
SmartKey with you and lock the vehicle. Never leave children unsupervised in the vehicle.
The memory function can be used at any time,
e.g. even when the SmartKey is not in the igni-
tion lock. Storing settings
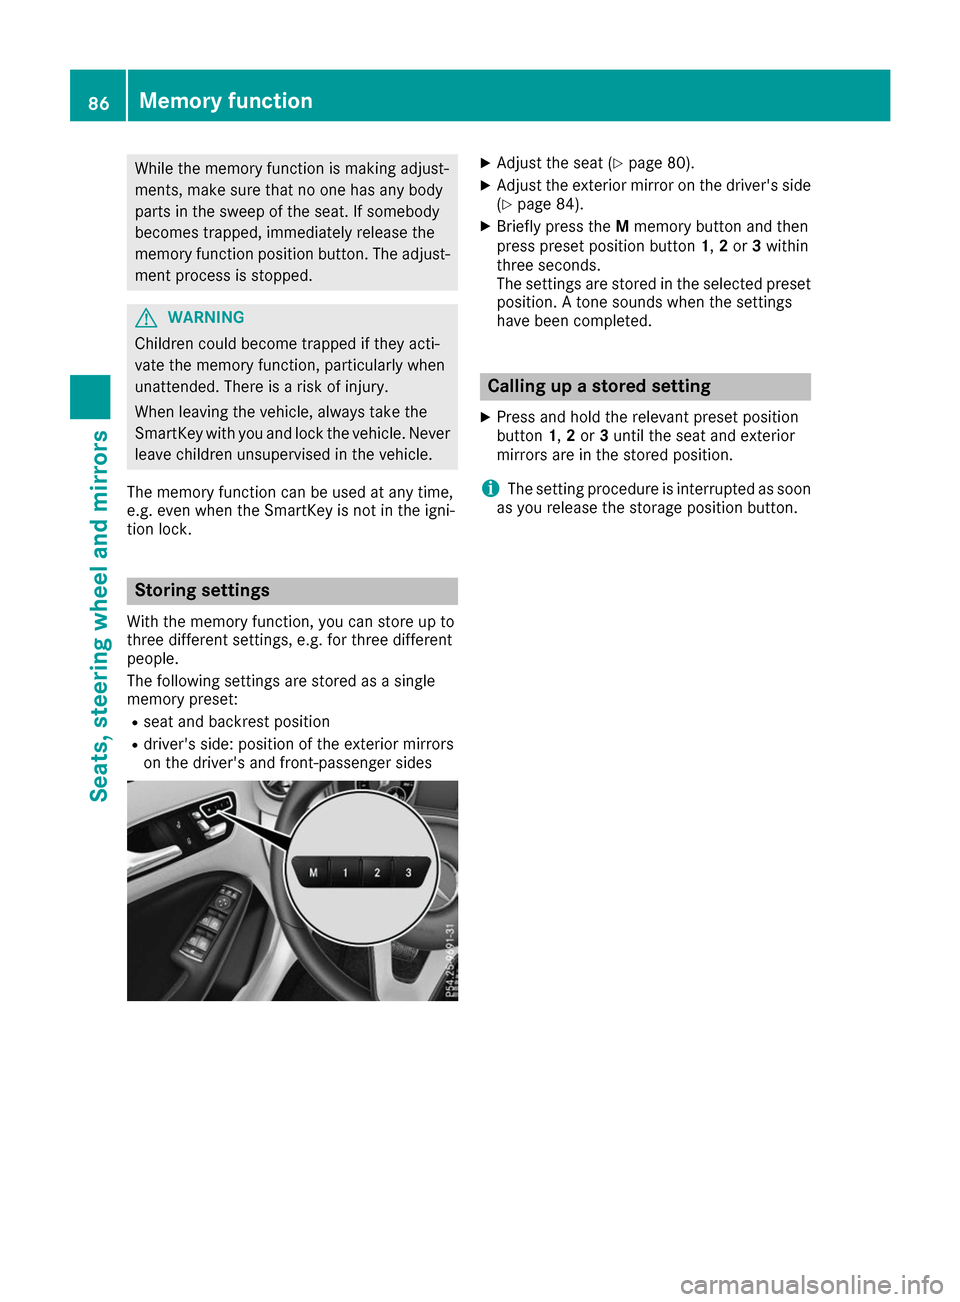
With the memory function, you can store up to
three different settings, e.g. for three different
people.
The following settings are stored as a single
memory preset:
R seat and backrest position
R driver's side: position of the exterior mirrors
on the driver's and front-passenger sides X
Adjust the seat (Y page 80).
X Adjust the exterior mirror on the driver's side
(Y page 84).
X Briefly press the Mmemory button and then
press preset position button 1,2or 3within
three seconds.
The settings are stored in the selected preset
position. A tone sounds when the settings
have been completed. Calling up a stored setting
X Press and hold the relevant preset position
button 1,2or 3until the seat and exterior
mirrors are in the stored position.
i The setting procedure is interrupted as soon
as you release the storage position button. 86
Memory functionSeats, steering wheel and mirrors
Page 102 of 290
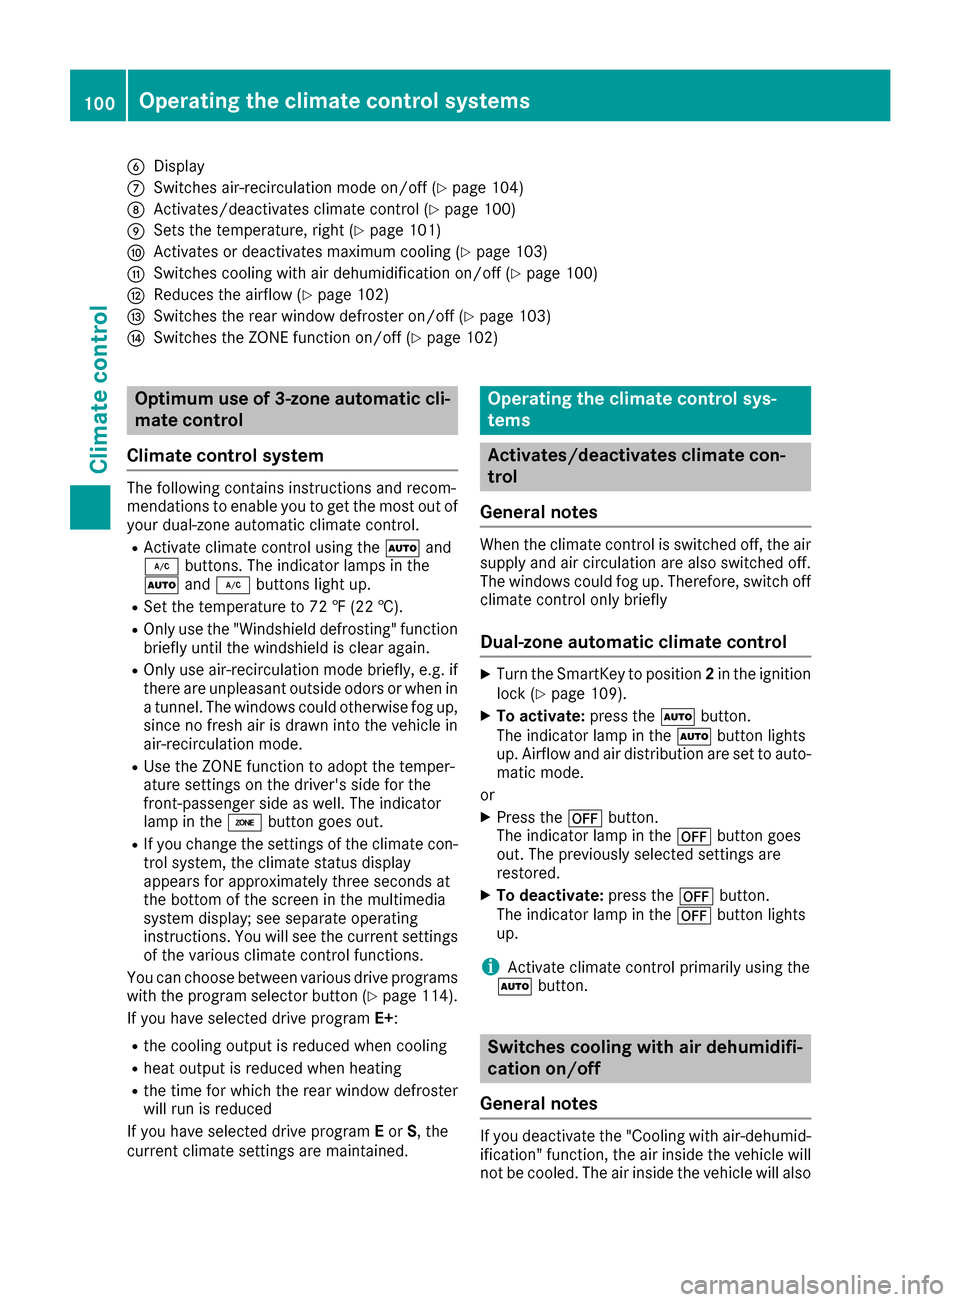
0084
Display
006B Switches air-recirculation mode on/off (Y page 104)
006C Activates/deactivates climate control (Y page 100)
006D Sets the temperature, right (Y page 101)
006E Activates or deactivates maximum cooling (Y page 103)
006F Switches cooling with air dehumidification on/off (Y page 100)
0070 Reduces the airflow (Y page 102)
0071 Switches the rear window defroster on/off (Y page 103)
0072 Switches the ZONE function on/off (Y page 102)Optimum use of 3-zone automatic cli-
mate control
Climate control system The following contains instructions and recom-
mendations to enable you to get the most out of
your dual-zone automatic climate control.
R Activate climate control using the 0058and
005A buttons. The indicator lamps in the
0058 and005A buttons light up.
R Set the temperature to 72 ‡ (22 †).
R Only use the "Windshield defrosting" function
briefly until the windshield is clear again.
R Only use air-recirculation mode briefly, e.g. if
there are unpleasant outside odors or when in a tunnel. The windows could otherwise fog up,
since no fresh air is drawn into the vehicle in
air-recirculation mode.
R Use the ZONE function to adopt the temper-
ature settings on the driver's side for the
front-passenger side as well. The indicator
lamp in the 00D6button goes out.
R If you change the settings of the climate con-
trol system, the climate status display
appears for approximately three seconds at
the bottom of the screen in the multimedia
system display; see separate operating
instructions. You will see the current settings
of the various climate control functions.
You can choose between various drive programs
with the program selector button (Y page 114).
If you have selected drive program E+:
R the cooling output is reduced when cooling
R heat output is reduced when heating
R the time for which the rear window defroster
will run is reduced
If you have selected drive program Eor S, the
current climate settings are maintained. Operating the climate control sys-
tems
Activates/deactivates climate con-
trol
General notes When the climate control is switched off, the air
supply and air circulation are also switched off.
The windows could fog up. Therefore, switch off
climate control only briefly
Dual-zone automatic climate control X
Turn the SmartKey to position 2in the ignition
lock (Y page 109).
X To activate: press the0058button.
The indicator lamp in the 0058button lights
up. Airflow and air distribution are set to auto- matic mode.
or X Press the 0078button.
The indicator lamp in the 0078button goes
out. The previously selected settings are
restored.
X To deactivate: press the0078button.
The indicator lamp in the 0078button lights
up.
i Activate climate control primarily using the
0058 button. Switches cooling with air dehumidifi-
cation on/off
General notes If you deactivate the "Cooling with air-dehumid-
ification" function, the air inside the vehicle will
not be cooled. The air inside the vehicle will also 100
Operating the climate control systemsClimate control
Page 104 of 290
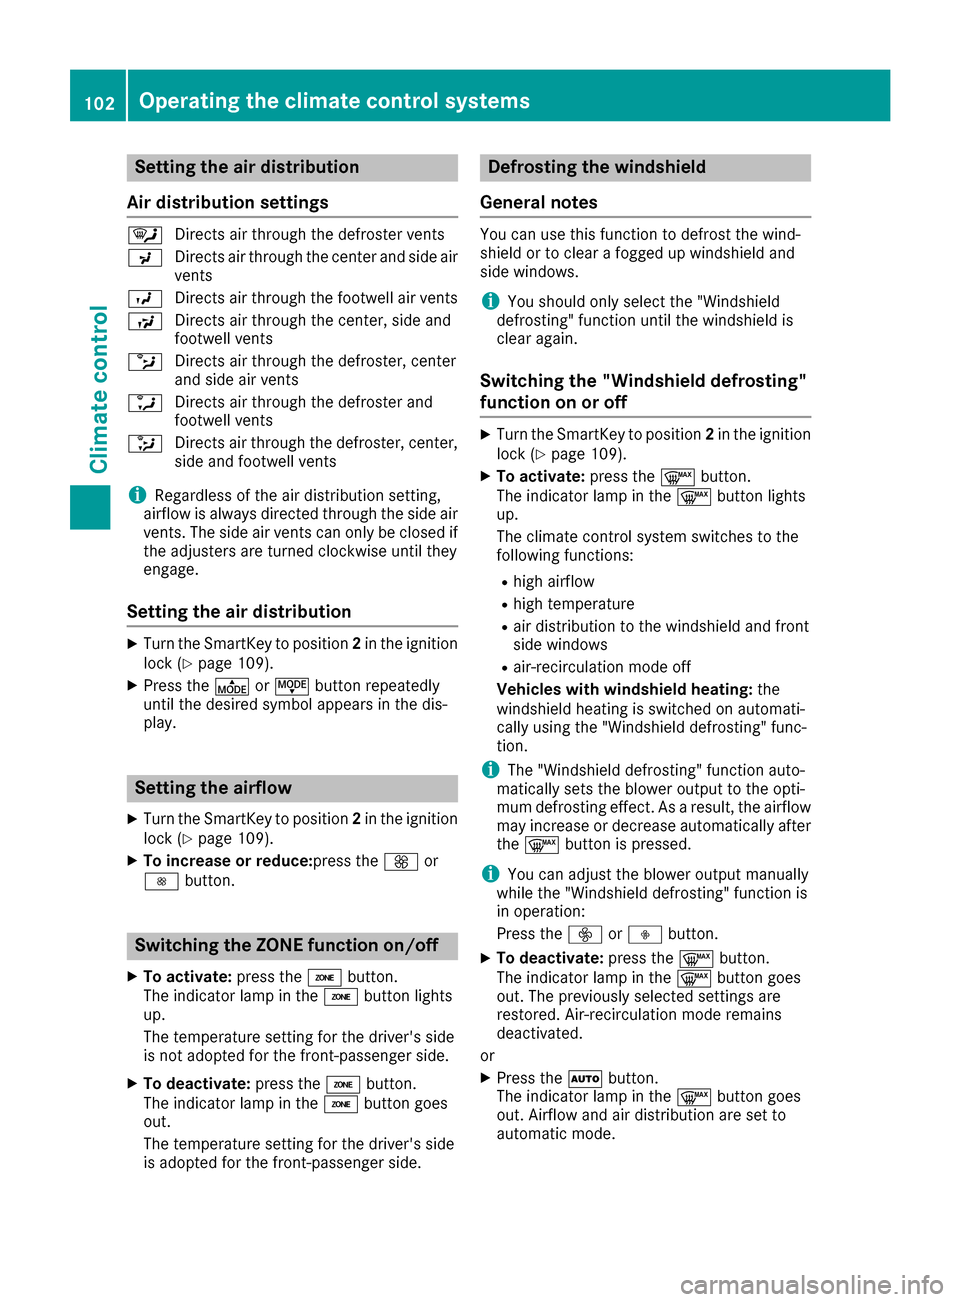
Setting the air distribution
Air distribution settings 0061
Directs air through the defroster vents
009C Directs air through the center and side air
vents
009B Directs air through the footwell air vents
009F Directs air through the center, side and
footwell vents
0087 Directs air through the defroster, center
and side air vents
0086 Directs air through the defroster and
footwell vents
008F Directs air through the defroster, center,
side and footwell vents
i Regardless of the air distribution setting,
airflow is always directed through the side air
vents. The side air vents can only be closed if the adjusters are turned clockwise until they
engage.
Setting the air distribution X
Turn the SmartKey to position 2in the ignition
lock (Y page 109).
X Press the 004For004A button repeatedly
until the desired symbol appears in the dis-
play. Setting the airflow
X Turn the SmartKey to position 2in the ignition
lock (Y page 109).
X To increase or reduce:press the 0097or
0095 button. Switching the ZONE function on/off
X To activate: press the00D6button.
The indicator lamp in the 00D6button lights
up.
The temperature setting for the driver's side
is not adopted for the front-passenger side.
X To deactivate: press the00D6button.
The indicator lamp in the 00D6button goes
out.
The temperature setting for the driver's side
is adopted for the front-passenger side. Defrosting the windshield
General notes You can use this function to defrost the wind-
shield or to clear a fogged up windshield and
side windows.
i You should only select the "Windshield
defrosting" function until the windshield is
clear again.
Switching the "Windshield defrosting"
function on or off X
Turn the SmartKey to position 2in the ignition
lock (Y page 109).
X To activate: press the0064button.
The indicator lamp in the 0064button lights
up.
The climate control system switches to the
following functions:
R high airflow
R high temperature
R air distribution to the windshield and front
side windows
R air-recirculation mode off
Vehicles with windshield heating: the
windshield heating is switched on automati-
cally using the "Windshield defrosting" func-
tion.
i The "Windshield defrosting" function auto-
matically sets the blower output to the opti-
mum defrosting effect. As a result, the airflow
may increase or decrease automatically after
the 0064 button is pressed.
i You can adjust the blower output manually
while the "Windshield defrosting" function is
in operation:
Press the 00F2or00F3 button.
X To deactivate: press the0064button.
The indicator lamp in the 0064button goes
out. The previously selected settings are
restored. Air-recirculation mode remains
deactivated.
or X Press the 0058button.
The indicator lamp in the 0064button goes
out. Airflow and air distribution are set to
automatic mode. 102
Operating the climate control systemsClimate control
Page 105 of 290
or
X Turn temperature control 0043or006D counter-
clockwise or clockwise (Y page 99).MAX COOL maximum cooling
The MAX COOL function is only available in vehi-
cles for the USA.
The MAX COOL function only works when the
vehicle is ready to drive.
X To activate: press the00C9button.
The indicator lamp in the button lights up.
X To deactivate: press the00C9button.
The indicator lamp goes out. The previously
selected settings are restored.
When you activate MAX COOL, climate control
switches to the following functions:
R maximum cooling
R maximum airflow
R air-recirculation mode on Defrosting the windows
Windows fogged up on the inside X
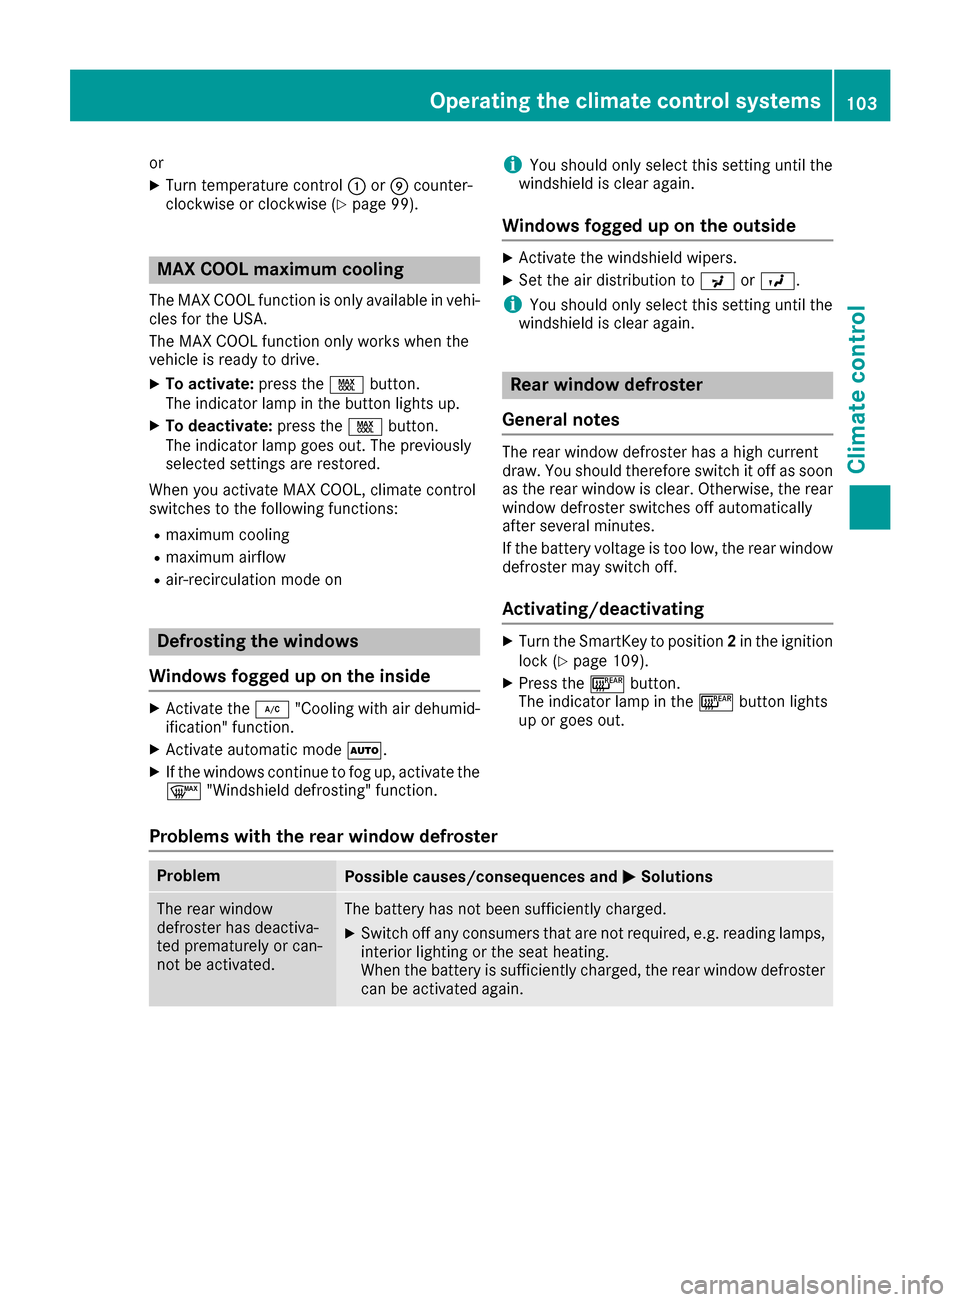
Activate the 005A"Cooling with air dehumid-
ification" function.
X Activate automatic mode 0058.
X If the windows continue to fog up, activate the
0064 "Windshield defrosting" function. i
You should only select this setting until the
windshield is clear again.
Windows fogged up on the outside X
Activate the windshield wipers.
X Set the air distribution to 009Cor009B.
i You should only select this setting until the
windshield is clear again. Rear window defroster
General notes The rear window defroster has a high current
draw. You should therefore switch it off as soon
as the rear window is clear. Otherwise, the rear window defroster switches off automatically
after several minutes.
If the battery voltage is too low, the rear window
defroster may switch off.
Activating/deactivating X
Turn the SmartKey to position 2in the ignition
lock (Y page 109).
X Press the 006Cbutton.
The indicator lamp in the 006Cbutton lights
up or goes out.
Problems with the rear window defroster Problem
Possible causes/consequences and
0050 0050Solutions The rear window
defroster has deactiva-
ted prematurely or can-
not be activated. The battery has not been sufficiently charged.
X Switch off any consumers that are not required, e.g. reading lamps,
interior lighting or the seat heating.
When the battery is sufficiently charged, the rear window defroster can be activated again. Operating the climate control systems
103Climate control