tow bar MERCEDES-BENZ B-Class 2017 W246 Owner's Manual
[x] Cancel search | Manufacturer: MERCEDES-BENZ, Model Year: 2017, Model line: B-Class, Model: MERCEDES-BENZ B-Class 2017 W246Pages: 290, PDF Size: 19.81 MB
Page 124 of 290
Displaying the range and destination acces-
sibility via navigation mode:
X To switch to navigation mode: press the
00CB button.
The map shows the vehicle's current position.
or
X From one of the other main functions: slide
5 the controller (e. g. in radio mode).
The main function bar is displayed.
X To select Navi
Navi from the main function bar:
turn and press the controller.
The map shows the vehicle's current position.
X To call up e-Navigator: press the00CBbut-
ton.
X To select Range on Map
Range on Map in the navigation
menu: turn and press the controller.
The range and destination accessibility are
displayed on the navigation map.
Displaying the range and destination acces- sibility via Mercedes-Benz Apps:
X Switch on the multimedia system (see sepa-
rate operating instructions).
X Set access data and connect to the Internet
(see separate operating instructions)
X To call up the telephone menu: press the
002B button.
X To switch to the main function bar: slide 5
the controller.
X To select Tel/
Tel/00A7: press the controller.
X To select Internet
Internet: turn and press the con-
troller.
The menu with the Internet functions is dis-
played.
X To select Mercedes-Benz Apps
Mercedes-Benz Apps: turn and
press the controller.
The available Mercedes-Benz Apps
Mercedes-Benz Apps are dis-
played.
X To call up the e-Navigator App: turn and
press the controller.
The navigation map is displayed showing the
range and destination accessibility
Showing the view levels on the map:
X To display the menu: slide6and press
the controller when the map appears.
The menu of the view levels opens. You may
choose from the following view levels: R
available charging stations
R current route
R current vehicle position with vehicle direc-
tion
Exiting the map display:
X Press the 0038button on the controller.
or
X To select 0038: slide 6and press the con-
troller. Charging the high-voltage battery via
the electrical outlet
Charging cable Important safety notes
! Only use the charging cable to charge the
high-voltage battery. Do not use the charging
cable for other purposes. It may otherwise be damaged.
The vehicle is supplied with a single-phase 12 A charging cable. Only use the charging cable
included with the vehicle, which has been
approved for vehicle use.
Pay attention to the "Important safety notes"
(Y page 117).
If you use the supplied 12 A charging cable to
charge a high-voltage battery:
R the charge time increases considerably
R electrical consumption increases considera-
bly
Where possible, charge the high-voltage battery at a charging station (Y page 125). Only then
can certified electrical energy consumption lev- els be reached.
i The charging process can vary depending on
the charging station. Therefore, always
observe the local information.
Stowing the charging cable
The charging cable can be stowed in a bag in the trunk of the vehicle. To do so, the bag must be
secured to the cargo tie-down rings using the
retaining strap provided. 122
High-voltage batteryDriving and pa
rking
Page 148 of 290
Activating/deactivating the rear view
camera X
To activate: make sure that the SmartKey is
in position 2in the ignition lock.
X Make sure that the Activation by R gear
Activation by R gear
function is selected in the multimedia system; see the Digital Operator's Manual.
X Engage reverse gear.
The area behind the vehicle is shown with
guide lines in the multimedia system display.
The image from the rear view camera is avail-
able throughout the maneuvering process.
To deactivate: the rear view camera deacti-
vates if you shift the transmission to Por after
driving forwards a short distance.
Messages in the multimedia system dis- play The rear view camera may show a distorted view
of obstacles, show them incorrectly or not at all.The rear view camera does not show objects in
the following positions:
R very close to the rear bumper
R under the rear bumper
R in the area immediately above the tailgate
handle
! Objects not at ground level may appear to
be further away than they actually are, e.g.:
R the bumper of a parked vehicle
R the drawbar of a trailer
R the ball coupling of a trailer tow hitch
R the rear section of an HGV
R a slanted post
Use the guidelines only for orientation.
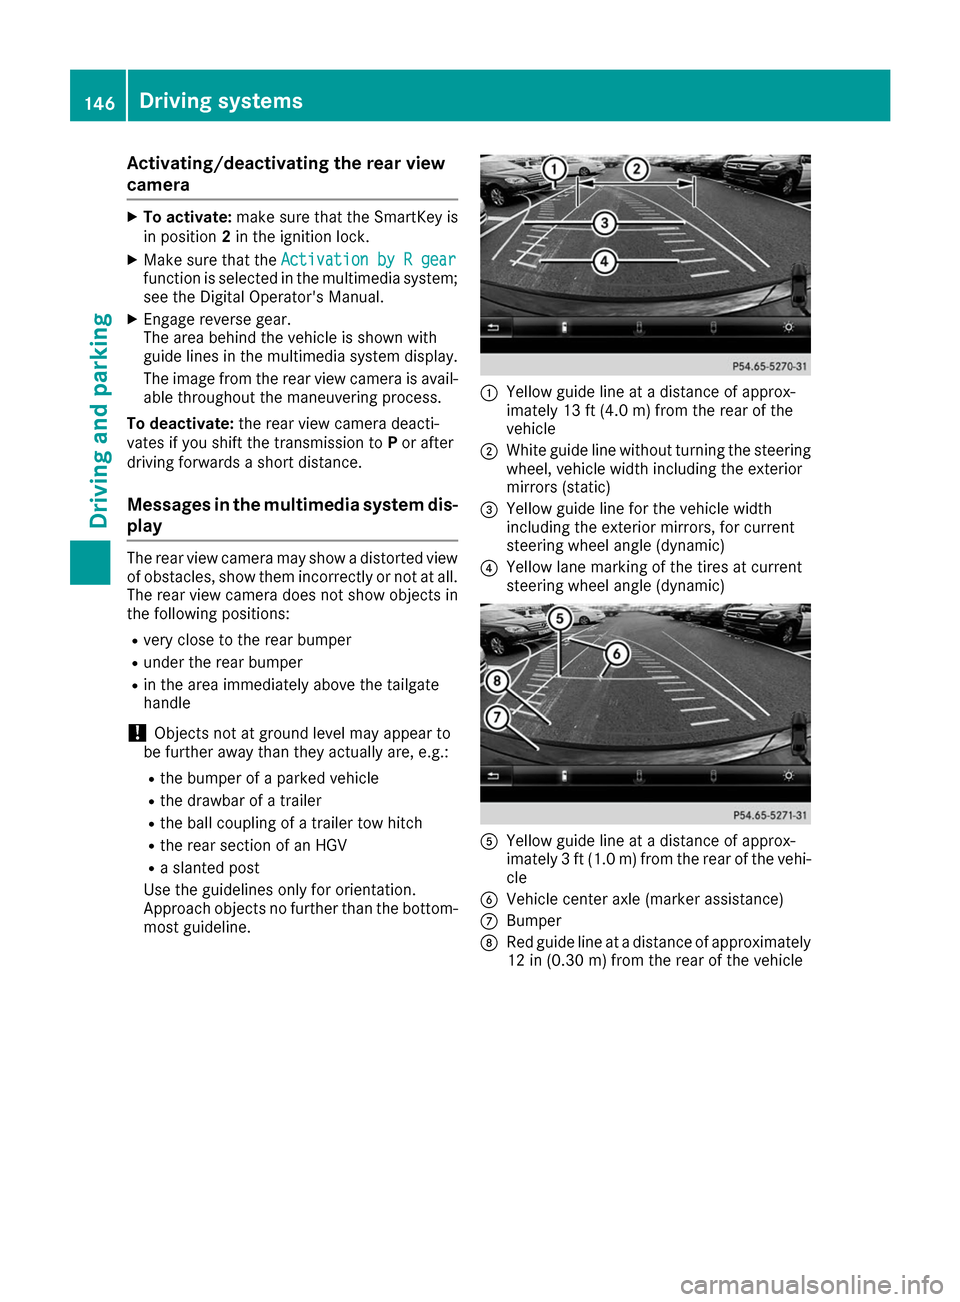
Approach objects no further than the bottom- most guideline. 0043
Yellow guide line at a distance of approx-
imately 13 ft (4.0 m) from the rear of the
vehicle
0044 White guide line without turning the steering
wheel, vehicle width including the exterior
mirrors (static)
0087 Yellow guide line for the vehicle width
including the exterior mirrors, for current
steering wheel angle (dynamic)
0085 Yellow lane marking of the tires at current
steering wheel angle (dynamic) 0083
Yellow guide line at a distance of approx-
imately 3 ft (1.0 m) from the rear of the vehi-
cle
0084 Vehicle center axle (marker assistance)
006B Bumper
006C Red guide line at a distance of approximately
12 in (0.30 m) from the rear of the vehicle 146
Driving systemsDriving an
d parking
Page 247 of 290
Tire pressure reached
G
WARNING
A tire temporarily sealed with tire sealant
impairs the driving characteristics and is not
suitable for higher speeds. There is a risk of
accident.
You should therefore adapt your driving style
accordingly and drive carefully. Do not exceed the specified maximum speed with a tire that
has been repaired using tire sealant.
The maximum permissible speed for a tire
sealed with tire sealant is 50 mph (80 km/h).
The upper part of the TIREFIT sticker must be
affixed to the instrument cluster in the driver's
field of vision.
If a tire pressure of 200 kPa (2.0 bar/29 psi) has been attained after ten minutes:
X Switch off the tire inflation compressor.
X Unscrew the filler hose from the valve of the
faulty tire.
Note that tire sealant may escape when you
unscrew the filler hose.
X Stow the tire sealant bottle and the tire infla-
tion compressor.
X Pull away immediately.
X Stop after driving for approximately ten
minutes and check the tire pressure with the
tire inflation compressor.
The tire pressure must now be at least
130 kPa (1.3 bar/19 psi). G
WARNING
If the required tire pressure is not reached
after driving for a short period, the tire is too
badly damaged. The tire sealant cannot repair the tire in this instance. Damaged tires and a
tire pressure that is too low can significantly
impair the vehicle's braking and driving char-
acteristics. There is a risk of accident.
Do not continue driving. Contact a qualified
specialist workshop.
i In cases such as the one mentioned above,
contact an authorized Mercedes-Benz Cen-
ter. Or call 1-800-FOR-MERCedes (in the
USA) or 1-800-387-0100 (in Canada). X
Correct the tire pressure if it is still at least
130 kPa (1.3 bar/19 psi). See the Tire and
Loading Information placard on the driver's
side B-pillar or the tire pressure table in the
charge socket flap for values.
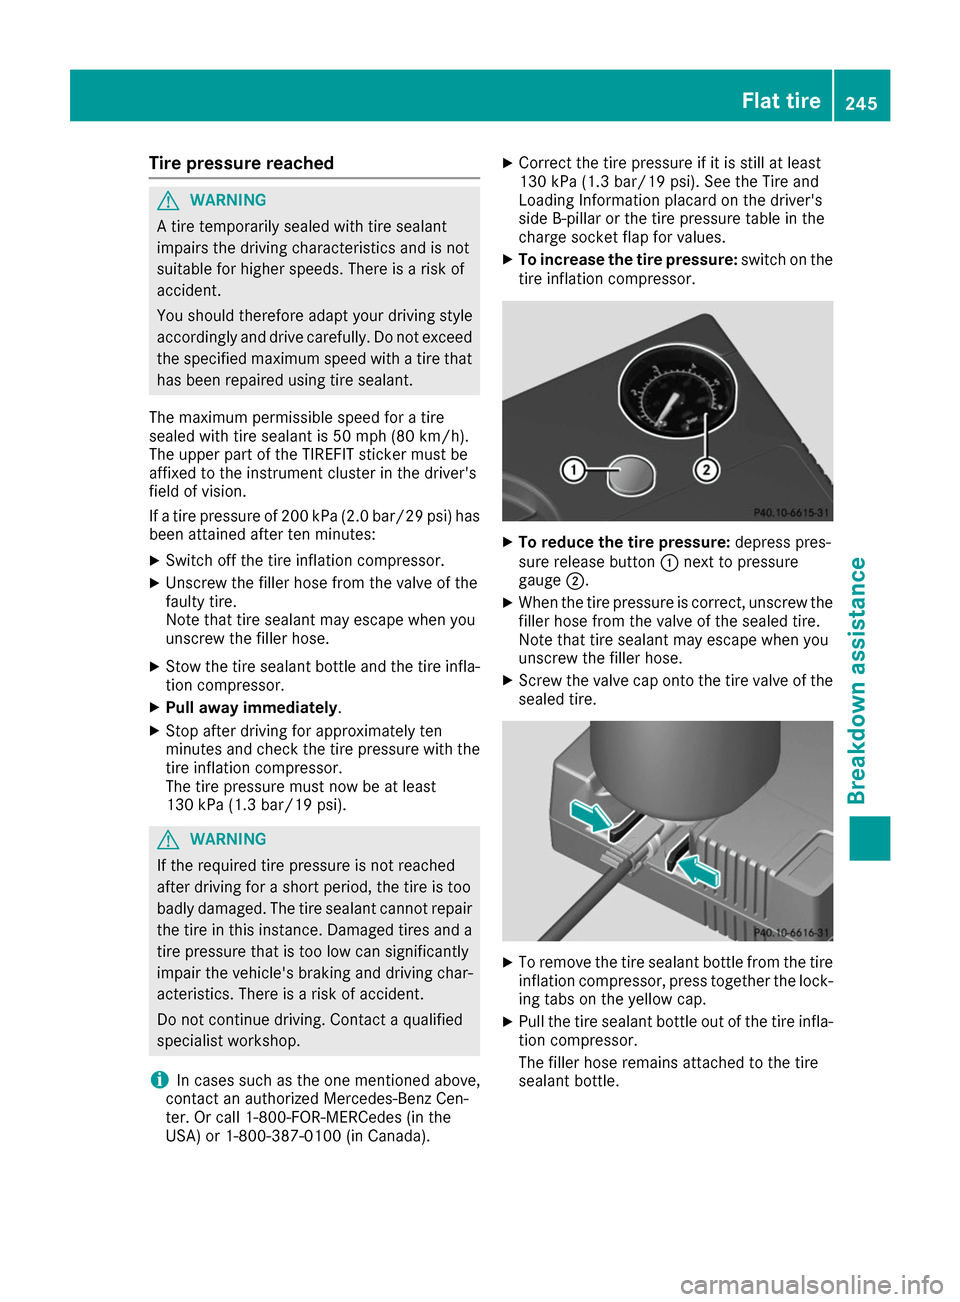
X To increase the tire pressure: switch on the
tire inflation compressor. X
To reduce the tire pressure: depress pres-
sure release button 0043next to pressure
gauge 0044.
X When the tire pressure is correct, unscrew the
filler hose from the valve of the sealed tire.
Note that tire sealant may escape when you
unscrew the filler hose.
X Screw the valve cap onto the tire valve of the
sealed tire. X
To remove the tire sealant bottle from the tire
inflation compressor, press together the lock- ing tabs on the yellow cap.
X Pull the tire sealant bottle out of the tire infla-
tion compressor.
The filler hose remains attached to the tire
sealant bottle. Flat tire
245Breakdown assistance Z
Page 253 of 290
X
Switch off the engine of both vehicles.
X Shift the transmission to position P.
X Switch off all electrical consumers.
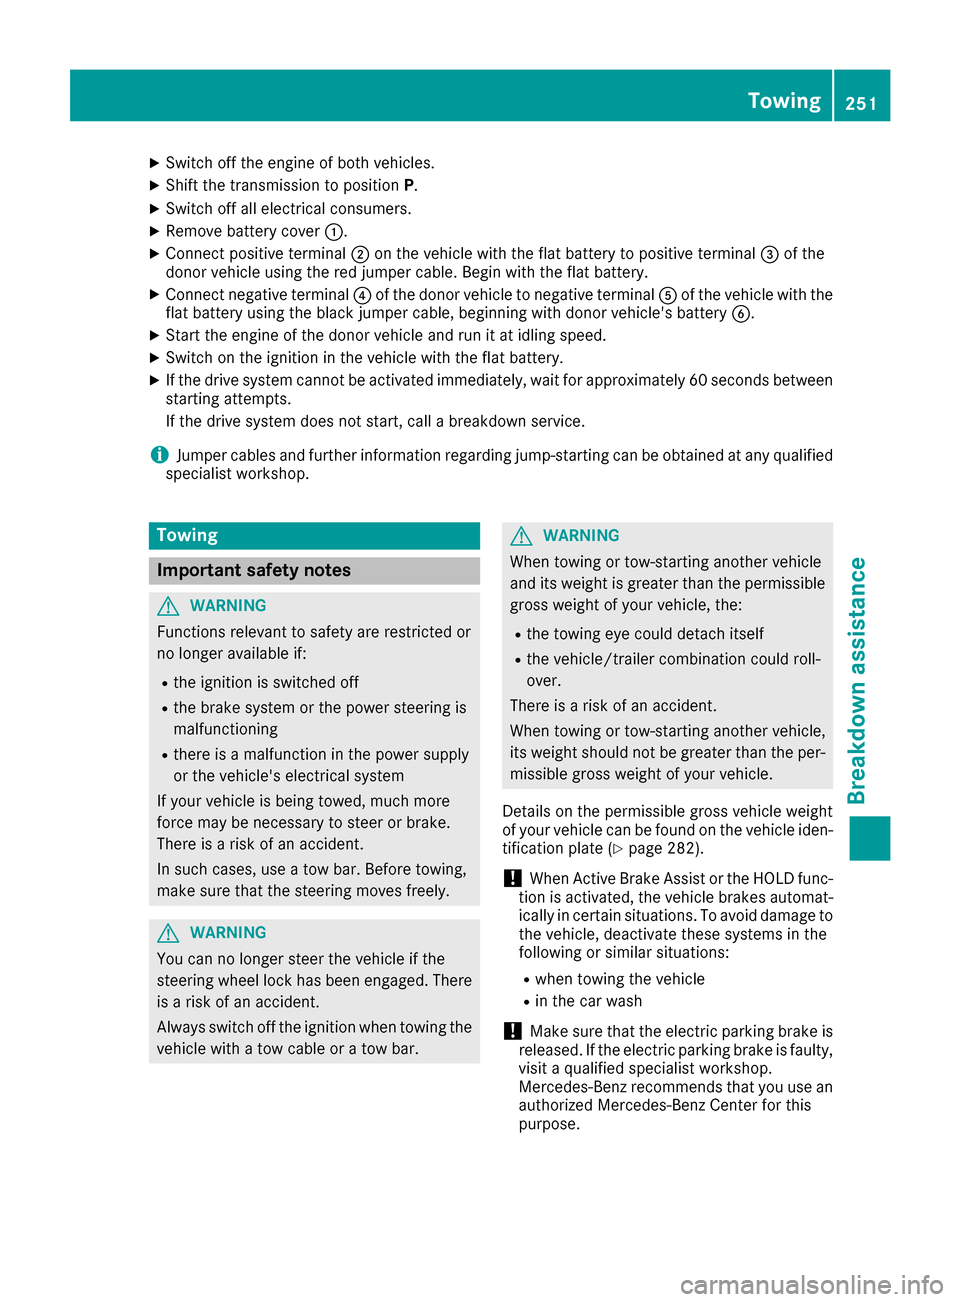
X Remove battery cover 0043.
X Connect positive terminal 0044on the vehicle with the flat battery to positive terminal 0087of the
donor vehicle using the red jumper cable. Begin with the flat battery.
X Connect negative terminal 0085of the donor vehicle to negative terminal 0083of the vehicle with the
flat battery using the black jumper cable, beginning with donor vehicle's battery 0084.
X Start the engine of the donor vehicle and run it at idling speed.
X Switch on the ignition in the vehicle with the flat battery.
X If the drive system cannot be activated immediately, wait for approximately 60 seconds between
starting attempts.
If the drive system does not start, call a breakdown service.
i Jumper cables and further information regarding jump-starting can be obtained at any qualified
specialist workshop. Towing
Important safety notes
G
WARNING
Functions relevant to safety are restricted or
no longer available if:
R the ignition is switched off
R the brake system or the power steering is
malfunctioning
R there is a malfunction in the power supply
or the vehicle's electrical system
If your vehicle is being towed, much more
force may be necessary to steer or brake.
There is a risk of an accident.
In such cases, use a tow bar. Before towing,
make sure that the steering moves freely. G
WARNING
You can no longer steer the vehicle if the
steering wheel lock has been engaged. There is a risk of an accident.
Always switch off the ignition when towing the
vehicle with a tow cable or a tow bar. G
WARNING
When towing or tow-starting another vehicle
and its weight is greater than the permissible gross weight of your vehicle, the:
R the towing eye could detach itself
R the vehicle/trailer combination could roll-
over.
There is a risk of an accident.
When towing or tow-starting another vehicle,
its weight should not be greater than the per- missible gross weight of your vehicle.
Details on the permissible gross vehicle weight
of your vehicle can be found on the vehicle iden-
tification plate (Y page 282).
! When Active Brake Assist or the HOLD func-
tion is activated, the vehicle brakes automat- ically in certain situations. To avoid damage to the vehicle, deactivate these systems in the
following or similar situations:
R when towing the vehicle
R in the car wash
! Make sure that the electric parking brake is
released. If the electric parking brake is faulty,
visit a qualified specialist workshop.
Mercedes-Benz recommends that you use an authorized Mercedes-Benz Center for this
purpose. Towing
251Breakdown assistance Z
Page 254 of 290
!
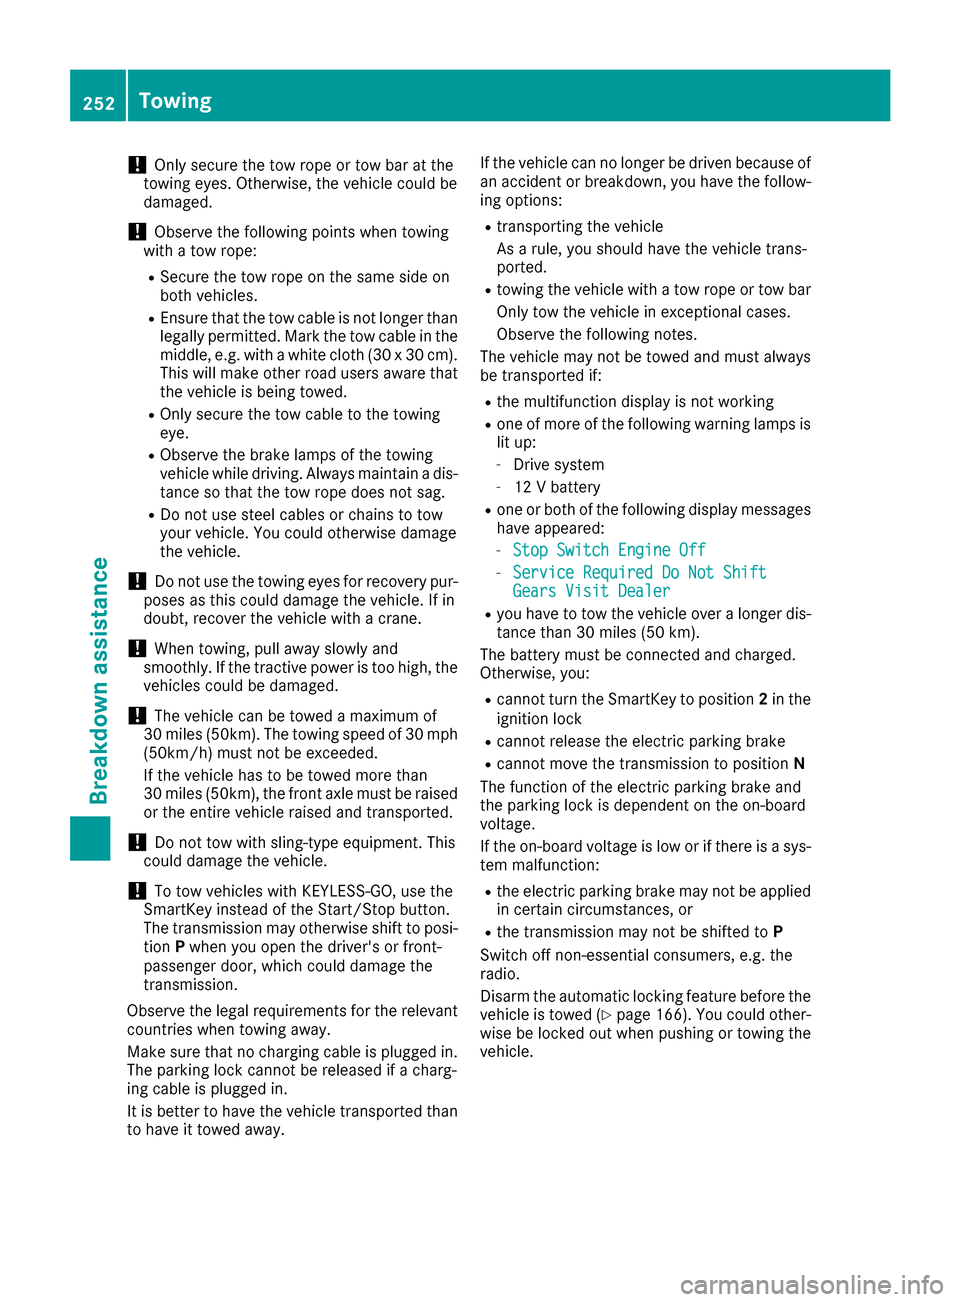
Only secure the tow rope or tow bar at the
towing eyes. Otherwise, the vehicle could be
damaged.
! Observe the following points when towing
with a tow rope:
R Secure the tow rope on the same side on
both vehicles.
R Ensure that the tow cable is not longer than
legally permitted. Mark the tow cable in the
middle, e.g. with a white cloth (30 x 30 cm). This will make other road users aware that
the vehicle is being towed.
R Only secure the tow cable to the towing
eye.
R Observe the brake lamps of the towing
vehicle while driving. Always maintain a dis-
tance so that the tow rope does not sag.
R Do not use steel cables or chains to tow
your vehicle. You could otherwise damage
the vehicle.
! Do not use the towing eyes for recovery pur-
poses as this could damage the vehicle. If in
doubt, recover the vehicle with a crane.
! When towing, pull away slowly and
smoothly. If the tractive power is too high, the vehicles could be damaged.
! The vehicle can be towed a maximum of
30 miles (50km). The towing speed of 30 mph
(50km/h) must not be exceeded.
If the vehicle has to be towed more than
30 miles (50km), the front axle must be raised
or the entire vehicle raised and transported.
! Do not tow with sling-type equipment. This
could damage the vehicle.
! To tow vehicles with KEYLESS-GO, use the
SmartKey instead of the Start/Stop button.
The transmission may otherwise shift to posi- tion Pwhen you open the driver's or front-
passenger door, which could damage the
transmission.
Observe the legal requirements for the relevant countries when towing away.
Make sure that no charging cable is plugged in.
The parking lock cannot be released if a charg-
ing cable is plugged in.
It is better to have the vehicle transported than
to have it towed away. If the vehicle can no longer be driven because of
an accident or breakdown, you have the follow-
ing options:
R transporting the vehicle
As a rule, you should have the vehicle trans-
ported.
R towing the vehicle with a tow rope or tow bar
Only tow the vehicle in exceptional cases.
Observe the following notes.
The vehicle may not be towed and must always be transported if:
R the multifunction display is not working
R one of more of the following warning lamps is
lit up:
- Drive system
- 12 V battery
R one or both of the following display messages
have appeared:
- Stop Switch Engine Off
Stop Switch Engine Off
- Service Required Do Not Shift Service Required Do Not Shift
Gears Visit Dealer Gears Visit Dealer
R you have to tow the vehicle over a longer dis-
tance than 30 miles (50 km).
The battery must be connected and charged.
Otherwise, you:
R cannot turn the SmartKey to position 2in the
ignition lock
R cannot release the electric parking brake
R cannot move the transmission to position N
The function of the electric parking brake and
the parking lock is dependent on the on-board
voltage.
If the on-board voltage is low or if there is a sys- tem malfunction:
R the electric parking brake may not be applied
in certain circumstances, or
R the transmission may not be shifted to P
Switch off non-essential consumers, e.g. the
radio.
Disarm the automatic locking feature before the
vehicle is towed (Y page 166). You could other-
wise be locked out when pushing or towing the
vehicle. 252
TowingBreakdown assistance
Page 281 of 290
X
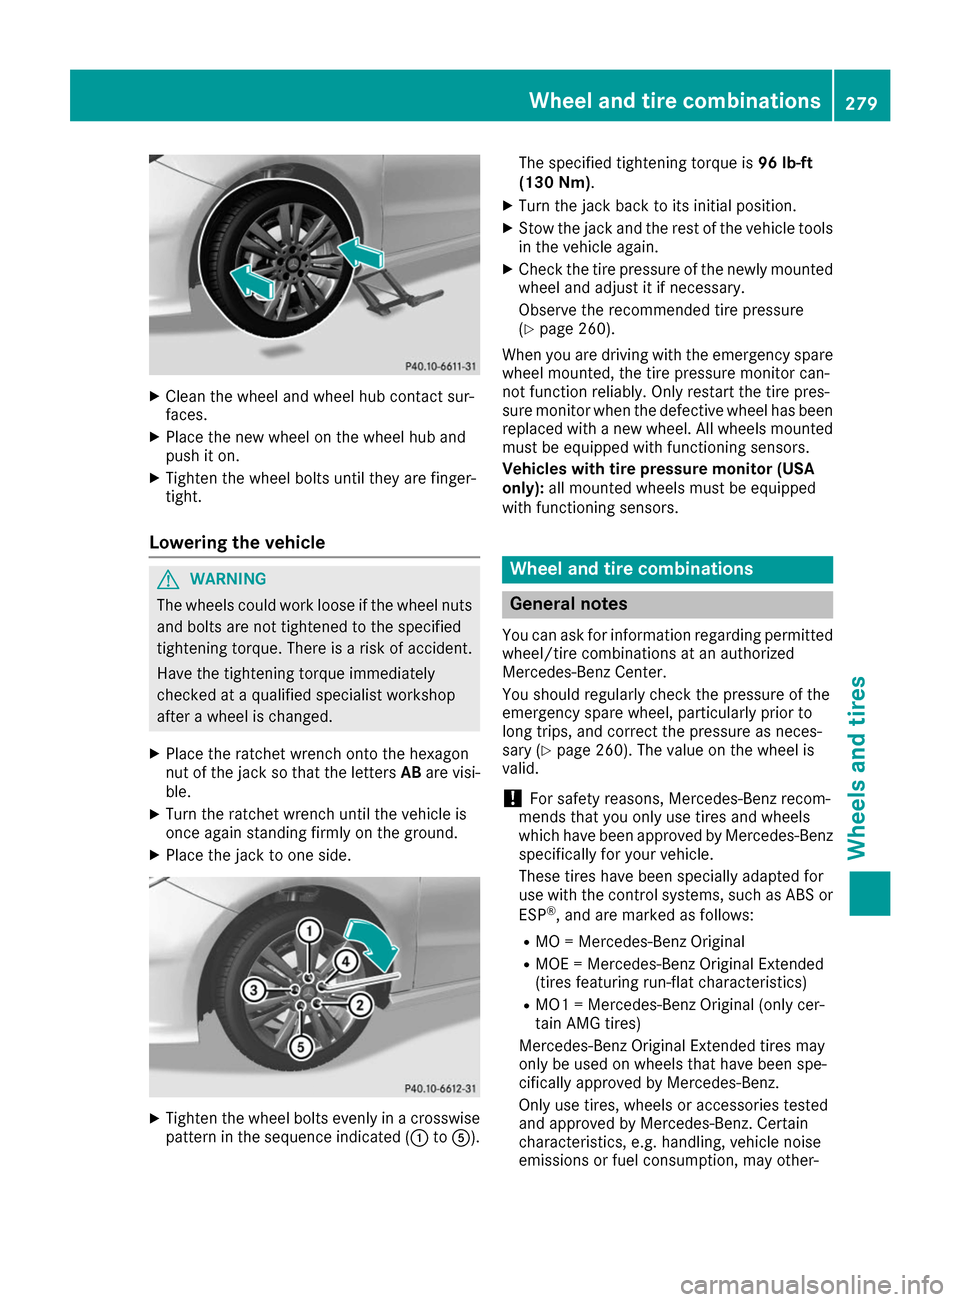
Clean the wheel and wheel hub contact sur-
faces.
X Place the new wheel on the wheel hub and
push it on.
X Tighten the wheel bolts until they are finger-
tight.
Lowering the vehicle G
WARNING
The wheels could work loose if the wheel nuts and bolts are not tightened to the specified
tightening torque. There is a risk of accident.
Have the tightening torque immediately
checked at a qualified specialist workshop
after a wheel is changed.
X Place the ratchet wrench onto the hexagon
nut of the jack so that the letters ABare visi-
ble.
X Turn the ratchet wrench until the vehicle is
once again standing firmly on the ground.
X Place the jack to one side. X
Tighten the wheel bolts evenly in a crosswise
pattern in the sequence indicated (0043 to0083). The specified tightening torque is
96 lb-ft
(130 Nm) .
X Turn the jack back to its initial position.
X Stow the jack and the rest of the vehicle tools
in the vehicle again.
X Check the tire pressure of the newly mounted
wheel and adjust it if necessary.
Observe the recommended tire pressure
(Y page 260).
When you are driving with the emergency spare
wheel mounted, the tire pressure monitor can-
not function reliably. Only restart the tire pres-
sure monitor when the defective wheel has been
replaced with a new wheel. All wheels mounted
must be equipped with functioning sensors.
Vehicles with tire pressure monitor (USA
only): all mounted wheels must be equipped
with functioning sensors. Wheel and tire combinations
General notes
You can ask for information regarding permitted wheel/tire combinations at an authorized
Mercedes-Benz Center.
You should regularly check the pressure of the
emergency spare wheel, particularly prior to
long trips, and correct the pressure as neces-
sary (Y page 260). The value on the wheel is
valid.
! For safety reasons, Mercedes-Benz recom-
mends that you only use tires and wheels
which have been approved by Mercedes-Benz specifically for your vehicle.
These tires have been specially adapted for
use with the control systems, such as ABS or
ESP ®
, and are marked as follows:
R MO = Mercedes-Benz Original
R MOE = Mercedes-Benz Original Extended
(tires featuring run-flat characteristics)
R MO1 = Mercedes-Benz Original (only cer-
tain AMG tires)
Mercedes-Benz Original Extended tires may
only be used on wheels that have been spe-
cifically approved by Mercedes-Benz.
Only use tires, wheels or accessories tested
and approved by Mercedes-Benz. Certain
characteristics, e.g. handling, vehicle noise
emissions or fuel consumption, may other- Wheel and tire combinations
279Wheels and tires Z