sensor MERCEDES-BENZ B-Class ELECTRIC 2016 W246 User Guide
[x] Cancel search | Manufacturer: MERCEDES-BENZ, Model Year: 2016, Model line: B-Class ELECTRIC, Model: MERCEDES-BENZ B-Class ELECTRIC 2016 W246Pages: 342, PDF Size: 7.53 MB
Page 76 of 342
For the purposes of activation/deactivation,
the vehicle must not be nearby.
XTo deactivate:press the&button on
the SmartKey twice in rapid succession.
The battery check lamp of the SmartKey
flashes twice briefly and lights up once,
then KEYLESS-GO is deactivated
(
Ypage 75).
XTo activate: press any button on the
SmartKey.
or
XInsert the SmartKey into the ignition lock.
KEYLESS-GO and all of its associated fea-
tures are available again.
KEYLESS-GO start function
General notes
Bear in mind that the drive system can be
started by any of the vehicle occupants if
there is a key in the vehicle.
Changing the settings of the locking
system
You can change the settings of the locking
system. This means that only the driver's door
and the charge socket flap are unlocked when
the vehicle is unlocked. This is useful if you
frequently travel on your own.
XTo change the setting: press and hold the
% and& buttons simultaneously for
approximately six seconds until the battery
check lamp flashes twice (
Ypage 75).
If the setting of the locking system is changed
within the signal range of the vehicle, press-
ing the &or% button:
Rlocks or
Runlocks the vehicle The SmartKey now functions as follows:
XTo unlock:
press the%button once.
XTo unlock centrally: press the%but-
ton twice.
XTo lock centrally: press the&button.
The KEYLESS-GO function is changed as fol-
lows:
XTo unlock the driver's door: touch the
inner surface of the door handle on the
driver's door.
XTo unlock centrally: touch the inner sur-
face of the door handle on the front-
passenger door or the rear door.
XTo lock centrally: touch the outer sensor
surface on one of the door handles.
XTo restore the factory settings: press
and hold the %and& buttons simul-
taneously for approximately six seconds
until the battery check lamp flashes twice
(
Ypage 75).
Mechanical key
General notes
If the vehicle can no longer be locked or
unlocked with the SmartKey or KEYLESS-GO,
use the mechanical key.
If you use the mechanical key to unlock and
open the driver's door or the trunk lid, the
anti-theft alarm system will be triggered
(
Ypage 69).
There are several ways to turn off the alarm:
XTo deactivate the alarm with the key:
press the %or& button on the key.
or
XInsert the SmartKey into the ignition lock.
or
XTo deactivate the alarm with KEYLESS-
GO: press the Start/Stop button in the igni-
tion lock. The SmartKey must be in the
vehicle.
74SmartKey
Opening and closing
Page 87 of 342
handle on the driver's door. The SmartKey
must be close to the driver's door handle.
iVehicles with KEYLESS-GO or the KEY-
LESS-GO start function: the SmartKey
must be in close proximity to the vehicle.
XPress and hold the &button until the
side windows are fully closed.
XTo interrupt convenience closing:
release the &button.
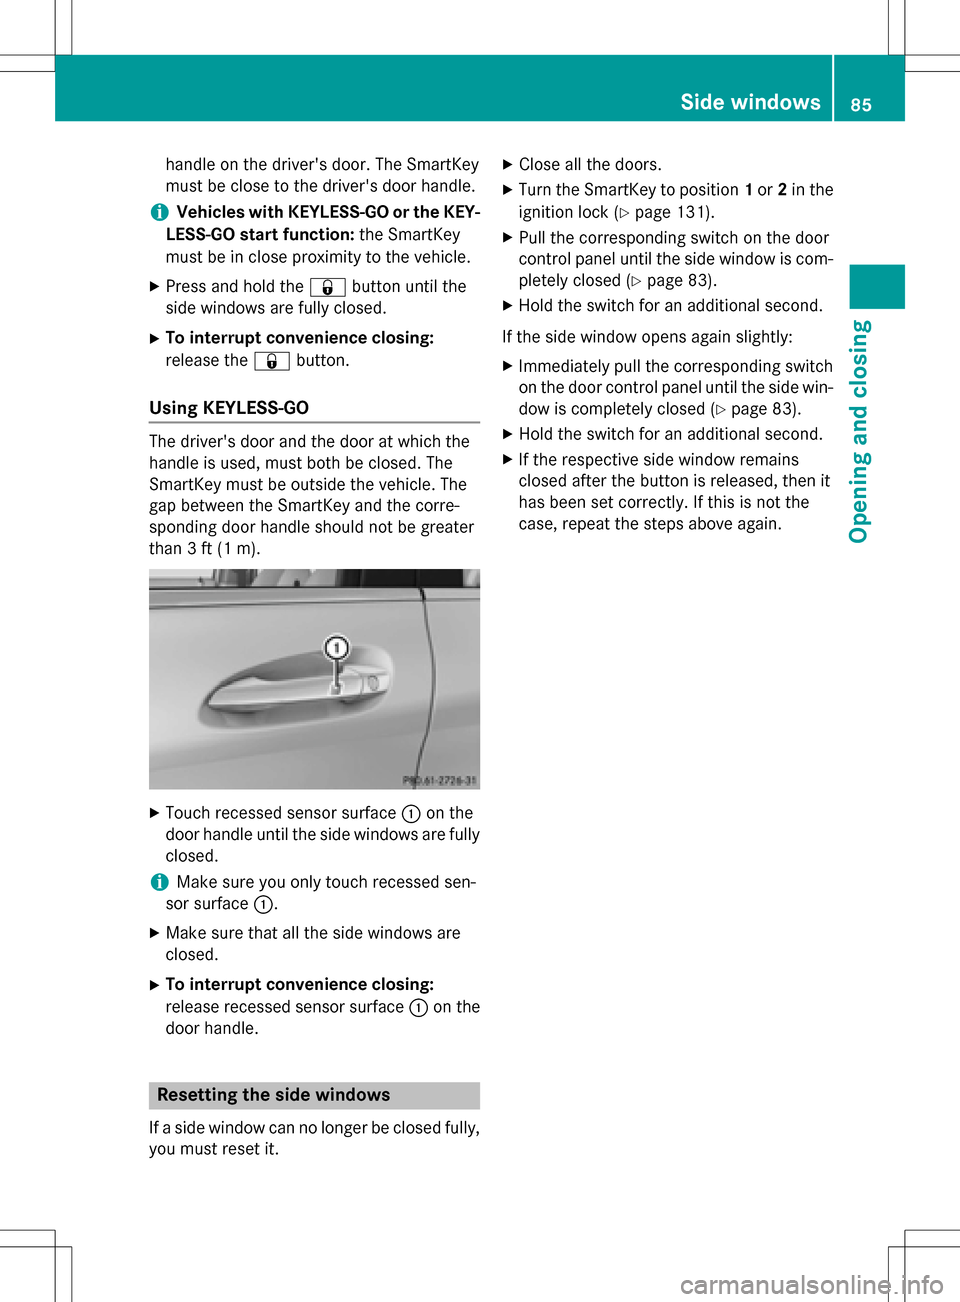
Using KEYLESS-GO
The driver's door and the door at which the
handle is used, must both be closed. The
SmartKey must be outside the vehicle. The
gap between the SmartKey and the corre-
sponding door handle should not be greater
than 3 ft (1 m).
XTouch recessed sensor surface :on the
door handle until the side windows are fully
closed.
iMake sure you only touch recessed sen-
sor surface :.
XMake sure that all the side windows are
closed.
XTo interrupt convenience closing:
release recessed sensor surface :on the
door handle.
Resetting the side windows
If a side window can no longer be closed fully,
you must reset it.
XClose all the doors.
XTurn the SmartKey to position 1or 2in the
ignition lock (
Ypage 131).
XPull the corresponding switch on the door
control panel until the side window is com-
pletely closed (
Ypage 83).
XHold the switch for an additional second.
If the side window opens again slightly:
XImmediately pull the corresponding switch on the door control panel until the side win-
dow is completely closed (
Ypage 83).
XHold the switch for an additional second.
XIf the respective side window remains
closed after the button is released, then it
has been set correctly. If this is not the
case, repeat the steps above again.
Side windows85
Opening and closing
Z
Page 98 of 342
Automatic anti-glare mirrors
GWARNING
Electrolyte may escape if the glass in an auto-
matic anti-glare mirror breaks. The electrolyte
is harmful and causes irritation. It mustno t
come int o contact with your skin, eyes, res-
piratory organs or clothing or be swallowed.
There is a risk of injury.
If you come into contact with the electrolyte,
observe the following:
RRinse off the electrolyte from your skin
immediately with water.
RImmediately rinse the electrolyte out of
your eyes thoroughly with clean water.
RIf th e electrolyte is swallowed, immediately
rinse your mouth out thoroughly. Do not
induce vomiting.
RIf electrolyte comes into contact with your
skin or hair or is swallowed, seek medical
attention immediately.
RImmediately change out of clothing which
has come into contact with electrolyte.
RIf an allergic reaction occurs, seek medical
attention immediately.
The "Automatic anti-glare mirrors" function is
only available if the vehicle is equipped with
th e "Mirrors package".
The rear-view mirror and the exterior mirror
on the driver's side automatically go into anti-
glare mode if:
Rth e ignition is switched on and
Rincident light from headlamps strikes the
sensor in the rear-view mirror
The mirrors do not go into anti-glare mode if
reverse gear is engaged or the interior lighting
is switched on.
Park ing position for the exterior mir-
ror on the front-passenger side
Gene ral notes
The "Parking position of the exterior mirror on
the front-passenger side" function is only
available if the vehicle is equipped with the
"Mirrors package".
Setting and stori ng the parking position
You can position the front-passenger side
exterior mirror in such a way that you can see
the rear wheel on that side as soon as you
engage reverse gear. You can store this posi-
tion .
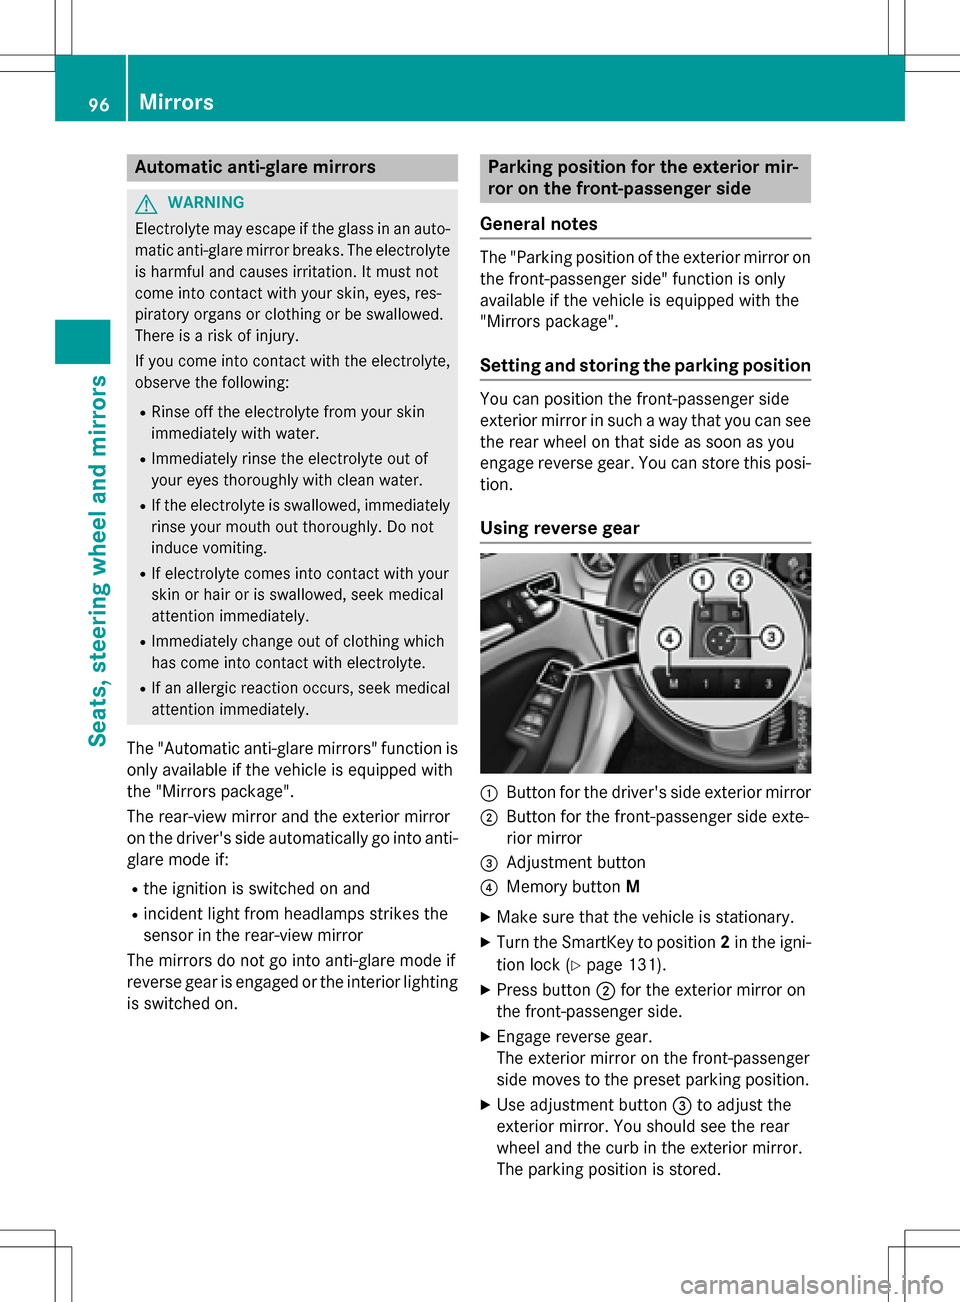
Using reverse gear
:Butto nfor th e driver's side exterior mirror
;Butto nfor th e front-passenger side exte-
rior mirror
=Adjustment button
?Memory button M
XMake surethat the vehicle is stationary.
XTurn the SmartKey to position 2in the igni-
tion lock(
Ypage 131).
XPress button ;for th e exterior mirror on
th e front-passenger side.
XEngage reverse gear.
The exterior mirror on the front-passenger
side moves to the preset parking position.
XUse adjustment button =to adjust the
exterior mirror. You should see the rear
wheel and the curb in the exterior mirror.
The parking position is stored.
96Mirrors
Seats, steering wheel and mirrors
Page 102 of 342
Useful information
i
This Operator's Manual describes all
models and all standard and optional equip-
ment of your vehicle available at the time of
publication of the Operator's Manual.
Country-specific differences are possible.
Please note that your vehicle may not be
equipped with all features described. This
also applies to safety-related systems and
functions.
iRead the information on qualified special-
ist workshops (
Ypage 26).
Exterior lighting
General notes
For reasons of safety, Mercedes-Benz recom-
mends that you drive with the lights switched
on even during the daytime. In some coun-
tries, operation of the headlamps varies due
to legal requirements and self-imposed obli-
gations.
Setting the exterior lighting
Setting options
Exterior lighting can be set using the:
Rlight switch
Rcombination switch (Ypage 102)
Ron-board computer (Ypage 198)
Light switch
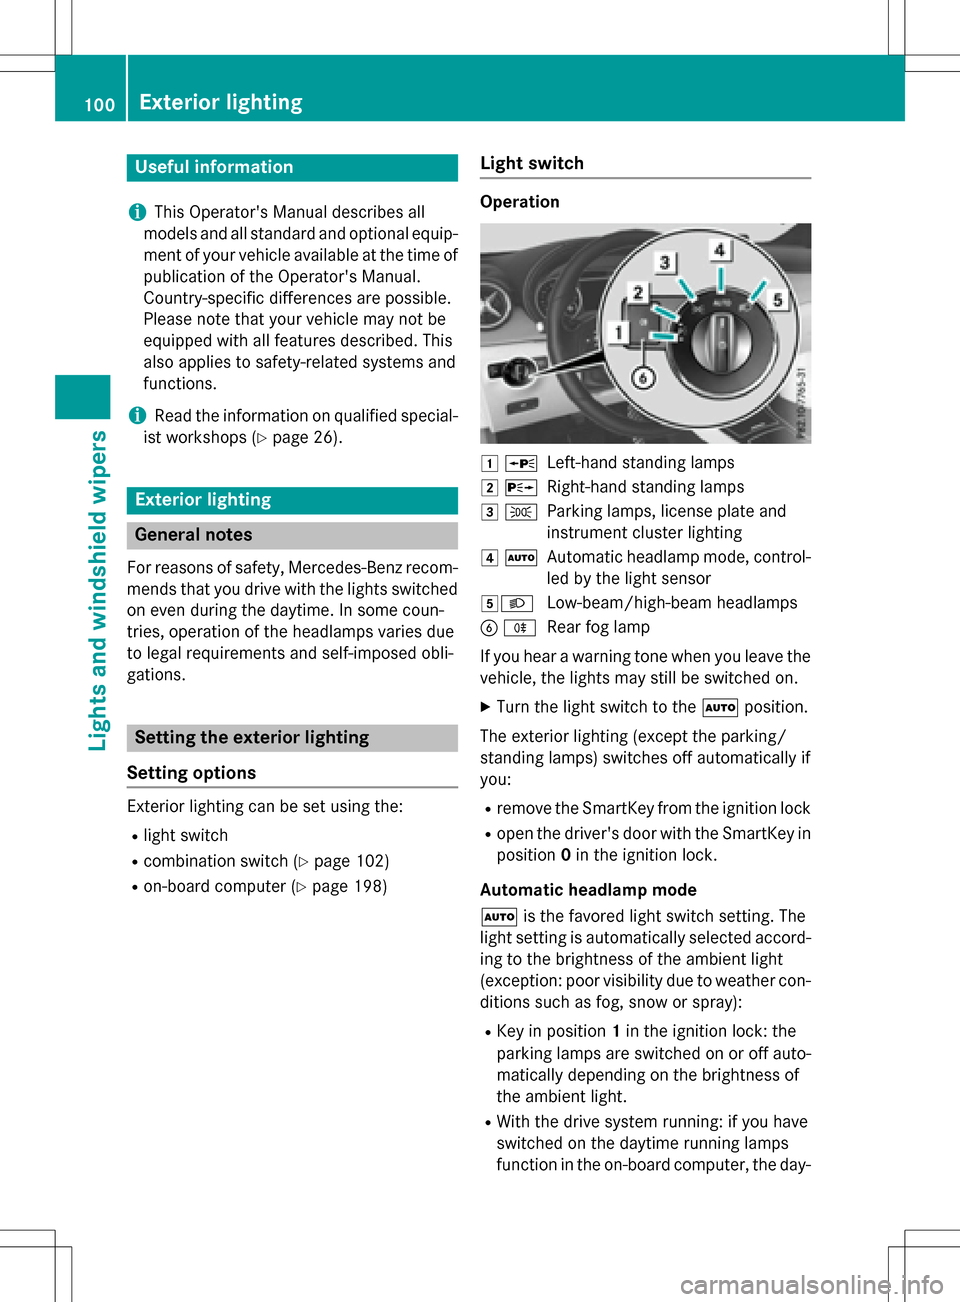
Operation
1 WLeft-hand standing lamps
2XRight-hand standing lamps
3TParking lamps, license plate and
instrument cluster lighting
4ÃAutomatic headlamp mode, control-
led by the light sensor
5LLow-beam/high-beam headlamps
BRRear fog lamp
If you hear a warning tone when you leave the
vehicle, the lights may still be switched on.
XTurn the light switch to the Ãposition.
The exterior lighting (except the parking/
standing lamps) switches off automatically if
you:
Rremove the SmartKey from the ignition lock
Ropen the driver's door with the SmartKey in
position 0in the ignition lock.
Automatic headlamp mode
à is the favored light switch setting. The
light setting is automatically selected accord-
ing to the brightness of the ambient light
(exception: poor visibility due to weather con-
ditions such as fog, snow or spray):
RKey in position 1in the ignition lock: the
parking lamps are switched on or off auto-
matically depending on the brightness of
the ambient light.
RWith the drive system running: if you have
switched on the daytime running lamps
function in the on-board computer, the day-
100Exterior lighting
Lights and windshield wipers
Page 103 of 342
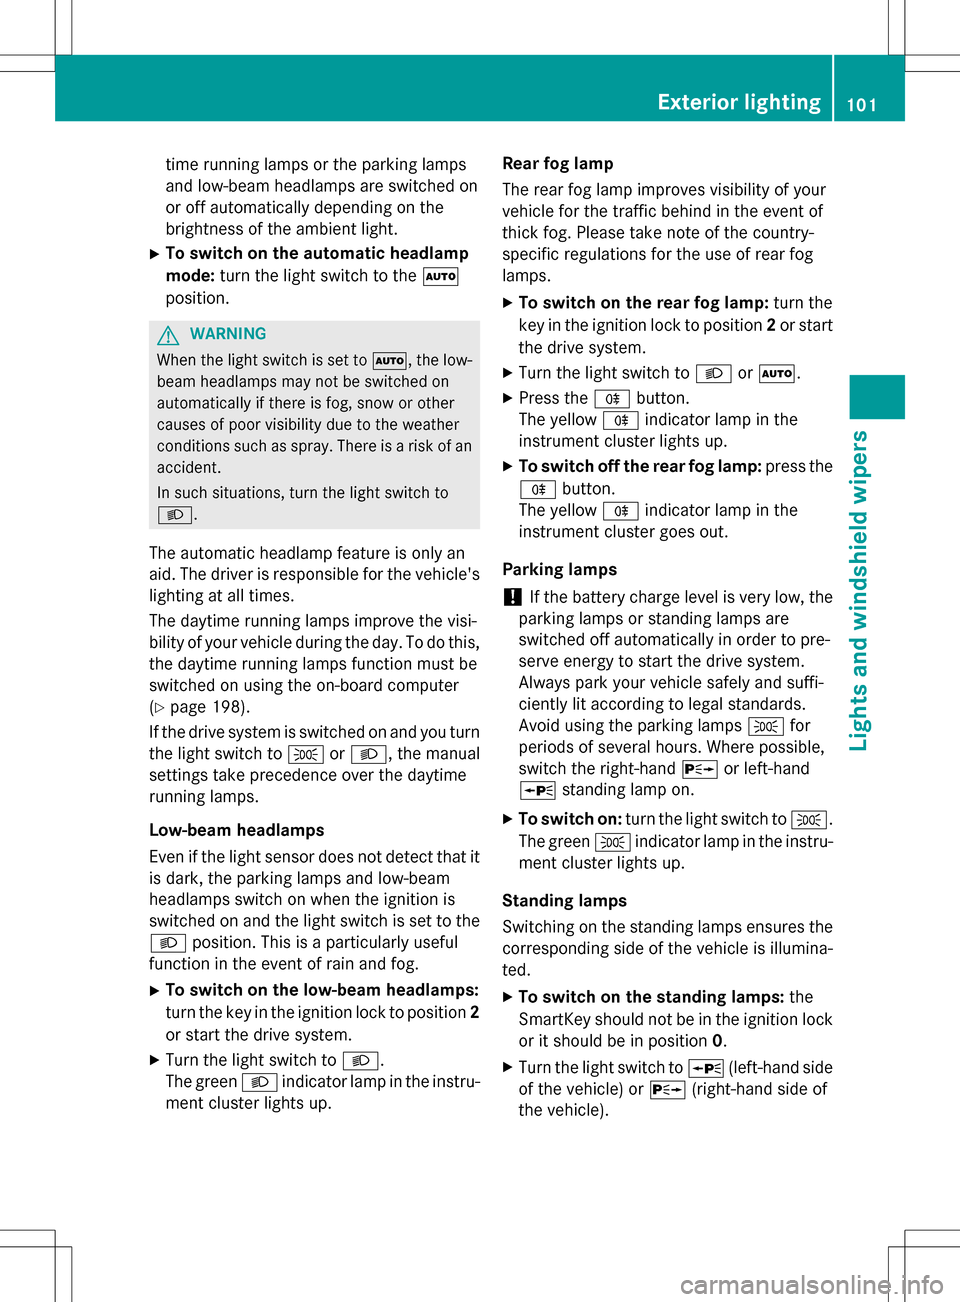
time running lamps or the parking lamps
and low-beam headlamps are switched on
or off automatically depending on the
brightness of the ambient light.
XTo switch on the automatic headlamp
mode:turn the light switch to the Ã
position.
GWARNING
When the light switch is set to Ã, the low-
beam headlamps may not be switched on
automatically if there is fog, snow or other
causes of poor visibility due to the weather
conditions such as spray. There is a risk of an
accident.
In such situations, turn the light switch to
L .
The automatic headlamp feature is only an
aid. The driver is responsible for the vehicle's
lighting at all times.
The daytime running lamps improve the visi-
bility of your vehicle during the day. To do this,
the daytime running lamps function must be
switched on using the on-board computer
(
Ypage 198).
If the drive system is switched on and you turn
the light switch to TorL, the manual
settings take precedence over the daytime
running lamps.
Low-beam headlamps
Even if the light sensor does not detect that it
is dark, the parking lamps and low-beam
headlamps switch on when the ignition is
switched on and the light switch is set to the
L position. This is a particularly useful
function in the event of rain and fog.
XTo switch on the low-beam headlamps:
turn the key in the ignition lock to position 2
or sta rt the drive system.
XTurn the light switch to
L.
The green Lindicator lamp in the instru-
ment cluster lights up. Rear fog lamp
The rear fog lamp improves visibility of your
vehicle for the traffic behind in the event of
thick fog. Please take note of the country-
specific regulations for the use of rear fog
lamps.
XTo switch on the rear fog lamp:
turn the
key in the ignition lock to position 2or start
the drive system.
XTurn the light switch to LorÃ.
XPress the Rbutton.
The yellow Rindicator lamp in the
instrument cluster lights up.
XTo switch off the rear fog lamp: press the
R button.
The yellow Rindicator lamp in the
instrument cluster goes out.
Parking lamps
!If the battery charge level is very low, the
parking lamps or standing lamps are
switched off automatically in order to pre-
serve energy to start the drive system.
Always park your vehicle safely and suffi-
ciently lit according to legal standards.
Avoid using the parking lamps Tfor
periods of several hours. Where possible,
switch the right-hand Xor left-hand
W standing lamp on.
XTo switch on: turn the light switch to T.
T he green Tindicator lamp in the instru-
ment cluster lights up.
Standing lamps
Switching on the standing lamps ensures the
corresponding side of the vehicle is illumina-
ted.
XTo switch on the standing lamps: the
SmartKey should not be in the ignition lock
or it should be in position 0.
XTurn the light switch to W(left-hand side
of the vehicle) or X(right-hand side of
the vehicle).
Exterior lighting101
Lights and windshield wipers
Z
Page 112 of 342
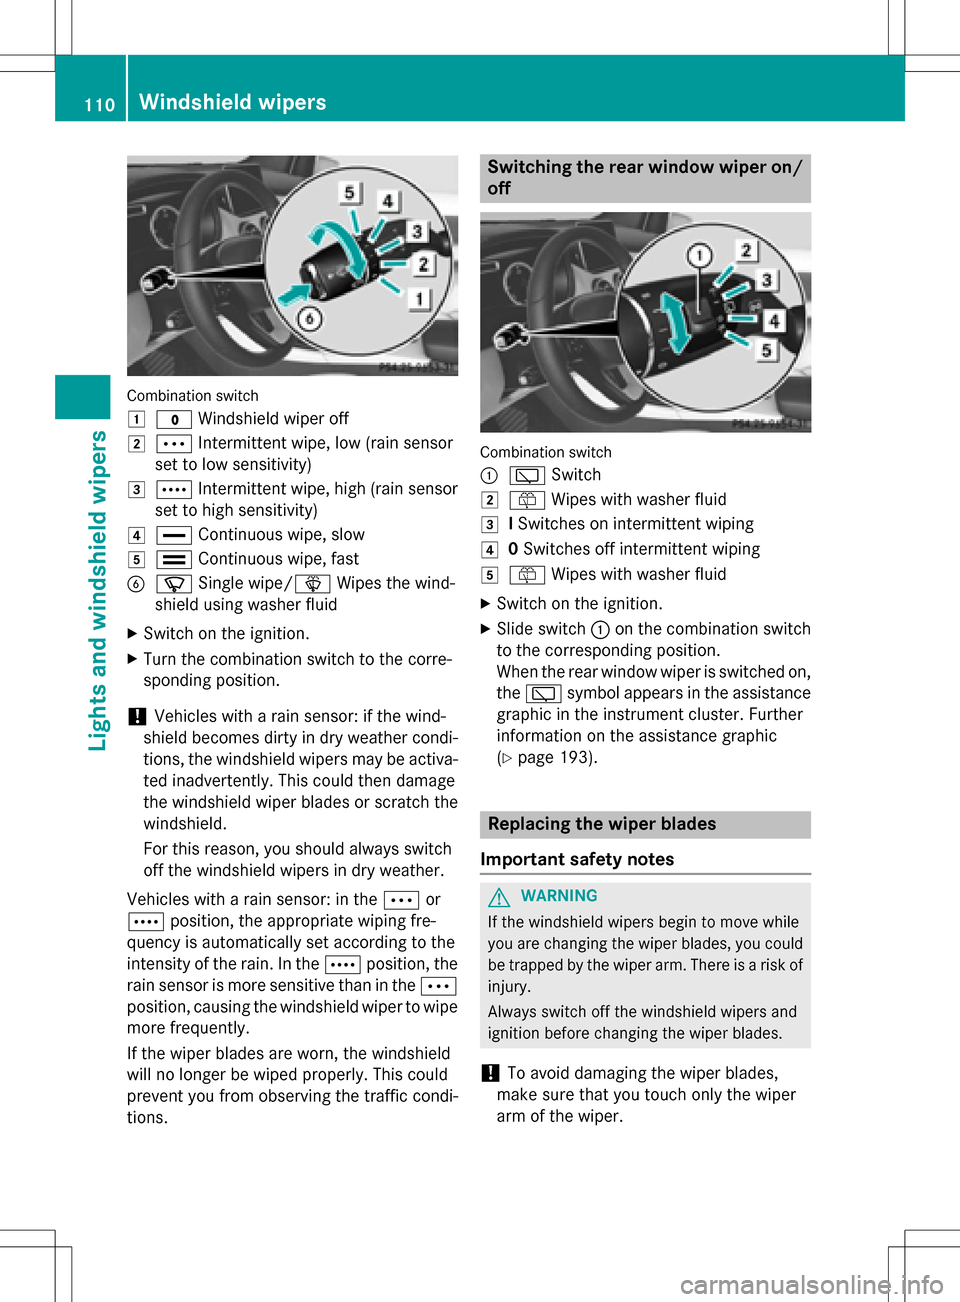
Combination switch
1
$Windshield wiper off
2ÄIntermittent wipe, low (rain sensor
set to low sensitivity)
3Å Intermittent wipe, high (rain sensor
set to high sensitivity)
4° Continuous wipe, slow
5¯Continuous wipe, fast
BíSingle wipe/î Wipes the wind-
shield using washer fluid
XSwitch on the ignition.
XTurn the combination switch to the corre-
sponding position.
!Vehicles with a rain sensor: if the wind-
shield becomes dirty in dry weather condi-
tions, the windshield wipers may be activa-
ted inadvertently. This could then damage
the windshield wiper blades or scratch the
windshield.
For this reason, you should always switch
off the windshield wipers in dry weather.
Vehicles with a rain sensor: in the Äor
Å position, the appropriate wiping fre-
quency is automatically set according to the
intensity of the rain. In the Åposition, the
rain sensor is more sensitive than in the Ä
position, causing the windshield wiper to wipe
more frequently.
If the wiper blades are worn, the windshield
will no longer be wiped properly. This could
prevent you from observing the traffic condi-
tions.
Switching the rear window wiper on/
off
Combination switch
:
è Switch
2ôWipes with washer fluid
3ISwitches on intermittent wiping
40 Switches off intermittent wiping
5ô Wipes with washer fluid
XSwitch on the ignition.
XSlide switch :on the combination switch
to the corresponding position.
When the rear window wiper is switched on,
the è symbol appears in the assistance
graphic in the instrument cluster. Further
information on the assistance graphic
(
Ypage 193).
Replacing the wiper blades
Important safety notes
GWARNING
If the windshield wipers begin to move while
you are changing the wiper blades, you could be trapped by the wiper arm. There is a risk of
injury.
Always switch off the windshield wipers and
ignition before changing the wiper blades.
!To avoid damaging the wiper blades,
make sure that you touch only the wiper
arm of the wiper.
110Windshield wipers
Lights and windshield wipers
Page 132 of 342
Useful information
i
This Operator's Manual describes all
models and all standard and optional equip-
ment of your vehicle available at the time of
publication of the Operator's Manual.
Country-specific differences are possible.
Please note that your vehicle may not be
equipped with all features described. This
also applies to safety-related systems and
functions.
iRead the information on qualified special-
ist workshops (
Ypage 26).
Notes on breaking-in a new vehicle
The sensor system of some driving and driv-
ing safety systems adjusts automatically
while a certain distance is being driven after
the vehicle has been delivered or after
repairs. Full system effectiveness is not
reached until the end of this teach-in proce-
dure.
New and replaced brake pads and discs only
reach their optimum braking effect after sev-
eral hundred kilometers of driving. Compen-
sate for this by applying greater force to the
brake pedal.
Driving
Important safety notes
GWARNING
Objects in the driver's footwell can restrict the pedal travel or obstruct a depressed pedal.
The operating and road safety of the vehicle is
jeopardized. There is a risk of an accident.
Make sure that all objects in the vehicle are
stowed correctly, and that they cannot enter
the driver's footwell. Install the floormats
securely and as specified in order to ensure
sufficient clearance for the pedals. Do not use
loose floormats and do not place floormats on
top of one another.
GWARNING
Unsuitable footwear can hinder correct usage of the pedals, e.g.:
Rshoes with thick soles
Rshoes with high heels
Rslippers
There is a risk of an accident.
Wear suitable footwear to ensure correct
usage of the pedals.
GWARNING
If you switch off the ignition while driving,
safety-relevant functions are only available
with limitations, or not at all. This could affect, for example, the power steering and the brake
boosting effect. You will require considerably
more effort to steer and brake. There is a risk
of an accident.
Do not switch off the ignition while driving.
GWARNING
If the parking brake has not been fully
released when driving, the parking brake can:
Roverheat and cause a fire
Rlose its hold function.
There is a risk of fire and an accident. Release
the parking brake fully before driving off.
!Before driving away, you must ensure
that, for your own safety and to avoid dam-
age, the charging cable has been removed
from the vehicle socket. Otherwise, you
cannot shift the transmission out of posi-
tion P.
The braking performance of the electric
motor using recuperative braking is, in some
operating modes, either reduced or not effec-
tive:
Rwhen the condition of charge of the high-
voltage battery increases
Rif the high-voltage battery is not yet at a
normal operating temperature
Rwhen driving close to the maximum speed
Rwhen the vehicle is almost stationary
130Driving
Driving and parking
Page 141 of 342
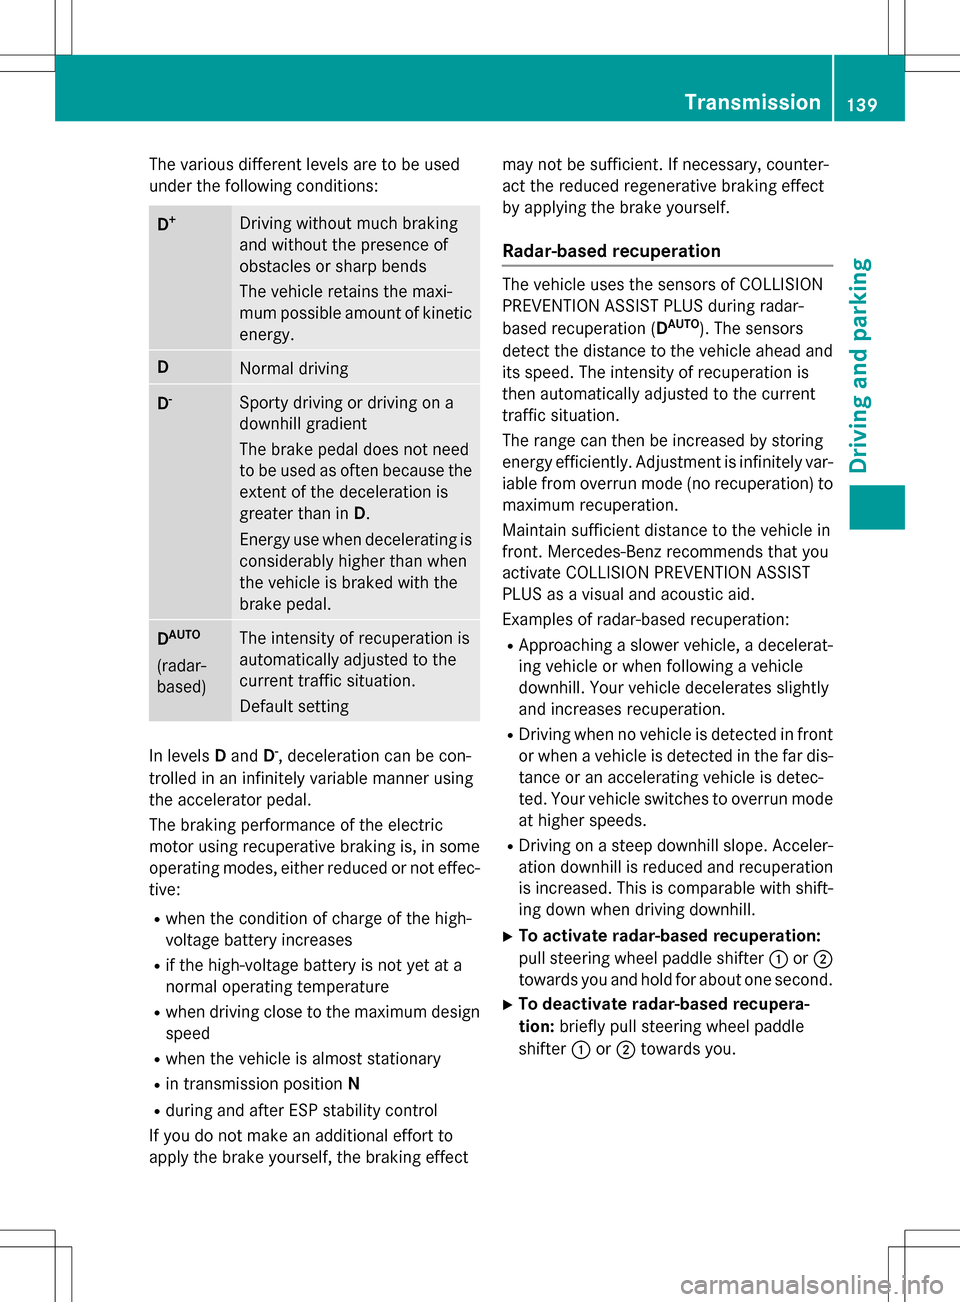
The various different levels are to be used
under the following conditions:
D+Driving without much braking
and without the presence of
obstacles or sharp bends
The vehicle retains the maxi-
mum possible amount of kinetic
energy.
DNormal driving
D-Sporty driving or driving on a
downhill gradient
The brake pedal does not need
to be used as often because the
extent of the deceleration is
greater than inD.
Energy use when decelerating is
considerably higher than when
the vehicle is braked with the
brake pedal.
DAUTO
(radar-
based)
The intensity of recuperation is
automatically adjusted to the
current traffic situation.
Default setting
In levels Dand D-, deceleration can be con-
trolled in an infinitely variable manner using
the accelerator pedal.
The braking performance of the electric
motor using recuperative braking is, in some
operating modes, either reduced or not effec-
tive:
Rwhen the condition of charge of the high-
voltage battery increases
Rif the high-voltage battery is not yet at a
normal operating temperature
Rwhen driving close to the maximum design
speed
Rwhen the vehicle is almost stationary
Rin transmission position N
Rduring and after ESP stability control
If you do not make an additional effort to
apply the brake yourself, the braking effect may not be sufficient. If necessary, counter-
act the reduced regenerative braking effect
by applying the brake yourself.
Radar-based recuperation
The vehicle uses the sensors of COLLISION
PREVENTION ASSIST PLUS during radar-
based recuperation (D
AUTO). The sensors
detect the distance to the vehicle ahead and
its speed. The intensity of recuperation is
then automatically adjusted to the current
traffic situation.
The range can then be increased by storing
energy efficiently. Adjustment is infinitely var-
iable from overrun mode (no recuperation) to
maximum recuperation.
Maintain sufficient distance to the vehicle in
front. Mercedes-Benz recommends that you
activate COLLISION PREVENTION ASSIST
PLUS as a visual and acoustic aid.
Examples of radar-based recuperation:
RApproaching a slower vehicle, a decelerat-
ing vehicle or when following a vehicle
downhill. Your vehicle decelerates slightly
and increases recuperation.
RDriving when no vehicle is detected in front
or when a vehicle is detected in the far dis- tance or an accelerating vehicle is detec-
ted. Your vehicle switches to overrun mode
at higher speeds.
RDriving on a steep downhill slope. Acceler-
ation downhill is reduced and recuperation
is increased. This is comparable with shift-
ing down when driving downhill.
XTo activate radar-based recuperation:
pull steering wheel paddle shifter :or;
towards you and hold for about one second.
XTo deactivate radar-based recupera-
tion: briefly pull steering wheel paddle
shifter :or; towards you.
Transmission139
Driving and parking
Z
Page 142 of 342
If you change between radar-based and man-
ual recuperation, the following levels are acti-
vated depending on the selection via the
steering wheel paddle shifters:
:Steering
wheel paddle
shifter -selects D-(maximum
recuperation)
; Steering
wheel paddle
shifter +selects D+(overrun)
In particular, the function of the radar sensors
can be impaired in the case of:
Rthere is dirt on the sensors or anything else
covering the sensors
Rthere is snow or heavy rain
Rthere is interference by other radar sources
Rthere are strong radar reflections, for
example in parking garages
Ra narrow vehicle traveling in front, e.g. a
motorbike
Ra vehicle traveling in front on a different line
relative to the center of your vehicle
Following damage to the front end of the vehi-
cle, have the radar sensor settings and oper-
ation checked at a qualified specialist work-
shop immediately. This also applies to colli-
sions at slow speeds where there is no visible
damage to the front of the vehicle.
If the radar sensors are not available, the sys-
tem switches automatically to level Dwith
moderate recuperation. Have the radar sen-
sors checked at a qualified specialist work-
shop immediately.
Automatic adjustment of recuperation
on downhill gradients
The vehicle can detect steep downhill gradi-
ents. To reduce acceleration downhill and to
charge the high-voltage battery, recuperation
is increased steplessly. This is comparable to
the engine brake in a combustion engine
when you downshift a gear on a downhill gra-
dient. Automatic adjustment of recuperation on
downhill gradients is available in level
D
AUTO
or on vehicles without steering wheel paddle
shifters in levelD.
Intelligent recuperation
The vehicle uses the map and camera data of
Traffic Sign Assist in addition to the sensors
of COLLISION PREVENTION ASSIST PLUS
during radar-based recuperation (D
AUTO). The
rate of recuperation is then automatically
adjusted to the current traffic situation, tak-
ing the current and future maximum speed
into account.
High-voltage battery
Important safety notes
GDANGER
The vehicle's high-voltage electrical system is under high voltage. If you modify components
in the vehicle's high-voltage electrical system
or touch damaged components, you may be
electrocuted. The components in the vehi-
cle's high-voltage electrical system may be
damaged in an accident, although the damage
is not visible. There is a risk of fatal injury.
Following an accident, do not touch any high-
voltage components and never modify the
vehicle's high-voltage electrical system. Have
the vehicle towed away after an accident and
the vehicle's high-voltage electrical system
checked by a qualified specialist workshop.
GWARNING
In the event of a vehicle fire, the internal pres- sure of the high-voltage battery can exceed a
critical value. In this case flammable gas
escapes through a ventilation valve on the
underbody. The gas can ignite. There is a risk
of injury.
Leave the danger zone immediately. Secure
the danger area at a suitable distance, whilst
observing legal requirements.
140High-voltage battery
Driving and parking
Page 167 of 342
The electric parking brake secures the vehicle
automatically if the HOLD function is activa-
ted and:
Rthe driver's seat belt is not fastened and the
driver's door is open.
Rthe engine is switched off, unless it is auto- matically switched off by the ECO start/
stop function.
Ra system malfunction occurs.
Rthe power supply is not sufficient.
The Brake Immediately
message may also
appear in the multifunction display.
XImmediately depress the brake firmly until
the warning message in the multifunction
display goes out.
The HOLD function is deactivated. The horn
sounds at regular intervals if you have
switched off the engine, released the seat
belt and opened the driver's door with the
HOLD function activated. The sounding of the
horn alerts you to the fact that the HOLD
function is still activated. If you attempt to
lock the vehicle, the tone becomes louder.
The vehicle cannot be locked until you have
deactivated the HOLD function.
iAfter switching off the engine, it can only
be started again once you have deactivated
the HOLD function.
PARKTRONIC
Important safety notes
PARKTRONIC is an electronic parking aid with ultrasonic sensors. It monitors the area
around your vehicle using six sensors in the
front bumper and six sensors in the rear
bumper. PARKTRONIC indicates visually and
audibly the distance between your vehicle
and an object.
PARKTRONIC is only an aid. It is not a replace-
ment for your attention to your immediate
surroundings. You are always responsible for
safe maneuvering, parking and exiting a park-
ing space. When maneuvering, parking or pulling out of a parking space, make sure that
there are no persons, animals or objects in
the area in which you are maneuvering.
!When parking, pay particular attention to
objects above or below the sensors, such
as flower pots or trailer drawbars.
PARKTRONIC does not detect such objects
when they are in the immediate vicinity of
the vehicle. You could damage the vehicle
or the objects.
The sensors may not detect snow and other
objects that absorb ultrasonic waves.
Ultrasonic sources such as an automatic
car wash, the compressed-air brakes on a
truck or a pneumatic drill could cause
PARKTRONIC to malfunction.
PARKTRONIC may not function correctly on
uneven terrain.
PARKTRONIC is activated automatically when
you:
Rswitch on the ignition
Rshift the transmission to position D,Ror N
Rshift the transmission to position D,Ror N
Rrelease the electric parking brake
Range of the sensors
General notes
PARKTRONIC does not take objects into con-
sideration that are:
Rbelow the detection range, e.g. people, ani-
mals or objects.
Rabove the detection range, e.g. overhang-
ing loads, truck overhangs or loading
ramps.
Driving systems165
Driving and parking
Z