brake fluid MERCEDES-BENZ B-CLASS HATCHBACK 2008 Owners Manual
[x] Cancel search | Manufacturer: MERCEDES-BENZ, Model Year: 2008, Model line: B-CLASS HATCHBACK, Model: MERCEDES-BENZ B-CLASS HATCHBACK 2008Pages: 305, PDF Size: 5.1 MB
Page 7 of 305
4One-touch gearshifting.
....................93
Program selector button ...................94
Trailer towing. ................................... 95
Working on the vehicle .....................95
AUTOTRONIC
Releasing the parking lock man-
ually. ............................................... 243
Axle load, maximum permissible
..................................................... 287, 288B
Backrest Removing/fitting. ........................... 151
Bag hook............................................. 157
Ball coupling Fitting ............................................. 186
Removing....................................... .190
BAS (Brake Assist)............................... 55
Battery Changing (key).. .............................. 244
Charging. ........................................ 265
Checking (key). ............................... 244
Check lamp (key). ........................... 244
Disconnecting ................................. 264
Display message ............................. 213
Jump-starting. ................................. 266
Maintenance (vehicle)..................... 263
Reconnecting.................................. 266
Removing/fitting. ........................... 265
Vehicle battery. .............................. 263Belt force limiters
Activation.......................................... 37
Belt height adjustment ........................74
Belt tensioners Activation.......................................... 37
Belt warning.......................................... 74
Bonnet Bonnet catch .................................. 172
Opening/closing ............................ 171
Bonnet release lever
Release leve r.................................. 171
Brake Assist
see BAS
Brake fluid .......................................... 299
Display message ............................. 214
Brake lamps
Adaptive............................................ 56
Display message ............................. 217
Brakes
Parking brake................................... .89
Warning lamp..................................2 26
Brake system
Display message ............................. 213
Bulb
see Lamp
Bulbs
Brake lamp. .................................... 249
Cornering light. ............................... 247
Dipped-beam headlamps ................247
Licence plate lamp.......................... 250 Main-beam headlamps
...................247
Overview. ........................................ 245
Parking lamp.................................. .247
Replacing............................... .246, 248
Side lamp....................................... .247
Tail lamp ......................................... 249
Turn signal lamp. ....................248, 249 C
Calling up a malfunction see Message memory menu
Care..................................................... 192
Automatic car wash. .......................193
Exhaust tail pipes............................ 196
Headlamps. .................................... 194
High-pressure cleaners. ..................193
Parktronic. ...................................... 196
Plastic trim. .................................... 195
Rear window. .................................. 194
Side windows.................................. 194
Trailer tow hitch. ............................. 196
CD player/CD changer
Operating (on-board computer)
....................................................... 103
Central locking
Automatic locking (on-board com-
puter). ............................................. 110
Key. .................................................. 60
Central locking/unlocking button ......61 Index
245_AKB; 2; 7, en-GB
wdomann,
Version: 2.11.4 2008-10-17T11:22:31+02:00 - Seite 4Dateiname: 6515_1640_02_buchblock.pdf; preflight
Page 14 of 305
11S
Seat Adjusting. ................................... 63, 65
Correct driver's seat position. ..........75
Folding the rear bench seat
forward. .......................................... 149
Removing/fitting the front-
passenger seat. .............................. 155
Removing/fitting the rear seat
backrest. ........................................ 151
Removing/fitting the rear seat
cushion. .......................................... 150
Seat belt
Adjusting the height.......................... 74
Display message .......................74, 212
Fastening. ......................................... 72
Warning lamp. .......................... 74, 228
Seat cushion
Removing (rear bench seat). ...........150
Seat heating......................................... .68
Seat ventilation Malfunction indicator lamp. ............222
Securing a load................................... 146
Selector lever Positions. .......................................... 93
Service indicator................................ 191
Service products................................ 291
Brake fluid. ..................................... 299Coolant.
.......................................... 297
Windscreen washer fluid. ................299
Settings
Factory (on-board computer). .........105
Setting the unit (on-board computer)
Speedometer. ................................. 107
Sidebags................................................ 41
Side window
Fault. .............................................. 238
Side windows
Cleaning. ........................................ 194
Opening/closing. .............................. 83
resetting ........................................... 84
Ski rack............................................... 143
Snow chains....................................... 182
Socket Cockpit. .......................................... 162
Luggage compartment. ...................163
Rear compartment. .........................163
Spare wheel
Fitting ............................................. 258
Storage location. ............................ 200
Technical data. ............................... 285
Speed
Technical data. ............................... 280
Speed limiter
Speedtronic. ................................... 116Speedometer
Additional speedometer (on-
board computer). ............................ 102
Setting the unit (on-board com-
puter). ............................................. 107
Speedtronic........................................ 116
Display message ............................. 220
Permanent. ..................................... 119
Variabl e.......................................... 117
SRS (Supplemental Restraint Sys-
tem)....................................................... 37
Display message ............................. 211
Warning lamp. .......................... 37, 226
Standard display (on-board com-
puter) ................................................... 102
Station see Radio
Status line (on-board computer)......... 99
Selecting the display....................... 107
Steering
Display message ............................. 215
Steering assistant STEER CONTROL ...56
Steering wheel Adjusting .......................................... 69
Buttons (on-board computer)............ 98
Gearshift buttons. ............................. 95
Stowage compartment ......................158
Armrest (front) ................................ 159
Armrest (under) .............................. 160
Backrest ......................................... 161 Index
245_AKB; 2; 7, en-GB
wdomann,
Version: 2.11.4
2008-10-17T11:22:31+02:00 - Seite 11 Dateiname: 6515_1640_02_buchblock.pdf; preflight
Page 82 of 305
Lights
79Hazard warning lamps
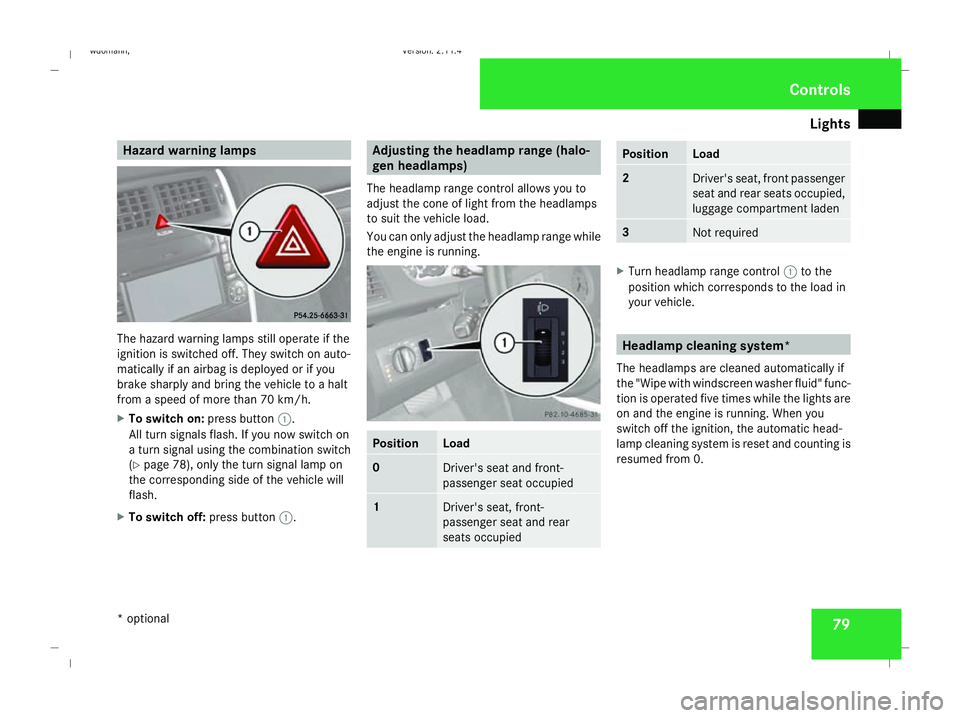
The hazard warning lamps still operate if the
ignition is switched off. They switch on auto-
matically if an airbag is deployed or if you
brake sharply and bring the vehicle to a halt
from a speed of more than 70 km/h.
X To switch on: press button1.
All turn signals flash. If you now switch on
a turn signal using the combination switch
(Y page 78), only the turn signal lamp on
the corresponding side of the vehicle will
flash.
X To switch off: press button1. Adjusting the headlamp range (halo-
gen headlamps)
The headlamp range control allows you to
adjust the cone of light from the headlamps
to suit the vehicle load.
You can only adjust the headlamp range while
the engine is running. Position Load
0
Driver's seat and front-
passenger seat occupied
1
Driver's seat, front-
passenger seat and rear
seats occupied Position Load
2
Driver's seat, front passenger
seat and rear seats occupied,
luggage compartment laden
3
Not required
X
Turn headlamp range control 1to the
position which corresponds to the load in
your vehicle. Headlamp cleaning system*
The headlamps are cleaned automatically if
the "Wipe with windscreen washer fluid" func-
tion is operated five times while the lights are
on and the engine is running. When you
switch off the ignition, the automatic head-
lamp cleaning system is reset and counting is
resumed from 0. Controls
* optional
245_AKB; 2; 7, en-GB
wdomann,
Version: 2.11.4 2008-10-17T11:22:31+02:00 - Seite 79 ZDateiname: 6515_1640_02_buchblock.pdf; preflight
Page 179 of 305
Tyres and wheels
176 G
Risk of fire
Washer fluid concentrate is highly flamma-
ble. Fire, naked flames and smoking are
prohibited when washer fluid concentrate
is being handled.
X At temperatures above freezing:
fill the washer fluid reservoir with a mix of
water and windscreen washer concentrate
(Y page 175).
X At temperatures below freezing:
fill the washer fluid reservoir with a mix of
water, antifreeze additive and windscreen
washer concentrate ( Ypage 175). Adapt
the mixing ratio to the outside tempera-
tures.
X Mix the windscreen washer fluid in a con-
tainer beforehand.
! Only use windscreen washer fluid which
is suitable for plastic lamp lenses. Unsuit-
able windscreen washer fluid could dam-
age the plastic lamp lenses of the head-
lamps.
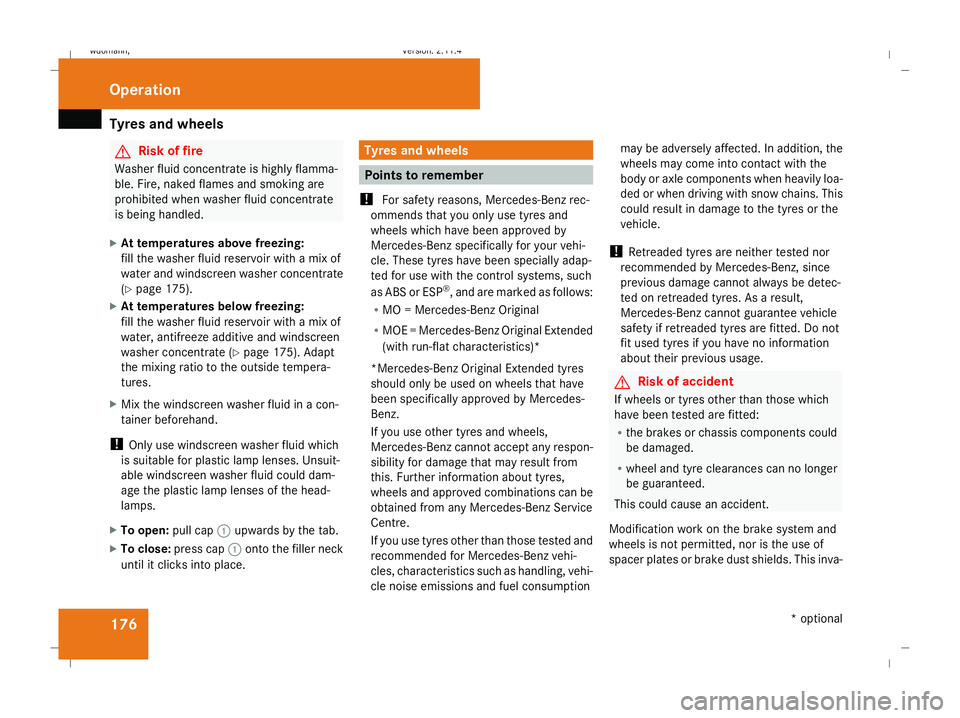
X To open: pull cap1upwards by the tab.
X To close: press cap 1onto the filler neck
until it clicks into place. Tyres and wheels
Points to remember
! For safety reasons, Mercedes-Benz rec-
ommends that you only use tyres and
wheels which have been approved by
Mercedes-Benz specifically for your vehi-
cle. These tyres have been specially adap-
ted for use with the control systems, such
as ABS or ESP ®
, and are marked as follows:
R MO = Mercedes-Benz Original
R MOE = Mercedes-Benz Original Extended
(with run-flat characteristics)*
*Mercedes-Benz Original Extended tyres
should only be used on wheels that have
been specifically approved by Mercedes-
Benz.
If you use other tyres and wheels,
Mercedes-Benz cannot accept any respon-
sibility for damage that may result from
this. Further information about tyres,
wheels and approved combinations can be
obtained from any Mercedes-Benz Service
Centre.
If you use tyres other than those tested and
recommended for Mercedes-Benz vehi-
cles, characteristics such as handling, vehi-
cle noise emissions and fuel consumption may be adversely affected. In addition, the
wheels may come into contact with the
body or axle components when heavily loa-
ded or when driving with snow chains. This
could result in damage to the tyres or the
vehicle.
! Retreaded tyres are neither tested nor
recommended by Mercedes-Benz, since
previous damage cannot always be detec-
ted on retreaded tyres. As a result,
Mercedes-Benz cannot guarantee vehicle
safety if retreaded tyres are fitted. Do not
fit used tyres if you have no information
about their previous usage. G
Risk of accident
If wheels or tyres other than those which
have been tested are fitted:
R the brakes or chassis components could
be damaged.
R wheel and tyre clearances can no longer
be guaranteed.
This could cause an accident.
Modification work on the brake system and
wheels is not permitted, nor is the use of
spacer plates or brake dust shields. This inva- Operation
* optional
245_AKB; 2; 7, en-GB
wdomann,
Version: 2.11.4 2008-10-17T11:22:31+02:00 - Seite 176Dateiname: 6515_1640_02_buchblock.pdf; preflight
Page 217 of 305
Display
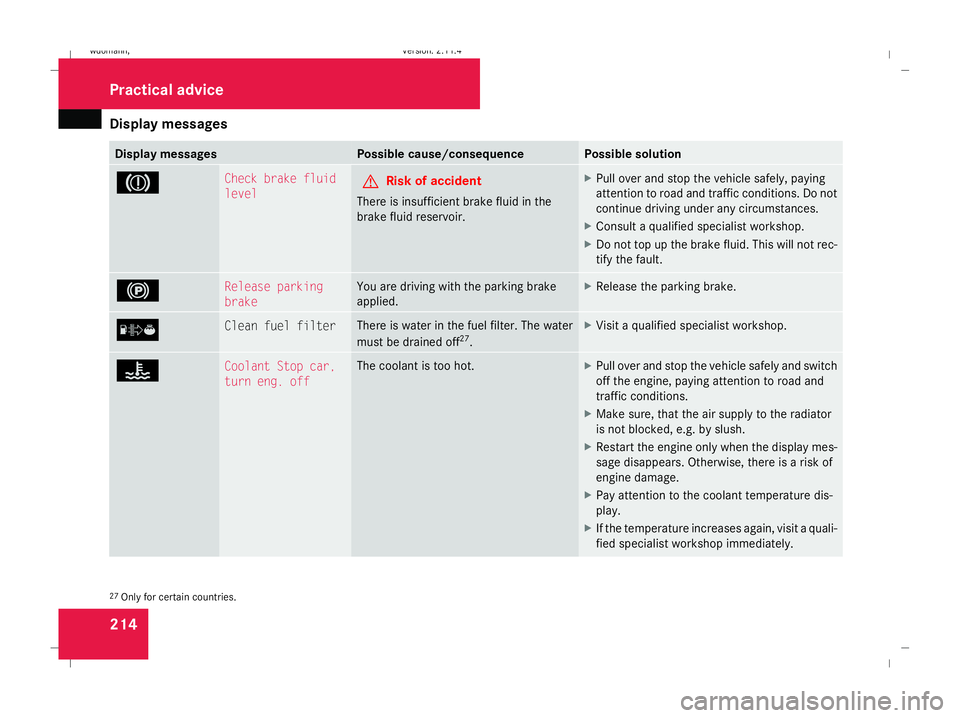
messages 214 Display messages Possible cause/consequence Possible solution
3 Check brake fluid
level
G
Risk of accident
There is insufficient brake fluid in the
brake fluid reservoir. X
Pull over and stop the vehicle safely, paying
attention to road and traffic conditions. Do not
continue driving under any circumstances.
X Consult a qualified specialist workshop.
X Do not top up the brake fluid. This will not rec-
tify the fault. ! Release parking
brake You are driving with the parking brake
applied. X
Release the parking brake. [ Clean fuel filter There is water in the fuel filter. The water
must be drained off
27
. X
Visit a qualified specialist workshop. D Coolant Stop car,
turn eng. off The coolant is too hot. X
Pull over and stop the vehicle safely and switch
off the engine, paying attention to road and
traffic conditions.
X Make sure, that the air supply to the radiator
is not blocked, e.g. by slush.
X Restart the engine only when the display mes-
sage disappears. Otherwise, there is a risk of
engine damage.
X Pay attention to the coolant temperature dis-
play.
X If the temperature increases again, visit a quali-
fied specialist workshop immediately. 27
Only for certain countries. Practical advi
ce
245_AKB; 2; 7, en-GB
wdomann,
Version: 2.11.4 2008-10-17T11:22:31+02:00 - Seite 214Dateiname: 6515_1640_02_buchblock.pdf; preflight
Page 230 of 305
Troubleshooting
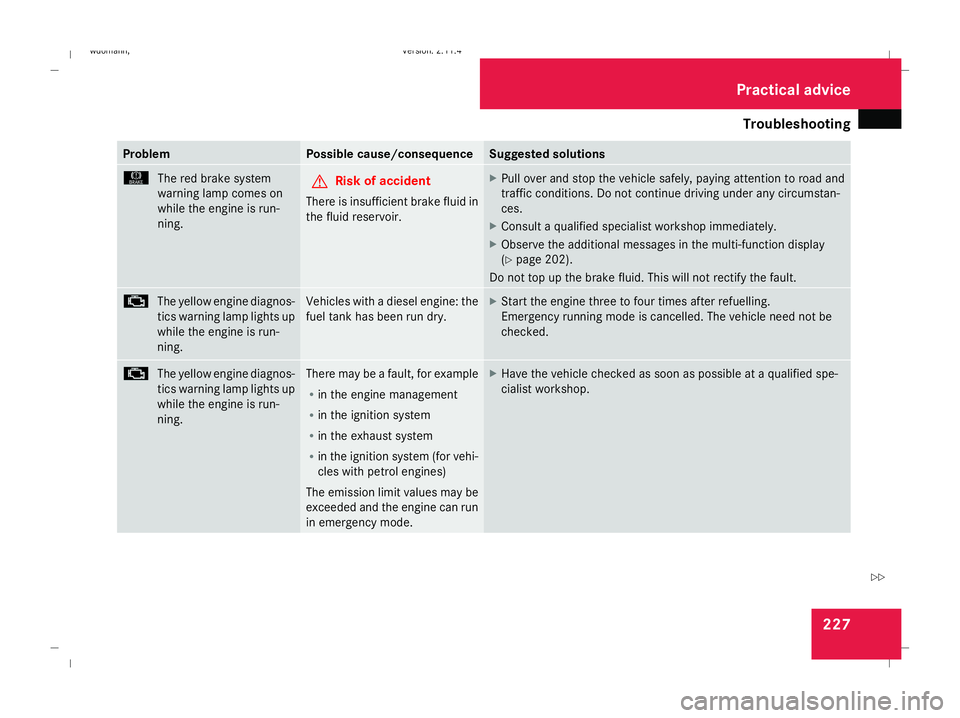
227Problem Possible cause/consequence Suggested solutions
H
The red brake system
warning lamp comes on
while the engine is run-
ning. G
Risk of accident
There is insufficient brake fluid in
the fluid reservoir. X
Pull over and stop the vehicle safely, paying attention to road and
traffic conditions. Do not continue driving under any circumstan-
ces.
X Consult a qualified specialist workshop immediately.
X Observe the additional messages in the multi-function display
(Y page 202).
Do not top up the brake fluid. This will not rectify the fault. ±
The yellow engine diagnos-
tics warning lamp lights up
while the engine is run-
ning. Vehicles with a diesel engine: the
fuel tank has been run dry. X
Start the engine three to four times after refuelling.
Emergency running mode is cancelled. The vehicle need not be
checked. ±
The yellow engine diagnos-
tics warning lamp lights up
while the engine is run-
ning. There may be a fault, for example
R
in the engine management
R in the ignition system
R in the exhaust system
R in the ignition system (for vehi-
cles with petrol engines)
The emission limit values may be
exceeded and the engine can run
in emergency mode. X
Have the vehicle checked as soon as possible at a qualified spe-
cialist workshop. Practical advice
245_AKB; 2; 7, en-GB
wdomann,
Version: 2.11.4
2008-10-17T11:22:31+02:00 - Seite 227 ZDateiname: 6515_1640_02_buchblock.pdf; preflight
Page 249 of 305
Changing bulbs
246
Rear bulbs Bulb Type
7
Third brake
lamp LED
8
Turn signal lamp PY 21 W
9
Reversing lamp P 21 W
a
Licence plate
lamp C 5 W
b
Rear foglamp P 21 W
c
Tail lamp P 5 W
d
Brake lamp P 21 W
Before changing bulbs
You can replace the following bulbs:
R
Dipped-beam headlamps (halogen head-
lamps)
R Main-beam headlamps (halogen head-
lamps)
R Side lamp/parking lamp
R Cornering light* (vehicles with bi-xenon
headlamps *)
R Front turn signal lamp R
Brake lamp
R Tail lamp
R Turn signal lamp (rear)
R Licence plate lamp
Observe the following points:
R Use only the bulb types specified here.
R To prevent a short-circuit, switch off the
lights before changing a bulb.
R Only hold bulbs with a clean, lint-free cloth.
R Do not work with wet or greasy fingers.
R If the new bulb still does not light up, con-
sult a qualified specialist workshop, e.g. a
Mercedes-Benz Service Centre.
i Due to the location of the bulbs in the
front headlamps, it is best to have these
changed at a qualified specialist workshop,
e.g. a Mercedes-Benz Service Centre.
i Have the headlamp setting checked reg-
ularly at a qualified specialist workshop,
e.g. a Mercedes-Benz Service Centre. Changing the front bulbs
Removing/fitting the washer fluid res-
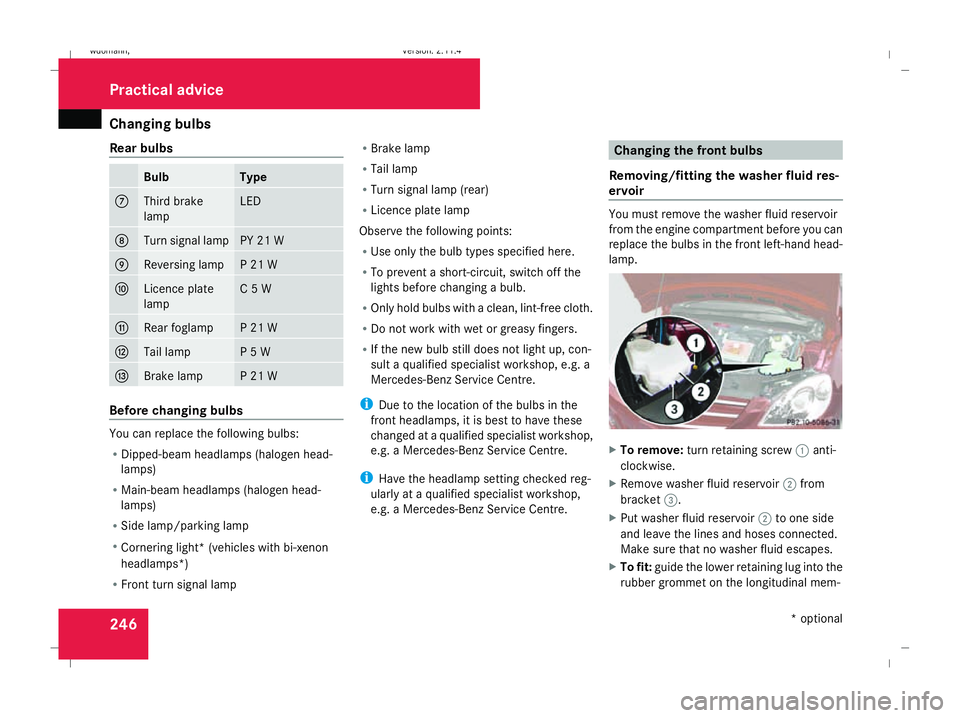
ervoir You must remove the washer fluid reservoir
from the engine compartment before you can
replace the bulbs in the front left-hand head-
lamp.
X
To remove: turn retaining screw 1anti-
clockwise.
X Remove washer fluid reservoir 2from
bracket 3.
X Put washer fluid reservoir 2to one side
and leave the lines and hoses connected.
Make sure that no washer fluid escapes.
X To fit: guide the lower retaining lug into the
rubber grommet on the longitudinal mem- Practical advice
* optional
245_AKB; 2; 7, en-GB
wdomann,
Version: 2.11.4 2008-10-17T11:22:31+02:00 - Seite 246Dateiname: 6515_1640_02_buchblock.pdf; preflight
Page 255 of 305
Flat tyre
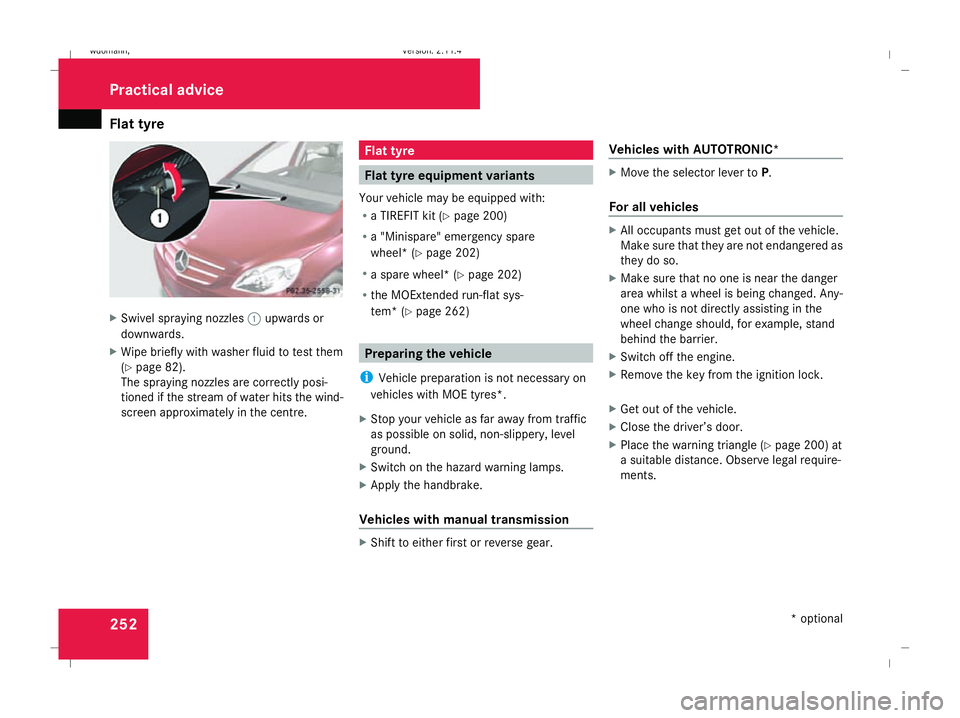
252X
Swivel spraying nozzles 1upwards or
downwards.
X Wipe briefly with washer fluid to test them
(Y page 82).
The spraying nozzles are correctly posi-
tioned if the stream of water hits the wind-
screen approximately in the centre. Flat tyre
Flat tyre equipment variants
Your vehicle may be equipped with:
R a TIREFIT kit (Y page 200)
R a "Minispare" emergency spare
wheel* (Y page 202)
R a spare wheel* (Y page 202)
R the MOExtended run-flat sys-
tem* (Y page 262) Preparing the vehicle
i Vehicle preparation is not necessary on
vehicles with MOE tyres*.
X Stop your vehicle as far away from traffic
as possible on solid, non-slippery, level
ground.
X Switch on the hazard warning lamps.
X Apply the handbrake.
Vehicles with manual transmission X
Shift to either first or reverse gear. Vehicles with AUTOTRONIC* X
Move the selector lever to P.
For all vehicles X
All occupants must get out of the vehicle.
Make sure that they are not endangered as
they do so.
X Make sure that no one is near the danger
area whilst a wheel is being changed. Any-
one who is not directly assisting in the
wheel change should, for example, stand
behind the barrier.
X Switch off the engine.
X Remove the key from the ignition lock.
X Get out of the vehicle.
X Close the driver’s door.
X Place the warning triangle ( Ypage 200) at
a suitable distance. Observe legal require-
ments. Practical advice
* optional
245_AKB; 2; 7, en-GB
wdomann
, Version: 2.11.4
2008-10-17T11:22:31+02:00 - Seite 252 Dateiname: 6515_1640_02_buchblock.pdf; preflight
Page 294 of 305

Service products and capacities
291Service products and capacities
Notes on service products and capaci-
ties
Service products are:
R fuels (e.g. petrol, diesel)
R lubricants (e.g. engine oil, transmission oil)
R coolant
R brake fluid
R windscreen washer fluid
Mercedes-Benz recommends that you only
use those products which have been tested
and specially approved by Mercedes-Benz for
your vehicle and are listed in the Mercedes-
Benz Owner's Manual in the relevant chapter
since:
R parts and service products are matched
R damage caused by the use of non-approved
service products is not covered by the war-
ranty
You can recognise service products approved
by Mercedes-Benz by the following inscrip-
tion on the containers:
R MB-Freigabe (e.g. MB-Freigabe 229.51)
R MB Approval (e.g. MB Approval 229.51) Other designations or recommendations that
relate to a level of quality or a specification in
accordance with an MB Approval have not
necessarily been approved by Mercedes-
Benz.
You can obtain further information from any
Mercedes-Benz Service Centre. G
Risk of injury
When handling, storing and disposing of
any service products, please observe the
relevant regulations, as, otherwise, you
could endanger yourself and others.
Keep service products away from children.
To protect your health, do not allow service
products to come into contact with your
eyes or open wounds. See a doctor imme-
diately if any service product is swallowed. H
Environmental note
Dispose of service products in an environ-
mentally-responsible manner. Fuels
G
Risk of explosion
Fuel is highly flammable. Fire, naked flames
and smoking are therefore prohibited when
handling fuels.
Switch off the engine before refuelling. G
Risk of injury
Do not allow fuel to come into contact with
skin or clothing.
Allowing fuels to come into direct contact
with your skin or inhaling fuel vapours is
damaging to your health.
Tank capacity Total capacity 54 l
Of which reserve
fuel
Approximately 6 l
!
Do not use petrol to refuel vehicles with a
diesel engine. Do not use diesel to refuel
vehicles with a petrol engine. Never mix
diesel with petrol. Even small amounts of
the wrong fuel result in damage to the
injection system. Damage resulting from Technical data
245_AKB; 2; 7, en-GB
wdomann,
Version: 2.11.4
2008-10-17T11:22:31+02:00 - Seite 291 ZDateiname: 6515_1640_02_buchblock.pdf; preflight
Page 302 of 305

Service products and capacities
299Amount of antifreeze/corrosion inhibitor required for antifreeze protection
Down to
–37 †(approx.
50%)
3.0 l 4.25 l 4.0 l 4.85 l
Down to
–45 †(approx.
55%) 3.65 l 4.7 l 4.4 l 5.35 l
Brake fluid
Over a period of time, the brake fluid absorbs
moisture from the air; this lowers its boiling
point. G
Risk of accident
If the boiling point of the brake fluid is too
low, vapour pockets may form in the brake
system when the brakes are applied hard
(e.g. when driving downhill). This would
impair braking efficiency.
Have the brake fluid renewed every two
years with a brake fluid that has been
approved by Mercedes-Benz and have this
confirmed in the Service Booklet. i
There is usually a notice in the engine
compartment to remind you when the next
brake fluid change is due. Windscreen washer system
G
Risk of fire
Windscreen washer concentrate is highly
flammable. Fire, naked flames and smoking
are prohibited when windscreen washer
concentrate is being handled.
The washer fluid reservoir holds approxi-
mately 6.4 litres.
The headlamp cleaning system* and the
windscreen washer system are both supplied
from the washer fluid reservoir. Further information on windshield washer
fluid and the mixing ratio can be found on
(Y
page 175). Technical data
* optional
245_AKB; 2; 7, en-GB
wdomann,
Version: 2.11.4
2008-10-17T11:22:31+02:00 - Seite 299 ZDateiname: 6515_1640_02_buchblock.pdf; preflight