spare wheel MERCEDES-BENZ B-CLASS HATCHBACK 2008 Owners Manual
[x] Cancel search | Manufacturer: MERCEDES-BENZ, Model Year: 2008, Model line: B-CLASS HATCHBACK, Model: MERCEDES-BENZ B-CLASS HATCHBACK 2008Pages: 305, PDF Size: 5.1 MB
Page 12 of 305
9
Malfunction memory
see Message memory menu
Manual transmission........................... 91
Maximum speed Technical data. ............................... 280
Memory card ...................................... 103
Operation (on-board computer). .....103
see separate operating instructions
Menu (on-board computer)................ 100
Audio. ............................................. 102
DVD. ............................................... 104
Message memory. .......................... 105
Navigation. ..................................... 104
Operating........................................ 101
Resetting to factory settings........... 105
Settings .......................................... 105
Submenu overview. ........................106
Telephone. ...................................... 112
Trip computer. ................................ 111
Messages
see Display messages
see Message memory menu
see Warning and indicator lamps
Minispare emergency spare wheel
Technical data. ............................... 285
Mirrors
Sun visor......................................... 161
Mobile phone...................................... 163
Display message..................... 210, 221 Installation.
..................................... 275
Telephone menu (on-board com-
puter). ............................................. 112
Modifying the programming
Key. .................................................. 60
MOExtended run-flat system* ..178, 262
MP3..................................................... 103
Operating (on-board computer)
....................................................... 103
see separate operating instructions
Multi-contour backrest........................ 68
Multi-function display ....................97, 99
Multi-function steering wheel............. 98
Overview. .......................................... 30 N
Navigation........................................... 104 Navigation menu (on-board com-
puter). ............................................. 104
see separate operating instructions O
Odometer Total distance recorder. ....................26
Trip meter. ........................................ 26
Oil
Consumption. ................................. 172
Topping up. ..................................... 174Oil level
Checking (dipstick). ........................174
Checking (on-board computer). ......173
On-board computer.............................. 98
Audio menu. ................................... 102
Convenience submenu. ..................107
Display messages ........................... 202
DVD menu ...................................... 104
Factory settings .............................. 105
Instrument cluster submenu ...........106
Lighting submenu. ..........................107
Message memory menu.................. 105
Navigation menu. ............................ 104
Operation menu. ............................. 101
Settings menu ................................ 105
Standard display menu. ..................102
Telephone menu. ............................ 112
Time/date submenu. ......................106
Trip computer menu. ......................111
Vehicle submenu. ........................... 107
On-board computer language ...........107
One-touch gearshifting........................ 93
Operating system see On-board computer
Outside temperature display .............98
On-board computer. .......................102
Override feature
Rear side windows ............................ 54 Index
245_AKB; 2; 7, en-GB
wdomann,
Version: 2.11.4
2008-10-17T11:22:31+02:00 - Seite 9 Dateiname: 6515_1640_02_buchblock.pdf; preflight
Page 14 of 305
11S
Seat Adjusting. ................................... 63, 65
Correct driver's seat position. ..........75
Folding the rear bench seat
forward. .......................................... 149
Removing/fitting the front-
passenger seat. .............................. 155
Removing/fitting the rear seat
backrest. ........................................ 151
Removing/fitting the rear seat
cushion. .......................................... 150
Seat belt
Adjusting the height.......................... 74
Display message .......................74, 212
Fastening. ......................................... 72
Warning lamp. .......................... 74, 228
Seat cushion
Removing (rear bench seat). ...........150
Seat heating......................................... .68
Seat ventilation Malfunction indicator lamp. ............222
Securing a load................................... 146
Selector lever Positions. .......................................... 93
Service indicator................................ 191
Service products................................ 291
Brake fluid. ..................................... 299Coolant.
.......................................... 297
Windscreen washer fluid. ................299
Settings
Factory (on-board computer). .........105
Setting the unit (on-board computer)
Speedometer. ................................. 107
Sidebags................................................ 41
Side window
Fault. .............................................. 238
Side windows
Cleaning. ........................................ 194
Opening/closing. .............................. 83
resetting ........................................... 84
Ski rack............................................... 143
Snow chains....................................... 182
Socket Cockpit. .......................................... 162
Luggage compartment. ...................163
Rear compartment. .........................163
Spare wheel
Fitting ............................................. 258
Storage location. ............................ 200
Technical data. ............................... 285
Speed
Technical data. ............................... 280
Speed limiter
Speedtronic. ................................... 116Speedometer
Additional speedometer (on-
board computer). ............................ 102
Setting the unit (on-board com-
puter). ............................................. 107
Speedtronic........................................ 116
Display message ............................. 220
Permanent. ..................................... 119
Variabl e.......................................... 117
SRS (Supplemental Restraint Sys-
tem)....................................................... 37
Display message ............................. 211
Warning lamp. .......................... 37, 226
Standard display (on-board com-
puter) ................................................... 102
Station see Radio
Status line (on-board computer)......... 99
Selecting the display....................... 107
Steering
Display message ............................. 215
Steering assistant STEER CONTROL ...56
Steering wheel Adjusting .......................................... 69
Buttons (on-board computer)............ 98
Gearshift buttons. ............................. 95
Stowage compartment ......................158
Armrest (front) ................................ 159
Armrest (under) .............................. 160
Backrest ......................................... 161 Index
245_AKB; 2; 7, en-GB
wdomann,
Version: 2.11.4
2008-10-17T11:22:31+02:00 - Seite 11 Dateiname: 6515_1640_02_buchblock.pdf; preflight
Page 24 of 305
Exterior view
21Function Page
1
Luggage compartment
Spare wheel 202
Vehicle tool kit 200
2
Rear window heating 139
3
Opening and closing the
tailgate 61
4
Fuel filler flap 168
Fuel requirements 168
5
Opening and closing the
doors 60
6
Exterior mirrors
70 Function Page
7
Demisting the windscreen 138
Cleaning the windows 194
8
Panorama roof* 141
Panorama louvred sliding
sunroof*
141
9
Windscreen wiper opera-
tion
82
Cleaning the wiper blades 194
Replacing the wiper blades
250 Function Page
a
Opening the bonnet 171
Engine oil 172
Coolant 175
b
Front lights 244
c
Fitting the front towing eye 267
d
Tyres and wheels 176
Checking the tyre pressure 178
Flat tyre, fitting the spare
wheel
252
e
Fitting the rear towing eye 267
f
Rear lights 244At a glance
* optional
245_AKB; 2; 7, en-GB
wdomann
,V ersion: 2.11.4
2008-10-17T11:22:31+02:00 - Seite 21 Dateiname: 6515_1640_02_buchblock.pdf; preflight
Page 126 of 305
Driving sys
tems 123
Use Active parking assist for parking spaces
R
that are parallel to the direction of travel.
R that are on straight roads, not bends.
R that are on the same level as the road, i.e.
not on the pavement, for example;
Parking tips:
R On narrow roads, drive as close to the park-
ing space as possible.
R Parking spaces which are littered, over-
grown or partially occupied by trailer tow-
bars might not be identified properly.
R Snowfall or heavy rain may lead to a parking
space being measured inaccurately.
R Pay attention to the Parktronic warning
messages during the parking procedure
(Y page 120).
R You can intervene in the steering procedure
to correct it at any time. Active parking
assist will then be cancelled.
R When transporting a load which protrudes
from your vehicle you should not use Active
parking assist.
R Never use active parking assist when snow
chains or an emergency spare wheel* are
fitted. R
Make sure that the tyre pressures are
always correct. This has a direct influence
on the parking characteristics of the vehi-
cle.
R The way your vehicle is positioned in the
parking space after parking is dependent
on various factors. These include the posi-
tion and shape of the vehicles parked in
front and behind it as well as the condition
of the location. In some cases, Active park-
ing assist may guide you too far into a park-
ing space, or not far enough into it. In some
cases it may also lead you across or onto
the kerb. If necessary, you should abort the
parking procedure with Active parking
assist.
R You can also engage forward gear prema-
turely. The vehicle redirects and does not
drive as far into the parking space Should
a gear be changed too early to achieve a
sensible parking position, the parking pro-
cedure will be aborted.
! When unavoidable, you should drive over
obstacles such as kerbs slowly and not at
a sharp angle. Otherwise you may damage
the wheel rims or tyres. Detecting parking spaces Active parking assist is switched on automat-
ically when driving forwards. The system is
operational at speeds of up to approximately
35 km/h. While in operation, the system inde-
pendently locates and measures parking
spaces on both sides of the vehicle. When
driving at speeds below 35 km/h, you will see
the parking symbol as a status indicator in the
instrument cluster. Active parking assist only
displays parking spaces on the front-
passenger side as standard. Parking spaces
on the driver's side are displayed as soon as
the turn signal on the driver's side is activa-
ted. If you wish to park in a space on the driv-
er's side, the indicator on the driver's side
must remain on. This must remain switched
on until you acknowledge the use of Active
parking assist by pressing the jbutton on
the multi-function steering wheel.
When a parking space has been detected, an
arrow towards the right or the left also
appears. Controls
* optional
245_AKB; 2; 7, en-GB
wdomann,
Version: 2.11.4
2008-10-17T11:22:31+02:00 - Seite 123 ZDateiname: 6515_1640_02_buchblock.pdf; preflight
Page 154 of 305
Loading and stowing
151
X
Grasp release handle 3and pull seat cush-
ion 4upwards.
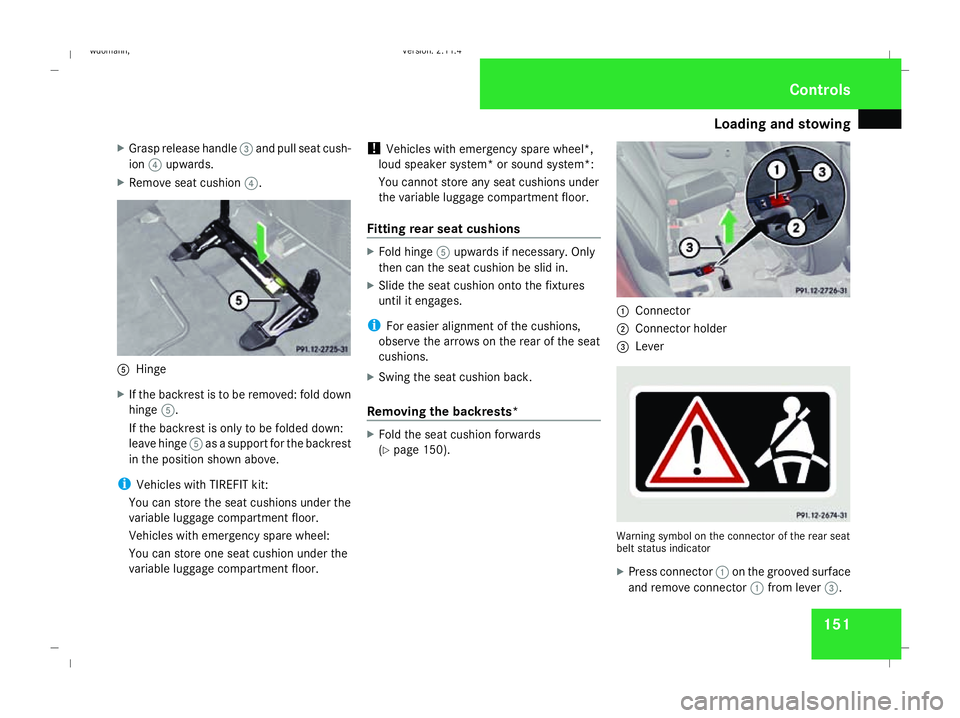
X Remove seat cushion 4. 5
Hinge
X If the backrest is to be removed: fold down
hinge 5.
If the backrest is only to be folded down:
leave hinge 5as a support for the backrest
in the position shown above.
i Vehicles with TIREFIT kit:
You can store the seat cushions under the
variable luggage compartment floor.
Vehicles with emergency spare wheel:
You can store one seat cushion under the
variable luggage compartment floor. !
Vehicles with emergency spare wheel*,
loud speaker system* or sound system*:
You cannot store any seat cushions under
the variable luggage compartment floor.
Fitting rear seat cushions X
Fold hinge 5upwards if necessary. Only
then can the seat cushion be slid in.
X Slide the seat cushion onto the fixtures
until it engages.
i For easier alignment of the cushions,
observe the arrows on the rear of the seat
cushions.
X Swing the seat cushion back.
Removing the backrests* X
Fold the seat cushion forwards
(Y page 150). 1
Connector
2 Connector holder
3 Lever Warning symbol on the connector of the rear seat
belt status indicator
X
Press connector 1on the grooved surface
and remove connector 1from lever 3. Controls
245_AKB; 2; 7, en-GB
wdomann,
Version: 2.11.4 2008-10-17T11:22:31+02:00 - Seite 151 ZDateiname: 6515_1640_02_buchblock.pdf; preflight
Page 180 of 305
Tyres and wheels
177
lidates the General Operating Permit for the
vehicle.
Notes on selecting, fitting and replacing
tyres R
Only fit tyres and wheels of the same type
and make.
R Only fit tyres of the correct size onto the
wheels.
R After fitting new tyres, run them in at mod-
erate speeds for the first 100 km as they
only reach their full performance after this
distance.
R Fit new tyres on the front wheels first if
tyres of the same size are required on the
front and rear wheels.
R Replace the tyres after six years at the lat-
est, regardless of wear. This also applies to
the spare wheel*.
R Do not drive with tyres which have too little
tread depth as this significantly reduces
the traction on wet roads (aquaplaning).
! Store tyres that are not being used in a
cool, dry and preferably dark place. Protect
the tyres against oil, grease, petrol and die-
sel. Notes on regularly inspecting wheels
and tyres R
Regularly check the wheels and tyres of
your vehicle for damage (e.g. cuts, punctu-
res, tears, bulges on tyres and deformation,
cracks or severe corrosion on wheels), at
least every 14 days, as well as after driving
off-road or on rough roads. Damaged
wheels could cause a loss of tyre pressure.
R Regularly check the tyre tread depth and
the condition of the tread across the whole
width of the tyre (Y page 178). If neces-
sary, turn the front wheels to full lock in
order to inspect the inner side of the tyre
surface.
R All wheels must have a valve cap to protect
the valve against dirt and moisture.
R Regularly check the pressure of all your
tyres including the spare tyre*, particularly
prior to long trips, and correct the pressure
as necessary (Y page 178).
Notes on driving R
While driving, pay attention to vibrations,
noises and unusual handling characteris-
tics, e.g. pulling to one side. This may indi-
cate that the wheels or tyres are damaged.
If you suspect that a tyre is defective, reduce your speed and stop the vehicle as
soon as possible to check the wheels and
tyres for damage. Hidden tyre damage
could also be causing the unusual handling
characteristics. If you find no signs of dam-
age, have the wheels and tyres examined
at a specialist workshop, for example at a
Mercedes-Benz Service Centre.
R When parking your vehicle, make sure that
the tyres do not get deformed by the kerb
or other obstacles. If it is necessary to drive
over kerbs, speed humps or similar, try to
do so slowly and at an obtuse angle. Oth-
erwise, the tyres, particularly the sidewalls,
could get damaged. Direction of rotation
Tyres with a specified direction of rotation
have additional benefits, e.g. if there is a risk
of aquaplaning. You will only gain these ben-
efits if the correct direction of rotation is
observed.
An arrow on the sidewall of the tyre indicates
its correct direction of rotation.
i You may fit a spare tyre* against the
direction of rotation. Operation
* optional
245_AKB; 2; 7, en-GB
wdomann,
Version: 2.11.4
2008-10-17T11:22:31+02:00 - Seite 177 ZDateiname: 6515_1640_02_buchblock.pdf; preflight
Page 181 of 305

Tyres and wheels
178 MOExtended run-flat system*
The MOExtended run-flat system allows you
to continue driving the vehicle even when one
or more tyres lose all air pressure.
The MOExtended run-flat system may only be
used in combination with the tyre pressure
loss warning system and only on wheels spe-
cifically tested and approved by Mercedes-
Benz.
i Vehicles with MOExtended run-flat sys-
tem are not equipped with the TIREFIT
kit* 24
.
Therefore, it is recommended that you
equip your vehicle additionally with the
TIREFIT kit* when fitting tyres that do not
feature run-flat properties, e.g. winter
tyres.
i A TIREFIT kit* is available from any quali-
fied specialist workshop, e.g. a Mercedes-
Benz Service Centre.
You will find notes on driving with a flat tyre
in the "Practical advice" section
(Y page 262). Tyre tread
G
Risk of accident
Bear in mind that:
R tyre grip decreases rapidly on wet roads
when the tread depth is less than 3 mm.
Thus, you should replace tyres that have
insufficient tread.
R winter tyres should be replaced when the
tread depth is 4 mm or less as they will
no longer provide adequate grip.
R the tread on a tyre may not wear evenly.
Thus, you should regularly check the
tread depth and the condition of the
tread across the entire width of all tyres.
If necessary, turn the steering wheel so
that you can see the tyre tread more eas-
ily.
Otherwise, you could lose control of the
vehicle and cause an accident due to the
reduced grip of the tyres on the road. Tyre pressures
i You will find a table of tyre pressures for
various operating conditions on the inside
of your vehicle's fuel filler flap.
The valid value for the spare wheel* is sta-
ted on the spare wheel and in the technical
data section. G
Risk of accident
Tyre pressure that is either too high or too
low has a negative effect on the vehicle’s
driving safety, which could lead you to
cause an accident. Therefore, you should
regularly check the pressure of all the tyres
(including the spare tyre*), particularly
prior to long trips, and correct the pressure
as necessary.
To test tyre pressure, use a suitable pressure
gauge. The outer appearance of a tyre does
not permit any reliable conclusion about the
tyre pressure. G
Risk of accident
Should the tyre pressure drop repeatedly:
24 Only for certain countries. Operation
* optional
245_AKB; 2; 7, en-GB
wdomann,
Version: 2.11.4 2008-10-17T11:22:31+02:00 - Seite 178Dateiname: 6515_1640_02_buchblock.pdf; preflight
Page 185 of 305
Winter driving
182
in the driver's field of vision. This can be
obtained at a qualified specialist workshop,
e.g. from a Mercedes-Benz Service Centre.
Under these circumstances, you should also
restrict the maximum speed of the vehicle
using permanent Speedtronic* 25
to the max-
imum permissible speed for the winter tyres
(Y page 119).
Once you have fitted the winter tyres:
X Check the tyre pressures (Y page 178).G
Risk of accident
If you fit the spare wheel* when driving with
winter tyres, bear in mind that driving sta-
bility will be impaired owing to unstable
cornering characteristics caused by the dif-
ferent tyres. You should therefore adapt
your driving style and drive carefully.
Have the spare wheel* replaced at the
nearest qualified specialist workshop
which has the necessary specialist knowl-
edge and tools to carry out the work
required. Mercedes-Benz recommends
that you use a Mercedes-Benz Service
Centre for this purpose. In particular, work
relevant to safety or on safety-related sys- tems must be carried out at a qualified spe-
cialist workshop.
Snow chains
For safety reasons, Mercedes-Benz recom-
mends that you only use snow chains which
have been specially approved for your vehicle
by Mercedes-Benz, or are of a corresponding
standard of quality.
! Information about the use of snow chain-
compatible AMG winter tyres is applicable
for AMG tyres. Use of snow chains is only
permissible with these tyres.
If you intend to fit snow chains, please bear
the following points in mind:
R snow chains cannot be fitted to all wheel/
tyre combinations.
R snow chains must not be fitted to emer-
gency spare wheels, e.g. on a "Minispare"
emergency spare wheel.
R Fit snow chains only in pairs and only to the
front wheels. Comply with the manufactur-
er's installation instructions.
! Vehicles with 17" tyres You may only fit snow chains as a pulling-
away aid. Only use fine-link snow chains.
When snow chains are fitted, you may only
drive straight ahead. The snow chains could
otherwise come into contact with the body-
work when you turn the front wheels.
When snow chains are fitted, you cannot use
Active Park Assist* (Y page 122).
Do not exceed the maximum permissible
speed of 50 km/h. Winter driving
G
Risk of accident
Do not shift down for additional engine
braking on a slippery road surface. This
could cause the drive wheels to lose their
grip and the vehicle could skid.
You should drive particularly carefully on slip-
pery road surfaces. Avoid sudden accelera-
tion, steering and braking manoeuvres.
If the vehicle threatens to skid or cannot be
stopped when moving at low speed:
25 Only available for certain countries. Operation
* optional
245_AKB; 2; 7, en-GB
wdomann,
Version: 2.11.4 2008-10-17T11:22:31+02:00 - Seite 182Dateiname: 6515_1640_02_buchblock.pdf; preflight
Page 205 of 305
Display
messages 202 Spare
wheel*/"Minispare" emer-
gency spare wheel*
X Open the luggage compartment floor
(Y page 153).
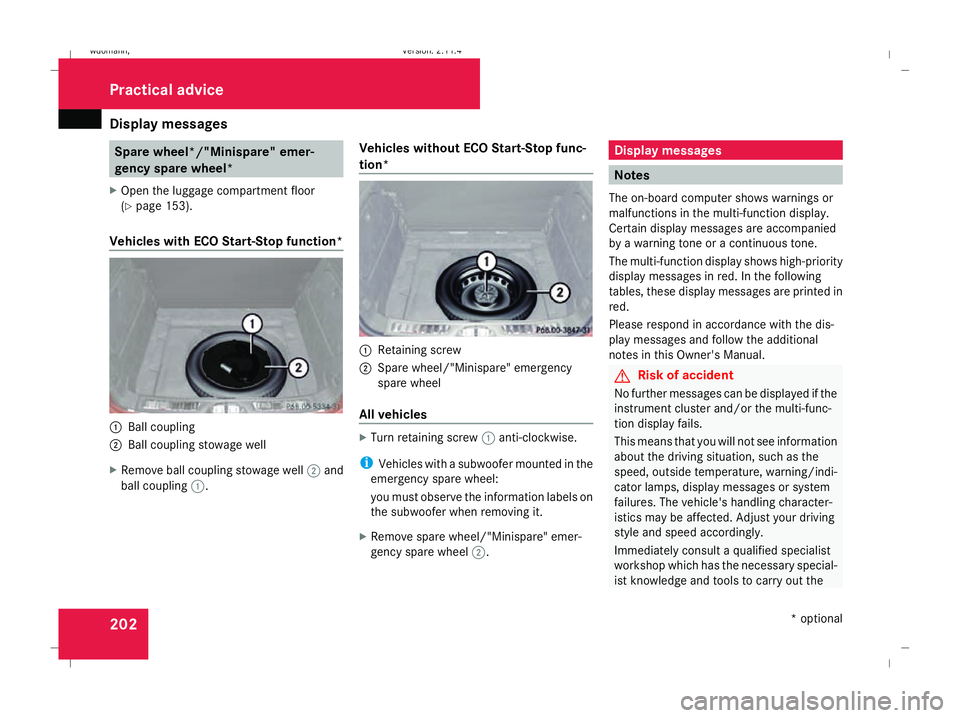
Vehicles with ECO Start-Stop function* 1
Ball coupling
2 Ball coupling stowage well
X Remove ball coupling stowage well 2and
ball coupling 1. Vehicles without ECO Start-Stop func-
tion* 1
Retaining screw
2 Spare wheel/"Minispare" emergency
spare wheel
All vehicles X
Turn retaining screw 1anti-clockwise.
i Vehicles with a subwoofer mounted in the
emergency spare wheel:
you must observe the information labels on
the subwoofer when removing it.
X Remove spare wheel/"Minispare" emer-
gency spare wheel 2. Display messages
Notes
The on-board computer shows warnings or
malfunctions in the multi-function display.
Certain display messages are accompanied
by a warning tone or a continuous tone.
The multi-function display shows high-priority
display messages in red. In the following
tables, these display messages are printed in
red.
Please respond in accordance with the dis-
play messages and follow the additional
notes in this Owner's Manual. G
Risk of accident
No further messages can be displayed if the
instrument cluster and/or the multi-func-
tion display fails.
This means that you will not see information
about the driving situation, such as the
speed, outside temperature, warning/indi-
cator lamps, display messages or system
failures. The vehicle's handling character-
istics may be affected. Adjust your driving
style and speed accordingly.
Immediately consult a qualified specialist
workshop which has the necessary special-
ist knowledge and tools to carry out the Practical advice
* optional
245_AKB; 2; 7, en-GB
wdomann,
Version: 2.11.4 2008-10-17T11:22:31+02:00 - Seite 202Dateiname: 6515_1640_02_buchblock.pdf; preflight
Page 255 of 305
Flat tyre
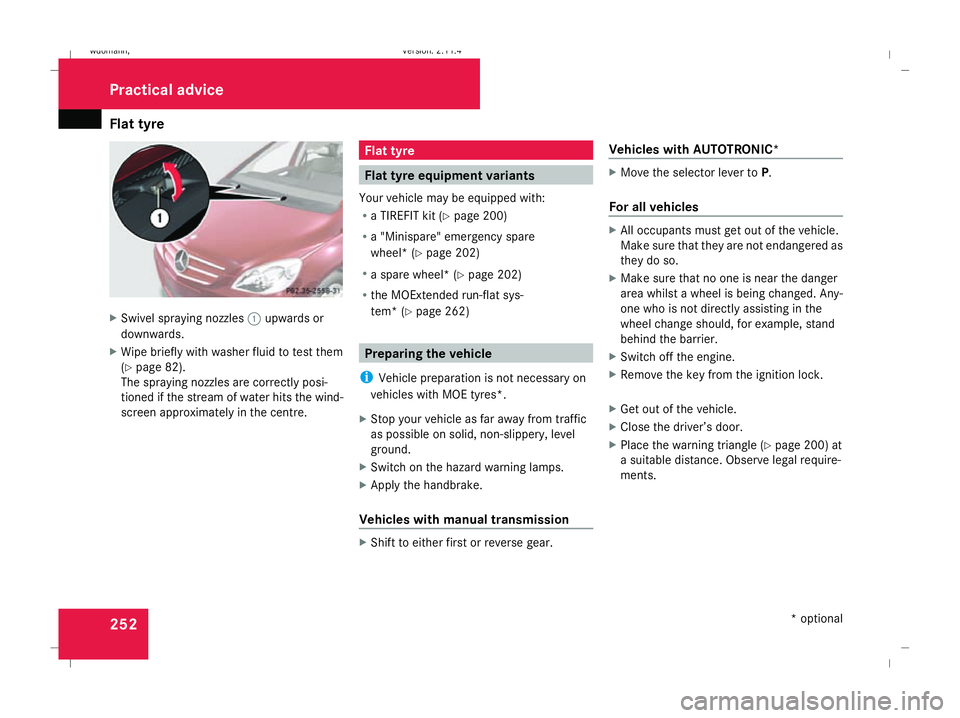
252X
Swivel spraying nozzles 1upwards or
downwards.
X Wipe briefly with washer fluid to test them
(Y page 82).
The spraying nozzles are correctly posi-
tioned if the stream of water hits the wind-
screen approximately in the centre. Flat tyre
Flat tyre equipment variants
Your vehicle may be equipped with:
R a TIREFIT kit (Y page 200)
R a "Minispare" emergency spare
wheel* (Y page 202)
R a spare wheel* (Y page 202)
R the MOExtended run-flat sys-
tem* (Y page 262) Preparing the vehicle
i Vehicle preparation is not necessary on
vehicles with MOE tyres*.
X Stop your vehicle as far away from traffic
as possible on solid, non-slippery, level
ground.
X Switch on the hazard warning lamps.
X Apply the handbrake.
Vehicles with manual transmission X
Shift to either first or reverse gear. Vehicles with AUTOTRONIC* X
Move the selector lever to P.
For all vehicles X
All occupants must get out of the vehicle.
Make sure that they are not endangered as
they do so.
X Make sure that no one is near the danger
area whilst a wheel is being changed. Any-
one who is not directly assisting in the
wheel change should, for example, stand
behind the barrier.
X Switch off the engine.
X Remove the key from the ignition lock.
X Get out of the vehicle.
X Close the driver’s door.
X Place the warning triangle ( Ypage 200) at
a suitable distance. Observe legal require-
ments. Practical advice
* optional
245_AKB; 2; 7, en-GB
wdomann
, Version: 2.11.4
2008-10-17T11:22:31+02:00 - Seite 252 Dateiname: 6515_1640_02_buchblock.pdf; preflight