tire type MERCEDES-BENZ B-CLASS HATCHBACK 2008 Owners Manual
[x] Cancel search | Manufacturer: MERCEDES-BENZ, Model Year: 2008, Model line: B-CLASS HATCHBACK, Model: MERCEDES-BENZ B-CLASS HATCHBACK 2008Pages: 305, PDF Size: 5.1 MB
Page 198 of 305

Care
195
Otherwise, you could scratch or damage
the surface of the lenses.
Cleaning the plastic trim !
Do not use dry, coarse or hard cloths and
do not scrub. Doing so will scratch or dam-
age the surfaces.
! Ensure that cosmetics and suntan lotion
do not come into contact with the vehicle's
trim. This will protect the vehicle's high-
quality trim and help retain its overall
appearance.
X Wipe plastic parts with a damp, lint-free
cloth (e.g. a microfibre cloth).
X Light soiling: use a low-foaming soap (e.g.
a light liquid hand soap) diluted in water.
X Heavy soiling: use a cleaning agent that is
solvent-free and non-corrosive. Mercedes-
Benz recommends that you use a
Mercedes-Benz cleaning product for this
purpose. Cleaning the steering wheel boss and
dashboard X
Moisten a clean lint-free cloth with water.
X Clean the plastic parts and the dashboard.
X If particularly dirty, use a mild detergent. G
Risk of injury
Do not use cleaners and cockpit care
sprays containing solvents to clean the
cockpit and steering wheel boss. Cleaners
containing solvents cause the surface to
become porous and in the event of an air-
bag being triggered, plastic parts that have
become loose could cause considerable
injuries.
Cleaning the leather upholstery* !
Cleaning
R Clean genuine leather covers using a
damp cloth, then wipe the covers down
using a dry cloth. Make sure that the
leather does not become soaked. For
leather care, use leather care foam A 001
986 59 71 10. You can purchase this
from any Mercedes-Benz Service Centre.
R Clean artificial leather covers with a cloth
moistened with a solution containing 1%
detergent (e. g. washing-up liquid). R
Clean fabric covers with a microfibre
cloth moistened with a solution contain-
ing 1% detergent (e. g. washing-up liquid).
When cleaning, take care not to rub too
vigorously and always wipe entire seat
sections to avoid leaving visible lines.
Leave the seat to dry afterwards. Clean-
ing results depend on the type of dirt and
how long it has been there.
R Clean Alcantara covers with a damp
cloth. Make sure you wipe entire seat
sections to avoid leaving visible lines.
i Note that leather covers are a natural
product and as such are subject to a natural
ageing process and may react differently
(e.g. increased wrinkling) to certain envi-
ronmental influences (such as high humid-
ity, intense heat).
Note that regular care is essential to ensure
that the quality (both appearance and com-
fort) of the covers is retained over time.
Cleaning the padded table* The plastic parts of the padded table can be
cleaned using a detergent solution.
The fabric cover can be cleaned using a deter-
gent solution or an upholstery cleaner. Operation
* optional
245_AKB; 2; 7, en-GB
wdomann
,V ersion: 2.11.4
2008-10-17T11:22:31+02:00 - Seite 195 ZDateiname: 6515_1640_02_buchblock.pdf; preflight
Page 257 of 305

Flat tyre
254
i
Your vehicle may be equipped with one of
two different air pumps. Version 1 can be
identified by the flap, behind which the
hose with the pressure gauge and cable are
located; version 2 has a pressure gauge
integrated in the electric air pump.
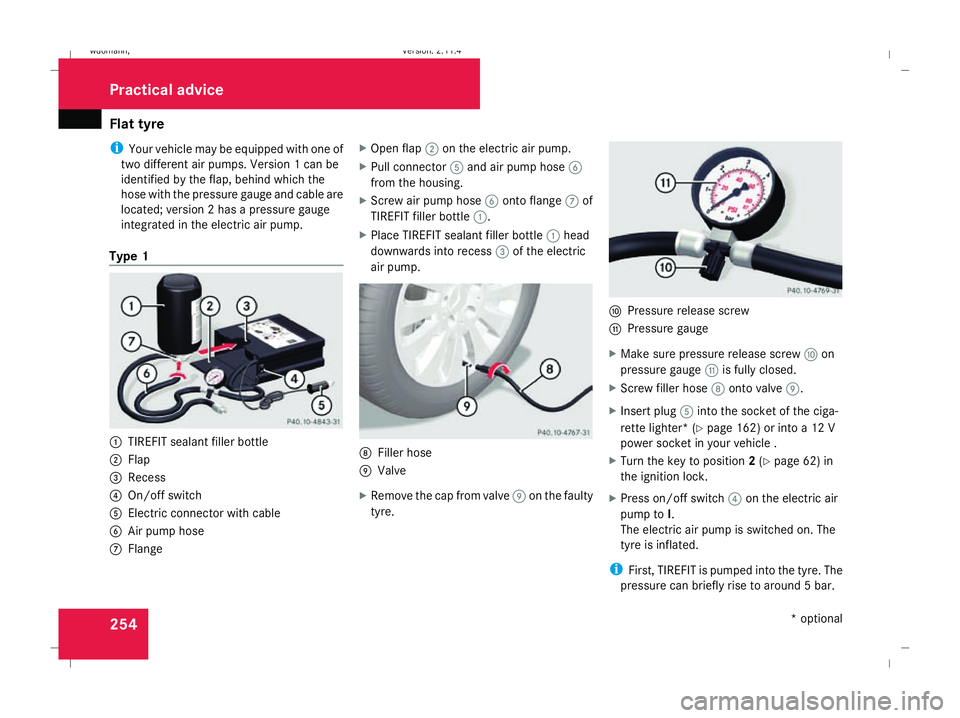
Type 1 1
TIREFIT sealant filler bottle
2 Flap
3 Recess
4 On/off switch
5 Electric connector with cable
6 Air pump hose
7 Flange X
Open flap 2on the electric air pump.
X Pull connector 5and air pump hose 6
from the housing.
X Screw air pump hose 6onto flange 7of
TIREFIT filler bottle 1.
X Place TIREFIT sealant filler bottle 1head
downwards into recess 3of the electric
air pump. 8
Filler hose
9 Valve
X Remove the cap from valve 9on the faulty
tyre. a
Pressure release screw
b Pressure gauge
X Make sure pressure release screw aon
pressure gauge bis fully closed.
X Screw filler hose 8onto valve 9.
X Insert plug 5into the socket of the ciga-
rette lighter* (Y page 162) or into a 12 V
power socket in your vehicle .
X Turn the key to position 2(Y page 62) in
the ignition lock.
X Press on/off switch 4on the electric air
pump to I.
The electric air pump is switched on. The
tyre is inflated.
i First, TIREFIT is pumped into the tyre. The
pressure can briefly rise to around 5 bar. Practical advice
* optional
245_AKB; 2; 7, en-GB
wdomann
,V ersion: 2.11.4
2008-10-17T11:22:31+02:00 - Seite 254 Dateiname: 6515_1640_02_buchblock.pdf; preflight
Page 259 of 305

Flat tyre
256 H
Environmental note
Have the used TIREFIT kit disposed of pro-
fessionally, e.g. at a Mercedes-Benz
Service Centre.
X Have the TIREFIT kit replaced every four
years at a qualified specialist workshop,
e.g. a Mercedes-Benz Service Centre.
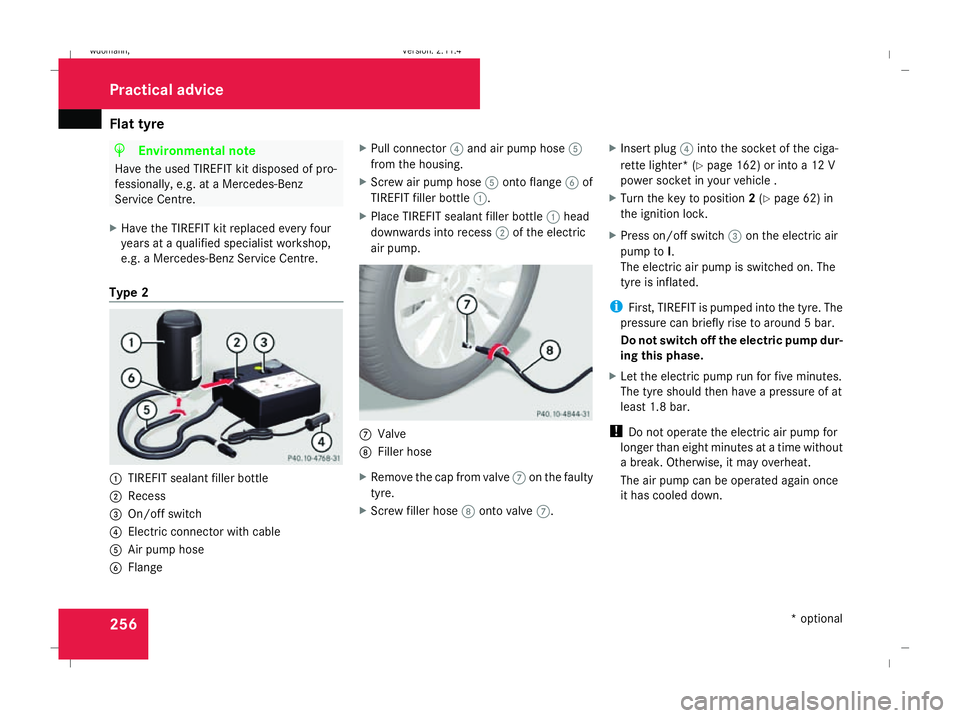
Type 2 1
TIREFIT sealant filler bottle
2 Recess
3 On/off switch
4 Electric connector with cable
5 Air pump hose
6 Flange X
Pull connector 4and air pump hose 5
from the housing.
X Screw air pump hose 5onto flange 6of
TIREFIT filler bottle 1.
X Place TIREFIT sealant filler bottle 1head
downwards into recess 2of the electric
air pump. 7
Valve
8 Filler hose
X Remove the cap from valve 7on the faulty
tyre.
X Screw filler hose 8onto valve 7. X
Insert plug 4into the socket of the ciga-
rette lighter* (Y page 162) or into a 12 V
power socket in your vehicle .
X Turn the key to position 2(Y page 62) in
the ignition lock.
X Press on/off switch 3on the electric air
pump to I.
The electric air pump is switched on. The
tyre is inflated.
i First, TIREFIT is pumped into the tyre. The
pressure can briefly rise to around 5 bar.
Do not switch off the electric pump dur-
ing this phase.
X Let the electric pump run for five minutes.
The tyre should then have a pressure of at
least 1.8 bar.
! Do not operate the electric air pump for
longer than eight minutes at a time without
a break. Otherwise, it may overheat.
The air pump can be operated again once
it has cooled down. Practical advice
* optional
245_AKB; 2; 7, en-GB
wdomann
,V ersion: 2.11.4
2008-10-17T11:22:31+02:00 - Seite 256 Dateiname: 6515_1640_02_buchblock.pdf; preflight