instrument cluster MERCEDES-BENZ B-CLASS HATCHBACK 2011 User Guide
[x] Cancel search | Manufacturer: MERCEDES-BENZ, Model Year: 2011, Model line: B-CLASS HATCHBACK, Model: MERCEDES-BENZ B-CLASS HATCHBACK 2011Pages: 329, PDF Size: 7.91 MB
Page 66 of 329
ABS (Anti-lock Braking System)
Important safety notes G
WARNING
If AB Sis faulty, the wheels could lock when
braking. This limits the steerability of the vehi-
cle when braking and the braking distance
may increase.
If ABS is deactivated due to a malfunction,
then BAS and ESP are also deactivated. There
is an increased risk of your vehicle skidding in
certain situations.
You should always adapty our driving style to
suit the prevailing road and weather condi-
tions.
ABS regulates brake pressure in such a way
that the wheels do not lock when you brake.
This allows you to continue steering the vehi-
cle when braking.
ABS works from a speed of about 8 km/h
upwards, regardless of road-surface condi-
tions. ABS works on slippery surfaces, even
when you only brake gently.
The yellow !ABS warning lamp in the
instrument cluster lights up when the ignition
is switched on. It goes out when the engine is
running.
i Observe the "Important safety notes" sec-
tion (Y page 62).
Brakes G
WARNING
Do not depress the brake pedal several times
in quick succession (pumping). Pumping the
brake pedal reduces the braking effect .You
might otherwise not be able to stop the vehi-
cle in time and could cause an accident.
Depress the brake pedal firmly and smoothly.
X If ABS intervenes: continue to depress the
brake pedal with force until the braking sit-
uation is over.
X To make a full brake application:
depress the brake pedal with full force. If ABS intervenes when braking, you will feel
a pulsing in the brake pedal.
The pulsating brake pedal can be an indica-
tion of hazardous road conditions and func-
tions as a reminder to take extra care while
driving.
BAS (Brake Assist)
G
WARNING
If BAS has malfunctioned, the braking system
remains available with full brake boosting
effect. However, braking force is not auto-
matically increased in emergency braking sit-
uations and the stopping distance may
increase.
X Keep the brake pedal firmly depressed until
the emergency braking situation is over.
ABS prevents the wheels from locking.
BAS operates in emergency braking situa-
tions. If you depress the brake pedal quickly,
BAS automatically boosts the braking force,
thus shortening the stopping distance.
The brakes will function as usual once you
release the brake pedal. BAS is deactivated.
i Observe the "Important safety notes" sec-
tion (Y page 62). COLLISION PREVENTION ASSIST
General notes COLLISION PREVENTION ASSIST consists of
the BAS PLUS system and the distance warn-
ing signal, which are described in the follow-
ing.
Distance warning
G
WARNING
The distance warning signal cannot always
clearly identify objects and complex traffic
situations. Driving safety systems
63Safety
Z
Page 67 of 329

In such cases, the distance warning signal
may:
R
give an unnecessary warning
R not give a warning
There is a risk of an accident. Always pay par-
ticula rattention to the traffi csituation and be
ready to brake, especially if the distance
warning signal alerts you. G
WARNING
The distance warning signal does not react:
R to people or animals
R to oncoming vehicles
R to crossing traffic
R when cornering
Thus, the distance warning signal cannot pro-
vide a warning in all critical situations .There
is a risk of an accident. Always pay careful
attention to the traffic situation and be ready
to brake.
X To activate/deactivate: activate or deac-
tivate the distance warning signal in the on-
board computer (Y page 199).
When the distance warning signal is activa-
ted, the multifunction display shows the
Ä symbol as long as the HOLD function is
not activated (Y page 162). On vehicles with
Active Parking Assist, the Äsymbol is dis-
played when position Pis engaged or you are
driving faster than 35 km/h.
The distance warning signal can help you to
minimise the risk of a front-end collision with
a vehicle ahead or reduce the effects of such
a collision. If the distance warning signal
detects that there is a risk of a collision, you
will be warned visually and acoustically .The
distance warning signal cannot prevent a col-
lision without your intervention.
The distance warning signal will issue a warn-
ing at speeds of around 30 km/h or more if:
R the distance to the vehicle in front is too
short for the speed you are driving at for
several seconds. The ·distance warn- ing lamp then lights up in the instrument
cluster.
R you are rapidly approaching the vehicle in
front. An intermittent warning tone will
then sound and the ·distance warning
lamp will light up in the instrumentc luster.
X Brake immediately in order to increase the
distance from the vehicle in front.
or
X Take evasive action provided it is safe to do
so.
For the distance warnin gsignal to assist you
when driving, the function must be activated
in the on-board computer (Y page 199) and
be operational.
Due to the nature of the system, particularly
complicated driving conditions may cause the
system to display an unnecessary warning.
With the help of the radar sensor system, the
distance warning signal can detect obstacles
that are in the path of your vehicle for an
extended period of time.
At speeds up to approximately 70 km/h, the
distance warning signal may also detect sta-
tionary obstacles, for example, stopped or
parked vehicles.
If you approach an obstacle and the distance
warning signal detects a risk of a collision, the
system will initially alert you both visually and
acoustically.
In particular, the detection of obstacles can
be impaired if there is:
R dirt on the sensors or anything else cover-
ing the sensors
R snow or heavy rain
R interference by other radar sources
R the possibility of strong radar reflections,
for example, in multi-storey car parks
R a narrow vehicle travelling in front, e.g. a
motorbike
R a vehicle travelling in front on a different
line
Following damage to the front end of the vehi-
cle, have the configuration and operation of 64
Driving safety systemsSafety
Page 69 of 329
Adaptive brake lamps
If you brake sharply from a speed of more
than 50 km/h or if braking is assisted by BAS
or BA SPLUS, the brake lamps flash rapidly.
In this way, traffic travelling behind you is
warned in an even more noticeable manner.
If you brake sharply from a speed of more
than 70 km/h to a standstill, the hazard warn-
ing lamps are activated automatically. If the
brakes are applied again, the brake lamps
lightu p continuously. The hazard warning
lamps switch off automatically if you travel
faster than 10 km/ h.You can also switch off
the hazard warning lamps using the hazard
warning switch button (Y page 99).
i Adaptive brake lamps are only available in
certain countries. ESP
®
(Electronic Stability Program)
Important safety notes G
WARNING
If the ÷ warning lamp in the instrument
cluster flashes, proceed as follows:
R do not deactivate ESP ®
under any circum-
stances.
R only depress the accelerator pedal as far as
necessary when pulling away.
R adapt your driving style to suit the prevail-
ing road and weathe rconditions.
Otherwise, the vehicle could go into a skid.
ESP ®
cannot reduce the risk of an accident if
you drive too fast. ESP ®
cannot override the
laws of physics.
! Switch the ignition off when:
R the electric parking brake is being tested
using a brake dynamometer.
R the vehicle is being towed with the front/
rear axle raised.
Application of the brakes by ESP ®
may oth-
erwise destroy the brake system. If ESP
®
detects that the vehicle is deviating
from the direction desired by the driver, one
or more wheels are braked to stabilise the
vehicle. If necessary, the engine output is also
modified to keep the vehicle on the desired
course within physical limits. ESP ®
assists
the driver when pulling away on wet or slip-
pery roads. ESP ®
can also stabilise the vehi-
cle during braking.
If ESP ®
intervenes, the ÷ESP®
warning
lamp flashes in the instrument cluster.
i Observe the "Important safety notes" sec-
tion (Y page 62).
i Only use wheels with the recommended
tyre sizes. Only then will ESP ®
function
properly.
Traction control Traction control is part of ESP
®
.
Traction control brakes the drive wheels indi-
vidually if they spin. This enables you to pull
away and accelerate on slippery surfaces, for
example if the road surface is slippery on one
side.
Traction control remains active if you deacti-
vate ESP ®
.
i Observe the "Important safety notes" sec-
tion (Y page 62).
Deactivating/activating ESP ® G
WARNING
ESP ®
is deactivated if the åwarning lamp
in the instrument cluster lights up continu-
ously when the engine is running.
If the ÷ warning lamp and åwarning
lamp are lit continuously, ESP ®
is not availa-
ble due to a malfunction.
There is an increased risk of your vehicle skid-
ding in certain situations.
You should always adapt your driving style to
suit the prevailing road and weather condi-
tions. 66
Driving safety systemsSafety
Page 70 of 329
ESP
®
is activated automaticall ywhen the
engine is started.
If ESP ®
is deactivated and one or more wheels
start to spin, the ÷ESP®
warning lamp in
the instrumentc luster flashes.Insuch situa-
tions, ESP ®
will no tstabilise the vehicle.
X To deactivate:( Ypage 198).
The å ESP®
OFF warning lamp in the
instrument cluste rlights up.
X To activate:(Y page 198).
The å ESP®
OFF warning lamp in the
instrumen tcluster goes out.
It may be best to deactivate ESP ®
in the fol-
lowing situations:
R when using snow chains
R in deep snow
R on sand or gravel G
WARNING
Activate ESP ®
as soon as the situations
described above no longer apply. ESP ®
will
otherwise not be able to stabilise the vehicle
if the vehicle starts to skid or a wheel starts
to spin.
If you deactivate ESP ®
:
R ESP ®
no longer improves driving stability.
R the engine's torque is no longer limited, and
the drive wheels can spin .The spinning of
the wheels results in a cutting action, which
provides better grip.
R traction control is still activated.
R ESP ®
still provides support when you
brake.
i Vehicles with ECO start/stop function:
the ECO start/stop function switches the
engine off automatically when the vehicle
comes to a stop. When pulling away again,
the engine starts automatically .ESP ®
remains in its previously selected status.
Example: if ESP ®
was deactivated before
the engine was switched off, ESP ®
remains deactivated when the engine is switched on
again.
i Observe the "Important safety notes" sec-
tion (Y page 62).
ESP ®
trailer stabilisation G
WARNING
If road and weather conditions are poor,
traile rstabilisation will not be able to prevent
the trailer fro mswerving and will thus be
unable to reduce the risk of an accident. Trail-
ers with a high centre of gravity can tip over
before ESP ®
can detect this.
If your vehicle/trailer combination begins to
lurch, you can only stabilise the vehicle/
trailer combination by depressing the brake
firmly.
In this situation, ESP ®
assists you and can
detect if the vehicle/trailer combination
begins to lurch. ESP ®
slows the vehicle down
by braking and limiting the engine output until
the vehicle/trailer combination has stabi-
lised.
Trailer stabilisation is active above speeds of
about 65 km/h.
Trailer stabilisation does not work if ESP ®
is
deactivated or disabled because of a mal-
function. EBD (electronic brake force distribu-
tion)
G
WARNING
If EB Dhas malfunctioned, the braking system
remains available with full brake boosting
effect .However, the rear wheels can still lock,
e.g. under full braking. This could cause you
to lose control of your vehicle and cause an
accident .You should therefore adapt your
driving style to the different handling charac-
teristics. Driving safety systems
67Safety Z
Page 100 of 329
The exterior lighting (except the side lamps/
parking lamps) switches off automatically if
you:
R remove the key from the ignition lock
R open the driver's door with the key in posi-
tion 0
If you hear a warning tone when you leave the
vehicle, the lights may still be switched on.
X Turn the light switch to Ã.
Dipped-beam headlamps X
To switch on the dipped-beam head-
lamps: turn the key in the ignition lock to
position 2or start the engine.
X Turn the light switch to L.
The L indicator lamp in the instrument
cluster lights up.
Daytime driving lights You can activate or deactivate the daytime
driving lights function using the on-board
computer (Y page 201).
X Daytime driving lights: activate the day-
time driving lights function using the on-
board computer.
X Turn the light switch to Ã.
When the engine is on: depending on the
ambient light conditions, the daytime driv-
ing lights or the parking and dipped-beam
headlamps are switched on.
When the dipped-beam headlamps are
switched on, the Lindicator lamp in the
instrument cluster lights up.
Automatic headlamp mode G
WARNING
If the light switch is set to Ã, the dipped-
beam headlamps will not come on automati-
cally if it is foggy. This could endanger you and
others. Therefore, turn the light switch to
L in fog. The automatic headlamp feature is only an
aid. The driver is responsible for the vehicle's
lighting at all times.
X To switch on automatic headlamp
mode: turn the light switch to Ã.
Key in position 1in the ignition lock: the
side lamps are switched on or off automat-
ically depending on the brightness of the
ambient light.
With the engine running: depending on the
brightness of the ambient light, the daytime
driving lights 5
or the dipped-beam head-
lamps are switched on or off automatically.
When the dipped-beam headlamps are
switched on, the Lindicator lamp in the
instrument cluster lights up.
Front foglamps and rear foglamp Foglamps
Only vehicles with frontf
oglamps have the
"Foglamps" function. G
WARNING
If you suspect that driving conditions will be
foggy, turn the light switch to Lbefore you
start your journey. Your vehicle may other-
wise not be visible and you could endanger
yourself and others.
X To switch on the foglamps: turn the key
in the ignition lock to position 2or start the
engine.
X Turn the light switch to T,Lor
Ã.
X Press the Nbutton.
The green Nindicator lamp in the instru-
ment cluster lights up.
X To switch off the front foglamps: press
the N button.
The green Nindicator lamp in the instru-
ment cluster goes out.
5 Only if daytime driving lights have been activated via the on-board computer. Exterior lighting
97Lights and windscreen wipers Z
Page 101 of 329
Rear foglamp
X To switch on the rear foglamp: turn the
key in the ignition lock to position 2or start
the engine.
X Turn the light switch to LorÃ.
X Press the Rbutton.
The yellow Rindicator lamp in the
instrument cluster lights up.
X To switch off the rear foglamp: press the
R button.
The yellow Rindicator lamp in the
instrument cluster goes out.
Vehicles with front foglamps: when the light
switch is in the Tposition, the rea rfog-
lamp can only be switched on if the foglamps
(without dipped-beam headlamps) are
switched on.
Adjusting the headlam prange (halogen
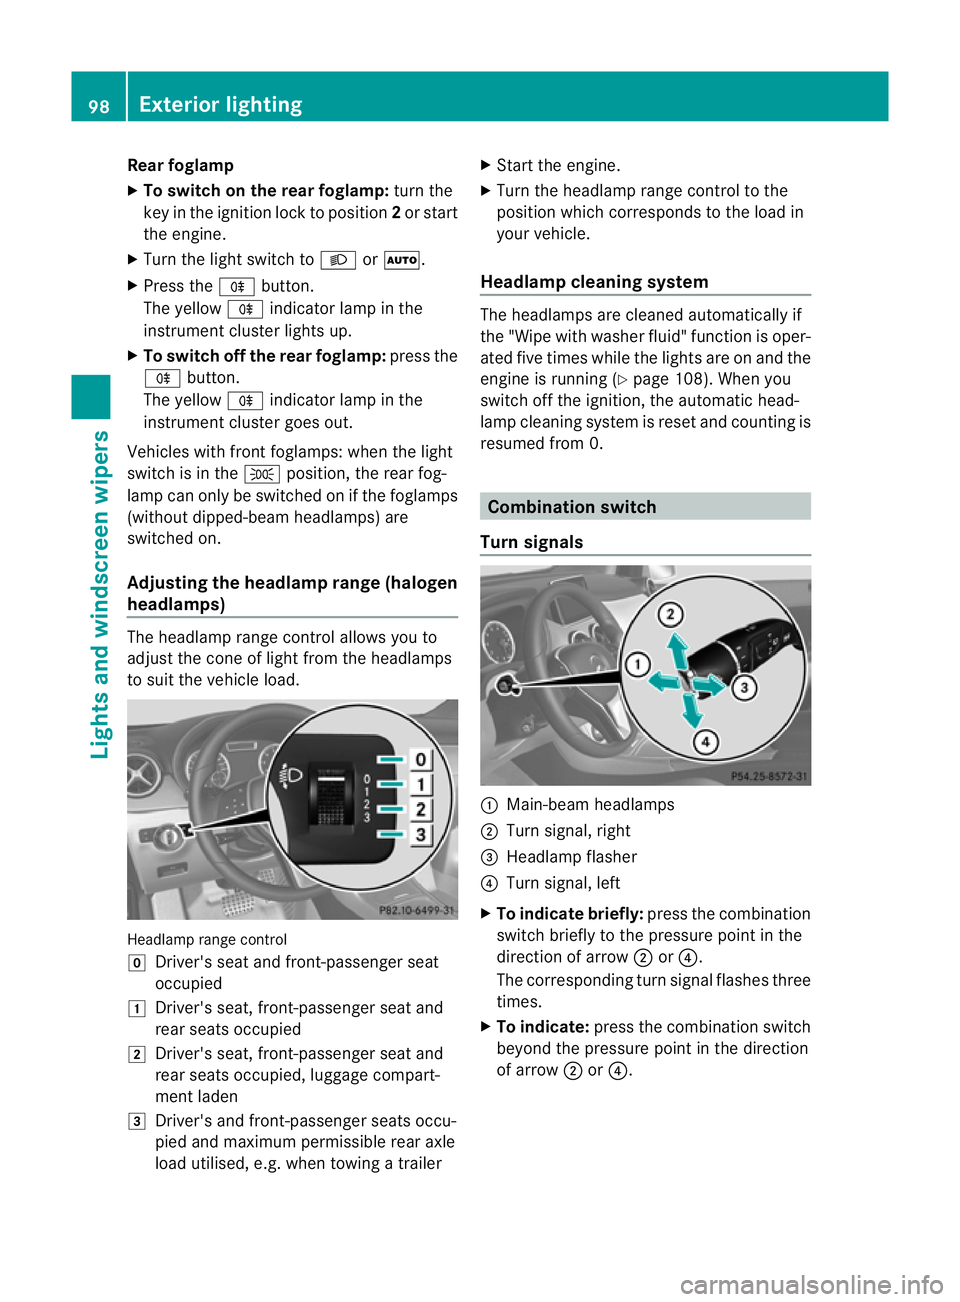
headlamps) The headlamp range control allows you to
adjust the cone of light from the headlamps
to sui tthe vehicle load. Headlamp range control
g
Driver's seat and front-passenger seat
occupied
1 Driver's seat, front-passenger seat and
rear seats occupied
2 Driver's seat, front-passenger seat and
rear seats occupied, luggage compart-
ment laden
3 Driver's and front-passenger seats occu-
pied and maximum permissible rear axle
load utilised, e.g. when towing a trailer X
Start the engine.
X Turn the headlamp range control to the
position which corresponds to the load in
your vehicle.
Headlampc leaning system The headlamps are cleaned automatically if
the "Wipe with washer fluid" function is oper-
ated five times while the lights are on and the
engine is running (Y
page 108). When you
switch off the ignition, the automatic head-
lamp cleaning syste mis reset and counting is
resumed from 0. Combination switch
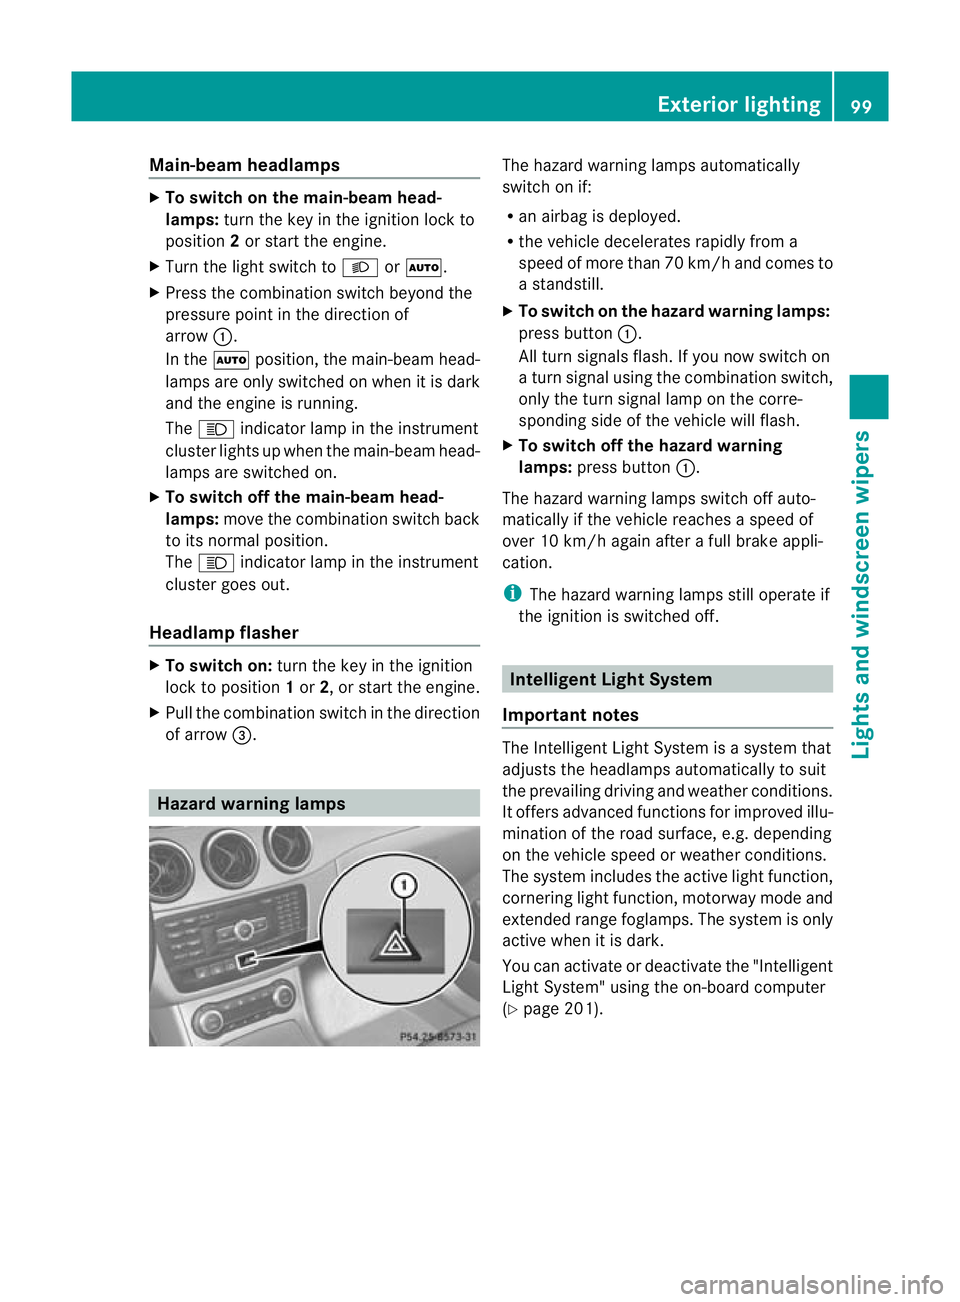
Turn signals :
Main-beam headlamps
; Turn signal, right
= Headlamp flasher
? Turn signal, left
X To indicate briefly: press the combination
switch briefly to the pressure point in the
direction of arrow ;or?.
The corresponding turn signal flashes three
times.
X To indicate: press the combination switch
beyond the pressure point in the direction
of arrow ;or?. 98
Exterior lightingLights and windscreen wipers
Page 102 of 329
Main-beam headlamps
X
To switch on the main-beam head-
lamps: turn the key in the ignition lock to
position 2or start the engine.
X Turn the light switch to LorÃ.
X Press the combination switch beyond the
pressure point in the direction of
arrow :.
In the Ãposition, the main-beam head-
lamps are only switched on when it is dark
and the engine is running.
The K indicator lamp in the instrument
cluster lights up when the main-beam head-
lamps are switched on.
X To switch off the main-beam head-
lamps: move the combination switch back
to its normal position.
The K indicator lamp in the instrument
cluster goes out.
Headlamp flasher X
To switch on: turn the key in the ignition
lock to position 1or 2, or start the engine.
X Pull the combination switch in the direction
of arrow =. Hazard warning lamps The hazard warning lamps automatically
switch on if:
R
an airbag is deployed.
R the vehicle decelerates rapidly from a
speed of more than 70 km/h and comes to
a standstill.
X To switch on the hazard warnin glamps:
press button :.
All turn signals flash. If you now switch on
a turn signal using the combination switch,
only the turn signal lamp on the corre-
sponding side of the vehicle will flash.
X To switch off the hazard warning
lamps: press button :.
The hazard warning lamps switch off auto-
matically if the vehicle reaches a speed of
over 10 km/h again after a full brake appli-
cation.
i The hazard warning lamps still operate if
the ignition is switched off. Intelligen
tLight System
Important notes The Intelligent Light System is a syste
mthat
adjusts the headlamps automatically to suit
the prevailing driving and weather conditions.
It offers advanced functions for improved illu-
mination of the road surface, e.g. depending
on the vehicle speed or weather conditions.
The system includes the active light function,
cornering light function, motorway mode and
extended range foglamps. The system is only
active when it is dark.
You can activate or deactivate the "Intelligent
Light System" using the on-board computer
(Y page 201). Exterior lighting
99Lights and windscreen wipers Z
Page 112 of 329
windscreen wiper blades or scratch the
windscreen.
For this reason, you should always switch
off the windscreen wipers in dry weather.
Vehicles with arain sensor: in theÄor
Å position, the appropriate wiping fre-
quency is automatically set according to the
intensity of the rain. In the Åposition, the
rai ns ensor is more sensitive than in
the Ä position, causing the windscreen
wipers to wipe more frequently. Switching the rear window wiper on/
off
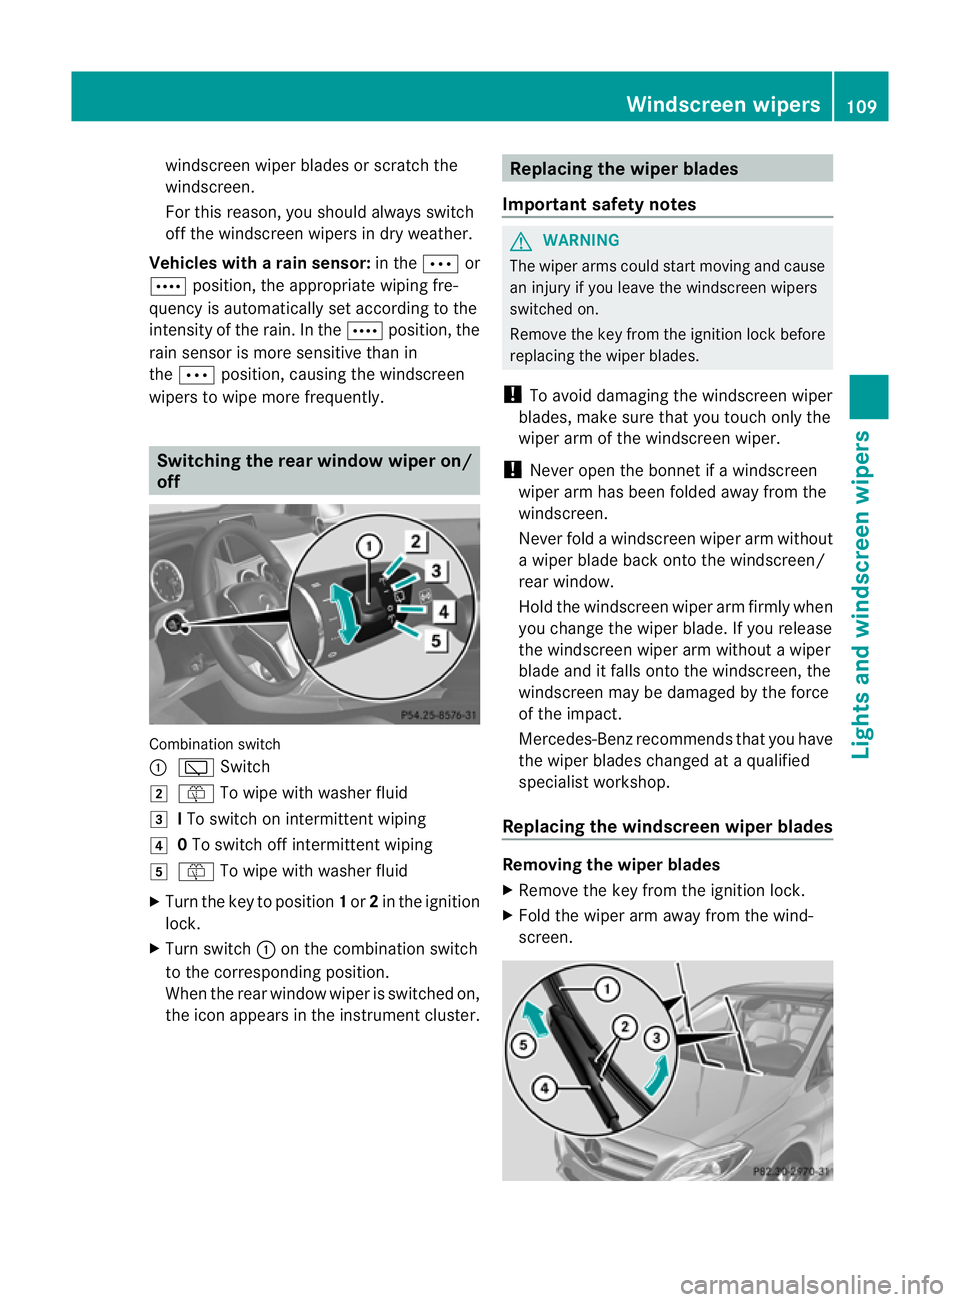
Combination switch
:
è Switch
2 ô To wipe with washer fluid
3 ITo switch on intermittent wiping
4 0To switch off intermittent wiping
5 ô To wipe with washer fluid
X Turn the key to position 1or 2in the ignition
lock.
X Turn switch :on the combination switch
to the corresponding position.
When the rear window wiper is switched on,
the icon appears in the instrument cluster. Replacing the wiper blades
Important safety notes G
WARNING
The wiper arms could start moving and cause
an injury if you leave the windscreen wipers
switched on.
Remove the key from the ignition lock before
replacing the wiper blades.
! To avoid damaging the windscreen wiper
blades, make sure that you touch only the
wiper arm of the windscreen wiper.
! Never open the bonnet if a windscreen
wiper arm has been folded away from the
windscreen.
Never fold a windscreen wiper arm without
a wiper blade back onto the windscreen/
rear window.
Hold the windscreen wiper arm firmly when
you change the wiper blade. If you release
the windscreen wiper arm without a wiper
blade and it falls onto the windscreen, the
windscreen may be damaged by the force
of the impact.
Mercedes-Benzr ecommends that you have
the wiper blades changed at aqualified
specialist workshop.
Replacing the windscreen wiper blades Removing the wiper blades
X
Remove the key from the ignition lock.
X Fold the wiper arm away from the wind-
screen. Windscreen wipers
109Lights and windscreen wipers Z
Page 145 of 329
Refuelling
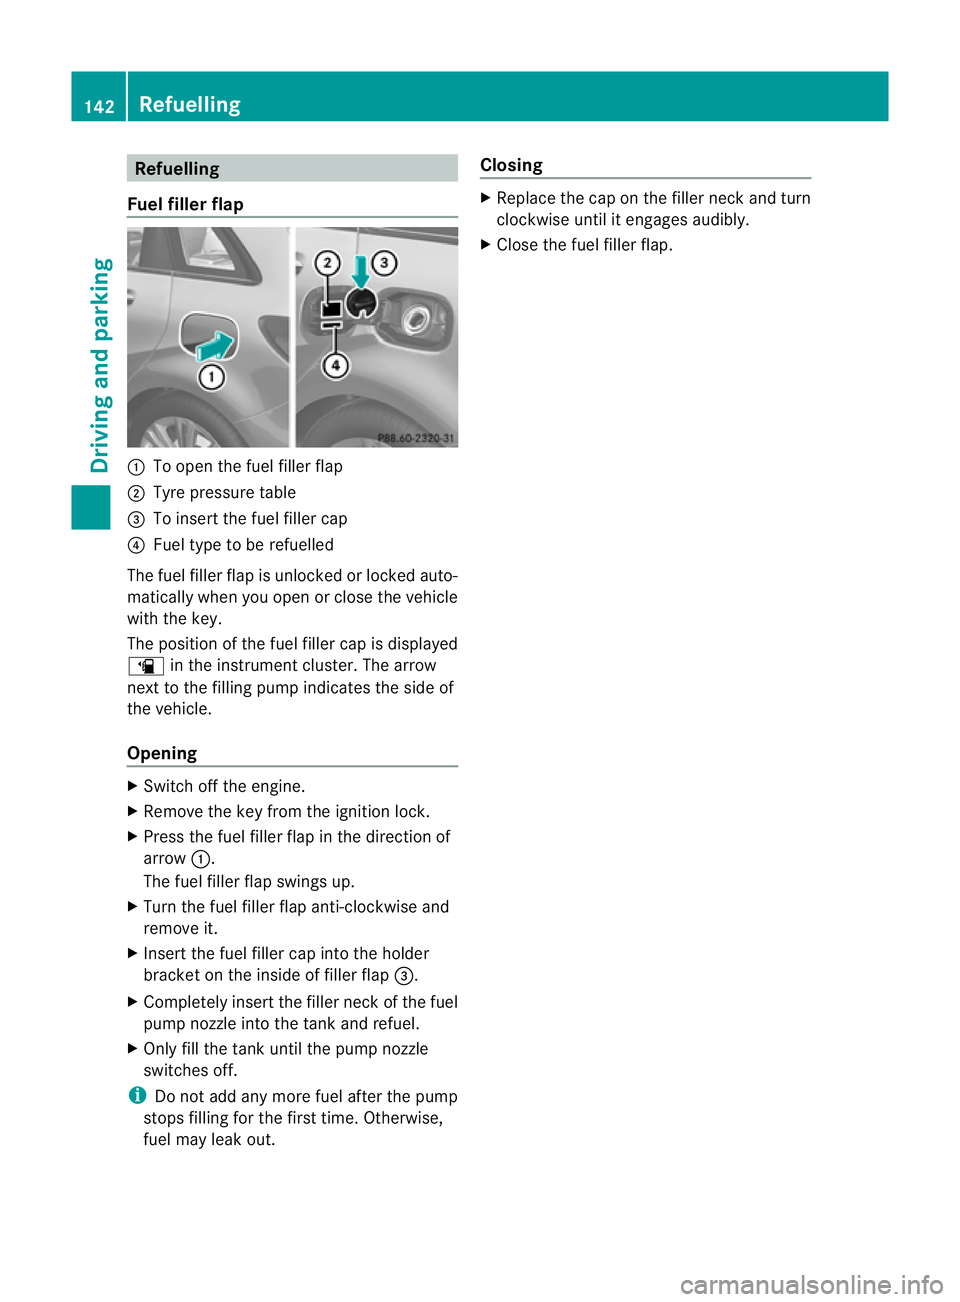
Fuel fille rflap :
To open the fuel filler flap
; Tyre pressure table
= To inser tthe fuel filler cap
? Fuel type to be refuelled
The fuel filler flap is unlocked or locked auto-
matically when you open or close the vehicle
with the key.
The position of the fuel filler cap is displayed
æ in the instrument cluster. The arrow
next to the filling pump indicates the side of
the vehicle.
Opening X
Switch off the engine.
X Remove the key from the ignition lock.
X Press the fuel filler flap in the direction of
arrow :.
The fuel filler flap swings up.
X Turn the fuel filler flap anti-clockwise and
remove it.
X Insert the fuel filler cap into the holder
bracket on the inside of filler flap =.
X Completely insert the filler neck of the fuel
pump nozzle into the tank and refuel.
X Only fill the tank until the pump nozzle
switches off.
i Do not add any more fuel after the pump
stops filling for the first time. Otherwise,
fuel may leak out. Closing X
Replace the cap on the filler neck and turn
clockwise until it engages audibly.
X Close the fuel filler flap. 142
RefuellingDriving and parking
Page 148 of 329
Vehicles with automatic transmission
X
Apply the electri cparking brake.
X Shift the transmission to position P.
X Turn the key to position 0in the ignition
lock and remove it.
The immobiliser is activated.
i If you switch the engine off with the trans-
mission in position Ror D, the automatic
transmission shifts to Nautomatically.
If you then open the driver's door or the
front-passenger door or remove the key
from the ignition, the automatic transmis-
sion shifts to P.
If you shift the automatic transmission to
N before switching off the engine, the auto-
matic transmission remains in Neven if a
door is opened. Electric parking brake
General notes i
The electric parking brake carries out a
function check at regular intervals when
the engine is switched off .Noises that
occur are normal.
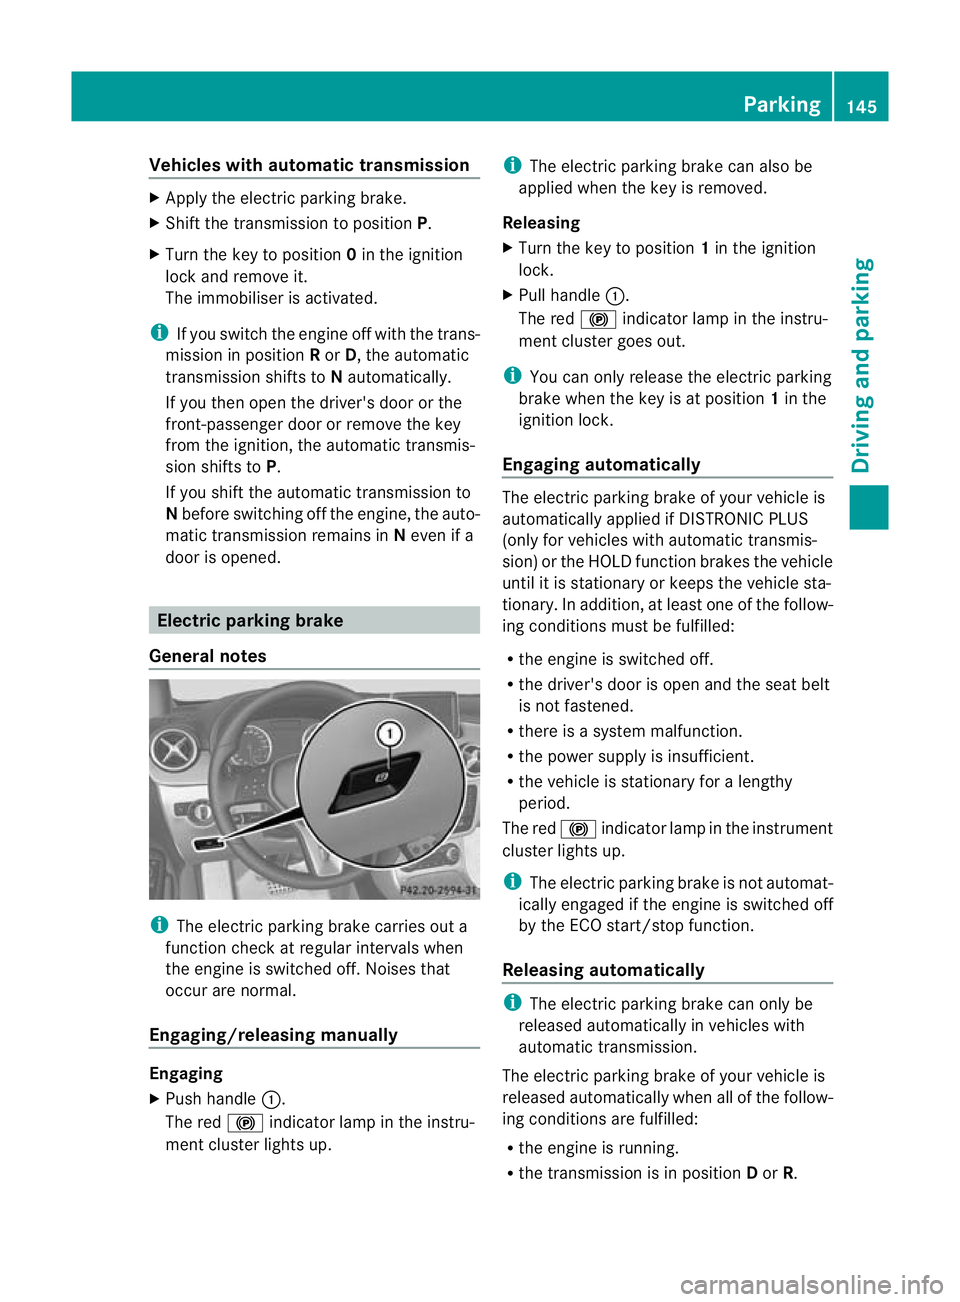
Engaging/releasing manually Engaging
X
Push handle :.
The red !indicator lamp in the instru-
ment cluster lights up. i
The electric parking brake can also be
applied when the key is removed.
Releasing
X Turn the key to position 1in the ignition
lock.
X Pull handle :.
The red !indicator lamp in the instru-
ment cluster goes out.
i You can only release the electric parking
brake when the key is at position 1in the
ignition lock.
Engaging automatically The electric parking brake of your vehicle is
automatically applied if DISTRONIC PLUS
(only for vehicles with automatic transmis-
sion) or the HOLD function brakes the vehicle
until it is stationary or keeps the vehicle sta-
tionary. In addition, at least one of the follow-
ing conditions must be fulfilled:
R
the engine is switched off.
R the driver's door is open and the seat belt
is not fastened.
R there is a system malfunction.
R the power supply is insufficient.
R the vehicle is stationary for a lengthy
period.
The red !indicator lamp in the instrument
cluster lights up.
i The electric parking brake is not automat-
ically engaged if the engine is switched off
by the ECO start/stop function.
Releasing automatically i
The electric parking brake can only be
released automatically in vehicles with
automatic transmission.
The electric parking brake of your vehicle is
released automatically when all of the follow-
ing conditions are fulfilled:
R the engine is running.
R the transmission is in position Dor R. Parking
145Driving and parking Z