clock MERCEDES-BENZ B-CLASS HATCHBACK 2011 Owners Manual
[x] Cancel search | Manufacturer: MERCEDES-BENZ, Model Year: 2011, Model line: B-CLASS HATCHBACK, Model: MERCEDES-BENZ B-CLASS HATCHBACK 2011Pages: 329, PDF Size: 7.91 MB
Page 31 of 329
Instrumen
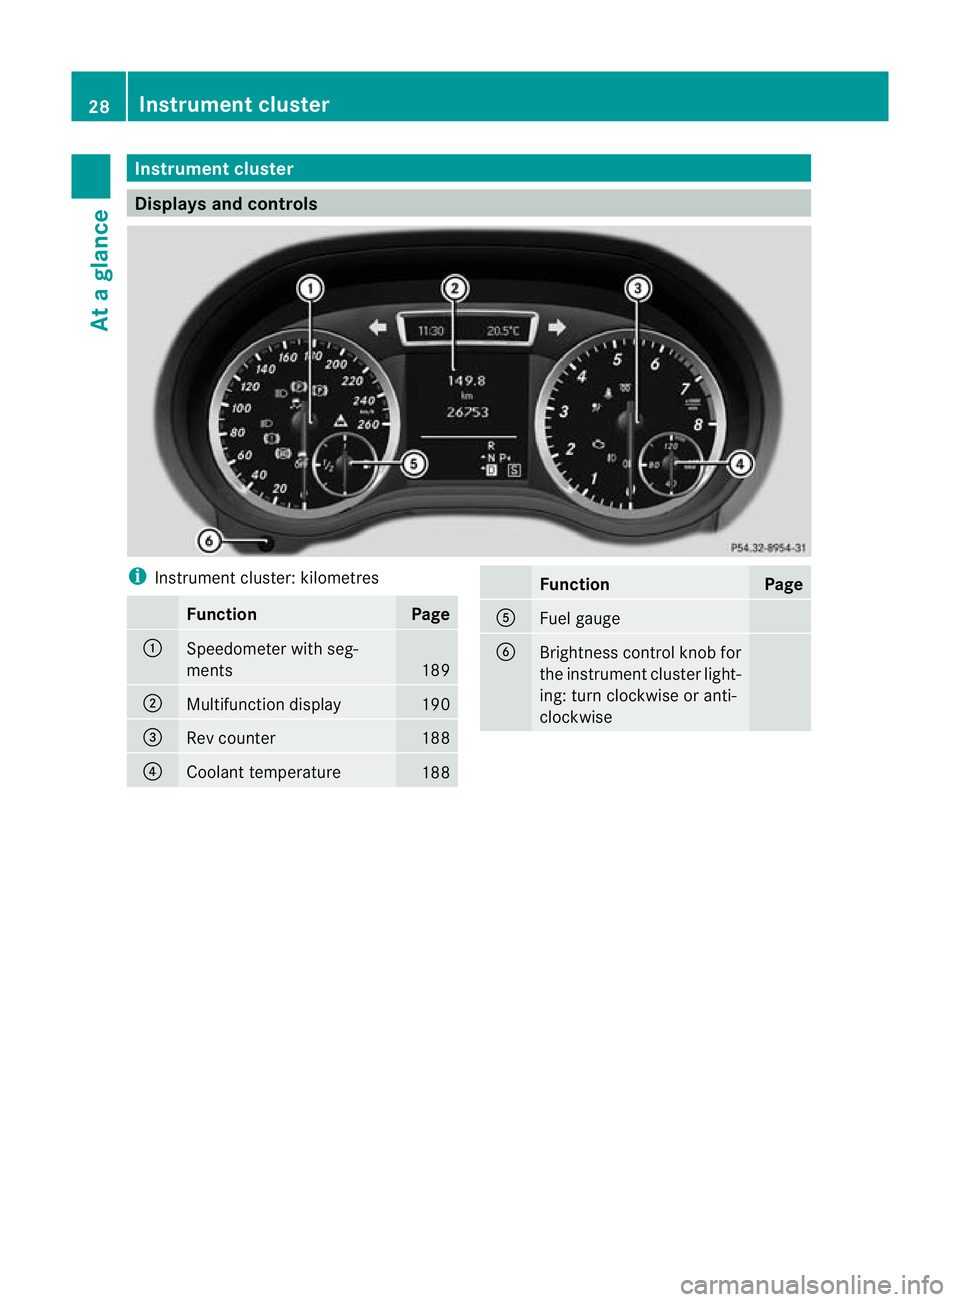
tcluster Displays and controls
i
Instrument cluster: kilometres Function Page
:
Speedometer with seg-
ments
189
;
Multifunction display 190
=
Rev counter 188
?
Coolant temperature
188 Function Page
A
Fuel gauge
B
Brightness control knob for
the instrumen
tcluster light-
ing: turn clockwise or anti-
clockwise 28
Instrument clusterAt a glance
Page 32 of 329
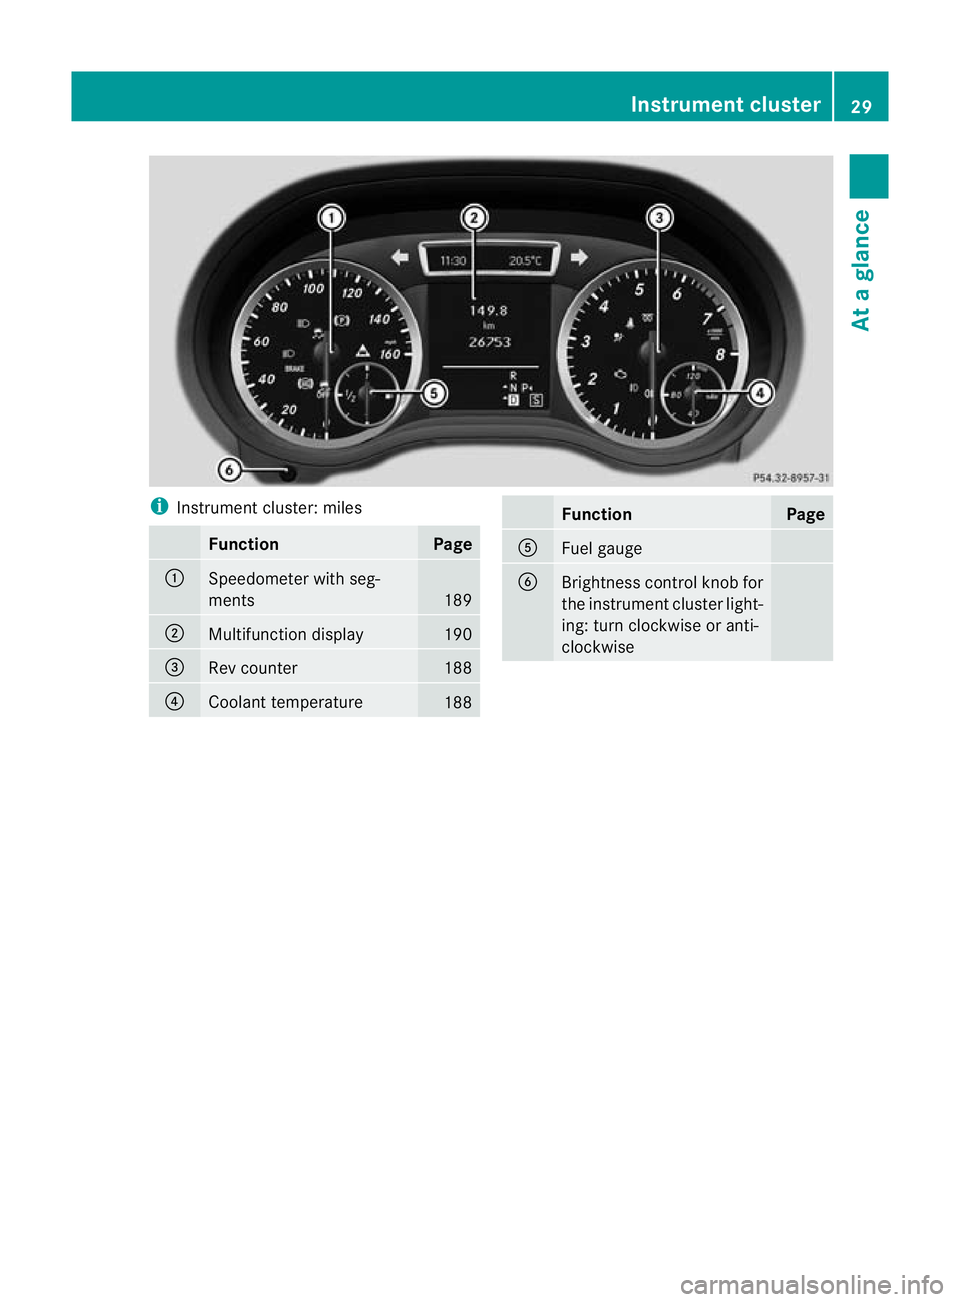
i
Instrument cluster: miles Function Page
:
Speedometer with seg-
ments
189
;
Multifunction display 190
=
Rev counter 188
?
Coolant temperature
188 Function Page
A
Fuel gauge
B
Brightness control knob for
the instrument cluster light-
ing: turn clockwise or anti-
clockwise Instrument cluster
29At a glance
Page 81 of 329
X
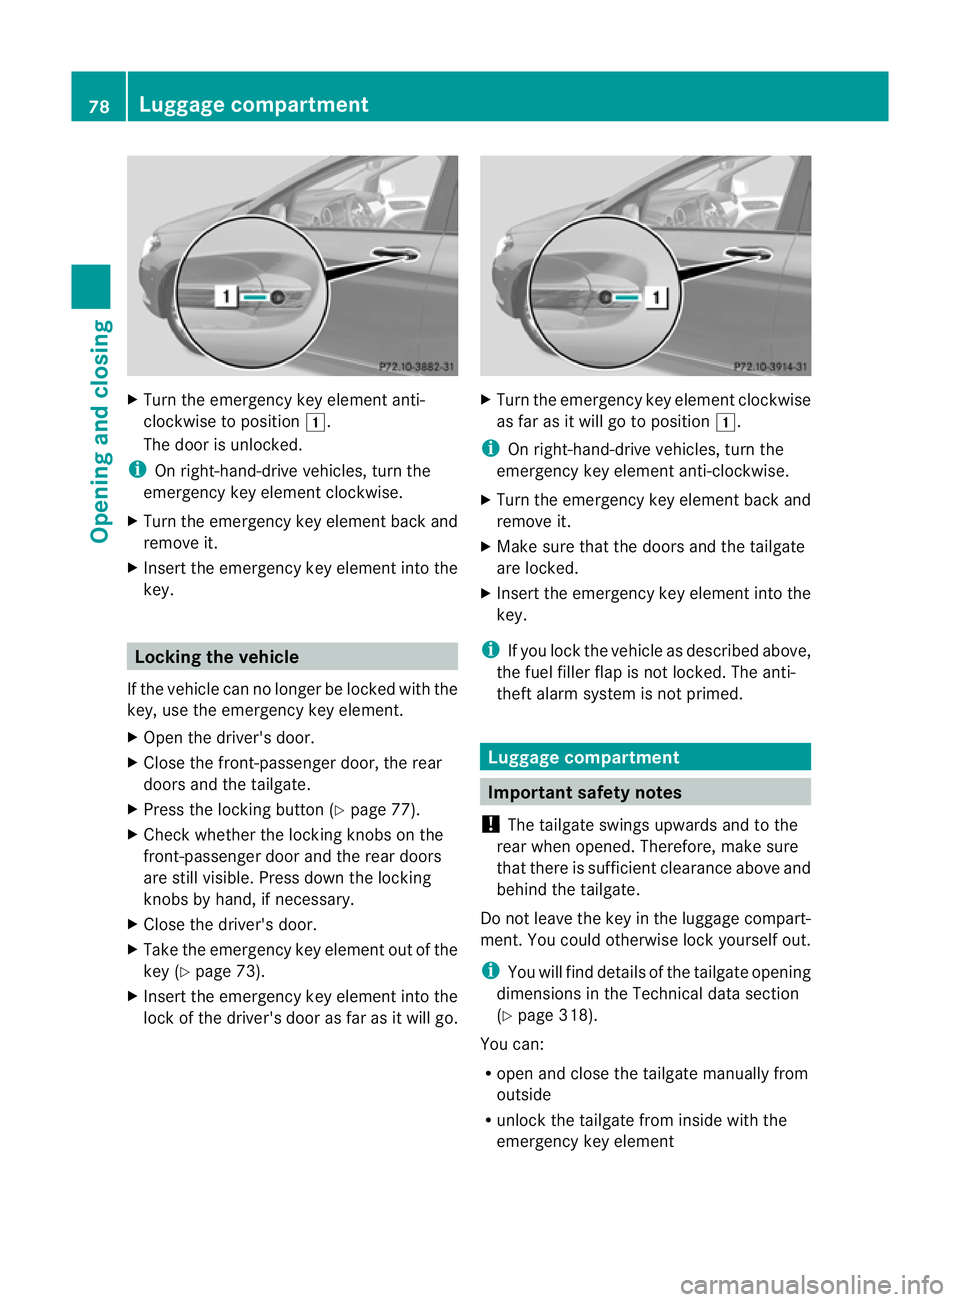
Turn the emergency key element anti-
clockwise to position 1.
The door is unlocked.
i On right-hand-drive vehicles, turn the
emergency key element clockwise.
X Turn the emergency key element back and
remove it.
X Insert the emergency key element into the
key. Locking the vehicle
If the vehicle can no longer be locked with the
key, use the emergency key element.
X Open the driver's door.
X Close the front-passenger door, the rear
doors and the tailgate.
X Press the locking button (Y page 77).
X Check whether the locking knobs on the
front-passenger door and the rear doors
are still visible. Press down the locking
knobs by hand, if necessary.
X Close the driver's door.
X Take the emergency key element out of the
key (Y page 73).
X Insert the emergency key element into the
lock of the driver's door as far as it will go. X
Turn the emergency key element clockwise
as far as it will go to position 1.
i On right-hand-drive vehicles, turn the
emergency key element anti-clockwise.
X Turn the emergency key element back and
remove it.
X Make sure that the doors and the tailgate
are locked.
X Insert the emergency key element into the
key.
i If you lock the vehicle as described above,
the fuel filler flap is not locked. The anti-
theft alarm system is not primed. Luggage compartment
Important safety notes
! The tailgate swings upwards and to the
rear when opened. Therefore, make sure
that there is sufficient clearance above and
behind the tailgate.
Do not leave the key in the luggage compart-
ment.Y ou could otherwise lock yourself out.
i You will find details of the tailgate opening
dimensions in the Technical data section
(Y page 318).
You can:
R open and close the tailgate manually from
outside
R unlock the tailgate from inside with the
emergency key element 78
Luggage compartmentOpening and closing
Page 82 of 329
Opening/closing from the outside
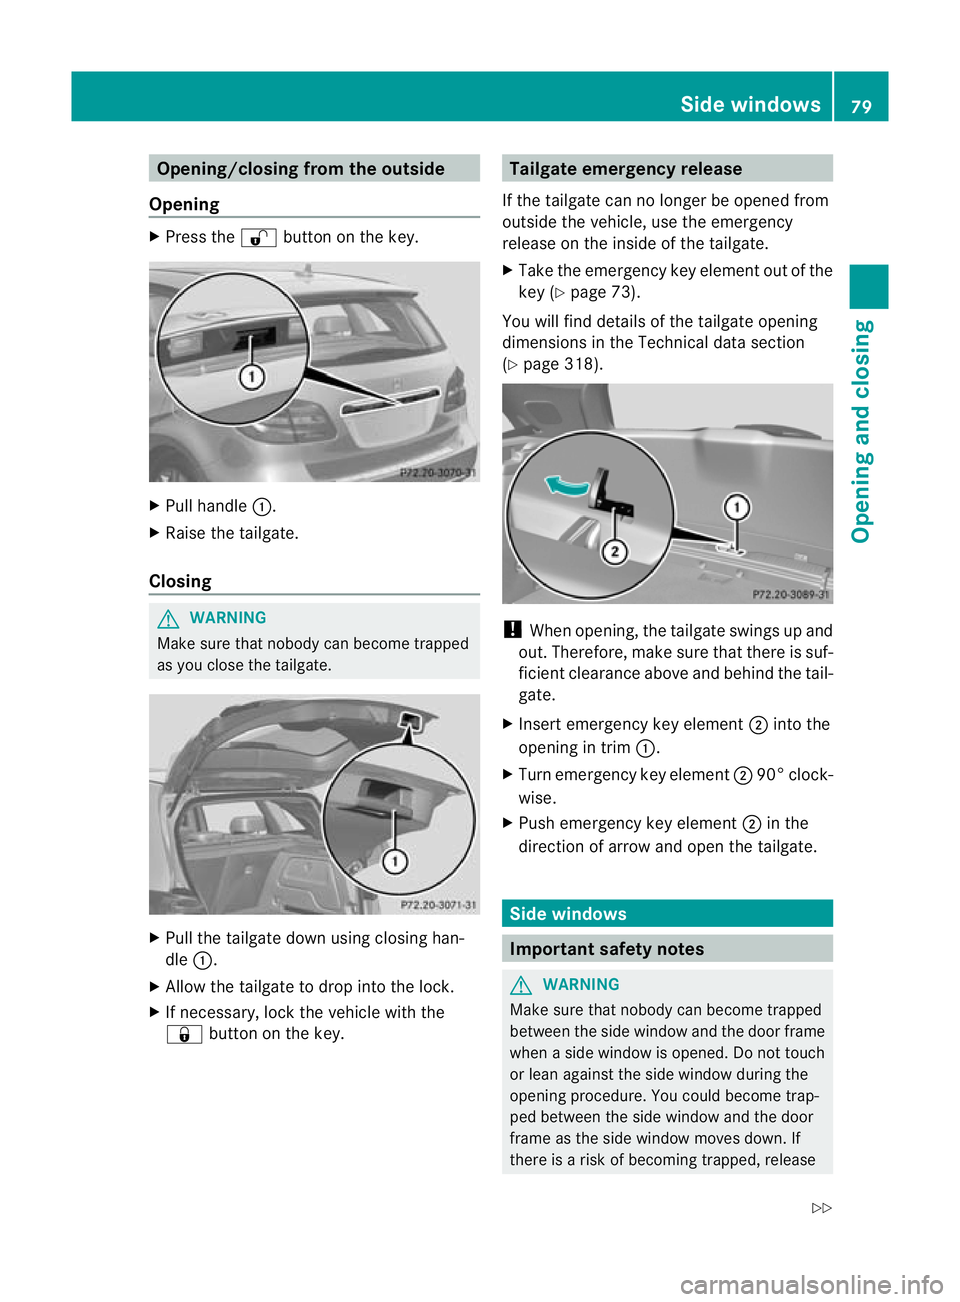
Opening X
Press the %button on the key. X
Pull handle :.
X Raise the tailgate.
Closing G
WARNING
Make sure that nobody can become trapped
as you close the tailgate. X
Pull the tailgate down using closing han-
dle :.
X Allow the tailgate to drop into the lock.
X If necessary, lock the vehicle with the
& button on the key. Tailgate emergency release
If the tailgate can no longer be opened from
outside the vehicle, use the emergency
release on the inside of the tailgate.
X Take the emergency key element out of the
key (Y page 73).
You will find details of the tailgate opening
dimensions in the Technical data section
(Y page 318). !
When opening, the tailgate swings up and
out. Therefore, make sure that there is suf-
ficien tclearance above and behind the tail-
gate.
X Insert emergency key element ;into the
opening in trim :.
X Turn emergency key element ;90° clock-
wise.
X Push emergency key element ;in the
direction of arrow and open the tailgate. Side windows
Important safety notes
G
WARNING
Make sure that nobody can become trapped
between the side window and the door frame
when a side window is opened. Do not touch
or lean against the side window during the
opening procedure. You could become trap-
ped between the side window and the door
frame as the side window moves down. If
there is a risk of becoming trapped, release Side windows
79Opening and closing
Z
Page 108 of 329

Tail lamp (bi-xenon headlamps)
:
Brake lamp: P 21 W Licence plate lamp (vehicles with halogen head-
lamps)
: Licence plate lamp: C 5 W Replacing the front bulbs
Fitting/removing the cover on the front
wheel arch You must remove the cover from the front
wheel housing before you can change the
front bulbs. X
To remove: switch off the lights.
X Turn the front wheels inwards.
X Slide cover :up and remove it.
X To fit: insert cover :again and slide it
down until it engages.
Dipped-beam headlamps (halogen
headlamps) X
Remove the cover in the front wheel arch
(Y page 105).
X Turn housing cover :anti-clockwise and
pull it out.
X Turn bulb holder ;anti-clockwise and pull
it out.
X Take the bulb out of bulb holder ;.
X Insert the new bulb into bulb holder ;.
X Insert bulb holder ;into the lamp and turn
it clockwise.
X Align housing cover :and turn it clock-
wise until it engages.
X Replace the cover in the front wheel arch
(Y page 105). Replacing bulbs
105Lights and windscreen wipers Z
Page 109 of 329
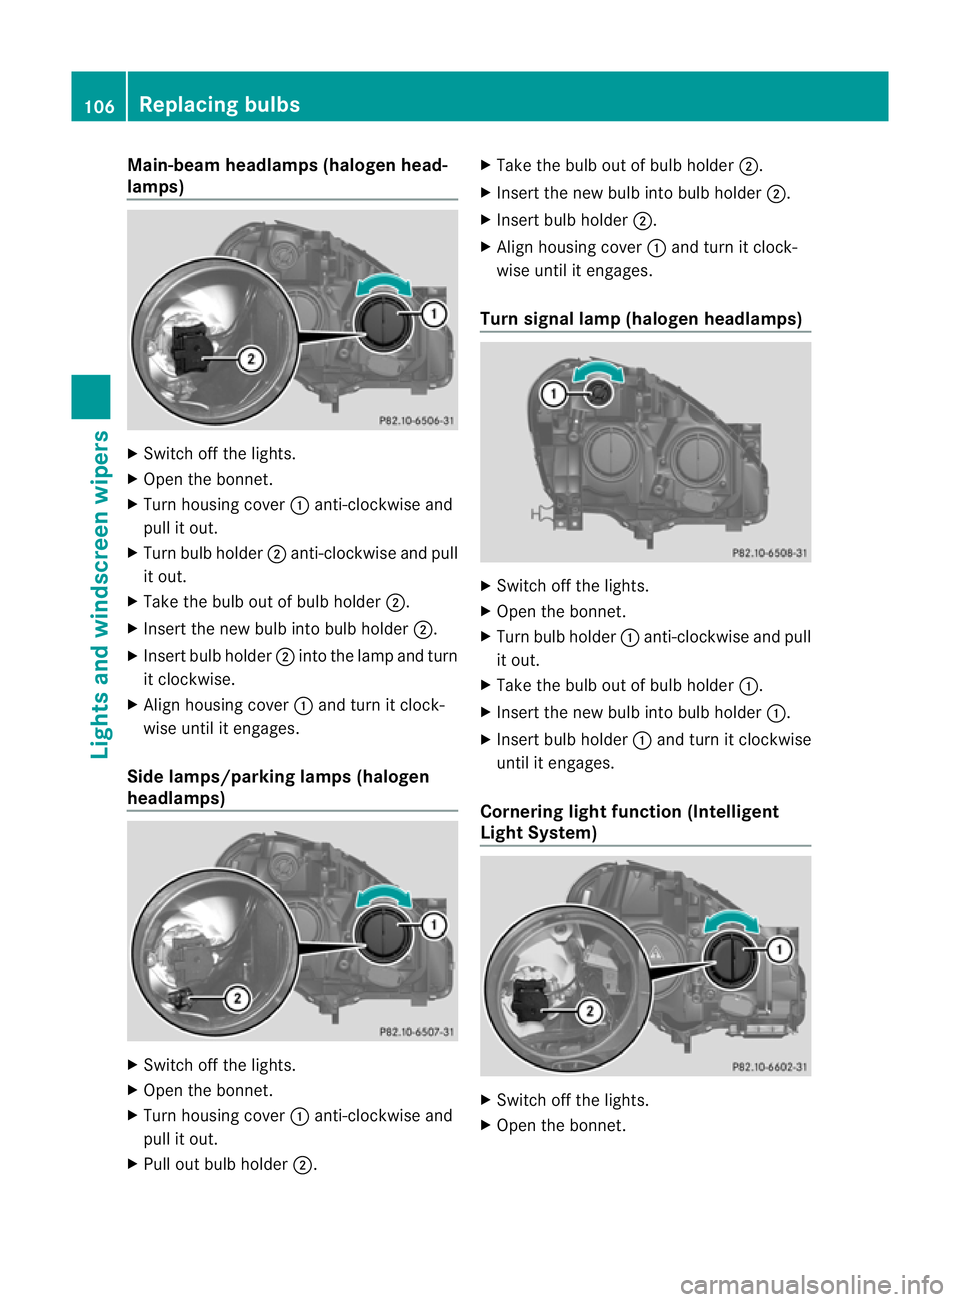
Main-beam headlamps (halogen head-
lamps)
X
Switch off the lights.
X Open the bonnet.
X Turn housing cover :anti-clockwise and
pull it out.
X Turn bulb holder ;anti-clockwise and pull
it out.
X Take the bulb out of bulb holder ;.
X Insert the new bulb into bulb holder ;.
X Insert bulb holder ;into the lamp and turn
it clockwise.
X Align housing cover :and turn it clock-
wise until it engages.
Side lamps/parking lamps (halogen
headlamps) X
Switch off the lights.
X Open the bonnet.
X Turn housing cover :anti-clockwise and
pull it out.
X Pull out bulb holder ;. X
Take the bulb out of bulb holder ;.
X Insert the new bulb into bulb holder ;.
X Insert bulb holder ;.
X Align housing cover :and turn it clock-
wise until it engages.
Turn signal lamp (halogen headlamps) X
Switch off the lights.
X Open the bonnet.
X Turn bulb holder :anti-clockwise and pull
it out.
X Take the bulb out of bulb holder :.
X Insert the new bulb into bulb holder :.
X Insert bulb holder :and turn it clockwise
until it engages.
Cornering light function (Intelligent
Light System) X
Switch off the lights.
X Open the bonnet. 106
Replacing bulbsLights and windscreen wipers
Page 110 of 329
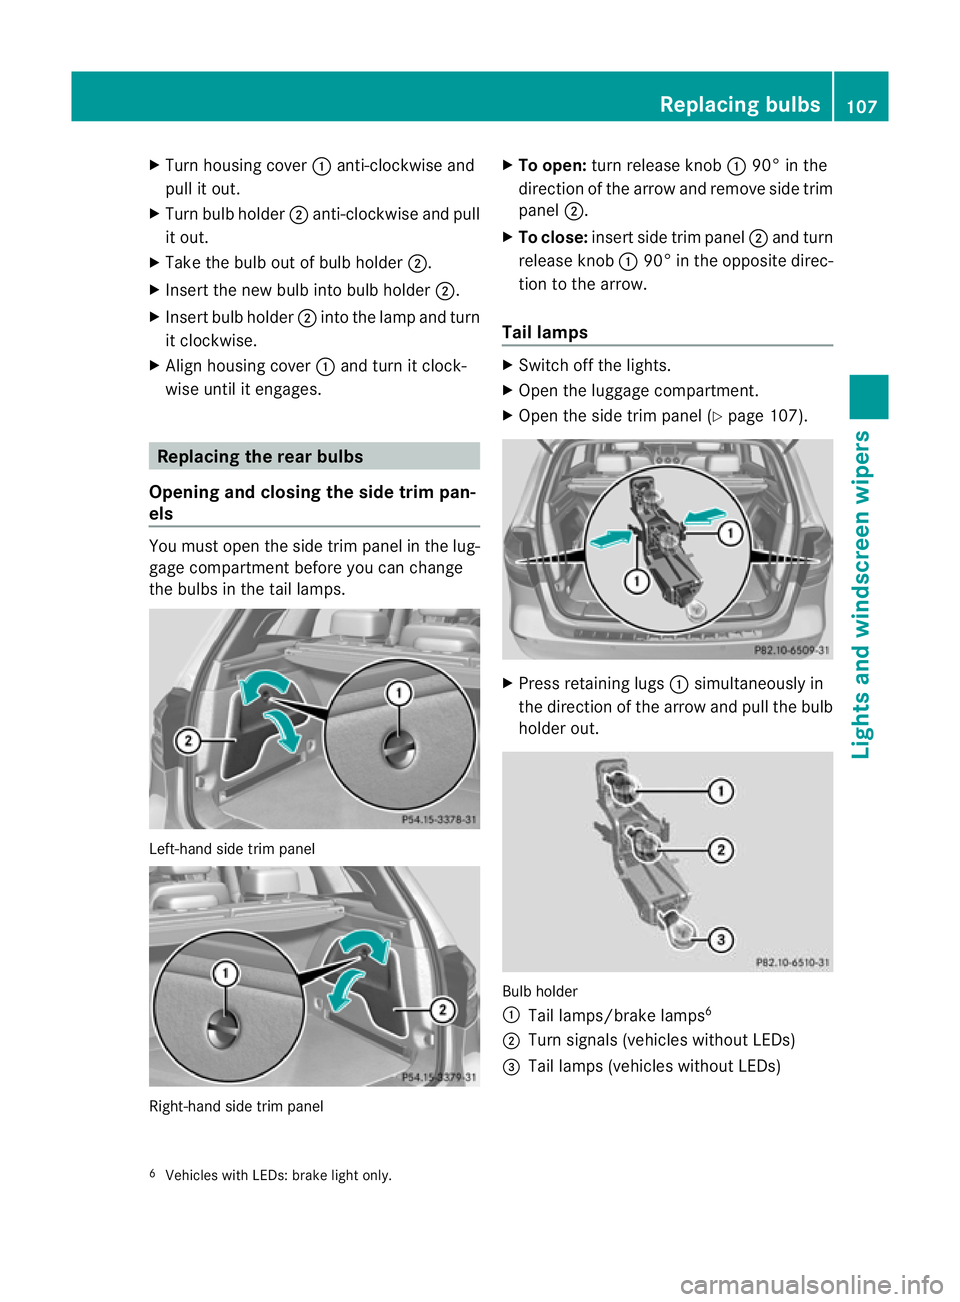
X
Turn housing cover :anti-clockwise and
pull it out.
X Turn bulb holder ;anti-clockwise and pull
it out.
X Take the bulb out of bulb holder ;.
X Insert the new bulb into bulb holder ;.
X Insert bulb holder ;into the lamp and turn
it clockwise.
X Align housing cover :and turn it clock-
wise until it engages. Replacing the rear bulbs
Opening and closing the side trim pan-
els You must open the side trim panel in the lug-
gage compartment before you can change
the bulbs in the tail lamps. Left-hand side trim panel
Right-hand side trim panel X
To open: turn release knob :90° in the
direction of the arrow and remove side trim
panel ;.
X To close: insert side trim panel ;and turn
release knob :90° in the opposite direc-
tion to the arrow.
Tail lamps X
Switch off the lights.
X Open the luggage compartment.
X Open the side trim panel (Y page 107). X
Press retaining lugs :simultaneously in
the direction of the arrow and pull the bulb
holder out. Bulb holder
:
Tail lamps/brake lamps 6
; Turn signals (vehicles without LEDs)
= Tail lamps (vehicles without LEDs)
6 Vehicles with LEDs: brake light only. Replacing bulbs
107Lights and windscreen wipers Z
Page 111 of 329
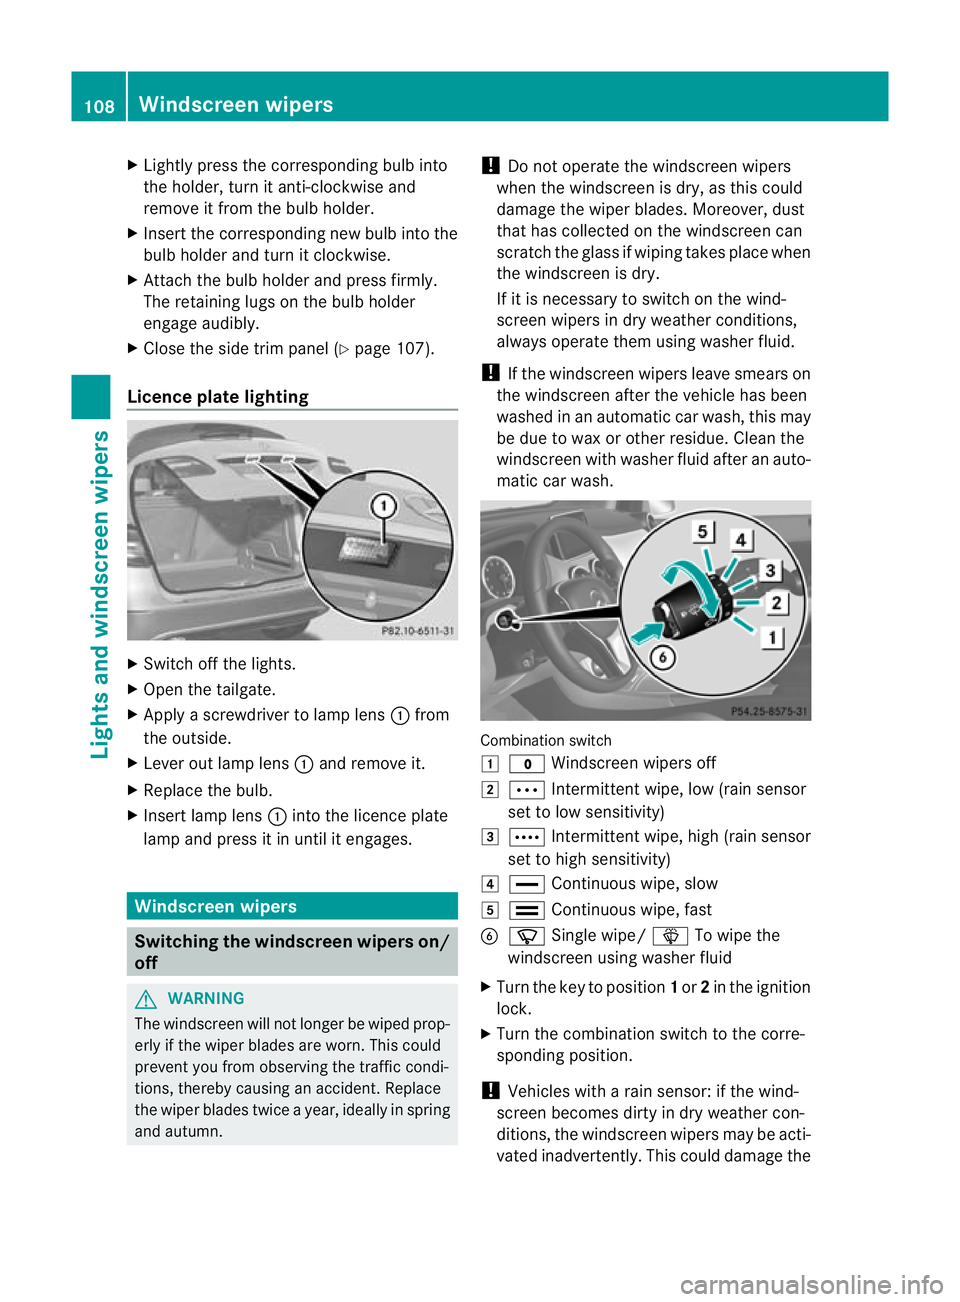
X
Lightly press the corresponding bulb into
the holder, turn it anti-clockwise and
remove it from the bulb holder.
X Insert the corresponding new bulb into the
bulb holdera nd turnitclockwise.
X Attach the bulb holder and press firmly.
The retaining lugs on the bulb holder
engage audibly.
X Close the side trim panel (Y page 107).
Licence plate lighting X
Switch off the lights.
X Open the tailgate.
X Apply a screwdriver to lamp lens :from
the outside.
X Leve rout lamp lens :and remove it.
X Replace the bulb.
X Inser tlamp lens :into the licence plate
lamp and press it in until it engages. Windscreen wipers
Switching the windscreen wipers on/
off
G
WARNING
The windscree nwill not longer be wiped prop-
erly if the wiper blades are worn .This could
prevent you from observing the traffic condi-
tions, thereby causing an accident. Replace
the wiper blades twice a year, ideally in spring
and autumn. !
Do not operate the windscreen wipers
when the windscreen is dry, as this could
damage the wiper blades. Moreover, dust
that has collected on the windscreen can
scratch the glass if wiping takes place when
the windscreen is dry.
If it is necessary to switch on the wind-
screen wipers in dry weather conditions,
always operate them using washer fluid.
! If the windscreen wipers leave smears on
the windscreen after the vehicle has been
washed in an automatic car wash, this may
be due to wax or other residue. Cleant he
windscreen with washer fluid after an auto-
matic car wash. Combination switch
1
$ Windscreen wipers off
2 Ä Intermittent wipe, low (rain sensor
set to low sensitivity)
3 Å Intermittent wipe, high (rain sensor
set to high sensitivity)
4 ° Continuous wipe, slow
5 ¯ Continuous wipe, fast
B í Single wipe/ îTo wipe the
windscreen using washer fluid
X Turn the key to position 1or 2in the ignition
lock.
X Turn the combination switch to the corre-
sponding position.
! Vehicles with a rain sensor: if the wind-
screen becomes dirty in dry weather con-
ditions, the windscreen wipers may be acti-
vated inadvertently. This could damage the 108
Windscreen wipersLights and windscreen wipers
Page 118 of 329
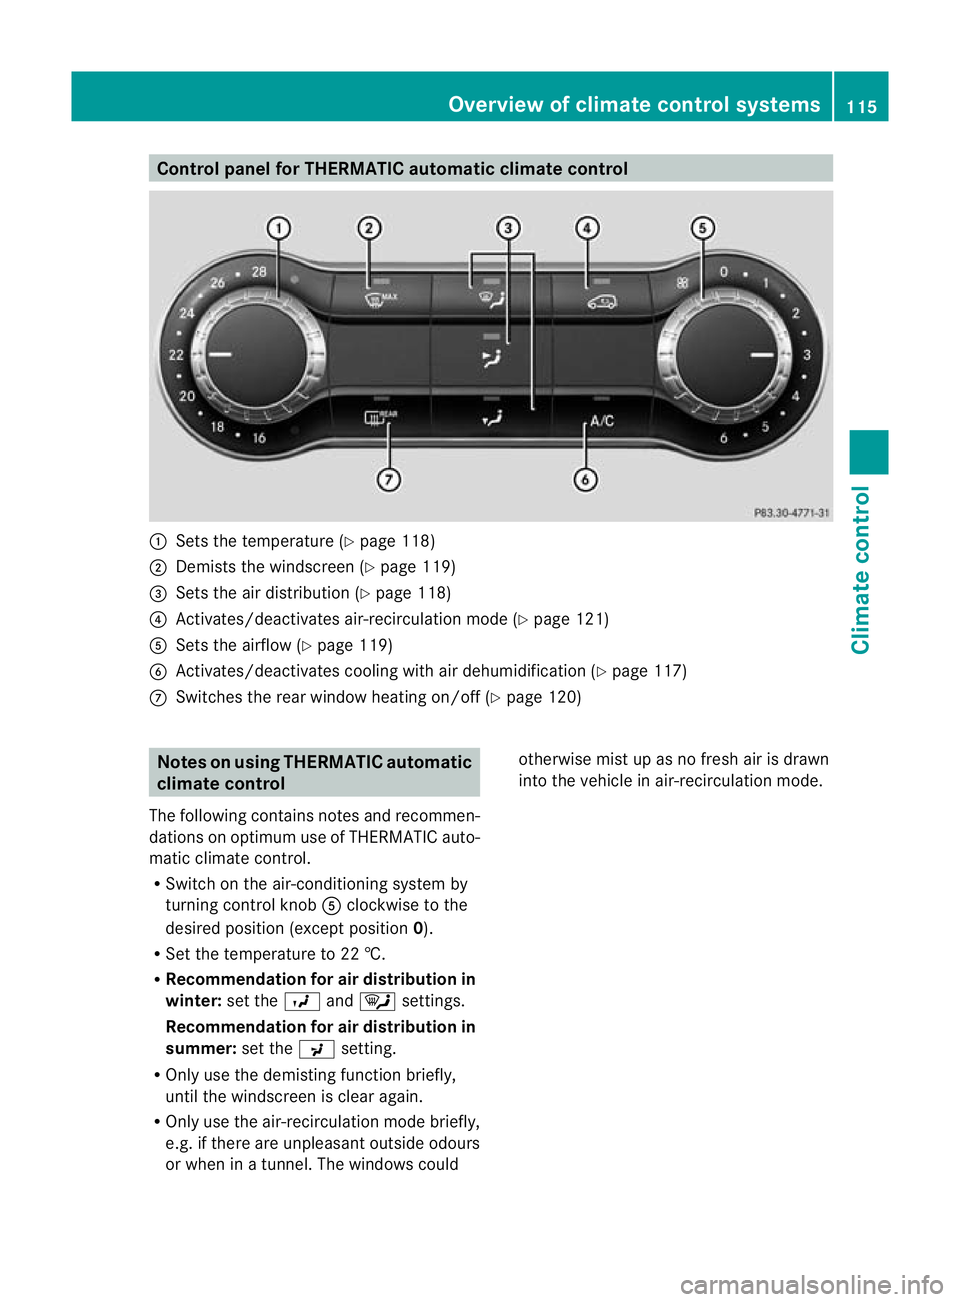
Control panel for THERMATIC automatic climate control
:
Sets the temperature (Y page 118)
; Demists the windscreen (Y page 119)
= Sets the air distribution (Y page 118)
? Activates/deactivates air-recirculation mode (Y page 121)
A Sets the airflow (Y page 119)
B Activates/deactivates coolin gwith air dehumidification ( Ypage 117)
C Switches the rear window heating on/off (Y page 120)Notes on using THERMATIC automatic
climate control
The following contains notes and recommen-
dations on optimum use of THERMATIC auto-
matic climate control.
R Switch on the air-conditioning system by
turning control knob Aclockwise to the
desired position (except position 0).
R Set the temperature to 22 †.
R Recommendation for air distribution in
winter: set theOand¯ settings.
Recommendation for air distribution in
summer: set thePsetting.
R Only use the demisting function briefly,
until the windscreen is clear again.
R Only use the air-recirculation mode briefly,
e.g. if there are unpleasan toutside odours
or when in a tunnel. The windows could otherwise mis
tup as no fresh air is drawn
into the vehicle in air-recirculation mode. Overview of climate control systems
115Climate control Z
Page 120 of 329
the front-passenge
rside as well. The indi-
cator lamp in the ábutton goes out.
R Use the residual heat function if you want
to heat or ventilate the vehicle interior
when the ignition is switched off .The resid-
ual heat function can only be activated or
deactivated with the ignition switched off. Operating the climate control system
Switching climate control on/off
Switching on/off THERMATIC automatic climate control
X Turn the key to position 2in the ignition
lock.
X To switch on: turn controlAclockwise
to the desired position (except position 0)
(Y page 115).
X To switch off: turn controlAanti-clock-
wise to position 0(Y page 115).
THERMOTRONIC automatic climate con-
trol
X Turn the key to position 2in the ignition
lock.
X To activate: press theÃbutton.
The indicator lamp in the Ãbutton lights
up. Airflow and air distribution are set to
automatic mode.
or
X Press the ^button.
The indicator lamp in the ^button goes
out. The previously selected settings come
into effect again.
X To switch off: press the^button.
The indicator lamp in the ^button lights
up.
i If climate control is switched off, the air
supply and air circulation are also switched
off. Only use this setting for a brief period.
The windows could otherwise mist up. i
THERMOTRONIC automatic climate con-
trol: switch on climate control primarily
using the Ãbutton. Activating/deactivating the cooling
with air dehumidification function
Important information G
WARNING
If the "cooling with air dehumidification" func-
tion is deactivated, the air inside the vehicle
will not be cooled (during warm weather) or
dehumidified. The windows could mist up
more quickly. This may prevent you from
observing the traffic conditions, thereby caus-
ing an accident.
The cooling with air dehumidification function
is only available when the engine is running.
The air inside the vehicle is cooled and dehu-
midified according to the temperature selec-
ted.
Condensation may drip from the underside of
the vehicle when cooling mode is active. This
is normal and not a sign that there is a mal-
function.
i The refrigerant that is used by the cooling
with air dehumidification does not contain
chlorofluorocarbons, and therefore does
not damage the ozone layer. You can obtain
more detailed information on refrigerants
from any qualified specialist workshop.
Switching on/off X
To activate: press the¿button.
The indicator lamp in the ¿button lights
up.
X To switch off: press the¿button.
The indicator lamp in the ¿button goes
out. The cooling with air dehumidification
function has a delayed switch-off feature. Operating the climate control system
117Climate control Z