winter tyres MERCEDES-BENZ B-CLASS HATCHBACK 2011 Owners Manual
[x] Cancel search | Manufacturer: MERCEDES-BENZ, Model Year: 2011, Model line: B-CLASS HATCHBACK, Model: MERCEDES-BENZ B-CLASS HATCHBACK 2011Pages: 329, PDF Size: 7.91 MB
Page 22 of 329
Vehicle identification number
see VIN
Vehicle identification plate ..............310
Vehicle tool kit .................................. 275
Vehicle weights ................................. 317
Vents see Air vents
Video (DVD) ........................................ 196
Video DVD (on-board computer) ......196
VIN ...................................................... 310W
Warning and indicator lamps ABS ................................................ 233
Brakes ........................................... 233
Distance warning signa l................. 241
ESP ®
.............................................. 235
ESP ®
OFF ....................................... 236
Fuel tank ........................................ 239
LIM (cruise control) ........................ 149
LIM (DISTRONIC PLUS) ..................155
LIM (variable SPEEDTRONIC) .........152
Overview .......................................... 30
PASSENGER AIRBAG OFF ................49
Reserve fuel ................................... 239
Seat bel t........................................ 231
SRS ................................................ 238
Warning triangle ................................ 274
Washer fluid Display message ............................ 231
Wheel bol ttightening torque ...........302
Wheel chock ...................................... 299
Wheels Changing/replacing .......................298
Changing awheel .......................... 298
Checking ........................................ 293
Cleaning ......................................... 268
Cleaning (warning) .........................298
Emergency spare wheel .................304
Fitting anew wheel ........................ 301
Fitting awheel ............................... 298
Important safety notes ..................292
Removing awheel .......................... 301
Storing ........................................... 298
Tightening torque ........................... 302
Whee lsize/tyre size ...................... 302Windowbag
Display message ............................ 215
Operation ........................................ .43
Windows
Cleaning ......................................... 269
see Side windows
Windscreen
Demisting ...................................... 119
Windscreen washer fluid
see Windscreen washer system
Windscreen washer system .............265
Notes ............................................. 316
Windscreen wipers
Problem (malfunction) ...................110
Rea rwindow wiper ........................ 109
Replacing the wiper blades ............109
Switching on/off ........................... 108
Winter operation
Important safety notes ..................294
Slippery road surfaces ...................149
Snow chains .................................. 295
Winter tyres
Limiting the speed (on-board com-
puter) ............................................. 203
M+S tyres ...................................... 294
Wiper blades
Cleaning ......................................... 269
Important safety notes ..................109
Replacing (on the rear window) .....110
Replacing (windscreen) ..................109
Wooden trim (cleaning instruc-
tions) .................................................. 272
Workshop see Qualified specialist workshop Index
19
Page 65 of 329
You secure each door individually with the
child-proof locks on the rear doors
.Adoor
secured with a child-proof lock cannot be
opened from inside the vehicle. When the
vehicle is unlocked, the door can be opened
from the outside.
X To activate: press the child-proof lock
lever up in the direction of arrow :.
X Make sure that the child-proof locks are
working properly.
X To deactivate: press the child-proof lock
lever down in the direction of arrow ;.
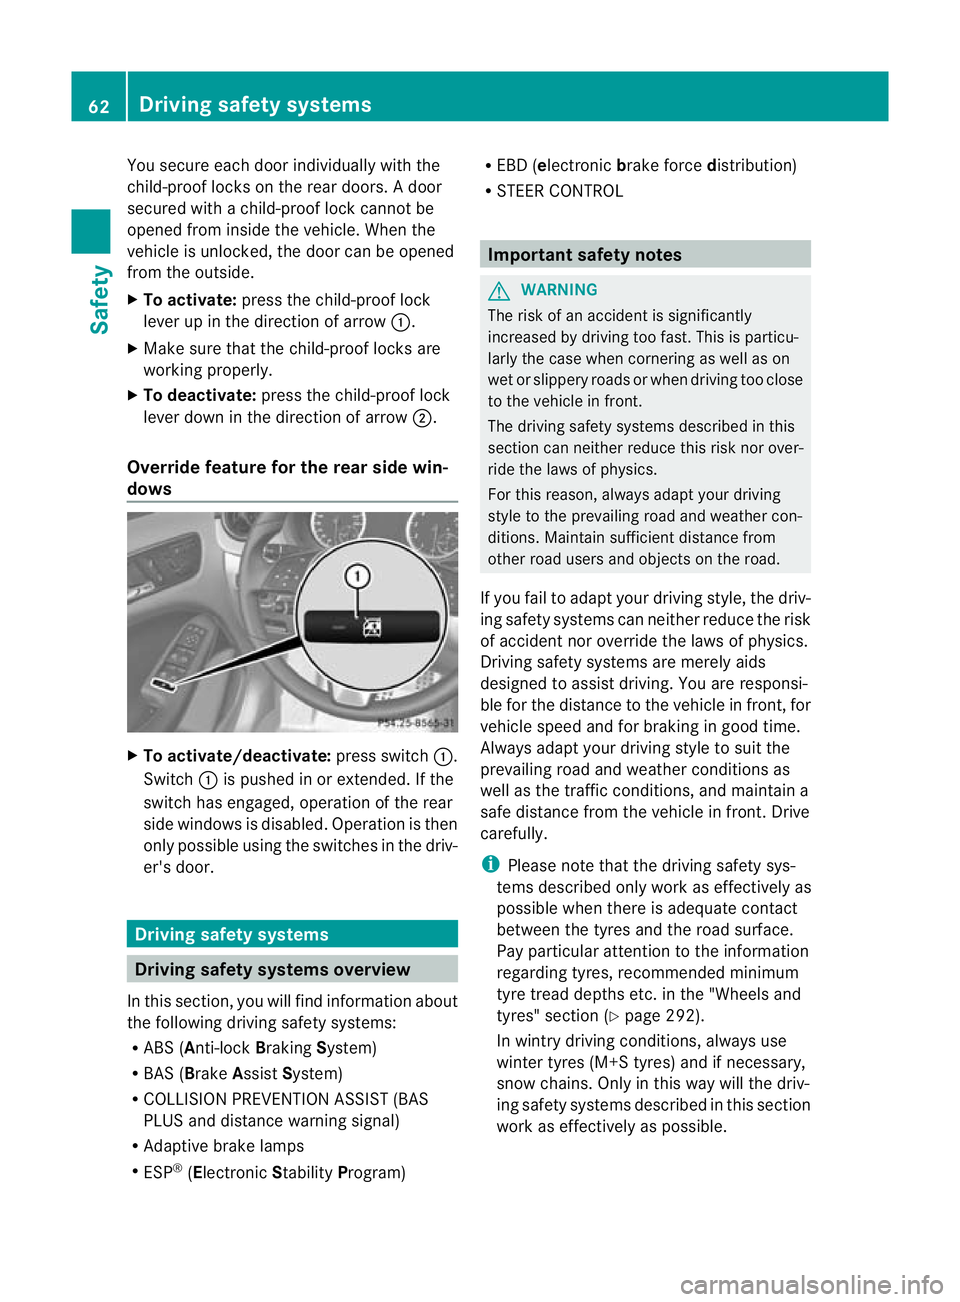
Override feature for the rear side win-
dows X
To activate/deactivate: press switch:.
Switch :is pushed in or extended. If the
switch has engaged, operation of the rear
side windows is disabled. Operation is then
only possible using the switches in the driv-
er's door. Driving safety systems
Driving safety systems overview
In this section, you will find information about
the following driving safety systems:
R ABS (Anti-lock BrakingSystem)
R BAS (Brake AssistSystem)
R COLLISION PREVENTION ASSIST (BAS
PLUS and distance warning signal)
R Adaptive brake lamps
R ESP ®
(Electronic StabilityProgram) R
EBD ( electronic brake force distribution)
R STEER CONTROL Important safety notes
G
WARNING
The risk of an accident is significantly
increased by driving too fast. This is particu-
larly the case when cornering as well as on
wet or slippery roads or when driving too close
to the vehicle in front.
The driving safety systems described in this
section can neither reduce this risk nor over-
ride the laws of physics.
For this reason, always adapt your driving
style to the prevailing road and weather con-
ditions. Maintain sufficient distance from
other road users and objects on the road.
If you fail to adapt your driving style, the driv-
ing safety systems can neither reduce the risk
of accident nor override the laws of physics.
Driving safety systems are merely aids
designed to assist driving. You are responsi-
ble for the distance to the vehicle in front, for
vehicle speed and for braking in good time.
Always adapt your driving style to suit the
prevailing road and weather conditions as
well as the traffic conditions, and maintain a
safe distance from the vehicle in front. Drive
carefully.
i Please note that the driving safety sys-
tems described only work as effectively as
possible when there is adequate contact
between the tyres and the road surface.
Pay particular attention to the information
regarding tyres, recommended minimum
tyre tread depths etc. in the "Wheels and
tyres" section (Y page 292).
In wintry driving conditions, always use
winter tyres (M+S tyres) and if necessary,
snow chains. Only in this way will the driv-
ing safety systems described in this section
work as effectively as possible. 62
Driving safety systemsSafety
Page 151 of 329
New brake pads/linings
G
WARNING
New brake pads/linings onl yreach their opti-
mum braking effec tafter several hundred kil-
ometres of driving. Before this optimu mbrak-
ing effect is reached, you should compensate
for the reduced braking effect by applying
greater pressure when braking. This also
applies after the brake discs or the brake
pads/linings have been replaced.
For safety reasons, Mercedes-Benz recom-
mends that you only have brake pads/linings
fitted to yourv ehicle which have been
approved for Mercedes-Benz vehicles or
which correspond to an equivalent quality
standard. Brake pads/linings which have not
been approved for Mercedes-Benzv ehicles or
which are not of an equivalent quality could
affect your vehicle's operating safety. Tyre traction
G
WARNING
Whereas the vehicle can be fully controlled at
a certain speed on dry roads, you must reduce
your speed on wet or icy roads to achieve the
same road safety. You could otherwise cause
an accident.
Pay particular attention to the road conditions
at temperatures around freezing point.
If ice has formed on the road surface (e.g.
from fog), a thin film of water rapidly forms on
the ice when you brake, considerably reduc-
ing tyre traction. Drive with particular care in
such weather conditions. Driving on wet roads
Aquaplaning If water has accumulated to a certain depth
on the road surface, there is a danger of aqua-
planing occurring, even if:
R you are driving at low speeds.
R the tyres have adequate tread depth.
For this reason, do not drive in tyre ruts, and
brake carefully.
Driving on flooded roads !
Bear in mind that vehicles travelling in
front or in the opposite direction create
waves. This may cause the maximum per-
missible water depth to be exceeded.
These notes must be observed under all
circumstances. You could otherwise dam-
age the engine, the electronics or the trans-
mission.
If you have to drive on stretches of road on
which water has collected, please bear in
mind that:
R the maximum permissible still water depth
is 25 cm.
R you should drive no faster than at walking
pace. Winter driving
General notes G
WARNING
If the vehicle becomes trapped in snow,
ensure that snow is kept away from the
exhaust pipe and from around the vehicle as
long as the engine is running. Otherwise, poi-
sonous carbon monoxide (CO) may enter the
vehicle, resulting in loss of consciousness and
even death.
To assure sufficien tfresh air ventilation, open
a window slightly on the side of the vehicle
not facing the wind. 148
Driving tipsDriving and parking
Page 152 of 329
Have your vehicle winterproofed at a qualified
specialist workshop at the onset of winter.
Observe the notes in the "Winter operation"
sectio n(Ypage 294).
Driving with summer tyres Observe the notes in the "Winter operation"
section (Y page 294).
Slippery road surfaces G
WARNING
Do not shift down for additional engine brak-
ing on a slippery road surface. This could
cause the drive wheels to lose their grip and
the vehicle could skid.
If the vehicle threatens to skid or cannot be
stopped when moving at low speed:
X Vehicles with manual transmission:
shift to neutral.
X Vehicles with automatic transmission:
shift the transmission to position N.
X Try to bring the vehicle under control by
using corrective steering.
You should drive particularly carefully on slip-
pery road surfaces .Avoid sudden accelera-
tion, steering and braking manoeuvres.
i For more information on driving with
snow chains, see (Y page 295). Driving systems
Cruise control
General notes Cruise control maintains a constant road
speed for you.Itb
rakes automatically in order
to avoid exceeding the set speed. You must
select a lower gearing ood time on long and
steep downhill gradients, especially if the
vehicle is laden or towing a trailer. For vehi-
cles with automatic transmission, you need
to have selected manual drive program
M(Y page 147). By doing so, you will make use of the braking effect of the engine. This
relieves the load on the brake system and
prevents the brakes from overheating and
wearing too quickly.
Use cruise control only if road and traffic con-
ditions make it appropriate to maintain a
steady speed for a prolonged period. You can
store any road speed above 30 km/h.
Important safety notes
G
WARNING
Do not change down for additional engine
braking on a slippery road surface. This could
cause the drive wheels to lose their grip and
the vehicle could skid. G
WARNING
Cruise control cannot take account of road
and traffic conditions.
Always pay attention to traffic conditions
even when cruise control is activated.
Cruise control is only an aid designed to assist
driving. You are responsible for the vehicle's
speed and for braking in good time. G
WARNING
Do not use cruise control
R in traffic conditions that do not allow you to
drive at a constant speed (e.g. heavy traffic
or winding roads). You may otherwise
cause an accident.
R on slippery roads. The drive wheels may
lose their grip when braking or accelerating
and the vehicle may skid.
R when there is low visibility, e.g. due to fog,
heavy rain or snow.
Cruise control lever You can operate cruise control and variable
SPEEDTRONIC with the cruise control lever. Driving systems
149Driving and parking Z
Page 155 of 329
to have selected manual drive program
M(Y
page 147) .By doing so, you will make
use of the braking effec tofthe engine. This
relieves the load on the brake system and
prevents the brakes from overheating and
wearing too quickly. If you need additional
braking, depress the brake pedal repeatedly
rather than continuously.
You can set a variable or permanent limit
speed:
R variable for speed limits, e.g. in built-up
areas
R permanent for long-term speed restric-
tions, e.g. when driving with winter tyres
fitted (Y page 154)
i The speed indicated in the speedometer
may differ slightly from the limit speed
stored.
Important safety notes G
WARNING
Never depress the brake pedal continuously
while the vehicle is in motion, e.g. never cause
the brakes to rub by applying constant slight
pedal pressure. This causes the brake system
to overheat, increases the braking distance
and can lead to the brakes failing completely. G
WARNING
Do not change down for additional engine
braking on a slippery road surface. This could
cause the drive wheels to lose their grip and
the vehicle could skid. G
WARNING
SPEEDTRONIC is only an aid designed to
assist driving. You are responsible for the
vehicle's speed and for braking in good time.
Variable SPEEDTRONIC General notes
With the cruise control lever, you can operate
cruise control or DISTRONIC PLUS and vari-
able SPEEDTRONIC. The LIM indicator lamp on the cruise control
lever indicates which system you have selec-
ted:
R LIM indicator lamp off: cruise control or
DISTRONIC PLUS is selected.
R LIM indicator lamp on: variable SPEED-
TRONIC is selected.
You can use the cruise control lever to limit
the speed to any speed above 30 km/h while
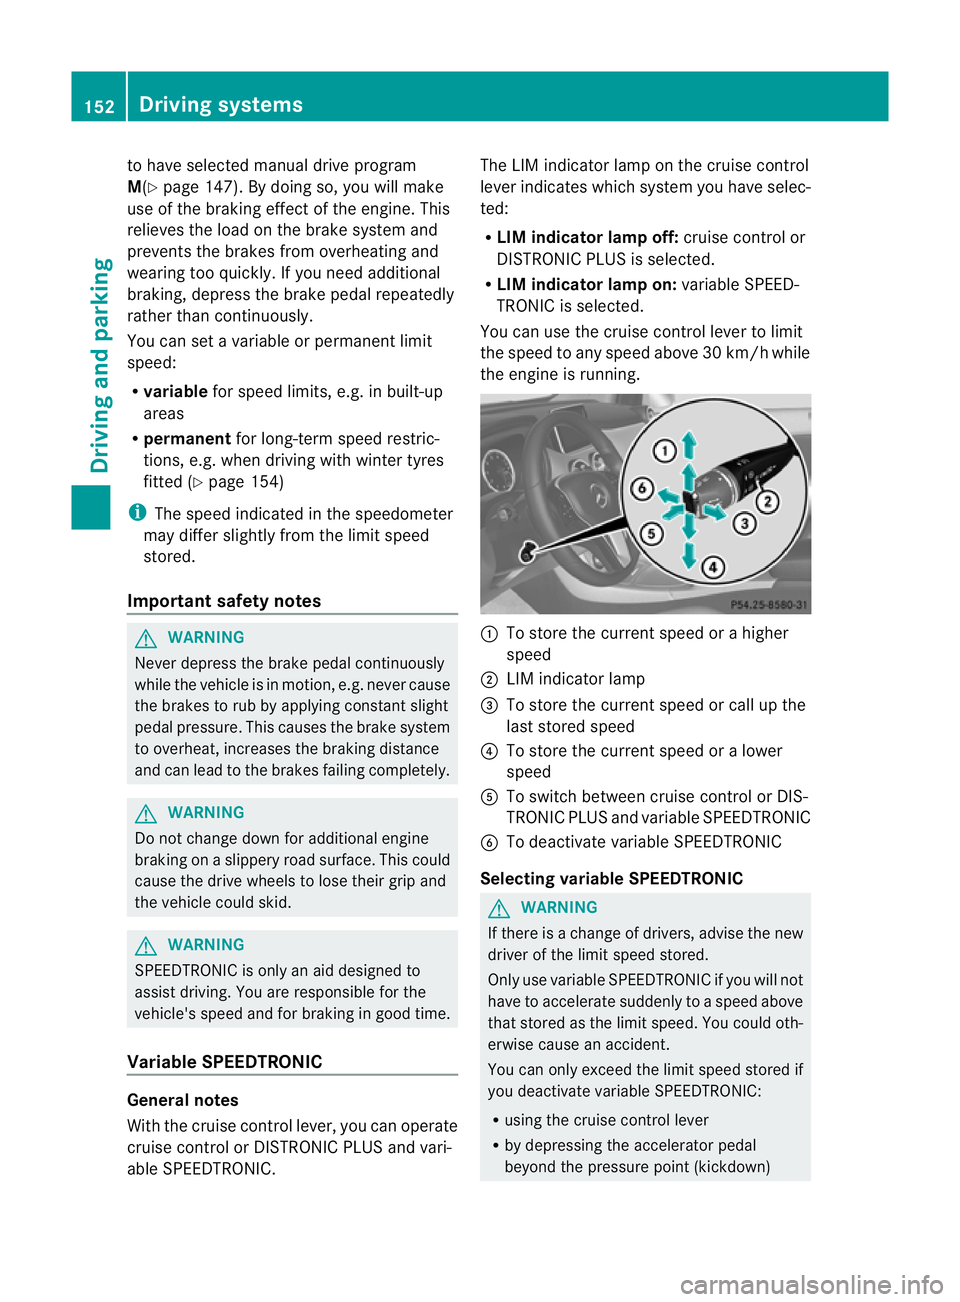
the engine is running. :
To store the current speed or a higher
speed
; LIM indicator lamp
= To store the current speed or call up the
last stored speed
? To store the current speed or a lower
speed
A To switch between cruise control or DIS-
TRONIC PLUS and variable SPEEDTRONIC
B To deactivate variable SPEEDTRONIC
Selecting variable SPEEDTRONIC G
WARNING
If there is a change of drivers, advise the new
driver of the limit speed stored.
Only use variable SPEEDTRONIC if you will not
have to accelerate suddenly to a speed above
that stored as the limit speed. You could oth-
erwise cause an accident.
You can only exceed the limit speed stored if
you deactivate variable SPEEDTRONIC:
R using the cruise control lever
R by depressing the accelerator pedal
beyond the pressure point (kickdown) 152
Driving systemsDriving and parking
Page 157 of 329

Permanent SPEEDTRONIC
You can use the on-board computer to limit
the speed permanently to avalue between
160 km/h(e.g. for driving on winter tyres) and
the maximum speed ( Ypage 203).
Shortly before the store dspeed is reached, it
appears in the multifunction display.
Permanent SPEEDTRONIC remains active,
even if variable SPEEDTRONIC is deactivated.
You cannot exceed the stored limit speed,
even if you depress the accelerator pedal
beyond the pressure point (kickdown). DISTRONIC PLUS
Important safety notes G
WARNING
Do not change down for additional engine
braking on a slippery road surface. This could
cause the drive wheels to lose their grip and
the vehicle could skid. G
WARNING
DISTRONIC PLUS is only an aid designed to
assist driving. The driver remains fully respon-
sible for the vehicle's distance from other
vehicles, the vehicle's speed and for braking
in good time.
DISTRONIC PLUS does not react in particular
to:
R pedestrians
R stationary obstacles on the road, e.g. stop-
ped or parked vehicles
R oncoming and crossing traffic
DISTRONIC PLUS may not detect narro wvehi-
cles driving in front, e.g. motorcycles, or vehi-
cles driving on a differen tline. Therefore,
always pay attention to traffic conditions even
when DISTRONIC PLUS is activated. Other-
wise, you may fail to recognise dangers in
time, cause an accident and injure yourself
and others. G
WARNING
DISTRONIC PLUS cannot tak eaccount of road
and traffic conditions. If DISTRONIC doe snot
recognise or no longer recognises the vehicle
in front, do not activate DISTRONIC or, if it is
already active, deactivate it. This is especially
the case:
R before corners
R on filter lanes
R when changing to a lane with faster moving
traffic
R in complex driving situations or where lanes
are diverted, e.g. at roadworks on a motor-
way
DISTRONIC PLUS otherwise maintains the
current speed set by you or accelerates up to
the set speed.
DISTRONIC PLUS cannot take account of
weather conditions. Deactivate, or do not
activate, DISTRONIC PLUS:
R if the roads are slippery, snow-covered or
icy. The wheels could lose their grip when
braking or accelerating. The vehicle could
start to skid.
R if the sensors are dirty or there is poor vis-
ibility, e.g. due to snow, rain or fog. Dis-
tance control may be impaired.
Always pay attention to traffic conditions
even when DISTRONIC PLUS is activated.
Otherwise, you may fail to recognise dangers
in time, cause an accident and injure yourself
and others. G
WARNING
DISTRONIC PLUS brakes your vehicle up to a
maximum of 4 m/s 2
depending on its speed.
This corresponds to approximately 40% of
your vehicle's maximum braking power. You
must also apply the brakes yourself if this
braking power is not sufficient.
If DISTRONIC PLUS detects a risk of collision
with avehicle in front, an intermittent warning
tone sounds. In addition, the ·distance
warning lamp in the instrument cluster lights
up. Brake to avoid a collision. 154
Driving systemsDriving and parking
Page 206 of 329
ing remains on for 20 seconds after you
remove the key from the ignition lock.
X Press the =or; button on the steer-
ing wheel to selec tthe Settings menu.
X Press the :or9 button to select the
Light submenu.
X Press the abutton to confirm.
X Press the :or9 button to select the
Interior lighting delay sw. off: function.
You will see the selected setting:
on or
off .
X Press the abutton to save the setting.
Vehicle Setting permanent SPEEDTRONIC
X Press the =or; button on the steer-
ing wheel to select the Settings menu.
X Press the :or9 button to select the
Vehicle submenu.
X Press the abutton to confirm.
X Press the :or9 button to select the
Limit speed (winter tyres): function.
You will see the current setting.
X Press the abutton to confirm.
X Press the :or9 button to adjust
permanent SPEEDTRONIC in increments of
ten (230 km/h to
160 km/h ). The
Off set-
ting switches permanent SPEEDTRONIC
off.
X Press the abutton to store the entry.
You can set permanent SPEEDTRONIC
(Y page 154) using the Limit speed (win‐ter tyres): function.
Switching the automatic locking feature
on/off
X Press the =or; button on the steer-
ing wheel to select the Settings menu.
X Press the :or9 button to select the
Vehicle submenu.
X Press the abutton to confirm. X
Press the :or9 button to select the
Automatic door locks: function.
You will see the selected setting: on or
off .
X Press the abutton to save the setting.
If you select the Automatic door locks: function, the vehicle is centrally locked above
a speed of around 15 km/h.
i
For further information on the automatic
locking feature, see (Y page 77).
Activating/deactivating the acoustic
locking confirmation
If you switch on the Acoustic Lock feed‐ back function, an acoustic signal sounds
when you lock the vehicle.
X Press the =or; button on the steer-
ing wheel to select the Settings menu.
X Press the :or9 button to select the
Vehicle submenu.
X Press the abutton to confirm.
X Press the :or9 button to select the
Acoustic Lock feedback function.
You will see the selected setting: Activa‐ ted or
Deactivated .
X Press the abutton to save the setting.
Activating/deactivating the radar sensor
system
X Press the =or; button on the steer-
ing wheel to select the Settings menu.
X Press the :or9 button to select the
Vehicle submenu.
X Press the abutton to confirm.
X Press the 9or: button to select
Radar sensor (See Owner's Man.) .
You will see the selected setting: on or
off .
X Press the abutton to save the setting.
i You must deactivate the radar sensor sys-
tem in certain countries and near radio
telescope facilities. For further informa-
tion, see (Y page 320). Menus and submenus
203On-board computer and displays Z
Page 207 of 329
If the radars
ensor system is switched off,
Blind Spot Assist is deactivated
(Y page 177).
Convenience Switching the belt adjustment on/off
X
Press the =or; button on the steer-
ing wheel to select the Settings menu.
X Press the :or9 button to select the
Convenience submenu.
X Press the abutton to confirm.
X Press the :or9 button to select the
Belt adjustment: function.
You will see the selected setting: Activa‐ted or
Deactivated .
X Press the abutton to save the setting.
For further information on belt adjustment,
see (Y page 45).
Switching on/off the fold in mirrors when
locking function
X Press the =or; button on the steer-
ing wheel to select the Settings menu.
X Press the :or9 button to select the
Convenience submenu.
X Press the abutton to confirm.
X Press the :or9 button to select the
Fold mirrors in when locking: func-
tion.
You will see the selected setting: on or
off .
X Press the abutton to save the setting.
If you switch on the Fold mirrors in when
locking: function, the exterior mirrors fold
in when you lock the vehicle. When you
unlock the vehicle and then open the driver's
or front-passenger door, the exterior mirrors
fold out again.
If you have switched the function on and you
fold the exterior mirror sinusing the button
on the door (Y page 92), they will not fold out
automatically. The exterior mirrors can then
only be folded out using the button on the
door. Resetting to factory settings X
Press the =or; button on the steer-
ing wheel to select the Settings menu.
X Press the :or9 button to select the
Factory setting submenu.
X Press the abutton to confirm.
The Reset all settings? message
appears.
X Press the :or9 button to select
No or
Yes .
X Press the abutton to confirm the selec-
tion.
If you have selected Yes , the multifunction
display shows a confirmation message.
For safety reasons, not all functions are reset:
the Limit speed (winter tyres): func-
tion in permanent SPEEDTRONIC can only be
set in the Vehicle submenu. If you want to
reset the Daytime driving lights: in the
Light submenu, you must turn the key in the
ignition lock to position 1.204
Menus and submenusOn-board computer and displays
Page 271 of 329
Washing by hand
In some countries, washing by hand is only
allowed at wash bays that are specially
designed for this purpose. Observe the legal
requirements for each individual country.
X Do not use hot water and do not wash the
vehicle in direct sunlight.
X Use a soft sponge to clean.
X Use a mild cleaning agent, such as a car
shampoo approved by Mercedes-Benz.
X Thoroughly hose dow nthe vehicle with a
gentle jet of water.
X Do not point the water jet directly towards
the air inlet.
X Use plenty of water and rinse out the
sponge frequently.
X Rinse the vehicle with clean water and dry
thoroughly with a chamois.
X Do not let the cleaning agent dry on the
paintwork.
When using the vehicle in winter, remove all
traces of road salt deposits carefully and as
soon as possible.
High-pressure cleaning equipment G
WARNING
Do not use high-pressure cleaners with circu-
lar-jet nozzles (dirt grinders) to clean your
vehicle, in particular the tyres. You could oth-
erwise damage the tyres and cause an acci-
dent.
! Always maintain a distance of at least
30 cm between the vehicle and the high-
pressure cleaner nozzle. Information about
the correct distance is available from the
equipment manufacturer.
Move the high-pressure cleaner nozzle
around when cleaning your vehicle.
Do not aim directly at any of the following:
R tyres
R door gaps, roof gaps, joints etc.
R electrical components R
battery
R connectors
R lights
R seals
R trim elements
R ventilation slots
Damaged seals or electrical components
can lead to leaks or failures.
Cleaning the wheels !
Do not use acidic wheel cleaning products
to remove brake dust. This could damage
wheel bolts and brake components.
! Do not park up the vehicle for an extended
period straight after cleaning it, particularly
after having cleaned the wheels with wheel
cleaner. Wheel cleaners could cause
increased corrosion of the brake discs and
brake pads/linings. For this reason, you
should drive for a few minutes after clean-
ing. Braking heats the brake discs and the
brake pads/linings, thus drying them. The
vehicle can then be parked up.
Cleaning the paintwork !
Do not affix:
R stickers
R films
R magnetic plates or similar items
to painted surfaces. You could otherwise
damage the paintwork.
X Remove impurities immediately, where
possible, whilst avoiding rubbing too hard.
X Soak insect remains with insect remover
and rinse off the treated areas afterwards.
X Soak bird droppings with water and rinse
off the treated areas afterwards.
X Remove coolant, brake fluid, tree resin,
oils, fuels and greases by rubbing gently
with a cloth soaked in petroleum ether or
lighter fluid. 268
CareMaintenance and care
Page 279 of 329
Flat tyre
Preparing the vehicle
Your vehicle may be equipped with:
R MOExtended tyres (tyres with run-flat char-
acteristics) (Y page 276)
R a TIREFIT kit
R an emergency spare wheel (only for certain
countries)
You can find information on changing/fitting
wheels in the "Wheel change" section
(Y page 298).
i Vehicle preparation is no tnecessary on
vehicles with MOExtended tyres.
i Vehicles with MOExtended tyres are not
equipped with a TIREFIT kit at the factory.
It is therefore recommended that you addi-
tionally equip your vehicle with a TIREFIT kit
if you fit tyres that do not feature run-flat
characteristics, e.g. winter tyres. A TIREFIT
kit can be obtained from a qualified spe-
cialist workshop.
X Stop the vehicle as far away as possible
from traffic on solid, non-slippery and level
ground.
X Switch on the hazard warning lamps.
X Apply the electric parkin gbrake manually
(Y page 145).
X Bring the front wheels into the straight-
ahead position.
X Vehicles with manual transmission:
engage first or reverse gear.
X Vehicles with automatic transmission:
move the DIRECT SELECT lever to P.
X Switch off the engine.
X Remove the key from the ignition lock.
X All occupants must get out of the vehicle.
Make sure that they are not endangered as
they do so.
X Make sure that no one is near the danger
area whilst a wheel is being changed .Any-
one who is not directly assisting in the wheel change should, for example, stand
behind the barrier.
X Ge tout of the vehicle. Pay attention to traf-
fic conditions when doing so.
X Close the driver's door.
X Place the warning triangle ( Ypage 274) a
suitable distance away. Observe legal
requirements. MOExtended tyres (tyres with run-flat
characteristics)
G
WARNING
When driving in emergency mode, the driving
characteristics deteriorate, e.g. when corner-
ing, accelerating quickly and when braking.
There is a ris kofaccident.
Do not exceed the state dmaximum speed.
Avoid abrupt steering and driving manoeu-
vres, and driving ove robstacles (kerbs, pot-
holes, off-road). This applies in particular to a
laden vehicle.
Stop driving in emergency mode if:
R you hear banging noises.
R the vehicle starts to shake.
R you see smoke and smell rubber.
R ESP ®
is intervening constantly.
R there are tears in the sidewalls of the tyre.
After driving in emergency mode, have the
wheel rims checked at a qualified specialist
workshop with regard to their further use. The
faulty tyre must be replaced.
With MOExtended tyres (tyres with run-flat
characteristics), you can continue to drive
your vehicle even if there is a total loss of
pressure in one or more tyres.
MOExtended tyres may only be used in con-
junction with an activated tyre pressure loss
warning system.
The driving distance possible is 80 km when
the vehicle is partially laden, and 30 km when
the vehicle is fully laden. 276
Flat tyreBreakdown assistance