airbag off MERCEDES-BENZ B-CLASS HATCHBACK 2014 Owner's Manual
[x] Cancel search | Manufacturer: MERCEDES-BENZ, Model Year: 2014, Model line: B-CLASS HATCHBACK, Model: MERCEDES-BENZ B-CLASS HATCHBACK 2014Pages: 405, PDF Size: 12.24 MB
Page 69 of 405
Rearward-facing child restraint system
If it is absolutely necessary to fit a rearward-
facing child restraint system to the front-
passenger seat, always make sure that the
front-passenger front airbag is disabled. Only if the PASSENGER AIR BAG OFF indicator
lamp is lit continuously (Y page 41) is the
front-passenger front airbag disabled.
Always observe the information on suitable
positioning of the child restraint system
(Y page 66) in addition to the child restraint
system manufacturer's installation and oper-
ating instructions.
Forward-facing child restraint system If it is absolutely necessary to fit a forward-
facing child restraint system to the front-
passenger seat, always move the front-
passenger seat as far back as possible. The
entire base of the child restraint system must
always rest on the seat cushion of the front-
passenger seat. The backrest of the child
restraint system must, as far as possible, lie
flat against the backrest of the front-
passenger seat. The child restraint system
must not touch the roof or be put under strain by the head restraint. Adjust the angle of the
seat backrest and the head restraint position accordingly. Always make sure that the shoul-
der belt strap is correctly routed from the
vehicle belt outlet to the shoulder belt guide
on the child restraint system. The shoulder
belt strap must be routed forwards and down- wards from the vehicle belt outlet. If neces-
sary, adjust the vehicle belt outlet and the
front-passenger seat accordingly.
Always observe the information on suitable
positioning of the child restraint system
(Y page 66) in addition to the child restraint
system manufacturer's installation and oper- ating instructions. Suitable positioning of the child
restraint system
Introduction Only child restraint systems which are
approved in accordance with the ECE stand-
ard ECE R44 are permitted for use in the vehi-
cle.
For certain child restraint systems in weight
category III, this can mean that the area of use is restricted. The maximum size setting of the
child restraint system is not possible due to
possible contact with the roof.
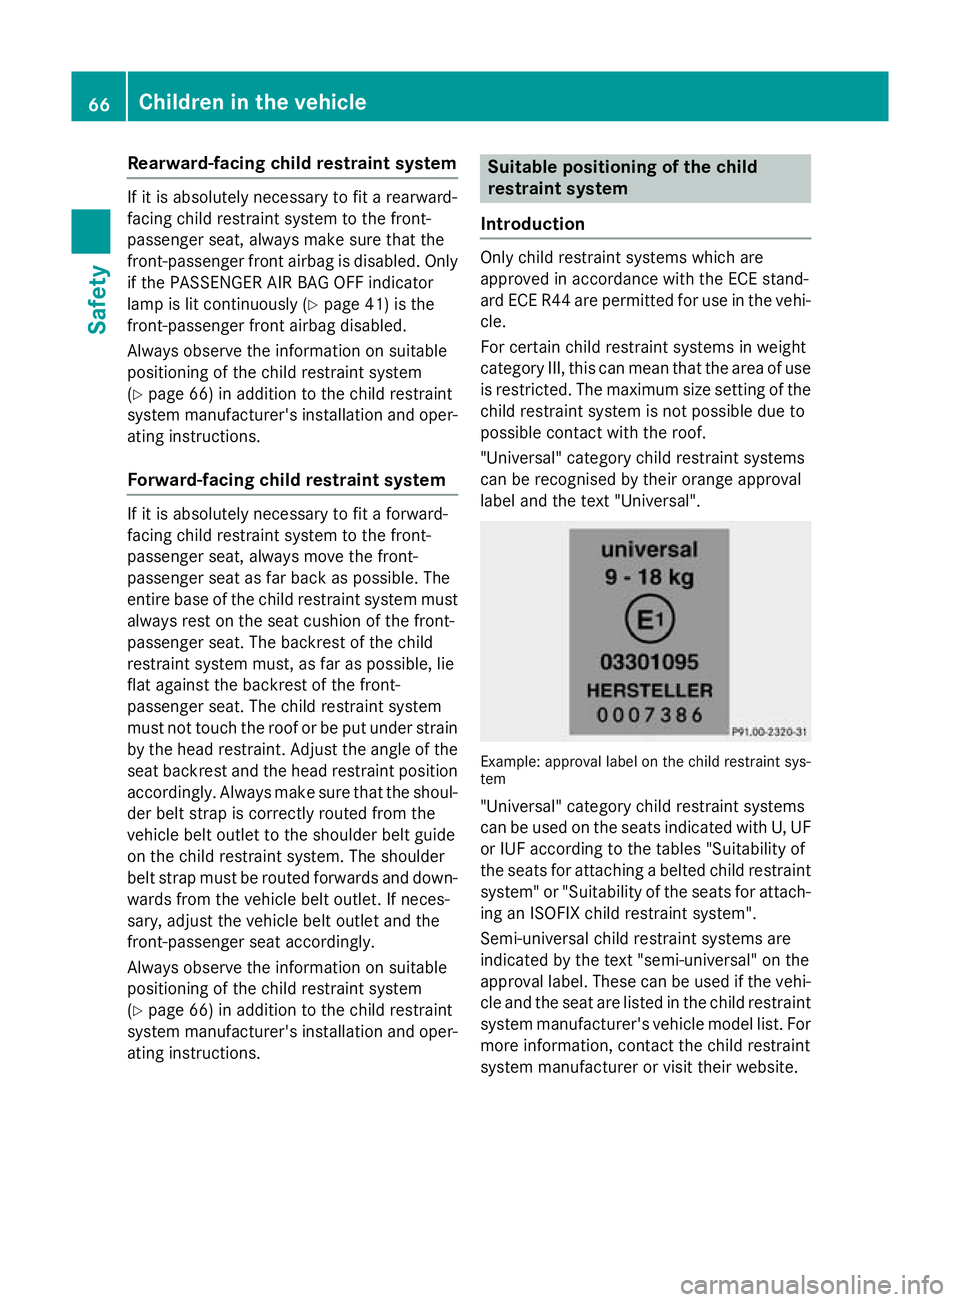
"Universal" category child restraint systems
can be recognised by their orange approval
label and the text "Universal". Example: approval label on the child restraint sys-
tem
"Universal" category child restraint systems
can be used on the seats indicated with U, UF
or IUF according to the tables "Suitability of
the seats for attaching a belted child restraint
system" or "Suitability of the seats for attach-
ing an ISOFIX child restraint system".
Semi-universal child restraint systems are
indicated by the text "semi-universal" on the
approval label. These can be used if the vehi- cle and the seat are listed in the child restraint
system manufacturer's vehicle model list. For more information, contact the child restraint
system manufacturer or visit their website. 66
Children in the vehicleSafety
Page 71 of 405
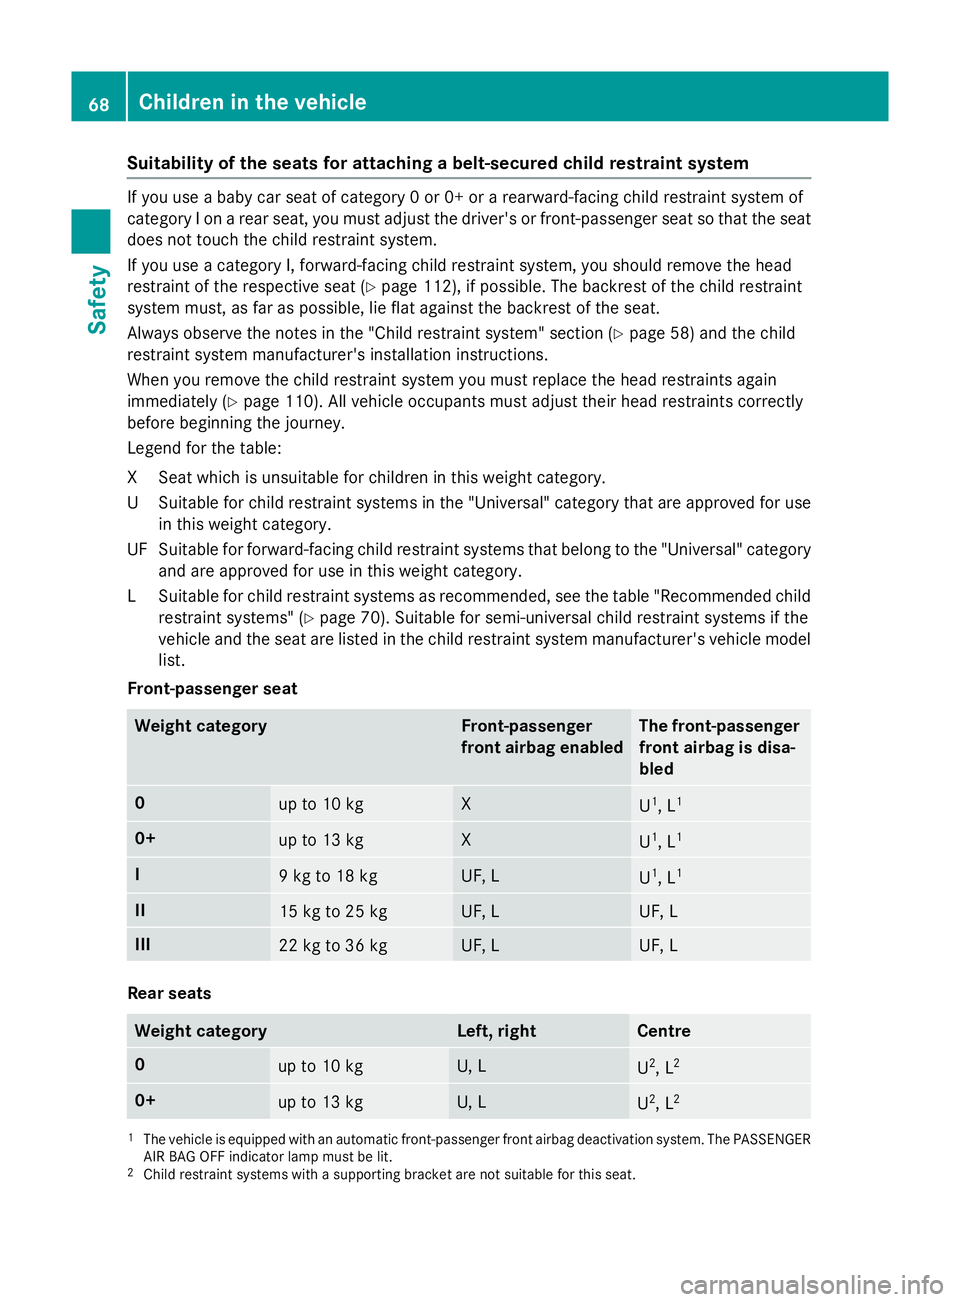
Suitability of the seats for attaching a belt-secured child restraint system
If you use a baby car seat of category 0 or 0+ or a rearward-facing child restraint system of
category I on a rear seat, you must adjust the driver's or front-passenger seat so that the seat
does not touch the child restraint system.
If you use a category I, forward-facing child restraint system, you should remove the head
restraint of the respective seat (Y page 112), if possible. The backrest of the child restraint
system must, as far as possible, lie flat against the backrest of the seat.
Always observe the notes in the "Child restraint system" section (Y page 58) and the child
restraint system manufacturer's installation instructions.
When you remove the child restraint system you must replace the head restraints again
immediately (Y page 110). All vehicle occupants must adjust their head restraints correctly
before beginning the journey.
Legend for the table:
XS eat which is unsuitable for children in this weight category.
US uitable for child restraint systems in the "Universal" category that are approved for use
in this weight category.
UF Suitable for forward-facing child restraint systems that belong to the "Universal" category and are approved for use in this weight category.
LS uitable for child restraint systems as recommended, see the table "Recommended child
restraint systems" (Y page 70). Suitable for semi-universal child restraint systems if the
vehicle and the seat are listed in the child restraint system manufacturer's vehicle model
list.
Front-passenger seat Weight category Front-passenger
front airbag enabled The front-passenger
front airbag is disa-
bled 0
up to 10 kg X
U
1
, L 1 0+
up to 13 kg X
U
1
, L 1 I
9 kg to 18 kg UF, L
U
1
, L 1 II
15 kg to 25 kg UF, L UF, L
III
22 kg to 36 kg UF, L UF, L
Rear seats
Weight category Left, right Centre
0
up to 10 kg U, L
U
2
, L 2 0+
up to 13 kg U, L
U
2
, L 2 1
The vehicle is equipped with an automatic front-passenger front airbag deactivation system. The PASSENGER
AIR BAG OFF indicator lamp must be lit.
2 Child restraint systems with a supporting bracket are not suitable for this seat. 68
Children in the vehicleSafety
Page 112 of 405
The seat belt should:
R fit snugly across your body
R be routed across the middle of your
shoulder
R be routed across your hips in the pelvic
area
X Before starting off, adjust the rear-view mir-
ror and the exterior mirrors (Y page 115)
so that you have a good view of road and
traffic conditions.
X Vehicles with a memory function: save
the seat and exterior mirror settings
(Y page 118). Seats
Important safety notes
G
WARNING
If children adjust the seats, they could
become trapped, especially if they are unat-
tended. There is a risk of injury.
When leaving the vehicle, always take the key with you and lock the vehicle. Never leave
children unattended in the vehicle.
The seats can still be adjusted when there is
no key in the ignition lock. G
WARNING
When adjusting a seat, you or another vehicle occupant could become trapped by the guiderail of the seat, for instance. There is a risk of
injury.
Make sure that no one has any part of their
body within the sweep of the seat when
adjusting it.
Observe the safety notes on "Airbags"
(Y page 46) and "Children in the Vehicle"
(Y page 57). G
WARNING
If the driver's seat is not correctly engaged, it could unexpectedly move while driving. This could cause you to lose control of the vehicle.
There is a risk of an accident.
Always ensure that the driver's seat is
engaged before starting the vehicle. G
WARNING
You could lose control of the vehicle while
driving if you:
R adjust the driver's seat, steering wheel or
mirrors
R fasten the seat belt
There is a risk of an accident.
Adjust the driver's seat, head restraint, steer-
ing wheel and mirrors and fasten your seat
belt before starting the engine. G
WARNING
If you adjust the seat height carelessly, you or other vehicle occupants could be trapped andthereby injured. Children in particular could
accidentally press the electrical seat adjust-
ment buttons and become trapped. There is a
risk of injury.
While moving the seats, make sure that your
hands or other body parts do not get under the
lever assembly of the seat adjustment sys-
tem.
! To avoid damage to the seats and the seat
heating, observe the following information:
R do not spill any liquids on the seats. If
liquid is spilled on the seats, dry them as
soon as possible.
R if the seat covers are damp or wet, do not
switch on the seat heating. The seat
heating should also not be used to dry
the seats.
R clean the seat covers as recommended;
see the "Interior care" section.
R do not transport heavy loads on the
seats. Do not place sharp objects on the
seat cushions, e.g. knives, nails or tools. Seats
109Seats, steering wheel and mirrors Z
Page 128 of 405
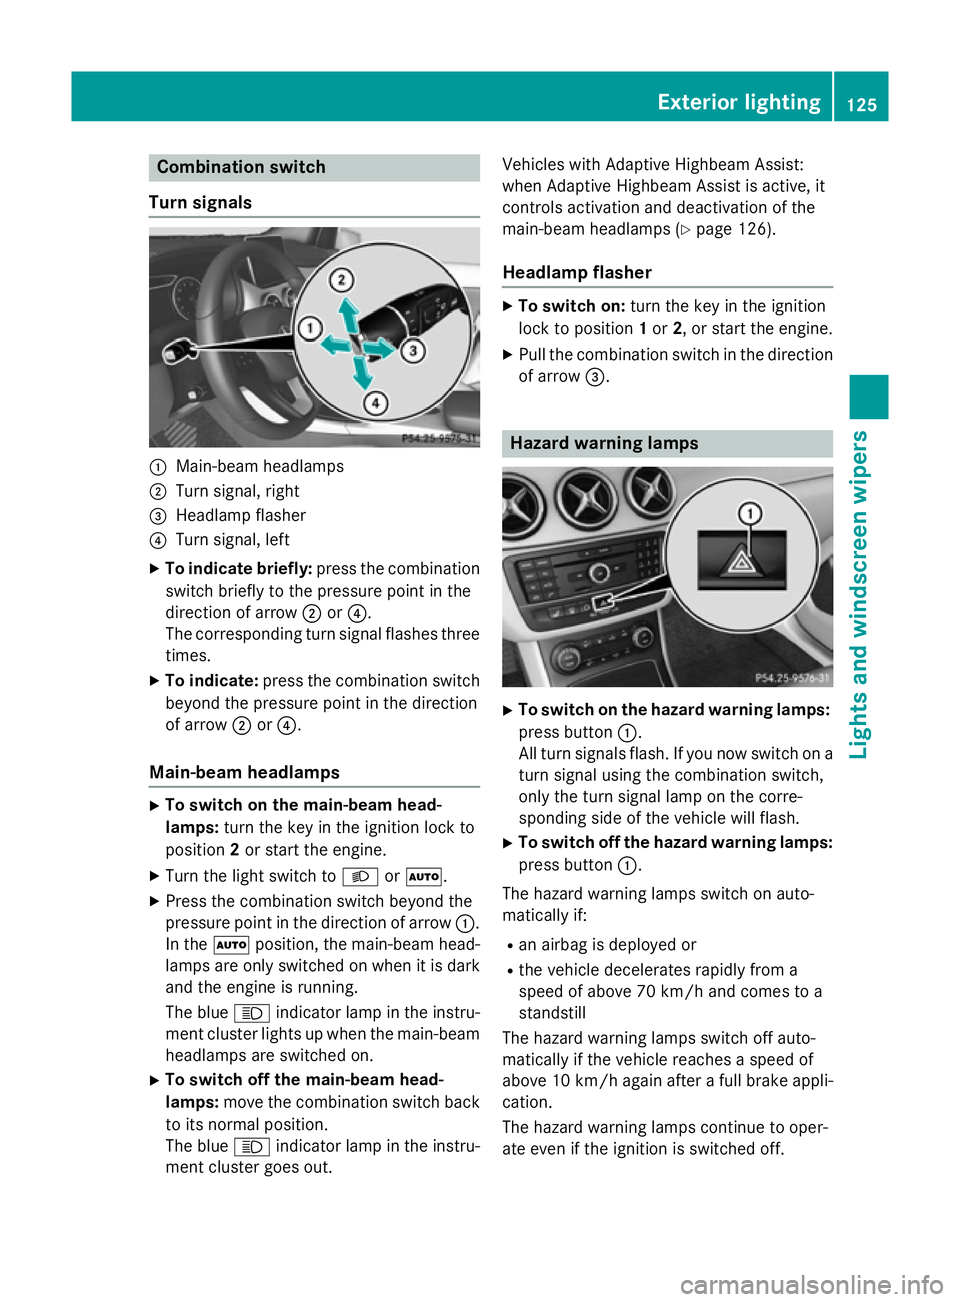
Combination switch
Turn signals :
Main-beam headlamps
; Turn signal, right
= Headlamp flasher
? Turn signal, left
X To indicate briefly: press the combination
switch briefly to the pressure point in the
direction of arrow ;or?.
The corresponding turn signal flashes three
times.
X To indicate: press the combination switch
beyond the pressure point in the direction
of arrow ;or?.
Main-beam headlamps X
To switch on the main-beam head-
lamps: turn the key in the ignition lock to
position 2or start the engine.
X Turn the light switch to LorÃ.
X Press the combination switch beyond the
pressure point in the direction of arrow :.
In the Ãposition, the main-beam head-
lamps are only switched on when it is dark
and the engine is running.
The blue Kindicator lamp in the instru-
ment cluster lights up when the main-beam headlamps are switched on.
X To switch off the main-beam head-
lamps: move the combination switch back
to its normal position.
The blue Kindicator lamp in the instru-
ment cluster goes out. Vehicles with Adaptive Highbeam Assist:
when Adaptive Highbeam Assist is active, it
controls activation and deactivation of the
main-beam headlamps (Y
page 126).
Headlamp flasher X
To switch on: turn the key in the ignition
lock to position 1or 2, or start the engine.
X Pull the combination switch in the direction
of arrow =. Hazard warning lamps
X
To switch on the hazard warning lamps:
press button :.
All turn signals flash. If you now switch on a turn signal using the combination switch,
only the turn signal lamp on the corre-
sponding side of the vehicle will flash.
X To switch off the hazard warning lamps:
press button :.
The hazard warning lamps switch on auto-
matically if:
R an airbag is deployed or
R the vehicle decelerates rapidly from a
speed of above 70 km/h and comes to a
standstill
The hazard warning lamps switch off auto-
matically if the vehicle reaches a speed of
above 10 km/h again after a full brake appli- cation.
The hazard warning lamps continue to oper-
ate even if the ignition is switched off. Exterior lighting
125Lights and windscreen wipers Z
Page 263 of 405
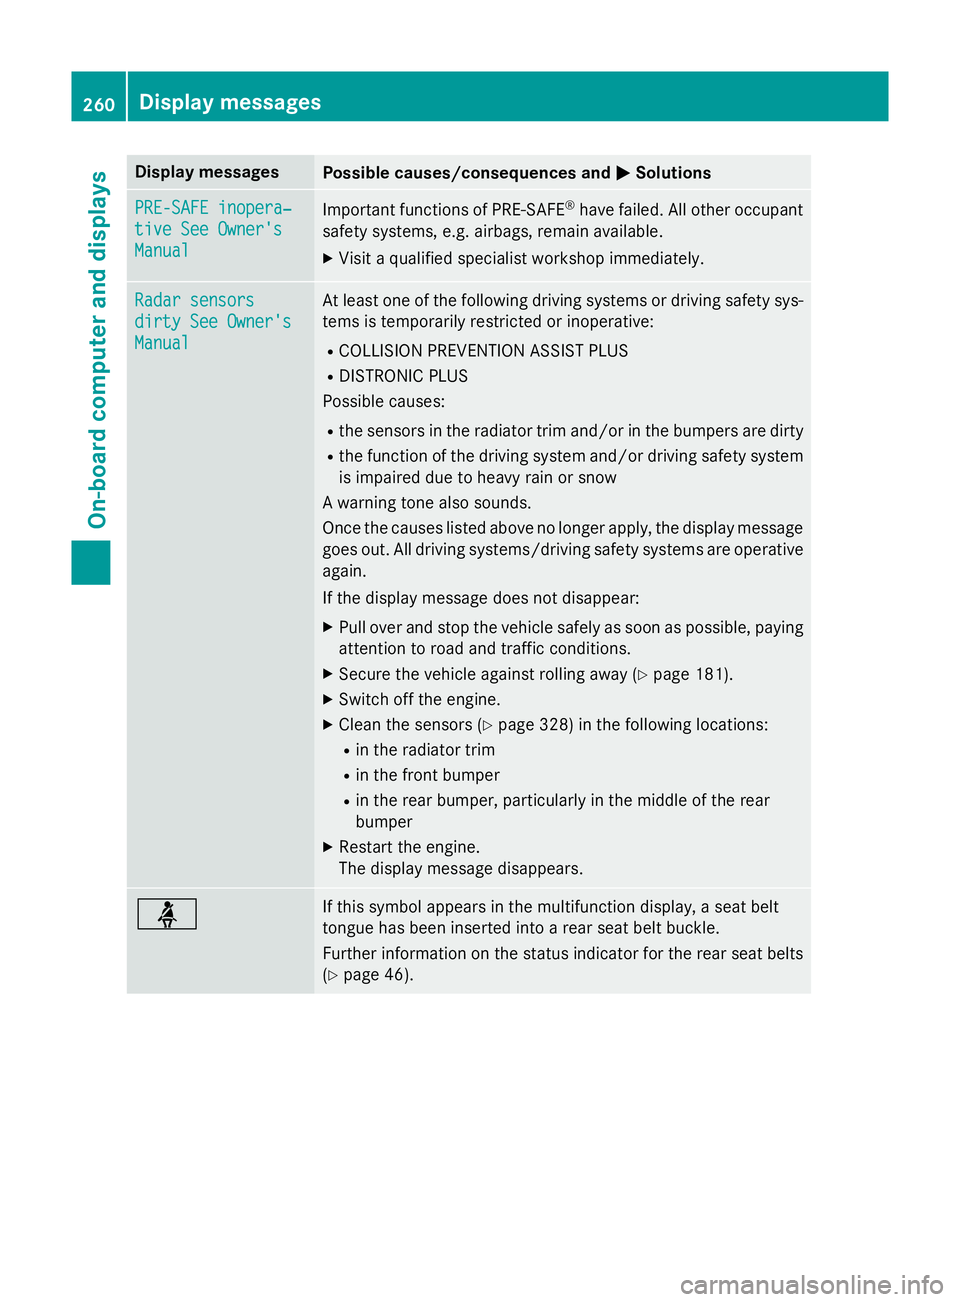
Display messages
Possible causes/consequences and
M
MSolutions PRE-SAFE inopera‐
PRE-SAFE inopera‐
tive See Owner's tive See Owner's
Manual Manual
Important functions of PRE-SAFE
®
have failed. All other occupant
safety systems, e.g. airbags, remain available.
X Visit a qualified specialist workshop immediately. Radar sensors
Radar sensors
dirty See Owner's dirty See Owner's
Manual Manual At least one of the following driving systems or driving safety sys-
tems is temporarily restricted or inoperative:
R COLLISION PREVENTION ASSIST PLUS
R DISTRONIC PLUS
Possible causes:
R the sensors in the radiator trim and/or in the bumpers are dirty
R the function of the driving system and/or driving safety system
is impaired due to heavy rain or snow
A warning tone also sounds.
Once the causes listed above no longer apply, the display message
goes out. All driving systems/driving safety systems are operative again.
If the display message does not disappear:
X Pull over and stop the vehicle safely as soon as possible, paying
attention to road and traffic conditions.
X Secure the vehicle against rolling away (Y page 181).
X Switch off the engine.
X Clean the sensors (Y page 328) in the following locations:
R in the radiator trim
R in the front bumper
R in the rear bumper, particularly in the middle of the rear
bumper
X Restart the engine.
The display message disappears. ü If this symbol appears in the multifunction display, a seat belt
tongue has been inserted into a rear seat belt buckle.
Further information on the status indicator for the rear seat belts
(Y page 46). 260
Display
messagesOn-board computer and displays
Page 266 of 405
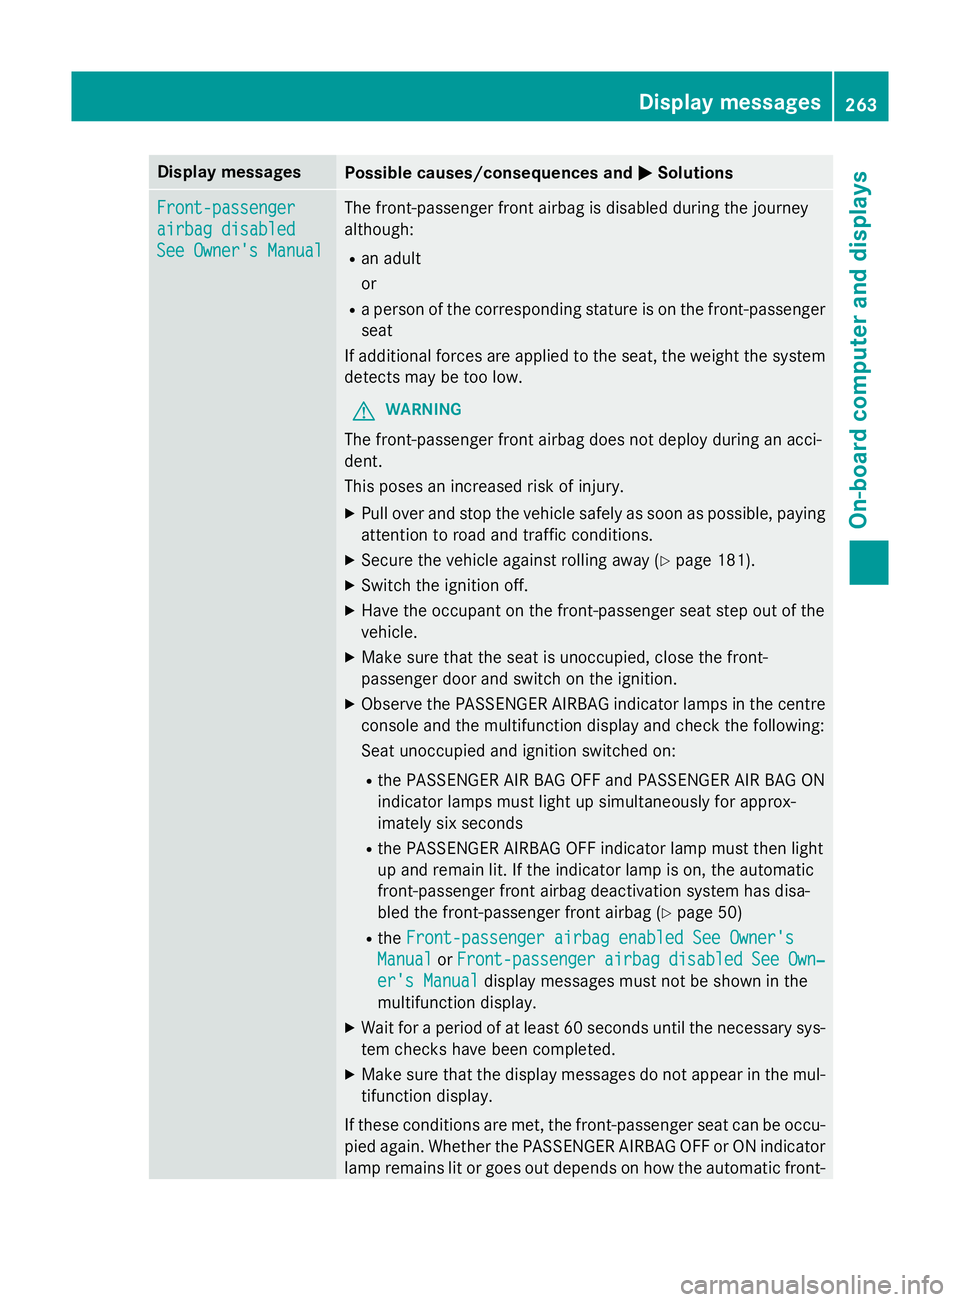
Display messages
Possible causes/consequences and
M
MSolutions Front-passenger
Front-passenger
airbag disabled airbag disabled
See Owner's Manual See Owner's Manual The front-passenger front airbag is disabled during the journey
although:
R an adult
or
R a person of the corresponding stature is on the front-passenger
seat
If additional forces are applied to the seat, the weight the system detects may be too low.
G WARNING
The front-passenger front airbag does not deploy during an acci-
dent.
This poses an increased risk of injury. X Pull over and stop the vehicle safely as soon as possible, paying
attention to road and traffic conditions.
X Secure the vehicle against rolling away (Y page 181).
X Switch the ignition off.
X Have the occupant on the front-passenger seat step out of the
vehicle.
X Make sure that the seat is unoccupied, close the front-
passenger door and switch on the ignition.
X Observe the PASSENGER AIRBAG indicator lamps in the centre
console and the multifunction display and check the following:
Seat unoccupied and ignition switched on:
R the PASSENGER AIR BAG OFF and PASSENGER AIR BAG ON
indicator lamps must light up simultaneously for approx-
imately six seconds
R the PASSENGER AIRBAG OFF indicator lamp must then light
up and remain lit. If the indicator lamp is on, the automatic
front-passenger front airbag deactivation system has disa-
bled the front-passenger front airbag (Y page 50)
R the Front-passenger airbag enabled See Owner's Front-passenger airbag enabled See Owner's
Manual
Manual orFront-passenger
Front-passenger airbag
airbagdisabled
disabled See
SeeOwn‐
Own‐
er's Manual
er's Manual display messages must not be shown in the
multifunction display.
X Wait for a period of at least 60 seconds until the necessary sys-
tem checks have been completed.
X Make sure that the display messages do not appear in the mul-
tifunction display.
If these conditions are met, the front-passenger seat can be occu-
pied again. Whether the PASSENGER AIRBAG OFF or ON indicator
lamp remains lit or goes out depends on how the automatic front- Display
messages
263On-board computer and displays Z
Page 267 of 405
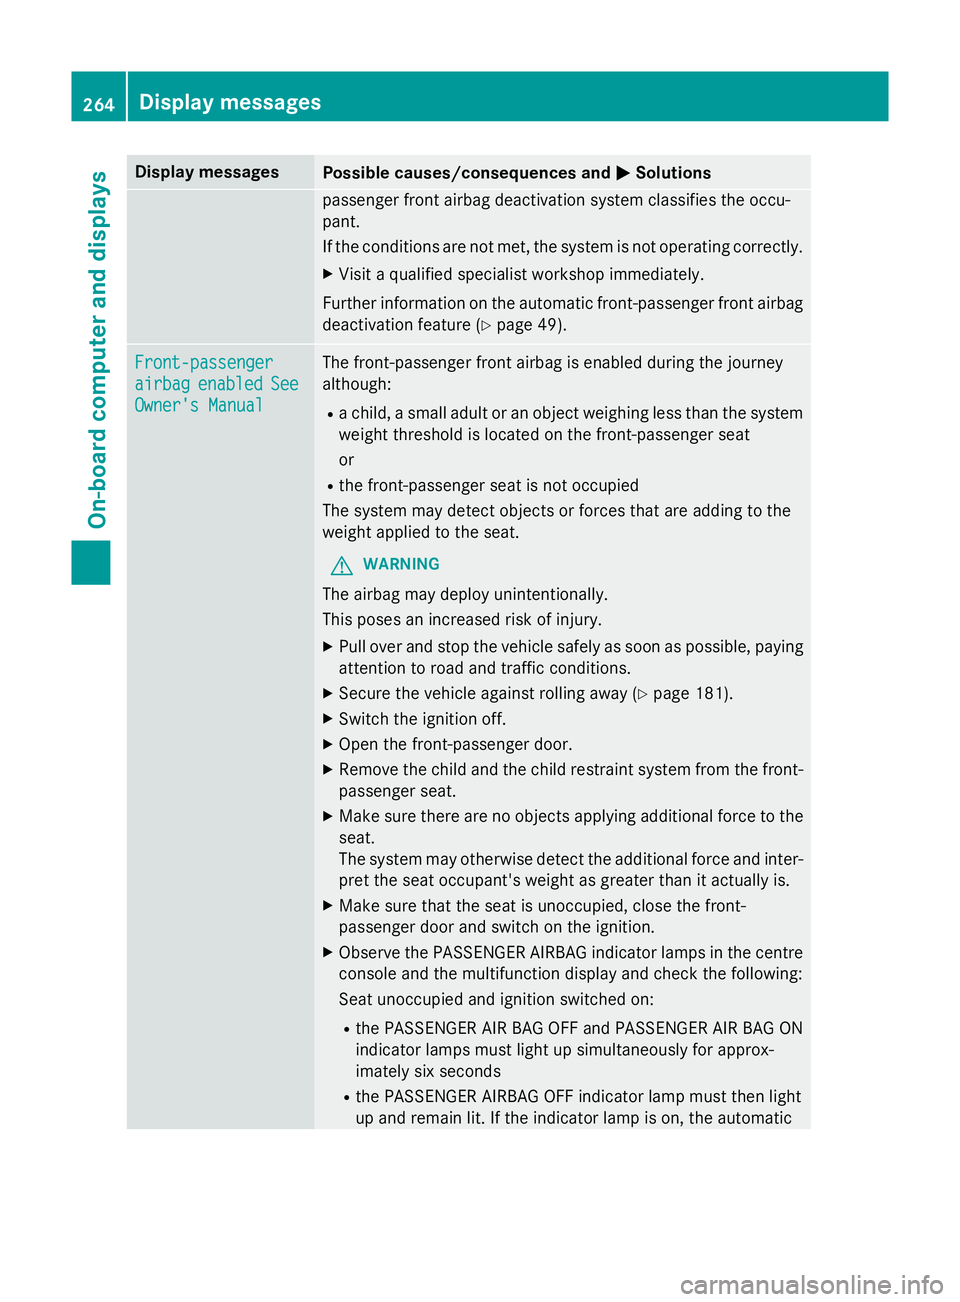
Display messages
Possible causes/consequences and
M
MSolutions passenger front airbag deactivation system classifies the occu-
pant.
If the conditions are not met, the system is not operating correctly.
X Visit a qualified specialist workshop immediately.
Further information on the automatic front-passenger front airbag deactivation feature (Y page 49).Front-passenger Front-passenger
airbag airbag
enabled
enabled See
See
Owner's Manual
Owner's Manual The front-passenger front airbag is enabled during the journey
although:
R a child, a small adult or an object weighing less than the system
weight threshold is located on the front-passenger seat
or
R the front-passenger seat is not occupied
The system may detect objects or forces that are adding to the
weight applied to the seat.
G WARNING
The airbag may deploy unintentionally.
This poses an increased risk of injury. X Pull over and stop the vehicle safely as soon as possible, paying
attention to road and traffic conditions.
X Secure the vehicle against rolling away (Y page 181).
X Switch the ignition off.
X Open the front-passenger door.
X Remove the child and the child restraint system from the front-
passenger seat.
X Make sure there are no objects applying additional force to the
seat.
The system may otherwise detect the additional force and inter- pret the seat occupant's weight as greater than it actually is.
X Make sure that the seat is unoccupied, close the front-
passenger door and switch on the ignition.
X Observe the PASSENGER AIRBAG indicator lamps in the centre
console and the multifunction display and check the following:
Seat unoccupied and ignition switched on:
R the PASSENGER AIR BAG OFF and PASSENGER AIR BAG ON
indicator lamps must light up simultaneously for approx-
imately six seconds
R the PASSENGER AIRBAG OFF indicator lamp must then light
up and remain lit. If the indicator lamp is on, the automatic 264
Display
messagesOn-board computer and displays
Page 268 of 405
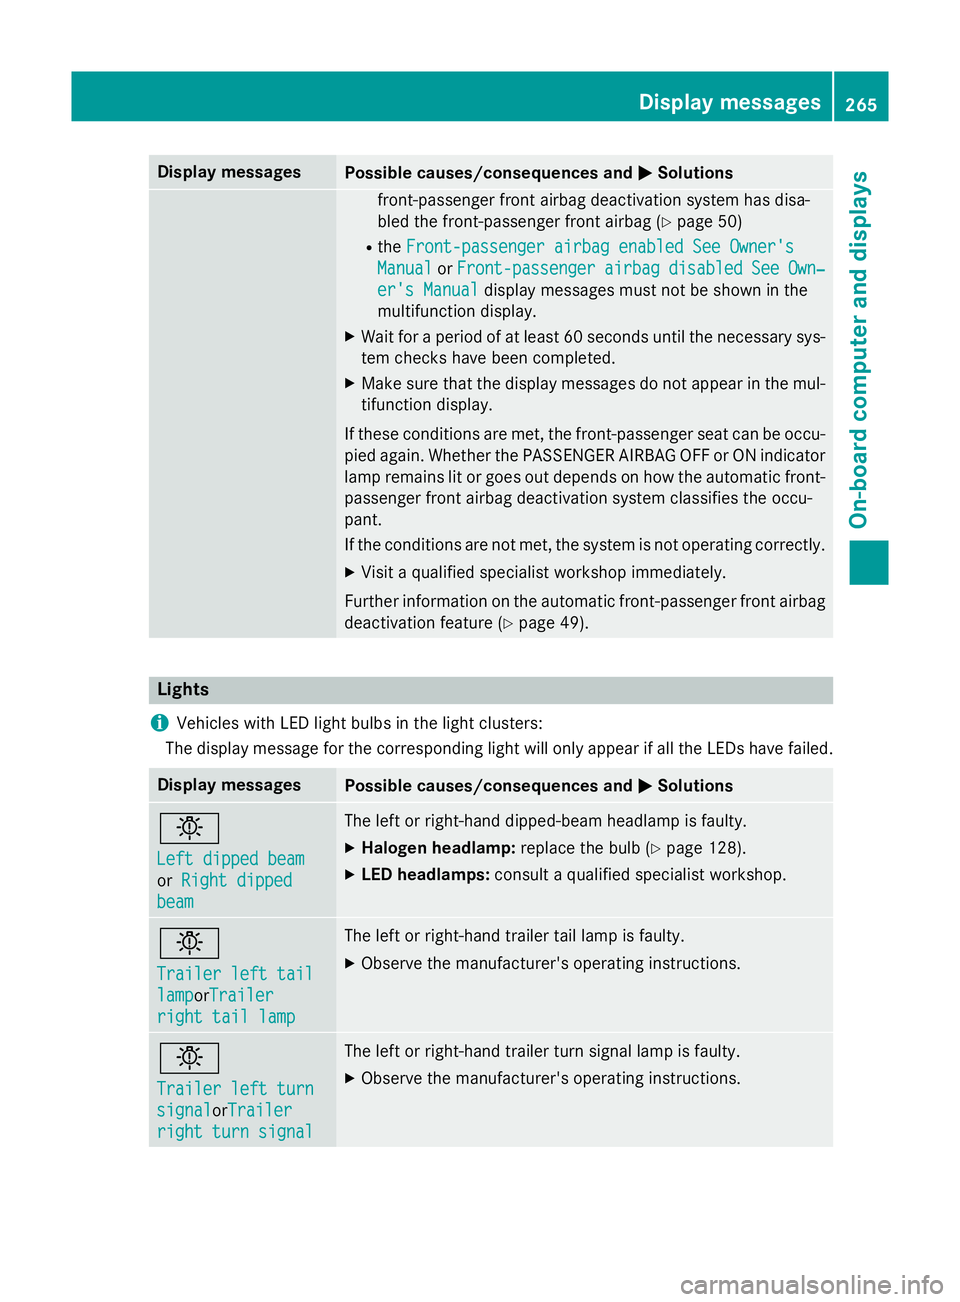
Display messages
Possible causes/consequences and
M
MSolutions front-passenger front airbag deactivation system has disa-
bled the front-passenger front airbag (Y
page 50)
R the Front-passenger airbag enabled See Owner's Front-passenger airbag enabled See Owner's
Manual
Manual orFront-passenger
Front-passenger airbag
airbagdisabled
disabled See
SeeOwn‐
Own‐
er's Manual
er's Manual display messages must not be shown in the
multifunction display.
X Wait for a period of at least 60 seconds until the necessary sys-
tem checks have been completed.
X Make sure that the display messages do not appear in the mul-
tifunction display.
If these conditions are met, the front-passenger seat can be occu-
pied again. Whether the PASSENGER AIRBAG OFF or ON indicator
lamp remains lit or goes out depends on how the automatic front-
passenger front airbag deactivation system classifies the occu-
pant.
If the conditions are not met, the system is not operating correctly.
X Visit a qualified specialist workshop immediately.
Further information on the automatic front-passenger front airbag deactivation feature (Y page 49).Lights
i Vehicles with LED light bulbs in the light clusters:
The display message for the corresponding light will only appear if all the LEDs have failed. Display messages
Possible causes/consequences and
M MSolutions b
Left dipped beam Left dipped beam
or
Right dipped Right dipped
beam
beam The left or right-hand dipped-beam headlamp is faulty.
X Halogen headlamp: replace the bulb (Ypage 128).
X LED headlamps: consult a qualified specialist workshop. b
Trailer left tail Trailer left tail
lamp lampor
Trailer
Trailer
right tail lamp
right tail lamp The left or right-hand trailer tail lamp is faulty.
X Observe the manufacturer's operating instructions. b
Trailer left turn Trailer left turn
signal signal
orTrailerTrailer
right turn signal
right turn signal The left or right-hand trailer turn signal lamp is faulty.
X Observe the manufacturer's operating instructions. Display
messages
265On-board computer and displays Z
Page 332 of 405
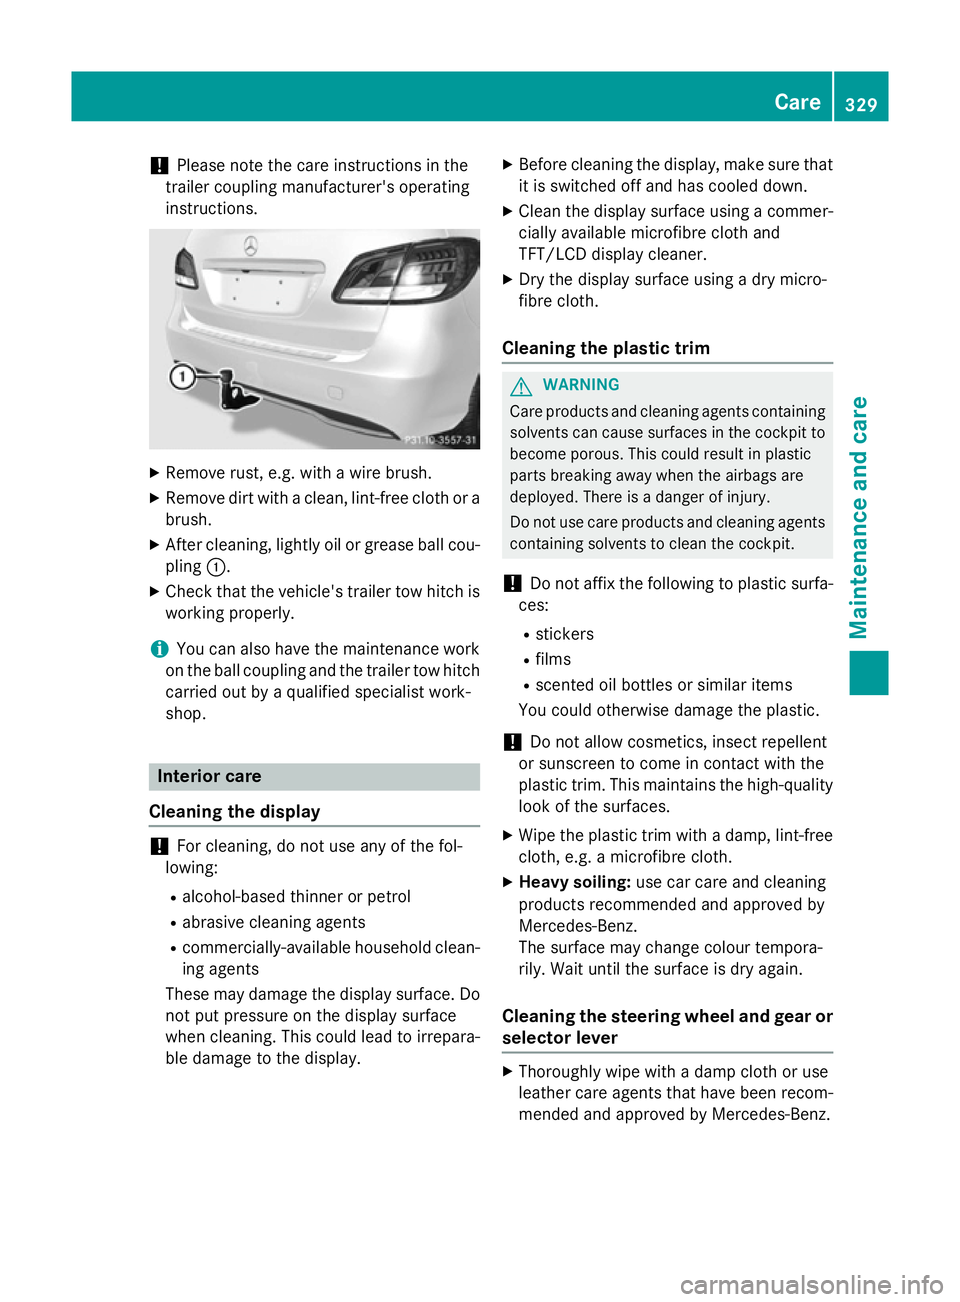
!
Please note the care instructions in the
trailer coupling manufacturer's operating
instructions. X
Remove rust, e.g. with a wire brush.
X Remove dirt with a clean, lint-free cloth or a
brush.
X After cleaning, lightly oil or grease ball cou-
pling :.
X Check that the vehicle's trailer tow hitch is
working properly.
i You can also have the maintenance work
on the ball coupling and the trailer tow hitch
carried out by a qualified specialist work-
shop. Interior care
Cleaning the display !
For cleaning, do not use any of the fol-
lowing:
R alcohol-based thinner or petrol
R abrasive cleaning agents
R commercially-available household clean-
ing agents
These may damage the display surface. Do not put pressure on the display surface
when cleaning. This could lead to irrepara-
ble damage to the display. X
Before cleaning the display, make sure that
it is switched off and has cooled down.
X Clean the display surface using a commer-
cially available microfibre cloth and
TFT/LCD display cleaner.
X Dry the display surface using a dry micro-
fibre cloth.
Cleaning the plastic trim G
WARNING
Care products and cleaning agents containing solvents can cause surfaces in the cockpit to
become porous. This could result in plastic
parts breaking away when the airbags are
deployed. There is a danger of injury.
Do not use care products and cleaning agents containing solvents to clean the cockpit.
! Do not affix the following to plastic surfa-
ces:
R stickers
R films
R scented oil bottles or similar items
You could otherwise damage the plastic.
! Do not allow cosmetics, insect repellent
or sunscreen to come in contact with the
plastic trim. This maintains the high-quality look of the surfaces.
X Wipe the plastic trim with a damp, lint-free
cloth, e.g. a microfibre cloth.
X Heavy soiling: use car care and cleaning
products recommended and approved by
Mercedes-Benz.
The surface may change colour tempora-
rily. Wait until the surface is dry again.
Cleaning the steering wheel and gear or selector lever X
Thoroughly wipe with a damp cloth or use
leather care agents that have been recom-
mended and approved by Mercedes-Benz. Care
329Maintenance and care Z