mirror MERCEDES-BENZ B-CLASS HATCHBACK 2014 Owner's Guide
[x] Cancel search | Manufacturer: MERCEDES-BENZ, Model Year: 2014, Model line: B-CLASS HATCHBACK, Model: MERCEDES-BENZ B-CLASS HATCHBACK 2014Pages: 405, PDF Size: 12.24 MB
Page 269 of 405
Display messages
Possible causes/consequences and
M
MSolutions b
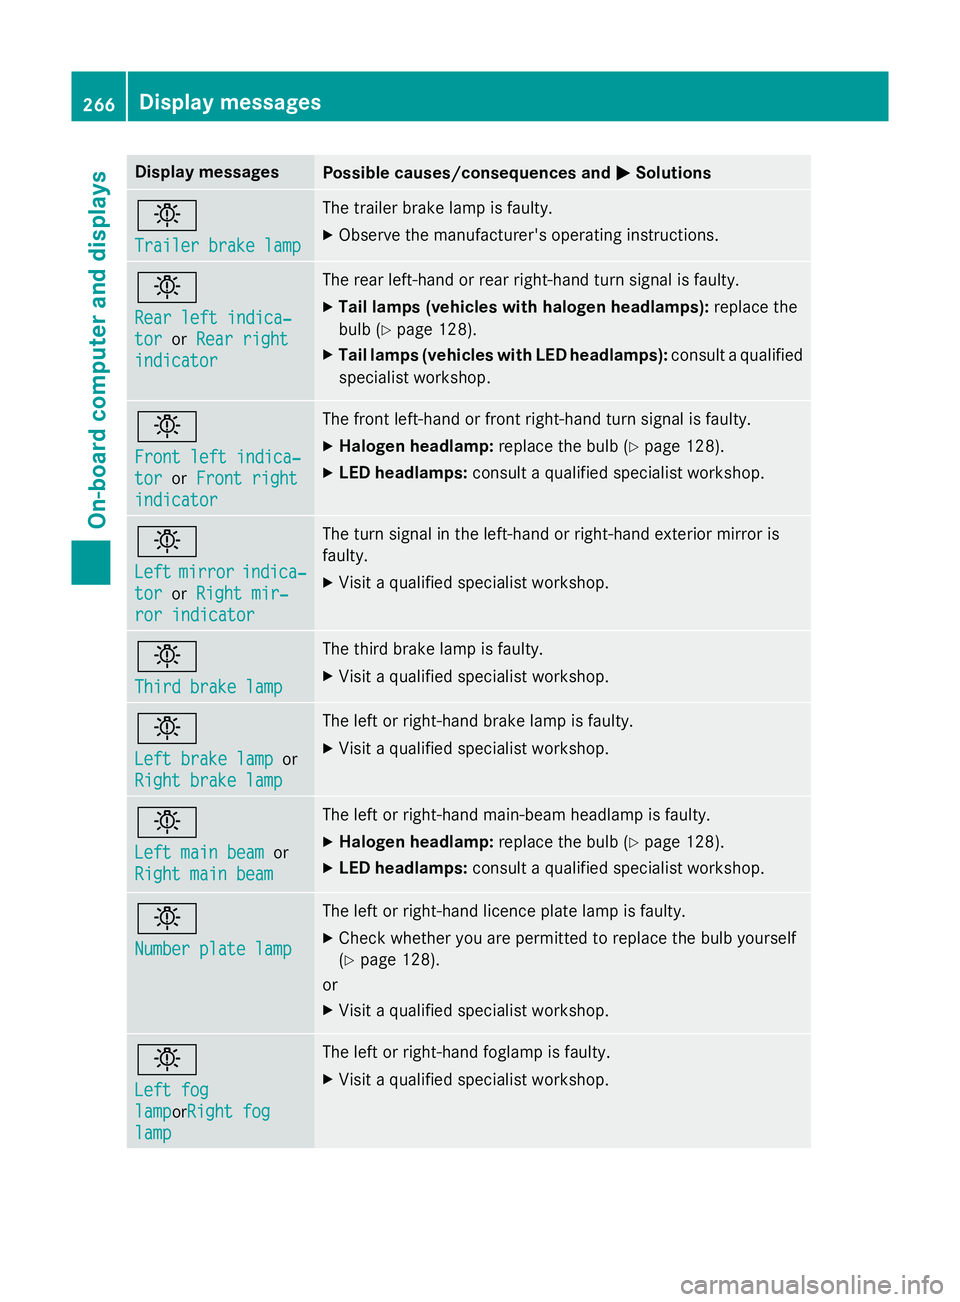
Trailer brake lamp Trailer brake lamp The trailer brake lamp is faulty.
X Observe the manufacturer's operating instructions. b
Rear left indica‐ Rear left indica‐
tor tor
orRear right
Rear right
indicator
indicator The rear left-hand or rear right-hand turn signal is faulty.
X Tail lamps (vehicles with halogen headlamps): replace the
bulb (Y page 128).
X Tail lamps (vehicles with LED headlamps): consult a qualified
specialist workshop. b
Front left indica‐ Front left indica‐
tor tor
orFront right
Front right
indicator
indicator The front left-hand or front right-hand turn signal is faulty.
X Halogen headlamp: replace the bulb (Ypage 128).
X LED headlamps: consult a qualified specialist workshop. b
Left Left
mirror
mirror indica‐
indica‐
tor
tor orRight mir‐
Right mir‐
ror indicator
ror indicator The turn signal in the left-hand or right-hand exterior mirror is
faulty.
X Visit a qualified specialist workshop. b
Third brake lamp Third brake lamp The third brake lamp is faulty.
X Visit a qualified specialist workshop. b
Left brake lamp Left brake lamp
or
Right brake lamp
Right brake lamp The left or right-hand brake lamp is faulty.
X Visit a qualified specialist workshop. b
Left main beam Left main beam
or
Right main beam
Right main beam The left or right-hand main-beam headlamp is faulty.
X Halogen headlamp: replace the bulb (Ypage 128).
X LED headlamps: consult a qualified specialist workshop. b
Number plate lamp Number plate lamp The left or right-hand licence plate lamp is faulty.
X Check whether you are permitted to replace the bulb yourself
(Y page 128).
or
X Visit a qualified specialist workshop. b
Left fog Left fog
lamp lampor
Right fog
Right fog
lamp
lamp The left or right-hand foglamp is faulty.
X Visit a qualified specialist workshop. 266
Display
messagesOn-board computer and displays
Page 314 of 405
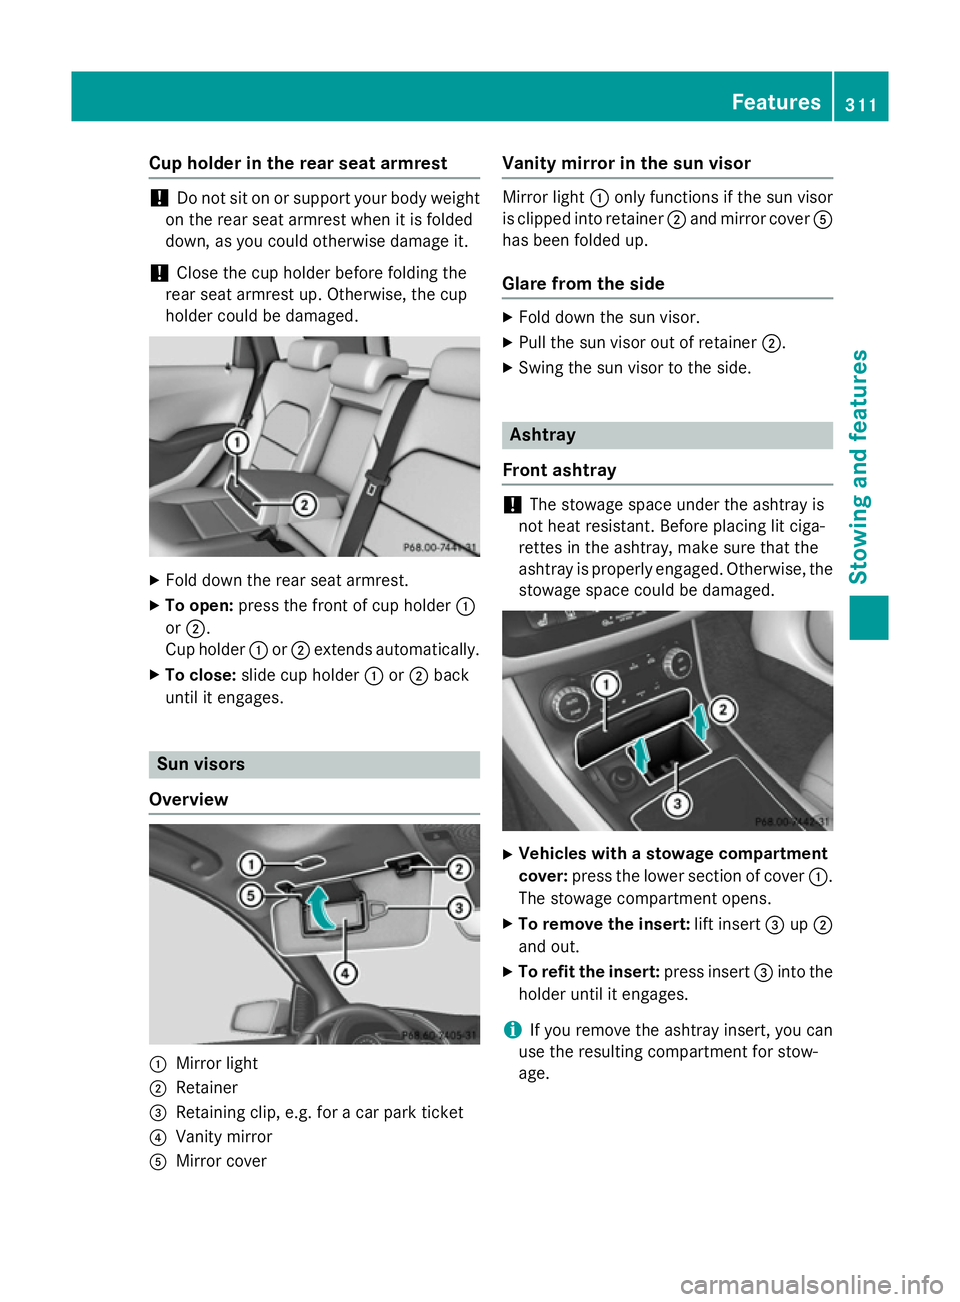
Cup holder in the rear seat armrest
!
Do not sit on or support your body weight
on the rear seat armrest when it is folded
down, as you could otherwise damage it.
! Close the cup holder before folding the
rear seat armrest up. Otherwise, the cup
holder could be damaged. X
Fold down the rear seat armrest.
X To open: press the front of cup holder :
or ;.
Cup holder :or; extends automatically.
X To close: slide cup holder :or; back
until it engages. Sun visors
Overview :
Mirror light
; Retainer
= Retaining clip, e.g. for a car park ticket
? Vanity mirror
A Mirror cover Vanity mirror in the sun visor Mirror light
:only functions if the sun visor
is clipped into retainer ;and mirror cover A
has been folded up.
Glare from the side X
Fold down the sun visor.
X Pull the sun visor out of retainer ;.
X Swing the sun visor to the side. Ashtray
Front ashtray !
The stowage space under the ashtray is
not heat resistant. Before placing lit ciga-
rettes in the ashtray, make sure that the
ashtray is properly engaged. Otherwise, the
stowage space could be damaged. X
Vehicles with a stowage compartment
cover: press the lower section of cover :.
The stowage compartment opens.
X To remove the insert: lift insert=up;
and out.
X To refit the insert: press insert=into the
holder until it engages.
i If you remove the ashtray insert, you can
use the resulting compartment for stow-
age. Features
311Stowing and features Z
Page 331 of 405
Cleaning the mirror turn signal
!
Only use cleaning agents or cleaning
cloths that are suitable for plastic lenses.
Unsuitable cleaning agents or cleaning
cloths could scratch or damage the plastic lenses of the mirror turn signals.
X Clean the plastic lenses of the mirror turn
signals in the exterior mirror housing using
a wet sponge and mild cleaning agent, e.g.
Mercedes-Benz car shampoo or cleaning
cloths.
Cleaning the sensors !
If you clean the sensors with a high-pres-
sure cleaner, make sure that you keep a
distance of at least 30 cm between the
vehicle and the high-pressure cleaner noz-
zle. Information about the correct distance is available from the equipment manufac-
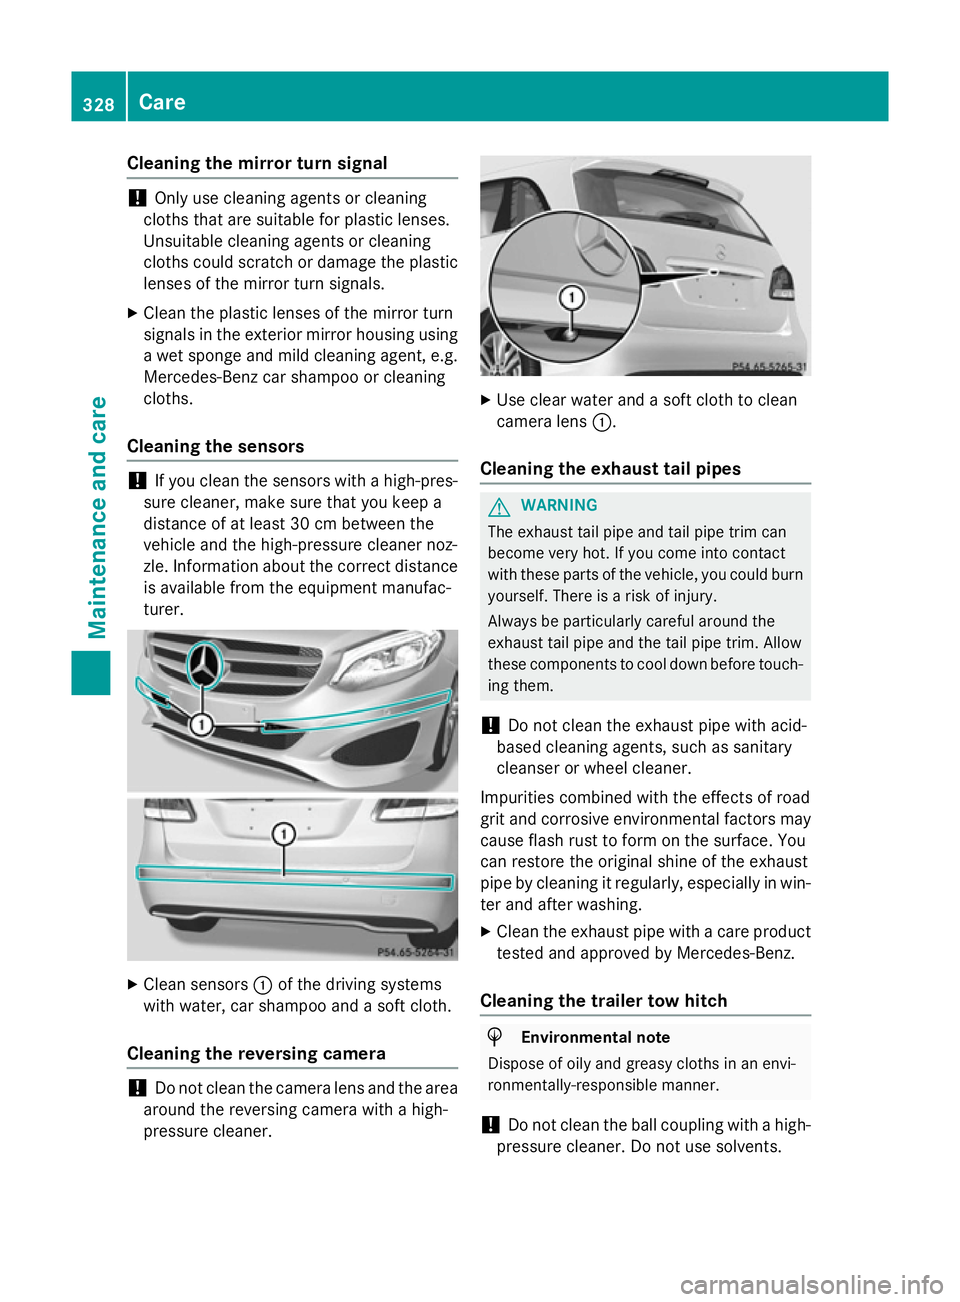
turer. X
Clean sensors :of the driving systems
with water, car shampoo and a soft cloth.
Cleaning the reversing camera !
Do not clean the camera lens and the area
around the reversing camera with a high-
pressure cleaner. X
Use clear water and a soft cloth to clean
camera lens :.
Cleaning the exhaust tail pipes G
WARNING
The exhaust tail pipe and tail pipe trim can
become very hot. If you come into contact
with these parts of the vehicle, you could burn
yourself. There is a risk of injury.
Always be particularly careful around the
exhaust tail pipe and the tail pipe trim. Allow
these components to cool down before touch-
ing them.
! Do not clean the exhaust pipe with acid-
based cleaning agents, such as sanitary
cleanser or wheel cleaner.
Impurities combined with the effects of road
grit and corrosive environmental factors may cause flash rust to form on the surface. You
can restore the original shine of the exhaust
pipe by cleaning it regularly, especially in win- ter and after washing.
X Clean the exhaust pipe with a care product
tested and approved by Mercedes-Benz.
Cleaning the trailer tow hitch H
Environmental note
Dispose of oily and greasy cloths in an envi-
ronmentally-responsible manner.
! Do not clean the ball coupling with a high-
pressure cleaner. Do not use solvents. 328
CareMaintenance and care
Page 344 of 405
sumers. The vehicle will then use very little
energy, thus conserving battery power.
i If the power supply has been interrupted,
e.g. if the battery was discharged, you will
have to:
R set the clock via Audio 20 or COMAND
Online; see the separate operating
instructions
R reset the function for folding the exterior
mirrors in/out automatically, by folding
the mirrors out once (Y page 116).Charging the battery
G
WARNING
During charging and jump-starting, explosive
gases can escape from the battery. There is a risk of an explosion.
Particularly avoid fire, naked flames, creating
sparks and smoking. Ensure there is sufficient
ventilation while charging and jump-starting.
Do not lean over a battery. G
WARNING
Battery acid is caustic. There is a risk of injury. Avoid contact with the skin, eyes or clothing.
Do not breathe in any battery gases. Do not
lean over the battery. Keep the batteries out
of the reach of children. Immediately rinse off
battery acid thoroughly with plenty of clean
water and seek medical attention at once. G
WARNING
A discharged battery can freeze at tempera-
tures below freezing point. When jump-start-
ing the vehicle or charging the battery, gases can escape from the battery. There is a risk of
an explosion.
Allow the frozen battery to thaw out before
charging it or jump-starting.
! Only use battery chargers with a maxi-
mum charging voltage of 14.8 V.
! Only charge the battery using the jump-
start connection point. The jump-starting connection point is in the
engine compartment (Y
page 342).
X Open the bonnet.
X Connect the battery charger to the positive
terminal and earth point in the same order
as when connecting the donor battery in
the jump-starting procedure (Y page 342).
If the indicator/warning lamps do not light up at low temperatures, it is very likely that the
discharged battery has frozen. In this case
you may neither jump-start the vehicle nor
charge the battery. The service life of a bat-
tery that has been thawed may be reduced.
The starting characteristics may be impaired,
especially at low temperatures. Have the
thawed battery checked at a qualified spe-
cialist workshop.
Only charge the installed battery with a bat-
tery charger which has been tested and
approved by Mercedes-Benz. A battery
charger unit specially adapted for Mercedes-
Benz vehicles and tested and approved by
Mercedes-Benz is available as an accessory.
This device permits charging of the battery in position. Contact a Mercedes-Benz Service
Centre for information and availability. Read
the battery charger's operating instructions
before charging the battery. Battery (vehicle)
341Breakdown assistance Z
Page 397 of 405
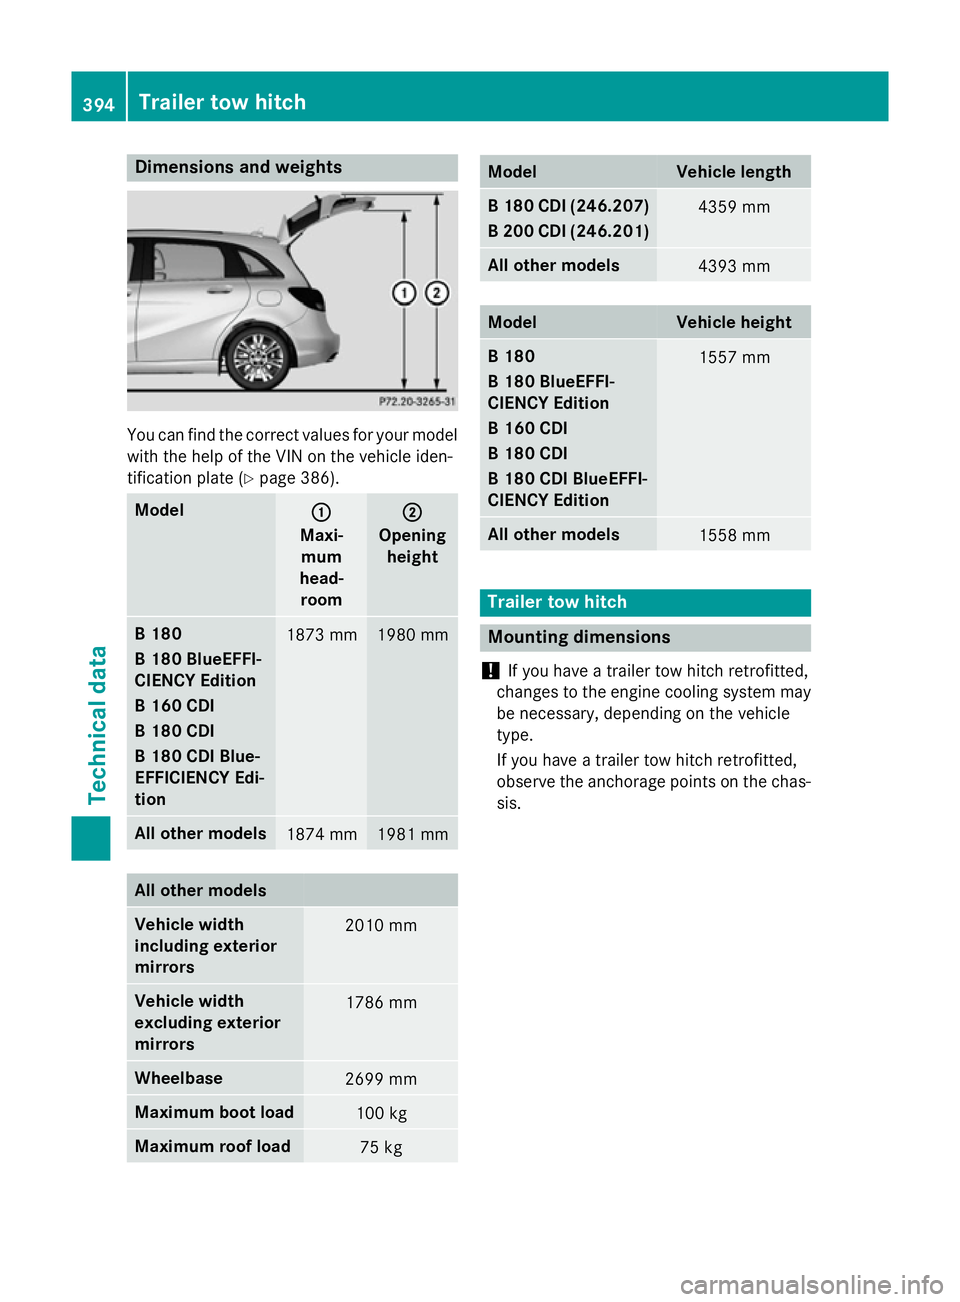
Dimensions and weights
You can find the correct values for your model
with the help of the VIN on the vehicle iden-
tification plate (Y page 386). Model
: :
Maxi- mum
head- room ;
;
Opening height B 180
B 180 BlueEFFI-
CIENCY Edition
B 160 CDI
B 180 CDI
B 180 CDI Blue-
EFFICIENCY Edi-
tion
1873 mm 1980 mm
All other models
1874 mm 1981 mm
All other models
Vehicle width
including exterior
mirrors
2010 mm
Vehicle width
excluding exterior
mirrors
1786 mm
Wheelbase
2699 mm
Maximum boot load
100 kg
Maximum roof load
75 kg Model Vehicle length
B 180 CDI (246.207)
B 200 CDI (246.201) 4359 mm
All other models
4393 mm
Model Vehicle height
B 180
B 180 BlueEFFI-
CIENCY Edition
B 160 CDI
B 180 CDI
B 180 CDI BlueEFFI-
CIENCY Edition
1557 mm
All other models
1558 mm
Trailer tow hitch
Mounting dimensions
! If you have a trailer tow hitch retrofitted,
changes to the engine cooling system may
be necessary, depending on the vehicle
type.
If you have a trailer tow hitch retrofitted,
observe the anchorage points on the chas- sis. 394
Trailer tow hitchTe
chnical da ta