eco MERCEDES-BENZ B-CLASS HATCHBACK 2015 Owners Manual
[x] Cancel search | Manufacturer: MERCEDES-BENZ, Model Year: 2015, Model line: B-CLASS HATCHBACK, Model: MERCEDES-BENZ B-CLASS HATCHBACK 2015Pages: 293, PDF Size: 10.83 MB
Page 8 of 293
Care
Automatic car wash ...................... .243
Carpets .......................................... 247
Display .......................................... .246
Exterior lighting ............................ .245
Gear or selector lever .................... 247
High-pressure cleaner .................... 243
Interior .......................................... .246
Matt paintwork .............................. 244
Notes ............................................. 242
Paint .............................................. 244
Plastic trim ................................... .246
Reversing camera .......................... 246
Roof lining ...................................... 247
Seat belt ........................................ 247
Seat cover ..................................... 247
Sensors ......................................... 245
Steering wheel ............................... 247
Trim pieces ................................... .247
Washing by hand ........................... 243
Wheels .......................................... .244
Windows ........................................ 244
Wiper blades .................................. 245
Wooden trim .................................. 247
CD player (on-board computer) ........180
Central locking
Automatic locking (on-board com-
puter) ............................................. 187
Locking/unlocking (key ).................. 72
Centre console
Lower section .................................. 31
Upper section .................................. 30
Changing bulbs
Cornering light function ................. 106
Dipped-beam headlamp s............... 105
Licence plate lighting ..................... 108
Main-beam headlamp s................... 105
Parking lamps (front) ..................... 106
Rear foglamp ................................. 107
Reversing lamps ............................ 107
Standing lamps .............................. 106
Turn signals (front) ......................... 106
Turn signals (rear) .......................... 107
Charge level display .......................... 174
Charge socket flap
Emergency release ........................ 143
Charging
with RANGE PLUS .......................... 184 see Charging the high-voltage battery
Charging cable
Connection .................................... 141
Control panel ................................. 140
Disconnecting ................................ 142
Heating up ..................................... 135
Important safety notes .................. 139
Indicator lamps .............................. 141
Storing ........................................... 140
Charging the high-voltage battery
(important safety notes) ................... 134
Child
Restraint system .............................. 49
Child seat
Forward-facing restraint system ...... 54
ISOFIX .............................................. 50
On the front-passenger sea t............ 52
Rearward-facing restraint system .... 53
Recommendations ........................... 58
Suitable positions ............................ 54
Top Tether ....................................... 51
Child-proof locks
Important safety notes .................... 60
Rear doors ....................................... 60
Cigarette lighter ................................ 235
Cleaning
Mirror turn signal ........................... 245
Climate control
Auxiliary climate control (on-
board computer) ............................ 185
Controlling automaticall y............... 117
Convenience opening/closing
(air-recirculation mode) ................. 120
Cooling with air dehumidification .. 116
Demisting the windows .................. 118
Demisting the windscreen ............. 118
Immediate pre-entry climate con-
trol ................................................. 121
Indicator lamp ................................ 117
Information on using
THERMOTRONIC automatic cli-
mate control .................................. 115
Overview of systems ...................... 114
Pre-entry climate control at
departure time ............................... 121
Pre-entry climate control at time
of departure (on-board computer) .. 185 Pre-entry climate control via key ... 121 Index
5
Page 11 of 293
DVD video
Operating (on-board computer) .... .180 E
E‑CELL display ................................... 173
EBD (electronic brake force distri-
bution)
Display message ............................ 192
Function/notes ................................ 66
ECO display
Function/notes ............................ .148
On-board computer ....................... 176
Electric motor number ......................282
Electromagnetic compatibility
Declaration of conformity ................ 22
Electronic Stability Program
see ESP ®
(Electronic Stability Program)
Emergency
Automatic measures after an acci-
dent ................................................. 48
Emergency key
Unlocking the driver's door .............. 80
Emergency key element
Function/notes ................................ 73
Inserting .......................................... 74
Locking vehicle ................................ 80
Removing ......................................... 74
Emergency release
Charge socket flap ......................... 143
Driver's door ................................... .80
Emergency unlocking
Tailgat e............................................ 81
Vehicle ............................................. 80
Energy
Driving tips .................................... 148
Energy flow display ........................... 177
Engine electronics
Notes ............................................. 280
Environmental protection
Returning an end-of-life vehicle ....... 19
ESP ®
(Electronic Stability Pro-
gram)
Activating/deactivating (on-
board computer) ............................ 182
Characteristics ................................. 66
Deactivating/activating (notes) ....... 66
Display message ............................ 190 Function/note
s................................ 65
General notes .................................. 65
Important safety guidelines ............. 65
Warning lamp ................................. 218
ETS/4ETS (Electronic Traction Sys-
tem) ...................................................... 65
Exhaustive discharging (high-volt-
age battery) ....................................... 256
Exterior lighting
Cleaning ......................................... 245
see Lights
Exterior mirrors
Adjusting ......................................... 93
Anti-dazzle mode (automatic) .......... 94
Folding in when locking (on-boardcomputer) ...................................... 188
Folding in/out (automatically )......... 94
Folding in/out (electrically) ............. 94
Out of position (troubleshooting) ..... 94
Parking position ............................... 95
Resetting ......................................... 94
Storing settings (memory func-
tion) ................................................. 96 F
Fault message see Display messages
Fire extinguisher ............................... 249
First-aid kit ......................................... 248
Fitting a wheel
Fitting a wheel ............................... 276
Lowering the vehicle ...................... 276
Preparing the vehicle ..................... 274
Raising the vehicle ......................... 274
Removing a wheel .......................... 276
Securing the vehicle against roll-
ing away ........................................ 274
Flat tyre
Changing a wheel/fitting the
spare wheel ................................... 273
MOExtended tyre s......................... 250
Preparing the vehicle ..................... 249
TIREFIT kit ...................................... 251
Floormat ............................................. 238
Foglamps (extended range) .............. 101
Folding table ...................................... 2268
Index
Page 19 of 293
TEMPOMAT
Function/note s............................. 150
Through-loading ................................ 227
TIREFIT kit .......................................... 251
Tyre pressure not reached ............. 252
Tyre pressure reached ................... 253
Top Tether ............................................ 51
Total distance recorder .................... 176
Tow-away protection
Activating ......................................... 68
Deactivating ..................................... 68
Function ........................................... 68
Towing
Important safety notes .................. 260
Transporting the vehicle ................ 263
With the rear axle raised ................ 262
Towing away
Fitting the towing eye .................... 261
Removing the towing eye ............... 262
With both axles on the ground ....... 262
With front axle raised ..................... 262
Towing eye ......................................... 249
Traffic Sign Assist
Activating ....................................... 167
Activating/deactivating the warn- ing function .................................... 182
Display message ............................ 207
Function/note s............................. 166
Important safety notes .................. 167
Instrument cluster display ............. 167
Trailer tow hitch .................................. 22
Transmission
DIRECT SELECT lever ..................... 129
Drive program ................................ 131
Driving tips .................................... 131
Engaging the drive position ............ 130
Engaging the park position ............ 129
Holding the vehicle stationary on
uphill gradients .............................. 131
Kickdown ....................................... 131
Overview ........................................ 128
Program selector button ................ 131
Shifting to neutral .......................... 130
Transmission position display ......... 129
Transmission position display
(DIRECT SELECT lever) ...................... 129
Transmission positions .................... 131Transporting the vehicle
.................. 263
Trim pieces (cleaning instruc-
tions) .................................................. 247
Trip computer (on-board com-
puter) .................................................. 176
Trip meter
Calling up ....................................... 176
Resetting (on-board computer) ...... 178
Turn signals
Changing bulbs (front) ................... 106
Changing bulbs (rear) .................... 107
Switching on/of f.............................. 99
Two-way radio
Frequencies ................................... 280
Installation ..................................... 280
Transmission output (maximum) .... 280
Type identification plate
see Vehicle identification plate
Tyre pressure
Calling up (on-board computer) ..... 270
Display message ............................ 209
Not reached (TIREFIT) .................... 252
Reached (TIREFIT) .......................... 253
Recommended ............................... 269
Tyre pressure monitor
Checking the tyre pressure elec-
tronically ........................................ 271
Function/note s............................. 270
General notes ................................ 270
Important safety notes .................. 271
Radio type approval for the tyre
pressure monitor ........................... 272
Restarting ...................................... 272
Warning lamp ................................. 223
Warning message .......................... 271
Tyres
Changing a whee l.......................... 273
Checking ........................................ 267
Direction of rotation ...................... 273
Display message ............................ 209
General notes ................................ 277
Important safety notes .................. 266
Information on driving .................... 266
M+S tyres ...................................... 268
MOExtended tyre s......................... 268
Replacing ....................................... 273
Service life ..................................... 267
Storing ........................................... 274 16
Index
Page 22 of 293
Protection of the environment
General notes
H
Environmental note
Daimler's declared policy is one of compre-
hensive environmental protection.
Our objectives are to use the natural resour-
ces which form the basis of our existence on
this planet sparingly and in a manner which
takes the requirements of both nature and
humanity into consideration.
You too can help to protect the environment
by operating your vehicle in an environmen-
tally-responsible manner.
Energy consumption and the rate of engine,
transmission, brake and tyre wear depend on
the following factors:
R operating conditions of your vehicle
R your personal driving style
You can influence both factors. Therefore,
please bear the following in mind:
Operating conditions:
R observe the correct tyre pressure.
R do not carry any unnecessary weight in the
vehicle
R remove the roof rack once you no longer
need it.
R a regularly serviced vehicle will contribute
to environmental protection. You should
therefore adhere to the service intervals.
R all maintenance work should be carried out
at a qualified specialist workshop.
Personal driving style:
R drive carefully and maintain a safe distance
from the vehicle in front.
R avoid frequent, sudden acceleration and
braking.
R monitor the vehicle's energy consumption. H
Environmental note
Have defective high-voltage batteries dis-
posed of in an environmentally responsible
manner. Consult a qualified specialist work- shop which has the necessary specialist
knowledge and tools to carry out the work
required. Mercedes-Benz recommends that
you use a Mercedes-Benz Service Centre for
this purpose.
Returning an end-of-life vehicle
EU countries only:
Mercedes-Benz will take back your old vehicle to dispose of it in an environmentally-responsible
manner in accordance with the European Union
(EU) End of Life Vehicles Directive.
There is a network of return points and disas-
sembly plants available. You can return your
vehicle to these plants free of charge. This
makes a valuable contribution to the recycling
process and the conservation of resources.
For further information on recycling old vehi-
cles, recovery and the terms of the policy, visit
the Mercedes-Benz homepage. Genuine Mercedes-Benz parts
H
Environmental note
Daimler AG also supplies reconditioned
assemblies and parts which are of the same
quality as new parts. For these, the same war-
ranty applies as for new parts.
! Airbags and seat belt tensioners, as well as
control units and sensors for these restraint
systems, may be installed in the following
areas of your vehicle:
R doors
R door pillars
R door sills
R seats
R dashboard
R instrument cluster
R centre console
Do not install accessories such as audio sys-
tems in these areas. Do not carry out repairs
or welding. You could impair the operating
efficiency of the restraint systems.
Have accessories retrofitted at a qualified
specialist workshop. Introduction
19 Z
Page 23 of 293
You could jeopardise the operating safety of
your vehicle if you use parts, tyres and wheels as
well as accessories relevant to safety which
have not been approved by Mercedes-Benz. This
could lead to malfunctions in safety-relevant
systems, e.g. the brake system. Only use genu- ine Mercedes-Benz parts or parts of equal qual-
ity. Only use tyres, wheels and accessories that
have been specifically approved for your vehi-
cle.
Mercedes-Benz tests genuine parts and conver-
sion parts and accessories that have been spe-
cifically approved for your vehicle for their reli-
ability, safety and suitability. Despite ongoing
market research, Mercedes-Benz is unable to
assess other parts. Mercedes-Benz therefore
accepts no responsibility for the use of such
parts in Mercedes-Benz vehicles, even if they
have been officially approved or independently
approved by a testing centre.
In Germany, certain parts are only officially
approved for installation or modification if they
comply with legal requirements. This also
applies to some other countries. All genuine
Mercedes-Benz parts meet the approval
requirements. The use of non-approved parts
may invalidate the vehicle's general operating
permit.
This is the case:
R if they cause a change of the vehicle type from
that for which the vehicle's general operating
permit was granted
R if other road users could be endangered
R if the noise levels are adversely affected
Always specify the vehicle identification number (VIN) (Y page 281) when ordering genuine
Mercedes-Benz parts. Owner's Manual
Vehicle equipment
This Owner's Manual describes all models and
all standard and optional equipment available
for your vehicle at the time of publication of the
Owner's Manual. Country-specific differences
are possible. Note that your vehicle may not be
fitted with all features described. This is also the case for systems and functions relevant to
safety. Therefore, the equipment on your vehiclemay differ from that in the descriptions and
illustrations. The original purchase contract documentation
for your vehicle contains a list of all of the sys-
tems in your vehicle.
Should you have any questions concerning
equipment and operation, please consult a
Mercedes-Benz Service Centre.
The Owner's Manual and Service Booklet are
important documents and should kept in the
vehicle. Operating safety
Important safety notes
Important safety notes G
WARNING
If you do not have the prescribed service/
maintenance work or necessary repairs car-
ried out, this could result in malfunctions or
system failures. There is a risk of an accident.
Always have the prescribed service/mainte-
nance work as well as necessary repairs car-
ried out at a qualified specialist workshop. G
WARNING
Modifications to electronic components, their software as well as wiring could affect their
function and/or the operation of other net-
worked components. This could in particular
also be the case for systems relevant to
safety. They might not function properly any-
more and/or jeopardise the operational
safety of the vehicle. There is an increased
risk of an accident and injury.
Do not attempt to modify the wiring as well as
electronic components or their software.
Always have work on electrical and electronic components carried out at a qualified special-
ist workshop.
! There is a risk of damage to the vehicle if:
R the vehicle becomes stuck, e.g. on a high
kerb or an unpaved road
R you drive too fast over an obstacle, e.g. a
kerb or a pothole in the road
R a heavy object strikes the underbody or
parts of the chassis 20
Introduction
Page 26 of 293
loose floormats and do not place several floor-
mats on top of one another.
! If equipment on the diagnostics connection
is used, the starter battery may discharge. Qualified specialist workshop
A qualified specialist workshop has the neces-
sary special skills, tools and qualifications to
correctly carry out any necessary work on your
vehicle. This particularly applies to work rele-
vant to safety.
Observe the notes in the Service Booklet.
Always have the following work carried out at a
qualified specialist workshop:
R work relevant to safety
R service and maintenance work
R repair work
R modifications, installations and conversions
R work on electronic components
R work on the drive system
Mercedes-Benz recommends that you use a
Mercedes-Benz Service Centre. Vehicle registration
Mercedes-Benz may ask its Service Centres to
carry out technical inspections on certain vehi-
cles. The quality or safety of the vehicle is
improved as a result of the inspection.
Mercedes-Benz can only inform you about vehi-
cle checks if it has your registration data.
It is possible that your vehicle has not yet been
registered in your name in the following cases:
R if your vehicle was not purchased at an
authorised specialist dealer.
R if your vehicle has not yet been examined at a
Mercedes-Benz Service Centre.
It is advisable to register your vehicle with a
Mercedes-Benz Service Centre.
Inform Mercedes-Benz as soon as possible
about any change in address or vehicle owner-
ship. You can do this at a Mercedes-Benz Ser-
vice Centre, for example. Correct use
If you remove any warning stickers, you or oth-
ers could fail to recognise certain dangers.
Leave warning stickers in position.
Observe the following information when driving your vehicle:
R the safety notes in this manual
R the vehicle technical data
R traffic rules and regulations
R laws and safety standards pertaining to motor
vehicles Implied warranty
! Follow the instructions in this manual about
the proper operation of your vehicle as well as
about possible vehicle damage. Damage to
your vehicle that arises from culpable contra- ventions against these instructions are not
covered either by Mercedes-Benz implied
warranty or by the New or Used-Vehicle War- ranty. QR code for rescue card
The QR code is secured in the fuel filler flap and
on the opposite side on the B-pillar. In the event
of an accident, rescue services can use the QR
code to quickly find the appropriate rescue card for your vehicle. The current rescue card con-
tains, in a compact form, the most important
information about your vehicle, e.g. the routing
of the electric cables.
You can find more information under http://
portal.aftersales.i.daimler.com/public/
content/asportal/en/communication/
informationen_fuer/QRCode.html. Data stored in the vehicle
A wide range of electronic components in your
vehicle contain data memories.
These data memories temporarily or perma-
nently store technical information about:
R the vehicle's operating state
R events
R faults Introduction
23 Z
Page 37 of 293
Useful information
i This Owner's Manual describes all models,
series and optional equipment for your vehi-
cle that were available at the time of going to
press. National variations are possible. Note
that your vehicle may not be equipped with all
of the functions described. This is also the
case for systems and functions relevant to
safety.
i Read the information on qualified specialist
workshops: (Y page 23). Occupant safety
Introduction to the restraint system
The restraint system can reduce the risk of vehi-
cle occupants coming into contact with parts of
the vehicle's interior in the event of an accident. The restraint system can also reduce the forces
to which vehicle occupants are subjected during an accident.
The restraint system comprises:
R Seat belt system
R Airbags
R Child restraint system
R Child seat securing systems
The components of the restraint system work in
conjunction with each other. They can only
deploy their protective function if all vehicle
occupants always:
R fasten their seat belts correctly
(Y page 37)
R adjust their seat and head restraint properly
(Y page 87).
As the driver, you also have to make sure that
the steering wheel is adjusted correctly.
Observe the information relating to the correct
driver's seat position (Y page 86).
You also have to make sure that an airbag can
inflate properly if deployed (Y page 39).
An airbag supplements a correctly fastened seat belt. As an additional safety device, the airbag
increases the level of protection for vehicle
occupants in the event of an accident. For exam-
ple, if the protection of the seat belt is sufficient in an accident, the airbags are not deployed. In
the event of an accident, only the airbags that
increase protection in the relevant accident sit- uation are deployed. However, seat belts and
airbags generally do not protect against objects
penetrating the vehicle from the outside.
Information on the restraint system operation
can be found under "Triggering of belt tension-
ers and airbags" (Y page 46).
For more information about children travelling
with you in the vehicle, see "Children in the vehi-
cle" (Y page 49). Important safety notes
G
WARNING
If the restraint system is modified, it may no
longer work as intended. The restraint system
may then not perform its intended protective function by failing in an accident or triggering
unexpectedly, for example. There is an
increased risk of injury, possibly even fatal.
Never modify parts of the restraint system. Do not attempt to modify the wiring as well as
electronic components or their software.
If it is necessary to modify an airbag system to
accommodate a person with disabilities, con-
tact a Mercedes-Benz Service Centre for details. Restraint system warning lamp
The functions of the restraint system are
checked after the ignition is switched on and at
regular intervals while the drive system is run-
ning. Therefore, malfunctions can be detected in good time.
The 6 restraint system warning lamp in the
instrument cluster lights up when the ignition is switched on. It goes out no later than a few sec-
onds after the vehicle is started. The compo-
nents of the restraint system are in operational
readiness.
A malfunction has occurred if the 6restraint
system warning lamp:
R does not light up after the ignition is switched
on
R does not go out after a few seconds with the
drive system running
R lights up again while the drive system is run-
ning 34
Occupant safetySafety
Page 40 of 293
Seat belts may sustain non-visible damage in
an accident, e.g. due to glass splinters. Modi-
fied or damaged seat belts can tear or fail, for example in the event of an accident. Modified
seat belt tensioners may be deployed unin-
tentionally or fail to be deployed when
required. There is an increased risk of injury,
possibly even fatal.
Never modify safety belts, seat belt tension-
ers, seat belt anchorages and inertia reels.
Ensure that seat belts are not damaged or
worn and are clean. After an accident, have
the seat belts checked immediately at a quali- fied specialist workshop.
Mercedes-Benz recommends that you only use
seat belts which have been approved specifi-
cally for your vehicle by Mercedes-Benz. Other- wise, your vehicle's general operating permit
could be invalidated.
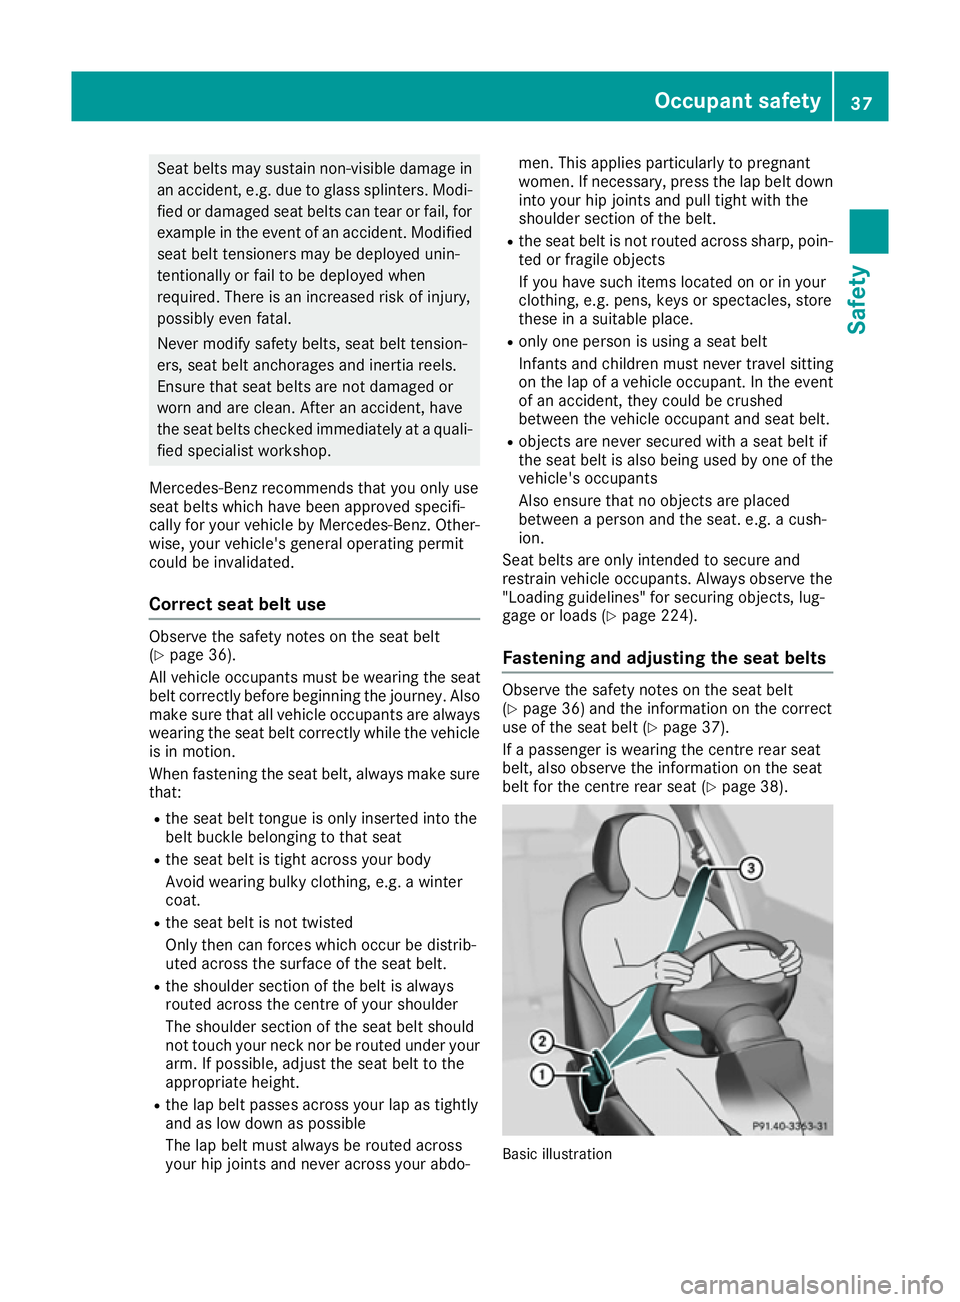
Correct seat belt use Observe the safety notes on the seat belt
(Y
page 36).
All vehicle occupants must be wearing the seat
belt correctly before beginning the journey. Also make sure that all vehicle occupants are always
wearing the seat belt correctly while the vehicle is in motion.
When fastening the seat belt, always make sure
that:
R the seat belt tongue is only inserted into the
belt buckle belonging to that seat
R the seat belt is tight across your body
Avoid wearing bulky clothing, e.g. a winter
coat.
R the seat belt is not twisted
Only then can forces which occur be distrib-
uted across the surface of the seat belt.
R the shoulder section of the belt is always
routed across the centre of your shoulder
The shoulder section of the seat belt should
not touch your neck nor be routed under your
arm. If possible, adjust the seat belt to the
appropriate height.
R the lap belt passes across your lap as tightly
and as low down as possible
The lap belt must always be routed across
your hip joints and never across your abdo- men. This applies particularly to pregnant
women. If necessary, press the lap belt down
into your hip joints and pull tight with the
shoulder section of the belt.
R the seat belt is not routed across sharp, poin-
ted or fragile objects
If you have such items located on or in your
clothing, e.g. pens, keys or spectacles, store
these in a suitable place.
R only one person is using a seat belt
Infants and children must never travel sitting
on the lap of a vehicle occupant. In the event
of an accident, they could be crushed
between the vehicle occupant and seat belt.
R objects are never secured with a seat belt if
the seat belt is also being used by one of the
vehicle's occupants
Also ensure that no objects are placed
between a person and the seat. e.g. a cush-
ion.
Seat belts are only intended to secure and
restrain vehicle occupants. Always observe the
"Loading guidelines" for securing objects, lug-
gage or loads (Y page 224).
Fastening and adjusting the seat belts Observe the safety notes on the seat belt
(Y
page 36) and the information on the correct
use of the seat belt (Y page 37).
If a passenger is wearing the centre rear seat
belt, also observe the information on the seat
belt for the centre rear seat (Y page 38). Basic illustration Occupant safety
37Safety Z
Page 42 of 293
Belt warning for the driver and front
passenger The
7 seat belt warning lamp in the instru-
ment cluster reminds you that all vehicle occu-
pants must fasten their seat belts. It may light up continuously or flash. A warning tone may also
sound.
The 7 seat belt warning lamp goes out and
the warning tone stops as soon as the driver's
and the co-driver's seat belts have been fas-
tened.
i For more information on the
7seat belt
warning lamp, see "Warning and indicator
lamps in the instrument cluster, seat belt"
(Y page 214).
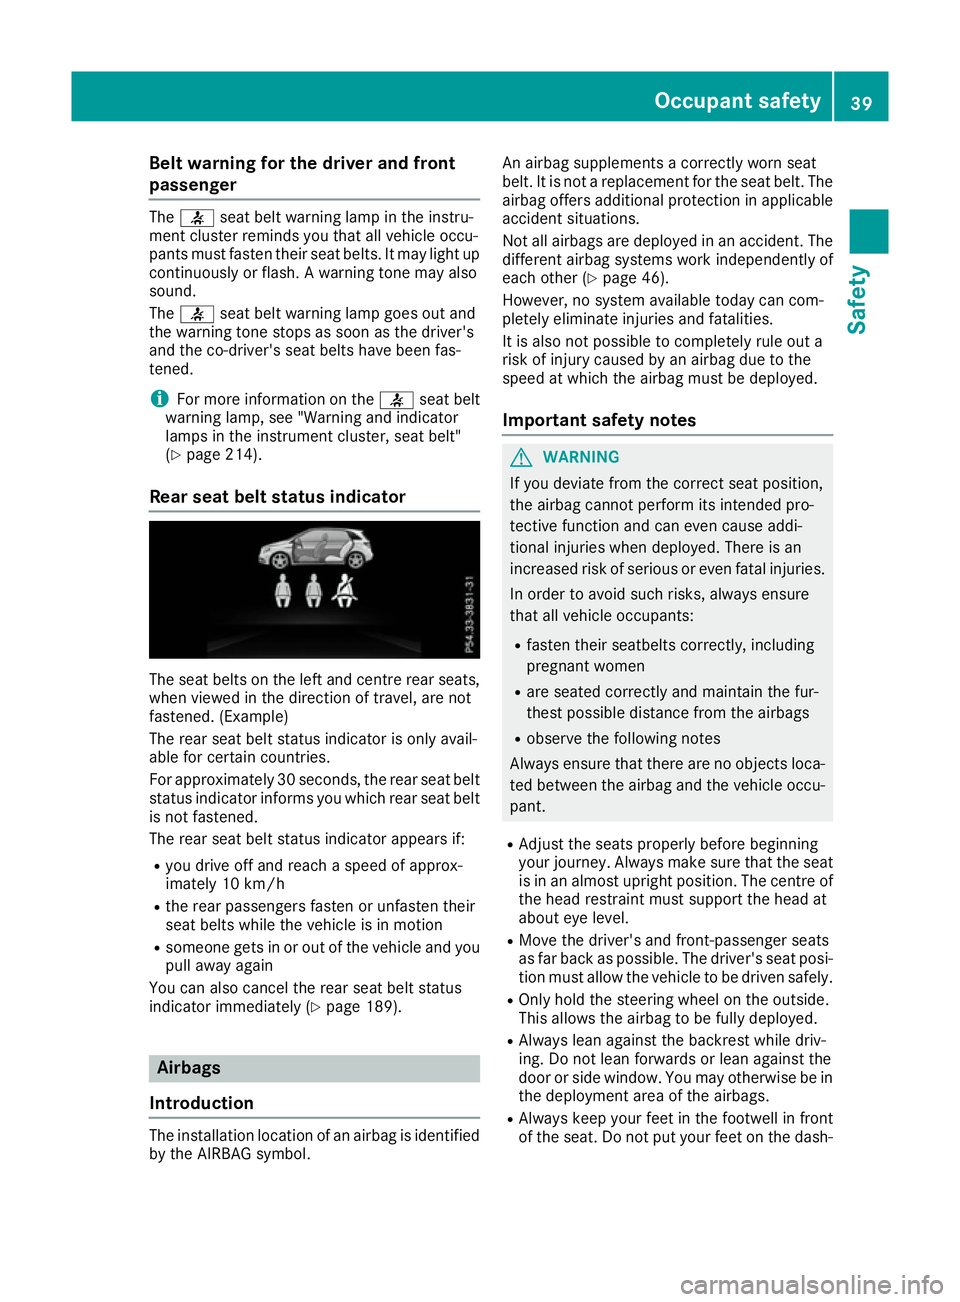
Rear seat belt status indicator The seat belts on the left and centre rear seats,
when viewed in the direction of travel, are not
fastened. (Example)
The rear seat belt status indicator is only avail-
able for certain countries.
For approximately 30 seconds, the rear seat belt status indicator informs you which rear seat belt
is not fastened.
The rear seat belt status indicator appears if:
R you drive off and reach a speed of approx-
imately 10 km/h
R the rear passengers fasten or unfasten their
seat belts while the vehicle is in motion
R someone gets in or out of the vehicle and you
pull away again
You can also cancel the rear seat belt status
indicator immediately (Y page 189).Airbags
Introduction The installation location of an airbag is identified
by the AIRBAG symbol. An airbag supplements a correctly worn seat
belt. It is not a replacement for the seat belt. The
airbag offers additional protection in applicable
accident situations.
Not all airbags are deployed in an accident. The
different airbag systems work independently of
each other (Y page 46).
However, no system available today can com-
pletely eliminate injuries and fatalities.
It is also not possible to completely rule out a
risk of injury caused by an airbag due to the
speed at which the airbag must be deployed.
Important safety notes G
WARNING
If you deviate from the correct seat position,
the airbag cannot perform its intended pro-
tective function and can even cause addi-
tional injuries when deployed. There is an
increased risk of serious or even fatal injuries. In order to avoid such risks, always ensure
that all vehicle occupants:
R fasten their seatbelts correctly, including
pregnant women
R are seated correctly and maintain the fur-
thest possible distance from the airbags
R observe the following notes
Always ensure that there are no objects loca-
ted between the airbag and the vehicle occu-
pant.
R Adjust the seats properly before beginning
your journey. Always make sure that the seat is in an almost upright position. The centre of
the head restraint must support the head at
about eye level.
R Move the driver's and front-passenger seats
as far back as possible. The driver's seat posi-
tion must allow the vehicle to be driven safely.
R Only hold the steering wheel on the outside.
This allows the airbag to be fully deployed.
R Always lean against the backrest while driv-
ing. Do not lean forwards or lean against the
door or side window. You may otherwise be in
the deployment area of the airbags.
R Always keep your feet in the footwell in front
of the seat. Do not put your feet on the dash- Occupant safety
39Safety Z
Page 45 of 293
Windowbags
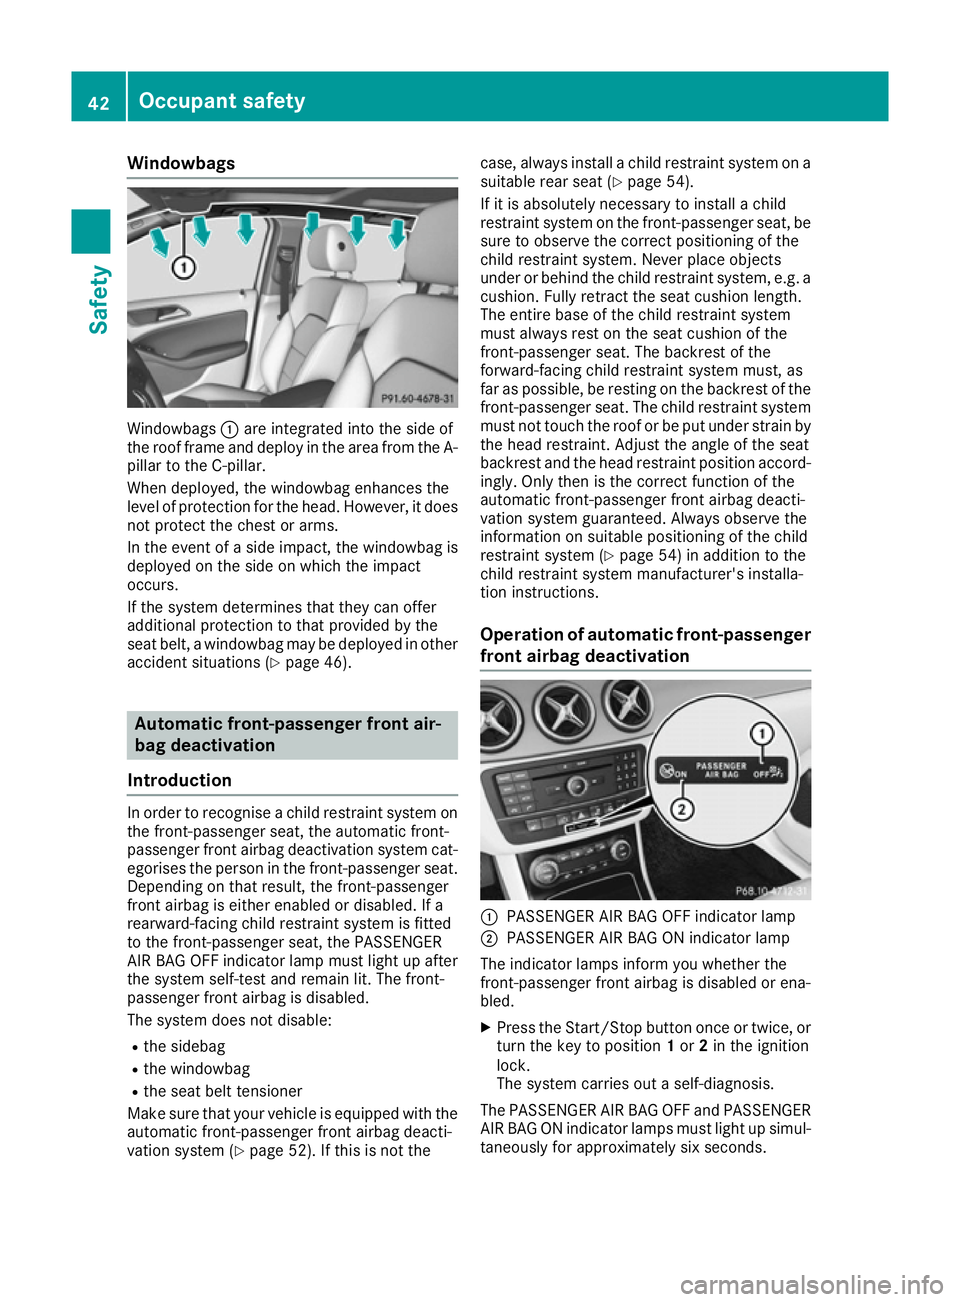
Windowbags
:are integrated into the side of
the roof frame and deploy in the area from the A-
pillar to the C-pillar.
When deployed, the windowbag enhances the
level of protection for the head. However, it does
not protect the chest or arms.
In the event of a side impact, the windowbag is
deployed on the side on which the impact
occurs.
If the system determines that they can offer
additional protection to that provided by the
seat belt, a windowbag may be deployed in other accident situations (Y page 46).Automatic front-passenger front air-
bag deactivation
Introduction In order to recognise a child restraint system on
the front-passenger seat, the automatic front-
passenger front airbag deactivation system cat- egorises the person in the front-passenger seat.
Depending on that result, the front-passenger
front airbag is either enabled or disabled. If a
rearward-facing child restraint system is fitted
to the front-passenger seat, the PASSENGER
AIR BAG OFF indicator lamp must light up after
the system self-test and remain lit. The front-
passenger front airbag is disabled.
The system does not disable:
R the sidebag
R the windowbag
R the seat belt tensioner
Make sure that your vehicle is equipped with the automatic front-passenger front airbag deacti-
vation system (Y page 52). If this is not the case, always install a child restraint system on a
suitable rear seat (Y page 54).
If it is absolutely necessary to install a child
restraint system on the front-passenger seat, be sure to observe the correct positioning of the
child restraint system. Never place objects
under or behind the child restraint system, e.g. a
cushion. Fully retract the seat cushion length.
The entire base of the child restraint system
must always rest on the seat cushion of the
front-passenger seat. The backrest of the
forward-facing child restraint system must, as
far as possible, be resting on the backrest of the
front-passenger seat. The child restraint system
must not touch the roof or be put under strain by the head restraint. Adjust the angle of the seat
backrest and the head restraint position accord- ingly. Only then is the correct function of the
automatic front-passenger front airbag deacti-
vation system guaranteed. Always observe the
information on suitable positioning of the child
restraint system (Y page 54) in addition to the
child restraint system manufacturer's installa-
tion instructions.
Operation of automatic front-passenger
front airbag deactivation :
PASSENGER AIR BAG OFF indicator lamp
; PASSENGER AIR BAG ON indicator lamp
The indicator lamps inform you whether the
front-passenger front airbag is disabled or ena-
bled. X Press the Start/Stop button once or twice, or
turn the key to position 1or 2in the ignition
lock.
The system carries out a self-diagnosis.
The PASSENGER AIR BAG OFF and PASSENGER AIR BAG ON indicator lamps must light up simul-
taneously for approximately six seconds. 42
Occupant safetySafety