change time MERCEDES-BENZ B-CLASS HATCHBACK 2015 User Guide
[x] Cancel search | Manufacturer: MERCEDES-BENZ, Model Year: 2015, Model line: B-CLASS HATCHBACK, Model: MERCEDES-BENZ B-CLASS HATCHBACK 2015Pages: 293, PDF Size: 10.83 MB
Page 156 of 293
or traffic conditions. SPEEDTRONIC is only an
aid. You are responsible for the distance to the
vehicle in front, for vehicle speed, for braking in
good time, and for staying in lane.
If there is a change of drivers, advise the new
driver of the speed stored.
Variable SPEEDTRONIC General notes
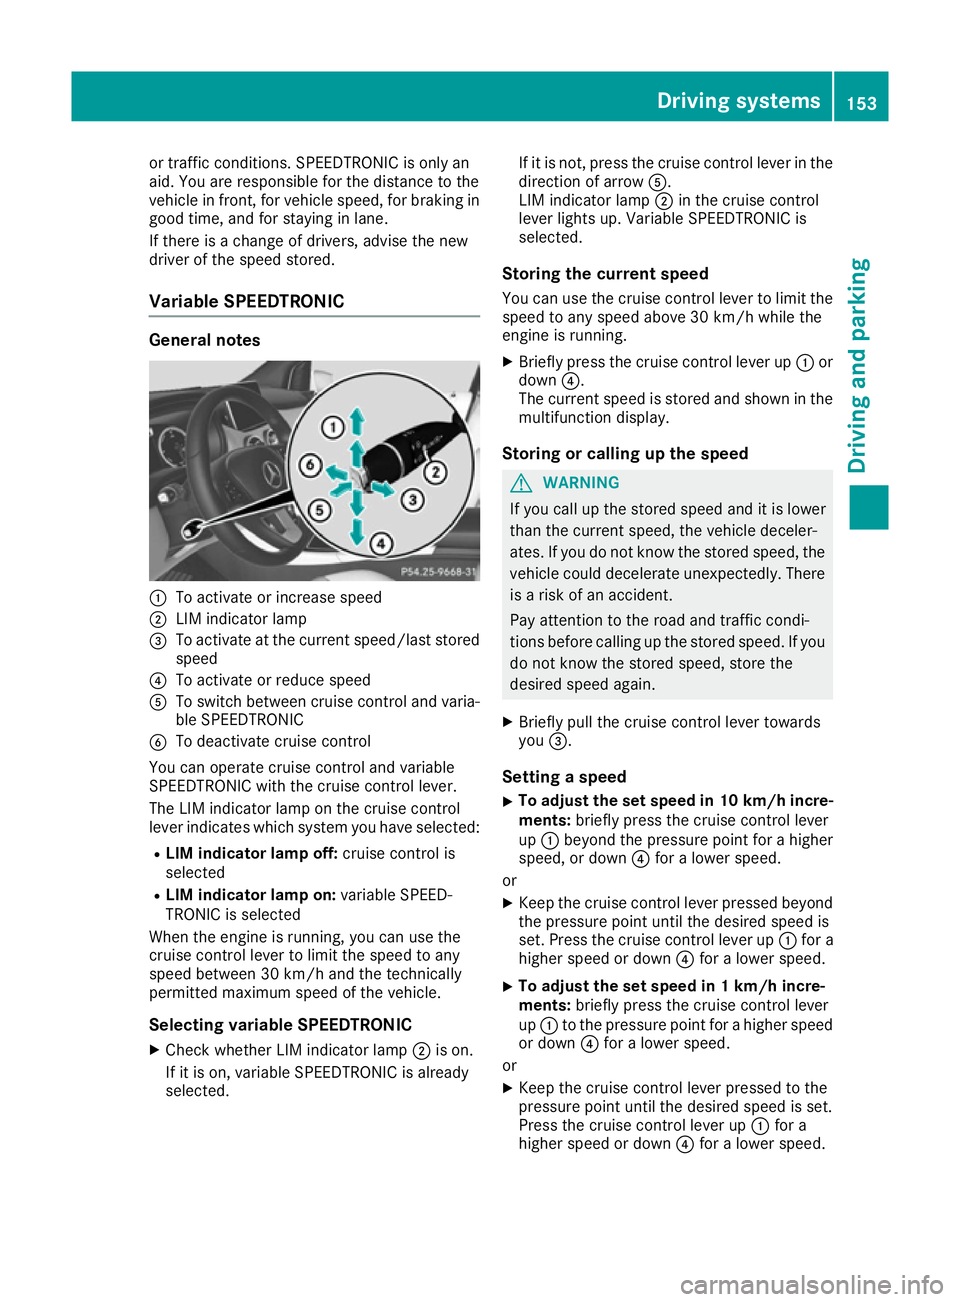
:
To activate or increase speed
; LIM indicator lamp
= To activate at the current speed/last stored
speed
? To activate or reduce speed
A To switch between cruise control and varia-
ble SPEEDTRONIC
B To deactivate cruise control
You can operate cruise control and variable
SPEEDTRONIC with the cruise control lever.
The LIM indicator lamp on the cruise control
lever indicates which system you have selected:
R LIM indicator lamp off: cruise control is
selected
R LIM indicator lamp on: variable SPEED-
TRONIC is selected
When the engine is running, you can use the
cruise control lever to limit the speed to any
speed between 30 km/h and the technically
permitted maximum speed of the vehicle.
Selecting variable SPEEDTRONICX Check whether LIM indicator lamp ;is on.
If it is on, variable SPEEDTRONIC is already
selected. If it is not, press the cruise control lever in the
direction of arrow A.
LIM indicator lamp ;in the cruise control
lever lights up. Variable SPEEDTRONIC is
selected.
Storing the current speed You can use the cruise control lever to limit the
speed to any speed above 30 km/h while the
engine is running.
X Briefly press the cruise control lever up :or
down ?.
The current speed is stored and shown in the multifunction display.
Storing or calling up the speed G
WARNING
If you call up the stored speed and it is lower
than the current speed, the vehicle deceler-
ates. If you do not know the stored speed, the vehicle could decelerate unexpectedly. There
is a risk of an accident.
Pay attention to the road and traffic condi-
tions before calling up the stored speed. If you do not know the stored speed, store the
desired speed again.
X Briefly pull the cruise control lever towards
you =.
Setting a speed
X To adjust the set speed in 10 km/h incre-
ments: briefly press the cruise control lever
up : beyond the pressure point for a higher
speed, or down ?for a lower speed.
or X Keep the cruise control lever pressed beyond
the pressure point until the desired speed is
set. Press the cruise control lever up :for a
higher speed or down ?for a lower speed.
X To adjust the set speed in 1 km/h incre-
ments:
briefly press the cruise control lever
up : to the pressure point for a higher speed
or down ?for a lower speed.
or X Keep the cruise control lever pressed to the
pressure point until the desired speed is set.
Press the cruise control lever up :for a
higher speed or down ?for a lower speed. Driving systems
153Driving and parking Z
Page 163 of 293
Always apply the brakes yourself when park-
ing and manoeuvring.
X Stop the vehicle when the parking symbol
shows the desired parking space in the instru- ment cluster.
X Shift the transmission to position R.
The Start
Start Park
ParkAssist?
Assist? Yes:
Yes:OK
OKNo:
No: %
message appears in the multifunction display.
X To cancel the procedure: press the%
button on the multifunction steering wheel or pull away.
or
X To park using Active Parking Assist: press
the a button on the multifunction steering
wheel.
The Park Assist active Accelerate
Park Assist active Accelerate
and brake and brake Observe surroundings
Observe surroundings mes-
sage appears in the multifunction display.
X Release the multifunction steering wheel.
X Reverse the vehicle, being ready to brake at
all times. When reversing, drive at a speed
below 10 km/h. Otherwise, Active Parking
Assist will be cancelled.
Manoeuvring may be required in tight parking
spaces.
X Stop as soon as PARKTRONIC sounds the
continuous warning tone, if not before.
Manoeuvring may be required in tight parking
spaces.
The Park
Park Assist Assist active
activeSelect D
Select D Observe
Observe
surroundings
surroundings message appears in the multi-
function display.
X Shift the transmission to position Dwhile the
vehicle is stationary.
Active Parking Assist immediately steers in
the other direction.
The Park Assist active Accelerate Park Assist active Accelerate
and brake and brake Observe surroundings
Observe surroundings mes-
sage appears in the multifunction display.
i You will achieve the best results by waiting
for the steering procedure to complete before
pulling away.
X Drive forwards and be ready to brake at all
times.
Manoeuvring may be required in tight parking
spaces.
X Stop as soon as PARKTRONIC sounds the
continuous warning tone, if not before. The
Park
Park Assist Assist active
activeSelect R
Select R Observe
Observe
surroundings
surroundings message appears in the multi-
function display.
As soon as the parking procedure is complete,
the Park Assist switched off Park Assist switched off message
appears and a warning tone sounds. The vehicle
is now parked.
Active Parking Assist no longer supports you
with steering interventions and brake applica-
tions. When Active Parking Assist is finished,
you must steer and brake again yourself.
PARKTRONIC is still available.
Parking tips:
R The way your vehicle is positioned in the park-
ing space after parking is dependent on vari-
ous factors. These include the position and
shape of the vehicles parked in front and
behind it and the conditions of the location. It
may be the case that Active Parking Assist
guides you too far into a parking space, or not
far enough into it. In some cases, it may also
lead you across or onto the kerb. If necessary, you should cancel the parking procedure withActive Parking Assist.
R You can also preselect transmission position
D. The vehicle redirects and does not drive as
far into the parking space. Should the trans-
mission change take place too early, the park-
ing procedure will be cancelled. A sensible
parking position can no longer be achieved
from this position.
Exiting a parking space In order that Active Parking Assist can support
you when exiting the parking space:
R you need to have parked using Active Parking
Assist.
R the border of the parking space must be high
enough at the front and the rear. A kerb stone is too small, for example.
R the border of the parking space must not be
too wide, as the position of the vehicle must
not exceed an angle of 45° to the starting
position as it is manoeuvred into the parking
space.
R a manoeuvring distance of at least 1.0 mmust
be available.
Active Parking Assist can only assist you with
exiting a parking space if you have parked the
vehicle parallel to the direction of travel using
Active Parking Assist. 160
Driving systemsDriving and pa
rking
Page 168 of 293
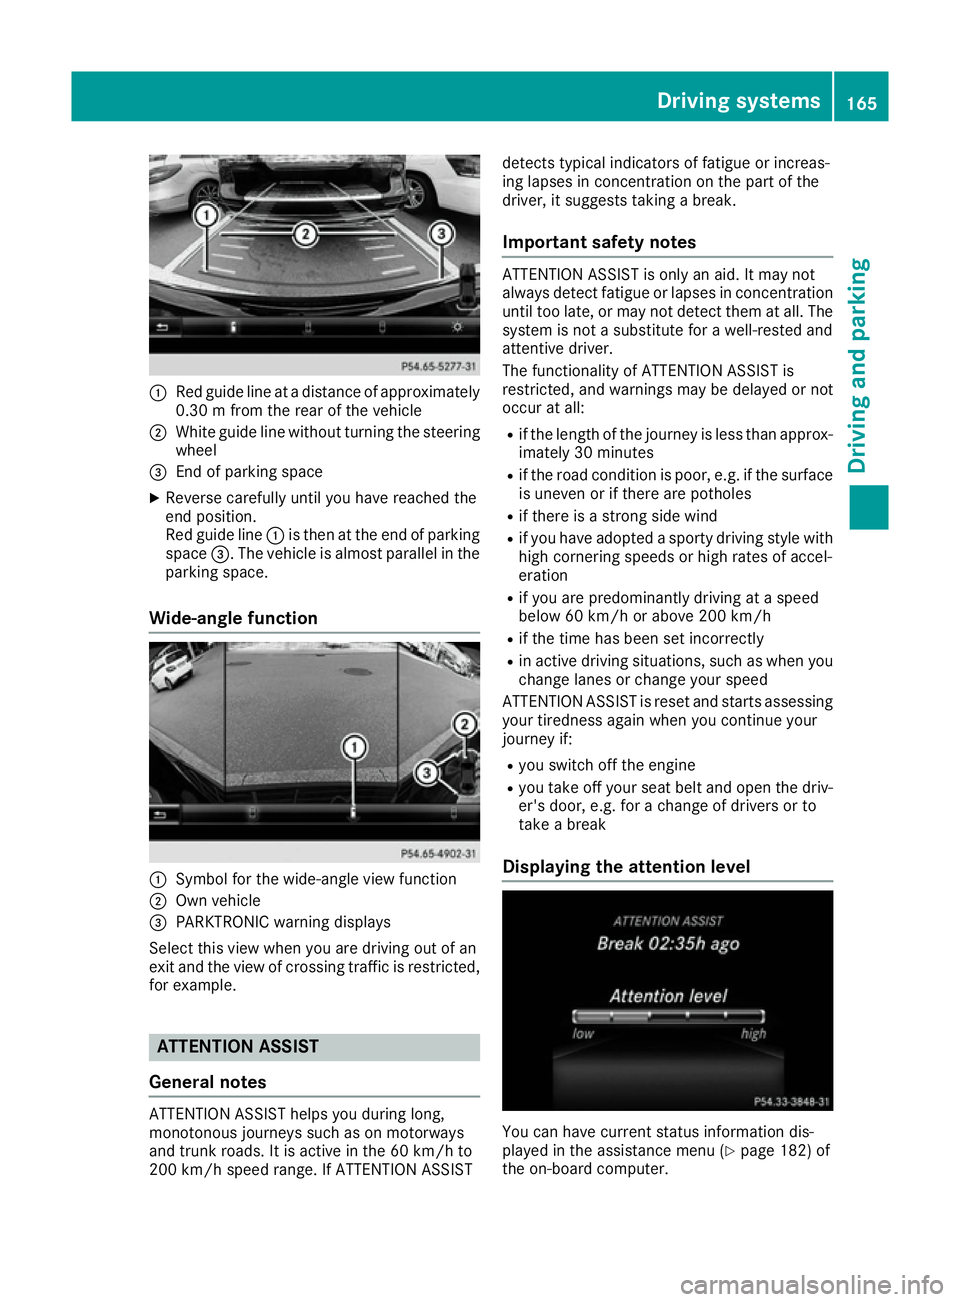
:
Red guide line at a distance of approximately
0.30 m from the rear of the vehicle
; White guide line without turning the steering
wheel
= End of parking space
X Reverse carefully until you have reached the
end position.
Red guide line :is then at the end of parking
space =. The vehicle is almost parallel in the
parking space.
Wide-angle function :
Symbol for the wide-angle view function
; Own vehicle
= PARKTRONIC warning displays
Select this view when you are driving out of an
exit and the view of crossing traffic is restricted, for example. ATTENTION ASSIST
General notes ATTENTION ASSIST helps you during long,
monotonous journeys such as on motorways
and trunk roads. It is active in the 60 km/h to
200 km/h speed range. If ATTENTION ASSIST detects typical indicators of fatigue or increas-
ing lapses in concentration on the part of the
driver, it suggests taking a break.
Important safety notes ATTENTION ASSIST is only an aid. It may not
always detect fatigue or lapses in concentration
until too late, or may not detect them at all. The system is not a substitute for a well-rested and
attentive driver.
The functionality of ATTENTION ASSIST is
restricted, and warnings may be delayed or not
occur at all:
R if the length of the journey is less than approx-
imately 30 minutes
R if the road condition is poor, e.g. if the surface
is uneven or if there are potholes
R if there is a strong side wind
R if you have adopted a sporty driving style with
high cornering speeds or high rates of accel-
eration
R if you are predominantly driving at a speed
below 60 km/h or above 200 km/h
R if the time has been set incorrectly
R in active driving situations, such as when you
change lanes or change your speed
ATTENTION ASSIST is reset and starts assessing
your tiredness again when you continue your
journey if:
R you switch off the engine
R you take off your seat belt and open the driv-
er's door, e.g. for a change of drivers or to
take a break
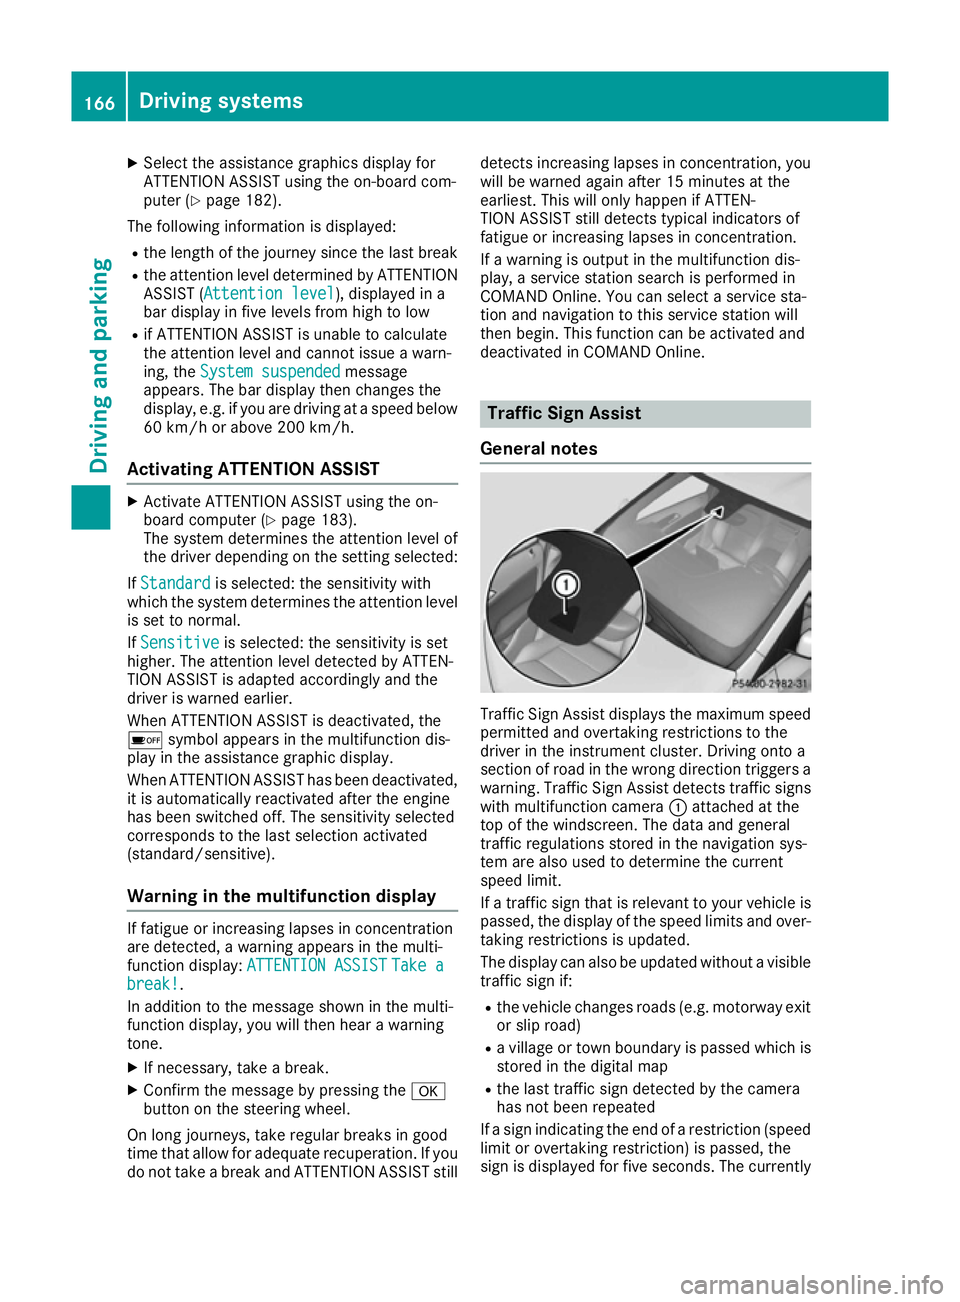
Displaying the attention level You can have current status information dis-
played in the assistance menu (Y
page 182) of
the on-board computer. Driving systems
165Driving and parking Z
Page 169 of 293
X
Select the assistance graphics display for
ATTENTION ASSIST using the on-board com-
puter (Y page 182).
The following information is displayed:
R the length of the journey since the last break
R the attention level determined by ATTENTION
ASSIST ( Attention level
Attention level), displayed in a
bar display in five levels from high to low
R if ATTENTION ASSIST is unable to calculate
the attention level and cannot issue a warn-
ing, the System suspended
System suspended message
appears. The bar display then changes the
display, e.g. if you are driving at a speed below 60 km/h or above 200 km/h.
Activating ATTENTION ASSIST X
Activate ATTENTION ASSIST using the on-
board computer (Y page 183).
The system determines the attention level of
the driver depending on the setting selected:
If Standard
Standard is selected: the sensitivity with
which the system determines the attention level
is set to normal.
If Sensitive Sensitive is selected: the sensitivity is set
higher. The attention level detected by ATTEN-
TION ASSIST is adapted accordingly and the
driver is warned earlier.
When ATTENTION ASSIST is deactivated, the
é symbol appears in the multifunction dis-
play in the assistance graphic display.
When ATTENTION ASSIST has been deactivated, it is automatically reactivated after the engine
has been switched off. The sensitivity selected
corresponds to the last selection activated
(standard/sensitive).
Warning in the multifunction display If fatigue or increasing lapses in concentration
are detected, a warning appears in the multi-
function display:
ATTENTION ASSIST ATTENTION ASSIST Take a
Take a
break!
break!.
In addition to the message shown in the multi-
function display, you will then hear a warning
tone.
X If necessary, take a break.
X Confirm the message by pressing the a
button on the steering wheel.
On long journeys, take regular breaks in good
time that allow for adequate recuperation. If you do not take a break and ATTENTION ASSIST still detects increasing lapses in concentration, you
will be warned again after 15 minutes at the
earliest. This will only happen if ATTEN-
TION ASSIST still detects typical indicators of
fatigue or increasing lapses in concentration.
If a warning is output in the multifunction dis-
play, a service station search is performed in
COMAND Online. You can select a service sta-
tion and navigation to this service station will
then begin. This function can be activated and
deactivated in COMAND Online. Traffic Sign Assist
General notes Traffic Sign Assist displays the maximum speed
permitted and overtaking restrictions to the
driver in the instrument cluster. Driving onto a
section of road in the wrong direction triggers a
warning. Traffic Sign Assist detects traffic signs with multifunction camera :attached at the
top of the windscreen. The data and general
traffic regulations stored in the navigation sys-
tem are also used to determine the current
speed limit.
If a traffic sign that is relevant to your vehicle is passed, the display of the speed limits and over-
taking restrictions is updated.
The display can also be updated without a visible traffic sign if:
R the vehicle changes roads (e.g. motorway exit
or slip road)
R a village or town boundary is passed which is
stored in the digital map
R the last traffic sign detected by the camera
has not been repeated
If a sign indicating the end of a restriction (speed limit or overtaking restriction) is passed, the
sign is displayed for five seconds. The currently 166
Driving systemsDriving and parking
Page 172 of 293
Blind Spot Assist
General notes
Blind Spot Assist monitors the areas on either
side of the vehicle that are not visible to the
driver with two lateral, rear-facing radar sen-
sors. A warning display in the exterior mirrors
draws your attention to vehicles detected in the
monitored area. If you then switch on the cor-
responding turn signal to change lanes, you will also receive a visual and audible collision warn-
ing.
Blind Spot Assist supports you from a speed of
approximately 30 km/h.
Important safety notes G
WARNING
Blind Spot Assist does not react to vehicles:
R overtaken too closely on the side, placing
them in the blind spot area
R when the difference in the speed of
approach and overtaking is too great
As a result, Blind Spot Assist cannot warn
drivers in these situations. There is a risk of an accident.
Always pay careful attention to the traffic sit- uation and maintain a safe distance at the side
of the vehicle.
Blind Spot Assist is only an aid. It may fail to
detect some vehicles and is no substitute for
attentive driving. Always ensure that there is
sufficient distance to the side for other road
users and obstacles. Radar sensors
The radar sensors for Blind Spot Assist are inte-
grated into the rear bumper. Make sure that the bumpers are free from dirt, ice or slush. The
sensors must not be covered, for example by
cycle racks or overhanging loads. Following a
severe impact or in the event of damage to the
bumpers, have the function of the radar sensors
checked at a qualified specialist workshop.
Blind Spot Assist may no longer work properly. Monitoring range of the sensors
In particular, the detection of obstacles can be
impaired in the case of:
R dirt on the sensors or obscured sensors
R poor visibility, e.g. due to fog, heavy rain or
snow
R a narrow vehicle travelling in front, e.g. a
motorcycle or a bicycle
R very wide lanes
R narrow lanes
R vehicles not driving in the middle of their lane
R barriers or other road boundaries
Vehicles in the monitoring range are then not
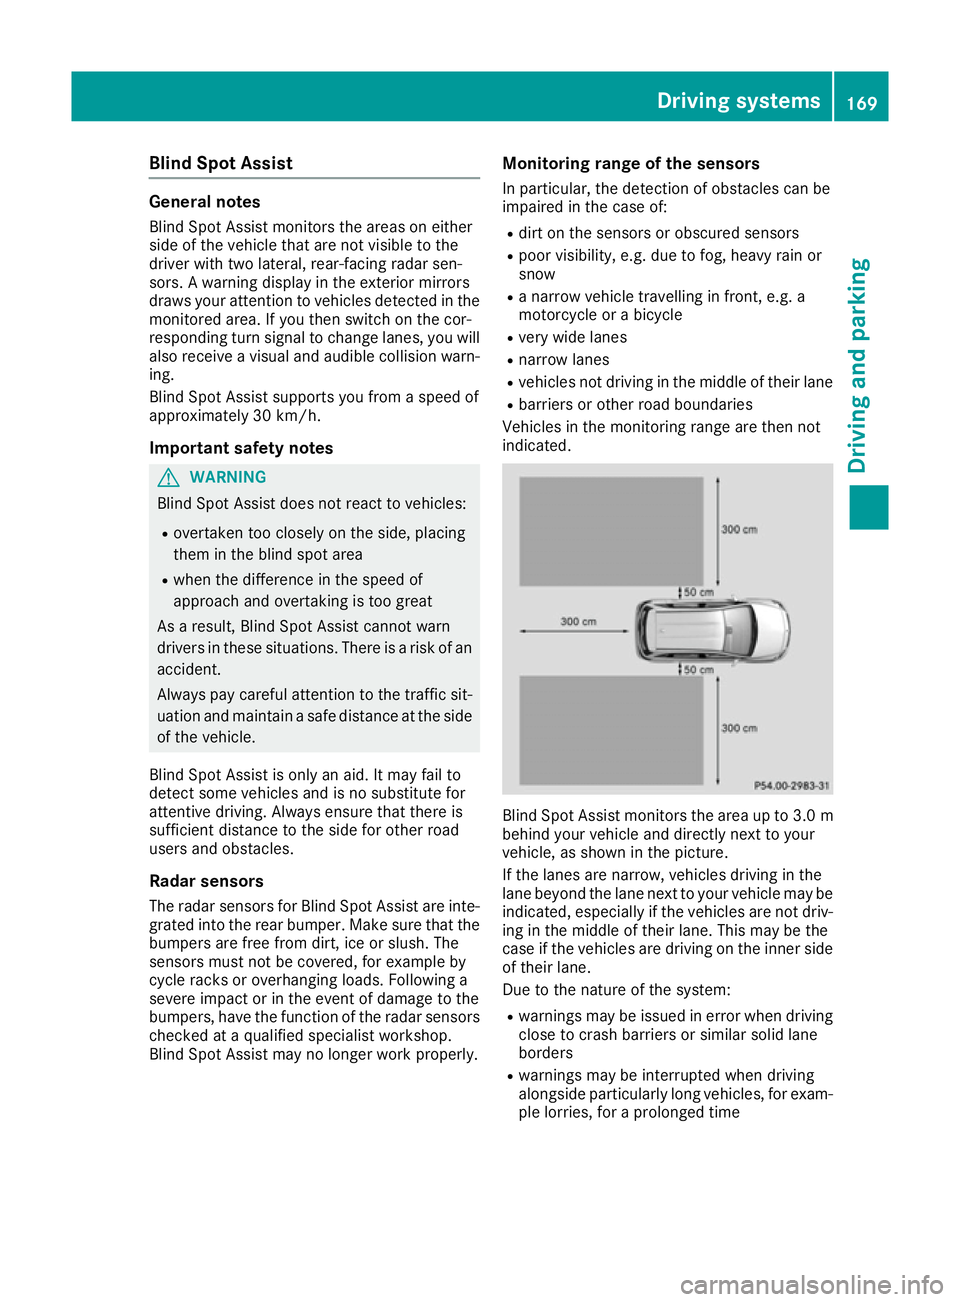
indicated. Blind Spot Assist monitors the area up to 3.0 m
behind your vehicle and directly next to your
vehicle, as shown in the picture.
If the lanes are narrow, vehicles driving in the
lane beyond the lane next to your vehicle may be
indicated, especially if the vehicles are not driv-
ing in the middle of their lane. This may be the
case if the vehicles are driving on the inner side of their lane.
Due to the nature of the system:
R warnings may be issued in error when driving
close to crash barriers or similar solid lane
borders
R warnings may be interrupted when driving
alongside particularly long vehicles, for exam-
ple lorries, for a prolonged time Driving systems
169Driving and parking Z
Page 174 of 293
G
WARNING
The Lane Keeping Assist warning does not
return the vehicle to the original lane. There is a risk of an accident.
Always steer, apply the brakes or accelerate
the vehicle yourself, especially if Lane Keep-
ing Assist alerts you.
If you fail to adapt your driving style, Lane Keep-
ing Assist can neither reduce the risk of an acci-
dent nor override the laws of physics. Lane
Keeping Assist cannot take into account road,
weather or traffic conditions. Lane Keeping
Assist is only an aid. You are responsible for the distance to the vehicle in front, for vehicle
speed, for braking in good time and for staying in
lane.
Lane Keeping Assist does not keep your vehicle
in its lane.
The system may be impaired or may not function if:
R there is poor visibility, e.g. due to insufficient
illumination of the road, or due to snow, rain,fog or spray
R there is glare, e.g. from oncoming traffic, the
sun or reflection from other vehicles (e.g. if
the road surface is wet)
R the windscreen is dirty, misted up, damaged
or covered, for instance by a sticker, in the
vicinity of the camera
R no or several, unclear lane markings are pres-
ent for one lane, e.g. in a construction area
R the lane markings are worn away, dark or cov-
ered up, e.g. by dirt or snow
R the distance to the vehicle in front is too small
and the lane markings thus cannot be detec-
ted
R the lane markings change quickly, e.g. lanes
branch off, cross one another or merge
R the road is narrow and winding
R there are highly variable shade conditions on
the road
Activating Lane Keeping Assist
X Activate Lane Keeping Assist using the on-
board computer; to do so, select Standard
Standard or
Adaptive
Adaptive (Ypage 183).
If you drive at speeds above 60 km/h and lane
markings are detected, the lane markings in
the assistance graphics display (Y page 182)
are shown in green. When
Standard
Standard is selected, no warning vibra-
tion occurs if:
R you have switched on the turn signal. In this
event, the warnings are suppressed for a cer-
tain period of time.
R a driving safety system intervenes, such as
ABS, BAS or ESP ®
.
When Adaptive Adaptive is selected, no warning vibra-
tion occurs if:
R you have switched on the turn signal. In this
event, the warnings are suppressed for a cer-
tain period of time.
R a driving safety system intervenes, such as
ABS, BAS or ESP ®
.
R you accelerate hard, e.g. kickdown.
R you brake hard.
R you steer actively, e.g. swerve to avoid an
obstacle or change lane quickly.
R you cut the corner on a sharp bend.
In order that you are warned only when neces-
sary and in good time if you cross the lane mark-
ing, the system detects certain conditions and
warns you accordingly.
The warning vibration occurs earlier if:
R you approach the outer lane marking on a
bend
R the road has very wide lanes, e.g. a motorway
R the system detects solid lane markings
The warning vibration occurs later if:
R the road has narrow lanes
R you cut the corner on a bend Driving systems
171Driving and parking Z
Page 175 of 293
Useful information
i This Owner's Manual describes all models,
series and optional equipment for your vehi-
cle that were available at the time of going to
press. National variations are possible. Note
that your vehicle may not be equipped with all
of the functions described. This is also the
case for systems and functions relevant to
safety.
i Read the information on qualified specialist
workshops: (Y page 23). Important safety notes
G
WARNING
Operating the integrated information systems and communications equipment in the vehicle
while driving will distract you from traffic con-
ditions. You could then lose control of the
vehicle. There is a risk of an accident.
Only operate these devices if road traffic con-
ditions permit. If you are unsure about the
surrounding conditions, pull over to a safe
location and make entries only while the vehi-
cle is stationary.
You must observe the legal requirements for the country in which you are currently driving whenoperating the on-board computer. G
WARNING
If the instrument cluster has failed or mal-
functioned, you may not recognise function
restrictions relevant to safety. The operating
safety of your vehicle may be impaired. There is a risk of an accident.
Drive on carefully. Have the vehicle checked
at a qualified specialist workshop immedi-
ately.
The on-board computer only shows messages or warnings from certain systems in the multifunc-tion display. You should therefore make sure
your vehicle is operating safely at all times.
If the operating safety of your vehicle is
impaired, park the vehicle safely as soon as pos- sible. Contact a qualified specialist workshop. For an overview, see the instrument panel illus-
tration (Y page 27). Displays and operation
Instrument cluster lighting
The light sensor in the instrument cluster auto-
matically controls the brightness of the multi-
function display. In daylight, the displays in the
instrument cluster are not illuminated.
The lighting in the instrument cluster, in the dis- plays and the controls in the vehicle interior can
be adjusted using the brightness control knob.
The brightness control knob is located on the
bottom left of the instrument cluster
(Y page 27).
X Turn the brightness control knob clockwise or
anti-clockwise.
If the light switch is set to the Ã,Tor
L position, the brightness is dependent
upon the brightness of the ambient light. READY indicator
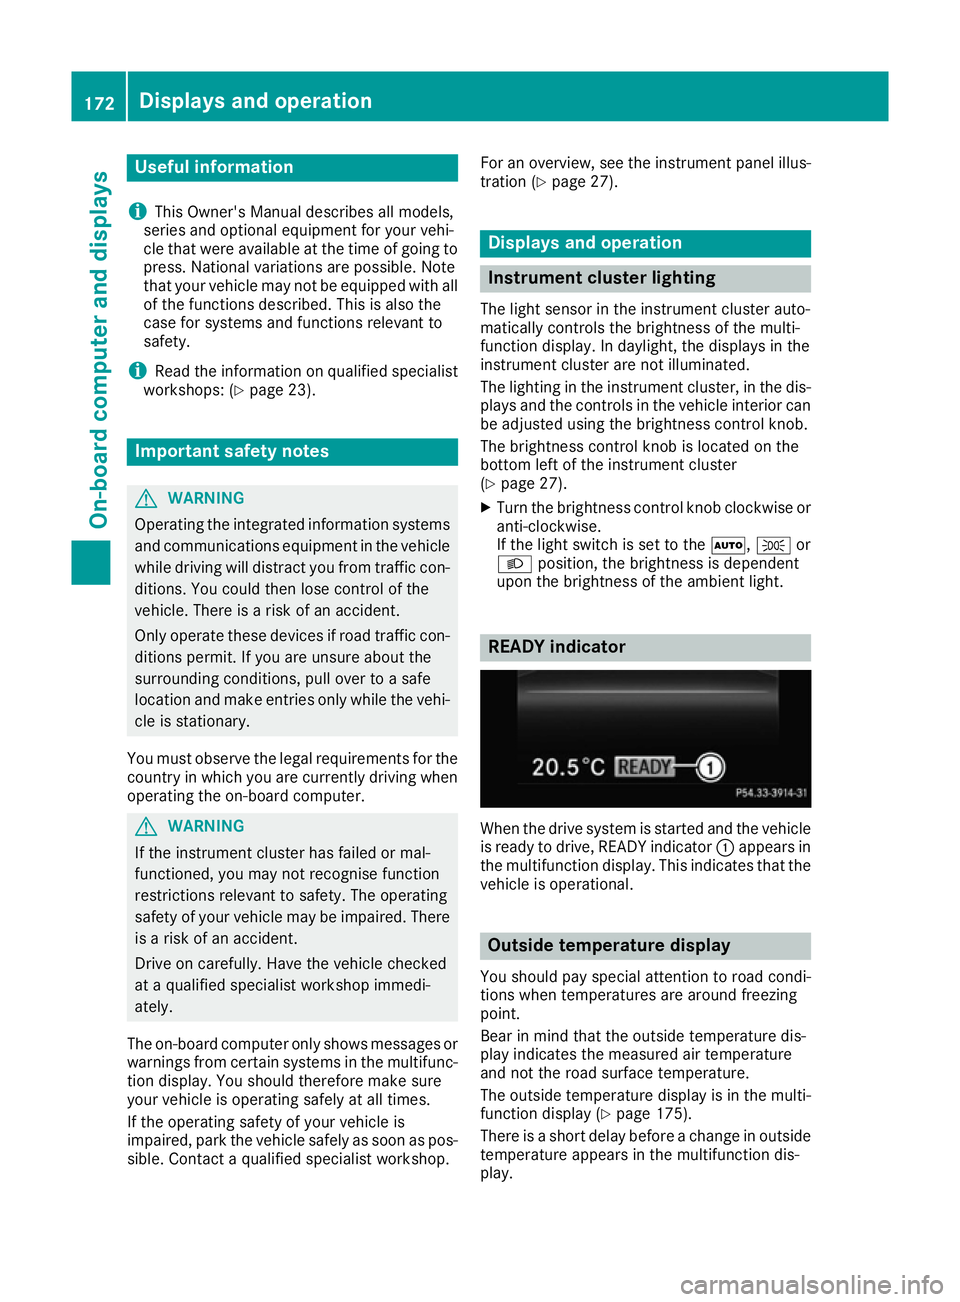
When the drive system is started and the vehicle
is ready to drive, READY indicator :appears in
the multifunction display. This indicates that the vehicle is operational. Outside temperature display
You should pay special attention to road condi-
tions when temperatures are around freezing
point.
Bear in mind that the outside temperature dis-
play indicates the measured air temperature
and not the road surface temperature.
The outside temperature display is in the multi-
function display (Y page 175).
There is a short delay before a change in outside
temperature appears in the multifunction dis-
play. 172
Displays and operationOn-board computer and displays
Page 187 of 293
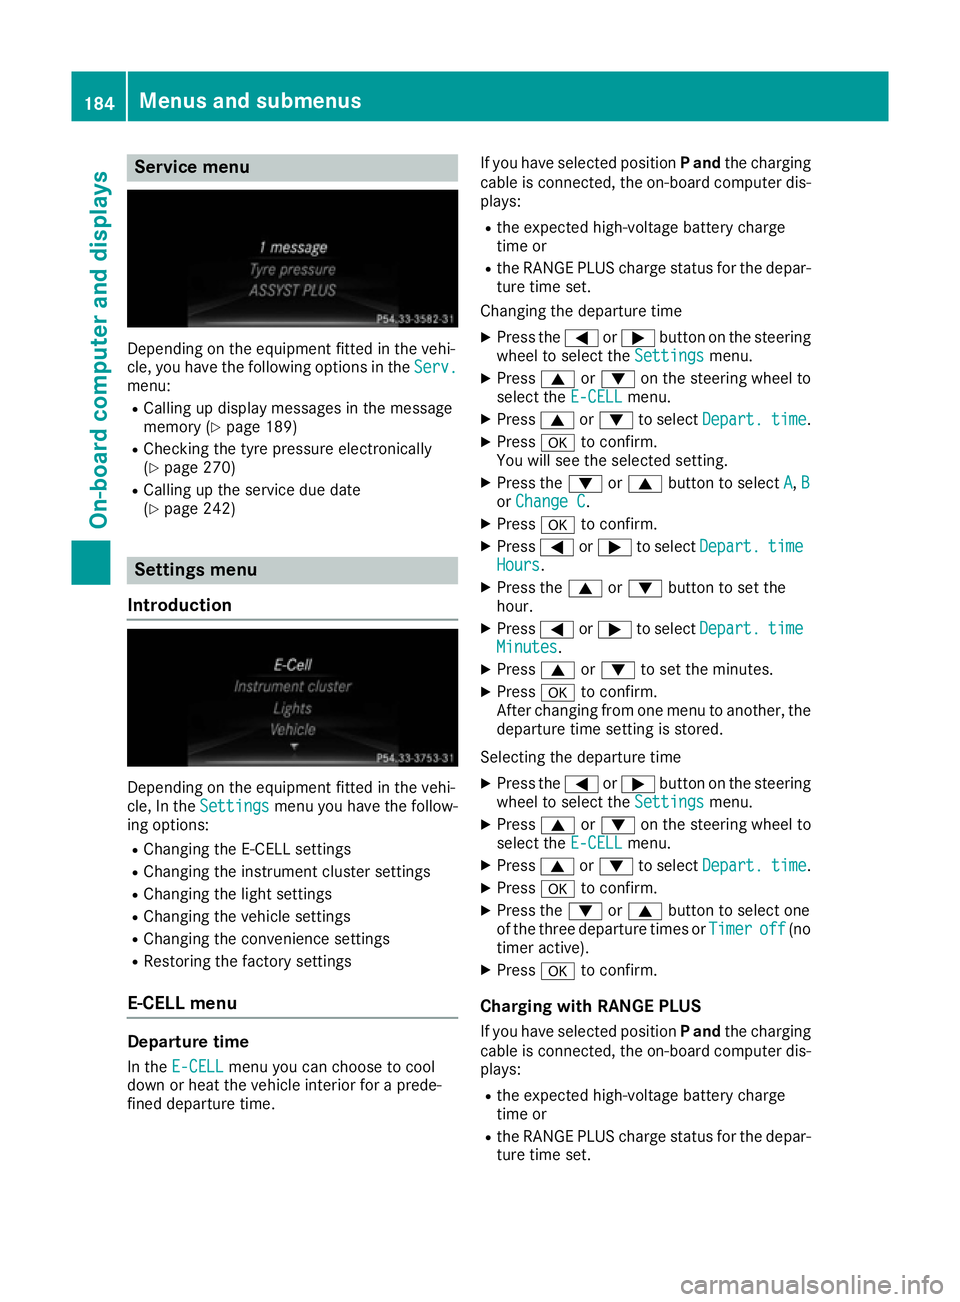
Service menu
Depending on the equipment fitted in the vehi-
cle, you have the following options in the Serv.
Serv.
menu:
R Calling up display messages in the message
memory (Y page 189)
R Checking the tyre pressure electronically
(Y page 270)
R Calling up the service due date
(Y page 242) Settings menu
Introduction Depending on the equipment fitted in the vehi-
cle, In the Settings Settings menu you have the follow-
ing options:
R Changing the E-CELL settings
R Changing the instrument cluster settings
R Changing the light settings
R Changing the vehicle settings
R Changing the convenience settings
R Restoring the factory settings
E‑CELL menu Departure time
In the E-CELL
E-CELL menu you can choose to cool
down or heat the vehicle interior for a prede-
fined departure time. If you have selected position
Pand the charging
cable is connected, the on-board computer dis- plays:
R the expected high-voltage battery charge
time or
R the RANGE PLUS charge status for the depar-
ture time set.
Changing the departure time
X Press the =or; button on the steering
wheel to select the Settings Settingsmenu.
X Press 9or: on the steering wheel to
select the E‑CELL E‑CELLmenu.
X Press 9or: to select Depart.
Depart. time
time.
X Press ato confirm.
You will see the selected setting.
X Press the :or9 button to select A
A, B
B
or Change C
Change C.
X Press ato confirm.
X Press =or; to select Depart.
Depart. time
time
Hours
Hours.
X Press the 9or: button to set the
hour.
X Press =or; to select Depart.
Depart. time
time
Minutes
Minutes.
X Press 9or: to set the minutes.
X Press ato confirm.
After changing from one menu to another, the departure time setting is stored.
Selecting the departure time
X Press the =or; button on the steering
wheel to select the Settings
Settings menu.
X Press 9or: on the steering wheel to
select the E‑CELL
E‑CELLmenu.
X Press 9or: to select Depart.
Depart. time
time.
X Press ato confirm.
X Press the :or9 button to select one
of the three departure times or Timer
Timeroff
off (no
timer active).
X Press ato confirm.
Charging with RANGE PLUS If you have selected position Pand the charging
cable is connected, the on-board computer dis- plays:
R the expected high-voltage battery charge
time or
R the RANGE PLUS charge status for the depar-
ture time set. 184
Menus and submenusOn-board computer and displays
Page 190 of 293
X
Press ato confirm.
X Press the :or9 button to select the
Daytime driving lights
Daytime driving lights function.
If the Daytime
Daytime driving
drivinglights
lightsfunction has
been switched on, the cone of light and the
W symbol in the multifunction display are
shown in orange.
X Press the abutton to save the setting.
Further information on daytime driving lights
(Y page 98).
Switching the Intelligent Light System
on/off
X Press the =or; button on the steering
wheel to select the Settings
Settings menu.
X Press the :or9 button to select the
Lights
Lights submenu.
X Press ato confirm.
X Press the :or9 button to select the
Intell. Light System
Intell. Light System function.
If the Intell. Light Sys. Intell. Light Sys. function has
been switched on, the cone of light and the
L symbol in the multifunction display are
shown in orange.
X Press the abutton to save the setting.
When you switch Intell.
Intell.Light
LightSystem
System func-
tion on, you activate the following functions:
R Motorway mode
R Active light function
R Cornering light function
R Extended range foglamps
If you set the dipped-beam headlamps for driv-
ing on the right/left, the multifunction display
shows the Intell. Light System: system
Intell. Light System: system
inoperative Inactive for left-side
inoperative Inactive for left-side
traffic traffic orIntell.
Intell. Light
LightSystem:
System: System
System
inoperative Inactive for right-side
inoperative Inactive for right-side
traffic traffic display message instead of the
Intell.
Intell. Light
LightSystem
System function in the Lights
Lights
submenu.
Further information on the Intelligent Light Sys-
tem (Y page 100).
Setting the dipped-beam headlamps for
driving on the left/right
This function is only available in vehicles with
the Intelligent Light System.
You can use this function to switch between
symmetrical and asymmetrical dipped beam
(Y page 97). X
Press the =or; button on the steering
wheel to select the Settings
Settings menu.
X Press the :or9 button to select the
Lights Lights submenu.
X Press ato confirm.
X Press the :or9 button to select the
Dipped beams Setting for:
Dipped beams Setting for: function.
The current setting Right-side traffic
Right-side traffic or
Left-side traffic
Left-side traffic appears.
X Press the abutton to save the setting.
If you change the setting, conversion does not take place until the next time the vehicle is
stationary.
If you set the dipped-beam headlamps for driv-
ing on the right/left, then motorway mode and
the extended range foglamps are unavailable.
These are only deactivated if the setting for driv-
ing on the left/right is set opposite to your vehi-
cle's country version.
A qualified specialist workshop can set the
dipped-beam headlamps for driving on the left/ right.
Vehicle Activating/deactivating the automatic
locking feature
X Press the =or; button on the steering
wheel to select the Settings Settingsmenu.
X Press the :or9 button to select the
Vehicle
Vehicle submenu.
X Press ato confirm.
X Press the :or9 button to select the
Automatic door locks
Automatic door locks function.
If the Automatic door locks
Automatic door locks function is
switched on, the multifunction display shows
the doors in orange.
X Press the abutton to save the setting.
If you activate the Automatic door locks
Automatic door locks
function, the vehicle is centrally locked above a
speed of around 15 km/h.
For further information on the automatic locking feature; see (Y page 79).
Activating/deactivating the acoustic
locking confirmation
If you switch on the Acoustic AcousticLock
Lockfunction, an
acoustic signal sounds when you lock the vehi-
cle. Menus and submenus
187On-board computer and displays Z
Page 227 of 293
Useful information
i This Owner's Manual describes all models,
series and optional equipment for your vehi-
cle that were available at the time of going to
press. National variations are possible. Note
that your vehicle may not be equipped with all
of the functions described. This is also the
case for systems and functions relevant to
safety.
i Read the information on qualified specialist
workshops: (Y page 23). Loading guidelines
G
WARNING
If objects, luggage or loads are not secured or not secured sufficiently, they could slip, tip
over or be flung around and thereby hit vehicle
occupants. There is a risk of injury, especially when braking or abruptly changing directions.
Always store objects so that they cannot be
flung around. Secure objects, luggage or
loads against slipping or tipping before the
journey.
The handling characteristics of a laden vehicle
are dependent on the distribution of the load
within the vehicle. For this reason, you should
observe the following notes when transporting a load:
R never exceed the maximum permissible gross
vehicle weight or the permissible axle loads
for the vehicle (including occupants).
R the luggage compartment is the preferred
place to carry objects.
R position heavy loads as far forwards as pos-
sible and as low down in the load compart-
ment as possible.
R the load must not protrude above the upper
edge of the seat backrests.
R always place the load against the rear or front
seat backrests. Make sure that the seat
backrests are securely locked into place.
R always place the load behind unoccupied
seats if possible.
R use the lashing eyelets and the luggage nets
to transport loads and luggage. R
only use lashing eyelets and fastening com-
ponents that are suitable for the weight and
size of the load.
R hook in the safety net when loading.
R the maximum load capacity of the stowage
well under the luggage compartment floor is
25 kg.
R secure the load with sufficiently strong and
wear-resistant lashing material. pad sharp
edges for protection.
! Do not position the load on one part of the
folding luggage compartment floor only. The
maximum load capacity of the folding luggage compartment floor is 100 kg. Spread the
weight evenly to avoid damaging the luggage
compartment floor. Place a solid board under the load if necessary. Please note that the
load on the luggage compartment floor will be increased when the load is lashed down. Stowage areas
Stowage compartments
Important safety notes G
WARNING
If objects in the passenger compartment are
stowed incorrectly, they can slide or be
thrown around and hit vehicle occupants.
There is a risk of injury, particularly in the
event of sudden braking or a sudden change
in direction.
R Always stow objects so that they cannot be
thrown around in such situations.
R Always make sure that objects do not pro-
trude from stowage spaces, parcel nets or
stowage nets.
R Close the lockable stowage spaces before
starting a journey.
R Stow and secure objects that are heavy,
hard, pointed, sharp-edged, fragile or too
large in the luggage compartment.
Observe the loading guidelines (Y page 224).224
Stowage areasStowing and features