sensor MERCEDES-BENZ B-CLASS HATCHBACK 2015 Owner's Manual
[x] Cancel search | Manufacturer: MERCEDES-BENZ, Model Year: 2015, Model line: B-CLASS HATCHBACK, Model: MERCEDES-BENZ B-CLASS HATCHBACK 2015Pages: 293, PDF Size: 10.83 MB
Page 101 of 293
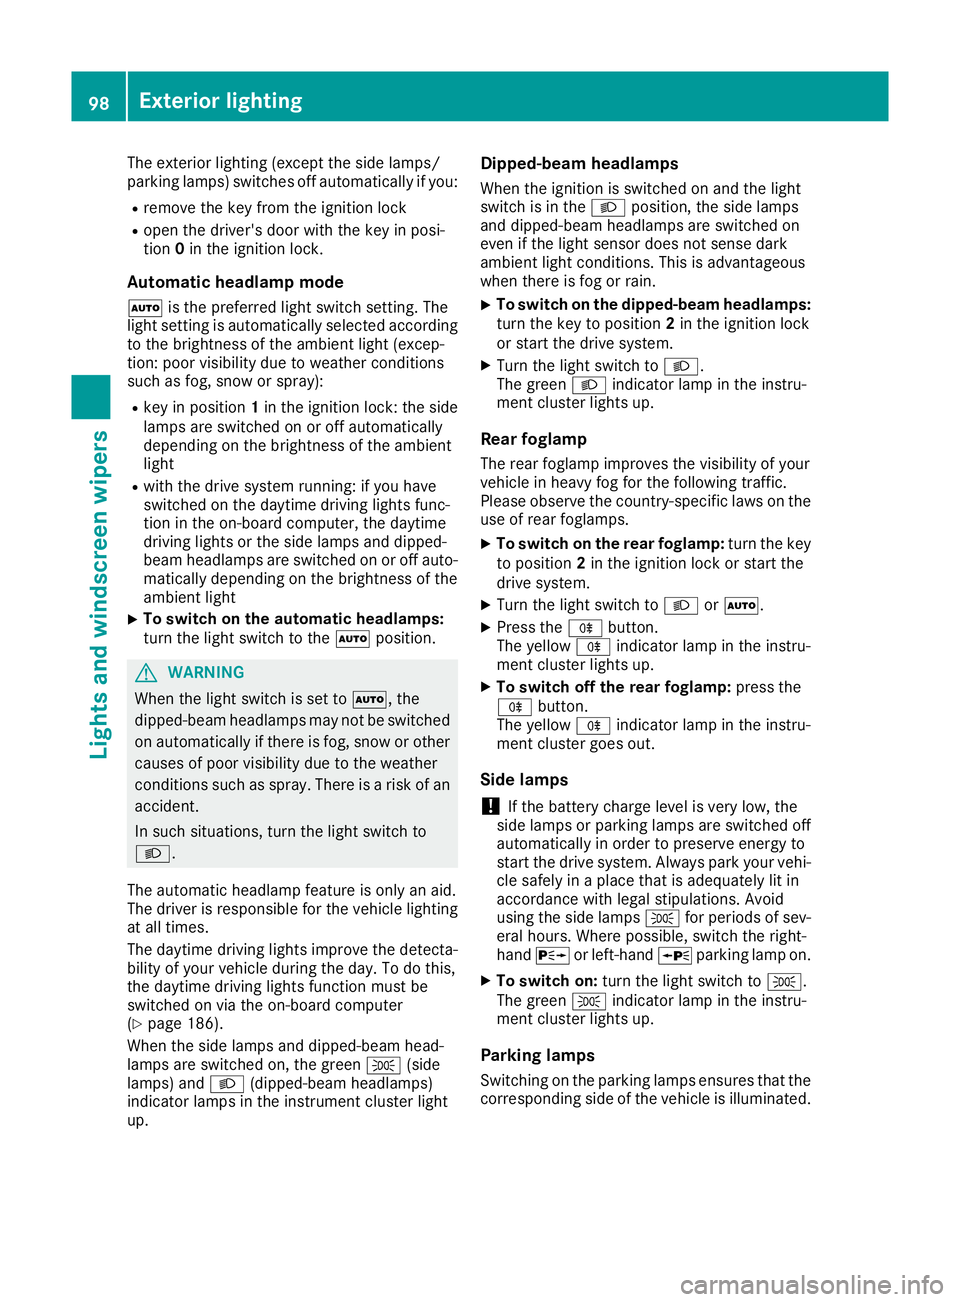
The exterior lighting (except the side lamps/
parking lamps) switches off automatically if you:
R remove the key from the ignition lock
R open the driver's door with the key in posi-
tion 0in the ignition lock.
Automatic headlamp mode à is the preferred light switch setting. The
light setting is automatically selected according to the brightness of the ambient light (excep-
tion: poor visibility due to weather conditions
such as fog, snow or spray):
R key in position 1in the ignition lock: the side
lamps are switched on or off automatically
depending on the brightness of the ambient
light
R with the drive system running: if you have
switched on the daytime driving lights func-
tion in the on-board computer, the daytime
driving lights or the side lamps and dipped-
beam headlamps are switched on or off auto-
matically depending on the brightness of the
ambient light
X To switch on the automatic headlamps:
turn the light switch to the
Ãposition. G
WARNING
When the light switch is set to Ã, the
dipped-beam headlamps may not be switched on automatically if there is fog, snow or othercauses of poor visibility due to the weather
conditions such as spray. There is a risk of an
accident.
In such situations, turn the light switch to
L.
The automatic headlamp feature is only an aid.
The driver is responsible for the vehicle lighting at all times.
The daytime driving lights improve the detecta-
bility of your vehicle during the day. To do this,
the daytime driving lights function must be
switched on via the on-board computer
(Y page 186).
When the side lamps and dipped-beam head-
lamps are switched on, the green T(side
lamps) and L(dipped-beam headlamps)
indicator lamps in the instrument cluster light
up. Dipped-beam headlamps
When the ignition is switched on and the light
switch is in the Lposition, the side lamps
and dipped-beam headlamps are switched on
even if the light sensor does not sense dark
ambient light conditions. This is advantageous
when there is fog or rain.
X To switch on the dipped-beam headlamps:
turn the key to position 2in the ignition lock
or start the drive system.
X Turn the light switch to L.
The green Lindicator lamp in the instru-
ment cluster lights up.
Rear foglamp The rear foglamp improves the visibility of your
vehicle in heavy fog for the following traffic.
Please observe the country-specific laws on the
use of rear foglamps.
X To switch on the rear foglamp: turn the key
to position 2in the ignition lock or start the
drive system.
X Turn the light switch to LorÃ.
X Press the Rbutton.
The yellow Rindicator lamp in the instru-
ment cluster lights up.
X To switch off the rear foglamp: press the
R button.
The yellow Rindicator lamp in the instru-
ment cluster goes out.
Side lamps
! If the battery charge level is very low, the
side lamps or parking lamps are switched off automatically in order to preserve energy to
start the drive system. Always park your vehi-
cle safely in a place that is adequately lit in
accordance with legal stipulations. Avoid
using the side lamps Tfor periods of sev-
eral hours. Where possible, switch the right-
hand X or left-hand Wparking lamp on.
X To switch on: turn the light switch to T.
The green Tindicator lamp in the instru-
ment cluster lights up.
Parking lamps Switching on the parking lamps ensures that the
corresponding side of the vehicle is illuminated. 98
Exterior lightingLights and windscreen wipers
Page 104 of 293
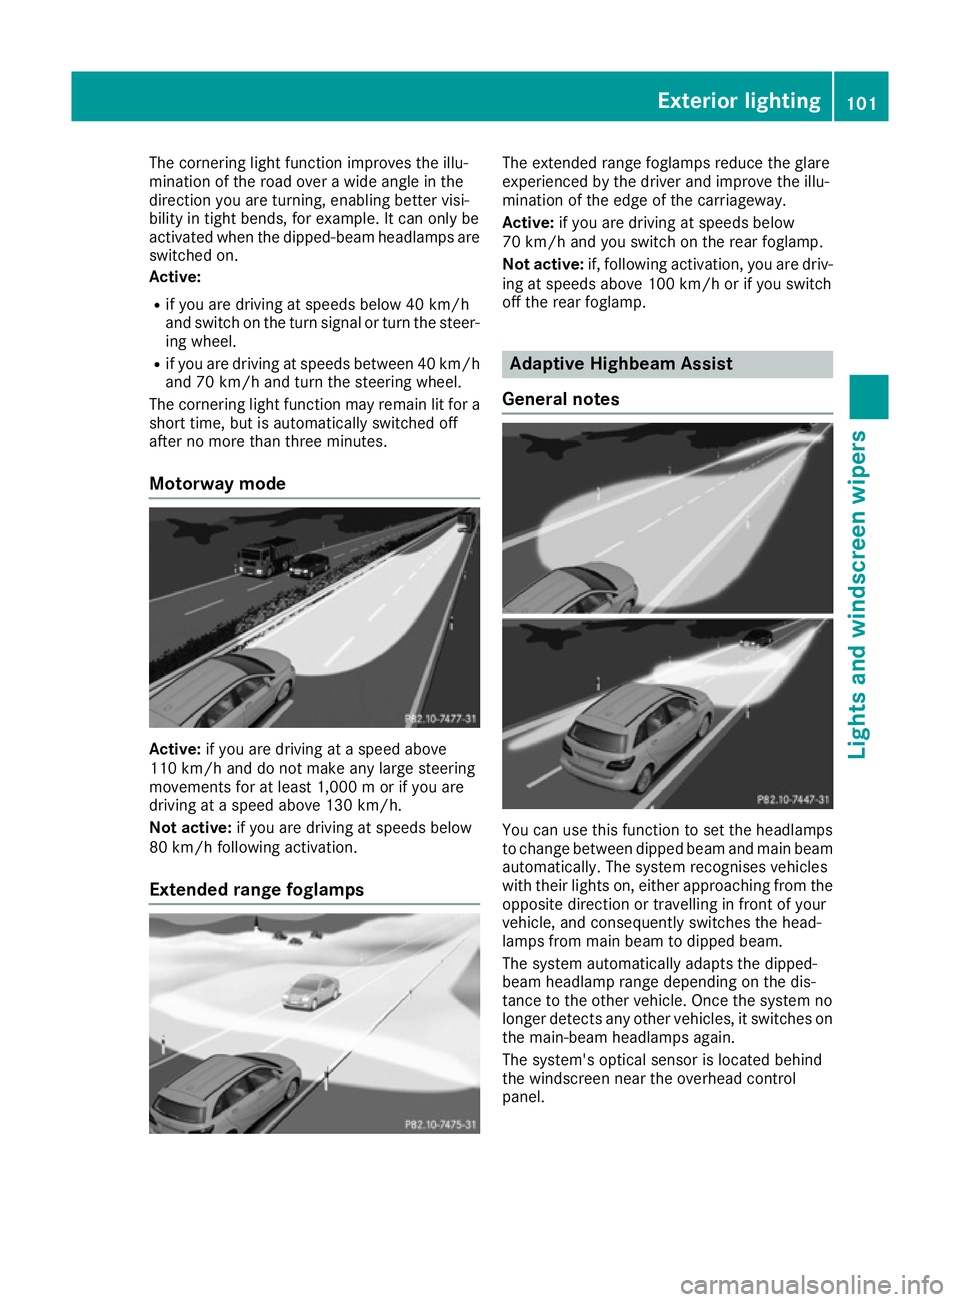
The cornering light function improves the illu-
mination of the road over a wide angle in the
direction you are turning, enabling better visi-
bility in tight bends, for example. It can only be
activated when the dipped-beam headlamps are
switched on.
Active:
R if you are driving at speeds below 40 km/h
and switch on the turn signal or turn the steer- ing wheel.
R if you are driving at speeds between 40 km/h
and 70 km/h and turn the steering wheel.
The cornering light function may remain lit for a
short time, but is automatically switched off
after no more than three minutes.
Motorway mode Active:
if you are driving at a speed above
110 km/h and do not make any large steering
movements for at least 1,000 m or if you are
driving at a speed above 130 km/h.
Not active: if you are driving at speeds below
80 km/h following activation.
Extended range foglamps The extended range foglamps reduce the glare
experienced by the driver and improve the illu-
mination of the edge of the carriageway.
Active:
if you are driving at speeds below
70 km/h and you switch on the rear foglamp.
Not active: if, following activation, you are driv-
ing at speeds above 100 km/h or if you switch
off the rear foglamp. Adaptive Highbeam Assist
General notes You can use this function to set the headlamps
to change between dipped beam and main beam automatically. The system recognises vehicles
with their lights on, either approaching from theopposite direction or travelling in front of your
vehicle, and consequently switches the head-
lamps from main beam to dipped beam.
The system automatically adapts the dipped-
beam headlamp range depending on the dis-
tance to the other vehicle. Once the system no
longer detects any other vehicles, it switches on the main-beam headlamps again.
The system's optical sensor is located behind
the windscreen near the overhead control
panel. Exterior lighting
101Lights and windscreen wipers Z
Page 105 of 293
Important safety notes
G
WARNING
Adaptive Highbeam Assist does not recognise road users:
R who have no lights, e.g. pedestrians
R who have poor lighting, e.g. cyclists
R whose lighting is blocked, e.g. by a barrier
In very rare cases, Adaptive Highbeam Assist
recognises road users too late or not at all. In
this, or in similar situations, the automatic
main-beam headlamps will not be deactivated
or activated regardless. There is a risk of an
accident.
Always carefully observe the traffic conditions and switch off the main-beam headlamps in
good time.
Adaptive Highbeam Assist cannot take into
account road, weather or traffic conditions.
Adaptive Highbeam Assist is only an aid. You are responsible for adjusting the vehicle's lighting
to the prevailing light, visibility and traffic con-
ditions.
In particular, the detection of obstacles can be
restricted if there is:
R poor visibility, e.g. due to fog, heavy rain or
snow
R dirt on the sensors or if the sensors are
obscured
Switching Adaptive Highbeam Assist
on/off X
To switch on: turn the light switch to Ã.
X Press the combination switch beyond the
pressure point in the direction of arrow :.
The _ indicator lamp in the multifunction
display lights up when it is dark and the light
sensor switches on the dipped-beam head-
lamps.
If you are driving at speeds above 25 km/h:
The headlamp range is set automatically
depending on the distance between the vehi- cle and other road users.
If you are driving at speeds above approx-
imately 30 km/h and no other road users are
recognised: The main-beam headlamps are switched on
automatically. The Kindicator lamp in the
instrument cluster also lights up.
If you are driving at speeds below 25 km/h or
other road users are recognised or the roads
are adequately lit:
The main-beam headlamps are switched off
automatically. The Kindicator lamp in the
instrument cluster goes out. The _indi-
cator lamp in the multifunction display
remains lit.
X To deactivate: move the combination switch
back to its normal position.
The _ indicator lamp in the multifunction
display goes out. Headlamps misted up on the inside
Certain climatic and physical conditions may
cause moisture to form in the headlamp. This
moisture does not affect the functionality of the headlamp. Interior lighting
Overview of interior lighting
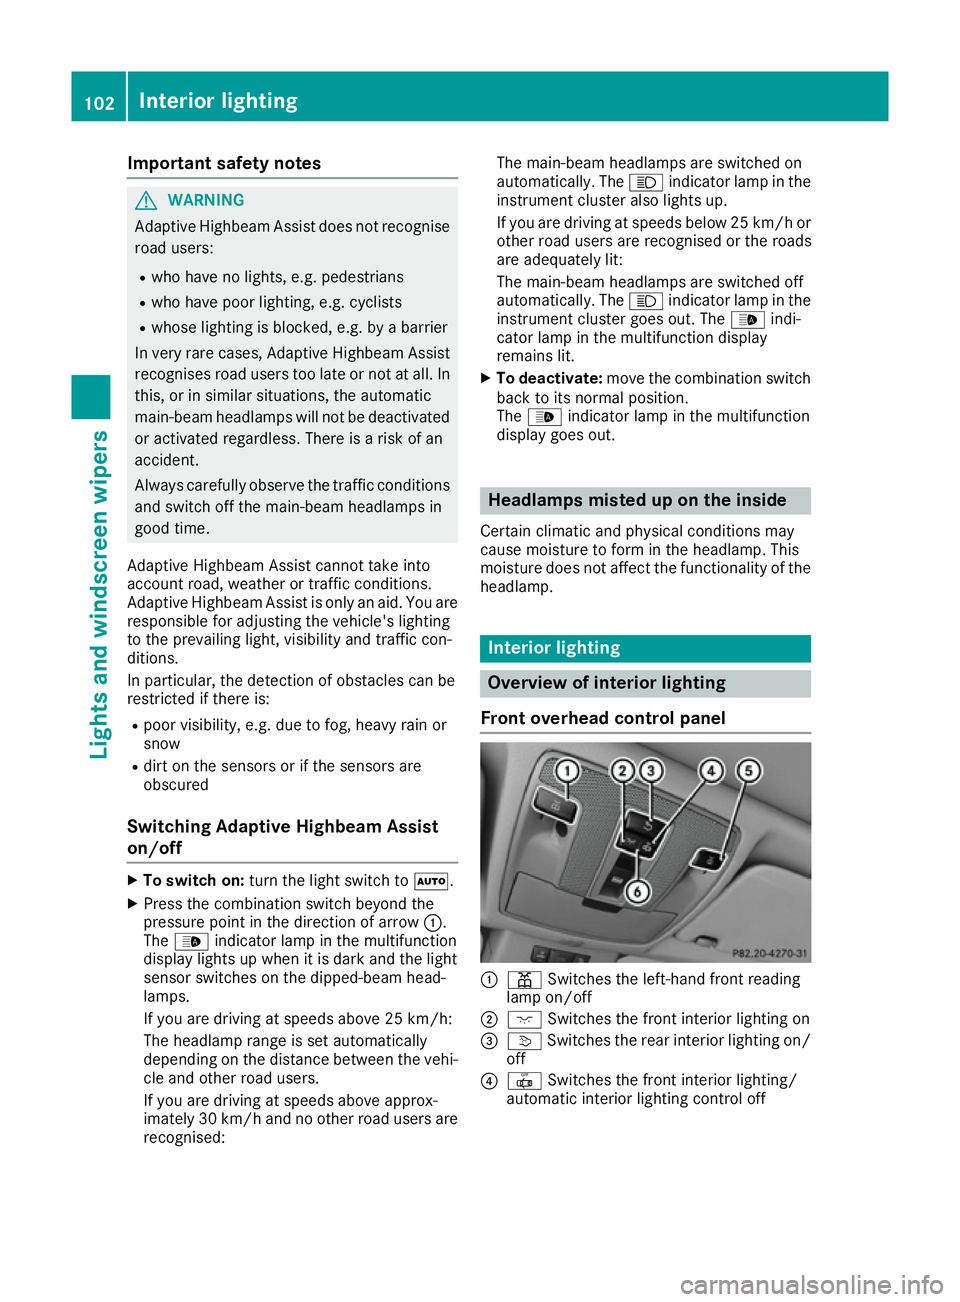
Front overhead control panel :
p Switches the left-hand front reading
lamp on/off
; c Switches the front interior lighting on
= v Switches the rear interior lighting on/
off
? | Switches the front interior lighting/
automatic interior lighting control off 102
Interior lightingLights and windscreen wipers
Page 112 of 293
!
If the windscreen wipers leave smears on
the windscreen after the vehicle has been
washed in an automatic car wash, this may be
due to wax or other residue. Clean the wind-
screen with washer fluid after an automatic
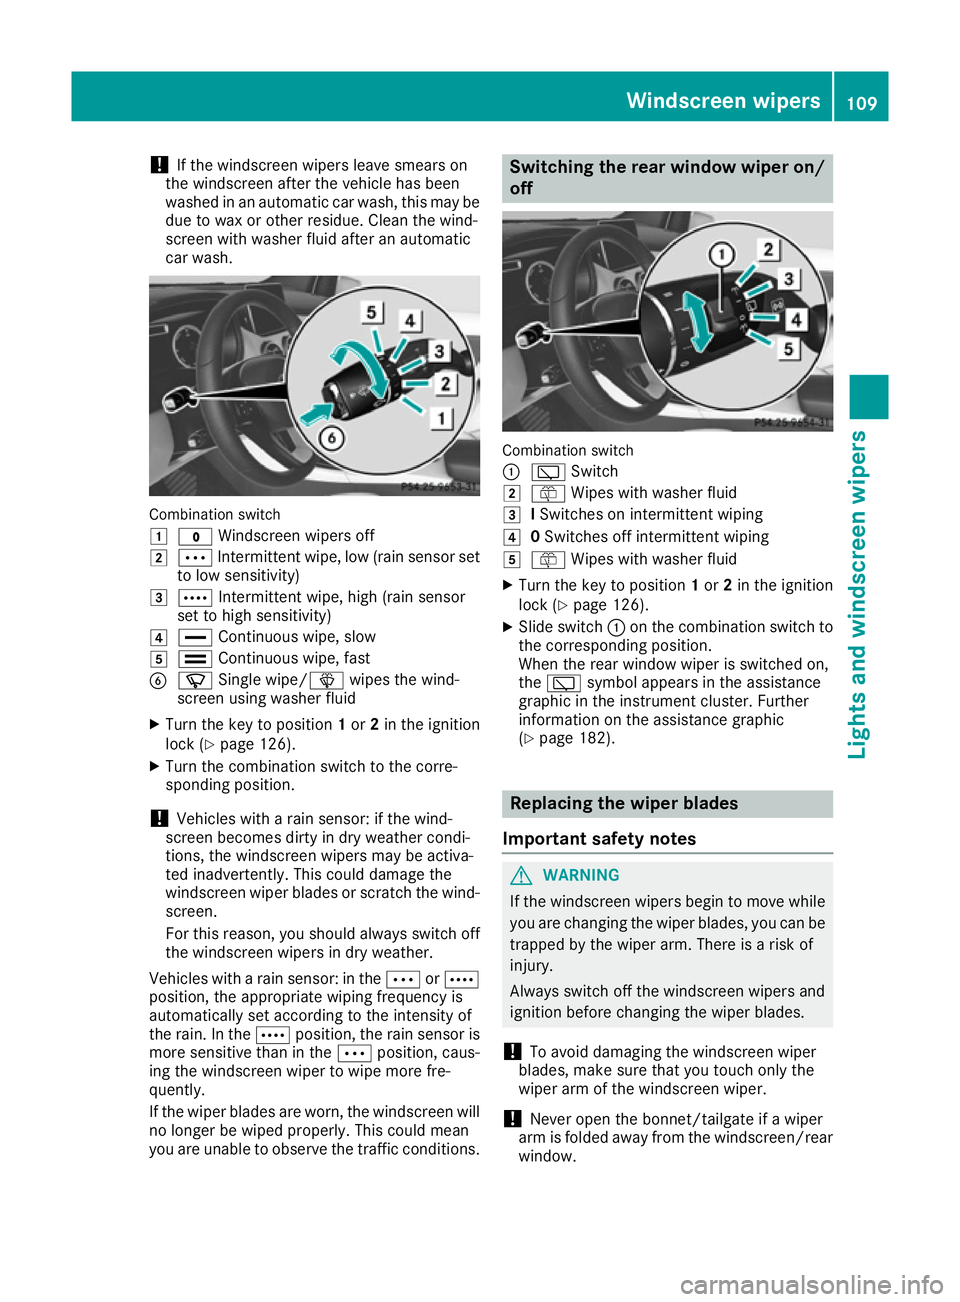
car wash. Combination switch
1
$ Windscreen wipers off
2 Ä Intermittent wipe, low (rain sensor set
to low sensitivity)
3 Å Intermittent wipe, high (rain sensor
set to high sensitivity)
4 ° Continuous wipe, slow
5 ¯ Continuous wipe, fast
B í Single wipe/î wipes the wind-
screen using washer fluid
X Turn the key to position 1or 2in the ignition
lock (Y page 126).
X Turn the combination switch to the corre-
sponding position.
! Vehicles with a rain sensor: if the wind-
screen becomes dirty in dry weather condi-
tions, the windscreen wipers may be activa-
ted inadvertently. This could damage the
windscreen wiper blades or scratch the wind- screen.
For this reason, you should always switch off
the windscreen wipers in dry weather.
Vehicles with a rain sensor: in the ÄorÅ
position, the appropriate wiping frequency is
automatically set according to the intensity of
the rain. In the Åposition, the rain sensor is
more sensitive than in the Äposition, caus-
ing the windscreen wiper to wipe more fre-
quently.
If the wiper blades are worn, the windscreen will
no longer be wiped properly. This could mean
you are unable to observe the traffic conditions. Switching the rear window wiper on/
off Combination switch
:
è Switch
2 ô Wipes with washer fluid
3 ISwitches on intermittent wiping
4 0Switches off intermittent wiping
5 ô Wipes with washer fluid
X Turn the key to position 1or 2in the ignition
lock (Y page 126).
X Slide switch :on the combination switch to
the corresponding position.
When the rear window wiper is switched on,
the è symbol appears in the assistance
graphic in the instrument cluster. Further
information on the assistance graphic
(Y page 182). Replacing the wiper blades
Important safety notes G
WARNING
If the windscreen wipers begin to move while
you are changing the wiper blades, you can be trapped by the wiper arm. There is a risk of
injury.
Always switch off the windscreen wipers and
ignition before changing the wiper blades.
! To avoid damaging the windscreen wiper
blades, make sure that you touch only the
wiper arm of the windscreen wiper.
! Never open the bonnet/tailgate if a wiper
arm is folded away from the windscreen/rear
window. Windscreen wipers
109Lights and windscreen wipers Z
Page 128 of 293
Useful information
i This Owner's Manual describes all models,
series and optional equipment for your vehi-
cle that were available at the time of going to
press. National variations are possible. Note
that your vehicle may not be equipped with all
of the functions described. This is also the
case for systems and functions relevant to
safety.
i Read the information on qualified specialist
workshops: (Y page 23). Running-in notes
In certain driving and driving safety systems, the sensors adjust automatically while a certain dis-
tance is being driven after the vehicle has been delivered or after repairs. Full system effective- ness is not reached until the end of this teach-in
process.
Brake pads/linings and discs that are either new or have been replaced only achieve optimum
braking effect after several hundred kilometres
of driving. Compensate for the reduced braking
effect by applying greater force to the brake
pedal. Driving
Important safety notes
G
WARNING
Objects in the driver's footwell may restrict
the clearance around the pedals or block a
depressed pedal. This jeopardises the oper-
ating and road safety of the vehicle. There is a risk of an accident.
Stow all objects securely in the vehicle so that
they do not get into the driver's footwell.
Always fit the floormats securely and as pre-
scribed in order to ensure that there is always sufficient room for the pedals. Do not use
loose floormats and do not place several floor- mats on top of one another. G
WARNING
Unsuitable footwear can hinder correct usage of the pedals, e.g.:
R shoes with thick soles
R shoes with high heels
R slippers
There is a risk of an accident.
Wear suitable footwear to ensure correct
usage of the pedals. G
WARNING
If you switch off the ignition while driving,
safety-relevant functions are only available
with limitations, or not at all. This could affect, for example, the power steering and the brake
boosting effect. You will require considerably
more effort to steer and brake. There is a risk of an accident.
Do not switch off the ignition while driving. G
WARNING
If the parking brake has not been fully
released when driving, the parking brake can:
R overheat and cause a fire
R lose its hold function.
There is a risk of fire and an accident. Release
the parking brake fully before driving off.
! Before driving away, you must ensure that,
for your own safety and to avoid damage, the charging cable has been removed from the
vehicle socket. Otherwise, you cannot shift
the transmission out of position P.
The braking performance of the electric motor
using recuperative braking is, in some operating modes, either reduced or not effective:
R when the charge status of the high-voltage
battery increases
R if the high-voltage battery is not yet at a nor-
mal operating temperature
R when driving close to the maximum speed
R when the vehicle is almost stationary
R in transmission position N
R during and after ESP stability control
If you do not make an additional effort to apply
the brake yourself, the braking effect may not be Driving
125Driving and parking Z
Page 136 of 293

D
- Sporty driving or driving on a
downhill gradient
The brake pedal does not need to
be used as often because the
extent of the deceleration is
greater than in D.
Energy use when decelerating is
considerably higher than when
the vehicle is braked with the
brake pedal. D
AUTO
(radar-
based) The intensity of recuperation is
automatically adjusted to the cur-
rent traffic situation.
Default setting In levels
Dand D-
, deceleration can be control-
led in an infinitely variable manner using the
accelerator pedal.
The braking performance of the electric motor
using recuperative braking is, in some operating modes, either reduced or not effective:
R when the charge status of the high-voltage
battery increases
R if the high-voltage battery is not yet at a nor-
mal operating temperature
R when driving close to the maximum design
speed
R when the vehicle is almost stationary
R in transmission position N
R during and after ESP stability control
If you do not make an additional effort to apply
the brake yourself, the braking effect may not be sufficient. If necessary, counteract the reduced regenerative braking effect by applying the
brake yourself.
Radar-based recuperation The vehicle uses the sensors of COLLISION PRE-
VENTION ASSIST PLUS during radar-based
recuperation (D AUTO
). The sensors detect the
distance to the vehicle ahead and its speed. The intensity of recuperation is then automatically
adjusted to the current traffic situation.
The range can then be increased by storing
energy efficiently. Adjustment is infinitely vari-
able from overrun mode (no recuperation) to
maximum recuperation.
Maintain sufficient distance to the vehicle in
front. Mercedes-Benz recommends that you activate COLLISION PREVENTION ASSIST PLUS
as a visual and acoustic aid.
Examples of radar-based recuperation:
R Approaching a slower vehicle, a decelerating
vehicle or when following a vehicle downhill.
Your vehicle decelerates slightly and increa-
ses recuperation.
R Driving when no vehicle is detected in front or
when a vehicle is detected in the far distance or an accelerating vehicle is detected. Your
vehicle switches to overrun mode at higher
speeds.
R Driving on a steep downhill slope. Accelera-
tion downhill is reduced and recuperation is
increased. This is comparable with shifting
down when driving downhill.
X To activate radar-based recuperation: pull
steering wheel gearshift paddle :or;
towards you and hold for about one second.
X To deactivate radar-based recuperation:
briefly pull steering wheel gearshift paddle
:
or ; towards you.
If you change between radar-based and manual
recuperation, the following levels are activated
depending on the selection via the steering
wheel gearshift paddles: :
Steering wheel
gearshift paddle - selects
D-
(maximum
recuperation) ;
Steering wheel
gearshift paddle + selects
D+
(overrun) In particular, the function of the radar sensors
can be impaired in the case of:
R
dirt on the sensors or obscured sensors
R snow or heavy rain
R interference by other radar sources
R strong radar reflections, for example, in multi-
storey car parks
R a narrow vehicle travelling in front, e.g. a
motorcycle
R a vehicle travelling in front on a different line
Following damage to the front end of the vehicle, have the radar sensor settings and operation
checked at a qualified specialist workshop
immediately. This also applies to collisions at
slow speeds where there is no visible damage to the front of the vehicle.
If the radar sensors are not available, the system
switches automatically to level Dwith moderate Transmission
133Driving and parking Z
Page 137 of 293
recuperation. Have the radar sensors checked
at a qualified specialist workshop immediately.
Automatic adjustment of recuperation
on downhill gradients The vehicle can detect steep downhill gradients.
To reduce acceleration downhill and to charge
the high-voltage battery, recuperation is
increased steplessly. This is comparable to the
engine brake in a combustion engine when you
downshift a gear on a downhill gradient.
Automatic adjustment of recuperation on down-
hill gradients is available in level DAUTO
or on
vehicles without steering wheel gearshift pad-
dles in level D.
Intelligent recuperation The vehicle uses the map and camera data of
Traffic Sign Assist in addition to the sensors of
COLLISION PREVENTION ASSIST PLUS during
radar-based recuperation ( DAUTO
). The rate of
recuperation is then automatically adjusted to
the current traffic situation, taking the current
and future maximum speed into account. High-voltage battery
Important safety notes
G
DANGER
The vehicle's high voltage electrical system is under high voltage. If you modify components
in the vehicle's high-voltage electrical system or touch damaged components, you may be
electrocuted. The components in the vehi-
cle's high-voltage electrical system may be
damaged in an accident, although the damage
is not visible. There is a risk of fatal injury.
Do not touch any high-voltage components
after an accident and never modify the vehi-
cle's high-voltage electrical system. Have the vehicle towed away after an accident and the vehicle's high-voltage electrical system
checked by a qualified specialist workshop. G
WARNING
In the event of a vehicle fire, the internal pres- sure of the high-voltage battery could exceed a critical value. In this case, flammable gas
escapes through a vent valve in the vehicle's
underbody. The gas can ignite. There is a risk of injury.
Leave the danger area immediately. Secure
the danger area at a suitable distance, whilst
observing legal requirements. G
DANGER
Connecting the charging cable to the mains
supply via incorrectly installed mains sockets or by means of adapters, extension cables or
similar could cause a fire or an electric shock. There is a risk of fatal injury.
To avoid such risks, observe the following:
R Only connect the charging cable to mains
sockets:
- which have been properly installed and
- which have been inspected by a qualified
electrician
R For safety reasons, only use charging
cables which have been supplied with the
vehicle or which have been approved for
this vehicle.
R Never use a damaged charging cable.
R Do not use:
- extension cables
- extension reels
- multi-outlet sockets
R Never use socket adapters to connect the
charging cable to the mains socket. The
only exception is if the adapter has been
tested and approved by the manufacturer
for charging the high-voltage battery of an
electric vehicle.
R Observe the safety notes in the operating
instructions for the socket adapter. G
DANGER
Connecting the charging cable to the wallbox via an incorrectly installed wallbox or adapter,
extension cable or similar could cause a fire or an electric shock. There is a risk of fatal injury. 134
High-voltage batteryDriving and parking
Page 158 of 293
Activating the HOLD function
X
Make sure that the activation conditions are
met.
X Depress the brake pedal.
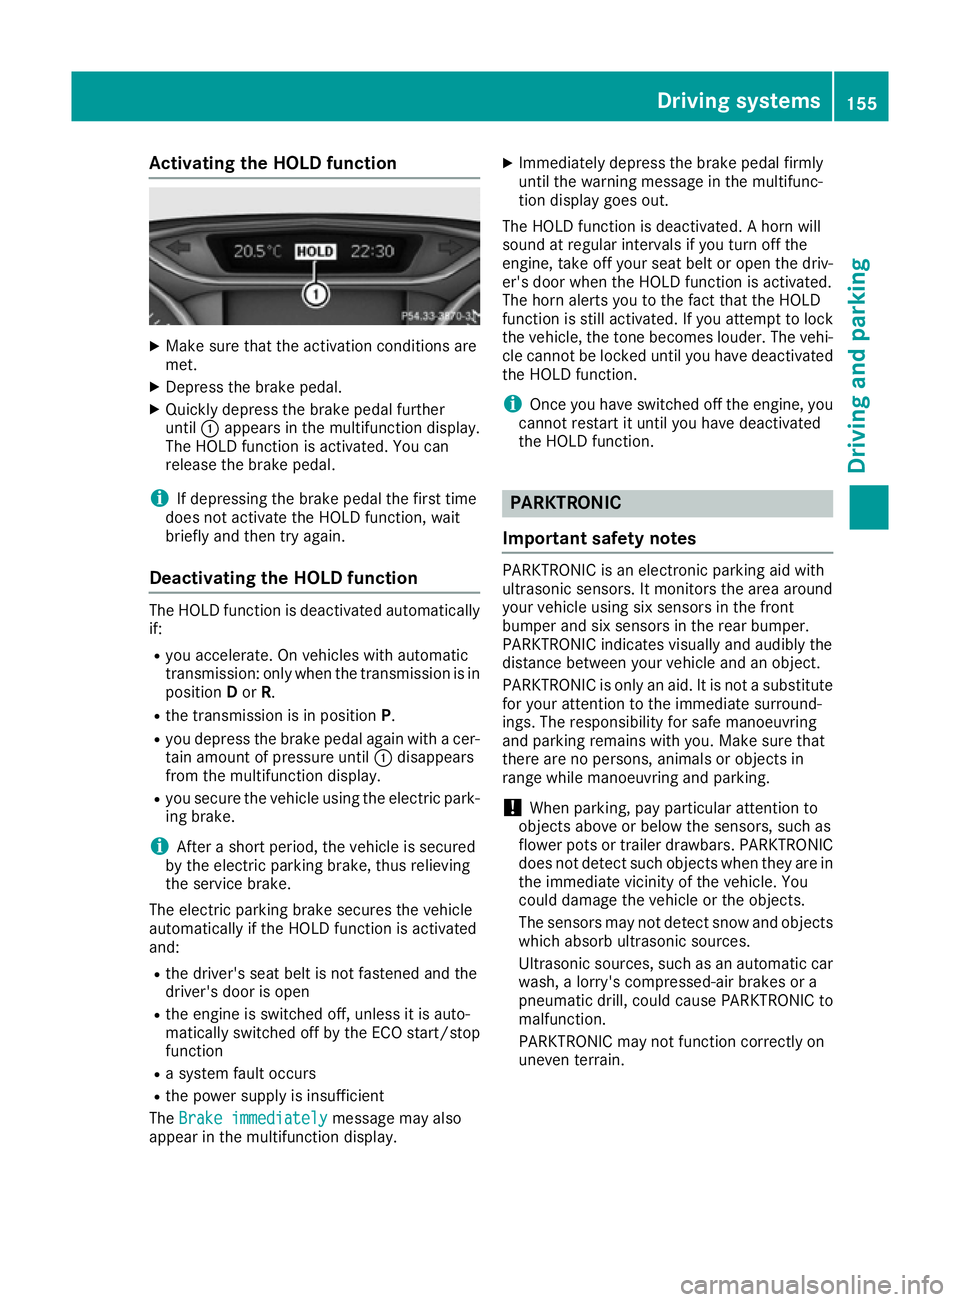
X Quickly depress the brake pedal further
until :appears in the multifunction display.
The HOLD function is activated. You can
release the brake pedal.
i If depressing the brake pedal the first time
does not activate the HOLD function, wait
briefly and then try again.
Deactivating the HOLD function The HOLD function is deactivated automatically
if:
R you accelerate. On vehicles with automatic
transmission: only when the transmission is in
position Dor R.
R the transmission is in position P.
R you depress the brake pedal again with a cer-
tain amount of pressure until :disappears
from the multifunction display.
R you secure the vehicle using the electric park-
ing brake.
i After a short period, the vehicle is secured
by the electric parking brake, thus relieving
the service brake.
The electric parking brake secures the vehicle
automatically if the HOLD function is activated
and:
R the driver's seat belt is not fastened and the
driver's door is open
R the engine is switched off, unless it is auto-
matically switched off by the ECO start/stop
function
R a system fault occurs
R the power supply is insufficient
The Brake immediately Brake immediately message may also
appear in the multifunction display. X
Immediately depress the brake pedal firmly
until the warning message in the multifunc-
tion display goes out.
The HOLD function is deactivated. A horn will
sound at regular intervals if you turn off the
engine, take off your seat belt or open the driv-
er's door when the HOLD function is activated.
The horn alerts you to the fact that the HOLD
function is still activated. If you attempt to lock
the vehicle, the tone becomes louder. The vehi- cle cannot be locked until you have deactivated
the HOLD function.
i Once you have switched off the engine, you
cannot restart it until you have deactivated
the HOLD function. PARKTRONIC
Important safety notes PARKTRONIC is an electronic parking aid with
ultrasonic sensors. It monitors the area around
your vehicle using six sensors in the front
bumper and six sensors in the rear bumper.
PARKTRONIC indicates visually and audibly the
distance between your vehicle and an object.
PARKTRONIC is only an aid. It is not a substitute for your attention to the immediate surround-
ings. The responsibility for safe manoeuvring
and parking remains with you. Make sure that
there are no persons, animals or objects in
range while manoeuvring and parking.
! When parking, pay particular attention to
objects above or below the sensors, such as
flower pots or trailer drawbars. PARKTRONIC does not detect such objects when they are in
the immediate vicinity of the vehicle. You
could damage the vehicle or the objects.
The sensors may not detect snow and objects which absorb ultrasonic sources.
Ultrasonic sources, such as an automatic car
wash, a lorry's compressed-air brakes or a
pneumatic drill, could cause PARKTRONIC to
malfunction.
PARKTRONIC may not function correctly on
uneven terrain. Driving systems
155Driving and parking Z
Page 159 of 293
PARKTRONIC is activated automatically when
you:
R switch on the ignition
R shift the transmission to position D,Ror N
R release the electric parking brake
PARKTRONIC is deactivated at speeds above
18 km/h. It is reactivated at lower speeds.
Range of the sensors General notes
PARKTRONIC does not take into account obsta-
cles located:
R below the detection range, e.g. persons, ani-
mals or objects
R above the detection range, e.g. overhanging
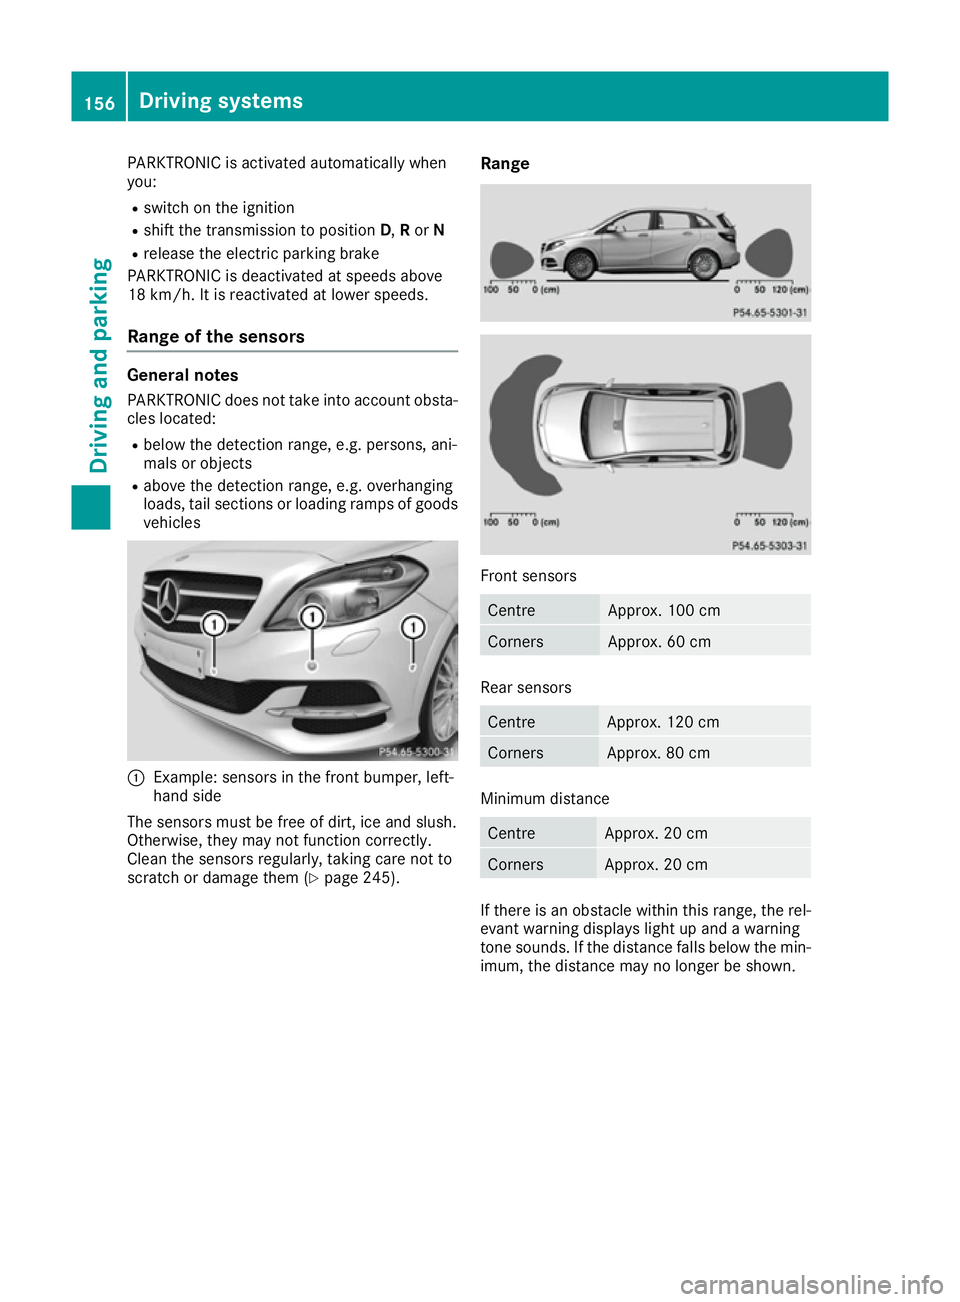
loads, tail sections or loading ramps of goods vehicles :
Example: sensors in the front bumper, left-
hand side
The sensors must be free of dirt, ice and slush.
Otherwise, they may not function correctly.
Clean the sensors regularly, taking care not to
scratch or damage them (Y page 245).Range Front sensors
Centre Approx. 100 cm
Corners Approx. 60 cm
Rear sensors
Centre Approx. 120 cm
Corners Approx. 80 cm
Minimum distance
Centre Approx. 20 cm
Corners Approx. 20 cm
If there is an obstacle within this range, the rel-
evant warning displays light up and a warning
tone sounds. If the distance falls below the min- imum, the distance may no longer be shown. 156
Driving systemsDriving and parking
Page 160 of 293
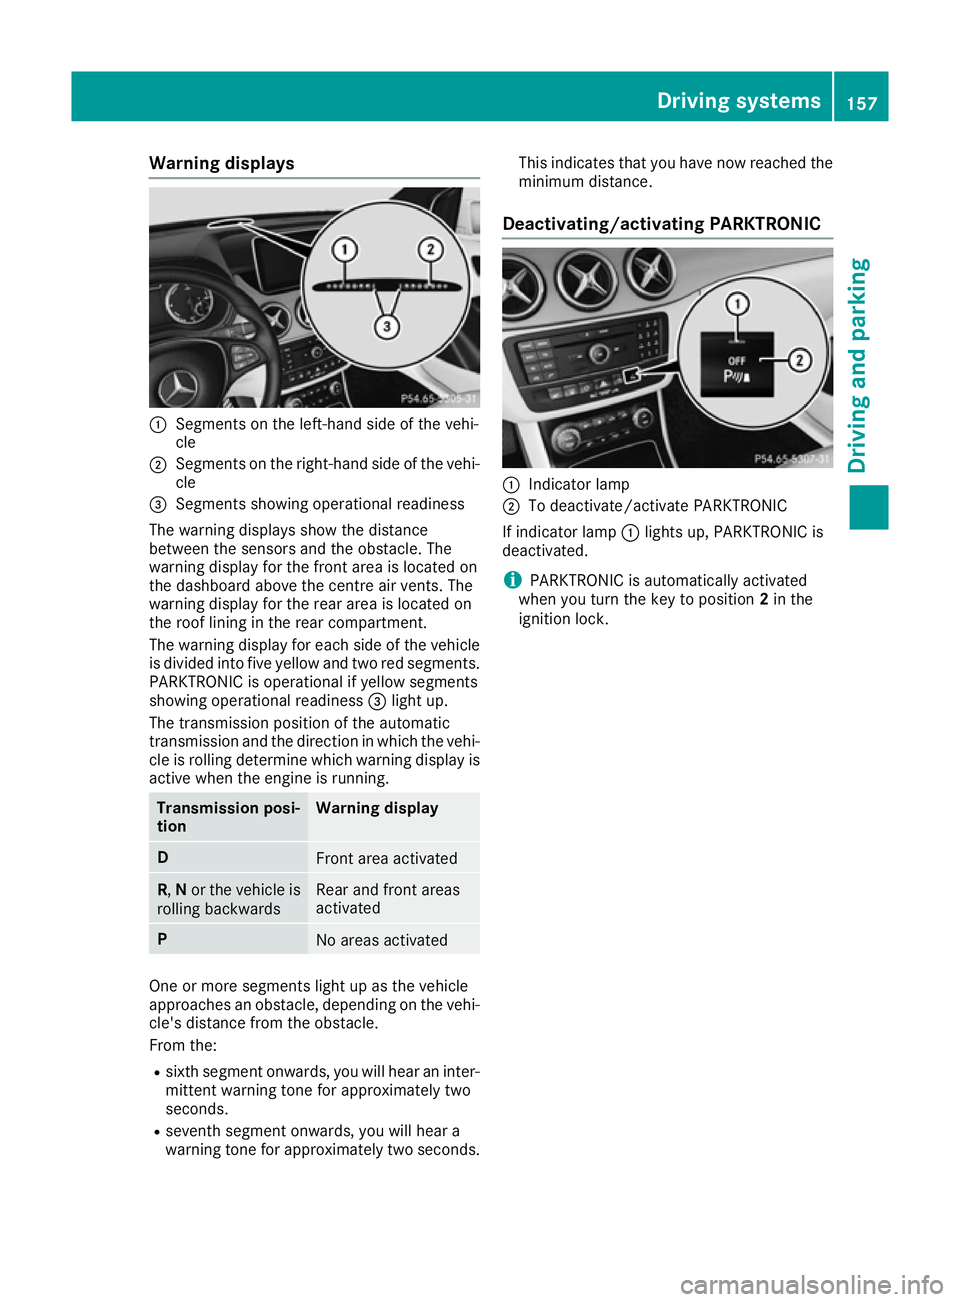
Warning displays
:
Segments on the left-hand side of the vehi-
cle
; Segments on the right-hand side of the vehi-
cle
= Segments showing operational readiness
The warning displays show the distance
between the sensors and the obstacle. The
warning display for the front area is located on
the dashboard above the centre air vents. The
warning display for the rear area is located on
the roof lining in the rear compartment.
The warning display for each side of the vehicle
is divided into five yellow and two red segments.
PARKTRONIC is operational if yellow segments
showing operational readiness =light up.
The transmission position of the automatic
transmission and the direction in which the vehi-
cle is rolling determine which warning display is active when the engine is running. Transmission posi-
tion Warning display
D
Front area activated
R,
Nor the vehicle is
rolling backwards Rear and front areas
activated
P
No areas activated
One or more segments light up as the vehicle
approaches an obstacle, depending on the vehi-
cle's distance from the obstacle.
From the:
R sixth segment onwards, you will hear an inter-
mittent warning tone for approximately two
seconds.
R seventh segment onwards, you will hear a
warning tone for approximately two seconds. This indicates that you have now reached the
minimum distance.
Deactivating/activating PARKTRONIC :
Indicator lamp
; To deactivate/activate PARKTRONIC
If indicator lamp :lights up, PARKTRONIC is
deactivated.
i PARKTRONIC is automatically activated
when you turn the key to position 2in the
ignition lock. Driving systems
157Driving and parking Z