roof MERCEDES-BENZ B-CLASS SPORTS 2013 Owner's Manual
[x] Cancel search | Manufacturer: MERCEDES-BENZ, Model Year: 2013, Model line: B-CLASS SPORTS, Model: MERCEDES-BENZ B-CLASS SPORTS 2013Pages: 336, PDF Size: 30 MB
Page 152 of 336
Driving on wet roads
Hydroplaning If water has accumulated to a certain depth
on the road surface, there is a danger of
hydroplaning occurring, eve
nif:
R you drive at low speeds.
R the tires have adequate tread depth.
For this reason, in the event of heavy rain or
in conditions in which hydroplaning may
occur, you must drive in the following
manner:
R lower yours peed.
R avoid ruts.
R brake carefully.
Driving on flooded roads !
Do not drive through flooded areas.
Check the depth of any water before driving
through it. Drive slowly through standing
water. Otherwise, water may enter the
vehicle interior or the engine compartment.
This can damage the electronic
components in the engin eorthe automatic
transmission. Water can also be drawn in
by the engine's air suction nozzles and this
can cause engine damage. Winter driving
General notes G
WARNING
If you shift down on a slippery road surface in
an attempt to increase the engine's braking
effect, the drive wheels could lose their grip.
There is an increased danger of skidding and
accidents.
Do not shift down for additional engine
braking on a slippery road surface. G
DANGER
If the exhaust pipe is blocked or adequate
ventilation is not possible, poisonous gases such as carbon monoxide (CO) may enter the
vehicle. This is the case, e.g. if the vehicle
becomes trapped in snow. There is a risk of
fatal injury.
If you leave the engine or the auxiliary heating
running, make sure the exhaust pipe and area
around the vehicle are clear of snow. To
ensure an adequate supply of fresh air, open
a window on the side of the vehicle that is not
facing into the wind.
Have your vehicle winterproofed at a qualified
specialist workshop at the onset of winter.
Observe the notes in the "Winter operation"
section (Y page 294).
Driving with summer tires Observe the notes in the "Winter operation"
section (Y
page 294).
Slippery road surfaces G
WARNING
If you shift down on a slippery road surface in
an attempt to increase the engine's braking
effect, the drive wheels could lose their grip.
There is an increased danger of skidding and
accidents.
Do not shift down for additional engine
braking on a slippery road surface. G
WARNING
The outside temperature indicator is not
designed to serve as an ice-warning device
and is therefore unsuitable for that purpose.
Indicated temperatures just above the
freezing point do not guarantee that the road
surface is free of ice. The road may still be icy,
especially in wooded areas or on bridges.
If the vehicle threatens to skid or cannot be
stopped when moving at low speed:
X Shift the transmission to position N.
Drive particularly carefully on slippery road
surfaces. Avoid sudden acceleration, steering Driving tips
149Driving and parking Z
Page 243 of 336
X
Attach hook =to the cargo
compartment's uppers eal?.
X To close: detach hook =from seal ?.
X Fasten hook =to the bracket on the
underside of the cargo compartment floor.
X Fold the trunk floor down.
X Press the trun kfloor down until it engages.
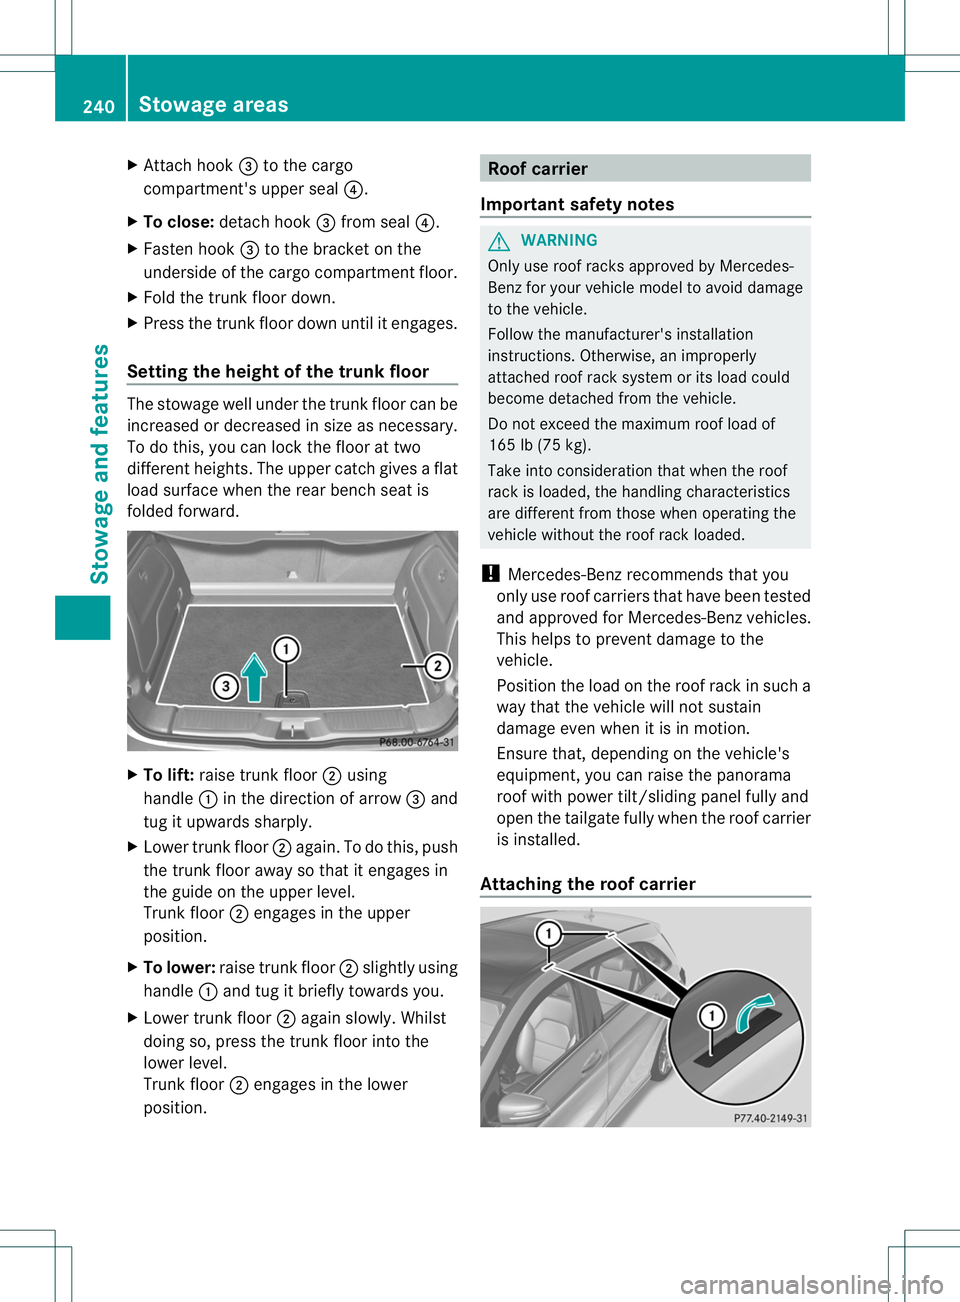
Setting the height of the trunk floor The stowage well under the trunk floor can be
increased or decreased in size as necessary.
To do this, you can lock the floor at two
differen
theights. The upper catch gives a flat
load surface when the rear bench seat is
folded forward. X
To lift: raise trunk floor ;using
handle :in the direction of arrow =and
tug it upwards sharply.
X Lower trunk floor ;again. To do this, push
the trun kfloor away so that it engages in
the guide on the upper level.
Trunk floor ;engages in the upper
position.
X To lower: raise trunk floor ;slightly using
handle :and tug it briefly towards you.
X Lower trunk floor ;again slowly. Whilst
doing so, press the trunk floor into the
lower level.
Trunk floor ;engages in the lower
position. Roof carrier
Important safety notes G
WARNING
Only use roof racks approved by Mercedes-
Ben zfor your vehicle model to avoid damage
to the vehicle.
Follow the manufacturer' sinstallation
instructions. Otherwise, an improperly
attached roo frack system or its load could
become detached from the vehicle.
Do not exceed the maximum roof load of
165 lb (75 kg).
Take into consideratio nthat when the roof
rack is loaded, the handling characteristics
are different from those when operating the
vehicle without the roof rack loaded.
! Mercedes-Benzr ecommends that you
only use roof carriers that have been tested
and approved for Mercedes-Benzv ehicles.
This helps to preven tdamage to the
vehicle.
Positio nthe load on the roof rack in such a
way that the vehicle will not sustain
damage even when it is in motion.
Ensure that, depending on the vehicle's
equipment, you can raise the panorama
roof with power tilt/sliding panel fully and
open the tailgate fully when the roof carrier
is installed.
Attaching the roof carrier 240
Stowage areasStowage and features
Page 244 of 336
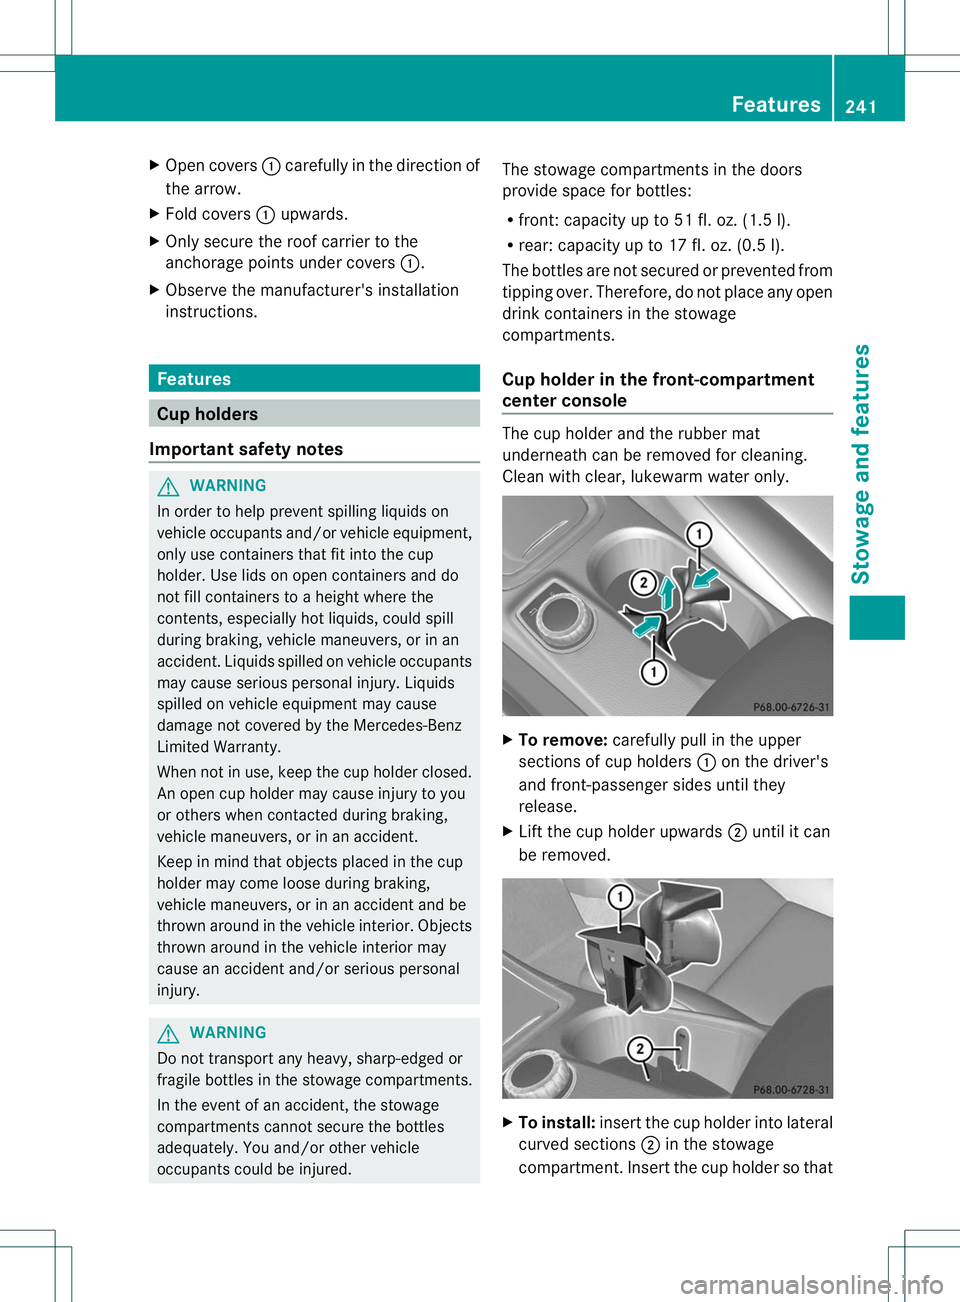
X
Open covers :carefully in the direction of
the arrow.
X Fold covers :upwards.
X Only secure the roof carrier to the
anchorage points under covers :.
X Observe the manufacturer's installation
instructions. Features
Cup holders
Important safety notes G
WARNING
In order to help prevent spilling liquids on
vehicle occupants and/or vehicle equipment,
only use containers that fit into the cup
holder. Use lids on open containers and do
not fill containers to aheight where the
contents, especially hot liquids, could spill
during braking, vehicle maneuvers, or in an
accident. Liquids spilled on vehicle occupants
may cause serious personal injury. Liquids
spilled on vehicle equipment may cause
damage not covered by the Mercedes-Benz
Limited Warranty.
When not in use, keep the cup holder closed.
An open cup holder may cause injury to you
or others when contacted during braking,
vehicle maneuvers, or in an accident.
Keep in mind that objects placed in the cup
holder may come loose during braking,
vehicle maneuvers, or in an accident and be
thrown around in the vehicle interior. Objects
thrown around in the vehicle interior may
cause an acciden tand/o rserious personal
injury. G
WARNING
Do not transport any heavy, sharp-edged or
fragile bottles in the stowage compartments.
In the event of an accident, the stowage
compartments cannot secure the bottles
adequately. You and/or other vehicle
occupants could be injured. The stowage compartments in the doors
provide space for bottles:
R
front: capacity up to 51 fl. oz. (1.5 l).
R rear: capacity up to 17 fl. oz. (0.5 l).
The bottles are not secured or prevented from
tipping over. Therefore, do not place any open
drink containers in the stowage
compartments.
Cup holder in the front-compartment
center console The cup holder and the rubber mat
underneath can be removed for cleaning.
Clean with clear, lukewarm water only.
X
To remove: carefully pull in the upper
sections of cup holders :on the driver's
and front-passenger sides until they
release.
X Lift the cup holder upwards ;until it can
be removed. X
To install: insert the cup holder into lateral
curved sections ;in the stowage
compartment .Inser tthe cup holder so that Features
241Stowage and features Z
Page 269 of 336
G
WARNING
The vehicle is braked when the HOLD function
or DISTRONIC PLUS is activated. Therefore,
deactivate the HOLD function and DISTRONIC
PLUS before the vehicle is washed in an
automatic car wash.
! Never cleany our vehicle in a Touchless
Automatic Car Wash as these use special
cleaning agents. These cleaning agents can
damage the paintwork or plastic parts.
! Make sure that the automatic
transmission is in position Nwhen washing
your vehicle in a tow-through car wash. The
vehicle could be damaged if the
transmission is in another position.
! Make sure that:
R the side windows and the sliding sunroof
are fully closed.
R the ventilation/heating is switched off
(the OFF button has been pressed/the
airflow control is set to position 0).
R the windshield wiper switch is in position
0.
Otherwise, the vehicle might be damaged.
You can wash the vehicle in an automatic car
wash from the very start.
If the vehicle is very dirty, pre-wash it before
cleaning it in an automatic car wash.
After using an automatic car wash, wipe off
wax from the windshield and the wiper
blades. This will prevent smears and reduce
wiping noises caused by residue on the
windshield.
Washing by hand In some countries, washing by hand is only
allowed at wash bays that are specially
designed for this purpose. Observe the legal
requirements in all countries concerned.
X
Do not use hot water and do not wash the
vehicle in direct sunlight.
X Use a soft sponge to clean. X
Use a mild cleaning agent, such as a car
shampoo approved by Mercedes-Benz.
X Thoroughly hose down the vehicle with a
gentle jet of water.
X Do not point the water jet directly towards
the air inlet.
X Use plenty of water and rinse out the
sponge frequently.
X Rinse the vehicle with clean water and dry
thoroughly with a chamois.
X Do not let the cleaning agent dry on the
paintwork.
When using the vehicle in winter, remove all
traces of road salt deposits carefully and as
soon as possible.
Power washers G
WARNING
Do not use power washers with circular-jet
nozzles (dirt grinders) to clean your vehicle, in
particular the tires. You could otherwise
damage the tires and cause an accident.
! Always maintain a distance of at least
11.8i n (30cm) between the vehicle and the
powerw asher nozzle. Information about
the correct distance is available from the
equipmen tmanufacturer.
Move the power washe rnozzle around
when cleaning your vehicle.
Do not aim directly at any of the following:
R tires
R door gaps, roof gaps, joints, etc.
R electrical components
R battery
R connectors
R lights
R seals
R trim
R ventilation slots
Damaged seals or electrical components
can lead to leaks or failures. 266
CareMaintenance and care
Page 297 of 336
Selecting, mounting and replacing
tires
R Only mount tires and wheels of the same
type and make.
R Only mount tires of the correct size onto
the wheels.
R After mounting new tires, break them in at
moderate speeds for the first 60 miles
(100 km), as they only reach their full
performance after this distance.
R Do not drive with tires which have too little
tread depth. as this significantly reduces
the traction on wet roads (hydroplaning).
R Replace the tires after six years at the
latest, regardless of wear. MOExtended tires (tires with run-flat
properties)
With MOExtended tires (tires with run flat
characteristics), you can continue to drive
your vehicle even if there is a total loss of
pressure in one or more tires.
MOExtended tires may only be used in
conjunction with an active tire pressure loss
warning system and only on wheels
specifically tested by Mercedes-Benz.
Notes on driving with MOExtended tires with
a flat tire (Y page 275).
i Vehicles equipped with MOExtended tires
are not equipped with a TIREFIT kit at the
factory. It is therefore recommended that
you additionally equip your vehicle with a
TIREFIT kit if you mount tires that do not
feature run-flat properties, e.g. winter tires.
A TIREFIT kit can be obtained from a
qualified specialist workshop. Winter operation
General notes
Have your vehicle winterproofed at a qualified
specialist workshop at the onset of winter. Observe the notes in the "Changing a wheel"
section (Y
page 312). Driving with summer tires
At temperatures below 45 ‡(+7 †), summer
tires lose elasticity and therefore traction and
braking power. Change the tires on your
vehicle to M+S tires. Using summer tires at
very cold temperatures could cause cracks to
form, thereby damaging the tires
permanently. Mercedes-Benz cannot accept
responsibility for this type of damage. M+S tires
G
WARNING
M+S tires with a tire tread depth of less than
ã in (4 mm) are not suitable for use in winter
and do not provide sufficient traction. There
is a risk of an accident.
M+S tires with a tread depth of less than ã
in (4 mm) must be replaced immediately.
At temperatures below 45 ‡ (+7 †), use
winter tires or all-season tires. Both types of
tire are identified by the M+S marking.
Only winter tires bearing the isnowflake
symbol in addition to the M+S marking
provide the best possible grip in wintry road
conditions. Only these tires will allow driving
safety systems such as ABS and ESP ®
to
function optimally in winter. These tires have
bee ndeveloped specifically for driving in
snow.
Use M+S tires of the same make and tread on
all wheels to maintain safe handling
characteristics.
Always observe the maximum permissible
speed specified for the M+S tires you have
mounted.
Once the winter tires are mounted:
X Check the tire pressures (Y page 298).
X Restart the tire pressure loss warning
system (Y page 298). 294
Winter operationWheels and tires
Page 302 of 336
a loss of pressure, a corresponding warning
message will appear in the multifunction
display.
The tire pressure warning system does not
warn you of an incorrectly set tire pressure.
Observe the notes on the recommended tire
pressure (
Ypage 295).
The tire pressure loss warning system does
no treplace the need to regularly chec kyour
vehicle's tire pressures, since an even loss of
pressure on several tires at the same time
cannot be detected by the tire pressure loss
warning system.
The tire pressure loss warning system is not
able to warn you of a sudden loss of pressure,
e.g. if the tire is penetrated by a foreign
object. In the event of a sudden loss of
pressure, bring the vehicle to a halt by braking
carefully. Avoid abrupt steering maneuvers.
The function of the tire pressure loss warning
system is limited or delayed if:
R snow chains are mounted to your vehicle's
tires.
R road conditions are wintry.
R you are driving on sand or gravel.
R you adopt a very sporty driving style
(cornering at high speeds or driving with
high rates of acceleration).
R you are driving with a heavy load (in the
vehicle or on the roof).
Restarting the tire pressure loss
warning system Restart the tire pressure loss warning system
if you have:
R
changed the tire pressure
R changed the wheels or tires
R mounted new wheels or tires
X Before restarting, make sure that the tire
pressures are set properly on all four tires
for the respective operating conditions.
The recommended tire pressures can be
found in the table on the fuel filler flap. The tire pressure loss warning system can
only give reliable warnings if you have set
the correct tire pressure. If an incorrect tire
pressure is set, these incorrect values will
be monitored.
X Observe the notes on tire pressure
(Y page 295).
X Make sure that the SmartKey is in
position 2(Y page 127) in the ignition lock.
X Press =or; on the steering wheel
to select the Service menu.
X Press the 9or: button to select
Tire Pressure .
X Press the abutton.
The Run Flat Indicator Active Press 'OK' to Restart message
appears in the multifunction display.
If you wish to confirm the restart:
X Press the abutton.
The Tire Pressure Now OK? message
appears in the multifunction display.
X Press the 9or: button to select
Yes .
X Press the abutton.
The Run Flat Indicator Restarted message appears in the multifunction
display.
After a teach-in period, the tire pressure
loss warning system will monitor the set
tire pressures of all four tires.
or
If you wish to cancel the restart:
X Press the %button.
or
X If the Tire Pressure Now OK? message
appears, use the 9or: button to
select Cancel .
X Press the abutton.
The tire pressure values stored at the last
restart will continue to be monitored. Tire pressure
299Wheels and tires Z
Page 314 of 336
Aspect ratio
Relationship between tire height and tire
width in percent. tire pressure
This is pressure inside the tire applying an
outward force to each square inch of the tire's
surface. The tire pressure is specified in
pounds per square inch (psi), in kilopascal
(kPa) or in bar. The tire pressure should only
be corrected when the tires are cold. Tire pressure of cold tires
The tires are cold:
R if the vehicle has been parked without
direct sunligh tonthe tires for at least three
hours and
R if the vehicle has not been driven further
than 1 mile (1.6 km) Tread
The part of the tire that comes into contact
with the road. Bead
The tire bead ensures that the tire sits
securely on the wheel. There are several steel
wires in the bead to prevent the tire from
coming loose from the wheel rim. Sidewall
The part of the tire between the tread and the
bead. Weight of optional extras
The combined weight of those optional extras
that weigh more than the replaced standard
part and more than 2.3 kg (5 lbs). These optional extras, such as high-performance
brakes, level control, a roof rack or a high-
performance battery, are not included in the
curb weight and the weight of the
accessories.
TIN (Tire Identification Number)
This is a unique identifier which can be used
by a tire manufacturer to identify tires, for
example for a product recall, and thus identify
the purchasers. The TIN is made up of the
manufacturer's identity code, tire size, tire
type code and the manufacturing date. Load bearing index
The load bearing index (also load index) is a
code that contains the maximum load bearing
capacity of a tire. Traction
Traction is the result of friction between the
tires and the road surface. Treadwear indicators
Narrow bars (tread wear bars) that are
distributed over the tire tread. If the tire tread
is level with the bars, the wear limit of áin
(1.6 mm) has been reached. Occupant distribution
The distribution of occupants in a vehicle at
their designated seating positions. Total load limit
Nominal load and luggage load plus
68 kilograms (150 lb) multiplied by the
number of seats in the vehicle. Definition of terms for tires and loading
311Wheels and tires Z
Page 332 of 336
At temperatures below freezing:
X
Fill the washe rfluid reservoir with a mixture
of water and windshield washer fluid, e.g.
MB WinterFit.
Adapt the mixing ratio to the outside
temperature.
R Down to 14 ‡ (Ò10 †): mix 1 part MB
WinterFit to 2 parts water.
R Down to Ò4 ‡ (Ò20 †): mix 1 part MB
WinterFit to 1 part water.
R Down to Ò20.2 ‡ (Ò29 †): mix 2 parts MB
WinterFit to 1 part water.
i Add windshield washer fluid, e.g. MB
SummerFit or MB WinterFit, to the washer
fluid all year round.
Filling capacities Model Capacity
B2
50
BlueEFFICIENCY 3.2 US qt (3.0 l)
Vehicle data
General notes
Please note that for the specified vehicle
data:
R the heights specified may vary as a result
of:
-Tires
- Load
- Condition of the suspension
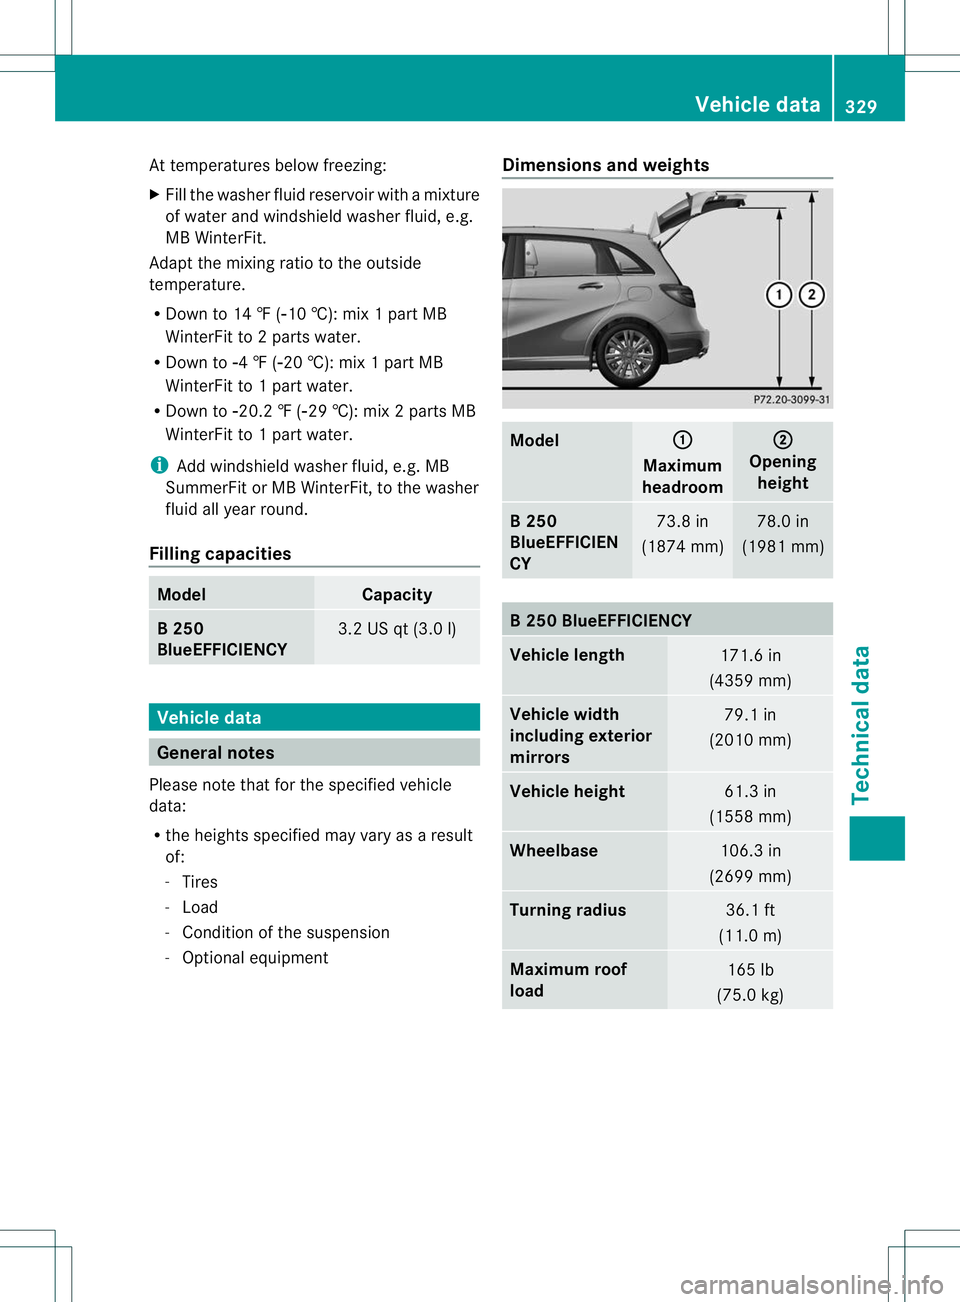
- Optional equipment Dimensions and weights Model :
Maximum
headroom ;
Opening
height B2
50
BlueEFFICIEN
CY 73.8 in
(1874 mm) 78.0 in
(1981 mm) B2
50 BlueEFFICIENCY Vehicle length
171.6 in
(4359 mm) Vehicle width
including exterior
mirrors
79.1 in
(2010 mm) Vehicle height
61.3 in
(1558 mm) Wheelbase
106.3 in
(2699 mm) Turning radius
36.1 ft
(11.0 m) Maximum roof
load
165 lb
(75.0 kg) Vehicle data
329Technical data Z