fuel cap MERCEDES-BENZ B-CLASS SPORTS 2014 Owners Manual
[x] Cancel search | Manufacturer: MERCEDES-BENZ, Model Year: 2014, Model line: B-CLASS SPORTS, Model: MERCEDES-BENZ B-CLASS SPORTS 2014Pages: 360, PDF Size: 39.45 MB
Page 12 of 360
Folding in whe
nlocking( on-board
computer) ...................................... 206
Out of position (troubleshooting) ...100
Setting ........................................... 100
Storing settings (memory function) 101
Storing the parking position ..........100
Eyeglasses compartment .................251 F
Fille rcap
see Fuel filler flap
First-aid kit ......................................... 294
Flat tire MOExtended tires ..........................295
Preparing the vehicle .....................295
TIREFIT kit ...................................... 296
see Emergency spare wheel
Floormats ........................................... 277
Fogl amps
Extended range .............................. 108
Switching on/off ........................... 105
Foldin gtable ...................................... 253
Fron tfog lamps
Display message ............................ 222
Switching on/off ........................... 105
Front-passenger seat
Folding the backres tforward/back 253
Fuel
Additives ........................................ 349
Consumption statistics ..................194
Displaying the current
consumption .................................. 194
Displaying the range ......................194
Driving tips .................................... 155
Fuel gauge ....................................... 31
Grade (gasoline) ............................ 348
Important safety notes ..................348
Premium-grade unleade dgasoline .348
Problem (malfunction) ...................152
Refueling ........................................ 150
Tank content/reserve fuel .............348
Fue lfiller flap
Opening/closing ............................ 151
Fue llevel
Calling up the range (on-board
computer) ...................................... 194Fue
ltank
Capacity ........................................ 348
Problem (malfunction) ...................152
Fuses
Allocation chart ............................. 309
Before changing ............................. 308
Fuse box in the engine
compartment ................................. 308
Fuse box in the front-passenger
footwell .......................................... 309
Important safety notes ..................308 G
Garage door opener Clearing the memory .....................276
Important safety notes ..................273
Opening/closing the garage door ..276
Programming (button in the rear-
view mirror) ................................... 274
Gear or selector lever (cleaning
guidelines) ......................................... 290
Genuine parts ...................................... 21
Glove box ........................................... 251 H
Handbrake see Parking brake
Hazard warning lamps ......................107
Display message ............................ 236
Headlamps
Fogging up ..................................... 109
see Automatic headlamp mode
Head restraints
Adjusting ......................................... 95
Adjusting (electrically). ....................96
Adjusting (manually )........................ 95
Adjusting (rear) ................................ 96
Installing/removing (rear) ................96
Heating
see Climate control
High-beam headlamps
Changing bulbs .............................. 113
Display message ............................ 221
Switching on/off ........................... 106
Hill start assist .................................. 13810
Index
Page 153 of 360
!
Overfilling the fuel tank could damage the
fuel system.
! Take care not to spill any fuel on painted
surfaces. You could otherwise damage the
paintwork.
! Use afilter when refueling from afuel can.
Otherwise, the fuel lines and/or injection
system could be blocked by particles from
the fuel can.
Do not get into the vehicle againd uringthe
refuelin gprocess. Otherwise, electrostatic
charge could build up again.
If you overfill th efuel tank, fuel could spray
out when th efuel pump nozzle is removed.
Fo rfurther information on fuel and fuel quality
(Y page 348). Refueling
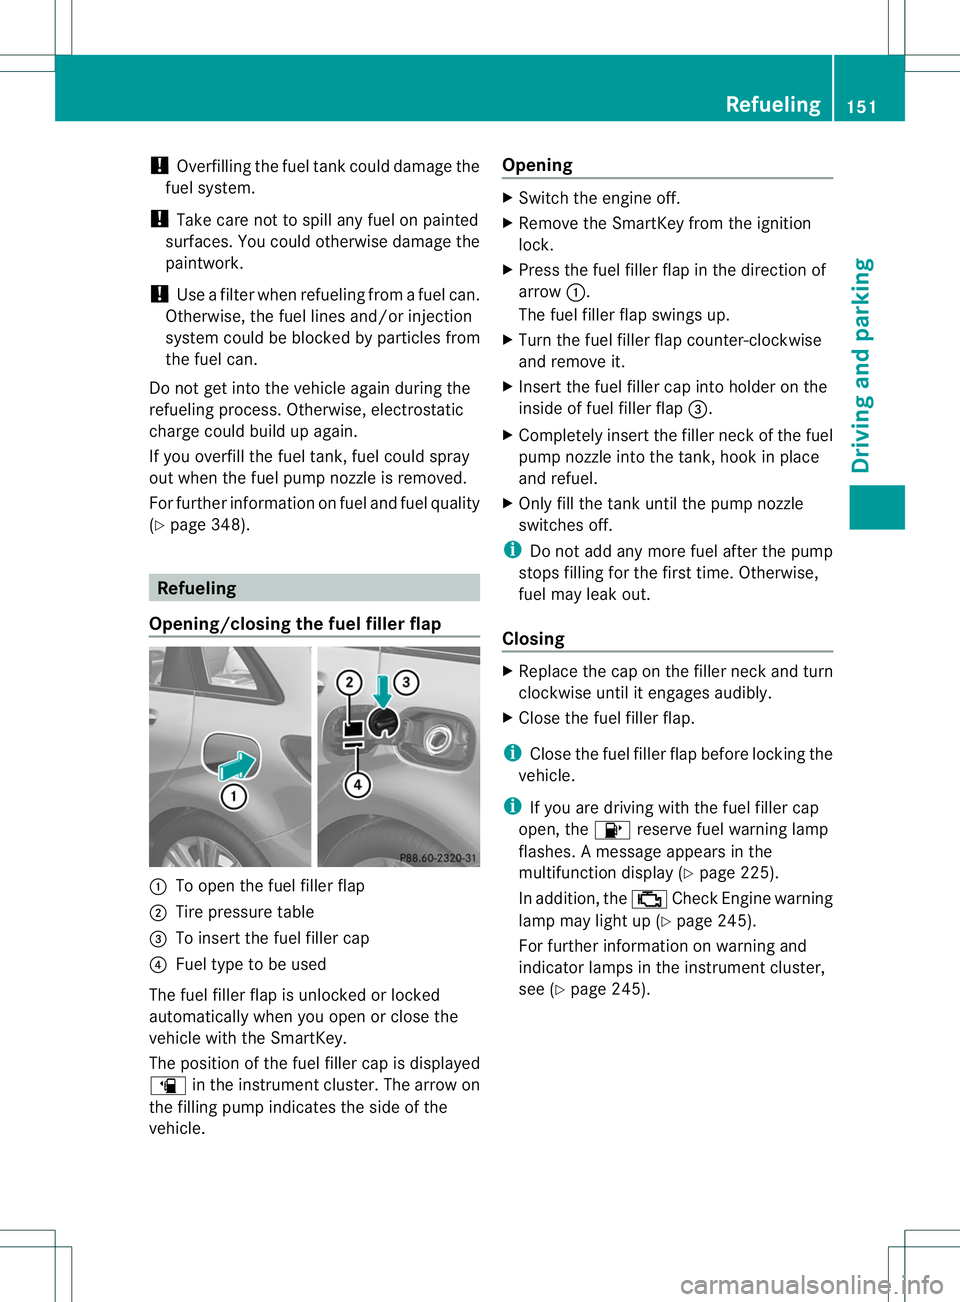
Opening/closing th efuelfiller flap 001A
To open th efuel filler flap
0010 Tirep ressur etable
0023 To insert th efuel filler cap
0021 Fuel typ etobeu sed
The fuel filler flap is unlocked or locked
automatically when you open or close the
vehicl ewitht he SmartKey.
The position of th efuel filler cap is displayed
0007 in theinstrumen tcluster .The arrow on
the filling pump indicates the side of the
vehicle. Opening X
Switch the engine off.
X Remove the SmartKey from the ignition
lock.
X Press the fuel filler flap in the direction of
arrow 001A.
The fuel filler flap swings up.
X Turn the fuel filler flap counter-clockwise
and remove it.
X Insert the fuel filler cap into holder on the
inside of fuel filler flap 0023.
X Completely insert the filler neck of the fuel
pump nozzle into the tank,h ook in place
and refuel.
X Only fill the tank until the pump nozzle
switches off.
i Do not add any more fuel after the pump
stops filling for the first time. Otherwise,
fuel may leak out.
Closing X
Replace the cap on the filler neck and turn
clockwise until it engages audibly.
X Close the fuel filler flap.
i Close the fuel filler flap before locking the
vehicle.
i If you are driving with the fuel filler cap
open, the 0007reserve fuel warning lamp
flashes. Amessage appears in the
multifunction display (Y page 225).
In addition, the 000ACheck Engine warning
lamp may light up (Y page 245).
For further information on warning and
indicator lamps in the instrument cluster,
see (Y page 245). Refueling
151Driving and parking Z
Page 228 of 360
Display messages Possible causes/consequences and
000B Solutions
0006 There is only
averys ma ll amount of fuel in th efuel tank.
X Refue lattheneares tgas statio nwithout fail. 0007
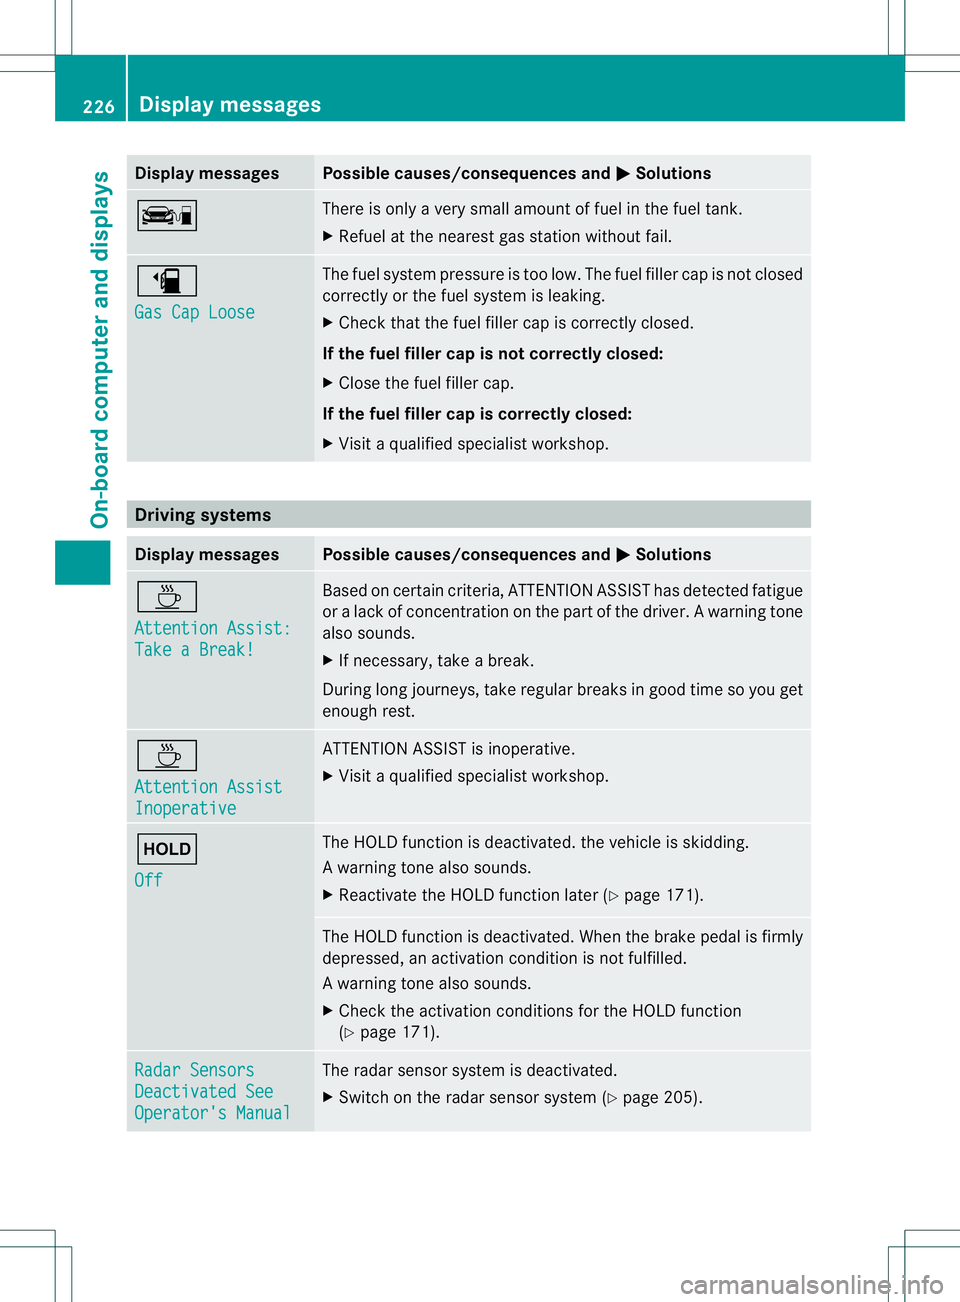
Gas Cap Loose The fuel system pressure is too low. The fuel filler cap is not closed
correctly or the fuel system is leaking.
X
Check that the fuel filler cap is correctly closed.
If th efuel filler cap is not correctly closed:
X Close the fuel filler cap.
If th efuel filler cap is correctly closed:
X Visit aqualified specialist workshop. Driving systems
Displa
ymessages Possibl
ecauses/consequences and 000B Solutions
0001
Attention Assist:
Tak
eaB reak! Base
donc ertain criteria, ATTENTION ASSIST has detected fatigue
or alack of concentratio nonthe part of th edriver. Awarning tone
alsos ounds.
X If necessary ,take abreak.
During long journeys, take regular breaks in good time so you get
enoug hrest. 0001
Attentio
nAssist Inoperative ATTENTION ASSIST is inoperative.
X
Visi taq ualified specialist workshop. 0005
Off The HOLD function is deactivated. the vehicle is skidding.
Aw
arning tone also sounds.
X Reactivat ethe HOLD function late r(Ypage 171). The HOLD function is deactivated. When th
ebrak epedal is firmly
depressed, an activation condition is not fulfilled.
Aw arning tone also sounds.
X Chec kthe activation condition sfor th eHOLDf unction
(Y page 171). Radar Sensors
Deactivated See
Operator'
sManual The radar sensor system is deactivated.
X
Switch on th eradar sensor system (Y page 205).226
Display messagesOn-boar
dcomputer and displays
Page 247 of 360
Engine
Problem Possible causes/consequences and
000B Solutions
000A
The yellow Check
Engin
ewarning lamp
light supw hile the
engin eisrunning. Ther
emay be amalfunction, for example:
R in th eenginem anagement
R in th efuel injection system
R in th eexhaust system
R in th eignition system
R in th efuel system
The emission limit values may be exceeded and th eenginem ay
be runnin ginemergenc ymode.
X Hav ethe vehicle checked as soon as possible at aqualified
specialist workshop.
i In som estates, you must immediately visit aqualified
specialist worksho passoon as th eyellow Chec kEngine warning
lamp lights up .This depends on the locally applicable legal
requirements. If in doubt, check whether such legal regulations
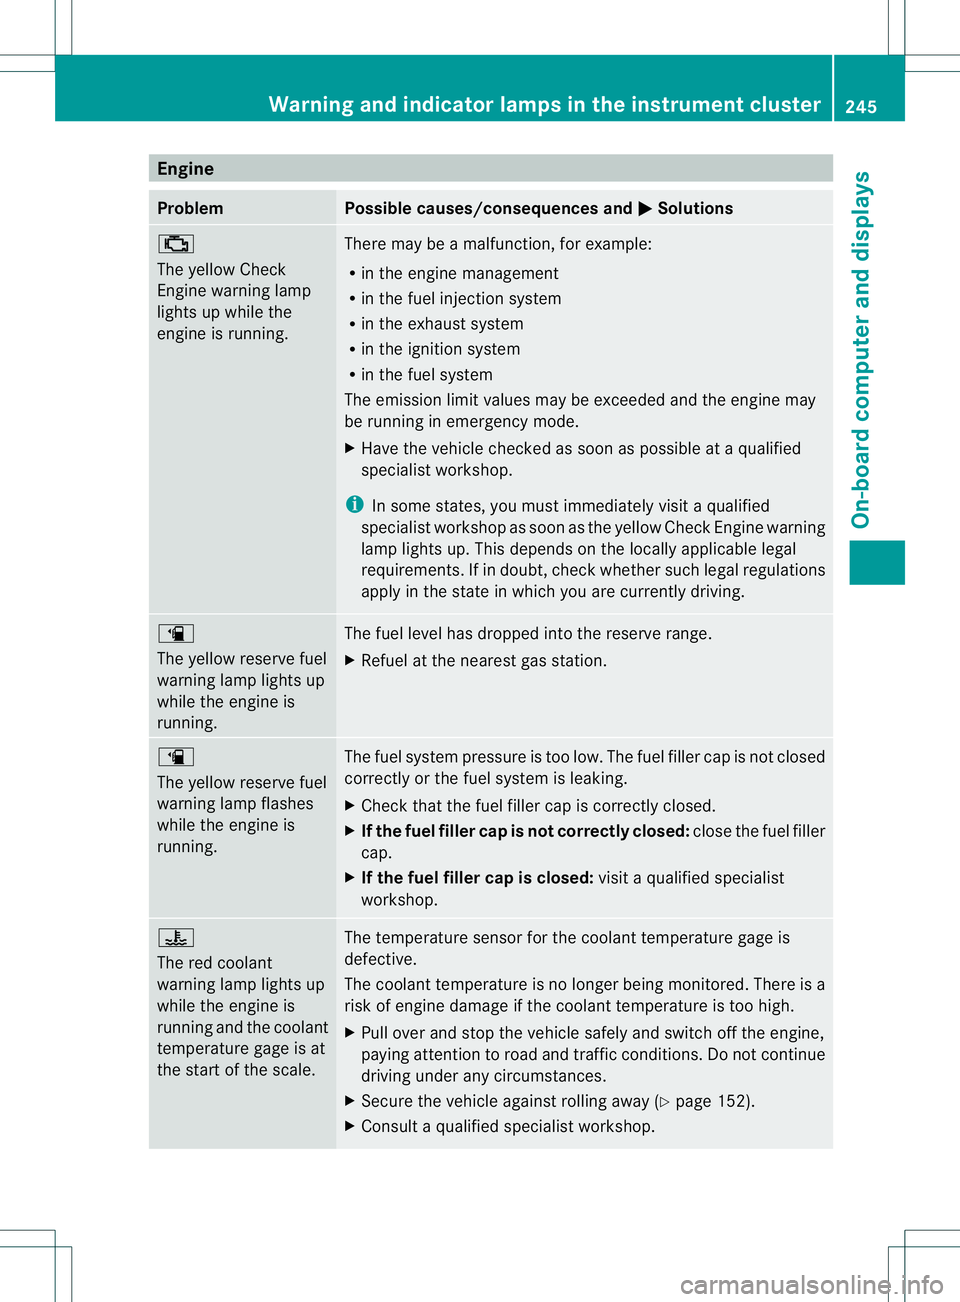
apply in the state in which you are currently driving. 0007
The yellow reserve fuel
warning lamp lights up
while the engine is
running.
The fuel level has dropped into the reserve range.
X
Refuel at the nearest gas station. 0007
The yellow reserve fuel
warning lamp flashes
while the engine is
running.
The fuel system pressure is too low. The fuel filler cap is not closed
correctly or the fuel system is leaking.
X
Check that the fuel filler cap is correctly closed.
X If the fuel filler cap is not correctly closed: close the fuel filler
cap.
X If the fuel filler cap is closed: visitaqualified specialist
workshop. 0010
The red coolant
warning lamp lights up
while the engine is
running and the coolant
temperature gage is at
the start of the scale.
The temperature sensor for the coolant temperature gage is
defective.
The coolant temperature is no longer being monitored. There is a
risk of engine damage if the coolant temperature is too high.
X Pull over and stop the vehicle safely and switch off the engine,
paying attention to road and traffic conditions. Do not continue
driving under any circumstances.
X Secure the vehicle against rolling away (Y page 152).
X Consult aqualified specialist workshop. Warning and indicator lampsint
he instrument cluster
245On-board computer and displays Z
Page 301 of 360
X
Stop afte rdriving for approximatel yten
minutes and check the tire pressure with
the tire inflation compressor.
The tire pressure mus tnow be at least
130 kPa (1.3 bar/19 psi). G
WARNING
If the required tire pressure is not reached
after driving for ashort period, the tire is too
badly damaged. The tire sealant cannot repair
the tire in this instance. Damaged tires and a
tire pressure that is too low can significantly
impair the vehicle's braking and driving
characteristics. There is arisk of accident.
Do not continue driving. Contact aqualified
specialist workshop.
X Correct the tire pressure if it is still at least
130 kPa (1.3 bar/19 psi) (for the values,
see the Tire and Loading Information
placard on the driver's side B-pillar or tire
pressure table on the fuel filler flap).
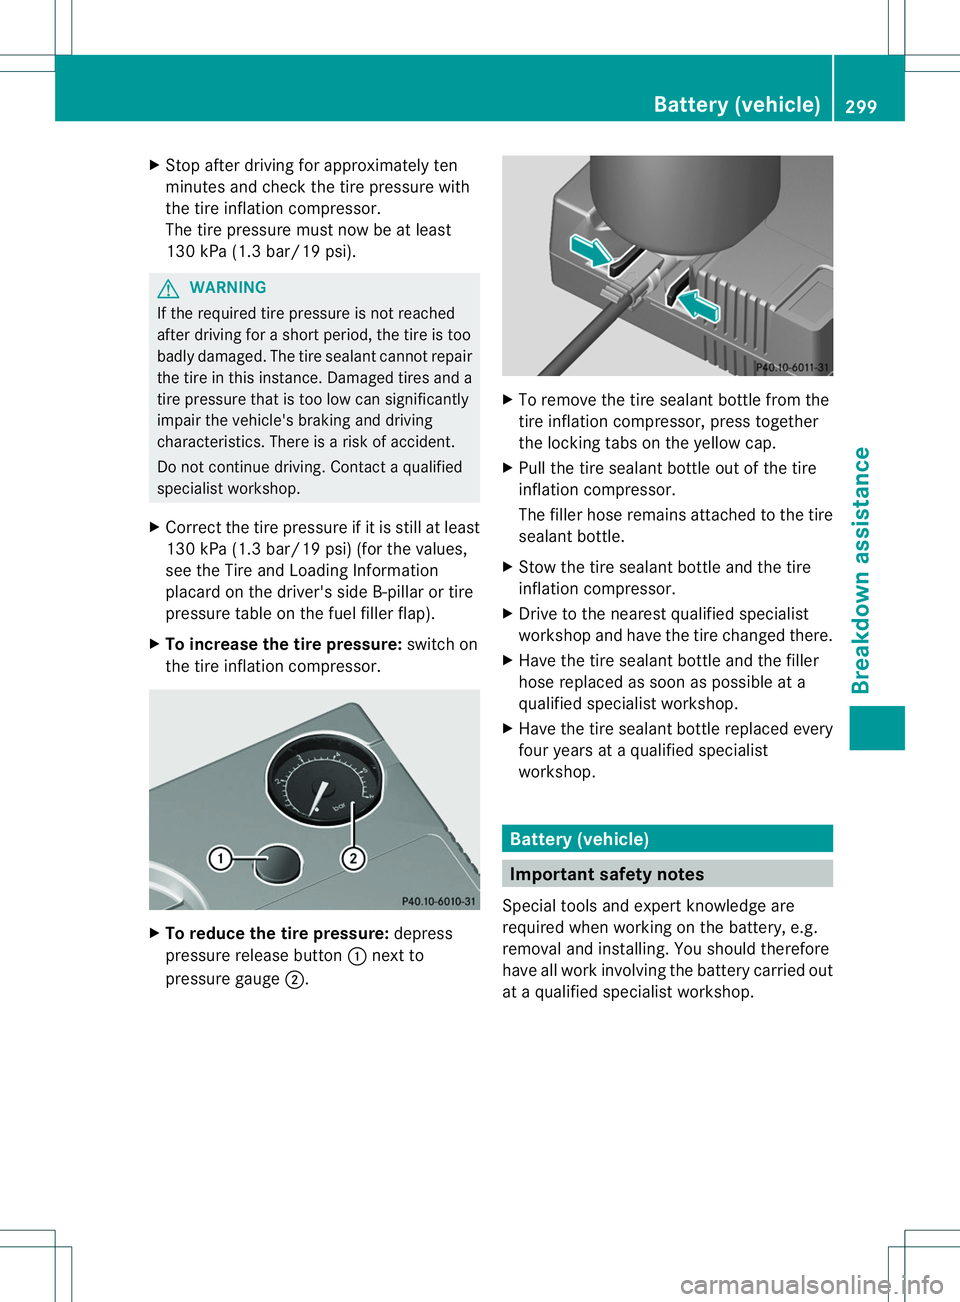
X To increase the tire pressure: switch on
the tire inflation compressor. X
To reduce the tire pressure: depress
pressure release button 001Anext to
pressure gauge 0010. X
To remove the tire sealant bottle from the
tire inflation compressor ,press together
the lockin gtabs on the yellow cap.
X Pull the tire sealant bottle out of the tire
inflation compressor.
The filler hose remains attached to the tire
sealant bottle.
X Stow the tire sealant bottle and the tire
inflation compressor.
X Drive to the nearest qualified specialist
workshop and have the tire changed there.
X Have the tire sealant bottle and the filler
hose replaced as soon as possible at a
qualified specialist workshop.
X Have the tire sealant bottle replaced every
four years at aqualified specialist
workshop. Battery (vehicle)
Important safety notes
Special tools and expert knowledge are
required when working on the battery, e.g.
removal and installing. You should therefore
have all work involving the battery carried out
at aq ualified specialist workshop. Battery (vehicle)
299Breakdown assistance Z
Page 305 of 360
Jump-starting
For the jump-starting procedure, use only the jump-starting connection point, consisting of a
positive terminal and an earth point, in the engine compartment. G
WARNING
Battery acid is caustic. There is arisk of injury.
Avoid contact with the skin, eyes or clothing. Do not inhale any battery gases. Do not lean over
the battery. Keep children away from batteries. Wash battery acid immediately with water and
seek medical attention. G
WARNING
During charging and jump-starting, explosive gases can escape from the battery. There is arisk
of an explosion.
Particularly avoid fire, open flames, creating sparks and smoking. Ensure there is sufficient
ventilation while charging and jump-starting. Do not lean over abattery. G
WARNING
During the charging process, abattery produces hydrogen gas. If ashort circuit occurs or sparks
are created, the hydrogen gas can ignite. There is arisk of an explosion.
R Make sure that the positive terminal of aconnected battery does not come into contact with
vehicle parts.
R Never place metal objects or tools on abattery.
R It is important that you observe the described order of the battery terminals when connecting
and disconnecting abattery.
R When jump-starting, make sure that the battery poles with identical polarity are connected.
R It is particularly important to observe the described order when connecting and disconnecting
the jumper cables.
R Never connect or disconnectt he battery terminals while the engine is running.G
WARNING
Ad ischarged battery can freeze at temperatures below freezin gpoint .When jump-starting the
vehicle or charging the battery, gases can escape from the battery. There is arisk of an explosion.
Allow the frozen battery to thaw out before charging it or jump-starting.
! Avoid repeated and lengthy startinga ttempts. Otherwise, the catalytic converter could be
damaged by the non-combusted fuel.
If, at low temperatures, the indicator lamps/warning lamps in the instrumentc luster do not
light up, it is highly likely that the discharged battery has frozen .Inthis case you may neither
jump-start the vehicle nor charge the battery. The service life of athawed-out battery may be
shorter. The startingc haracteristics can be impaired, particularly at low temperatures. Have
the thawed-out battery checked at aqualified specialist workshop. Jump-starting
303Breakdown assistance Z
Page 321 of 360
Checking tir
epressures manually To determine and set th
ecorrec ttire
pressure ,procee dasfollows:
X Remove th evalvec ap of th etiret hatisto
be checked.
X Press th etirep ressure gauge securely onto
th ev alve.
X Read th etirep ressure and compar eitwith
th er ecommended value on th eTire and
Loading Information placard on the
B-pillar on th edriver' sside of your vehicle.
X If necessary, increas ethe tirep ressure to
th er ecommended value ( Ypage 315).
X If th etirep ressure is to ohigh,release air
by pressin gdown th emetal pin in th evalve
usin gthe tip of apen,for example .Then,
check the tire pressure again using the tire
pressure gauge.
X Screw the valve cap onto the valve.
X Repeatt hese steps for the other tires. Tire pressurel
oss warning system
General notes While the vehicle is in motion, the tire
pressure loss warning system monitors the
set tire pressure using the rotational speed of
the wheels. This enables the system to detect
significant pressure loss in atire. If the speed
of rotation of awheel changes as aresult of
al oss of pressure, acorresponding warning
message will appearint he multifunction
display.
You can recognizet he tire pressure loss
warning by the Run Flat Indicator Active Press 'OK' to Restart message
which appears in the Service menu of the
multifunction display. Further information on
the message displayc an be found under
"Restarting the tire pressure loss warning
system" (Y page 319). Important safety notes The tire pressure warning system does not
warn you of an incorrectly set tire pressure.
Observe the notes on the recommended tire
pressure (Y
page 315).
The tire pressure loss warning does not
replace the need to regularly check the tire
pressure. An even loss of pressure on several
tires at the same time cannot be detected by
the tire pressure loss warning system.
The tire pressure monitor is not able to warn
you of asudden loss of pressure, e.g. if the
tire is penetrated by aforeign object.Int he
event of asudden loss of pressure, bring the
vehicle to ahalt by braking carefully. Avoid
abrupt steering maneuvers.
The function of the tire pressure loss warning
system is limited or delayed if:
R snow chains are mounted on your vehicle's
tires.
R road conditionsa re wintry.
R you are driving on sand or gravel.
R you adopt avery sporty driving style
(corneringath igh speeds or driving with
high rates of acceleration).
R you are driving with aheavy load (in the
vehicle or on the roof).
Restarting the tire pressurel oss
warning system Restart the tire pressure loss warning system
if you have:
R
changed the tire pressure
R changed the wheels or tires
R mounted new wheels or tires
X Before restarting, make sure that the tire
pressures are set properly on all four tires
for the respective operating conditions.
The recommended tire pressure can be
found on the Tire and Loading Information
placard on the B-pillar on the driver's side.
Additionally, atire pressure table is
attached to the fuel filler flap. The tire Tire pressure
319Wheels and tires Z
Page 336 of 360
GAWR (Gross AxleW
eight Rating)
The GAWR is the maximu mgross axle weight
rating. The actua lloa donana xle must never
exceed the gross axle weight rating. The
gross axle weight rating can be found on the
vehicl eidentification plate on the B-pillar on
the driver's side. Speed rating
The spee drating is part of the tire
identification. It specifies the spee drange for
which the tire is approved. GVW (Gross Vehicle Weight)
The gross vehicl eweight includes the weight
of the vehicl eincluding fuel ,tools, the spare
wheel, accessories installed, occupants,
luggage and the drawbar noseweight, if
applicable.T he gross vehicle weight must not
exceed the gross vehicle weight rating GVWR
as specified on the vehicle identification plate
on the B-pillar on the driver's side. GVWR (Gross Vehicle Weight Rating)
The GVWR is the maximum permissible gross
weight of afully loaded vehicle (the weight of
the vehicle including all accessories,
occupants, fuel, luggage and the drawbar
noseweight, if applicable). The gross vehicle
weight rating is specified on the vehicle
identification plate on the B-pillar on the
driver's side. Maximum loaded vehicle weight
The maximum weight is the sum of:
R the curb weight of the vehicle
R the weight of the accessories
R the load limit
R the weight of the factory installed optional
equipment Kilopascal (kPa)
Metric unit for tire pressure. 6.9 kPa
corresponds to 1psi. Another unit for tire
pressure is bar. 100 kilopascal (kPa) is the
equivalent of 1bar. Load index
In addition to th eload-bearing index ,the load
index may also be imprinted on th esidewall
of th etire. This specifie sthe load-bearing
capacity more precisely. Curb weight
The weight of avehicle with standard
equipment including the maximum capacity
of fuel, oil and coolant. It also includes the air-
conditioning system and optional equipment
if these are installed in the vehicle, but does
not include passengers or luggage. Maximum load rating
The maximum load rating in kilograms or
pounds is the maximum weight for which a
tire is approved. Maximum permissible tire pressure
Maximum permissible tire pressure for one
tire. Maximum load on one tire
Maximum load on one tire. This is calculated
by dividing the maximum axle load of one axle
by two. PSI (pounds per squarei
nch)
As tandar dunitofm easure for tire pressure. 334
Definition of terms for tires and loadingWheels and tires
Page 349 of 360
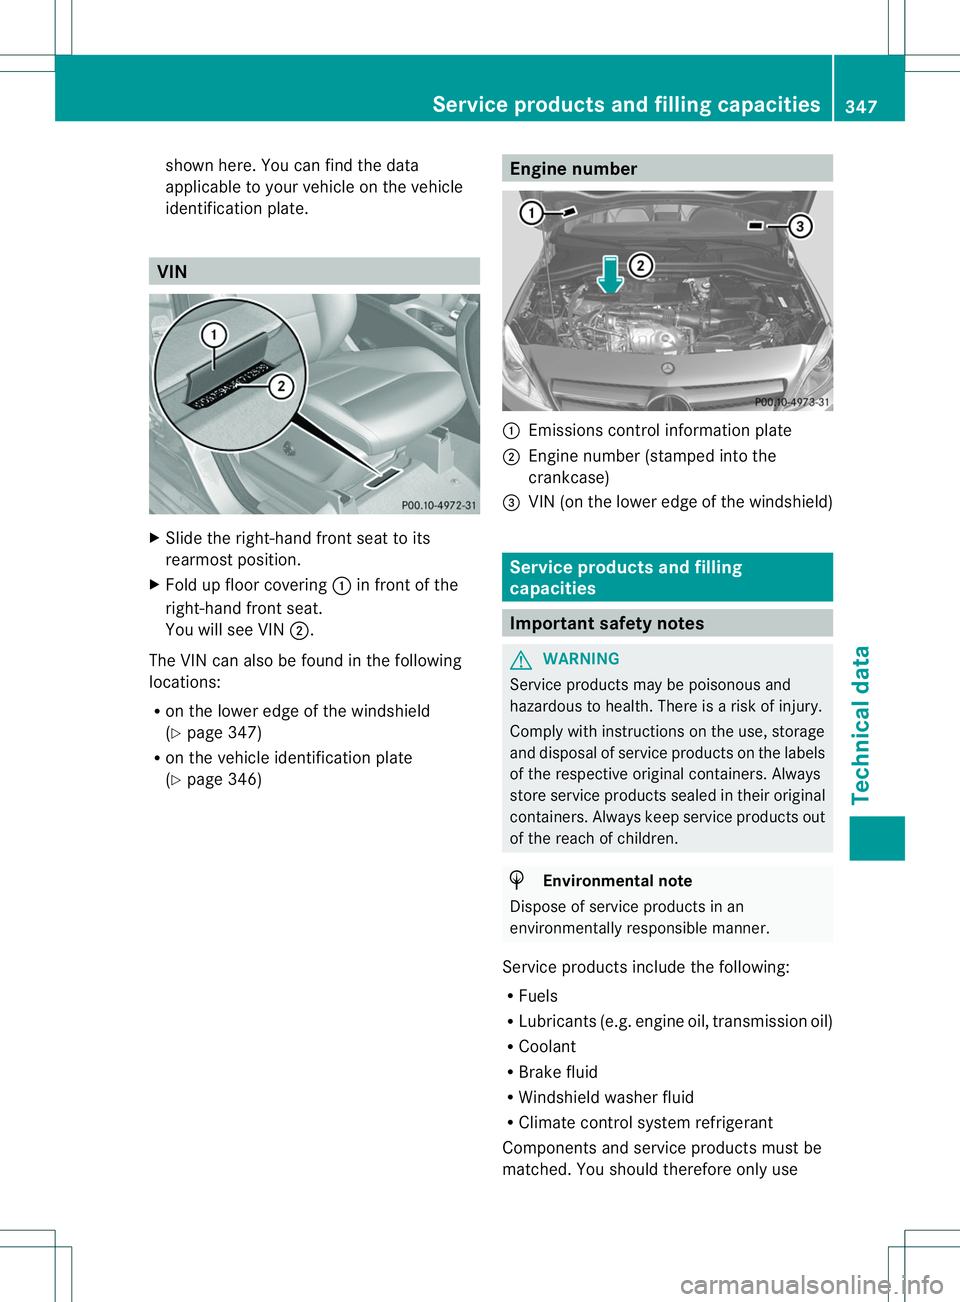
shown here. You can find the data
applicable to your vehicle on the vehicle
identification plate.
VIN
X
Slide the right-hand front seat to its
rearmost position.
X Fold up floor covering 001Ain front of the
right-hand front seat.
You will see VIN 0010.
The VIN can also be found in the following
locations:
R on the lower edge of the windshield
(Y page 347)
R on the vehicle identification plate
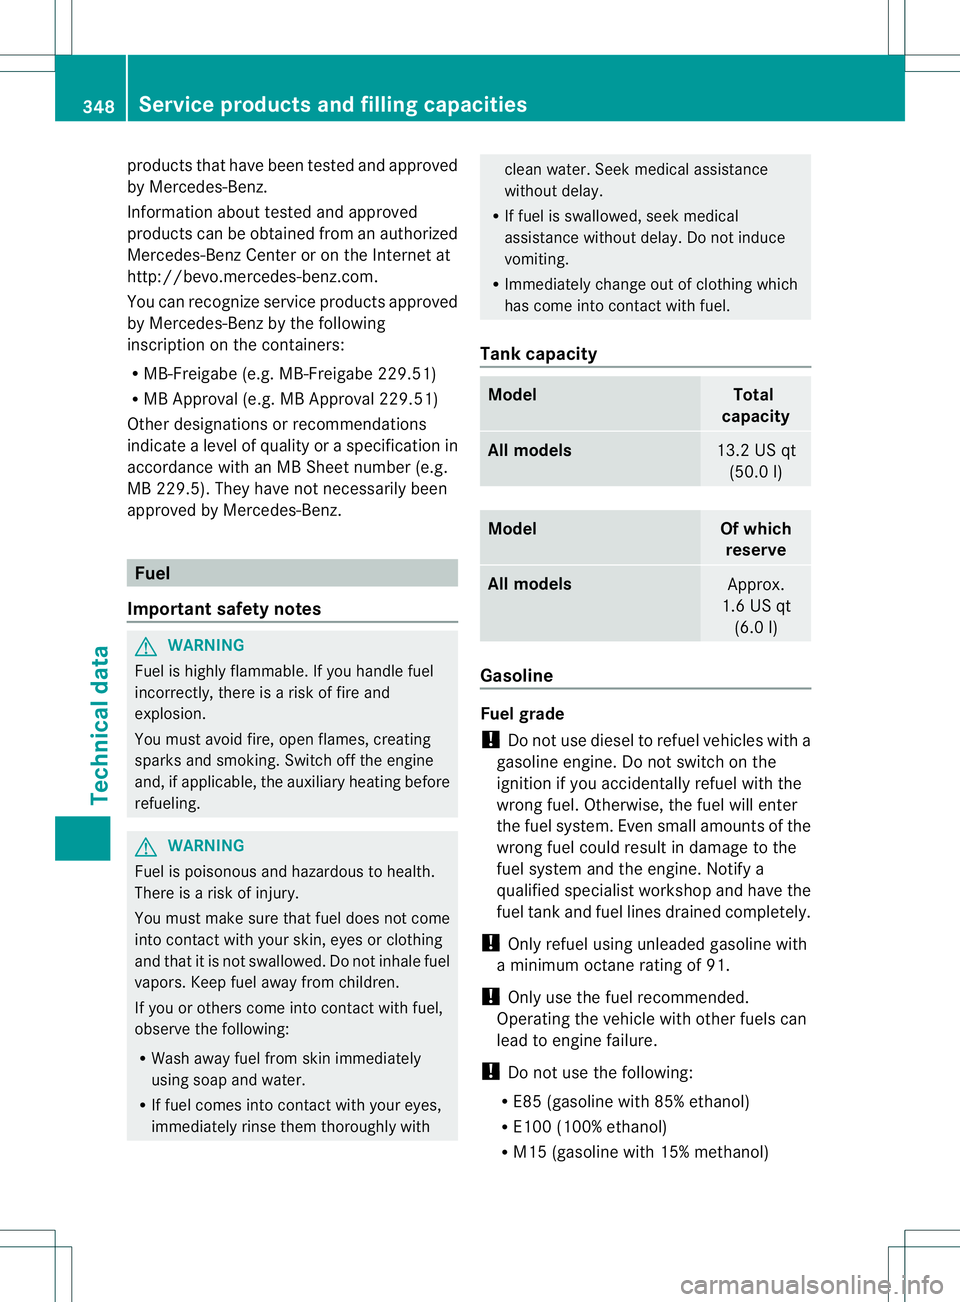
(Y page 346) Enginen
umber 001A
Emissions control information plate
0010 Engine number (stamped into the
crankcase)
0023 VIN (on the lower edge of the windshield) Service products and filling
capacities
Important safety notes
G
WARNING
Service products may be poisonous and
hazardous to health. There is arisk of injury.
Comply with instructions on the use, storage
and disposal of service products on the labels
of the respective original containers. Always
store service products sealed in their original
containers. Always keep service products out
of the reach of children. H
Environmental note
Dispose of service products in an
environmentally responsible manner.
Service products include the following:
R Fuels
R Lubricants (e.g. engine oil, transmission oil)
R Coolant
R Brake fluid
R Windshield washer fluid
R Climate control system refrigerant
Components and service products must be
matched. You should therefore only use Service products and filling capacities
347Technical data Z
Page 350 of 360
product
sthat have been tested and approved
by Mercedes-Benz.
Information about tested and approved
product scan be obtained from an authorized
Mercedes-Benz Cente roronthe Internet at
http://bevo.mercedes-benz.com.
You can recogniz eservic eproducts approved
by Mercedes-Benz by the following
inscriptio nonthe containers:
R MB-Freigabe (e.g. MB-Freigabe 229.51)
R MB Approva l(e.g. MB Approva l229.51)
Other designations or recommendations
indicate aleve lofq uality or aspecificatio nin
accordanc ewithanMBS heet number (e.g.
MB 229.5). They have no tnecessarily been
approved by Mercedes-Benz. Fuel
Important safet ynotes G
WARNING
Fuel is highly flammable. If you handle fuel
incorrectly, there is arisk of fire and
explosion.
You must avoid fire, open flames, creating
sparks and smoking. Switc hoff the engine
and, if applicable, the auxiliary heating before
refueling. G
WARNING
Fuel is poisonous and hazardous to health.
There is arisk of injury.
You must make sure that fuel does not come
into contact with your skin ,eyes or clothing
and that it is not swallowed. Do not inhale fuel
vapors. Keep fuel away from children.
If you or other scome into contact with fuel,
observe the following:
R Wash away fuel from skin immediately
using soap and water.
R If fuel comes into contact with your eyes,
immediately rinse them thoroughly with clean water. Seek medical assistance
without delay.
R If fuel is swallowed, seek medical
assistanc ewithout delay. Do not induce
vomiting.
R Immediately change out of clothing which
has come into contact with fuel.
Tank capacity Model Total
capacity All models
13.2USqt
(50. 0l) Model Of which
reserve All models
Approx.
1.6 US qt (6.0 l) Gasoline
Fuel grade
!
Do not use diesel to refuel vehicles with a
gasoline engine. Do not switch on the
ignition if you accidentally refuel with the
wrong fuel. Otherwise, the fuel will enter
the fuel system. Even small amounts of the
wrong fuel could result in damage to the
fuel system and the engine. Notif ya
qualified specialist worksho pand have the
fuel tank and fuel lines drained completely.
! Only refuel using unleaded gasoline with
am inimum octane ratin gof91.
! Only use the fuel recommended.
Operatin gthe vehicle with other fuels can
lead to engin efailure.
! Do not use the following:
R E85 (gasoline with 85% ethanol)
R E100( 100% ethanol)
R M15 (gasoline with 15% methanol) 348
Service products and filling capacitiesTechnical data