fuel type MERCEDES-BENZ B-CLASS SPORTS 2015 Owners Manual
[x] Cancel search | Manufacturer: MERCEDES-BENZ, Model Year: 2015, Model line: B-CLASS SPORTS, Model: MERCEDES-BENZ B-CLASS SPORTS 2015Pages: 346, PDF Size: 45.04 MB
Page 16 of 346
Reading lamp..................................... 108
Rear compartment
Setting the air vents ...................... 132
Rear fog lamp
Changing bulb s.............................. 112
Display message ............................ 220
Switching on/of f........................... 105
Rear lamps
see Lights
Rear seat
Adjusting the angle of the backr-
ests ................................................ 254
Folding the backrest forwards/
back (vehicles with the EASY-
VARIO-PLUS system) ..................... 253
Folding the backrest forwards/
back (vehicles without the EASY-
VARIO-PLUS system) ..................... 252
Fore-and-aft adjustment ................ 254
Rear view camera
Cleaning instructions ..................... 279
Displays in the Audio display ......... 180
Displays in the COMAND display ... 180
Function/note s............................. 180
Switching on/of f........................... 180
Rear window defroster
Problem (malfunction) ................... 130
Switching on/of f........................... 129
Rear window wiper
Replacing the wiper blad e.............. 116
Switching on/of f........................... 114
Rear-view mirror
Anti-glare (manual) .......................... 98
Dipping (automatic) ......................... 99
Recuperation display ........................ 196
Refrigerant (air-conditioning sys-tem)
Important safety notes .................. 340
Refueling
Fuel gaug e....................................... 29
Important safety notes .................. 150
Refueling process .......................... 151
see Fuel
Remote control
Garage door opener ....................... 263
Programming (garage door
opener) .......................................... 264 Replacing bulbs
Important safety notes .................. 109
Overview of bulb types .................. 110
Removing/replacing the cover
(front wheel arch) .......................... 111
Rescue card ......................................... 25
Reserve (fuel tank)
see Fuel
Reserve fuel
Display message ............................ 225
Warning lamp ................................. 244
see Fuel
Residual heat (climate control) ........ 130
Restraint system
Display message ............................ 215
Introduction ..................................... 38
Warning lamp ................................. 243
Warning lamp (function) ................... 39
Reversing feature
Panorama sliding sunroo f................ 86
Roller sunblind ................................. 87
Side windows ................................... 81
Roadside Assistance (breakdown) .... 22
Roller sunblind
Opening/closing .............................. 88
Panorama roof with power tilt/
sliding panel ..................................... 87
Roof carrier ........................................ 259
Roof lining and carpets (cleaning
guidelines) ......................................... 282
Roof load (maximum) ........................ 341
S
Safety
Children in the vehicle ..................... 54
Seat belts
Adjusting the height ......................... 42
center rear-compartment sea t......... 43
Cleaning ......................................... 282
Correct usage .................................. 41
Fastening ......................................... 42
Important safety guidelines ............. 40
Introduction ..................................... 40
Releasing ......................................... 43
Warning lamp ................................. 235
Warning lamp (function) ................... 43
14Index
Page 20 of 346
Trim pieces (cleaning instruc-
tions).................................................. 281
Trip computer (on-board com-
puter) .................................................. 196
Trip odometer
Calling up ....................................... 196
Resetting (on-board computer) ...... 197
Trunk load (maximum) ...................... 341
Turn signals
Changing bulbs (front) ................... 112
Display message ............................ 219
Switching on/off ........................... 106
Type identification plate
see Vehicle identification plate
U
UnlockingEmergency unlocking ....................... 78
From inside the vehicle (central
unlocking button) ............................. 78
V
Vanity mirror (in the sun visor) ........ 261
Vehicle
Correct use ...................................... 24
Data acquisition ............................... 25
Display message ............................ 230
Equipment ....................................... 21
Individual settings .......................... 204
Limited Warranty ............................. 25
Loading .......................................... 310
Locking (in an emergency) ............... 79
Locking (SmartKey) .......................... 70
Lowering ........................................ 325
Maintenance .................................... 21
Parking for a long period ................ 155
Pulling away ................................... 138
Raising ........................................... 323
Reporting problems ......................... 24
Securing from rolling away ............ 323
Transporting .................................. 298
Unlocking (in an emergency) ........... 78
Unlocking (SmartKey) ...................... 70
Vehicle data ................................... 341
Vehicle data
Roof load (maximum) ..................... 341 Trunk load (maximum) ................... 341
Vehicle dimensions ........................... 341
Vehicle emergency locking ................ 79
Vehicle identification number
see VIN
Vehicle identification plate .............. 334
Vehicle tool kit .................................. 284
Ventilation
Setting the vents ........................... 131
Video
Operating the DVD ........................ .200
VIN ...................................................... 334
W
Warning and indicator lamps
ABS ................................................ 238
Brakes .......................................... .237
Check Engine ................................. 244
Coolant .......................................... 244
Distance warning ........................... 246 ESP ®
.............................................. 240
ESP ®
OFF ....................................... 241
LIM (DISTRONIC PLUS) .................. 164
Overview .......................................... 30
PASSENGER AIR BAG ..................... .39
Reserve fuel .................................. .244
Restraint system ............................ 243
Seat belt ........................................ 235
Warranty .............................................. 21
Washer fluid
Display message ............................ 233
Wheel and tire combination
see Tires
Wheel bolt tightening torque ........... 325
Wheel chock ...................................... 323
Wheels
Changing a wheel .......................... 322
Checking ........................................ 303
Cleaning ......................................... 278
Emergency spare wheel ................. 329
General notes ................................ 326
Important safety notes .................. 302
Information on driving .................... 302
Interchanging/changing ................ 322
Mounting a new wheel ................... 325
Removing a wheel .......................... 325
Storing .......................................... .322
18Index
Page 27 of 346
Limited Warranty
!
Follow the instructions in this manual
about the proper operation of your vehicle
as well as about possible vehicle damage.
Damage to your vehicle that arises from
culpable contraventions against these
instructions is not covered either by the
Mercedes-Benz Limited Warranty or by the New or Used-Vehicle Warranty.
QR codes for the rescue card
The QR codes are secured in the fuel filler flap
and on the opposite side on the B-pillar. In the event of an accident, rescue services can use
the QR code to quickly find the appropriate
rescue card for your vehicle. The current res- cue card contains the most important infor-
mation about your vehicle in a compact form, e.g. the routing of the electric cables.
You can find more information under https://
portal.aftersales.i.daimler.com/public/
content/asportal/en/communication/
informationen_fuer/QRCode.html.
Data stored in the vehicle
Data recording
This vehicle is capable of recording diagnostic information relating to vehicle operation, mal-
functions, and user settings. This may include information about the performance or status
of various systems, including but not limited
to, engine, throttle, steering or brake sys-
tems, that is stored and can be read out with
suitable devices, particularly when the vehi-
cle is serviced. The data obtained is used to
properly diagnose and service your vehicle or to further optimize and develop vehicle func-
tions.
COMAND/mbrace
If the vehicle is equipped with COMAND or
mbrace, additional data about the vehicle’s
operation, the use of the vehicle in certain
situations, and the location of the vehicle maybe compiled through COMAND or the mbrace system.
For additional information please refer to the
COMAND User Manual and/or the mbrace
Terms and Conditions.
Event data recorders
This vehicle is equipped with an event data
recorder (EDR). The main purpose of an EDR
is to record data that will assist in under-
standing how a vehicle’s systems performed
in certain crash or near crash-like situations,
such as during air bag deployment or when
hitting a road obstacle. The EDR is designed
to record data related to vehicle dynamics
and safety systems for a short period of time, typically 30 seconds or less.
The EDR in this vehicle is designed to record
such data as: R how various systems in your vehicle are
operating
R whether or not the driver and passenger
seat belts are fastened
R how far (if at all) the driver is depressing the
accelerator and/or brake pedal and
R how fast the vehicle is traveling
This data can help provide a better under-
standing of the circumstances in which
crashes and injuries occur. NOTE: EDR data is
recorded by your vehicle only if a non-trivial
crash situation occurs; no data is recorded by the EDR under normal driving conditions andno personal data (e.g., name, gender, age,
and crash location) are recorded. However,
other parties, such as law enforcement, can
combine the EDR data with the type of per-
sonal identification data routinely acquired
during a crash investigation.
Introduction25
Z
Page 56 of 346
Automatic measures after an acci-
dent
Immediately after an accident, the following
measures are implemented, depending on
the type and severity of the impact:R the hazard warning lamps are activated
R the emergency lighting is activated
R the vehicle doors are unlocked
R the front side windows are lowered
R the engine is switched off and the fuel sup-
ply is cut off
R vehicles with mbrace: automatic emer-
gency call
Children in the vehicle
Important safety notes
Accident statistics show that children
secured in the rear seats are safer than chil-
dren secured in the front-passenger seat. For
this reason, Mercedes-Benz strongly advises
that you install a child restraint system on a
rear seat. Children are generally better pro-
tected there.
If a child younger than 12 years and under 5 ft
(1.50 m) in height is traveling in the vehicle:
R always secure the child in a child restraint
system suitable for Mercedes-Benz vehi-
cles. The child restraint system must be
appropriate to the age, weight and size of
the child
R be sure to observe the instructions and
safety notes in this section in addition to
the child restraint system manufacturer's
installation instructions
R be sure to observe the instructions and
safety notes on the "Occupant classifica-
tion system (OCS)" ( Ypage 47)
GWARNING
If you leave children unsupervised in the vehi-
cle, they could set it in motion by, for example:
R release the parking brake.
R shift the automatic transmission out of the
parking position P.
R start the engine.
In addition, they may operate vehicle equip-
ment and become trapped. There is a risk of
an accident and injury.
When leaving the vehicle, always take the
SmartKey with you and lock the vehicle. Never
leave children unsupervised in the vehicle.
GWARNING
If persons, particularly children are subjected to prolonged exposure to extreme heat or
cold, there is a risk of injury, possibly even
fatal. Never leave children unattended in the
vehicle.
GWARNING
If the child restraint system is subjected to
direct sunlight, parts may get very hot. Chil-
dren may burn themselves on these parts,
particularly on the metal parts of the child
restraint system. There is a risk of injury.
If you leave the vehicle, taking the child with
you, always ensure that the child restraint
system is not exposed to direct sunlight. Pro-tect it with a blanket, for example. If the childrestraint system has been exposed to direct
sunlight, let it cool down before securing the
child in it. Never leave children unattended inthe vehicle.
Always ensure that all vehicle occupants have
their seat belts fastened correctly and are sit- ting properly. Particular attention must be
paid to children.
Observe the safety notes on the seat belt ( Y page 40) and the notes on correct use of
seat belts ( Ypage 41).
A booster seat may be necessary to achieve
proper seat belt positioning for children over
54Children in the vehicle
Safety
Page 153 of 346
!Overfilling the fuel tank could damage the
fuel system.
!Take care not to spill any fuel on painted
surfaces. You could otherwise damage the
paintwork.
!Use a filter when refueling from a fuel can.
Otherwise, the fuel lines and/or injection
system could be blocked by particles from
the fuel can.
Do not get into the vehicle again during the
refueling process. Otherwise, electrostatic
charge could build up again.
If you overfill the fuel tank, fuel could spray
out when the fuel pump nozzle is removed.
For further information on fuel and fuel quality ( Y page 335).
Refueling
General information
The fuel filler flap is unlocked or locked auto- matically when you unlock or lock the vehicle
with the key.
The position of the fuel filler cap is displayed æ in the instrument cluster. The arrow on
the filling pump indicates the side of the vehi-
cle.
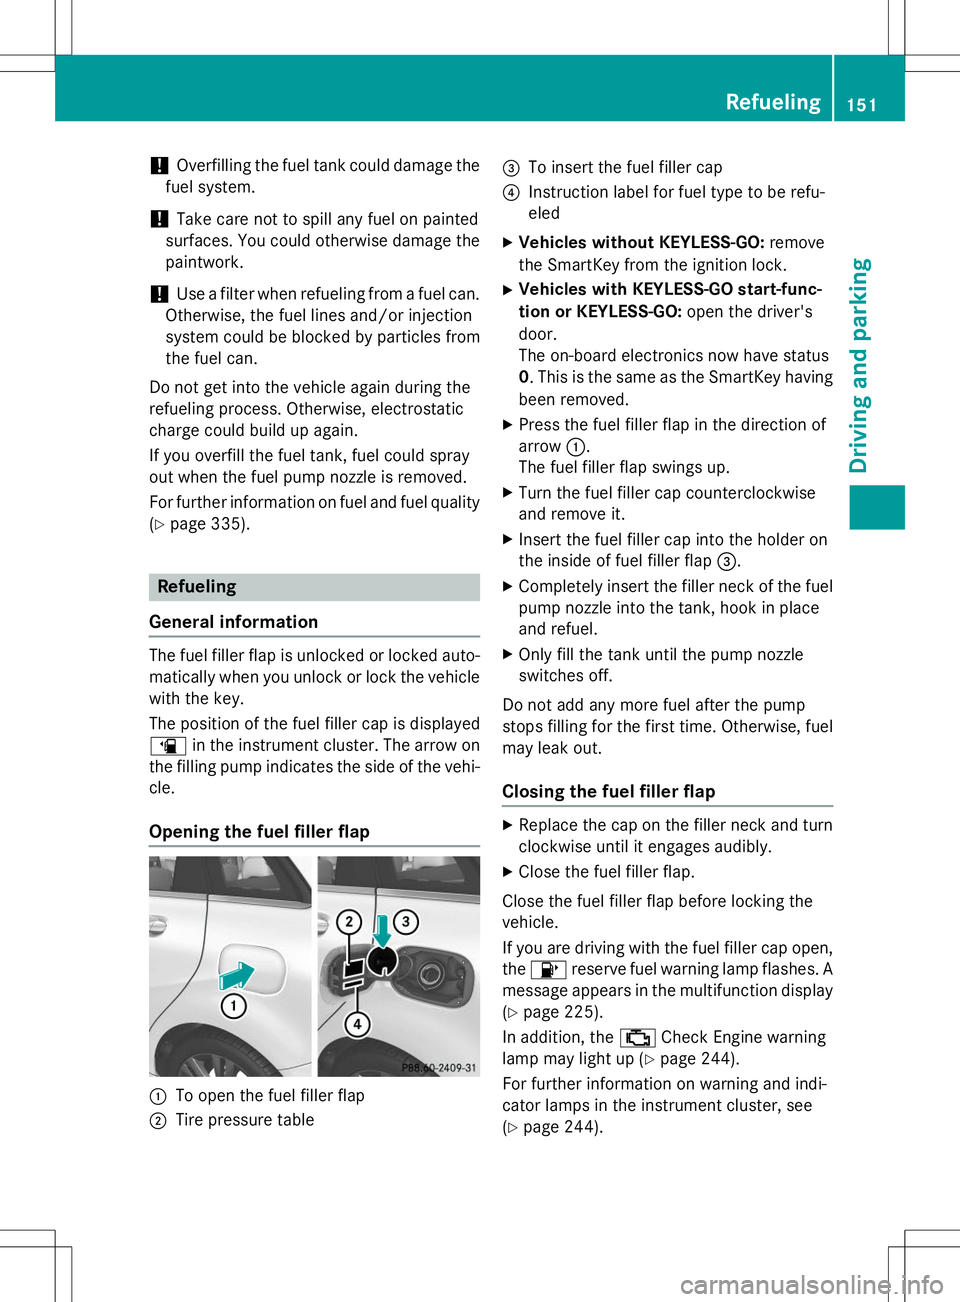
Opening the fuel filler flap
:To open the fuel filler flap
;Tire pressure table
=To insert the fuel filler cap
?Instruction label for fuel type to be refu- eled
X Vehicles without KEYLESS-GO: remove
the SmartKey from the ignition lock.
X Vehicles with KEYLESS-GO start-func-
tion or KEYLESS-GO: open the driver's
door.
The on-board electronics now have status0 . This is the same as the SmartKey having
been removed.
X Press the fuel filler flap in the direction ofarrow :.
The fuel filler flap swings up.
X Turn the fuel filler cap counterclockwise
and remove it.
X Insert the fuel filler cap into the holder on
the inside of fuel filler flap =.
X Completely insert the filler neck of the fuel
pump nozzle into the tank, hook in place
and refuel.
X Only fill the tank until the pump nozzle
switches off.
Do not add any more fuel after the pump
stops filling for the first time. Otherwise, fuel
may leak out.
Closing the fuel filler flap
X Replace the cap on the filler neck and turn
clockwise until it engages audibly.
X Close the fuel filler flap.
Close the fuel filler flap before locking the vehicle.
If you are driving with the fuel filler cap open, the 8 reserve fuel warning lamp flashes. A
message appears in the multifunction display
( Y page 225).
In addition, the ;Check Engine warning
lamp may light up ( Ypage 244).
For further information on warning and indi-
cator lamps in the instrument cluster, see( Y page 244).
Refueling151
Driving and parking
Z
Page 304 of 346
Useful information
iThis Operator's Manual describes all
models and all standard and optional equip- ment of your vehicle available at the time of
publication of the Operator's Manual.
Country-specific differences are possible.
Please note that your vehicle may not be
equipped with all features described. This
also applies to safety-related systems and
functions.
iRead the information on qualified special-
ist workshops ( Ypage 24).
Important safety notes
GWARNING
If wheels and tires of the wrong size are used,
the wheel brakes or suspension components
may be damaged. There is a risk of an acci-
dent.
Always replace wheels and tires with those
that fulfill the specifications of the originalpart.
When replacing wheels, make sure to use the
correct:
R designation
R model
When replacing tires, make sure to use the
correct:
R designation
R manufacturer
R model
GWARNING
A flat tire severely impairs the driving, steer-
ing and braking characteristics of the vehicle.
There is a risk of accident.
Tires without run-flat characteristics:
R do not drive with a flat tire.
R immediately replace the flat tire with your
emergency spare wheel or spare wheel, or
consult a qualified specialist workshop.
Tires with run-flat characteristics:
R pay attention to the information and warn-
ing notices on MOExtended tires (tires with
run-flat characteristics).
Accessories that are not approved for your
vehicle by Mercedes-Benz or are not being
used correctly can impair the operating
safety.
Before purchasing and using non-approved
accessories, visit a qualified specialist work-
shop and inquire about: R suitability
R legal stipulations
R factory recommendations
Information on the sizes and types of wheels
and tires for your vehicle can be found under "Wheel/tire combinations" ( Ypage 326).
Information on tire pressure can be found:
R on the vehicle's Tire and Loading Informa-
tion placard on the B-pillar ( Ypage 310)
R on the tire pressure label on the fuel filler
flap ( Ypage 151)
R under "Tire pressure" ( Ypage 305)
Operation
Information on driving
Check the tire pressure when the vehicle is
heavily laden and adjust prior to a trip.
While driving, pay attention to vibrations,
noises and unusual handling characteristics,
e.g. pulling to one side. This may indicate that
the wheels or tires are damaged. If you sus-
pect that a tire is defective, reduce your
speed immediately. Stop the vehicle as soon
as possible to check the wheels and tires for
damage. Hidden tire damage could also be
causing the unusual handling characteristics.
If you find no signs of damage, have the tires and wheels checked at a qualified specialist
workshop.
When parking your vehicle, make sure that
the tires do not get deformed by the curb or
302Operation
Wheels and tires
Page 323 of 346
Curb weight
The weight of a vehicle with standard equip-
ment including the maximum capacity of fuel,oil and coolant. It also includes the air-condi-
tioning system and optional equipment if
these are installed in the vehicle, but does not include passengers or luggage.
Maximum load rating
The maximum load rating is the maximum
permissible weight in kilograms or lbs for
which a tire is approved.
Maximum permissible tire pressure
Maximum permissible tire pressure for one
tire.
Maximum load on one tire
Maximum load on one tire. This is calculated
by dividing the maximum axle load of one axleby two.
PSI (pounds per square inch)
A standard unit of measure for tire pressure.
Aspect ratio
Relationship between tire height and tire
width in percent.
Tire pressure
This is pressure inside the tire applying an
outward force to each square inch of the tire's
surface. The tire pressure is specified in
pounds per square inch (psi), in kilopascal
(kPa) or in bar. The tire pressure should only
be corrected when the tires are cold.
Cold tire pressure
The tires are cold:
R if the vehicle has been parked without
direct sunlight on the tires for at least three
hours and
R if the vehicle has not been driven further
than 1 mile (1.6 km) Tread
The part of the tire that comes into contact
with the road.
Bead
The tire bead ensures that the tire sits
securely on the wheel. There are several steel
wires in the bead to prevent the tire from
coming loose from the wheel rim.
Sidewall
The part of the tire between the tread and the bead.
Weight of optional extras
The combined weight of those optional extras
that weigh more than the replaced standard
parts and more than 2.3 kg (5 lbs). These
optional extras, such as high-performance
brakes, level control, a roof rack or a high-
performance battery, are not included in the
curb weight and the weight of the accesso-
ries.
TIN (Tire Identification Number)
This is a unique identifier which can be used
by a tire manufacturer to identify tires, for
example for a product recall, and thus identify the purchasers. The TIN is made up of the
manufacturer's identity code, tire size, tire
type code and the manufacturing date.
Load bearing index
The load bearing index (also load index) is a
code that contains the maximum load bearing
capacity of a tire.
Traction
Traction is the result of friction between the
tires and the road surface.
Treadwear indicators
Narrow bars (tread wear bars) that are dis-
tributed over the tire tread. If the tire tread is level with the bars, the wear limit of áin
(1.6 mm) has been reached.
All about wheels and tires321
Wheels and tires
Z