radio MERCEDES-BENZ C-Class 2011 W204 User Guide
[x] Cancel search | Manufacturer: MERCEDES-BENZ, Model Year: 2011, Model line: C-Class, Model: MERCEDES-BENZ C-Class 2011 W204Pages: 320, PDF Size: 13.17 MB
Page 204 of 320

Display messagesPossible causes/consequences and M Solutions+
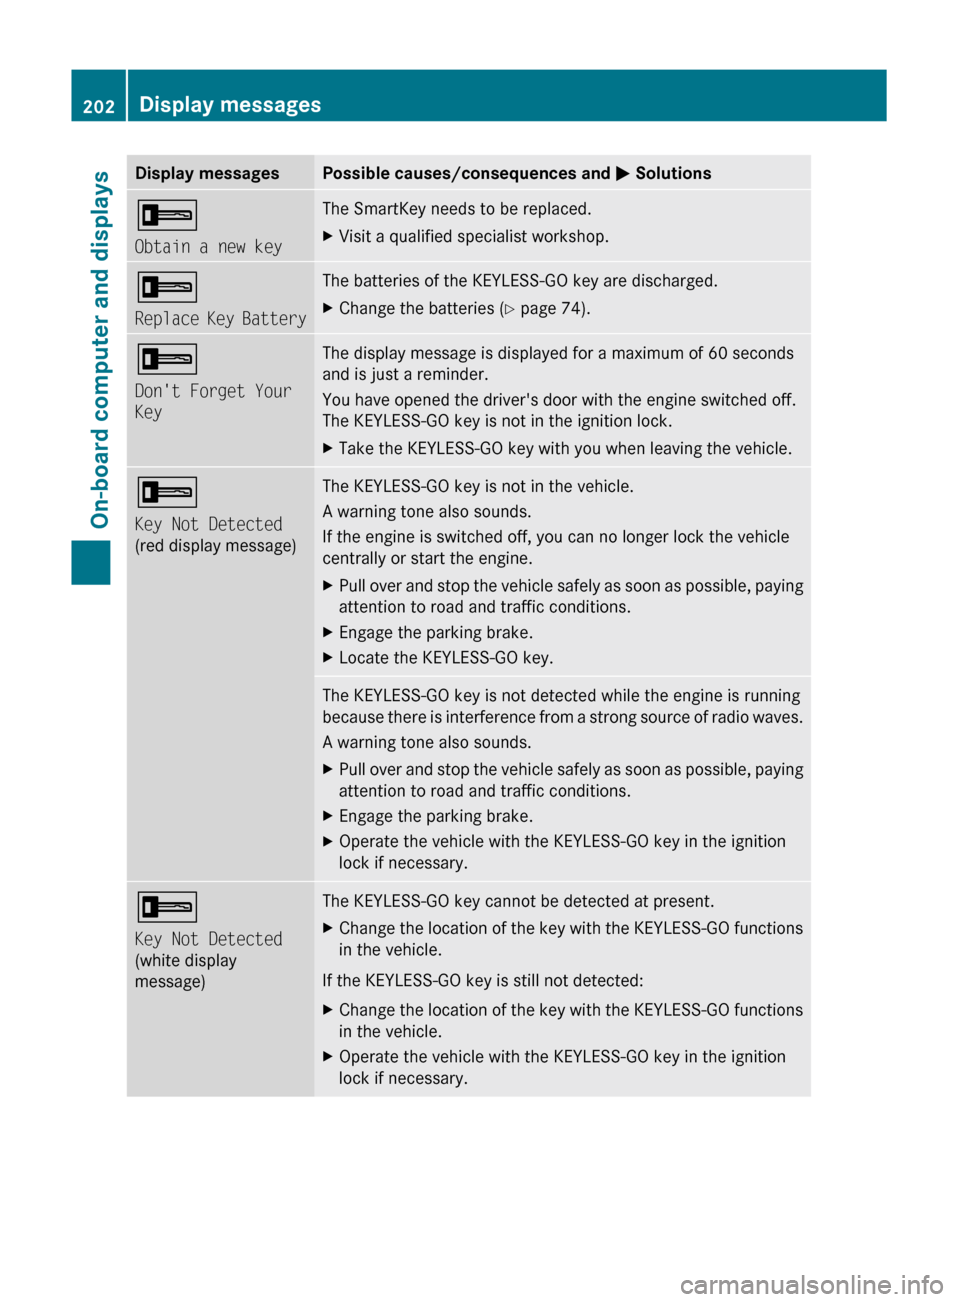
Obtain a new keyThe SmartKey needs to be replaced.XVisit a qualified specialist workshop.+
Replace Key BatteryThe batteries of the KEYLESS-GO key are discharged.XChange the batteries ( Y page 74).+
Don't Forget Your
KeyThe display message is displayed for a maximum of 60 seconds
and is just a reminder.
You have opened the driver's door with the engine switched off.
The KEYLESS-GO key is not in the ignition lock.XTake the KEYLESS-GO key with you when leaving the vehicle.+
Key Not Detected
(red display message)The KEYLESS-GO key is not in the vehicle.
A warning tone also sounds.
If the engine is switched off, you can no longer lock the vehicle
centrally or start the engine.XPull over and stop the vehicle safely as soon as possible, paying
attention to road and traffic conditions.XEngage the parking brake.XLocate the KEYLESS-GO key.The KEYLESS-GO key is not detected while the engine is running
because there is interference from a strong source of radio waves.
A warning tone also sounds.XPull over and stop the vehicle safely as soon as possible, paying
attention to road and traffic conditions.XEngage the parking brake.XOperate the vehicle with the KEYLESS-GO key in the ignition
lock if necessary.+
Key Not Detected
(white display
message)The KEYLESS-GO key cannot be detected at present.XChange the location of the key with the KEYLESS-GO functions
in the vehicle.
If the KEYLESS-GO key is still not detected:
XChange the location of the key with the KEYLESS-GO functions
in the vehicle.XOperate the vehicle with the KEYLESS-GO key in the ignition
lock if necessary.202Display messagesOn-board computer and displays
BA 204 USA, CA Edition A 2011; 1; 5, en-UShereepeVersion: 3.0.3.62010-05-20T09:17:30+02:00 - Seite 202
Page 235 of 320

of the garage door. People could otherwise be
injured by the movement of the door.
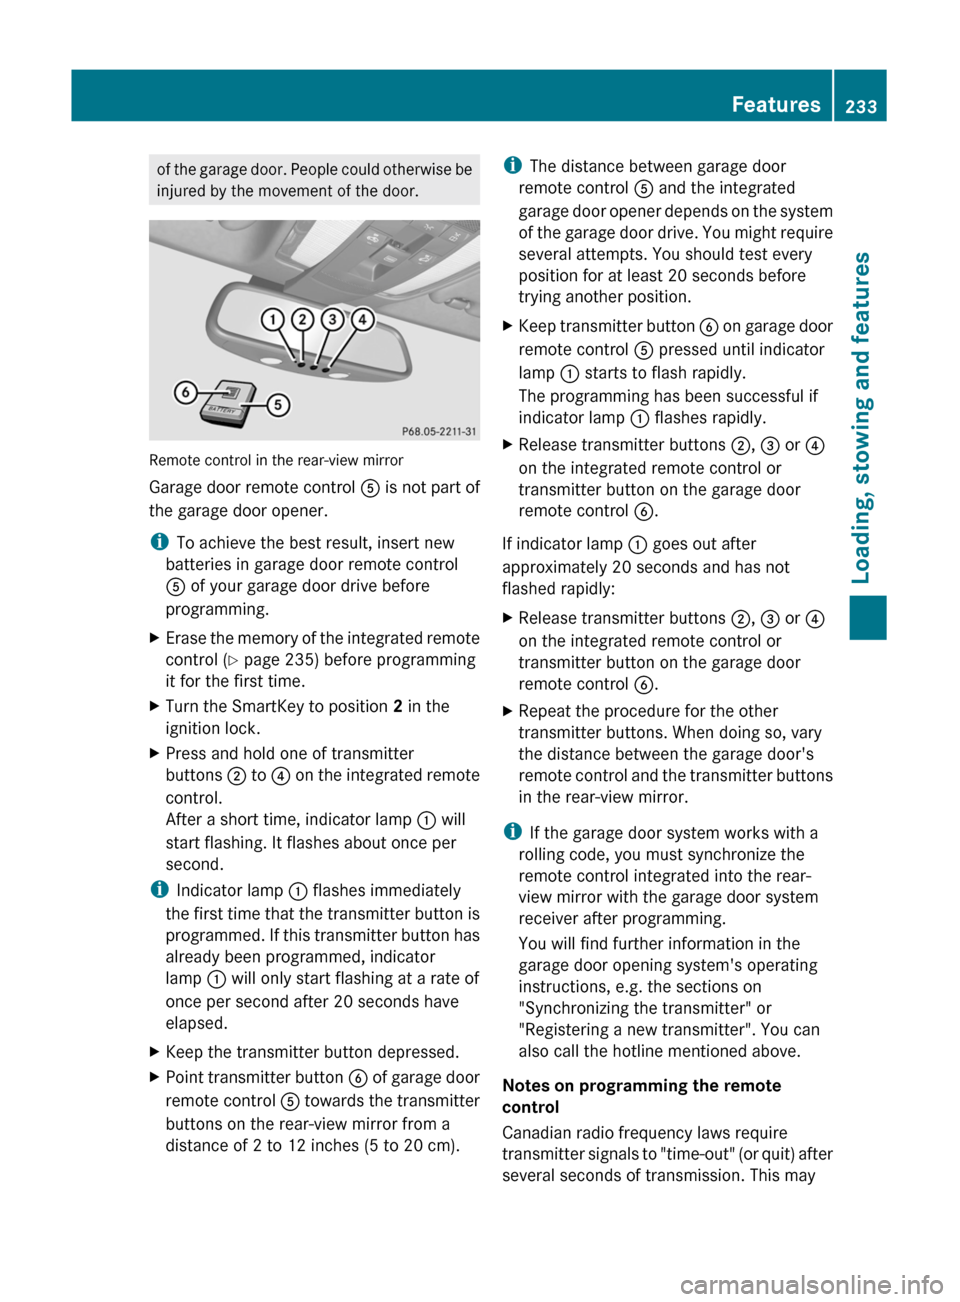
Remote control in the rear-view mirror
Garage door remote control A is not part of
the garage door opener.
i To achieve the best result, insert new
batteries in garage door remote control
A of your garage door drive before
programming.
XErase the memory of the integrated remote
control ( Y page 235) before programming
it for the first time.XTurn the SmartKey to position 2 in the
ignition lock.XPress and hold one of transmitter
buttons ; to ? on the integrated remote
control.
After a short time, indicator lamp : will
start flashing. It flashes about once per
second.
i Indicator lamp : flashes immediately
the first time that the transmitter button is
programmed. If this transmitter button has
already been programmed, indicator
lamp : will only start flashing at a rate of
once per second after 20 seconds have
elapsed.
XKeep the transmitter button depressed.XPoint transmitter button B of garage door
remote control A towards the transmitter
buttons on the rear-view mirror from a
distance of 2 to 12 inches (5 to 20 cm).i The distance between garage door
remote control A and the integrated
garage door opener depends on the system
of the garage door drive. You might require
several attempts. You should test every
position for at least 20 seconds before
trying another position.XKeep transmitter button B on garage door
remote control A pressed until indicator
lamp : starts to flash rapidly.
The programming has been successful if
indicator lamp : flashes rapidly.XRelease transmitter buttons ;, = or ?
on the integrated remote control or
transmitter button on the garage door
remote control B.
If indicator lamp : goes out after
approximately 20 seconds and has not
flashed rapidly:
XRelease transmitter buttons ;, = or ?
on the integrated remote control or
transmitter button on the garage door
remote control B.XRepeat the procedure for the other
transmitter buttons. When doing so, vary
the distance between the garage door's
remote control and the transmitter buttons
in the rear-view mirror.
i If the garage door system works with a
rolling code, you must synchronize the
remote control integrated into the rear-
view mirror with the garage door system
receiver after programming.
You will find further information in the
garage door opening system's operating
instructions, e.g. the sections on
"Synchronizing the transmitter" or
"Registering a new transmitter". You can
also call the hotline mentioned above.
Notes on programming the remote
control
Canadian radio frequency laws require
transmitter signals to "time-out" (or quit) after
several seconds of transmission. This may
Features233Loading, stowing and featuresBA 204 USA, CA Edition A 2011; 1; 5, en-UShereepeVersion: 3.0.3.62010-05-20T09:17:30+02:00 - Seite 233Z
Page 265 of 320

XManual transmission: engage neutral.XAutomatic transmission: move the selector lever to P.XSwitch off all electrical consumers (e.g. radio, blower etc.).XOpen the hood ( Y page 238).
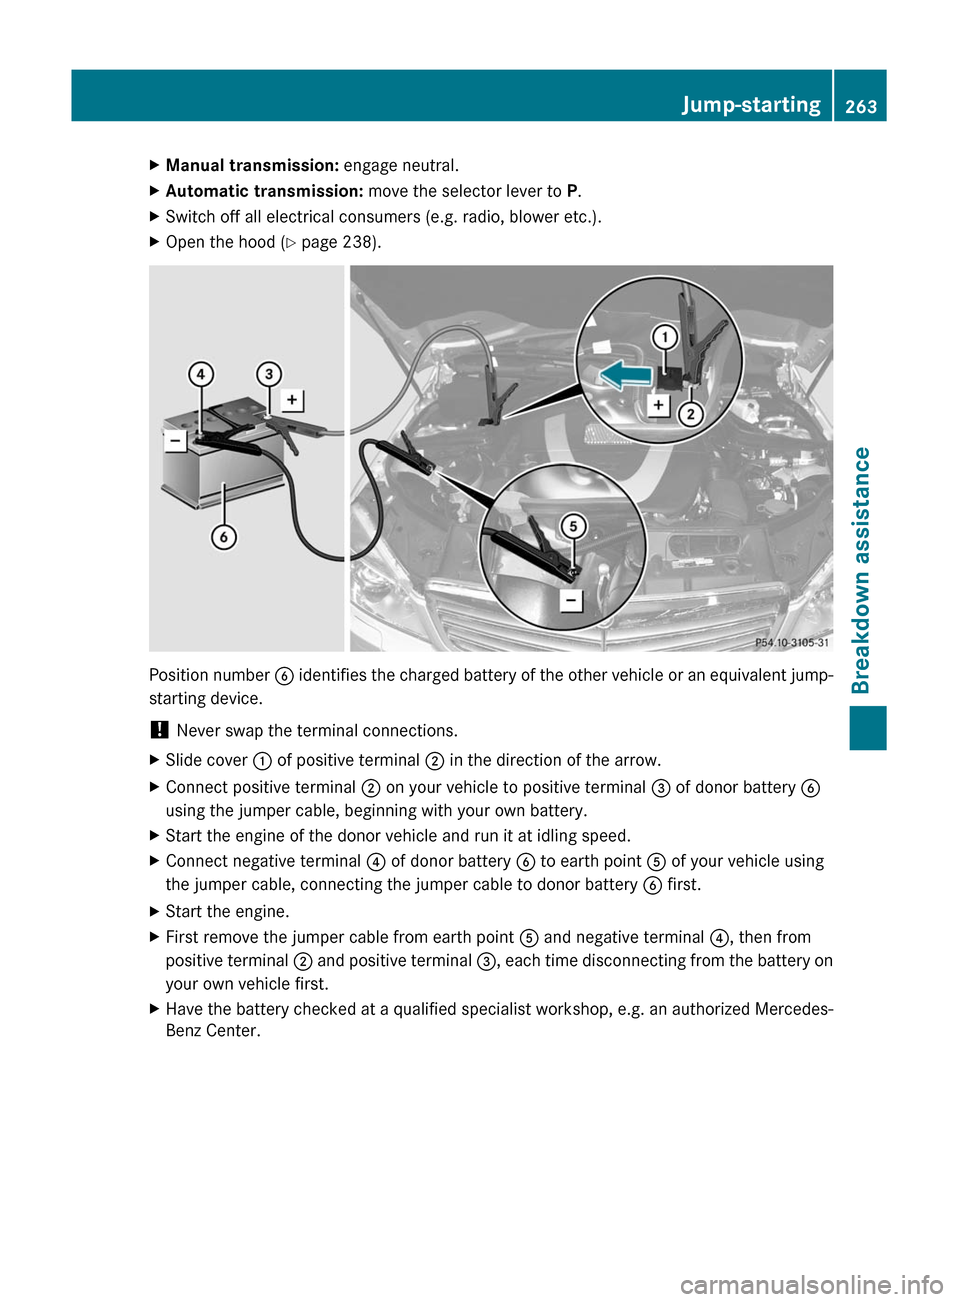
Position number B identifies the charged battery of the other vehicle or an equivalent jump-
starting device.
! Never swap the terminal connections.
XSlide cover : of positive terminal ; in the direction of the arrow.XConnect positive terminal ; on your vehicle to positive terminal = of donor battery B
using the jumper cable, beginning with your own battery.XStart the engine of the donor vehicle and run it at idling speed.XConnect negative terminal ? of donor battery B to earth point A of your vehicle using
the jumper cable, connecting the jumper cable to donor battery B first.XStart the engine.XFirst remove the jumper cable from earth point A and negative terminal ?, then from
positive terminal ; and positive terminal =, each time disconnecting from the battery on
your own vehicle first.XHave the battery checked at a qualified specialist workshop, e.g. an authorized Mercedes-
Benz Center.Jump-starting263Breakdown assistanceBA 204 USA, CA Edition A 2011; 1; 5, en-UShereepeVersion: 3.0.3.62010-05-20T09:17:30+02:00 - Seite 263Z
Page 280 of 320

reached the level at which the low tire
pressure indicator lamp of the TPMS lights up.
Your vehicle has also been equipped with a
TPMS malfunction indicator to indicate when
the system is not operating properly. The
TPMS malfunction indicator is combined with
the low tire pressure indicator lamp. When the
system detects a malfunction, the indicator
lamp will flash for approximately 1 minute and
then remain illuminated. This sequence will
continue upon subsequent vehicle start-ups
as long as the malfunction exists. When the
malfunction indicator is lit, the system may
not be able to detect or signal low tire
pressure as intended.
TPMS malfunctions may occur for a variety of
reasons, including the installation of
incompatible replacement or alternate tires
or wheels on the vehicle that prevent the
TPMS from functioning properly. Always
check the TPMS malfunction indicator after
replacing one or more tires or wheels on your
vehicle to ensure that the replacement or
alternate tires and wheels allow the TPMS to
continue to function properly.
i If the tire pressure monitor is
malfunctioning, it may take more than
10 minutes for the tire pressure warning
lamp to inform you of the malfunction by
flashing for 60 seconds and then remaining
lit.
When the malfunction has been rectified,
the tire pressure warning lamp goes out
after driving for a few minutes.
Information on tire pressures is displayed in
the multifunction display. After a few minutes
of driving, the current tire pressure of each
tire is shown in the multifunction display.
i The tire pressure values indicated by the
on-board computer may differ from those
measured at a gas station with a pressure
gauge. The tire pressures shown by the on-
board computer refer to those measured at
sea level. At high altitudes, the tire pressure
values indicated by a pressure gauge arehigher than those shown by the on-board
computer. In this case, do not reduce the
tire pressures.
i The operation of the tire pressure monitor
can be affected by interference from radio
transmitting equipment (e.g. radio
headphones, two-way radios) that may be
operated in or near the vehicle.
i This device complies with Part 15 of the
FCC Rules. Operation is subject to the
following two conditions:
1. This device may not cause harmful
interference, and
2. This device must withstand any
interference received, including
interference that may cause undesired
operation.
Unauthorized modifications to the device
could void the user’s authority to operate
the equipment.
Checking tire pressure electronicallyXMake sure that the SmartKey is in
position 2 ( Y page 131) in the ignition lock.XPress the = or ; button to select the
Service menu.XPress the 9 or : button to select
Tire Pressure .XPress the a button.
The current tire pressure for each wheel will
be displayed in the multifunction display.
If the vehicle has been parked for longer than
20 minutes, the Tire pressures will be
displayed after driving a few
minutes message appears in the display.
After a teach-in period, the tire pressure
monitor automatically recognizes new wheels
or new sensors. As long as a clear allocation
of the tire pressure values to the individual
wheels is not possible, the Tire Pressure
Monitor Active message is shown instead
of the tire pressure display. The tire pressures
are already being monitored.
278Tire pressuresTires and wheels
BA 204 USA, CA Edition A 2011; 1; 5, en-UShereepeVersion: 3.0.3.62010-05-20T09:17:30+02:00 - Seite 278